We have used the following resources to learn more about Electron. We have referred to these while creating this tutorial.
The most important resource is the Electron documentation. The Documentation has extensive coverage of almost all features and quirks of the framework. They are alone enough to make your way through building an app.
There are also some very good Electron examples presented in the electron-sample-apps respository.
Packaging and distributing apps is an integral part of the development process of a desktop application. Since Electron is a cross-platform desktop application development framework, packaging and distribution of apps for all the platforms should also be a seamless experience.
The electron community has created a project, electron-packager that takes care of the same for us. It allows us to package and distribute our Electron app with OS-specific bundles (.app, .exe etc) via JS or CLI.
Supported Platforms
Electron Packager runs on the following host platforms −
Windows (32/64 bit)
OS X
Linux (x86/x86_64)
It generates executables/bundles for the following target platforms −
Windows (also known as win32, for both 32/64 bit)
OS X (also known as darwin) / Mac App Store (also known as mas)
Linux (for x86, x86_64, and armv7l architectures)
Installation
Install the electron packager using −
# for use in npm scripts
$ npm install electron-packager --save-dev

# for use from cli
$ npm install electron-packager -g
Explore our latest online courses and learn new skills at your own pace. Enroll and become a certified expert to boost your career.
Packaging Apps
In this section, we will see how to run the packager from the command line. The basic form of the command is −
Use that version of Electron to create a app in <output-folder>/<appname>-<platform>-<arch>.
–platform and –arch can be omitted, in two cases. If you specify –all instead, bundles for all valid combinations of target platforms/architectures will be created. Otherwise, a single bundle for the host platform/architecture will be created.
We have two processes that run our application – the main process and the renderer process.
Since the renderer process is the one being executed in our browser window, we can use the Chrome Devtools to debug it. To open DevTools, use the shortcut “Ctrl+Shift+I” or the <F12> key. You can check out how to use devtools here.
When you open the DevTools, your app will look like as shown in the following screenshot −
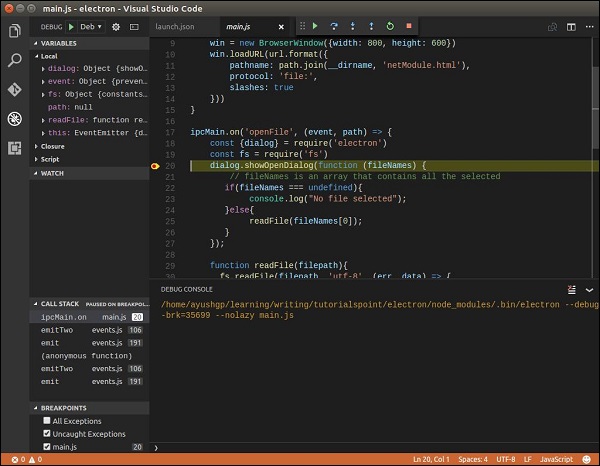
Debugging the Main Process
The DevTools in an Electron browser window can only debug JavaScript that is executed in that window (i.e., the web pages). To debug JavaScript that is executed in the main process you will need to use an external debugger and launch Electron with the –debug or the –debug-brk switch.
Electron will listen for the V8 debugger protocol messages on the specified port; an external debugger will need to connect on this port. The default port is 5858.
Run your app using the following −
$ electron --debug = 5858 ./main.js
Now you will need a debugger that supports the V8 debugger protocol. You can use VSCode or node-inspector for this purpose. For example, let us follow these steps and set up VSCode for this purpose. Follow these steps to set it up −
Download and install VSCode. Open your Electron project in VSCode.
Add a file .vscode/launch.json with the following configuration −
Note − For Windows, use “${workspaceRoot}/node_modules/.bin/electron.cmd” for runtimeExecutable.
Set some breakpoints in main.js, and start debugging in the Debug View. When you hit the breakpoints, the screen will look something like this −
The VSCode debugger is very powerful and will help you rectify errors quickly. You also have other options like node-inspector for debugging electron apps.
Environment Variables control application configuration and behavior without changing code. Certain Electron behaviors are controlled by environment variables because they are initialized earlier than the command line flags and the app’s code.
There are two kinds of environment variables encoded in electron – Production variables and Development variables.
Production Variables
The following environment variables are intended for use at runtime in packaged Electron applications.
Sr.No
Variable & Description
1
GOOGLE_API_KEYElectron includes a hardcoded API key for making requests to Google’s geocoding webservice. Because this API key is included in every version of Electron, it often exceeds its usage quota.To work around this, you can supply your own Google API key in the environment. Place the following code in your main process file, before opening any browser windows that will make geocoding requests −process.env.GOOGLE_API_KEY = ‘YOUR_KEY_HERE’
2
ELECTRON_RUN_AS_NODEStarts the process as a normal Node.js process.
3
ELECTRON_FORCE_WINDOW_MENU_BAR (Linux Only)Do not use the global menu bar on Linux.
Development Variables
The following environment variables are intended primarily for development and debugging purposes.
Sr.No
Variable & Description
1
ELECTRON_ENABLE_LOGGINGPrints Chrome’s internal logging to the console.
2
ELECTRON_ENABLE_STACK_DUMPINGPrints the stack trace to the console when Electron crashes.
3
ELECTRON_DEFAULT_ERROR_MODEShows the Windows’s crash dialog when Electron crashes.
To set any of these environment variables as true, set it in your console. For example, if you want to enable logging, then use the following commands −
For Windows
> set ELECTRON_ENABLE_LOGGING=true
For Linux
$ export ELECTRON_ENABLE_LOGGING=true
Note that you will need to set these environment variables every time you restart your computer. If you want to avoid doing so, add these lines to your .bashrc files.
We typically have memorized certain shortcuts for all the apps that we use on our PC daily. To make your applications feel intuitive and easily accessible to the user, you must allow the user to use shortcuts.
We will use the globalShortcut module to define shortcuts in our app. Note that Accelerators are Strings that can contain multiple modifiers and key codes, combined by the + character. These accelerators are used to define keyboard shortcuts throughout our application.
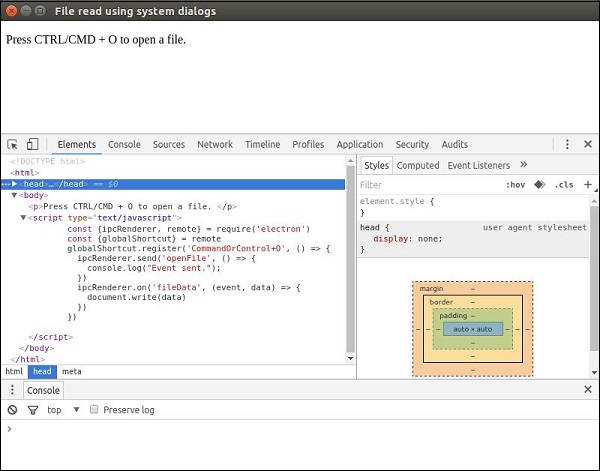
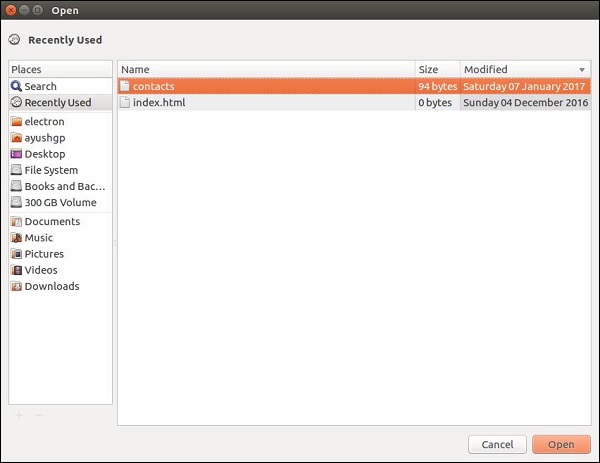
Let us consider an example and create a shortcut. For this, we will follow the dialog boxes example where we used the open dialog box for opening files. We will register a CommandOrControl+O shortcut to bring up the dialog box.
Our main.js code will remain the same as before. So create a new main.js file and enter the following code in it −
This code will pop open the open dialog box whenever our main process receives a ‘openFile’ message from a renderer process. Earlier this dialog box popped up whenever the app was run. Let us now limit it to open only when we press CommandOrControl+O.
Now create a new index.html file with the following content −
<!DOCTYPE html>
<html>
<head>
<meta charset = "UTF-8">
<title>File read using system dialogs</title>
</head>
<body>
<p>Press CTRL/CMD + O to open a file. </p>
<script type = "text/javascript">
const {ipcRenderer, remote} = require('electron')
const {globalShortcut} = remote
globalShortcut.register('CommandOrControl+O', () => {
ipcRenderer.send('openFile', () => {
console.log("Event sent.");
})
ipcRenderer.on('fileData', (event, data) => {
document.write(data)
})
})
</script>
</body>
</html>
We registered a new shortcut and passed a callback that will be executed whenever we press this shortcut. We can deregister shortcuts as and when we do not require them.
Now once the app is opened, we will get the message to open the file using the shortcut we just defined.
These shortcuts can be made customizable by allowing the user to choose his own shortcuts for defined actions.
Audio and video capturing are important characteristics if you are building apps for screen sharing, voice memos, etc. They are also useful if you require an application to capture the profile picture.
We will be using the getUserMedia HTML5 API for capturing audio and video streams with Electron. Let us first set up our main process in the main.js file as follows −
const {app, BrowserWindow} = require('electron')
const url = require('url')
const path = require('path')
let win
// Set the path where recordings will be saved
app.setPath("userData", __dirname + "/saved_recordings")
function createWindow() {
win = new BrowserWindow({width: 800, height: 600})
win.loadURL(url.format({
Now that we have set up our main process, let us create the HTML file that will be capturing this content. Create a file called index.html with the following content −
<!DOCTYPE html>
<html>
<head>
<meta charset = "UTF-8">
<title>Audio and Video</title>
</head>
<body>
<video autoplay></video>
<script type = "text/javascript">
function errorCallback(e) {
console.log('Error', e)
}
navigator.getUserMedia({video: true, audio: true}, (localMediaStream) => {
var video = document.querySelector('video')
video.src = window.URL.createObjectURL(localMediaStream)
video.onloadedmetadata = (e) => {
// Ready to go. Do some stuff.
};
}, errorCallback)
</script>
</body>
</html>
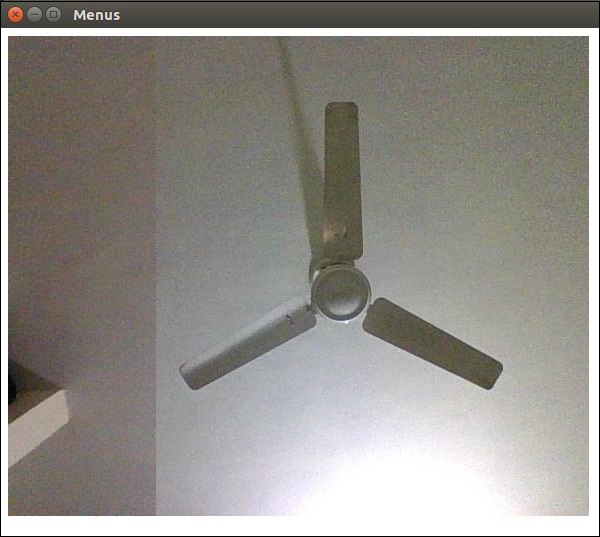
The above program will generate the following output −
You now have the stream from both your webcam and your microphone. You can send this stream over the network or save this in a format you like.
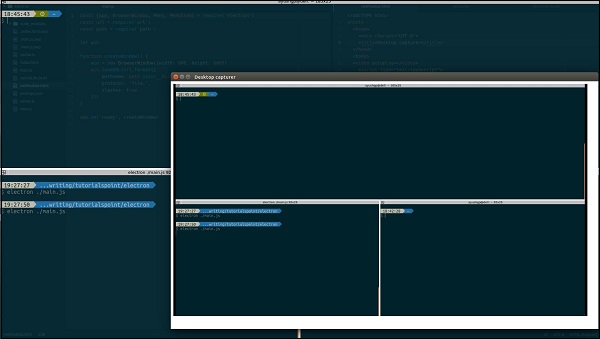
Have a look at the MDN Documentation for capturing images to get the images from your webcam and store them. This was done using the HTML5 getUserMedia API. You can also capture the user desktop using the desktopCapturer module that comes with Electron. Let us now see an example of how to get the screen stream.
Use the same main.js file as above and edit the index.html file to have the following content −
desktopCapturer.getSources({types: ['window', 'screen']}, (error, sources) => {
if (error) throw error
for (let i = 0; i < sources.length; ++i) {
}
})
function handleStream (stream) {
document.querySelector('video').src = URL.createObjectURL(stream)
}
function handleError (e) {
console.log(e)
}
We have used the desktopCapturer module to get the information about each open window. Now you can capture the events of a specific application or of the entire screen depending on the name you pass to the above if statement. This will stream only that which is happening on that screen to your app.
The webview tag is used to embed the ‘guest’ content like web pages in your Electron app. This content is contained within the webview container. An embedded page within your app controls how this content will be displayed.
The webview runs in a separate process than your app. To ensure security from malicious content, the webview doesn’t have same permissions as your web page. This keeps your app safe from the embedded content. All interactions between your app and the embedded page will be asynchronous.
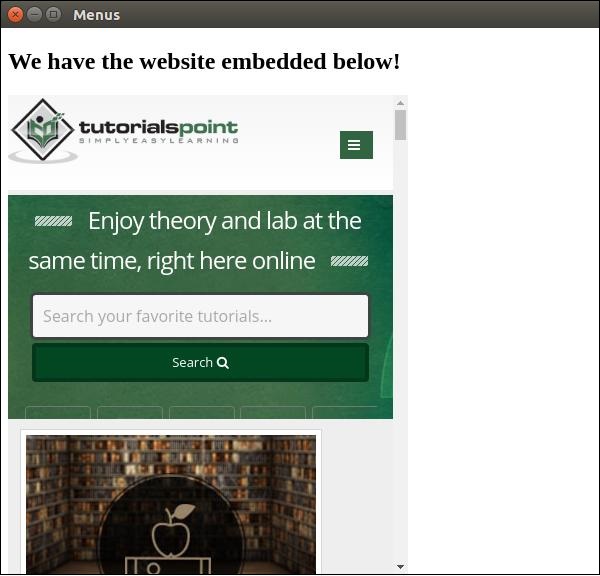
Let us consider an example to understand the embedding of an external webpage in our Electron app. We will embed the tutorialspoint website in our app on the right side. Create a new main.js file with the following content −
const {app, BrowserWindow} = require('electron')
const url = require('url')
const path = require('path')
let win
function createWindow() {
win = new BrowserWindow({width: 800, height: 600})
win.loadURL(url.format ({
Now that we have set up our main process, let us create the HTML file that will embed the tutorialspoint website. Create a file called index.html with the following content −
The above command will generate the following output −
The webview tag can be used for other resources as well. The webview element has a list of events that it emits listed on the official docs. You can use these events to improve the functionality depending on the things that take place in the webview.
Whenever you are embedding scripts or other resources from the Internet, it is advisable to use webview. This is recommended as it comes with great security benefits and does not hinder normal behaviour.
Electron provides native notifications API only for MacOS. So we are not going to use that, instead we’ll be using a npm module called node-notifier. It allows us to notify users on Windows, MacOS and Linux.
Install the node-notifier module in your app folder using the following command in that folder −
$ npm install --save node-notifier
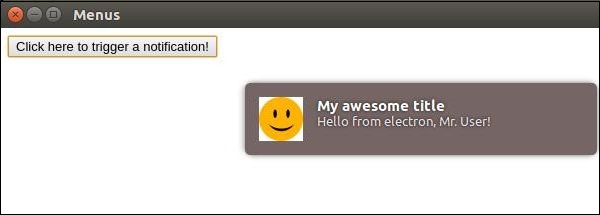
Let us now create an app that has a button which will generate a notification every time we click on this button.
Create a new main.js file and enter the following code in it −
const {app, BrowserWindow} = require('electron')
const url = require('url')
const path = require('path')
let win
function createWindow() {
win = new BrowserWindow({width: 800, height: 600})
win.loadURL(url.format ({
<button type = "button" id = "notify" name = "button">
Click here to trigger a notification!</button>
<script type = "text/javascript">
const notifier = require('node-notifier')
const path = require('path');
document.getElementById('notify').onclick = (event) => {
notifier.notify ({
title: 'My awesome title',
message: 'Hello from electron, Mr. User!',
icon: path.join('','/home/ayushgp/Desktop/images.png'), // Absolute path
(doesn't work on balloons)
sound: true, // Only Notification Center or Windows Toasters
wait: true // Wait with callback, until user action is taken
against notification
}, function (err, response) {
// Response is response from notification
});
notifier.on('click', function (notifierObject, options) {
console.log("You clicked on the notification")
});
The notify method allows us to pass it an objectwith information like the title, message, thumbnail, etc. which help us customize the notification. We can also set some event listeners on the notification.
Now, run the app using the following command −
$ electron ./main.js
When you click on the button that we created, you will see a native notification from your operating system as shown in the following screenshot −
We have also handled the events wherein, the user clicks the notification or the notification times out. These methods help us make the app more interactive if its running in the background.
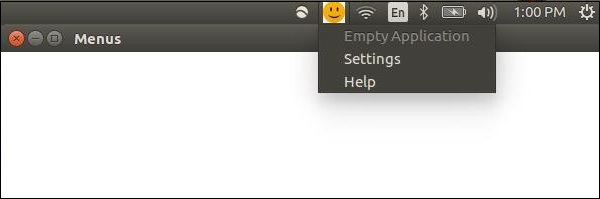
System tray is a menu outside of your application window. On MacOS and Ubuntu, it is located on the top right corner of your screen. On Windows it is on the bottom right corner. We can create menus for our application in system trays using Electron.
Create a new main.js file and add the following code to it. Have a png file ready to use for the system tray icon.
const {app, BrowserWindow} = require('electron')
const url = require('url')
const path = require('path')
let win
function createWindow() {
win = new BrowserWindow({width: 800, height: 600})
win.loadURL(url.format ({
let trayIcon = new Tray(path.join('','/home/ayushgp/Desktop/images.png'))
const trayMenuTemplate = [
{
label: 'Empty Application',
enabled: false
},
{
label: 'Settings',
click: function () {
console.log("Clicked on settings")
}
},
{
label: 'Help',
click: function () {
console.log("Clicked on Help")
}
}
]
let trayMenu = Menu.buildFromTemplate(trayMenuTemplate)
trayIcon.setContextMenu(trayMenu)
</script>
</body>
</html>
We created the tray using the Tray submodule. We then created a menu using a template and further attached the menu to our tray object.
Run the application using the following command −
$ electron ./main.js
When you run the above command, check your system tray for the icon you used. I used a smiley face for my application. The above command will generate the following output −
The desktop apps come with two types of menus – the application menu(on the top bar) and a context menu(right-click menu). We will learn how to create both of these in this chapter.
We will be using two modules – the Menu and the MenuItem modules. Note that the Menu and the MenuItem modules are only available in the main process. For using these modules in the renderer process, you need the remote module. We will come across this when we create a context menu.
Now, let us create a new main.js file for the main process −
const {app, BrowserWindow, Menu, MenuItem} = require('electron')
const url = require('url')
const path = require('path')
let win
function createWindow() {
win = new BrowserWindow({width: 800, height: 600})
win.loadURL(url.format ({
}
]
const menu = Menu.buildFromTemplate(template)
Menu.setApplicationMenu(menu)
app.on('ready', createWindow)
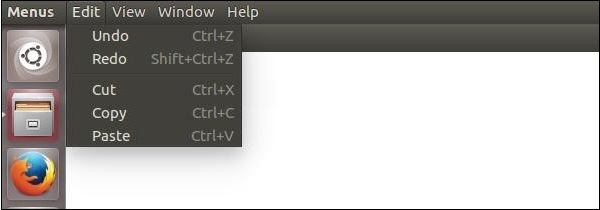
We are building a menu from a template here. This means that we provide the menu as a JSON to the function and it will take care of the rest. Now we have to set this menu as the Application menu.
Now create an empty HTML file called index.html and run this application using −
$ electron ./main.js
On the normal position of application menus, you will see a menu based on the above template.
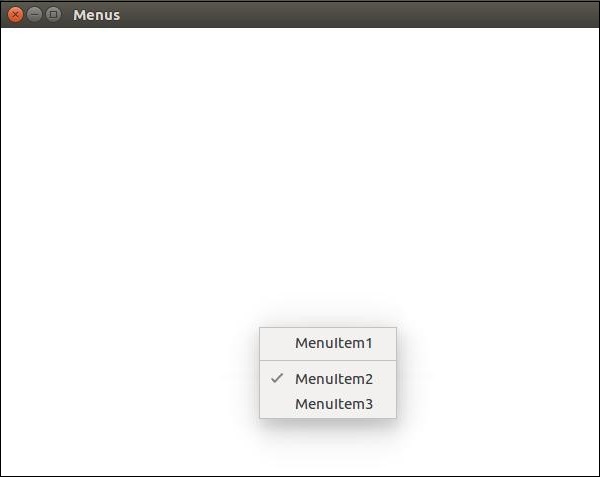
We created this menu from the main process. Let us now create a context menu for our app. We will do this in our HTML file −
// Build menu one item at a time, unlike
menu.append(new MenuItem ({
label: 'MenuItem1',
click() {
console.log('item 1 clicked')
}
}))
menu.append(new MenuItem({type: 'separator'}))
menu.append(new MenuItem({label: 'MenuItem2', type: 'checkbox', checked: true}))
menu.append(new MenuItem ({
label: 'MenuItem3',
click() {
console.log('item 3 clicked')
}
}))
// Prevent default action of right click in chromium. Replace with our menu.
window.addEventListener('contextmenu', (e) => {
e.preventDefault()
menu.popup(remote.getCurrentWindow())
}, false)
</script>
</body>
</html>
We imported the Menu and MenuItem modules using the remote module; then, we created a menu and appended our menuitems to it one by one. Further, we prevented the default action of right-click in chromium and replaced it with our menu.
The creation of menus in Electron is a very simple task. Now you can attach your event handlers to these items and handle the events according to your needs.