In Python, the main thread is the initial thread that starts when the Python interpreter is executed. It is the default thread within a Python process, responsible for managing the program and creating additional threads. Every Python program has at least one thread of execution called the main thread.
The main thread by default is a non-daemon thread. In this tutorial you will see the detailed explanation with relevant examples about main thread in Python programming.
Accessing the Main Thread
The threading module in Python provides functions to access the threads. Here are the key functions −
threading.current_thread(): This function returns a threading.Thread instance representing the current thread.
threading.main_thread(): Returns a threading.Thread instance representing the main thread.
Example
The threading.current_thread() function returns a threading.Thread instance representing the current thread. Here is an example.
Open Compiler
import threading

name ='Tutorialspoint'print('Output:', name)print(threading.current_thread())
It will produce the following output −
Output: Tutorialspoint
<_MainThread(MainThread, started 140260292161536)>
Example
This example demonstrates how to use the threading.main_thread() function to get a reference to the main thread. And it is also shows the difference between the main thread and other threads using threading.current_thread() function.
Open Compiler
import threading
import time

deffunc(x):
   time.sleep(x)ifnot threading.current_thread()is threading.main_thread():print('threading.current_thread() not threading.main_thread()')

t = threading.Thread(target=func, args=(0.5,))
t.start()print(threading.main_thread())print("Main thread finished")
When the above code is executed, it produces the following result −
<_MainThread(MainThread, started 140032182964224)>
Main thread finished
threading.current_thread() not threading.main_thread()
Main Thread Behavior in Python
The main thread will exit whenever it has finished executing all the code in your script that is not started in a separate thread. For instance, when you start a new thread using start() method, the main thread will continue to execute the remaining code in the script until it reaches the end and then exit.
Since the other threads are started in a non-daemon mode by default, they will continue running until they are finished, even if the main thread has exited.
Example
The following example shows the main thread behavior in a python multithreaded program.
Open Compiler
import threading
import time

deffunc(x):print('Current Thread Details:',threading.current_thread())for n inrange(x):print('Internal Thread Running', n)print('Internal Thread Finished...')

t = threading.Thread(target=func, args=(6,))
t.start()for i inrange(3):print('Main Thread Running',i)print("Main Thread Finished...")
It will produce the following output −
Current Thread Details: Thread(Thread-1 (func), started 140562647860800)>
Main Thread Running 0
Internal Thread Running 0
Main Thread Running 1
Main Thread Running 2
Internal Thread Running 1
Main Thread Finished...
Internal Thread Running 2
Internal Thread Running 3
Internal Thread Running 4
Internal Thread Running 5
Internal Thread Finished...
The above code can produce different outputs for different runs and different compilers.
Learn Python in-depth with real-world projects through our Python certification course. Enroll and become a certified expert to boost your career.
Main Thread Waiting for Other Threads
To ensure that the main thread waits for all other threads to finish, you can join the threads using the join() method. By using the join() method, you can control the execution flow and ensure that the main thread properly waits for all other threads to complete their tasks before exiting. This helps in managing the lifecycle of threads in a multi-threaded Python program effectively.
Example
This example demonstrates how to properly manage the main thread and ensure it does not exit before the worker threads have finished their tasks.
Open Compiler
from threading import Thread
from time import sleep

defmy_function_1():print("Worker 1 started")
   sleep(1)print("Worker 1 done")defmy_function_2(main_thread):print("Worker 2 waiting for Worker 1 to finish")
   main_thread.join()print("Worker 2 started")
   sleep(1)print("Worker 2 done")

worker1 = Thread(target=my_function_1)
worker2 = Thread(target=my_function_2, args=(worker1,))

worker1.start()
worker2.start()for num inrange(6):print("Main thread is still working on task", num)
   sleep(0.60)

worker1.join()print("Main thread Completed")
When the above code is executed, it produces the following result −
Worker 1 started
Worker 2 waiting for Worker 1 to finish
Main thread is still working on task 0
Main thread is still working on task 1
Worker 1 done
Worker 2 started
Main thread is still working on task 2
Main thread is still working on task 3
Worker 2 done
Main thread is still working on task 4
Main thread is still working on task 5
Main thread Completed
A thread pool is a mechanism that automatically manages multiple threads efficiently, allowing tasks to be executed concurrently. Python does not provide thread pooling directly through the threading module.
Instead, it offers thread-based pooling through the multiprocessing.dummy module and the concurrent.futures module. These modules provide convenient interfaces for creating and managing thread pools, making it easier to perform concurrent task execution.
What is a Thread Pool?
A thread pool is a collection of threads that are managed by a pool. Each thread in the pool is called a worker or a worker thread. These threads can be reused to perform multiple tasks, which reduces the burden of creating and destroying threads repeatedly.
Thread pools control the creation of threads and their life cycle, making them more efficient for handling large numbers of tasks.
We can implement thread-pools in Python using the following classes −
Python ThreadPool Class
Python ThreadPoolExecutor Class
Using Python ThreadPool Class
The multiprocessing.pool.ThreadPool class provides a thread pool interface within the multiprocessing module. It manages a pool of worker threads to which jobs can be submitted for concurrent execution.
A ThreadPool object simplifies the management of multiple threads by handling the creation and distribution of tasks among the worker threads. It shares an interface with the Pool class, originally designed for processes, but has been adjusted to work with threads too.
ThreadPool instances are fully interface-compatible with Pool instances and should be managed either as a context manager or by calling close() and terminate() manually.
Example
This example demonstrates the parallel execution of the square and cube functions on the list of numbers using the Python thread pool, where each function is applied to the numbers concurrently with up to 3 threads, each with a delay of 1 second between executions.
Open Compiler
from multiprocessing.dummy import Pool as ThreadPool
import time

defsquare(number):
   sqr = number * number
   time.sleep(1)print("Number:{} Square:{}".format(number, sqr))defcube(number):
   cub = number*number*number
   time.sleep(1)print("Number:{} Cube:{}".format(number, cub))

numbers =[1,2,3,4,5]
pool = ThreadPool(3)
pool.map(square, numbers)
pool.map(cube, numbers)

pool.close()
Output
On executing the above code you will get the following output −
The ThreadPoolExecutor class of the Python the concurrent.futures module provides a high-level interface for asynchronously executing functions using threads. The concurrent.futures module includes Future class and two Executor classes − ThreadPoolExecutor and ProcessPoolExecutor.
The Future Class
The concurrent.futures.Future class is responsible for handling asynchronous execution of any callable such as a function. To obtain a Future object, you should call the submit() method on any Executor object. It should not be created directly by its constructor.
Important methods in the Future class are −
result(timeout=None): This method returns the value returned by the call. If the call hasn’t yet completed, then this method will wait up to timeout seconds. If the call hasn’t completed in timeout seconds, then a TimeoutError will be raised. If timeout is not specified, there is no limit to the wait time.
cancel(): This method, attempt to cancel the call. If the call is currently being executed or finished running and cannot be cancelled then the method will return a boolean value False. Otherwise the call will be cancelled and the method returns True.
cancelled(): Returns True if the call was successfully cancelled.
running(): Returns True if the call is currently being executed and cannot be cancelled.
done(): Returns True if the call was successfully cancelled or finished running.
The ThreadPoolExecutor Class
This class represents a pool of specified number maximum worker threads to execute calls asynchronously.
Here is an example that uses the concurrent.futures.ThreadPoolExecutor class to manage and execute tasks asynchronously in Python. Specifically, it shows how to submit multiple tasks to a thread pool and how to check their execution status.
Open Compiler
from concurrent.futures import ThreadPoolExecutor
from time import sleep
defsquare(numbers):for val in numbers:
ret = val*val
sleep(1)print("Number:{} Square:{}".format(val, ret))defcube(numbers):for val in numbers:
ret = val*val*val
sleep(1)print("Number:{} Cube:{}".format(val, ret))if __name__ =='__main__':
Thread scheduling in Python is a process of deciding which thread runs at any given time. In a multi-threaded program, multiple threads are executed independently, allowing for parallel execution of tasks. However, Python does not have built-in support for controlling thread priorities or scheduling policies directly. Instead, it relies on the operating system’s thread scheduler.
Python threads are mapped to native threads of the host operating system, such as POSIX threads (pthreads) on Unix-like systems or Windows threads. The operating system’s scheduler manages the execution of these threads, including context switching, thread priorities, and scheduling policies. Python provides basic thread scheduling capabilities through the threading.Timer class and the sched module.
In this tutorial will learn the basics of thread scheduling in Python, including how to use the sched module for scheduling tasks and the threading.Timer class for delayed execution of functions.
Scheduling Threads using the Timer Class
The Timer class of the Python threading module allows you to schedule a function to be called after a certain amount of time. This class is a subclass of Thread and serves as an example of creating custom threads.
You start a timer by calling its start() method, similar to threads. If needed, you can stop the timer before it begins by using the cancel() method. Note that the actual delay before the action is executed might not match the exact interval specified.
Example
This example demonstrates how to use the threading.Timer() class to schedule and manage the execution of tasks (custom threads) in Python.
Open Compiler
import threading
import time

# Define the event functiondefschedule_event(name, start):
   now = time.time()
   elapsed =int(now - start)print('Elapsed:', elapsed,'Name:', name)# Start time
start = time.time()print('START:', time.ctime(start))# Schedule events using Timer
t1 = threading.Timer(3, schedule_event, args=('EVENT_1', start))
t2 = threading.Timer(2, schedule_event, args=('EVENT_2', start))# Start the timers
t1.start()
t2.start()

t1.join()
t2.join()# End time
end = time.time()print('End:', time.ctime(end))
On executing the above program, it will produce the following output −
The sched module in Python’s standard library provides a way to schedule tasks. It implements a generic event scheduler for running tasks at specific times. It provides similar tools like task scheduler in windows or Linux.
Key Classes and Methods of the sched Module
The scheduler() class is defined in the sched module is used to create a scheduler object. Here is the syntax of the class −
scheduler.enter(delay, priority, action, argument=(), kwargs={}) − Events can be scheduled to run after a delay, or at a specific time. To schedule them with a delay, enter() method is used.
scheduler.cancel(event) − Remove the event from the queue. If the event is not an event currently in the queue, this method will raise a ValueError.
scheduler.run(blocking=True) − Run all scheduled events.
Events can be scheduled to run after a delay, or at a specific time. To schedule them with a delay, use the enter() method, which takes four arguments.
A number representing the delay
A priority value
The function to call
A tuple of arguments for the function
Example
This example demonstrates how to schedule events to run after a delay using the sched module. It schedules two different events −
Open Compiler
import sched
import time

scheduler = sched.scheduler(time.time, time.sleep)defschedule_event(name, start):
   now = time.time()
   elapsed =int(now - start)print('elapsed=',elapsed,'name=', name)

start = time.time()print('START:', time.ctime(start))
scheduler.enter(2,1, schedule_event,('EVENT_1', start))
scheduler.enter(5,1, schedule_event,('EVENT_2', start))

scheduler.run()# End time
end = time.time()print('End:', time.ctime(end))
Let’s take another example to understand the concept better. This example schedules a function to perform an addition after a 4-second delay using the sched module in Python.
Open Compiler
import sched
from datetime import datetime
import time

defaddition(a,b):print("Performing Addition : ", datetime.now())print("Time : ", time.monotonic())print("Result {}+{} =".format(a, b), a+b)

s = sched.scheduler()print("Start Time : ", datetime.now())

event1 = s.enter(4,1, addition, argument =(5,6))print("Event Created : ", event1)
s.run()print("End Time : ", datetime.now())
It will produce the following output −
Start Time :  2024-07-02 15:18:27.862524
Event Created :  Event(time=2927111.05638099, priority=1, sequence=0, action=<function addition at 0x7f31f902bd90>, argument=(5, 6), kwargs={})
Performing Addition :  2024-07-02 15:18:31.866381
Time :  2927111.060294749
Result 5+6 = 11
End Time :  2024-07-02 15:18:31.866545
In Python, naming a thread involves assigning a string as an identifier to the thread object. Thread names in Python are primarily used for identification purposes only and do not affect the thread’s behavior or semantics. Multiple threads can share the same name, and names can be specified during the thread’s initialization or changed dynamically.
Thread naming in Python provides a straightforward way to identify and manage threads within a concurrent program. By assigning meaningful names, users can enhance code clarity and easily debug the complex multi-threaded applications.
Naming the Threads in Python
When you create a thread using threading.Thread() class, you can specify its name using the name parameter. If not provided, Python assigns a default name like the following pattern “Thread-N”, where N is a small decimal number. Alternatively, if you specify a target function, the default name format becomes “Thread-N (target_function_name)”.
Example
Here is an example demonstrates assigning custom and default names to threads created using threading.Thread() class, and displays how names can reflect target functions.
Open Compiler
from threading import Thread
import threading
from time import sleep

defmy_function_1(arg):print("This tread name is", threading.current_thread().name)# Create thread objects
thread1 = Thread(target=my_function_1, name='My_thread', args=(2,))
thread2 = Thread(target=my_function_1, args=(3,))print("This tread name is", threading.current_thread().name)# Start the first thread and wait for 0.2 seconds
thread1.start()
thread1.join()# Start the second thread and wait for it to complete
thread2.start()
thread2.join()
On executing the above, it will produce the following results −
This tread name is MainThread
This tread name is My_thread
This tread name is Thread-1 (my_function_1)
Dynamically Assigning Names to the Python Threads
You can assign or change a thread’s name dynamically by directly modifying the name attribute of the thread object.
Example
This example shows how to dynamically change thread names by modifying the name attribute of the thread object.
from threading import Thread
import threading
from time import sleep

defmy_function_1(arg):
   threading.current_thread().name ="custom_name"print("This tread name is", threading.current_thread().name)# Create thread objects
thread1 = Thread(target=my_function_1, name='My_thread', args=(2,))
thread2 = Thread(target=my_function_1, args=(3,))print("This tread name is", threading.current_thread().name)# Start the first thread and wait for 0.2 seconds
thread1.start()
thread1.join()# Start the second thread and wait for it to complete
thread2.start()
thread2.join()
When you execute the above code, it will produce the following results −
This tread name is MainThread
This tread name is custom_name
This tread name is custom_name
Example
Threads can be initialized with custom names and even renamed after creation. This example demonstrates creating threads with custom names and modifying a thread’s name after creation.
import threading

defaddition_of_numbers(x, y):print("This Thread name is :", threading.current_thread().name)
   result = x + y

defcube_number(i):
   result = i **3print("This Thread name is :", threading.current_thread().name)defbasic_function():print("This Thread name is :", threading.current_thread().name)# Create threads with custom names
t1 = threading.Thread(target=addition_of_numbers, name='My_thread', args=(2,4))
t2 = threading.Thread(target=cube_number, args=(4,))
t3 = threading.Thread(target=basic_function)# Start and join threads
t1.start()
t1.join()

t2.start()
t2.join()

t3.name ='custom_name'# Assigning name after thread creation
t3.start()
t3.join()print(threading.current_thread().name)# Print main thread's name
Upon execution, the above code will produce the following results −
This Thread name is : My_thread
This Thread name is : Thread-1 (cube_number)
This Thread name is : custom_name
MainThread
In Python, joining the threads means using the join() method to wait for one thread to finish before moving on to others. This is useful in multithreaded programming to make sure some threads are completed before starting or continuing with other threads. By using the join() method, you can make sure that one thread has finished running before another thread or the main program continues. In this tutorial you will get the detailed explain of the join() method with suitable examples.
Joining the Threads in Python
To join the threads in Python, you can use the Thread.join() method from the threading module. Which generally is used to block the calling thread until the thread on which join() was called terminates. The termination may be either normal, because of an unhandled exception − or until the optional timeout occurs. You can call join() multiple times. However, if you try to join the current thread or attempts to join a thread before starting it with the start() method, will raise the RuntimeError exception.
Following is the syntax of the Thread.join() method −
thread.join(timeout)
Where, the timeout is an optional parameter that takes a floating-point number specifying the maximum wait time in seconds (or fractions thereof). If it is not provided or None, the method will block until the thread terminates.
This method always returns None. After calling join(), you can use is_alive() to check if the thread is still running. This is useful to determine if the join() call timed out.
Example
The following example demonstrates the use of join() in a multithreaded program. It starts two threads (thread1 and thread2). Initially, it blocks the main thread until thread1 finishes executing the my_function_1. After thread1 completes, thread2.start() is called, followed by thread2.join() to ensure that the main thread waits until thread2 finishes executing my_function_2().
Open Compiler
from threading import Thread
from time import sleep
defmy_function_1(arg):for i inrange(arg):print("Child Thread 1 running", i)
thread1 = Thread(target=my_function_1, args=(5,))
thread2 = Thread(target=my_function_2, args=(3,))# Start the first thread and wait for it to complete
thread1.start()
thread1.join()# Start the second thread and wait for it to complete
thread2.start()
thread2.join()print("Main thread finished...exiting")
When the above code is executed, it produces the following result −
Here is another example that demonstrates how the join() method with a timeout allows waiting for a thread to complete for a specified period, then proceeding even if the thread hasn’t finished.
from threading import Thread
from time import sleep
defmy_function_1(arg):for i inrange(arg):print("Child Thread 1 running", i)
thread1 = Thread(target=my_function_1, args=(5,))
thread2 = Thread(target=my_function_2, args=(3,))# Start the first thread and wait for 0.2 seconds
thread1.start()
thread1.join(timeout=0.2)# Start the second thread and wait for it to complete
thread2.start()
thread2.join()print("Main thread finished...exiting")
When you run the above code, you can see the following output −
In Python, starting a thread involves using the start() method provided by the Thread class in the threading module. This method initiates the thread’s activity and automatically calls its run() method in a separate thread of execution. Meaning that, when you call start() on each thread object (for example., thread1, thread2, thread3) to initiate their execution.
Python to launch separate threads that concurrently execute the run() method defined in each Thread instance. And the main thread continues its execution after starting the child threads.
In this tutorial, you will see a detailed explanation and example of how to use the start() method effectively in multi-threaded programming to understand its behavior in multi-thread applications.
Starting a Thread in Python
The start() method is fundamental for beginning the execution of a thread. It sets up the thread’s environment and schedules it to run. Importantly, it should only be called once per Thread object. If this method is called more than once on the same Thread object, it will raise a RuntimeError.
Here is the syntax for using the start() method on a Thread object −
threading.thread.start()
Example
let’s see the below example, that demonstrates how to start a new thread in Python using the start() method.
Open Compiler
from threading import Thread
from time import sleep
defmy_function(arg):for i inrange(arg):print("child Thread running", i)
Here is another example demonstrating the working of the start() method. You can observe that, by not calling the start() method on thread2, it remains inactive and does not begin execution.
Open Compiler
import threading
import time
classMyThread(threading.Thread):def__init__(self, threadID, name, counter):
threading.Thread.__init__(self)
self.threadID = threadID
self.name = name
self.counter = counter
Creating a thread in Python involves initiating a separate flow of execution within a program, allowing multiple operations to run concurrently. This is particularly useful for performing tasks simultaneously, such as handling various I/O operations in parallel.
Python provides multiple ways to create and manage threads.
Creating a thread using the threading module is generally recommended due to its higher-level interface and additional functionalities.
On the other hand, the _thread module offers a simpler, lower-level approach to create and manage threads, which can be useful for straightforward, low-overhead threading tasks.
In this tutorial, you will learn the basics of creating threads in Python using different approaches. We will cover creating threads using functions, extending the Thread class from the threading module, and utilizing the _thread module.
Creating Threads with Functions
You can create threads by using the Thread class from the threading module. In this approach, you can create a thread by simply passing a function to the Thread object. Here are the steps to start a new thread −
Define a function that you want the thread to execute.
Create a Thread object using the Thread class, passing the target function and its arguments.
Call the start method on the Thread object to begin execution.
Optionally, call the join method to wait for the thread to complete before proceeding.
Example
The following example demonstrates concurrent execution using threads in Python. It creates and starts multiple threads that execute different tasks concurrently by specifying user-defined functions as targets within the Thread class.
Open Compiler
from threading import Thread

defaddition_of_numbers(x, y):
   result = x + y
   print('Addition of {} + {} = {}'.format(x, y, result))defcube_number(i):
   result = i **3print('Cube of {} = {}'.format(i, result))defbasic_function():print("Basic function is running concurrently...")

Thread(target=addition_of_numbers, args=(2,4)).start()
Thread(target=cube_number, args=(4,)).start()
Thread(target=basic_function).start()
On executing the above program, it will produces the following result −
Addition of 2 + 4 = 6
Cube of 4 = 64
Basic function is running concurrently...
Creating Threads by Extending the Thread Class
Another approach to creating a thread is by extending the Thread class. This approach involves defining a new class that inherits from Thread and overriding its __init__ and run methods. Here are the steps to start a new thread −
Define a new subclass of the Thread class.
Override the __init__ method to add additional arguments.
Override the run method to implement the thread’s behavior.
Example
This example demonstrates how to create and manage multiple threads using a custom MyThread class that extends the threading.Thread class in Python.
Open Compiler
import threading
import time
exitFlag =0classmyThread(threading.Thread):def__init__(self, threadID, name, counter):
threading.Thread.__init__(self)
self.threadID = threadID
self.name = name
self.counter = counter
thread1 = myThread(1,"Thread-1",1)
thread2 = myThread(2,"Thread-2",2)# Start new Threads
thread1.start()
thread2.start()print("Exiting Main Thread")
When the above code is executed, it produces the following result −
Starting Thread-1
Starting Thread-2
Exiting Main Thread
Thread-1: Mon Jun 24 16:38:10 2024
Thread-2: Mon Jun 24 16:38:11 2024
Thread-1: Mon Jun 24 16:38:11 2024
Thread-1: Mon Jun 24 16:38:12 2024
Thread-2: Mon Jun 24 16:38:13 2024
Thread-1: Mon Jun 24 16:38:13 2024
Thread-1: Mon Jun 24 16:38:14 2024
Exiting Thread-1
Thread-2: Mon Jun 24 16:38:15 2024
Thread-2: Mon Jun 24 16:38:17 2024
Thread-2: Mon Jun 24 16:38:19 2024
Exiting Thread-2
Learn Python in-depth with real-world projects through our Python certification course. Enroll and become a certified expert to boost your career.
Creating Threads using start_new_thread() Function
The start_new_thread() function included in the _thread module is used to create a new thread in the running program. This module offers a low-level approach to threading. It is simpler but does not have some of the advanced features provided by the threading module.
Here is the syntax of the _thread.start_new_thread() Function
This function starts a new thread and returns its identifier. The function parameter specifies the function that the new thread will execute. Any arguments required by this function can be passed using args and kwargs.
Example
import _thread
import time
# Define a function for the threaddefthread_task( threadName, delay):for count inrange(1,6):
time.sleep(delay)print("Thread name: {} Count: {}".format( threadName, count ))# Create two threads as followstry:
_thread.start_new_thread( thread_task,("Thread-1",2,))
_thread.start_new_thread( thread_task,("Thread-2",4,))except:print("Error: unable to start thread")whileTrue:pass
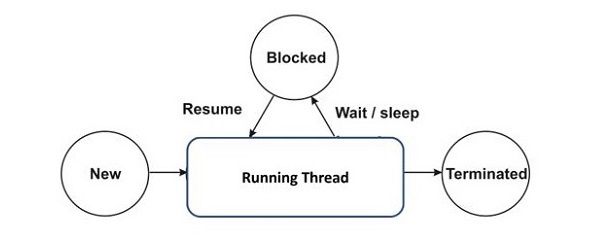
A thread object goes through different stages during its life cycle. When a new thread object is created, it must be started, which calls the run() method of thread class. This method contains the logic of the process to be performed by the new thread. The thread completes its task as the run() method is over, and the newly created thread merges with the main thread.
While a thread is running, it may be paused either for a predefined duration or it may be asked to pause till a certain event occurs. The thread resumes after the specified interval or the process is over.
States of a Thread Life Cycle in Python
Following are the stages of the Python Thread life cycle −
Creating a Thread− To create a new thread in Python, you typically use the Thread class from the threading module.
Starting a Thread− Once a thread object is created, it must be started by calling its start() method. This initiates the thread’s activity and invokes its run() method in a separate thread.
Paused/Blocked State− Threads can be paused or blocked for various reasons, such as waiting for I/O operations to complete or another thread to perform a task. This is typically managed by calling its join() method. This blocks the calling thread until the thread being joined terminates.
Synchronizing Threads− Synchronization ensures orderly execution and shared resource management among threads. This can be done by using synchronization primitives like locks, semaphores, or condition variables.
Termination − A thread terminates when its run() method completes execution, either by finishing its task or encountering an exception.
Example: Python Thread Life Cycle Demonstration
This example demonstrates the thread life cycle in Python by showing thread creation, starting, execution, and synchronization with the main thread.
Open Compiler
import threading

deffunc(x):print('Current Thread Details:', threading.current_thread())for n inrange(x):print('{} Running'.format(threading.current_thread().name), n)print('Internal Thread Finished...')# Create thread objects
t1 = threading.Thread(target=func, args=(2,))
t2 = threading.Thread(target=func, args=(3,))# Start the threadsprint('Thread State: CREATED')
t1.start()
t2.start()# Wait for threads to complete
t1.join()
t2.join()print('Threads State: FINISHED')# Simulate main thread workfor i inrange(3):print('Main Thread Running', i)print("Main Thread Finished...")
Output
When the above code is executed, it produces the following output −
Thread State: CREATED
Current Thread Details: <Thread(Thread-1 (func), started 140051032258112)>
Thread-1 (func) Running 0
Thread-1 (func) Running 1
Internal Thread Finished...
Current Thread Details: <Thread(Thread-2 (func), started 140051023865408)>
Thread-2 (func) Running 0
Thread-2 (func) Running 1
Thread-2 (func) Running 2
Internal Thread Finished...
Threads State: FINISHED
Main Thread Running 0
Main Thread Running 1
Main Thread Running 2
Main Thread Finished...
Example: Using a Synchronization Primitive
Here is another example demonstrates the thread life cycle in Python, including creation, starting, running, and termination states, along with synchronization using a semaphore.
Open Compiler
import threading
import time
# Create a semaphore
semaphore = threading.Semaphore(2)defworker():with semaphore:print('{} has started working'.format(threading.current_thread().name))
time.sleep(2)print('{} has finished working'.format(threading.current_thread().name))# Create a list to keep track of thread objects
threads =[]# Create and start 5 threadsfor i inrange(5):
t = threading.Thread(target=worker, name='Thread-{}'.format(i+1))
threads.append(t)print('{} has been created'.format(t.name))
t.start()# Wait for all threads to completefor t in threads:
t.join()print('{} has terminated'.format(t.name))print('Threads State: All are FINISHED')print("Main Thread Finished...")
Output
When the above code is executed, it produces the following output −
Thread-1 has been created
Thread-1 has started working
Thread-2 has been created
Thread-2 has started working
Thread-3 has been created
Thread-4 has been created
Thread-5 has been created
Thread-1 has finished working
Thread-2 has finished working
Thread-3 has started working
Thread-1 has terminated
Thread-2 has terminated
Thread-4 has started working
Thread-3 has finished working
Thread-5 has started working
Thread-3 has terminated
Thread-4 has finished working
Thread-4 has terminated
Thread-5 has finished working
Thread-5 has terminated
Threads State: All are FINISHED
Main Thread Finished...
In Python, multithreading allows you to run multiple threads concurrently within a single process, which is also known as thread-based parallelism. This means a program can perform multiple tasks at the same time, enhancing its efficiency and responsiveness.
Multithreading in Python is especially useful for multiple I/O-bound operations, rather than for tasks that require heavy computation.
Generally, a computer program sequentially executes the instructions, from start to the end. Whereas, Multithreading divides the main task into more than one sub-task and executes them in an overlapping manner.
Comparison with Processes
An operating system is capable of handling multiple processes concurrently. It allocates a separate memory space to each process so that one process cannot access or write anything in other’s space.
On the other hand, a thread can be considered a lightweight sub-process in a single program that shares the memory space allocated to it, facilitating easier communication and data sharing. As they are lightweight and do not require much memory overhead; they are cheaper than processes.
A process always starts with a single thread (main thread). As and when required, a new thread can be started and sub task is delegated to it. Now the two threads are working in an overlapping manner. When the task assigned to the secondary thread is over, it merges with the main thread.
A thread has a beginning, an execution sequence, and a conclusion. It has an instruction pointer that keeps track of where it is currently running within its context.
It can be pre-empted (interrupted)
It can temporarily be put on hold (also known as sleeping) while other threads are running – this is called yielding.
Thread Handling Modules in Python
Python’s standard library provides two main modules for managing threads: _thread and threading.
The _thread Module
The _thread module, also known as the low-level thread module, has been a part of Python’s standard library since version 2. It offers a basic API for thread management, supporting concurrent execution of threads within a shared global data space. The module includes simple locks (mutexes) for synchronization purposes.
The threading Module
The threading module, introduced in Python 2.4, builds upon _thread to provide a higher-level and more comprehensive threading API. It offers powerful tools for managing threads, making it easier to work with threads in Python applications.
Key Features of the threading Module
The threading module exposes all the methods of the thread module and provides some additional methods −
threading.activeCount() − Returns the number of thread objects that are active.
threading.currentThread() − Returns the number of thread objects in the caller’s thread control.
threading.enumerate() − Returns a list of all thread objects that are currently active.
In addition to the methods, the threading module has the Thread class that implements threading. The methods provided by the Thread class are as follows −
run() − The run() method is the entry point for a thread.
start() − The start() method starts a thread by calling the run method.
join([time]) − The join() waits for threads to terminate.
isAlive() − The isAlive() method checks whether a thread is still executing.
getName() − The getName() method returns the name of a thread.
setName() − The setName() method sets the name of a thread.
Learn Python in-depth with real-world projects through our Python certification course. Enroll and become a certified expert to boost your career.
Starting a New Thread
To create and start a new thread in Python, you can use either the low-level _thread module or the higher-level threading module. The threading module is generally recommended due to its additional features and ease of use. Below, you can see both approaches.
Starting a New Thread Using the _thread Module
The start_new_thread() method of the _thread module provides a basic way to create and start new threads. This method provides a fast and efficient way to create new threads in both Linux and Windows. Following is the syntax of the method −
thread.start_new_thread(function, args[, kwargs])
This method call returns immediately, and the new thread starts executing the specified function with the given arguments. When the function returns, the thread terminates.
Example
This example demonstrates how to use the _thread module to create and run threads. Each thread runs the print_name function with different arguments. The time.sleep(0.5) call ensures that the main program waits for the threads to complete their execution before exiting.
Open Compiler
import _thread
import time

defprint_name(name,*arg):print(name,*arg)

name="Tutorialspoint..."
_thread.start_new_thread(print_name,(name,1))
_thread.start_new_thread(print_name,(name,1,2))

time.sleep(0.5)
When the above code is executed, it produces the following result −
Tutorialspoint... 1
Tutorialspoint... 1 2
Although it is very effective for low-level threading, but the _thread module is limited compared to the threading module, which offers more features and higher-level thread management.
Starting a New Thread Using the Threading Module
The threading module provides the Thread class, which is used to create and manage threads.
Here are a few steps to start a new thread using the threading module −
Create a function that you want the thread to execute.
Then create a Thread object using the Thread class by passing the target function and its arguments.
Call the start method on the Thread object to begin execution.
Optionally, call the join method to wait for the thread to complete before proceeding.
Example
The following example demonstrates how to create and start threads using the threading module. It runs a function print_name that prints a name along with some arguments. This example creates two threads, starts them using the start() method, and waits for them to complete using the join method.
Open Compiler
import threading
import time

defprint_name(name,*args):print(name,*args)

name ="Tutorialspoint..."# Create and start threads
thread1 = threading.Thread(target=print_name, args=(name,1))
thread2 = threading.Thread(target=print_name, args=(name,1,2))

thread1.start()
thread2.start()# Wait for threads to complete
thread1.join()
thread2.join()print("Threads are finished...exiting")
When the above code is executed, it produces the following result −
Tutorialspoint... 1
Tutorialspoint... 1 2
Threads are finished...exiting
Synchronizing Threads
The threading module provided with Python includes a simple-to-implement locking mechanism that allows you to synchronize threads. A new lock is created by calling the Lock() method, which returns the new lock.
The acquire(blocking) method of the new lock object is used to force threads to run synchronously. The optional blocking parameter enables you to control whether the thread waits to acquire the lock.
If blocking is set to 0, the thread returns immediately with a 0 value if the lock cannot be acquired and with a 1 if the lock was acquired. If blocking is set to 1, the thread blocks and wait for the lock to be released.
The release() method of the new lock object is used to release the lock when it is no longer required.
Example
Open Compiler
import threading
import time
classmyThread(threading.Thread):def__init__(self, threadID, name, counter):
threading.Thread.__init__(self)
self.threadID = threadID
self.name = name
self.counter = counter
defrun(self):print("Starting "+ self.name)# Get lock to synchronize threads
threadLock.acquire()
print_time(self.name, self.counter,3)# Free lock to release next thread
threadLock.release()defprint_time(threadName, delay, counter):while counter:
time.sleep(delay)print("%s: %s"%(threadName, time.ctime(time.time())))
counter -=1
threadLock = threading.Lock()
threads =[]# Create new threads
thread1 = myThread(1,"Thread-1",1)
thread2 = myThread(2,"Thread-2",2)# Start new Threads
thread1.start()
thread2.start()# Add threads to thread list
threads.append(thread1)
threads.append(thread2)# Wait for all threads to completefor t in threads:
t.join()print("Exiting Main Thread")</code></pre>
When the above code is executed, it produces the following result −
Starting Thread-1
Starting Thread-2
Thread-1: Thu Mar 21 09:11:28 2013
Thread-1: Thu Mar 21 09:11:29 2013
Thread-1: Thu Mar 21 09:11:30 2013
Thread-2: Thu Mar 21 09:11:32 2013
Thread-2: Thu Mar 21 09:11:34 2013
Thread-2: Thu Mar 21 09:11:36 2013
Exiting Main Thread
Multithreaded Priority Queue
The Queue module allows you to create a new queue object that can hold a specific number of items. There are following methods to control the Queue −
get() − The get() removes and returns an item from the queue.
put() − The put adds item to a queue.
qsize() − The qsize() returns the number of items that are currently in the queue.
empty() − The empty( ) returns True if queue is empty; otherwise, False.
full() − the full() returns True if queue is full; otherwise, False.
threadList =["Thread-1","Thread-2","Thread-3"]
nameList =["One","Two","Three","Four","Five"]
queueLock = threading.Lock()
workQueue = queue.Queue(10)
threads =[]
threadID =1# Create new threadsfor tName in threadList:
thread = myThread(threadID, tName, workQueue)
thread.start()
threads.append(thread)
threadID +=1# Fill the queue
queueLock.acquire()for word in nameList:
workQueue.put(word)
queueLock.release()# Wait for queue to emptywhilenot workQueue.empty():pass# Notify threads it's time to exit
exitFlag =1# Wait for all threads to completefor t in threads:
t.join()print("Exiting Main Thread")
When the above code is executed, it produces the following result −
Starting Thread-1
Starting Thread-2
Starting Thread-3
Thread-1 processing One
Thread-2 processing Two
Thread-3 processing Three
Thread-1 processing Four
Thread-2 processing Five
Exiting Thread-3
Exiting Thread-1
Exiting Thread-2
Exiting Main Thread
Built-in exceptions are pre-defined error classes in Python that handle errors and exceptional conditions in programs. They are derived from the base class “BaseException” and are part of the standard library.
Standard Built-in Exceptions in Python
Here is a list of Standard Exceptions available in Python −
Sr.No.
Exception Name & Description
1
ExceptionBase class for all exceptions
2
StopIterationRaised when the next() method of an iterator does not point to any object.
3
SystemExitRaised by the sys.exit() function.
4
StandardErrorBase class for all built-in exceptions except StopIteration and SystemExit.
5
ArithmeticErrorBase class for all errors that occur for numeric calculation.
6
OverflowErrorRaised when a calculation exceeds maximum limit for a numeric type.
7
FloatingPointErrorRaised when a floating point calculation fails.
8
ZeroDivisonErrorRaised when division or modulo by zero takes place for all numeric types.
9
AssertionErrorRaised in case of failure of the Assert statement.
10
AttributeErrorRaised in case of failure of attribute reference or assignment.
11
EOFErrorRaised when there is no input from either the raw_input() or input() function and the end of file is reached.
12
ImportErrorRaised when an import statement fails.
13
KeyboardInterruptRaised when the user interrupts program execution, usually by pressing Ctrl+C.
14
LookupErrorBase class for all lookup errors.
15
IndexErrorRaised when an index is not found in a sequence.
16
KeyErrorRaised when the specified key is not found in the dictionary.
17
NameErrorRaised when an identifier is not found in the local or global namespace.
18
UnboundLocalErrorRaised when trying to access a local variable in a function or method but no value has been assigned to it.
19
EnvironmentErrorBase class for all exceptions that occur outside the Python environment.
20
IOErrorRaised when an input/ output operation fails, such as the print statement or the open() function when trying to open a file that does not exist.
21
OSErrorRaised for operating system-related errors.
22
SyntaxErrorRaised when there is an error in Python syntax.
23
IndentationErrorRaised when indentation is not specified properly.
24
SystemErrorRaised when the interpreter finds an internal problem, but when this error is encountered the Python interpreter does not exit.
25
SystemExitRaised when Python interpreter is quit by using the sys.exit() function. If not handled in the code, causes the interpreter to exit.
26
TypeErrorRaised when an operation or function is attempted that is invalid for the specified data type.
27
ValueErrorRaised when the built-in function for a data type has the valid type of arguments, but the arguments have invalid values specified.
28
RuntimeErrorRaised when a generated error does not fall into any category.
29
NotImplementedErrorRaised when an abstract method that needs to be implemented in an inherited class is not actually implemented.
Here are some examples of standard exceptions −
IndexError
It is shown when trying to access item at invalid index.
Open Compiler
numbers=[10,20,30,40]for n inrange(5):print(numbers[n])
It will produce the following output −
10
20
30
40
Traceback (most recent call last):

   print (numbers[n])
IndexError: list index out of range
ModuleNotFoundError
This is displayed when module could not be found.
import notamodule
Traceback (most recent call last):import notamodule
ModuleNotFoundError: No module named 'notamodule'
This is encountered when object could not be found.
print(age)
Traceback (most recent call last):

   age
NameError: name 'age'isnot defined
ZeroDivisionError
It is shown when second operator in division is zero.
x=100/0
Traceback (most recent call last):

   x=100/0
ZeroDivisionError: division by zero
KeyboardInterrupt
When user hits the interrupt key normally Control-C during execution of program.
name=input('enter your name')
enter your name^c
Traceback (most recent call last):

   name=input('enter your name')
KeyboardInterrupt
Hierarchy of Built-in Exceptions
The exceptions in Python are organized in a hierarchical structure, with “BaseException” at the top. Here is a simplified hierarchy −
BaseException
SystemExit
KeyboardInterrupt
Exception
ArithmeticError
FloatingPointError
OverflowError
ZeroDivisionError
AttributeError
EOFError
ImportError
LookupError
IndexError
KeyError
MemoryError
NameError
UnboundLocalError
OSError
FileNotFoundError
TypeError
ValueError
—(Many others)—
Learn Python in-depth with real-world projects through our Python certification course. Enroll and become a certified expert to boost your career.
How to Use Built-in Exceptions
As we already know that built-in exceptions in Python are pre-defined classes that handle specific error conditions. Now, here is a detailed guide on how to use them effectively in your Python programs −
Handling Exceptions with try-except Blocks
The primary way to handle exceptions in Python is using “try-except” blocks. This allows you to catch and respond to exceptions that may occur during the execution of your code.
Example
In the following example, the code that may raise an exception is placed inside the “try” block. The “except” block catches the specified exception “ZeroDivisionError” and handles it
Open Compiler
try:
   result =1/0except ZeroDivisionError as e:print(f"Caught an exception: {e}")
Following is the output obtained −
Caught an exception: division by zero
Handling Multiple Exceptions
You can handle multiple exceptions by specifying them in a tuple within the “except” block as shown in the example below −
Open Compiler
try:
   result =int('abc')except(ValueError, TypeError)as e:print(f"Caught a ValueError or TypeError: {e}")
Output of the above code is as shown below −
Caught a ValueError or TypeError: invalid literal for int() with base 10: 'abc'
Using “else” and “finally” Blocks
The “else” block is executed if the code block in the “try” clause does not raise an exception −
Open Compiler
try:
   number =int(input("Enter a number: "))except ValueError as e:print(f"Invalid input: {e}")else:print(f"You entered: {number}")
Output of the above code varies as per the input given −
Enter a number: bn
Invalid input: invalid literal for int() with base 10: 'bn'
The “finally” block is always executed, regardless of whether an exception occurred or not. It’s typically used for clean-up actions, such as closing files or releasing resources −
try:file=open('example.txt','r')
   content =file.read()except FileNotFoundError as e:print(f"File not found: {e}")finally:file.close()print("File closed.")
Following is the output of the above code −
File closed.
Explicitly Raising Built-in Exceptions
In Python, you can raise built-in exceptions to indicate errors or exceptional conditions in your code. This allows you to handle specific error scenarios and provide informative error messages to users or developers debugging your application.
Syntax
Following is the basic syntax for raising built-in exception −
raise ExceptionClassName("Error message")
Example
In this example, the “divide” function attempts to divide two numbers “a” and “b”. If “b” is zero, it raises a “ZeroDivisionError” with a custom message −
Open Compiler
defdivide(a, b):if b ==0:raise ZeroDivisionError("Cannot divide by zero")return a / b

try:
   result = divide(10,0)except ZeroDivisionError as e:print(f"Error: {e}")