In Python, generics is a mechanism with which you to define functions, classes, or methods that can operate on multiple types while maintaining type safety. With the implementation of Generics enable it is possible to write reusable code that can be used with different data types. It ensures promoting code flexibility and type correctness.
Normally, in Python programming, you don’t need to declare a variable type. The type is determined dynamically by the value assigned to it. Python’s interpreter doesn’t perform type checks and hence it may raise runtime exceptions.
Python introduced generics with type hints in version 3.5, allowing you to specify the expected types of variables, function arguments, and return values. This feature helps in reducing runtime errors and improving code readability.
Generics extend the concept of type hints by introducing type variables, which represent generic types that can be replaced with specific types when using the generic function or class.
Defining a Generic Function
Let us have a look at the following example that defines a generic function −
from typing import List, TypeVar, Generic
T = TypeVar('T')defreverse(items: List[T])-> List[T]:return items[::-1]
Here, we define a generic function called ‘reverse’. The function takes a list (‘List[T]’) as an argument and returns a list of the same type. The type variable ‘T’ represents the generic type, which will be replaced with a specific type when the function is used.
Calling the Generic Function with Different Data Types
The function reverse() function is called with different data types −
Learn Python in-depth with real-world projects through our Python certification course. Enroll and become a certified expert to boost your career.
Defining a Generic Class
A generic type is typically declared by adding a list of type parameters after the class name. The following example uses generics with a generic class −
from typing import List, TypeVar, Generic
T = TypeVar('T')classBox(Generic[T]):def__init__(self, item: T):
  self.item = item   defget_item(self)-> T:return self.item
Let us create objects of the above generic classwithintandstrtype
box1 = Box(42)print(box1.get_item())

box2 = Box('Hello')print(box2.get_item())
In the world of Internet, different resources are identified by URLs (Uniform Resource Locators). Python’s standard library includes the urllib package, which has modules for working with URLs. It helps you parse URLs, fetch web content, and manage errors.
This tutorial introduces urllib basics to help you start using it. Improve your skills in web scraping, fetching data, and managing URLs with Python using urllib.
The urllib package contains the following modules for processing URLs −
urllib.parse module is used for parsing a URL into its parts.
urllib.request module contains functions for opening and reading URLs
urllib.error module carries definitions of the exceptions raised by urllib.request
urllib.robotparser module parses the robots.txt files
The urllib.parse Module
This module serves as a standard interface to obtain various parts from a URL string. The module contains following functions −
urlparse(urlstring)
Parse a URL into six components, returning a 6-item named tuple. Each tuple item is a string corresponding to following attributes −
This function Parse a query string given as a string argument. Data is returned as a dictionary. The dictionary keys are the unique query variable names and the values are lists of values for each name.
To further fetch the query parameters from the query string into a dictionary, use parse_qs() function of the query attribute of ParseResult object as follows −
This is similar to urlparse(), but does not split the params from the URL. This should generally be used instead of urlparse() if the more recent URL syntax allowing parameters to be applied to each segment of the path portion of the URL is wanted.
urlunparse(parts)
This function is the opposite of urlparse() function. It constructs a URL from a tuple as returned by urlparse(). The parts argument can be any six-item iterable. This returns an equivalent URL.
Example
Open Compiler
from urllib.parse import urlunparse

lst =['https','example.com','/employees/name/','','salary>=25000','']
new_url = urlunparse(lst)print("URL:", new_url)
Combine the elements of a tuple as returned by urlsplit() into a complete URL as a string. The parts argument can be any five-item iterable.
The urllib.request Module
This module offers the functions and classes for handling the URL’s opening and reading operations by using the urlopen() function.
urlopen() function
This function opens the given URL, which can be either a string or a Request object. The optional timeout parameter specifies a timeout in seconds for blocking operations This actually only works for HTTP, HTTPS and FTP connections.
This function always returns an object which can work as a context manager and has the properties url, headers, and status. For HTTP and HTTPS URLs, this function returns a http.client.HTTPResponse object slightly modified.
Example
The following code uses urlopen() function to read the binary data from an image file, and writes it to local file. You can open the image file on your computer using any image viewer.
from urllib.request import urlopen
obj = urlopen("https://www.tutorialspoint.com/images/logo.png")
data = obj.read()
img =open("img.jpg","wb")
img.write(data)
img.close()
It will produce the following output −
Learn Python in-depth with real-world projects through our Python certification course. Enroll and become a certified expert to boost your career.
The Request Object
The urllib.request module includes Request class. This class is an abstraction of a URL request. The constructor requires a mandatory string argument a valid URL.
data − An object specifying additional data to send to the server. This parameter can only be used with HTTP requests. Data may be bytes, file-like objects, and iterables of bytes-like objects.
headers − Should be a dictionary of headers and their associated values.
origin_req_host − Should be the request-host of the origin transaction
method − should be a string that indicates the HTTP request method. One of GET, POST, PUT, DELETE and other HTTP verbs. Default is GET.
Example
from urllib.request import Request
obj = Request("https://www.tutorialspoint.com/")
This Request object can now be used as an argument to urlopen() method.
Following exceptions are defined in urllib.error module −
URLError
URLError is raised because there is no network connection (no route to the specified server), or the specified server doesn’t exist. In this case, the exception raised will have a ‘reason’ attribute.
Example
from urllib.request import Request, urlopen
import urllib.error as err

obj = Request("http://www.nosuchserver.com")try:
   urlopen(obj)except err.URLError as e:print(e)
It will produce the following output −
HTTP Error 403: Forbidden
HTTPError
Every time the server sends a HTTP response it is associated with a numeric “status code”. It code indicates why the server is unable to fulfill the request. The default handlers will handle some of these responses for you. For those it can’t handle, urlopen() function raises an HTTPError. Typical examples of HTTPErrors are ‘404’ (page not found), ‘403’ (request forbidden), and ‘401’ (authentication required).
Example
from urllib.request import Request, urlopen
import urllib.error as err

obj = Request("http://www.python.org/fish.html")try:
   urlopen(obj)except err.HTTPError as e:print(e.code)
Socket programming is a technique in which we communicate between two nodes connected in a network where the server node listens to the incoming requests from the client nodes.
In Python, the socket module is used for socket programming. The socket module in the standard library included functionality required for communication between server and client at hardware level.
This module provides access to the BSD socket interface. It is available on all operating systems such as Linux, Windows, MacOS.
What are Sockets?
Sockets are the endpoints of a bidirectional communications channel. Sockets may communicate within a process, between processes on the same machine, or between processes on different continents.
A socket is identified by the combination of IP address and the port number. It should be properly configured at both ends to begin communication.
Sockets may be implemented over a number of different channel types: Unix domain sockets, TCP, UDP, and so on. The socket library provides specific classes for handling the common transports as well as a generic interface for handling the rest.
The term socket programming implies programmatically setting up sockets to be able to send and receive data.
There are two types of communication protocols −
connection-oriented protocol
connection-less protocol
TCP or Transmission Control Protocol is a connection-oriented protocol. The data is transmitted in packets by the server, and assembled in the same order of transmission by the receiver. Since the sockets at either end of the communication need to be set before starting, this method is more reliable.
UDP or User Datagram Protocol is connectionless. The method is not reliable because the sockets does not require establishing any connection and termination process for transferring the data.
Learn Python in-depth with real-world projects through our Python certification course. Enroll and become a certified expert to boost your career.
Python socket Module
The socket module is used for creating and managing socket programming for the connected nodes in a network. The socket module provides a socket class. You need to create a socket using the socket.socket() constructor.
An object of the socket class represents the pair of host name and the port numbers.
Syntax
The following is the syntax of socket.socket() constructor –
family − AF_INET by default. Other values – AF_INET6 (eight groups of four hexadecimal digits), AF_UNIX, AF_CAN (Controller Area Network) or AF_RDS (Reliable Datagram Sockets).
socket_type − should be SOCK_STREAM (the default), SOCK_DGRAM, SOCK_RAW or perhaps one of the other SOCK_ constants.
protocol − number is usually zero and may be omitted.
Return Type
This method returns a socket object.
Once you have the socket object, then you can use the required methods to create your client or server program.
Server Socket Methods
The socket instantiated on server is called server socket. Following methods are available to the socket object on the server −
bind() method − This method binds the socket to specified IP address and port number.
listen() method − This method starts server and runs into a listen loop looking for connection request from client.
accept() method − When connection request is intercepted by server, this method accepts it and identifies the client socket with its address.
To create a socket on a server, use the following snippet −
By default, the server is bound to local machine’s IP address ‘localhost’ listening at arbitrary empty port number.
Client Socket Methods
Similar socket is set up on the client end. It mainly sends connection request to server socket listening at its IP address and port number
connect() method
This method takes a two-item tuple object as argument. The two items are IP address and port number of the server.
obj=socket.socket()
obj.connect((host,port))
Once the connection is accepted by the server, both the socket objects can send and/or receive data.
send() method
The server sends data to client by using the address it has intercepted.
client.send(bytes)
Client socket sends data to socket it has established connection with.
sendall() method
similar to send(). However, unlike send(),this method continues to send data from bytes until either all data has been sent or an error occurs. None is returned on success.
sendto() method
This method is to be used in case of UDP protocol only.
recv() method
This method is used to retrieve data sent to the client. In case of server, it uses the remote socket whose request has been accepted.
client.recv(bytes)
recvfrom() method
This method is used in case of UDP protocol.
Python – Socket Server
To write Internet servers, we use the socket function available in socket module to create a socket object. A socket object is then used to call other functions to setup a socket server.
Now call the bind(hostname, port) function to specify a port for your service on the given host.
Next, call the accept method of the returned object. This method waits until a client connects to the port you specified, and then returns a connection object that represents the connection to that client.
Example of Server Socket
import socket
host ="127.0.0.1"
port =5001
server = socket.socket()
server.bind((host,port))
server.listen()
conn, addr = server.accept()print("Connection from: "+str(addr))whileTrue:
   data = conn.recv(1024).decode()ifnot data:break
   data =str(data).upper()print(" from client: "+str(data))
   data =input("type message: ")
   conn.send(data.encode())
conn.close()
Python – Socket Client
Let us write a very simple client program, which opens a connection to a given port 5001 and a given localhost. It is very simple to create a socket client using the Python’s socket module function.
The socket.connect(hosname, port) opens a TCP connection to hostname on the port. Once you have a socket open, you can read from it like any IO object. When done, remember to close it, as you would close a file.
Example of Client Socket
The following code is a very simple client that connects to a given host and port, reads any available data from the socket, and then exits when ‘q’ is entered.
import socket
host ='127.0.0.1'
port =5001
obj = socket.socket()
obj.connect((host,port))
message =input("type message: ")while message !='q':
   obj.send(message.encode())
   data = obj.recv(1024).decode()print('Received from server: '+ data)
   message =input("type message: ")
obj.close()
Run Server code first. It starts listening.
Then start client code. It sends request.
Request accepted. Client address identified
Type some text and press Enter.
Data received is printed. Send data to client.
Data from server is received.
Loop terminates when ‘q’ is input.
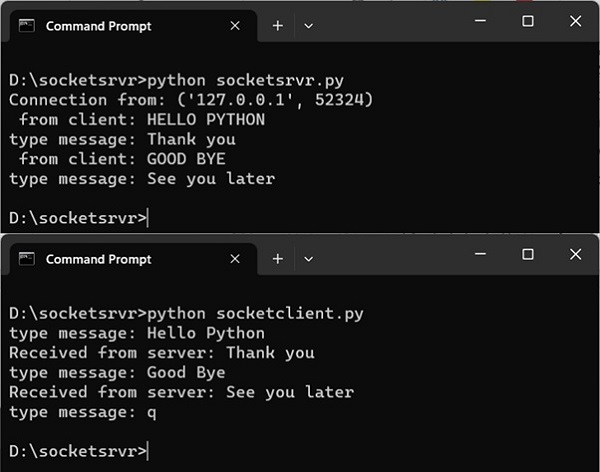
Server-client interaction is shown below −
We have implemented client-server communication with socket module on the local machine. To put server and client codes on two different machines on a network, we need to find the IP address of the server machine.
On Windows, you can find the IP address by running ipconfig command. The ifconfig command is the equivalent command on Ubuntu.
Change host string in both the server and client codes with IPv4 Address value and run them as before.
Python File Transfer with Socket Module
The following program demonstrates how socket communication can be used to transfer a file from server to the client
Server Code
The code for establishing connection is same as before. After the connection request is accepted, a file on server is opened in binary mode for reading, and bytes are successively read and sent to the client stream till end of file is reached.
import socket
host ="127.0.0.1"
port =5001
server = socket.socket()
server.bind((host, port))
server.listen()
conn, addr = server.accept()
data = conn.recv(1024).decode()
filename='test.txt'
f =open(filename,'rb')whileTrue:
   l = f.read(1024)ifnot l:break
   conn.send(l)print('Sent ',repr(l))
f.close()print('File transferred')
conn.close()
Client Code
On the client side, a new file is opened in wb mode. The stream of data received from server is written to the file. As the stream ends, the output file is closed. A new file will be created on the client machine.
import socket
s = socket.socket()
host ="127.0.0.1"
port =5001
s.connect((host, port))
s.send("Hello server!".encode())withopen('recv.txt','wb')as f:whileTrue:print('receiving data...')
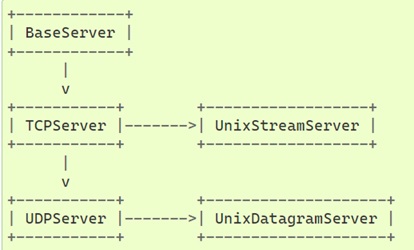
The socketserver module in Python’s standard library is a framework for simplifying task of writing network servers. There are following classes in module, which represent synchronous servers −
These classes work with corresponding RequestHandler classes for implementing the service. BaseServer is the superclass of all Server objects in the module.
TCPServer class uses the internet TCP protocol, to provide continuous streams of data between the client and server. The constructor automatically attempts to invoke server_bind() and server_activate(). The other parameters are passed to the BaseServer base class.
You must also create a subclass of StreamRequestHandler class. IT provides self.rfile and self.wfile attributes to read or write to get the request data or return data to the client.
UDPServer and DatagramRequestHandler − These classes are meant to be used for UDP protocol.
DatagramRequestHandler and UnixDatagramServer − These classes use Unix domain sockets; they’re not available on non-Unix platforms.
Server Code
You must write a RequestHandler class. It is instantiated once per connection to the server, and must override the handle() method to implement communication to the client.
On the server's assigned port number, an object of TCPServer class calls the forever() method to put the server in the listening mode and accepts incoming requests from clients.
if __name__ =="__main__":
HOST, PORT ="localhost",9999with socketserver.TCPServer((HOST, PORT), MyTCPHandler)as server:
server.serve_forever()</code></pre>
Client Code
When working with socketserver, the client code is more or less similar with the socket client application.
import socket
import sys
HOST, PORT ="localhost",9999whileTrue:with socket.socket(socket.AF_INET, socket.SOCK_STREAM)as sock:# Connect to server and send data
sock.connect((HOST, PORT))
data =input("enter text .. .")
sock.sendall(bytes(data +"\n","utf-8"))# Receive data from the server and shut down
received =str(sock.recv(1024),"utf-8")print("Sent: {}".format(data))print("Received: {}".format(received))</code></pre>
Run the server code in one command prompt terminal. Open multiple terminals for client instances. You can simulate a concurrent communication between the server and more than one clients.
Server
Client-1
Client-2
D:\socketsrvr>python myserver.py127.0.0.1:54518 wrote:from client-1enter text ..hello127.0.0.1:54522 wrote:how are youenter text ..fine127.0.0.1:54523 wrote:from client-2enter text ..hi client-2127.0.0.1:54526 wrote:good byeenter text ..bye bye127.0.0.1:54530 wrote:thanksenter text ..bye client-2
D:\socketsrvr>python myclient.pyenter text .. .from client-1Sent:from client-1Received: helloenter text .. .how are youSent:how are youReceived: fineenter text .. .good byeSent: good byeReceived: bye byeenter text .. .
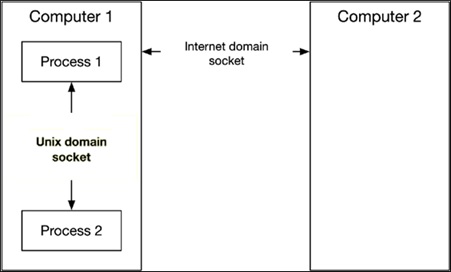
The threading module in Python’s standard library is capable of handling multiple threads and their interaction within a single process. Communication between two processes running on the same machine is handled by Unix domain sockets, whereas for the processes running on different machines connected with TCP (Transmission control protocol), Internet domain sockets are used.
Python’s standard library consists of various built-in modules that support interprocess communication and networking. Python provides two levels of access to the network services. At a low level, you can access the basic socket support in the underlying operating system, which allows you to implement clients and servers for both connection-oriented and connectionless protocols.
Python also has libraries that provide higher-level access to specific application-level network protocols, such as FTP, HTTP, and so on.
Interrupting a thread in Python is a common requirement in multi-threaded programming, where a thread’s execution needs to be terminated under certain conditions. In a multi-threaded program, a task in a new thread, may be required to be stopped. This may be for many reasons, such as − task completion, application shutdown, or other external conditions.
In Python, interrupting threads can be achieved using threading.Event or by setting a termination flag within the thread itself. These methods allow you to interrupt the threads effectively, ensuring that resources are properly released and threads exit cleanly.
Thread Interruption using Event Object
One of the straightforward ways to interrupt a thread is by using the threading.Event class. This class allows one thread to signal to another that a particular event has occurred. Here’s how you can implement thread interruption using threading.Event
Example
In this example, we have a MyThread class. Its object starts executing the run() method. The main thread sleeps for a certain period and then sets an event. Till the event is detected, loop in the run() method continues. As soon as the event is detected, the loop terminates.
Open Compiler
from time import sleep
from threading import Thread
from threading import Event
classMyThread(Thread):def__init__(self, event):super(MyThread, self).__init__()
Another approach to interrupting threads is by using a flag that the thread checks at regular intervals. This method involves setting a flag attribute in the thread object and regularly checking its value in the thread’s execution loop.
Example
This example demonstrates how to use a flag to control and stop a running thread in Python multithreaded program.
Open Compiler
import threading
import time
deffoo():
t = threading.current_thread()whilegetattr(t,"do_run",True):print("working on a task")
time.sleep(1)print("Stopping the Thread after some time.")# Create a thread
t = threading.Thread(target=foo)
t.start()# Allow the thread to run for 5 seconds
time.sleep(5)# Set the termination flag to stop the thread
t.do_run =False
When you execute this code, it will produce the following output −
working on a task
working on a task
working on a task
working on a task
working on a task
Stopping the Thread after some time.
A deadlock may be described as a concurrency failure mode. It is a situation in a program where one or more threads wait for a condition that never occurs. As a result, the threads are unable to progress and the program is stuck or frozen and must be terminated manually.
Deadlock situation may arise in many ways in your concurrent program. Deadlocks are never not developed intentionally, instead, they are in fact a side effect or bug in the code.
Common causes of thread deadlocks are listed below −
A thread that attempts to acquire the same mutex lock twice.
Threads that wait on each other (e.g. A waits on B, B waits on A).
When a thread that fails to release a resource such as lock, semaphore, condition, event, etc.
Threads that acquire mutex locks in different orders (e.g. fail to perform lock ordering).
How to Avoid Deadlocks in Python Threads
When multiple threads in a multi-threaded application attempt to access the same resource, such as performing read/write operations on the same file, it can lead to data inconsistency. Therefore, it is important to synchronize concurrent access to resources by using locking mechanisms.
The Python threading module provides a simple-to-implement locking mechanism to synchronize threads. You can create a new lock object by calling the Lock() class, which initializes the lock in an unlocked state.
Locking Mechanism with the Lock Object
An object of the Lock class has two possible states − locked or unlocked, initially in unlocked state when first created. A lock doesn’t belong to any particular thread.
The Lock class defines acquire() and release() methods.
The acquire() Method
The acquire() method of the Lock class changes the lock’s state from unlocked to locked. It returns immediately unless the optional blocking argument is set to True, in which case it waits until the lock is acquired.
Here is the Syntax of this method −
Lock.acquire(blocking, timeout)
Where,
blocking − If set to False, it means do not block. If a call with blocking set to True would block, return False immediately; otherwise, set the lock to locked and return True.
timeout − Specifies a timeout period for acquiring the lock.
The return value of this method is True if the lock is acquired successfully; False if not.
The release() Method
When the state is locked, this method in another thread changes it to unlocked. This can be called from any thread, not only the thread which has acquired the lock
Following is the Syntax of the release() method −
Lock.release()
The release() method should only be called in the locked state. If an attempt is made to release an unlocked lock, a RuntimeError will be raised.
When the lock is locked, reset it to unlocked, and return. If any other threads are blocked waiting for the lock to become unlocked, allow exactly one of them to proceed. There is no return value of this method.
Example
In the following program, two threads try to call the synchronized() method. One of them acquires the lock and gains the access while the other waits. When the run() method is completed for the first thread, the lock is released and the synchronized method is available for second thread.
When both the threads join, the program comes to an end.
from threading import Thread, Lock
import time

lock=Lock()
threads=[]classmyThread(Thread):def__init__(self,name):
  Thread.__init__(self)
  self.name=name   defrun(self):
  lock.acquire()
  synchronized(self.name)
  lock.release()defsynchronized(threadName):print("{} has acquired lock and is running synchronized method".format(threadName))   counter=5while counter:print('**', end='')
  time.sleep(2)
  counter=counter-1print('\nlock released for', threadName)
t1=myThread('Thread1')
t2=myThread('Thread2')

t1.start()
threads.append(t1)

t2.start()
threads.append(t2)for t in threads:
   t.join()print("end of main thread")
It will produce the following output −
Thread1 has acquired lock and is running synchronized method
**********
lock released for Thread1
Thread2 has acquired lock and is running synchronized method
**********
lock released for Thread2
end of main thread
Learn Python in-depth with real-world projects through our Python certification course. Enroll and become a certified expert to boost your career.
Semaphore Object for Synchronization
In addition to locks, Python threading module supports semaphores, which offering another synchronization technique. It is one of the oldest synchronization techniques invented by a well-known computer scientist, Edsger W. Dijkstra.
The basic concept of semaphore is to use an internal counter which is decremented by each acquire() call and incremented by each release() call. The counter can never go below zero; when acquire() finds that it is zero, it blocks, waiting until some other thread calls release().
The Semaphore class in threading module defines acquire() and release() methods.
The acquire() Method
If the internal counter is larger than zero on entry, decrement it by one and return True immediately.
If the internal counter is zero on entry, block until awoken by a call to release(). Once awoken (and the counter is greater than 0), decrement the counter by 1 and return True. Exactly one thread will be awoken by each call to release(). The order in which threads awake is arbitrary.
If blocking parameter is set to False, do not block. If a call without an argument would block, return False immediately; otherwise, do the same thing as when called without arguments, and return True.
The release() Method
Release a semaphore, incrementing the internal counter by 1. When it was zero on entry and other threads are waiting for it to become larger than zero again, wake up n of those threads.
Example
This example demonstrates how to use a Semaphore object in Python to control access to a shared resource among multiple threads, for avoiding deadlock in Python’s multi-threaded program.
Open Compiler
from threading import*import time
# creating thread instance where count = 3
lock = Semaphore(4)# creating instancedefsynchronized(name):# calling acquire method
lock.acquire()for n inrange(3):print('Hello! ', end ='')
Inter-Thread Communication refers to the process of enabling communication and synchronization between threads within a Python multi-threaded program.
Generally, threads in Python share the same memory space within a process, which allows them to exchange data and coordinate their activities through shared variables, objects, and specialized synchronization mechanisms provided by the threading module.
To facilitate inter-thread communication, the threading module provides various synchronization primitives like, Locks, Events, Conditions, and Semaphores objects. In this tutorial you will learn how to use the Event and Condition object for providing the communication between threads in a multi-threaded program.
The Event Object
An Event object manages the state of an internal flag so that threads can wait or set. Event object provides methods to control the state of this flag, allowing threads to synchronize their activities based on shared conditions.
The flag is initially false and becomes true with the set() method and reset to false with the clear() method. The wait() method blocks until the flag is true.
Following are the key methods of the Event object −
is_set(): Return True if and only if the internal flag is true.
set(): Set the internal flag to true. All threads waiting for it to become true are awakened. Threads that call wait() once the flag is true will not block at all.
clear(): Reset the internal flag to false. Subsequently, threads calling wait() will block until set() is called to set the internal flag to true again.
wait(timeout=None): Block until the internal flag is true. If the internal flag is true on entry, return immediately. Otherwise, block until another thread calls set() to set the flag to true, or until the optional timeout occurs. When the timeout argument is present and not None, it should be a floating point number specifying a timeout for the operation in seconds.
Example
The following code attempts to simulate the traffic flow being controlled by the state of traffic signal either GREEN or RED.
There are two threads in the program, targeting two different functions. The signal_state() function periodically sets and resets the event indicating change of signal from GREEN to RED.
The traffic_flow() function waits for the event to be set, and runs a loop till it remains set.
Open Compiler
from threading import Event, Thread
import time

terminate =Falsedefsignal_state():global terminate
whilenot terminate:
    time.sleep(0.5)print("Traffic Police Giving GREEN Signal")
    event.set()
    time.sleep(1)print("Traffic Police Giving RED Signal")
    event.clear()deftraffic_flow():global terminate
num =0while num <10andnot terminate:print("Waiting for GREEN Signal")
    event.wait()print("GREEN Signal ... Traffic can move")while event.is_set()andnot terminate:
        num +=1print("Vehicle No:", num," Crossing the Signal")
        time.sleep(1)print("RED Signal ... Traffic has to wait")
event = Event()
t1 = Thread(target=signal_state)
t2 = Thread(target=traffic_flow)
t1.start()
t2.start()# Terminate the threads after some time
time.sleep(5)
terminate =True# join all threads to complete
t1.join()
t2.join()print("Exiting Main Thread")
Output
On executing the above code you will get the following output −
Waiting for GREEN Signal
Traffic Police Giving GREEN Signal
GREEN Signal ... Traffic can move
Vehicle No: 1  Crossing the Signal
Traffic Police Giving RED Signal
RED Signal ... Traffic has to wait
Waiting for GREEN Signal
Traffic Police Giving GREEN Signal
GREEN Signal ... Traffic can move
Vehicle No: 2  Crossing the Signal
Vehicle No: 3  Crossing the Signal
Traffic Police Giving RED Signal
Traffic Police Giving GREEN Signal
Vehicle No: 4  Crossing the Signal
Traffic Police Giving RED Signal
RED Signal ... Traffic has to wait
Traffic Police Giving GREEN Signal
Traffic Police Giving RED Signal
Exiting Main Thread
The Condition Object
The Condition object in Python’s threading module provides a more advanced synchronization mechanism. It allows threads to wait for a notification from another thread before proceeding. The Condition object are always associated with a lock and provide mechanisms for signaling between threads.
Following is the syntax of the threading.Condition() class −
threading.Condition(lock=None)
Below are the key methods of the Condition object −
acquire(*args): Acquire the underlying lock. This method calls the corresponding method on the underlying lock; the return value is whatever that method returns.
release(): Release the underlying lock. This method calls the corresponding method on the underlying lock; there is no return value.
wait(timeout=None): This method releases the underlying lock, and then blocks until it is awakened by a notify() or notify_all() call for the same condition variable in another thread, or until the optional timeout occurs. Once awakened or timed out, it re-acquires the lock and returns.
wait_for(predicate, timeout=None): This utility method may call wait() repeatedly until the predicate is satisfied, or until a timeout occurs. The return value is the last return value of the predicate and will evaluate to False if the method timed out.
notify(n=1): This method wakes up at most n of the threads waiting for the condition variable; it is a no-op if no threads are waiting.
notify_all(): Wake up all threads waiting on this condition. This method acts like notify(), but wakes up all waiting threads instead of one. If the calling thread has not acquired the lock when this method is called, a RuntimeError is raised.
Example
This example demonstrates a simple form of inter-thread communication using the Condition object of the Python’s threading module. Here thread_a and thread_b are communicated using a Condition object, the thread_a waits until it receives a notification from thread_b. the thread_b sleeps for 2 seconds before notifying thread_a and then finishes.
Open Compiler
from threading import Condition, Thread
import time
c = Condition()defthread_a():print("Thread A started")with c:print("Thread A waiting for permission...")
c.wait()print("Thread A got permission!")print("Thread A finished")defthread_b():print("Thread B started")with c:
time.sleep(2)print("Notifying Thread A...")
c.notify()print("Thread B finished")
On executing the above code you will get the following output −
Thread A started
Thread A waiting for permission...
Thread B started
Notifying Thread A...
Thread B finished
Thread A got permission!
Thread A finished
Example
Here is another code demonstrating how the Condition object is used for providing the communication between threads. In this, the thread t2 runs the taskB() function, and the thread t1 runs the taskA() function. The t1 thread acquires the condition and notifies it.
By that time, the t2 thread is in a waiting state. After the condition is released, the waiting thread proceeds to consume the random number generated by the notifying function.
Open Compiler
from threading import Condition, Thread
import time
import random
numbers =[]deftaskA(c):for _ inrange(5):with c:
num = random.randint(1,10)print("Generated random number:", num)
numbers.append(num)print("Notification issued")
c.notify()
time.sleep(0.3)deftaskB(c):for i inrange(5):with c:print("waiting for update")whilenot numbers:
c.wait()print("Obtained random number", numbers.pop())
time.sleep(0.3)
When you execute this code, it will produce the following output −
waiting for update
Generated random number: 2
Notification issued
Obtained random number 2
Generated random number: 5
Notification issued
waiting for update
Obtained random number 5
Generated random number: 1
Notification issued
waiting for update
Obtained random number 1
Generated random number: 9
Notification issued
waiting for update
Obtained random number 9
Generated random number: 2
Notification issued
waiting for update
Obtained random number 2
Done
In Python, when multiple threads are working concurrently with shared resources, it’s important to synchronize their access to maintain data integrity and program correctness. Synchronizing threads in python can be achieved using various synchronization primitives provided by the threading module, such as locks, conditions, semaphores, and barriers to control access to shared resources and coordinate the execution of multiple threads.
In this tutorial, we’ll learn about various synchronization primitives provided by Python’s threading module.
Thread Synchronization using Locks
The lock object in the Python’s threading module provide the simplest synchronization primitive. They allow threads to acquire and release locks around critical sections of code, ensuring that only one thread can execute the protected code at a time.
A new lock is created by calling the Lock() method, which returns a lock object. The lock can be acquired using the acquire(blocking) method, which force the threads to run synchronously. The optional blocking parameter enables you to control whether the thread waits to acquire the lock and released using the release() method.
Example
The following example demonstrates how to use locks (the threading.Lock() method) to synchronize threads in Python, ensuring that multiple threads access shared resources safely and correctly.
Open Compiler
import threading

counter =10defincrement(theLock, N):global counter
   for i inrange(N):
  theLock.acquire()
  counter +=1
  theLock.release()
lock = threading.Lock()
t1 = threading.Thread(target=increment, args=[lock,2])
t2 = threading.Thread(target=increment, args=[lock,10])
t3 = threading.Thread(target=increment, args=[lock,4])

t1.start()
t2.start()
t3.start()# Wait for all threads to completefor thread in(t1, t2, t3):
   thread.join()print("All threads have completed")print("The Final Counter Value:", counter)
Output
When the above code is executed, it produces the following output −
All threads have completed
The Final Counter Value: 26
Condition Objects for Synchronizing Python Threads
Condition variables enable threads to wait until notified by another thread. They are useful for providing communication between the threads. The wait() method is used to block a thread until it is notified by another thread through notify() or notify_all().
Example
This example demonstrates how Condition objects can synchronize threads using the notify() and wait() methods.
Open Compiler
import threading
counter =0# Consumer functiondefconsumer(cv):global counter
with cv:print("Consumer is waiting")
cv.wait()# Wait until notified by incrementprint("Consumer has been notified. Current Counter value:", counter)# increment functiondefincrement(cv, N):global counter
with cv:print("increment is producing items")for i inrange(1, N +1):
counter += i # Increment counter by i# Notify the consumer
cv.notify()print("Increment has finished")# Create a Condition object
On executing the above program, it will produce the following output −
Consumer is waiting
increment is producing items
Increment has finished
Consumer has been notified. Current Counter value: 15
The Final Counter Value: 15
Learn Python in-depth with real-world projects through our Python certification course. Enroll and become a certified expert to boost your career.
Synchronizing threads using the join() Method
The join() method in Python’s threading module is used to wait until all threads have completed their execution. This is a straightforward way to synchronize the main thread with the completion of other threads.
Example
This demonstrates synchronization of threads using the join() method to ensure that the main thread waits for all started threads to complete their work before proceeding.
Open Compiler
import threading
import time
classMyThread(threading.Thread):def__init__(self, threadID, name, counter):
threading.Thread.__init__(self)
self.threadID = threadID
self.name = name
self.counter = counter
threads =[]# Create new threads
thread1 = MyThread(1,"Thread-1",1)
thread2 = MyThread(2,"Thread-2",2)# Start the new Threads
thread1.start()
thread2.start()# Join the threads
thread1.join()
thread2.join()print("Exiting Main Thread")
Output
On executing the above program, it will produce the following output −
In addition to the above synchronization primitives, Python’s threading module offers: −
RLocks (Reentrant Locks): A variant of locks that allow a thread to acquire the same lock multiple times before releasing it, useful in recursive functions or nested function calls.
Semaphores:Similar to locks but with a counter. Threads can acquire the semaphore up to a certain limit defined during initialization. Semaphores are useful for limiting access to resources with a fixed capacity.
Barriers: Allows a fixed number of threads to synchronize at a barrier point and continue executing only when all threads have reached that point. Barriers are useful for coordinating a group of threads that must all complete a certain phase of execution before any of them can proceed further.
Daemon threads in Python are useful for running background tasks that are not critical to the program’s operation. They allow you to run tasks in the background without worrying about keeping track of them.
Python provides two types of threads: non-daemon and daemon threads. By default, threads are non-daemon threads. This tutorial provides a detailed explanation with relevant examples about daemon threads in Python programming.
Overview of Daemon Threads
Sometimes, it is necessary to execute a task in the background. A special type of thread is used for background tasks, called a daemon thread. In other words, daemon threads execute tasks in the background. These threads handle non-critical tasks that may be useful to the application but do not hamper it if they fail or are canceled mid-operation.
Also, a daemon thread will not have control over when it is terminated. The program will terminate once all non-daemon threads finish, even if there are daemon threads still running at that point of time.
Difference Between Daemon & Non-Daemon Threads
Daemon
Non-daemon
A process will exit if only daemon threads are running (or if no threads are running).
A process will not exit if at least one non-daemon thread is running.
Daemon threads are used for background tasks.
Non-daemon threads are used for critical tasks.
Daemon threads are terminated abruptly.
Non-daemon threads run to completion.
Daemon threads can perform tasks such as −
Create a file that stores Log information in the background.
Perform web scraping in the background.
Save the data automatically into a database in the background.
Creating a Daemon Thread in Python
To create a daemon thread, you need to set the daemon property to True of the Thread constructor.
t1=threading.Thread(daemon=True)
By default the daemon property is set to None, If you change it to not None, daemon explicitly sets whether the thread is daemonic.
Example
Take a look at the following example to create a daemon thread and check whether the thread daemonic or not using the daemon attribute.
Open Compiler
import threading
from time import sleep

# function to be executed in a new threaddefrun():# get the current thread
   thread = threading.current_thread()# is it a daemon thread?print(f'Daemon thread: {thread.daemon}')# Create a new thread and set it as daemon
thread = threading.Thread(target=run, daemon=True)# start the thread
thread.start()print('Is Main Thread is Daemon thread:', threading.current_thread().daemon)# Block for a short time to allow the daemon thread to run
sleep(0.5)
It will produce the following output −
Daemon thread: True
Is Main Thread is Daemon thread: False
If a thread object is created in the main thread without any parameters, then the created thread will be a non-daemon thread because the main thread is not a daemon thread. Therefore, all threads created in the main thread default to non-daemon. However, we can change the daemon property to True by using the Thread.daemon attribute before starting the thread, nothing but before calling the start() method.
Example
Here is an example −
Open Compiler
import threading
from time import sleep

# function to be executed in a new threaddefrun():# get the current thread
   thread = threading.current_thread()# is it a daemon thread?print(f'Daemon thread: {thread.daemon}')# Create a new thread
thread = threading.Thread(target=run)# Using the daemon property set the thread as daemon before starting the thread
thread.daemon =True# start the thread
thread.start()print('Is Main Thread is Daemon thread:', threading.current_thread().daemon)# Block for a short time to allow the daemon thread to run
sleep(0.5)
On executing the above program, we will get the following output −
Daemon thread: True
Is Main Thread is Daemon thread: False
Learn Python in-depth with real-world projects through our Python certification course. Enroll and become a certified expert to boost your career.
Managing the Daemon Thread Attribute
If you attempt to set the daemon status of a thread after starting it, then a RuntimeError will be raised.
Example
Here is another example that demonstrates the getting the RuntimeError when you try to set the daemon status of a thread after starting it.
Open Compiler
from time import sleep
from threading import current_thread
from threading import Thread

# function to be executed in a new threaddefrun():# get the current thread
   thread = current_thread()# is it a daemon thread?print(f'Daemon thread: {thread.daemon}')
   thread.daemon =True# create a new thread
thread = Thread(target=run)# start the new thread
thread.start()# block for a 0.5 sec for daemon thread to run
sleep(0.5)
In Python, currently thread priority is not directly supported by the threading module. unlike Java, Python does not support thread priorities, thread groups, or certain thread control mechanisms like destroying, stopping, suspending, resuming, or interrupting threads.
Even thought Python threads are designed simple and is loosely based on Java’s threading model. This is because of Python’s Global Interpreter Lock (GIL), which manages Python threads.
However, you can simulate priority-based behavior using techniques such as sleep durations, custom scheduling logic within threads or using the additional module which manages task priorities.
Setting the Thread Priority Using Sleep()
You can simulate thread priority by introducing delays or using other mechanisms to control the execution order of threads. One common approach to simulate thread priority is by adjusting the sleep duration of your threads.
Threads with a lower priority sleep longer, and threads with a high priority sleep shorter.
Example
Here’s a simple example to demonstrate how to customize the thread priorities using the delays in Python threads. In this example, Thread-2 completes before Thread-1 because it has a lower priority value, resulting in a shorter sleep time.
Open Compiler
import threading
import time
classDummyThread(threading.Thread):def__init__(self, name, priority):
threading.Thread.__init__(self)
self.name = name
self.priority = priority
defrun(self):
name = self.name
time.sleep(1.0* self.priority)print(f"{name} thread with priority {self.priority} is running")# Creating threads with different priorities
t1 = DummyThread(name='Thread-1', priority=4)
t2 = DummyThread(name='Thread-2', priority=1)# Starting the threads
t1.start()
t2.start()# Waiting for both threads to complete
t1.join()
t2.join()print('All Threads are executed')
Output
On executing the above program, you will get the following results −
Thread-2 thread with priority 1 is running
Thread-1 thread with priority 4 is running
All Threads are executed
Adjusting Python Thread Priority on Windows
On Windows Operating system you can manipulate the thread priority using the ctypes module, This is one of the Python’s standard module used for interacting with the Windows API.
Example
This example demonstrates how to manually set the priority of threads in Python on a Windows system using the ctypes module.
import threading
import ctypes
import time
# Constants for Windows API
w32 = ctypes.windll.kernel32
SET_THREAD =0x20
PRIORITIZE_THE_THREAD =1classMyThread(threading.Thread):def__init__(self, start_event, name, iterations):super().__init__()
While executing this code in your Python interpreter, you will get the following results −
high running
normal running
high running
normal running
high running
normal running
high running
normal running
Learn Python in-depth with real-world projects through our Python certification course. Enroll and become a certified expert to boost your career.
Prioritizing Python Threads Using the Queue Module
The queue module in Python’s standard library is useful in threaded programming when information must be exchanged safely between multiple threads. The Priority Queue class in this module implements all the required locking semantics.
With a priority queue, the entries are kept sorted (using the heapq module) and the lowest valued entry is retrieved first.
The Queue objects have following methods to control the Queue −
get() − The get() removes and returns an item from the queue.
put() − The put adds item to a queue.
qsize() − The qsize() returns the number of items that are currently in the queue.
empty() − The empty( ) returns True if queue is empty; otherwise, False.
full() − the full() returns True if queue is full; otherwise, False.
queue.PriorityQueue(maxsize=0)
This is the Constructor for a priority queue. maxsize is an integer that sets the upper limit on the number of items that can be placed in the queue. If maxsize is less than or equal to zero, the queue size is infinite.
The lowest valued entries are retrieved first (the lowest valued entry is the one that would be returned by min(entries)). A typical pattern for entries is a tuple in the form −
(priority_number, data)
Example
This example demonstrates the use of the PriorityQueue class in the queue module to manage task priorities between the two threads.
Open Compiler
from time import sleep
from random import random, randint
from threading import Thread
from queue import PriorityQueue
queue = PriorityQueue()defproducer(queue):print('Producer: Running')for i inrange(5):# create item with priority
value = random()
priority = randint(0,5)
item =(priority, value)
queue.put(item)# wait for all items to be processed
queue.join()
queue.put(None)print('Producer: Done')defconsumer(queue):print('Consumer: Running')whileTrue:# get a unit of work