It is used to return trailing bytes, if any left in the buffer.
Node.js StringDecoder Example
Let’s see a simple example of Node.js StringDecoder.
File: stringdecoder_example1.js
const StringDecoder = require('string_decoder').StringDecoder;

const decoder = new StringDecoder('utf8');


const buf1 = new Buffer('this is a test');

console.log(decoder.write(buf1));//prints: this is a test


const buf2 = new Buffer('7468697320697320612074c3a97374', 'hex');

console.log(decoder.write(buf2));//prints: this is a test


const buf3 = Buffer.from([0x62,0x75,0x66,0x66,0x65,0x72]);

console.log(decoder.write(buf3));//prints: buffer
The Node.js path module is used to handle and transform files paths. This module can be imported by using the following syntax:
Syntax:
var path = require ("path")
Node.js Path Methods
Let’s see the list of methods used in path module:
Index
Method
Description
1.
path.normalize(p)
It is used to normalize a string path, taking care of ‘..’ and ‘.’ parts.
2.
path.join([path1][, path2][, …])
It is used to join all arguments together and normalize the resulting path.
3.
path.resolve([from …], to)
It is used to resolve an absolute path.
4.
path.isabsolute(path)
It determines whether path is an absolute path. an absolute path will always resolve to the same location, regardless of the working directory.
5.
path.relative(from, to)
It is used to solve the relative path from “from” to “to”.
6.
path.dirname(p)
It return the directory name of a path. It is similar to the unix dirname command
7.
path.basename(p[, ext])
It returns the last portion of a path. It is similar to the Unix basename command.
8.
path.extname(p)
It returns the extension of the path, from the last ‘.’ to end of string in the last portion of the path. if there is no ‘.’ in the last portion of the path or the first character of it is ‘.’, then it returns an empty string.
9.
path.parse(pathstring)
It returns an object from a path string.
10.
path.format(pathobject)
It returns a path string from an object, the opposite of path.parse above.
In Node.js, file I/O is provided by simple wrappers around standard POSIX functions. Node File System (fs) module can be imported using following syntax:
Syntax:
var fs = require("fs")
Node.js FS Reading File
Every method in fs module has synchronous and asynchronous forms.
Asynchronous methods take a last parameter as completion function callback. Asynchronous method is preferred over synchronous method because it never blocks the program execution where as the synchronous method blocks.
Let’s take an example:
Create a text file named “input.txt” having the following content.
File: input.txt
Javatpoint is a one of the best online tutorial website to learn different technologies

 in a very easy and efficient manner.
Let’s take an example to create a JavaScript file named “main.js” having the following code:
File: main.js
var fs = require("fs");

// Asynchronous read

fs.readFile('input.txt', function (err, data) {

   if (err) {

       return console.error(err);

   }

   console.log("Asynchronous read: " + data.toString());

});

// Synchronous read

var data = fs.readFileSync('input.txt');

console.log("Synchronous read: " + data.toString());

console.log("Program Ended");
Open Node.js command prompt and run the main.js:
node main.js
Node.js Open a file
Syntax:
Following is the syntax of the method to open a file in asynchronous mode:
fs.open(path, flags[, mode], callback)
Parameter explanation:
Following is the description of parameters used in the above syntax:
path: This is a string having file name including path.
flags: Flag specifies the behavior of the file to be opened. All possible values have been mentioned below.
mode: This sets the file mode (permission and sticky bits), but only if the file was created. It defaults to 0666, readable and writeable.
callback: This is the callback function which gets two arguments (err, fd).
Node.js Flags for Read/Write
Following is a list of flags for read/write operation:
Flag
Description
r
open file for reading. an exception occurs if the file does not exist.
r+
open file for reading and writing. an exception occurs if the file does not exist.
rs
open file for reading in synchronous mode.
rs+
open file for reading and writing, telling the os to open it synchronously. see notes for ‘rs’ about using this with caution.
w
open file for writing. the file is created (if it does not exist) or truncated (if it exists).
wx
like ‘w’ but fails if path exists.
w+
open file for reading and writing. the file is created (if it does not exist) or truncated (if it exists).
wx+
like ‘w+’ but fails if path exists.
a
open file for appending. the file is created if it does not exist.
ax
like ‘a’ but fails if path exists.
a+
open file for reading and appending. the file is created if it does not exist.
ax+
open file for reading and appending. the file is created if it does not exist.
Create a JavaScript file named “main.js” having the following code to open a file input.txt for reading and writing.
File: main.js
var fs = require("fs");

// Asynchronous - Opening File

console.log("Going to open file!");

fs.open('input.txt', 'r+', function(err, fd) {

   if (err) {

       return console.error(err);

   }

  console.log("File opened successfully!");

});
Open Node.js command prompt and run the main.js:
node main.js
Node.js File Information Method
Syntax:
Following is syntax of the method to get file information.
fs.stat(path, callback)
Parameter explanation:
Path: This is string having file name including path.
Callback: This is the callback function which gets two arguments (err, stats) where stats is an object of fs.Stats type.
Node.js fs.Stats class Methods
Method
Description
stats.isfile()
returns true if file type of a simple file.
stats.isdirectory()
returns true if file type of a directory.
stats.isblockdevice()
returns true if file type of a block device.
stats.ischaracterdevice()
returns true if file type of a character device.
stats.issymboliclink()
returns true if file type of a symbolic link.
stats.isfifo()
returns true if file type of a fifo.
stats.issocket()
returns true if file type of asocket.
Let’s take an example to create a JavaScript file named main.js having the following code:
File: main.js
var fs = require("fs");

console.log("Going to get file info!");

fs.stat('input.txt', function (err, stats) {

   if (err) {

       return console.error(err);

   }

   console.log(stats);

   console.log("Got file info successfully!");

   // Check file type

   console.log("isFile ? " + stats.isFile());

   console.log("isDirectory ? " + stats.isDirectory());

});
Now open the Node.js command prompt and run the main.js
Streams are the objects that facilitate you to read data from a source and write data to a destination. There are four types of streams in Node.js:
Readable: This stream is used for read operations.
Writable: This stream is used for write operations.
Duplex: This stream can be used for both read and write operations.
Transform: It is type of duplex stream where the output is computed according to input.
Each type of stream is an Event emitter instance and throws several events at different times. Following are some commonly used events:
Data:This event is fired when there is data available to read.
End:This event is fired when there is no more data available to read.
Error: This event is fired when there is any error receiving or writing data.
Finish:This event is fired when all data has been flushed to underlying system.
Node.js Reading from stream
Create a text file named input.txt having the following content:
Javatpoint is a one of the best online tutorial website to learn different technologies in a very easy and efficient manner.
Create a JavaScript file named main.js having the following code:
File: main.js
var fs = require("fs");

var data = '';

// Create a readable stream

var readerStream = fs.createReadStream('input.txt');

// Set the encoding to be utf8.

readerStream.setEncoding('UTF8');

// Handle stream events --> data, end, and error

readerStream.on('data', function(chunk) {

   data += chunk;

});

readerStream.on('end',function(){

   console.log(data);

});

readerStream.on('error', function(err){

   console.log(err.stack);

});

console.log("Program Ended");
Now, open the Node.js command prompt and run the main.js
node main.js
Output:
Node.js Writing to stream
Create a JavaScript file named main.js having the following code:
File: main.js
var fs = require("fs");

var data = 'A Solution of all Technology';

// Create a writable stream

var writerStream = fs.createWriteStream('output.txt');

// Write the data to stream with encoding to be utf8

writerStream.write(data,'UTF8');

// Mark the end of file

writerStream.end();

// Handle stream events --> finish, and error

writerStream.on('finish', function() {

    console.log("Write completed.");

});

writerStream.on('error', function(err){

   console.log(err.stack);

});

console.log("Program Ended");
Now open the Node.js command prompt and run the main.js
node main.js
You will see the following result:
Now, you can see that a text file named “output.txt” is created where you had saved “input.txt” and “main.js” file. In my case, it is on desktop.
Open the “output.txt” and you will see the following content.
Node.js Piping Streams
Piping is a mechanism where output of one stream is used as input to another stream. There is no limit on piping operation.
Let’s take a piping example for reading from one file and writing it to another file.
File: main.js
var fs = require("fs");

// Create a readable stream

var readerStream = fs.createReadStream('input.txt');

// Create a writable stream

var writerStream = fs.createWriteStream('output.txt');

// Pipe the read and write operations

// read input.txt and write data to output.txt

readerStream.pipe(writerStream);

console.log("Program Ended");
Open the Node.js and run the mian.js
node main.js
Now, you can see that a text file named “output.txt” is created where you had saved ?main.js? file. In my case, it is on desktop.
Open the “output.txt” and you will see the following content.
Node.js Chaining Streams
Chaining stream is a mechanism of creating a chain of multiple stream operations by connecting output of one stream to another stream. It is generally used with piping operation.
Let’s take an example of piping and chaining to compress a file and then decompress the same file.
File: main.js
var fs = require("fs");

var zlib = require('zlib');

// Compress the file input.txt to input.txt.gz

fs.createReadStream('input.txt')

  .pipe(zlib.createGzip())

  .pipe(fs.createWriteStream('input.txt.gz'));

  console.log("File Compressed.");
Open the Node.js command prompt and run main.js
node main.js
You will get the following result:
Now you will see that file “input.txt” is compressed and a new file is created named “input.txt.gz” in the current file.
To Decompress the same file: put the following code in the js file “main.js”
File: main.js
var fs = require("fs");

var zlib = require('zlib');

// Decompress the file input.txt.gz to input.txt

fs.createReadStream('input.txt.gz')

  .pipe(zlib.createGunzip())

  .pipe(fs.createWriteStream('input.txt'));

  console.log("File Decompressed.");
Node.js provides Buffer class to store raw data similar to an array of integers but corresponds to a raw memory allocation outside the V8 heap. Buffer class is used because pure JavaScript is not nice to binary data. So, when dealing with TCP streams or the file system, it’s necessary to handle octet streams.
Buffer class is a global class. It can be accessed in application without importing buffer module.
Node.js Creating Buffers
There are many ways to construct a Node buffer. Following are the three mostly used methods:
Create an uninitiated buffer: Following is the syntax of creating an uninitiated buffer of 10 octets:
var buf = new Buffer(10);
Create a buffer from array: Following is the syntax to create a Buffer from a given array:
var buf = new Buffer([10, 20, 30, 40, 50]);
Create a buffer from string: Following is the syntax to create a Buffer from a given string and optionally encoding type:
var buf = new Buffer("Simply Easy Learning", "utf-8");
Node.js Writing to buffers
Following is the method to write into a Node buffer:
Syntax:
buf.write(string[, offset][, length][, encoding])
Parameter explanation:
string: It specifies the string data to be written to buffer.
offset: It specifies the index of the buffer to start writing at. Its default value is 0.
length: It specifies the number of bytes to write. Defaults to buffer.length
encoding: Encoding to use. ‘utf8’ is the default encoding.
Return values from writing buffers:
This method is used to return number of octets written. In the case of space shortage for buffer to fit the entire string, it will write a part of the string.
Let’s take an example:
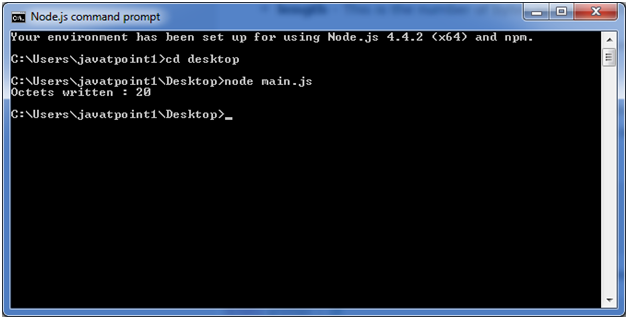
Create a JavaScript file named “main.js” having the following code:
File: main.js
buf = new Buffer(256);

len = buf.write("Simply Easy Learning");

console.log("Octets written : "+  len);
Open the Node.js command prompt and execute the following code:
node main.js
Output:
Node.js Reading from buffers
Following is the method to read data from a Node buffer.
Syntax:
buf.toString([encoding][, start][, end])
Parameter explanation:
encoding: It specifies encoding to use. ‘utf8’ is the default encoding
start: It specifies beginning index to start reading, defaults to 0.
end: It specifies end index to end reading, defaults is complete buffer.
Return values reading from buffers:
This method decodes and returns a string from buffer data encoded using the specified character set encoding.
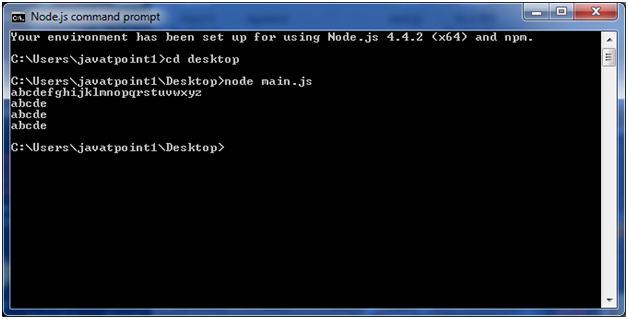
Let’s take an example:
File: main.js
buf = new Buffer(26);

for (var i = 0 ; i < 26 ; i++) {

  buf[i] = i + 97;

}

console.log( buf.toString('ascii'));       // outputs: abcdefghijklmnopqrstuvwxyz

console.log( buf.toString('ascii',0,5));   // outputs: abcde

console.log( buf.toString('utf8',0,5));    // outputs: abcde

console.log( buf.toString(undefined,0,5)); // encoding defaults to 'utf8', outputs abcde
Open Node.js command prompt and execute the following code:
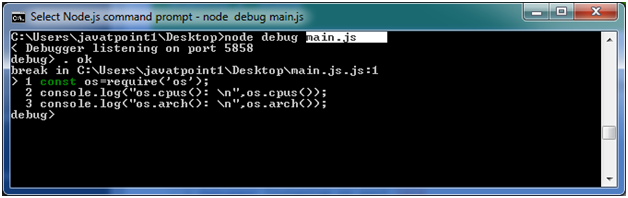
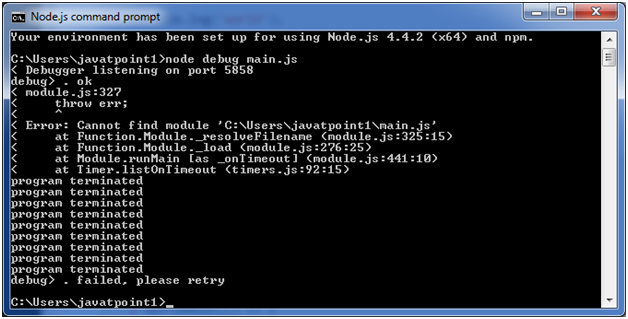
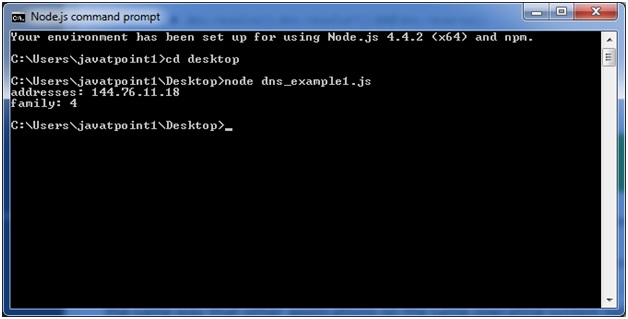
Node.js provides a simple TCP based protocol and built-in debugging client. For debugging your JavaScript file, you can use debug argument followed by the js file name you want to debug.
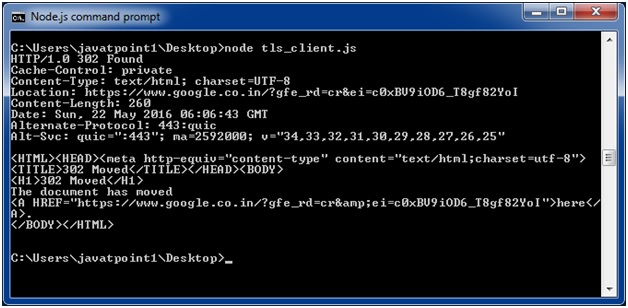
TLS stands for Transport Layer Security. It is the successor to Secure Sockets Layer (SSL). TLS along with SSL is used for cryptographic protocols to secure communication over the web.
TLS uses public-key cryptography to encrypt messages. It encrypts communication generally on the TCP layer.
What is public-key cryptography
In public-key cryptography, each client and each server has two keys: public key and private key. Public key is shared with everyone and private key is secured. To encrypt a message, a computer requires its private key and the recipient?s public key. On the other hand, to decrypt the message, the recipient requires its own
You have to use require(‘tls’) to access this module.
Syntax:
var tls = require('tls');
The tls module uses OpenSSL to attain Transport Layer Security and Secure Socket Layer. TLS/SSL is a public/private key infrastructure. Each client and each server must have a private key.
A private key can be created like this:
openssl genrsa -out ryans-key.pem 1024
All severs and some clients need to have a certificate. Certificates are public keys signed by a Certificate Authority or self-signed. To get certificate, you have to create a “Certificate Signing Request” (CSR) file.
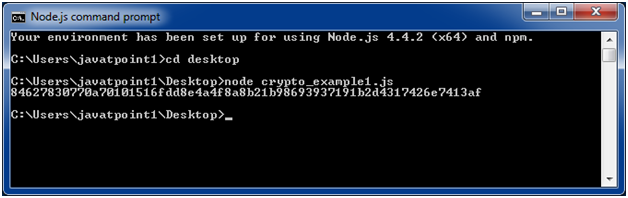
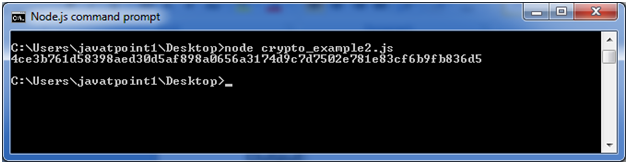
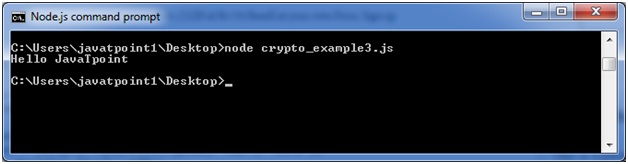
The Node.js Crypto module supports cryptography. It provides cryptographic functionality that includes a set of wrappers for open SSL’s hash HMAC, cipher, decipher, sign and verify functions.
What is Hash
A hash is a fixed-length string of bits i.e. procedurally and deterministically generated from some arbitrary block of source data.
What is HMAC
HMAC stands for Hash-based Message Authentication Code. It is a process for applying a hash algorithm to both data and a secret key that results in a single final hash.
Node.js provides the ability to perform socket programming. We can create chat application or communicate client and server applications using socket programming in Node.js. The Node.js net module contains functions for creating both servers and clients.
Node.js Net Example
In this example, we are using two command prompts:
Node.js command prompt for server.
Window’s default command prompt for client.
server:
File: net_server.js
const net = require('net');

var server = net.createServer((socket) => {

  socket.end('goodbye\n');

}).on('error', (err) => {

  // handle errors here

  throw err;

});

// grab a random port.

server.listen(() => {

  address = server.address();

  console.log('opened server on %j', address);

});
Open Node.js command prompt and run the following code:
node net_server.js
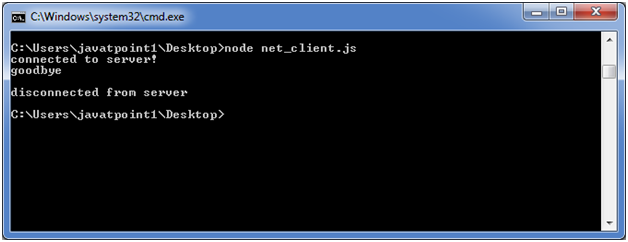
client:
File: net_client.js
const net = require('net');

const client = net.connect({port: 50302}, () => {//use same port of server

  console.log('connected to server!');

  client.write('world!\r\n');

});

client.on('data', (data) => {

  console.log(data.toString());

  client.end();

});

client.on('end', () => {

  console.log('disconnected from server');

});
Open Node.js command prompt and run the following code: