Caching is the term for storing reusable responses in order to make subsequent requests faster. Every browser ships with an implementation of a HTTP cache. All we have to do is ensure that each server response provides correct HTTP header directives to instruct the browser on when and for how long the response can be cached by the browser.
Following are some benefits of including caching in your web apps −
Your network costs decrease. If your content is cached, you’ll need to send less of it for every subsequent request.
Speed and performance of your website increases.
Your content can be made available even if your client is offline.
We’ll be using the koa-static-cache middleware to implement caching in our app. Install these middleware using −
$ npm install --save koa-static-cache
Go to your app.js file and add the following code to it.
var koa = require('koa');
var app = koa();

var path = require('path');
var staticCache = require('koa-static-cache');

app.use(staticCache(path.join(__dirname, 'public'), {
   maxAge: 365 * 24 * 60 * 60  //Add these files to caches for a year
}))

app.listen(3000);
The koa-static-cache middleware is used to cache server responses on the client side. The cache-control header is set according to the options we provide while initializing the cache object. We have set the expiration time of this cached response to 1 year. Following are the comparisons of request we have sent before and after the file was cached.
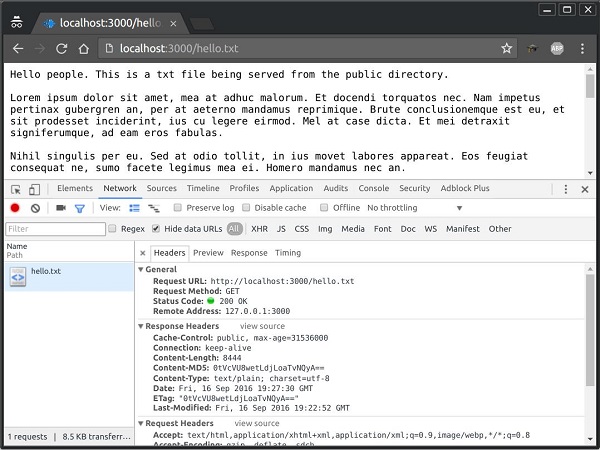
Before this file was cached, the returned status code was 200, which is OK. The response headers had multiple information regarding the content to be cached and had also given an ETag for the content.
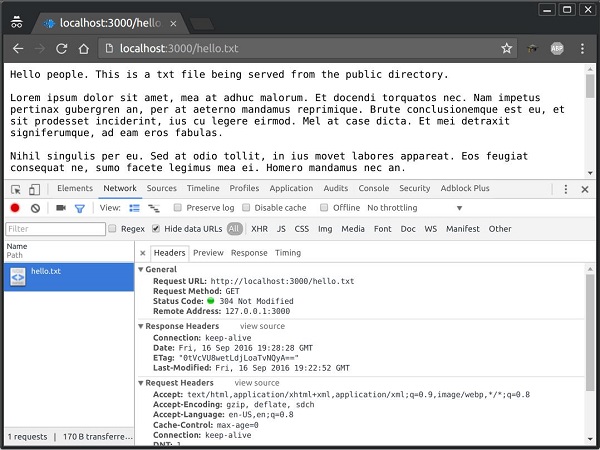
The next time the request was sent, it was sent along with the ETtag. Since our content hadn’t changed on the server, its corresponding ETag also remained the same and the client was told that the copy it has locally is up-to-date with what the server would provide and should use the local one instead of requesting again.
Note − For invalidating any cached file, you just need to change its file name and update its reference. This will ensure that you have a new file to send to the client and the client can’t load it back from the cache.
Compression is a simple, effective way to save bandwidth and speed up your site. It is only compatible with modern browsers and should be used with caution if your users use legacy browsers as well.
When sending responses from the server, if compression is used, it can greatly improve the load time. We’ll be using a middleware called koa-compress to take care of the compression of files as well as setting appropriate headers.
Go ahead and install the middleware using −
$ npm install --save koa-compress
Now in your app.js file, add the following code −
var koa = require('koa');
var router = require('koa-router');
var app = koa();

var Pug = require('koa-pug');
var pug = new Pug({
   viewPath: './views',
   basedir: './views',
   app: app //Equivalent to app.use(pug)
});

app.use(compress({
   filter: function (content_type) {
  return /text/i.test(content_type)   },
   threshold: 2048,
   flush: require('zlib').Z_SYNC_FLUSH
}));

var _ = router(); //Instantiate the router

_.get('/', getRoot);

function *getRoot(next){
   this.render('index');
}

app.use(_.routes()); //Use the routes defined using the router
app.listen(3000);
This puts our compression middleware in place. The filter option is a function that checks the response content type to decide whether to compress. The threshold option is the minimum response size in bytes to compress. This ensures we don’t compress every little response.
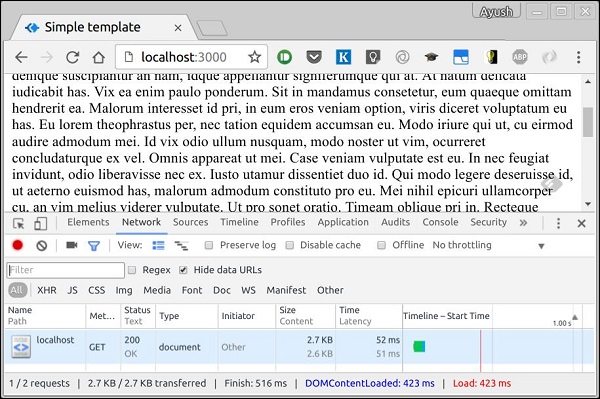
Following is a response without compression.
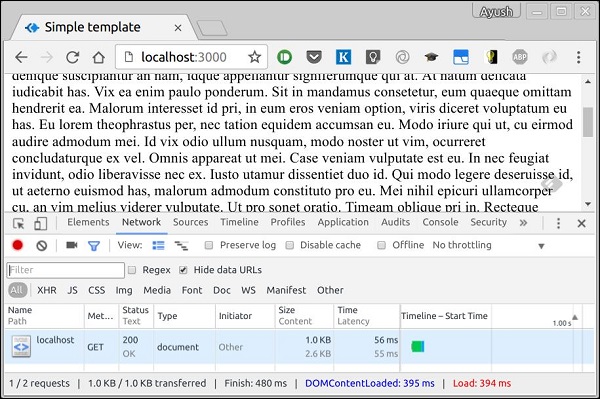
Following is the similar response with compression.
If you look at the size tab at the bottom, you can very well see the difference between the two. There is more than 150% improvement, when we compress the files.
Authentication is a process in which the credentials provided are compared to those on file in the database of authorized users’ information on a local operating system or within an authentication server. If the credentials match, the process is completed and the user is granted authorization for access.
We’ll be creating a very basic authentication system that’ll use Basic HTTP Authentication. This is the simplest possible way to enforce access control as it doesn’t require cookies, sessions, or anything else. To use this, the client has to send the Authorization header along with every request it makes. The username and password are not encrypted, but are concatenated in a single string like the following.
username:password
This string is encoded with Base64, and the word Basic is put before this value. For example, if your username is Ayush and password India, then the string “Ayush:India” would be sent as encoded in the authorization header.
Authorization: Basic QXl1c2g6SW5kaWE=
To implement this in your koa app, you’ll need the koa-basic-auth middleware. Install it using −
$ npm install --save koa-basic-auth
Now open your app.js file and enter the following code in it.
//This is what the authentication would be checked against
var credentials = { name: 'Ayush', pass: 'India' }

var koa = require('koa');
var auth = require('koa-basic-auth');
var _ = require('koa-router')();

var app = koa();

//Error handling middleware
app.use(function *(next){
   try {
  yield next;   } catch (err) {
  if (401 == err.status) {
     this.status = 401;
     this.set('WWW-Authenticate', 'Basic');
     this.body = 'You have no access here';
  } else {
     throw err;
  }   }
});

// Set up authentication here as first middleware.
// This returns an error if user is not authenticated.
_.get('/protected', auth(credentials), function *(){
   this.body = 'You have access to the protected area.';
   yield next;
});

// No authentication middleware present here.
_.get('/unprotected', function*(next){
   this.body = "Anyone can access this area";
   yield next;
});

app.use(_.routes());
app.listen(3000);
We have created an error handling middleware to handle all authentication related errors. Then, we have created 2 routes −
/protected − This route can only be accessed if the user sends the correct authentication header. For all others, it’ll give an error.
/unprotected − This route can be accessed by anyone, with or without the authentication.
Now if you send a request to /protected without an authentication header or with the wrong credentials, you’ll receive an error. For example,
HTTP/1.1 200 OK
Content-Type: text/plain; charset=utf-8
Content-Length: 38
Date: Sat, 17 Sep 2016 19:07:33 GMT
Connection: keep-alive

You have access to the protected area.
The /unprotected route is still accessible to everyone.
HTTP is stateless, hence in order to associate a request to any other request, you need a way to store user data between HTTP requests. Cookies and URL parameters are both suitable ways to transport data between the client and the server. However, they are both readable on the client side. Sessions solve exactly this problem. You assign the client an ID and it makes all further requests using that ID. Information associated with the client is stored on the server linked to this ID.
We’ll need the koa-session, thus install it using −
npm install --save koa-session
We will put the koa-session middleware in place. In this example, we’ll use the RAM to store sessions. Never use this in production environments. The session middleware handles everything, i.e. creating the session, setting the session cookie, and creating the session object in context object.
Whenever we make a request from the same client again, we will have their session information stored with us (given that server was not restarted). We can add more properties to this session object. In the following example, we will create a view counter for a client.
var session = require('koa-session');
var koa = require('koa');
var app = koa();
app.keys = ['Shh, its a secret!'];
app.use(session(app)); // Include the session middleware
app.use(function *(){
var n = this.session.views || 0;
this.session.views = ++n;
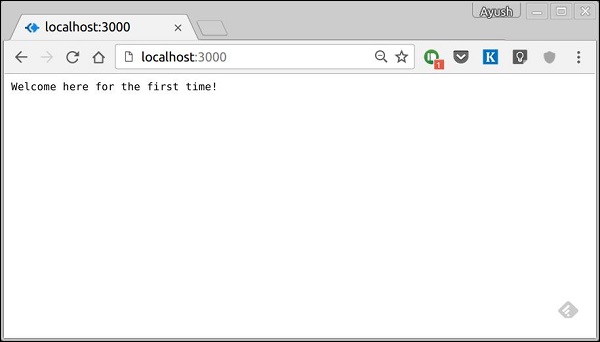
if(n === 1)
this.body = 'Welcome here for the first time!';
else
this.body = "You've visited this page " + n + " times!";
})
app.listen(3000);
What the above code does is, when a user visits the site, it creates a new session for the user and assigns a cookie. Next time the user visits, the cookie is checked and the page_view session variable is updated accordingly.
Now if you run the app and go to localhost:3000, you’ll get the following response.
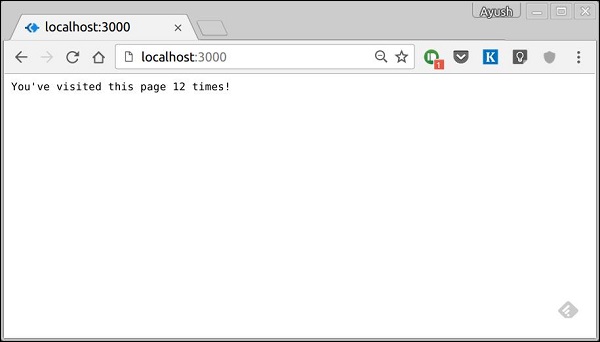
If you revisit the page, the page counter will increase. In this case, the page was refreshed 12 times.
Cookies are simple, small files/data that are sent to client with a server request and stored on the client side. Every time the user loads the website back, this cookie is sent with the request. This helps keep track of the users actions. There are numerous uses of HTTP Cookies.
Session management
Personalization(Recommendation systems)
User tracking
To use cookies with Koa, we have the functions: ctx.cookies.set() and ctx.cookies.get(). To set a new cookie, let’s define a new route in our Koa app.
var koa = require('koa');
var router = require('koa-router');
var app = koa();

_.get('/', setACookie);

function *setACookie() {
   this.cookies.set('foo', 'bar', {httpOnly: false});
}

var _ = router();

app.use(_.routes());
app.listen(3000);
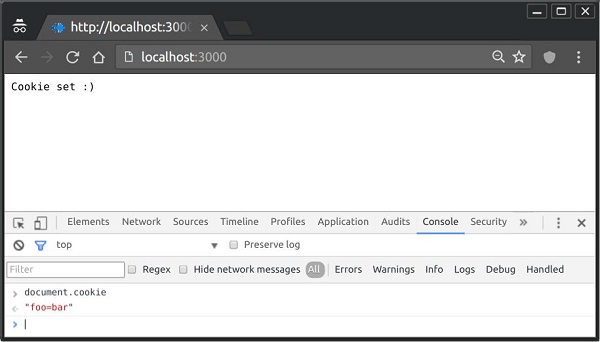
To check if the cookie is set or not, just go to your browser, fire up the console, and enter −
console.log(document.cookie);
This will produce the following output (you may have more cookies set maybe due to extensions in your browser).
"foo = bar"
Here is an example of the above.
The browser also sends back cookies every time it queries the server. To view a cookie on your server, on the server console in a route, add the following code to that route.
Next time you send a request to this route, you’ll get the following output.
Cookies: foo = bar
Adding Cookies with Expiration Time
You can add cookies that expire. To add a cookie that expires, just pass an object with the property ‘expires’ set to the time when you want it to expire. For example,
var koa = require('koa');
var router = require('koa-router');
var app = koa();
_.get('/', setACookie);
function *setACookie(){
//Expires after 360000 ms from the time it is set.
this.cookies.set('name', 'value', {
httpOnly: false, expires: 360000 + Date.now() });
}
var _ = router();
app.use(_.routes());
app.listen(3000);
Deleting Existing Cookies
To unset a cookie, simply set the cookie to an empty string. For example, if you need to clear a cookie named foo, use the following code.
var koa = require('koa');
var router = require('koa-router');
var app = koa();

_.get('/', setACookie);

function *setACookie(){
   //Expires after 360000 ms from the time it is set.
   this.cookies.set('name', '');
}

var _ = router();

app.use(_.routes());
app.listen(3000);
This will unset the said cookie. Note that you should leave the HttpOnly option to be true when not using the cookie in the client side code.
Static files are files that clients download as they are from the server. Create a new directory, public. Express, by default doesn’t allow you to serve static files.
We need a middleware to serve this purpose. Go ahead and install koa-serve −
$ npm install --save koa-static
Now we need to use this middleware. Before that create a directory called public. We will store all our static files here. This allows us to keep our server code secure as nothing above this public folder would be accessible to the clients. After you’ve created a public directory, create a file named hello.txt in it with any content you like. Now add the following to your app.js.
var serve = require('koa-static');
var koa = require('koa');
var app = koa();

app.use(serve('./public'));

app.listen(3000);
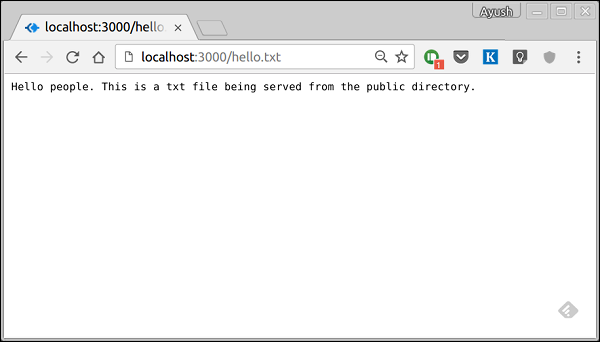
Note − Koa looks up the files relative to the static directory, so the name of the static directory is not part of the URL. The root route is now set to your public dir, so all static files you load will be considering public as the root. To test that this is working fine, run your app and visit https://localhost:3000/hello.txt
You should get the following output. Note that this is not a HTML document or Pug view, rather it is a simple txt file.
Multiple Static Dirs
We can also set multiple static assets directories using −
var serve = require('koa-static');
var koa = require('koa');
var app = koa();

app.use(serve('./public'));
app.use(serve('./images'));

app.listen(3000);
Now when we request a file, Koa will search these directories and send us the matching file.
eb applications need to provide the functionality to allow file uploads. Let us see how we can receive files from the clients and store them on our server.
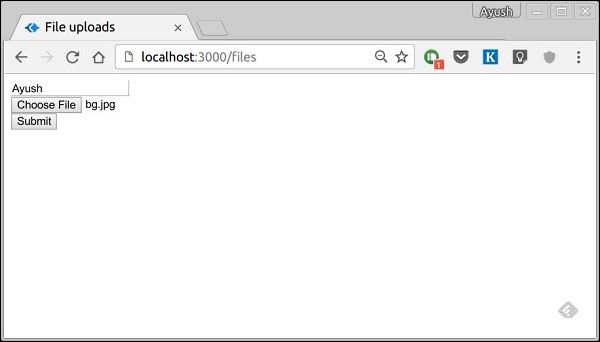
We have already used the koa-body middleware for parsing requests. This middleware is also used for handling file uploads. Let us create a form that allows us to upload files and then save these files using Koa. First create a template named file_upload.pug with the following contents.
html
head
title File uploads
body
form(action = "/upload" method = "POST" enctype = "multipart/form-data")
div
input(type = "text" name = "name" placeholder = "Name")
div
input(type = "file" name = "image")
div
input(type = "submit")</code></pre>
Note that you need to give the same encoding type as above in your form. Now let us handle this data on our server.
var koa = require('koa');
var router = require('koa-router');
var bodyParser = require('koa-body');
var app = koa();
//Set up Pug
var Pug = require('koa-pug');
var pug = new Pug({
viewPath: './views',
basedir: './views',
app: app
});
//Set up body parsing middleware
app.use(bodyParser({
formidable:{uploadDir: './uploads'}, //This is where the files would come
multipart: true,
urlencoded: true
}));
var _ = router(); //Instantiate the router
_.get('/files', renderForm);
_.post('/upload', handleForm);
function * renderForm(){
this.render('file_upload');
}
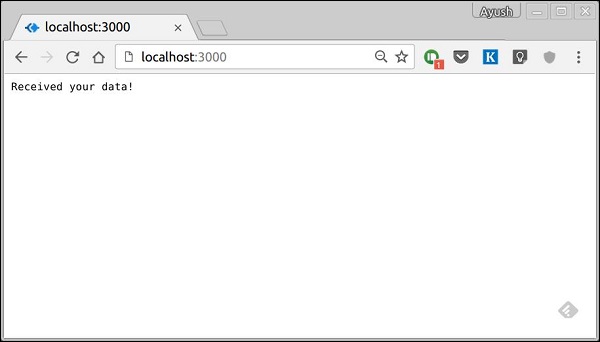
function *handleForm(){
console.log("Files: ", this.request.body.files);
console.log("Fields: ", this.request.body.fields);
this.body = "Received your data!"; //This is where the parsed request is stored
}
app.use(_.routes());
app.listen(3000);
When you run this, you get the following form.
When you submit this, your console will produce the following output.
The files that were uploaded are stored in the path in the above output. You can access the files in the request using this.request.body.files and the fields in that request by this.request.body.fields.
Forms are an integral part of the web. Almost every website we visit offers us forms that submit or fetch some information for us. To get started with forms, we will first install the koa-body. To install this, go to your terminal and use −
$ npm install --save koa-body
Replace your app.js file contents with the following code.
var koa = require('koa');
var router = require('koa-router');
var bodyParser = require('koa-body');
var app = koa();

//Set up Pug
var Pug = require('koa-pug');
var pug = new Pug({
   viewPath: './views',
   basedir: './views',
   app: app //Equivalent to app.use(pug)
});

//Set up body parsing middleware
app.use(bodyParser({
   formidable:{uploadDir: './uploads'},
   multipart: true,
   urlencoded: true
}));

_.get('/', renderForm);
_.post('/', handleForm);

function * renderForm(){
   this.render('form');
}
function *handleForm(){
   console.log(this.request.body);
   console.log(this.req.body);
   this.body = this.request.body; //This is where the parsed request is stored
}

app.use(_.routes());
app.listen(3000);
The new things we are doing here are importing the body parser and multer. We are using the body parser for parsing json and x-www-form-urlencoded header requests, while we use multer for parsing multipart/form-data.
Let us create a html form to test this out! Create a new view named form.pug with the following code.
html
   head
  title Form Tester   body
  form(action = "/", method = "POST")
     div
        label(for = "say") Say:
        input(name = "say" value = "Hi")
     br
     div
        label(for = "to") To:
        input(name = "to" value = "Koa form")
     br
     button(type = "submit") Send my greetings</code></pre>


Run your server using −


nodemon index.js


Now go to localhost:3000/ and fill the form as you like, and submit it. You'll receive the response as −


Take a look at your console, it'll show you the body of your request as a JavaScript object. For example −


The this.request.body object contains your parsed request body. To use fields from that object, just use them as normal JS objects.


This is just one way to send a request. There are many other ways, but those are irrelevant to cover here, because our Koa app will handle all those requests in the same way. To read more about different ways to make a request, have a look at this page.
Pug is a templating engine. Templating engines are used to remove the cluttering of our server code with HTML, concatenating strings wildly to existing HTML templates. Pug is a very powerful templating engine, which has a variety of features such as filters, includes, inheritance, interpolation, etc. There is a lot of ground to cover on this.
To use Pug with Koa, we need to install it using the following command.
$ npm install --save pug koa-pug
Once pug is installed, set it as the templating engine for your app. Add the following code to your app.js file.
var koa = require('koa');
var router = require('koa-router');
var app = koa();

var Pug = require('koa-pug');
var pug = new Pug({
   viewPath: './views',
   basedir: './views',
   app: app //Equivalent to app.use(pug)
});

var _ = router(); //Instantiate the router

app.use(_.routes()); //Use the routes defined using the router
app.listen(3000);
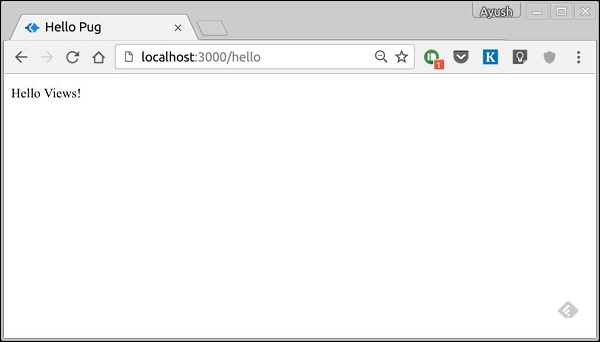
Now, create a new directory called views. Inside the directory, create a file named first_view.pug, and enter the following data in it.
doctype html
html
head
title = "Hello Pug"
body
p.greetings#people Hello Views!</code></pre>
To run this page, add the following route to your app.
_.get('/hello', getMessage); // Define routes
function *getMessage(){
this.render('first_view');
};
You'll receive the output as −
What Pug does is, it converts this very simple looking markup to html. We don’t need to keep track of closing our tags, no need to use class and id keywords, rather use '.' and '#' to define them. The above code first gets converted to
<!DOCTYPE html>
<html>
<head>
<title>Hello Pug</title>
</head>
<body>
<p class = "greetings" id = "people">Hello Views!</p>
</body>
</html>
Pug is capable of doing much more than simplifying HTML markup. Let’s explore some of these features of Pug.
Simple Tags
Tags are nested according to their indentation. Like in the above example, <title> was indented within the <head> tag, so it was inside it. However, the <body> tag was on the same indentation, thus it was a sibling of <head> tag.
We don’t need to close tags. As soon as Pug encounters the next tag on the same or the outer indentation level, it closes the tag for us.
There are three methods to put text inside of a tag −
Space seperated −
h1 Welcome to Pug
Piped text −
div
| To insert multiline text,
| You can use the pipe operator.
Block of text −
div.
But that gets tedious if you have a lot of text.
You can use "." at the end of tag to denote block of text.
To put tags inside this block, simply enter tag in a new line and
indent it accordingly.
Comments
Pug uses the same syntax as JavaScript(//) for creating comments. These comments are converted to html comments(<!--comment-->). For example,
//This is a Pug comment
This comment gets converted to −
<!--This is a Pug comment-->
Explore our latest online courses and learn new skills at your own pace. Enroll and become a certified expert to boost your career.
Attributes
To define attributes, we use a comma separated list of attributes, in parenthesis. Class and ID attributes have special representations. The following line of code covers defining attributes, classes, and id for a given html tag.
<div class = "container column main" id = "division" width = "100" height = "100"></div>
Passing Values to Templates
When we render a Pug template, we can actually pass it a value from our route handler, which we can then use in our template. Create a new route handler with the following code.
var koa = require('koa');
var router = require('koa-router');
var app = koa();
var Pug = require('koa-pug');
var pug = new Pug({
viewPath: './views',
basedir: './views',
app: app // equals to pug.use(app) and app.use(pug.middleware)
});
var _ = router(); //Instantiate the router
_.get('//dynamic_view', dynamicMessage); // Define routes
function *dynamicMessage(){
this.render('dynamic', {
});
};
app.use(_.routes()); //Use the routes defined using the router
app.listen(3000);
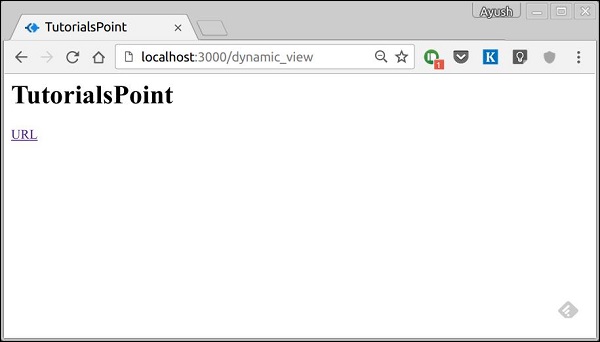
Then, create a new view file in the views directory, named dynamic.pug, using the following code.
html
head
title = name
body
h1 = name
a(href = url) URL</code></pre>
Open localhost:3000/dynamic in your browser and following should be the output. −
We can also use these passed variables within the text. To insert passed variables in between text of a tag, we use #{variableName} syntax. For example, in the above example, if we want to insert Greetings from TutorialsPoint, then we have to use the following code.
html
head
title = name
body
h1 Greetings from #{name}
a(href = url) URL</code></pre>
This method of using values is called interpolation.
Conditionals
We can use conditional statements and looping constructs as well. Consider this practical example, if a user is logged in we would want to display "Hi, User" and if not, then we would want to show him a "Login/Sign Up" link. To achieve this, we can define a simple template such as −
It'll give a message displaying Hi, Ayush. However, if we don’t pass any object or pass one with no user key, then we will get a Sign up link.
Include and Components
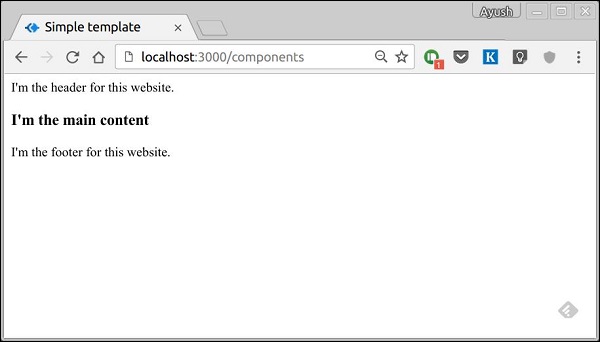
Pug provides a very intuitive way to create components for a web page. For example, if you see a news website, the header with logo and categories is always fixed. Instead of copying that to every view, we can use an include. Following example shows how we can use an include −
Create three views with the following code −
header.pug
div.header.
I'm the header for this website.
content.pug
html
head
title Simple template
body
include ./header.pug
h3 I'm the main content
include ./footer.pug</code></pre>
footer.pug
div.footer.
I'm the footer for this website.
Create a route for this as follows.
var koa = require('koa');
var router = require('koa-router');
var app = koa();
var Pug = require('koa-pug');
var pug = new Pug({
viewPath: './views',
basedir: './views',
app: app //Equivalent to app.use(pug)
});
var _ = router(); //Instantiate the router
_.get('/components', getComponents);
function *getComponents(){
this.render('content.pug');
}
app.use(_.routes()); //Use the routes defined using the router
app.listen(3000);
Go to localhost:3000/components, you should get the following output.
include can also be used to include plaintext, CSS and JavaScript.
There are many other features of Pug. However, those are out of the scope for this tutorial. You can further explore Pug at Pug.
Middleware functions are functions that have access to the context object and the next middleware function in the application’s request-response cycle. These functions are used to modify the request and response objects for tasks such as parsing request bodies, adding response headers, etc. Koa goes a step further by yielding ‘downstream’, then flowing the control back ‘upstream’. This effect is called cascading.
Following is a simple example of a middleware function in action.
var koa = require('koa');
var app = koa();
var _ = router();

//Simple request time logger
app.use(function* (next) {
   console.log("A new request received at " + Date.now());

   //This function call is very important. It tells that more processing is
   //required for the current request and is in the next middleware function/route handler.
   yield next;
});

app.listen(3000);
The above middleware is called for every request on the server. Thus after every request, we will get the following message in the console.
A new request received at 1467267512545
To restrict it to a specific route (and all its subroutes), we just need to create the routes like we did for routing. Actually its these middleware only that handle our request.
For example,
var koa = require('koa');
var router = require('koa-router');
var app = koa();

var _ = router();

//Simple request time logger
_.get('/request/*', function* (next) {
   console.log("A new request received at " + Date.now());
   yield next;
});

app.use(_.routes());
app.listen(3000);
Now whenever you request any subroute of ‘/request’, only then it’ll log the time.
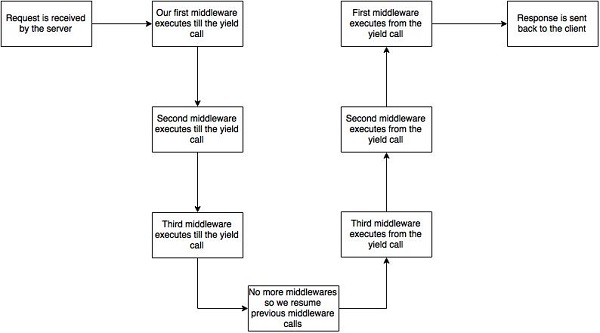
Order of Middleware Calls
One of the most important things about middleware in Koa is that the order in which they are written/included in your file, are the order in which they are executed downstream. As soon as we hit a yield statement in a middleware, it switches to the next middleware in line, till we reach the last. Then again we start moving back up and resuming functions from yield statements.
For example, in the following code snippet, the first function executes first till yield, then the second middleware till yield, then the third. As we have no more middleware here, we start moving back up, executing in a reverse order, i.e., third, second, first. This example summarizes how to use middleware the Koa way.
var koa = require('koa');
var app = koa();

//Order of middlewares
app.use(first);
app.use(second);
app.use(third);

function *first(next) {
   console.log("I'll be logged first. ");

   //Now we yield to the next middleware
   yield next;

   //We'll come back here at the end after all other middlewares have ended
   console.log("I'll be logged last. ");
};

function *second(next) {
   console.log("I'll be logged second. ");
   yield next;
   console.log("I'll be logged fifth. ");
};

function *third(next) {
   console.log("I'll be logged third. ");
   yield next;
   console.log("I'll be logged fourth. ");
};

app.listen(3000);
When we visit ‘/’ after running this code, on our console we will get −
I'll be logged first.
I'll be logged second.
I'll be logged third.
I'll be logged fourth.
I'll be logged fifth.
I'll be logged last.
The following diagram summarizes what is actually happening in the above example.
Now that we know how to create our own middleware, let us discuss some of the most commonly used community created middleware.
Third Party Middleware
A list of third party middleware for express is available here. Following are some of the most commonly used middleware −
koa-bodyparser
koa-router
koa-static
koa-compress
We’ll discuss multiple middleware in the subsequent chapters.