The dowhile loop is similar to the while loop except that the do…while loop doesnt evaluate the condition for the first time the loop executes. However, the condition is evaluated for the subsequent iterations. In other words, the code block will be executed at least once in a dowhile loop.
Syntax
The syntax of do…while loop in TypeScript is as follows
do{//statements }while(condition)
In the syntax of do…while loop, do block contains the code block that is executed in each iteration. The while block contains the condition that is checked after the do block executes.
In the above syntax, the condition is a boolean expression that evaluates to either true or false.
Flowchart
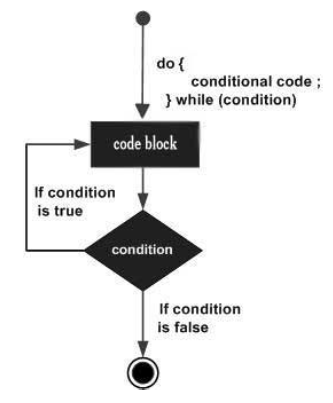
The flowchart of the do…while loop looks as follows
The flowchart shows that at first the loop control goes to the code block. Once the code block is executed, the condition is checked. If the condition evaluates to true, the loop control again goes to the code block and code block is executed. If the condition evaluates to false, the do…while loop breaks.
Lets now try an example of do…while loop in TypeScript.
Example: dowhile
In the example below, we define a variable n with value 10. Inside the do block, we print the value of n and then decrement it. The while block holds the condition n>=0, which determines if another iteration occurs.
var n:number=10;do{console.log(n);
   n--;}while(n>=0);
On compiling, it will generate following JavaScript code −
var n =10;do{console.log(n);
   n--;}while(n >=0);
The example prints numbers from 0 to 10 in the reverse order.
The while loop executes the instructions each time the condition specified evaluates to true. In other words, the loop evaluates the condition before the block of code is executed. As a superset of JavaScript, TypeScript inherits and expands upon JavaScripts features including different types of loops.
The while loop is an entry-controlled loop. In an entry-controlled loop, the condition is checked first and if the condition is true then the statements within the loop body are executed. While in an exit-controlled loop, the condition is checked after executing the loop body. The do…while loop is an example of the exit-controlled loop.
Syntax
The syntax of the while loop in TypeScript is as follows
while(condition){// statements if the condition is true }
Flow Diagram
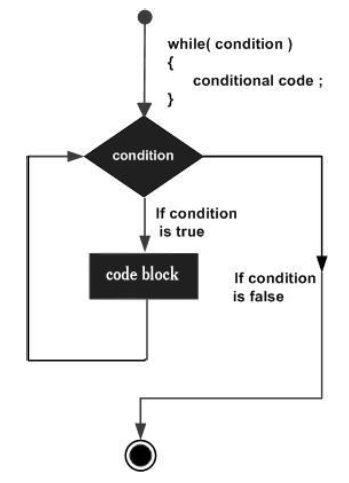
The flow diagram of the while loop looks as follows
Here is a breakdown of the while loop’s behavior
Condition evaluation − the while loop evaluates the condition before each iteration.
Execution − if the condition evaluates to true, the code block within the loop body is executed.
Iteration − After code block execution is finished, the loop jumps back to the first step (condition evaluation) to check if another iteration is required.
Example: While loop
var num:number=5;var factorial:number=1;while(num >=1){
   factorial = factorial * num;
   num--;}console.log("The factorial  is "+factorial);
The above code snippet uses a while loop to calculate the factorial of the value in the variable num.
On compiling, it will generate the following JavaScript code −
var num =5;var factorial =1;while(num >=1){
   factorial = factorial * num;
   num--;}console.log("The factorial  is "+ factorial);
It produces the following output −
The factorial is 120
While loop with a break statement
You can use a combination of an if statement and a break statement to terminate a while loop prematurely. The if statement checks a condition. If the condition evaluates to true, the break statement forces the while loop to exit, skipping any remaining code within the loop body.
Example
In the following example, the loop iterates until i reaches to 3. When the value of i becomes 3, the condition (i === 3) is true and break statement terminates the loop.
var i:number=0;while(i <5){if(i ===3){break;}console.log(i);
  i++;}
On compiling, it will generate the following JavaScript code.
var i =0;while(i <5){if(i ===3){break;}console.log(i);
i++;}</code></pre>


The output of the above example code is as follows


0
1
2


While loop vs. for loop


You should use a for loop when the number of iterations is fixed and known. When the number of iterations is not known, you should use the while loop.


We can convert a for loop to the while loop by omitting the first and last expression in the for loop.


Lets take the example of the following for loop


for(var i =0; i <5; i++){console.log(i)}


The output is as follows-


0
1
2
3
4


We can modify the above example code as follows


var i =0for(; i <5;){console.log(i);
  i++;}


It will also produce the same output as the above code


0
1
2
3
4


In the above example, we omitted the first and third expressions in the for loop. It is similar to the while loop statement.


var i =0while(i <5){console.log(i);
  i++;}


It will also produce the same output as the above two examples.


0
1
2
3
4


Notice that a for loop without first and third expressions is similar to the while loop.
The for loop executes the code block for a specified number of times. It can be used to iterate over a fixed set of values, such as an array.
The TypeScript offers two additional loop variants: for…in and for…of. These variants are particularly useful for iterating through iterables like arrays, strings, and maps.
The for…of loop is generally preferred for iterating over iterables. It directly accesses the elements within the iterables.
The for…in loop iterates the enumerable properties of an object. While it can be used with arrays or strings, it is generally not recommended for these cases.
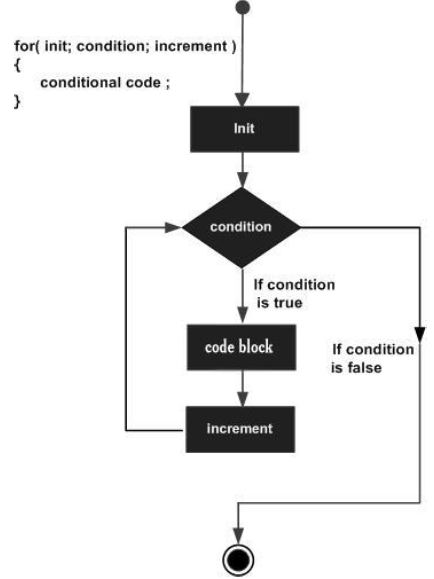
The loop uses a count variable to keep track of the iterations. The loop initializes the iteration by setting the value of count to its initial value. It executes the code block, each time the value of count satisfies the termination_condtion. The step changes the value of count after every iteration.
Flowchart
Example: Simple for loop
var num:number=5;var i:number;var factorial =1;for(i = num;i>=1;i--){
   factorial *= i;}console.log(factorial)
The program calculates the factorial of the number 5 and displays the same. The for loop generates the sequence of numbers from 5 to 1, calculating the product of the numbers in every iteration.
On compiling, it will generate following JavaScript code.
var num =5;var i;var factorial =1;for(i = num; i >=1; i--){
var i:number=0;for(i; i <5; i++){if(i ==4){break;}console.log(i);}
Inside the if condition, it breaks and exit the for loop when the value of i equals to 4. So it prints from 0 to 3 only.
On compiling, it will generate the following JavaScript code.
var i =0;for(i; i <5; i++){if(i ==4){break;}console.log(i);}
The output of the above example is as follows
0
1
2
3
Example: The for loop with continue statement
var i:number=0;for(i; i <5; i++){if(i %2==0){continue;}console.log(i);}
In the example above, the if condition (i % 2 == 0) evaluates to true, the execution control goes to then next iteration. The statements following the if block are skipped. When condition is false, the statements following the if block get executed.
On compiling it will generate the following JavaScript code.
var i =0;for(i; i <5; i++){if(i %2==0){continue;}console.log(i);}
The output is as follows
1
3
The for...in loop
Another variation of the for loop is the for... in loop. The for in loop can be used to iterate over a set of values as in the case of an array or a tuple. The syntax for the same is given below −
The for...in loop is used to iterate through a list or collection of values. The data type of val here should be string or any.
Syntax
The syntax of the for..in loop is as given below −
for(var val in list){//statements }
Lets take a look at the following examples −
Example: The for...in loop with strings
var j:any;var n:any="abc";for(j in n){console.log(n[j])}
On compiling, it will generate the following JavaScript code
var j;var n ="abc";for(j in n){console.log(n[j]);}
It will produce the following output
a
b
c
Example: The for...in loop with arrays
const arr:number[]=[10,20,30];for(var idx in arr){console.log(arr[idx]);}
On compiling it will generate the following JavaScript code.
const arr =[10,20,30];for(var idx in arr){console.log(arr[idx]);}
The output of the above example code is as follows
10
20
30
Example: The for...in loop with tuples
const tp:[string,number]=['TypeScript',20]for(var j in tp){console.log(tp[j])}
On compiling, it will generate the following JavaScript code.
const tp =['TypeScript',20];for(var j in tp){console.log(tp[j]);}
The output of the above example code is as follows
TypeScript
20
The for...of loop
The for...of loop in another variant of the for loop. The for...of loop can be used to iterate through the values of iterables. For example, we can use the for...of loop to iterate through the array and get values from every index.
Syntax
The syntax of the for...of loop in TypeScript is as follows
for(var element of iterable){// statements}
Where,
element − It is a current element of the iterable.
of − It is a ES6 operator in TypeScript.
iterable − It is an iterable like an array, string, etc.
Example: The for...of loop with arrays
const arr:string[]=["Tutorialspoint","JavaScript","TypeScript"];for(var element of arr){console.log(element);}
On compiling, it will generate the following JavaScript code.
const arr =["Tutorialspoint","JavaScript","TypeScript"];for(var element of arr){console.log(element);}
The output of the above example code is follows
Tutorialspoint
JavaScript
TypeScript
Example: The for...of loop with strings
let str:string="Hello";for(var char of str){console.log(char);}
On compiling, it will generate the following TypeScript code.
let str ="Hello";for(var char of str){console.log(char);}
The output of the above example code is as follows
You may encounter situations, when a block of code needs to be executed several number of times. In general, statements are executed sequentially: The first statement in a function is executed first, followed by the second, and so on.
Programming languages provide various control structures that allow for more complicated execution paths.
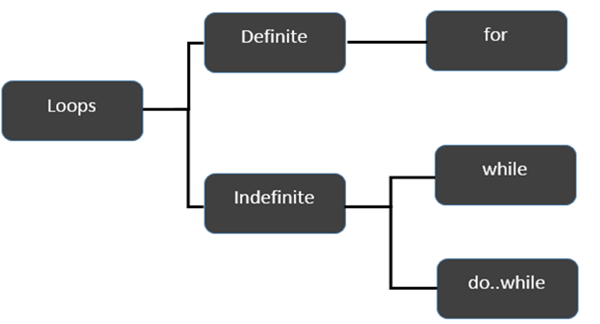
A loop statement allows us to execute a statement or group of statements multiple times. Given below is the general form of a loop statement in most of the programming languages.
TypeScript provides different types of loops to handle looping requirements. The following figure illustrates the classification of loops −
Definite Loop
A loop whose number of iterations are definite/fixed is termed as a definite loop. The for loop is an implementation of a definite loop.
S.No.
Loops & Description
1.
for loopThe for loop is an implementation of a definite loop.
Indefinite Loop
An indefinite loop is used when the number of iterations in a loop is indeterminate or unknown.
Indefinite loops can be implemented using −
S.No
Loops & Description
1.
while loopThe while loop executes the instructions each time the condition specified evaluates to true.
2.
do whileThe dowhile loop is similar to the while loop except that the do…while loop doesnt evaluate the condition for the first time the loop executes.
Example: while versus do..while
var n:number=5while(n >5){console.log("Entered while")}do{console.log("Entered dowhile")}while(n>5)
The example initially declares a while loop. The loop is entered only if the expression passed to while evaluates to true. In this example, the value of n is not greater than zero, hence the expression returns false and the loop is skipped.
On the other hand, the dowhile loop executes statement once. This is because the initial iteration does not consider the Boolean expression. However, for the subsequent iteration, the while checks the condition and takes the control out of the loop.
On compiling, it will generate following JavaScript code −
var n =5;while(n >5){console.log("Entered while");}do{console.log("Entered dowhile");}while(n >5);
The above code will produce the following output −
Entered dowhile
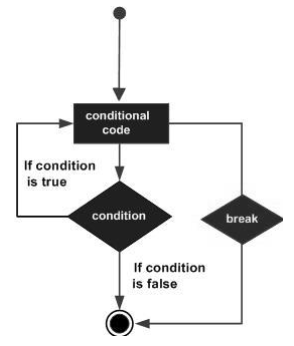
The break Statement
The break statement is used to take the control out of a construct. Using break in a loop causes the program to exit the loop. Its syntax is as follows −
Syntax
break
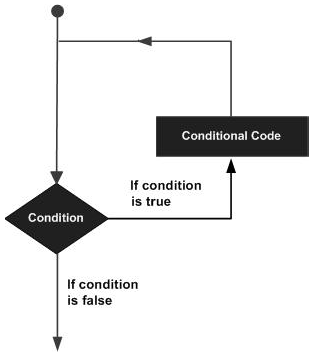
Flow diagram
Example
Now, take a look at the following example code −
var i:number=1while(i<=10){if(i %5==0){console.log("The first multiple of 5  between 1 and 10 is : "+i)break//exit the loop if the first multiple is found }
   i++}//outputs 5 and exits the loop
On compiling, it will generate the following JavaScript code −
var i =1;while(i <=10){if(i %5==0){console.log("The first multiple of 5  between 1 and 10 is : "+ i);break;//exit the loop if the first multiple is found}
   i++;}//outputs 5 and exits the loop
It will produce the following output −
The first multiple of 5 between 1 and 10 is : 5
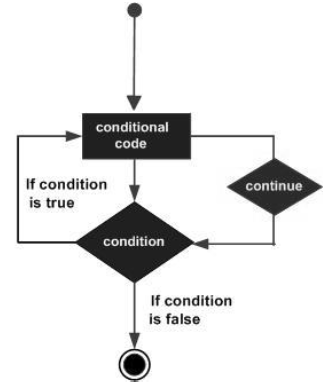
The continue Statement
The continue statement skips the subsequent statements in the current iteration and takes the control back to the beginning of the loop. Unlike the break statement, the continue doesnt exit the loop. It terminates the current iteration and starts the subsequent iteration.
Syntax
continue
Flowchart
Example
An example of the continue statement is given below −
var num:number=0var count:number=0;for(num=0;num<=20;num++){if(num %2==0){continue}
   count++}console.log(" The count of odd values between 0 and 20 is: "+count)//outputs 10
The above example displays the number of odd values between 0 and 20. The loop exits the current iteration if the number is even. This is achieved using the continue statement.
On compiling, it will generate following JavaScript code.
var num =0;var count =0;for(num =0; num <=20; num++){if(num %2==0){continue;}
   count++;}console.log(" The count of odd values between 0 and 20 is: "+ count);//outputs 10
Output
The count of odd values between 0 and 20 is: 10
The Infinite Loop
An infinite loop is a loop that runs endlessly. The for loop and the while loop can be used to make an endless loop.
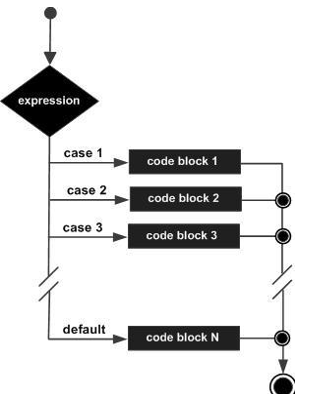
In TypeScript, the switch statement evaluates an expression, matches the expressions value to a case clause, and executes statements associated with that case.
You can use multiple if…else statements to achieve the similar functionality. However, it is not the best way especially when the all branches depend on a single value.
Syntax
The syntax of switch case in TypeScript is as follows −
The value of the variable_expression is tested against all cases in the switch. If the variable matches one of the cases, the corresponding code block is executed. If no case expression matches the matches the value of the variable_expression, the code within the default block is associated.
The following rules apply to a switch statement −
There can be any number of case statements within a switch.
The case statements can include only constants. It cannot be a variable or an expression.
The data type of the variable_expression and the constant expression must match.
Unless you put a break after each block of code, execution flows into the next block.
The case expression must be unique.
The default block is optional.
Flowchart
The following flow chart explains how a switch-case statement works.
Example: switchcase
var grade:string="A";switch(grade){case"A":{console.log("Excellent");break;}case"B":{console.log("Good");break;}case"C":{console.log("Fair");break;}case"D":{console.log("Poor");break;}default:{console.log("Invalid choice");break;}}
The example verifies the value of the variable grade against the set of constants (A, B, C, D, and E) and executes the corresponding blocks. If the value in the variable doesnt match any of the constants mentioned above, the default block will be executed.
On compiling, it will generate the following JavaScript code −
var grade ="A";switch(grade){case"A":{console.log("Excellent");break;}case"B":{console.log("Good");break;}case"C":{console.log("Fair");break;}case"D":{console.log("Poor");break;}default:{console.log("Invalid choice");break;}}
The above code will produce the following output −
Excellent
Example: Without break statement
When you dont use the break statement with any case in switch statement, the continue executing the next case without terminating it.
In the example below, we haven’t used the break statement with any case. It executes all the cases and print the respective values.
var grade:string='A';console.log("Entering switch block");switch(grade){case"A":{console.log("Excellent");}case"B":{console.log("Good");}case"C":{console.log("Fair");}case"D":{console.log("Poor");}default:{console.log("Invalid choice");}}console.log("Exiting switch block");
On compiling, it will generate the following JavaScript code.
var grade ='A';console.log("Entering switch block");switch(grade){case"A":{console.log("Excellent");}case"B":{console.log("Good");}case"C":{console.log("Fair");}case"D":{console.log("Poor");}default:{console.log("Invalid choice");}}console.log("Exiting switch block");
The output of the above example code is as follows
A nested if statement in TypeScript is an if statement that is present inside the body of another if or else statement. The else…if ladder is a type of nested if statement. The nested if statement or else…if ladder is useful to test multiple conditions. Its syntax is given below −
Syntax
if(boolean_expression1){//statements if the expression1 evaluates to true }elseif(boolean_expression2){//statements if the expression2 evaluates to true }elseif(boolean_expression3){//statements if the expression3 evaluates to false }else{//statements if all three boolean expressions result to false}
When using if…else…if and else statements, there are a few points to keep in mind.
An if can have zero or one else’s and it must come after any else…if‘s.
An if can have zero to many else…if‘s and they must come before the else.
Once an else…if succeeds, none of the remaining else…if‘s or else‘s will be tested.
Example: elseif ladder
var num:number=2if(num >0){console.log(num+" is positive")}elseif(num <0){console.log(num+" is negative")}else{console.log(num+" is neither positive nor negative")}
The snippet displays whether the value is positive, negative or zero.
On compiling, it will generate the following JavaScript code −
//Generated by typescript 1.8.10var num =2;if(num >0){console.log(num +" is positive");}elseif(num <0){console.log(num +" is negative");}else{console.log(num +" is neither positive nor negative");}
In TypeScript, the if…else statement controls the program’s execution flow based on the different conditions. If the condition evaluates to true, the if block of code is executed.
An if can be followed by an optional else block. The else block will execute if the Boolean expression tested by the if statement evaluates to false.
Syntax
The simple if…else statement in TypeScript is as follows
if(boolean_expression){// statement(s) will execute if the boolean expression is true}else{// statement(s) will execute if the boolean expression is false }
Flowchart
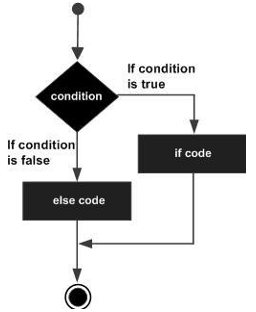
The following flow chart shows how the if…else statement works.
The if block guards the conditional expression. The block associated with the if statement is executed if the Boolean expression evaluates to true.
The if block may be followed by an optional else statement. The instruction block associated with the else block is executed if the expression evaluates to false.
Examples
Let’s understand the if…else statement in details with the help of some examples in TypeScript.
Example: Simple if…else
In the example below, the variable num is assigned the value 12. The condition (num % 2 == 0) checks if num is even. Since 12 divided by 2 has no remainder, the condition evaluates to true, and the block code following the if statement executes.
var num:number=12;if(num %2==0){console.log("Even");}else{console.log("Odd");}
On compiling, it will generate the following JavaScript code
var num =12;if(num %2==0){console.log("Even");}else{console.log("Odd");}
The above example prints whether the value in a variable is even or odd. The if block checks the divisibility of the value by 2 to determine the same. Here is the output of the above code
Even
Example: Condition evaluates false
In the above example, if you assign the value 13 to the variable num, the condition becomes false because 13 divided by 2 leaves a remainder of 1. So the block code following the else statement executes.
var num:number=13;if(num %2==0){console.log("Even");}else{console.log("Odd");}
On compiling, it will generate the following JavaScript code.
var num =13;if(num %2==0){console.log("Even");}else{console.log("Odd");}
Here the condition (13 % 2 == 0) evaluates to false and the else block executes. The output is as follows
Odd
Example: else if statement
let grade:number=85;if(grade >=90){console.log("Excellent");}elseif(grade >=80){console.log("Great");}else{console.log("Keep studying");}
Here, the if statement first checks for the condition, grade >=90. If the condition evaluates to false, the else if statement checks for the condition, grade >= 80. Finally, else block executes only if conditions are false.
On compiling, it will generate the following JavaScript code.
let grade =82;if(grade >=90){console.log("Excellent");}elseif(grade >=80){console.log("Great");}else{console.log("Keep studying");}
Here, the condition of the else if statement evaluates to true, so it prints Great as output.
In TypeScript, the if statement evaluates a condition (a boolean expression) and executes a block of code only if the condition is true. The condition is evaluated before the block of code block is executed.
If the condition is false, the code block following the else (if present) is executed. We will discuss the if…else statement in more detail in the next chapter.
Syntax
To write an if statement syntax, we use the if keyword followed by a condition in parentheses and then a block of code enclosed in curly braces ({}).
if(boolean_expression){// statement(s) will execute if the boolean expression is true }
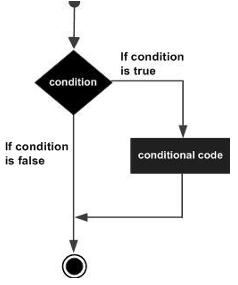
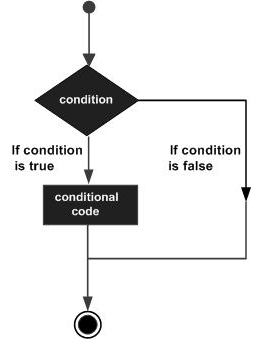
If the Boolean expression evaluates to true, then the block of code inside the if statement will be executed. If the Boolean expression evaluates to false, then the first set of code after the end of the if statement (after the closing curly brace) will be executed.
Flowchart
The following flow chart shows how the if statement works.
Examples
Let’s understand the if statement in details with the help of some examples in TypeScript.
Example 1
In the example below, we define a variable num of number type and assign it the value 5. Since the condition evaluates to true and the code of the if statement is executed.
var num:number=5if(num >0){console.log("number is positive")}
On compiling, it will generate following JavaScript code.
var num =5;if(num >0){console.log("number is positive");}
The above example will print “number is positive” as the condition specified by the if block is true.
number is positive
Example 2
In the example below, the condition is a boolean variable isQualified. If isQualified is true, the if statement executes the block of code following it.
var isQualified:boolean=true;if( isQualified ){console.log("Qualified for driving");}
On compiling, it will generate the following JavaScript code.
var isQualified =true;if( isQualified ){console.log("Qualified for driving");}
The above example will print “Qualified for driving” as the condition specified by the if block is true.
Qualified for driving
Example 3
In the example below, we define variables x, and y of number type and assign values 20 & 30 to them. The condition of the if statement is x < y. With these given values, the condition evaluates to true, so the code within the if statement is executed.
var x:number=20;var y:number=30;if(x < y){console.log("x is less than y");}
On compiling, it will produce the following JavaScript code.
var x =20;var y =30;if(x < y){console.log("x is less than y");}
The above example will print “x is less than y” as the condition (20 < 30) specified by the if statement is true.
x is less than y
Example 4: When condition is false
var x:number=100;var count:number=0;if(x <100){
count++;}console.log(count);</code></pre>
On compiling, it will produce the following JavaScript code.
var x =100;var count =0;if(x <100){
count++;}console.log(count);</code></pre>
Since the condition (x < 100) evaluates to false, the if block will not be executed. The value of count will remain same as previous. The output is as follows
In TypeScript, the decision making statements are used to control the flow of the execution based on certain conditions. TypeScript support all types of decision making constructs available in ES6, including if, if else, switch statements. As a superset of JavaScript, TypeScript inherits and expands upon JavaScripts features including decision-making statements.
Decision-making structures require that the programmer specifies one or more conditions to be evaluated or tested by the program, along with a statement or statements to be executed if the condition is determined to be true, and optionally, other statements to be executed if the condition is determined to be false.
Shown below is the general form of a typical decision-making structure found in most of the programming languages −
A decision-making construct evaluates a condition before the instructions are executed. Decision-making constructs in TypeScript are classified as follows −
S.No.
Statement & Description
1.
if statementAn if statement consists of a Boolean expression followed by one or more statements.
2.
if…else statementAn if statement can be followed by an optional else statement, which executes when the Boolean expression is false.
3.
elseif and nested if statementsYou can use one if or else if statement inside another if or else if statement(s).
4.
switch statementA switch statement allows a variable to be tested against a list of values.
Examples
Let’s understand the decision making in detail with the help of some examples in TypeScript.
Example: If Statement
In the example below, the if statement checks the condition “age >= 18”. The condition (boolean expression) is true so the statement within curly brackets ({}) is executed.
let age:number=19;if(age >=18){console.log("You care eligible for voting.");}
On compiling it will generate the following JavaScript code.
let age =19;if(age >=18){
console.log("You care eligible for voting.");}</code></pre>
The output of the above example code is as follows
You are eligible for voting.
So what if the condition (boolean expression) age >= 18 is evaluated as false.
If the condition is false, else statement will be executed.
Lets check the flowing example
Example: Ifelse statement
In this example, the condition (age >= 18) is evaluated to false so the statement following the else statement is executed.
let age:number=17;if(age >=18){console.log("You care eligible for voting.");}else{console.log("You are not eligible for voting.")}
On compiling, it will generate the following JavaScript code.
let age =17;if(age >=18){
console.log("You care eligible for voting.");}else{
console.log("You are not eligible for voting.")}</code></pre>
The output of the above example code is as follows
You are not eligible for voting.
Example: Nested if statements
In the example below, else...if ladder used to check multiple conditions. The condition grade >= 80 evaluates to true so it will print "You got a B grade" in the console.
var grade:number=85;if(grade >=90){console.log("You got an A grade");}elseif(grade >=80){console.log("You got a B grade ");}elseif(grade >=70){console.log("You got a C grade ");}elseif(grade >=60){console.log("You got a D grade ");}else{console.log("You got an F grade ");}
On compiling, it will generate the following JavaScript code.
var grade =85;if(grade >=90){
console.log("You got an A grade");}elseif(grade >=80){
console.log("You got a B grade ");}elseif(grade >=70){
console.log("You got a C grade ");}elseif(grade >=60){
console.log("You got a D grade ");}else{
console.log("You got an F grade ");}
The output of the above example code is as follows
You got a B grade
Example: Switch statement
The example below, we use the grade variable as an expression of switch case statement. It verifies the value of grade against the case constants (A, B and C) and executes the corresponding block. If value of grade does not match with any case value, the default case will be executed.
var grade:string='B';switch(grade){case'A':{console.log("Excellent");break;}case'B':{console.log("Good");break;}case'C':{console.log("Fair");break;}default:console.log("Unknown grade");}
On compiling, it will generate the following JavaScript code.