A custom directive is a user-defined directive that allows developers to extend the functionality of HTML elements. The attribute and structural built-in directives (covered in previous two chapters) offers very basic and pre-defined functionalities. However, with custom directives, you can add specific behaviors to HTML elements based on project requirements, user interactions, or changes in data.
Features and Uses of Angular Custom Directives
The Angular Custom Directives provides the following features −
The first and most basic feature of a custom directive is to modify the structure or appearance of DOM elements based on your specific logic.
It allows you to embed event listeners to the HTML elements so that their behavior can be changed in response to user interaction.
You can create a reusable and modular piece of code using custom directives.
The custom directives can also help us add various features to the user interface, such as tooltip, drag and drop, form validation, dynamic styles and much more.
Creating a Custom Directive in Angular
To create a custom directive, run the following command in Angular CLI −
ng generate directive <directive-name>
The above command will create a new directive with the specified name and add the necessary files for it. Among these files, the most important one is TypeScript file. This file has.tsextension.
Example
In this example, we will learn how to create a custom directive in Angular.
Step 1: Use the below command to create customstyle directive −
ng generate directive customstyle
After running this command, Angular CLI will create below files −
Here, constructor method gets the element using CustomStyleDirective as el. Then, it accesses style of el and sets its font size as 24px using the CSS property.
Step 3: Add the below text and use the selector of custom directive as shown below −
<p appCustomstyle>This text is styled using custom style directive</p><router-outlet />
Step 4: Import this custom directive inside app.component.ts file as shown below −
Structural directives change the structure of DOM by adding or removing elements at runtime. This type of Angular Directive is used to show or hide elements based on user authentication, render dynamic lists from APIs, or create interfaces like tabs and accordions that change based on user actions.
The structural directives are applied to elements by prefixing the directive name with an asterisk (*) symbol. To use these directives in your angular application, importing CommonModule is necessary as they are part of this module.
Built-in Structural Directives
The list of commonly used structural directives are −
ngIf: This directive is used to display or hide data in your application. When the given condition becomes TRUE, it will display the data, otherwise, it will not.
ngFor: ngFor is used to repeat a portion of elements from the given list of items.
The Angular Template does not provide the facility of conditional logic. Therefore, the ngIf directive is used to apply conditional logic. For this reason, it is also known as a conditional directive. For example, you can use the ngIf directive to display or hide data in your application based on the specified condition.
Example
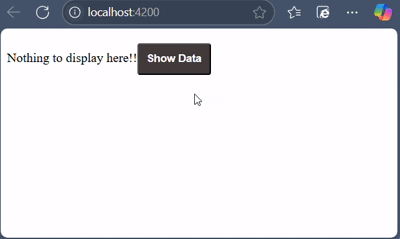
Let us try the ngIf directive in our directive-app application to show and hide information.
Now, run your application using the ng serve command and you can see the below response −
Clicking on the button will show the hidden contents.
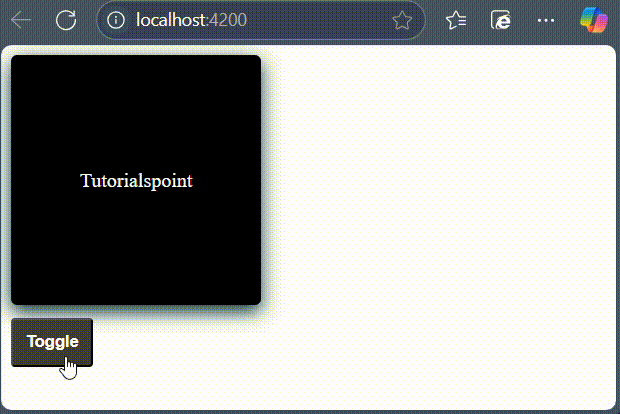
The ngIfElse Directive
The ngIfElse directive functions similarly to ngIf, but it also allows you to render content when the condition is evaluated as false. It is identical to the if-else condition that you may have learned in programming languages like C, C++ and Java.
Example
Let's understand how the ngIfElse works by creating a sample application.
Step 1: Add the following code in app.component.html file as follows −
If the condition is false, a text will be displayed and in the case of TRUE, a box will be displayed.
Step 2: Finally, start your application (if not done already) using the below command −
ng serve
Now, run your application and you can see the below response −
The ngFor Directive
Angular template does not have the feature of looping logic as well. So, to loop through given data, Angular provides NgFor directive. For example, you can use this directive to loop over an array of items and show it as a list, gallery, table, etc.
Example
Let's understand how ngFor with the help of a sample application.
Step 1: Add the list in app.component.ts file as shown below −
import{ Component }from'@angular/core';import{ RouterOutlet }from'@angular/router';import{ CommonModule }from'@angular/common';
@Component({
selector:'app-root',
standalone:true,
imports:[RouterOutlet, CommonModule],
templateUrl:'./app.component.html',
styleUrl:'./app.component.css'})exportclassAppComponent{
title ='directive-app';
list =[1,2,3,4,5];}
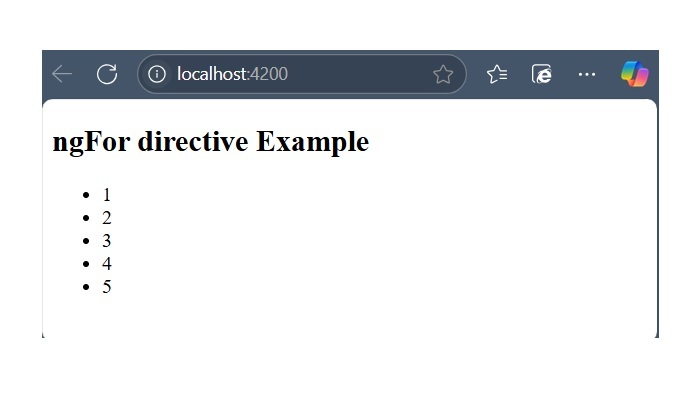
Step 2: Add ngFor directive in app.component.html as shown below −
<h2>ngFor directive Example</h2><ul><li *ngFor="let l of list">{{l}}</li></ul>
Here, the let keyword creates a local variable and it can be referenced anywhere in your template. The l creates a template local variable to get the list elements.
Step 3: Finally, start your application using the below command −
ng serve
The following response will be displayed −
Special Case: trackBy Function
Sometimes, the ngFor directive performance is low with large lists. For example, when adding a new item or removing any item in the list may trigger several DOM manipulations. To iterate over a large object collection, we usethe trackBy function.
It tracks when elements are added or removed. It has two arguments index and element. The index is used to identify each element uniquely.
Example
Let's understand how trackBy is used with ngFor in this example.
Step 1: Add the below code in app.component.ts file.
trackByData()method to access each student element in a unique way based on the id.
Step 2: Add the below code in app.component.html file to define trackBy method inside ngFor.
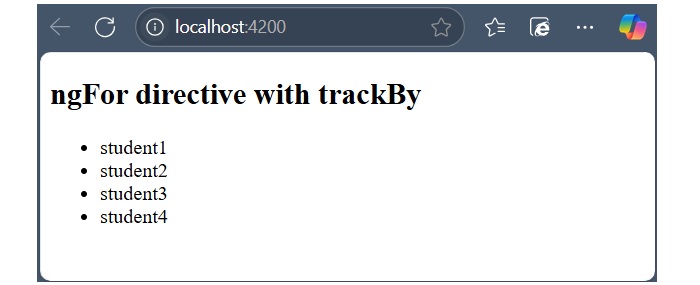
<ul><li *ngFor="let std of studentArr; trackBy: trackByData">{{std.name}}</li></ul>
Step 3: Now, run your application using ng serve command and you will get the below response −
Here, the application will print the student names. Now, the application is tracking student objects using the student id instead of object references. So, DOM elements are not affected.
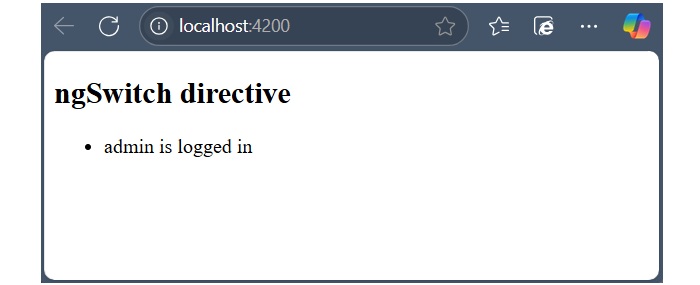
The ngSwitch Directive
Angular template does not have switch statement as well. At the place of switch statement, Angular provides the ngSwitch and its related directive to check multiple conditions and select any one of the item in a collection (of items).
Example
Let us try ngSwitch directive in our directive-app application.
Step 1: Add the following code in app.component.ts file.
Attribute directives change the appearance or behavior of DOM elements or components. It is used just like a normal HTML attribute. However, the directive should be enclosed within square brackets [ ] to bind it to the element.
Built-in Attribute Directives
The most commonly used attribute directives are as follows −
ngClass: It adds or removes CSS classes in HTML elements.
ngModel: This directive is used for two-way binding.
NOTE: To use ngStyle and ngClass directive, importing CommonModule is necessary as they are part of this module. For ngModel, we are required to import FormsModule.
The ngStyle Directive
The ngStyle directive is used to add dynamic styles. You can set one or more style properties using key-value pairs separated by a colon. Here, key is the name of style and the value is an expression that gets calculated. If the result is null, no style will be applied to the element.
Example
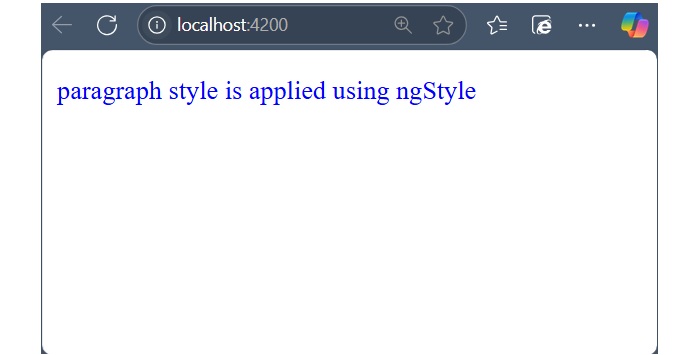
The example below shows how to apply blue color to the paragraph using ngStyle directive.
Step 1: Create a directive-app application using the below command:
ng newdirective-app
Step 2: Add the below content in app.component.html file.
<p [ngStyle]="{'color': 'blue', 'font-size': '14px'}">
   paragraph style is applied using ngStyle
</p><router-outlet />
Step 4: Start your application (if not done already) using the below command −
ng serve
Now, run your application and you can see the below response −
The ngClass Directive
The ngClass directive is used to add or remove CSS classes in HTML elements. The CSS classes are updated based on given conditions or type of expression.
If the expression is a string, the CSS classes specified in the string are added. If it’s an array, the CSS classes listed as array elements are added. And, if the expression is an object, the keys represent CSS classes that will be added when their corresponding values are evaluated to a truthy value and removed when their values are falsy.
Example
Let’s try ngClass directive in our directive-app application.
Step 1: Change the above code of the app.component.html file with the following code:
Step 4: Finally, start your application (if not done already) using the below command −
ng serve
Now, run your application and you can see the below response −
The ngModel Directive
The ngModel is a built-in attribute directive. It is mostly used to enable two-way data binding for HTML form elements with the help of banana-in-a-box syntax "[()]". However, you if you use ngModel in square bracket [] syntax, it will enable the one-way binding.
The ngModel directive is provided by a separate module called FormsModule, which is necessary for template-driven forms.
Example
A simple example of two way binding is given below. Here, a user object with name property is defined. Whenever user change the input field, the updated user name will be reflected to the user.name variable in the component. Similarly, if the components variable, user.name gets changed, the input fields value will be updated as well.
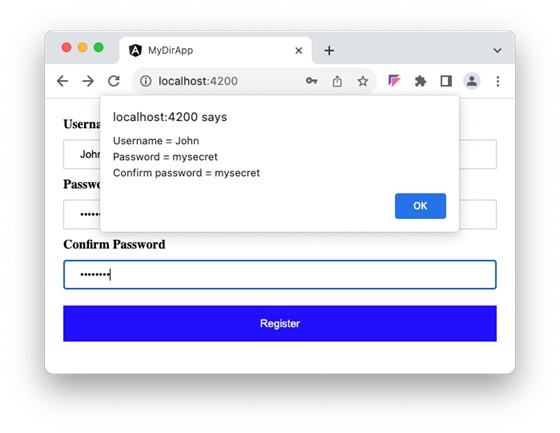
Let us create a simple registration form to understand ngModel directive. Our registration form will have three input fields as shown below and a button to submit the registration form:
Username
Password
Confirm password
Step 1: Create a new application, my-app using angular CLI as shown below −
ng newmy-app
Step 2: Create a new registration form component, RegisterForm using angular CLI as shown below −
ng generate component RegisterForm
Step 3: Open the registration form component's template and a user with username, password and confirm password.
Here, ngModel sets the value from "user" object to HTML input element. It sets the user-entered value to the user object in the reverse direction as well.
Step 4: Open the registration form component's style and add some CSS to the form as shown below −
Step 6: Next, add an object named "user" with username, password and confirmPassword properties. The "user" object will have an empty string initially. Once the user enters the data, it will get populated through NgModel directive.
user: any ={
   username:'',
   password:'',
   confirmPassword:''}
Step 7: Create a new member method, showInfo() in the component class. The purpose of the method is to collect the current user information and show it through alert() method.
showInfo(e: Event){
   e.preventDefault();let info: string ='';
   info +='Username = '+this.user.username;
   info +='\nPassword = '+this.user.password;
   info +='\nConfirm password = '+this.user.confirmPassword;alert(info)}
Here,
preventDefault() method of the event object will prevent the default action of submit button.
alert() method will show the message to the user.
Step 8: The complete listing of the component i.e. register-form.component.ts is as follows:
Step 10: Now, run the application, fill out the form and click the register button. It will collect the information through ngModel binding and show it through the alert() function.
Angular directives are classes that enhance the feature of a HTML element or component and add additional behavior to the web application. They can transform a static HTML page into dynamic by manipulating DOM. They begin with ng, which stands for Angular.
The @directive decorator is used to mark a TypeScript class as an Angular Directive. This decorator contains some configuration metadata that determines how the directive should be processed, instantiated and used at runtime.
HTML DOM model is constructed as a tree of objects. It is a standard object model to access HTML elements.
Features and Uses of Angular Directives
Following are the features and uses of Angular Directives −
Using directives, you can create your custom HTML elements, attributes and classes.
They allow developers to create the required features once and reuse them across different parts of the Angular application.
It became easy to update and maintain the code as we didn’t need to write code for the same feature again and again.
Directives can control the DOM elements.
Types of Directives
Directives are categorized based on the type of feature it provides to the HTML element/component. The type of directive and its purpose are as follows:
Components: Component is basically a type of directive. As we know, they can generate a a piece of HTML document in memory (DOM structure), called View. The view will have both design and event based dynamic functionality.
Attribute directives: Attribute directives provides additional feature to a HTML element/component (host) with respect to appearance and behavior. For example, a menu component attached to a attribute directive can show next level of menu upon hovering the component.
Structural directives: Structural directives can change the entire layout of the host HTML element/component by adding or removing the component’s DOM elements.
Structural Directives
Structural directives change the structure of DOM by adding or removing elements. It is denoted by an asterisk (*) symbol with three pre-defined directives ngIf, ngFor and ngSwitch. Let’s understand one by one in brief.
The list of commonly used structural directives are:
ngIf − This directive is used to display or hide data in your application. When the given condition becomes TRUE, it will display the data, otherwise not. We can add this to any tag in our template.
ngFor − ngFor is used to repeat a portion of elements from the given list of items.
ngSwitch − It checks multiple conditions.
Attribute Directives
Attribute directives change the appearance or behavior of DOM elements or components. It is used just like a normal HTML attribute. However, the directive should be enclosed within square brackets [ ] to bind it to the element.
The most commonly used attribute directives are as follows:
ngStyle − It is used to add dynamic styles.
ngClass − It adds or removes CSS classes in HTML elements.
ngModel − This directive is used for two-way binding.
Component Directives
Each component of an Angular application is a directive itself. It is a special directive with Views. Also, it has @Input and @Output decorator to send and receive information between parent and child components.
Syntax
To create a component for your Angular application, use the command given below −
ng generate component component-name
Difference between Component and Directive
The table below shows how Components are different from Directives −
Components
Directives
Components in Angular are used to create UI elements and manage their state.
Directives in Angular are classes that can modify the behavior or appearance of existing DOM elements.
They create reusable UI elements.
They create reusable features and behaviors for certain elements.
The @Component decorator is used to declare a Component.
The @Directive decorator is used to declare a Directive.
There is only one component for each DOM element.
There can be one or more directives for each DOM element.
Custom Directives
A custom directive is a user-defined directive that allows developers to extend the functionality of HTML elements. The attribute and structural built-in directives (covered in previous two chapters) offers very basic and pre-defined functionalities. However, with custom directives, you can add specific behaviors to HTML elements based on project requirements, user interactions, or changes in data.
To create a custom directive, run the following command in Angular CLI −