Scalable Vector Graphics, in short SVG, is used to create vector-based graphics in XML format. XML is a markup language like HTML that stores and transfers data on the web.
SVG provides a framework for creating rich graphics with declarative programming. Angular template can be applied to the SVG to create dynamic graphics with minimal effort.
In this chapter, we will understand how to create SVG as an Angular Template.
Creating SVG as a Template
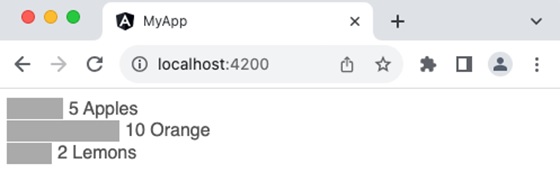
Let us create a simple bar chart in SVG format and use it in our template and then update the bar chart dynamically through template input variables.
Step 1: Create a new application using angular CLI as shown below −
$ ng newmy-app
Step 2: Create a component, chart using angular CLI as shown below −
ngFor (structural directive) is used to loop over the fruits.
Attribute binding ([attr.width], [attr.x] & [attr-y]) is used along with template statement to dynamically add each bar in the chart based on the fruits template variable
fruit.count * 10 is a template statement, which sets the width of the bar based on the fruit count
0 + (i * 20) is another template statement, which sets the y position of the bar in the chart.
fruit.count * 10 + 5 is another template statement, which sets x position of the text at the end of the bar in the chart.
10 + (i * 20) is another template statement, which sets the y position of the text at the end of the bar in the chart.
Step 13: Run the application and check whether the chart is rendered properly.
Template variables are variables available in the context of template. Angular does not allow the developer to create a new variable in the template. Instead, it allows new variables to be passed into the template through a component or directive instance. Also, it allows to declare a variable in the template and refers to any of the existing elements available in the template.
Let us learn more about template variables in this chapter.
Types of Template Variables
There are two types of template variables −
Template input variable: Template input variables are passed into the template either through component or directive instance.
Template reference variable: Template reference variables are declared in the template itself and refer to the existing element in the template.
Template Input Variable
Template input variables are variables passed into the template and available in the context of template. They are passed into the template through multiple channels. They are as follows:
Component: Component exposes all its public variables/properties to it’s template
Directive: Directive exposes selective variables into the template during its execution. For example, ngFor exposes index and current looping variable to the template as shown below,
users is template input variable exposed by component.
user and i are template input variables exposed by ngFor directive.
Template Reference Variable
The syntax to declare a template reference variables is #var (# along with variable name). Angular allows the variable to be declared as attributes of an element available in the template. The type and value of the template reference variable depend on where it is declared.
1. If a variable is declared inside an element, then it refers to the HTML element.
<button #btn>Click Here</button>
Here, btn refers to the button object of type HtmlButtonElement
2. If a variable is declared inside a component, then it refers to the component instance.
<app-comp #mycomp></app-comp>
Here, mycomp refers to the component instance and can access the internal of the referenced component.
3. If a variable is declared inside a template (ng-template, a tag used to create template within a template), then it refers to the instance of the template.
<ng-template #mytemplate><div>Hi, I am template within the template</div></ng-template>
Here, mytemplate refers to the instance of the template.
4. If a variable is declared inside a custom web component, then it refers to the custom HTML element.
<my-card #mycard>Click Here</my-card>
Here, mycard refers to the custom web component, my-card
Let us see how to create a template reference variable, firstname to refer to an input element as shown below −
firstname represents the instance of HtmlInputElement element. HtmlInputElement is a type in DOM to represent the input element.
firstname can access all properties and methods of HtmlInputElement element
The template reference variable can be used in template statement and text interpolation.
Example
Let us create an application to show the value entered by user in an input box to a span element using pure template reference variable concept. The application will provide a button for the user to fire the process of accessing the input box value and show it in the span element.
Step 1: Create a new application using angular CLI as shown below −
$ ng newmy-app
Step 2: Create a component, MyTemplateRefVarSample using angular CLI as shown below −
Here, the click event has a single template statement, which will access the value entered by user in input element through value property of source object and set it into the target element, span using innerText property of target object.
Step 7: Next, open the app components template file, src/app/app.component.html and add our component as shown below −
<app-my-template-ref-var-sample />
Step 8: Finally, run the application and check whether the button is working fine.
Template reference variable with a value
In general, a template reference variable will only declare a variable inside the element to be referred.
<form #formVar><!-- form information --></form>
Here, the formVar represents the object of type HtmlFormElement. But, in some cases, it can include value as well. If it includes value, then the value is interrupted as directive or component with exportAs property matching the set value.
To better understand the concept, let us change the above form to include ngForm as value.
<form #formVar="ngForm"><!-- form information --></form>
ngForm is a directive provided by angular team to support form programming. Here, the formVar refers to an instance of ngForm directive instead of HtmlFormElement. formVar can access properties and methods (like formVar.form.valid) of ngForm and do better form programming.
Template statements are used to interact with users through events in the HTML document. They allow the developer to call the components method in response to the users action. Also, it allows the developer to write simple logic in the template itself with multiple statements separated by colon (;). Let’s learn more about the template statement in this chapter.
Syntax
Template statement is similar to JavaScript expression with the below exceptions.
Compound assignment operators: The template statement does not support compound assignment operators (+= and -=). Compared to the template expression, the statement supports the normal assignment operator (=).
The new keyword: Template does not allow the creation of new objects. All objects should be created in the component class. An object created in the component will be available in the template.
Increment and decrement operators: Template does not allow side effects. Since the increment and decrement operators do the side effects, they are excluded.
Bitwise operator: Bitwise operators (| and &) are not supported.
Pipe operator: Template statement does not support pipe (|) operator.
How to use Template Statements in the Template
Template statements can be written inside the double quotes and set as the value of components or elements event property as shown below −
<button(click)="<statements>">Click here</button>
Here,
(click) represent the click event of the button. It uses event binding concept, which is explained in the Event binding chapter.
<statement> can be any template statement as specified in the previous section.
Template Statement Context
Similar to template expression, template statement has three contexts, which are:
1. Components property/method: Component’s property/method is the property/method set in the components instance. For example, a user object (user) in the component can be used in the template as follows,
Here, the context of user property and showUser() method is components instance.
2. Template input variable: Template input variables are input to the template assigned through directives. For example, ngFor directive sends the index and current item of the loop to the template as shown below −
<ul><li *ngFor="let user of users"(click)="showUser(user)">{{user.name}}</li></ul>
Here, the context of user property is template input variable.
3. Template reference variable: Template reference variable is basically a representation of HTML elements, components and directives in the given template as shown below −
Here, the context of user & user.value is template reference variable.
The precedence of context in case of name collision is as follow,
Template variable
Variable in the directives context
Components member variable and method
The angular team recommends using complex logic in the components method and calling it through a template statement instead of trying to write the logic in the template itself using a template statement.
Example
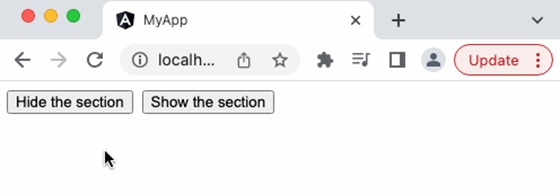
Let us consider a simple scenario of show/hide a section through user’s action.
Step 1: Create a new application using angular CLI as shown below −
$ ng newmy-app
Step 2: Create a component, BlockWithShowHide using angular CLI as shown below −
Step 3: Next, open the component file, src/app/block-with-show-hide/block-with-show-hide.component.ts and add a variable, hideStatus to represent the show / hide status
hideStatus: boolean =false;
Step 4: Next, add two method, show() and hide() to change the value of hideStatus variable with respect to the users action.
Step 5: Next, open the components template file, src/app/block-with-show-hide/block-with-show-hide.component.html and a block with two buttons,
<div><div><p>Hi, I am simple section created for the testing purpose<p></div><button>Hide the section</button><button>Show the section</button></div>
Step 6: Next, add click event to the button and the corresponding method as shown below −
<div><div [class.hide]="hideStatus"><p>Hi, I am simple section created for the testing purpose<p></div><button (click)="hide()">Hide the section</button><button (click)="show()">Show the section</button></div>
Step 7: Next, add a class property binding, class.hide with value hideStatus in the block to be shown / hidden.
<div><div [class.hide]="hideStatus"><p>Hi, I am simple section created for the testing purpose<p></div><button (click)="hide()">Hide the section</button><button (click)="show()">Show the section</button></div>
Here,
class.hide represents the hide CSS class and it will be set if its value hideStatus is true.
Step 8: The complete listing of the component is as follows,
Template is a small part of an Angular application’s user interface(UI). It is written in HTML and its use is to generate the view of a component to be rendered in the browser. Since the purpose of an angular template is to produce only a chunk of HTML and not a complete HTML document, it does not support a few HTML elements, which are <html>, <body> and <base>. The <script> tag is not supported intentionally to prevent script injection in the final angular application.
Relation between Template and Component
Angular Component controls how a view should be displayed on the browser screen. It consists of a TypeScript class and CSS style along with an HTML template. Templates can be found inside the metadata of a Component defined using the template property or linked using the templateURL property. We can conclude that the Component generates the view with the help of Template.
Ways to Define Templates in Angular
There are two ways in which we can define Angular Templates −
Inline: We can create a template using the template property of the @Component decorator directly in the component class file.
External: It is the default way of creating a template. It uses the templateUrl property to link a template to a Component.
The Angular Views
Angular provides a rich set of features to create a user interface of the application. A portion of the user interface in an angular application is called View. Angular Views are basically a chunk of HTML/DOM structure represented immediately in the memory during the execution of an angular application and are rendered into the final HTML markup.
Each component in an Angular application has an associated view, known as a component view, which is created from the template associate with the component. This template and component instance have dynamic interaction between them. The template receives data from the component and sends data back to the component as well.
Features of Angular Template
In addition to HTML, The Angular template supports additional features to create dynamic content and to provide rich interaction with components. These additional features are −
Text interpolation
Text transformation through angular pipes
Template Statements
Data Binding
Directives
Template Variables
Text Interpolation
Text interpolation is the usage of a component’s data in its template using the template expression. Let us consider that a component has a name as one of its properties.
exportclassHomeComponent{
   name: string ='John'}
Then, name can be used in its template as shown below −
Hello {{ name }}
Please note that the double curly brace is used to specify the template expression.
Text Transformation through Pipes
Text transformation can be done in the template using pipe symbol (|). Angular template provides a unique feature called Angular pipes, basically a javascript function, which accepts input along with modifiers through arguments and transforms the input data from one format to another and renders it. Angular has many built-in pipes for date, currency, etc., and also provides an option to create new, customized pipes.
Let us consider a simple component, CurrentTimeComponent to show the current time along with the date.
exportclassCurrentTimeComponent{
   currentDate : date =newDate()}<div>
   The current date and time is {{ currentDate | date:'short'}}</div>
Here, the date is the pipe function (datePipe) and short is its argument. This will show the current date with time in a simple format as shown below
<div _ngcontent-ng-c323970836="">
   The current date and time is 7/29/23,3:35PM</div>
Template Statement
Template statements are used to interact with users through events in the HTML document. They are similar to JavaScript expressions with few exceptions and few additions.
Let us consider a simple scenario of show/hide a section through user’s action. The component will have a hide() method to hide and another method show() to show the section. The component’s template will have two buttons to fire the show and hide action. The click event of the buttons will be set with show/hide method through template statement.
Here, hideStatus is a boolean property of the component used to set/remove the CSS class, hide in the section element. show() and hide() are two method to execute the action of setting / remove the css class from the section element.
.hide {
   display: none;}<div [class.hide]="hideStatus"><p>Hi,I am simple section created for the testing purpose<p></div><button(click)="hide()">Hide the section</button><button(click)="show()">Show the section</button>
Here, hide() and show() are template statements used to set the action for click event of the buttons. [class.hide]=”hideStatus” is class binding concept available in angular template, which we will learn in upcoming chapters.
Data Binding
Binding is the process of connecting a target in the template and an expression or statement based on model of the component to which the template belongs. Text interpolation is the simplest form for binding and angular provides many types of binding. They are as follows,
Text interpolation: Text interpolation is the process of connecting model of a components instance to the text portion of components template
Attribute binding: Attribute binding is the process of connecting model of a components instance to the attribute of a (target) HTML element in the components template
Class and style binding: Class and style binding is the process of connecting model of a components instance to the class and style attributes of a (target) HTML element in the components template
Property binding: Property binding is the process of connecting model of a components instance to the property of a (target) HTML element / other component in the components template. Angular exposes the attributes of HTML element as properties with attribute names converted to CamelCase. This will help to connect all attributes of the HTML element through property binding.
Event binding: Event binding is the process of connecting the model of a components instance method to the event of a (target) HTML element / (another) component.
Two way data binding: Two way data binding is a combination of property and event binding to sync data between parent and child component.
Directives
Angular provides an excellent feature, Directive to add additional behavior to any existing HTML elements or components in a generic way. In addition to creating new directives, angular provides a default set of directives to provide additional functionality like condition (ngIf) and loops (ngFor) (which are not available in the angular tempaltes) to the HTML elements and component. We will learn the complete set of built-in directive in the later chapter.
A simple example of using ngIf directive to show or hide a target element is as follows,
Here, showSection is a variable in the component having truthy value.
<div *ngIf="showSection">
   I will be shown based on the showSection property in the component's
   instance.
</div>
Here, showSection is the condition (template expression) used by ngIf to decide whether to render the div element. If the condition succeeds, it will render the div element; otherwise, it will skip the rendering of the element.
If the showSection value is changed to false, then the section will not be shown.
Template Variables
The Template Variable is basically used to reference any one of the below items in the template.
HTML element
Directive
Component
Template inside template (ng-template)
Web component
Let us create a reference to a input element and span element and show the value entered in the input element to the span element.
source is the template variable referring to the input element.
target is the template variable referring to the target span element.
When the user clicks the button, the click event will fire and run the statement specified inside the event and set the data entered by user into the span element.