Category: 02. Angular 7

https://cdn3d.iconscout.com/3d/free/thumb/free-angularjs-3d-icon-download-in-png-blend-fbx-gltf-file-formats–google-logo-html-angular-coding-lang-pack-logos-icons-7577994.png?f=webp

  • Style elements dynamically with ngStyle

    The ngStyle attribute is used to change or style the multiple properties of Angular. You can change the value, color, and size etc. of the elements.

    Let’s see this by an example:

    component.ts file:

    import {Component} from '@angular/core';  
    
    @Component(  
    
      {selector: 'app-server',  
    
        templateUrl: 'server.component.html'})  
    
    export class ServerComponent {  
    
      serverID: number = 10;  
    
      serverStatus: string = 'Offline';  


      constructor () {  
    
      this.serverStatus = Math.random() > 0.5 ? 'Online' : 'Offline';  
    
    }  
    
     getServerStatus() {  
    
      return this.serverStatus;  
    
      }  
    
    }

    component.html file:

    <p>Server with ID {{serverID}} is {{serverStatus}}. </p>  

    Here, we have chosen a method to show the method randomly “Online” and “Offline”. There is 50% chance.

    Output:

    Style elements dynamically with ngStyle

    Let’s use ngStyle to change the background color ‘red’ when the server is offline and “green” when the server is online.

    component.html file:

    <p [ngStyle]="{backgroundColor: getColor()}">  Server  with ID {{serverID}} is {{serverStatus}}. </p>  

    Here, we have created a method getColor() to change the color dynamically.

    Output:

    Style elements dynamically with ngStyle

    If both servers are online, it will be as:

    Style elements dynamically with ngStyle

    This is the example of ngStyle attribute with property binding to configure it.

    How to apply CSS classes dynamically with ngClass

    In the previous article, we have seen that how to use ngStyle to make changes in an element dynamically. Here, we shall use ngClass directive to apply a CSS class to the element. It facilitates you to add or remove a CSS dynamically.

    Example:

    Let’s create a class in component.ts file which will change the color of the text yellow if the server is online.

    component.ts file:

    import {Component} from '@angular/core';  
    
    @Component(  
    
      {selector: 'app-server',  
    
        templateUrl: 'server.component.html',  
    
        styles: [`  
    
        .Online{  
    
          color: yellow;  
    
        }`]  


      })  
    
    export class ServerComponent {  
    
      serverID: number = 10;  
    
      serverStatus: string = 'Offline';  


      constructor () {  
    
        this.serverStatus = Math.random() > 0.5 ? 'Online' : 'Offline';  
    
      }  
    
      getServerStatus() {  
    
        return this.serverStatus;  
    
      }  
    
      getColor() {  
    
        return this.serverStatus === 'Online' ? 'green' : 'red';  
    
      }  
    
    }

    component.html file:

    <p [ngStyle]="{backgroundColor: getColor()}"  
    
    [ngClass]="{Online: serverStatus === 'Online'}">  Server  with ID {{serverID}} is {{serverStatus}}. </p> 

      Output:

      Style elements dynamically with ngStyle

      You can see that the ngClass directive has changed the color of the text which is online. This is an example of ngClass directive with property binding applying CSS class dynamically.

    1. Use of *ngIf directive to change the output conditionally

      Example:

      component.ts file:

      import { Component, OnInit } from '@angular/core';  


      @Component({  
      
        selector: 'app-server2',  
      
        templateUrl: './server2.component.html',  
      
        styleUrls: ['./server2.component.css']  
      
      })  
      
      export class Server2Component implements OnInit {  
      
       allowNewServer = false;  
      
       serverCreationStatus = 'No server is created.';  
      
        serverName = 'TestServer';  
      
        serverCreated = false;  


        /*constructor() {  
      
          setTimeout(() =>{  
      
            this.allowNewServer = true;  
      
          }, 5000);  
      
        }*/  


        ngOnInit() {  
      
        }  
      
        onCreateServer() {  
      
          this.serverCreated = true;  
      
          this.serverCreationStatus = 'Server is created. Name of the server is' + this.serverName;  
      
        }  
      
        OnUpdateServerName(event: Event) {  
      
          this.serverName = (<HTMLInputElement>event.target).value;  
      
        }  
      
      }

      component.html file:

      <p>  
      
        Server2 is also working fine.  
      
      </p>  


      <label>Server Name</label>  
      
      <!--<input type="text"  
      
             class="form-control"  
      
             (input)="OnUpdateServerName($event)">-->  
      
      <input type="text"  
      
             class="form-control"  
      
      [(ngModel)]="serverName">  
      
      <!--<p>{{serverName}}</p>-->  
      
      <button  
      
        class="btn btn-primary"  
      
        [disabled]="allowNewServer"  
      
        (click)="onCreateServer()">Add Server</button>  
      
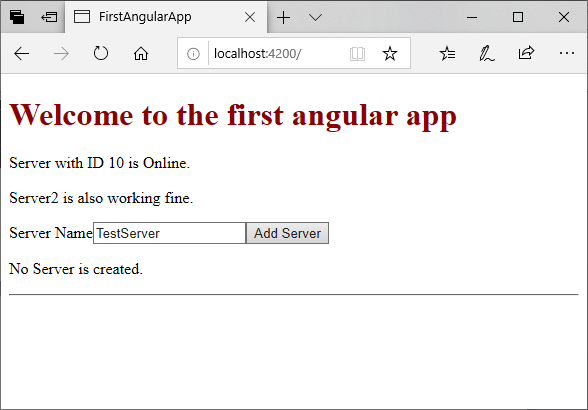
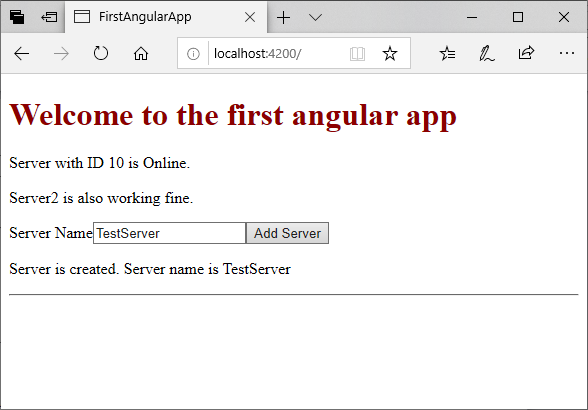
      <p *ngIf="serverCreated"> Server is created. Server name is {{serverName}}</p> 
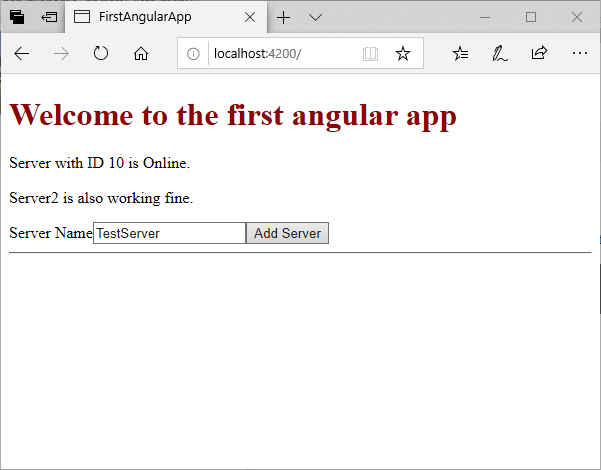
        Output:

        The output will look like this.

        Use of *ngIf directive to change the output conditionally

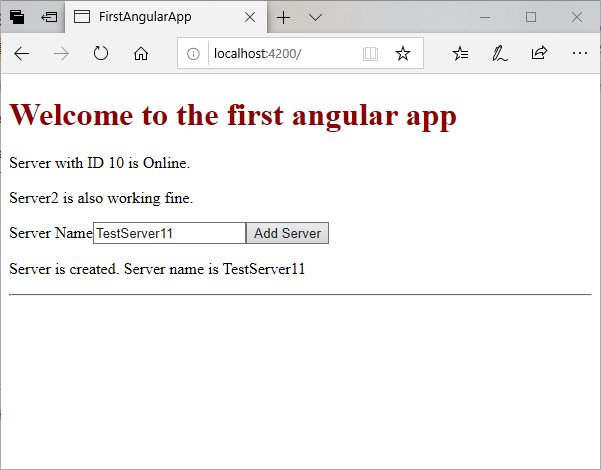
        When we change the input value and click on “Add Server” button, you will see the following result:

        Use of *ngIf directive to change the output conditionally

        You can see in the above example that by using *ngIf directive, we can change the condition to display the output accordingly.

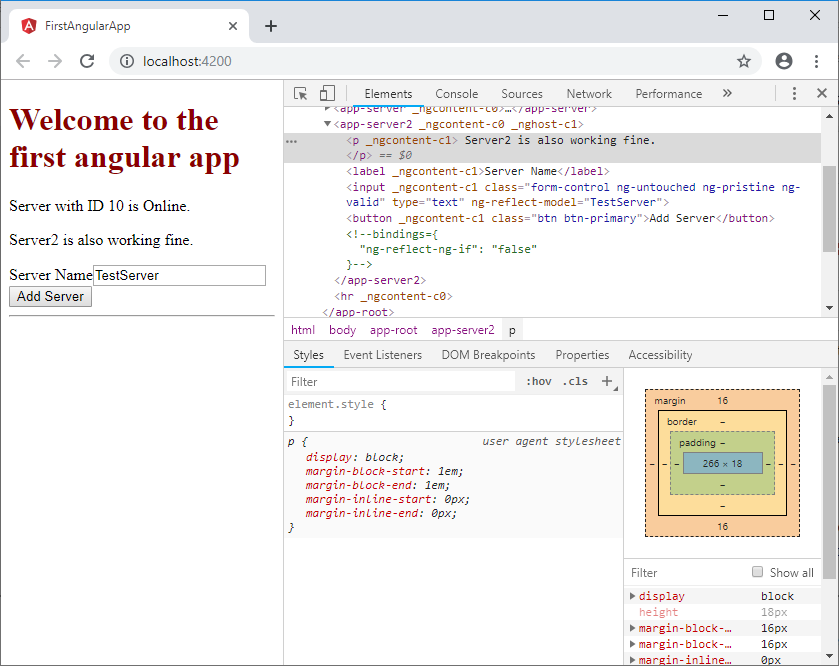
        You can check the view source of your output before and after the adding the server. You will see the difference clearly.

        Before adding server:

        Use of *ngIf directive to change the output conditionally

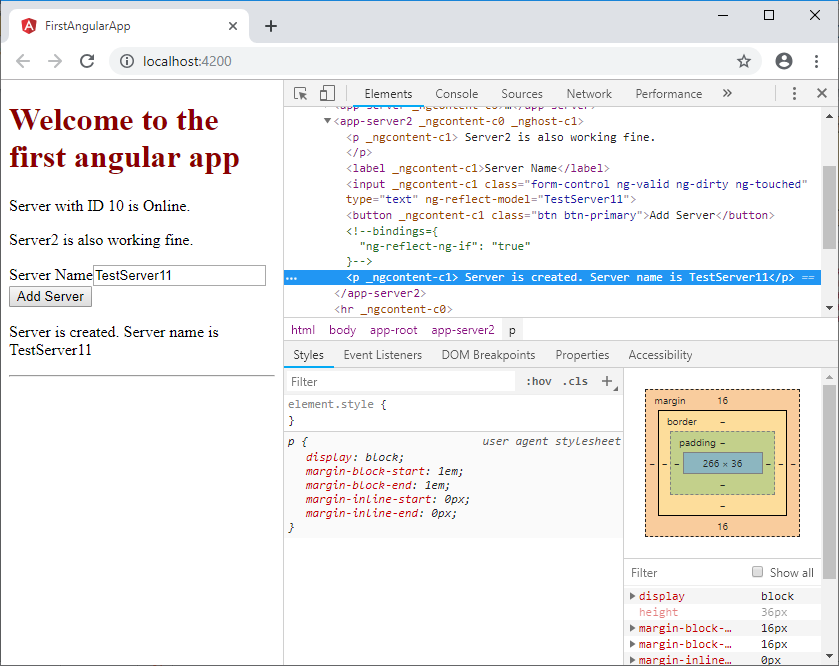
        After adding the server:

        Use of *ngIf directive to change the output conditionally

        So, you can see that how a structural directive can change the DOM.

        *ngIf directive with an Else condition

        You can also use an Else condition with *ngIf directive. It is used to display the output if *ngIf is not true. Let’s make some changes in component.html file.

        component.html file:

        <p *ngIf="serverCreated; else noServer"> Server is created. Server name is {{serverName}}</p>  
        
        <ng-template #noServer>  
        
          <p>No Server is created.</p>  
        
        </ng-template> 

          Output:

          Use of *ngIf directive to change the output conditionally

          After clicking on “Add Server” button:

          Use of *ngIf directive to change the output conditionally

          You can also check its reverse case by using the negation (!) sign.

          <p *ngIf="!serverCreated; else noServer"> Server is created. Server name is {{serverName}}</p>  
          
          <ng-template #noServer>  
          
            <p>No Server is created.</p>  
          
          </ng-template>
        1. Angular 7 Directives

          Directives are instructions in the DOM. They specify how to place your components and business logic in the Angular.

          Directives are js class and declared as @directive. There are 3 directives in Angular.

          • Component Directives
          • Structural Directives
          • Attribute Directives

          Component Directives: Component directives are used in main class. They contain the detail of how the component should be processed, instantiated and used at runtime.

          Structural Directives: Structural directives start with a * sign. These directives are used to manipulate and change the structure of the DOM elements. For example, *ngIf and *ngFor.

          Attribute Directives: Attribute directives are used to change the look and behavior of the DOM elements. For example: ngClass, ngStyle etc.

          Difference between Attribute Directive and Structural Directive

          Attribute DirectivesStructural Directives
          Attribute directives look like a normal HTML Attribute and mainly used in databinding and event binding.Structural Directives start with a * symbol and look different.
          Attribute Directives affect only the element they are added to.Structural Directives affect the whole area in the DOM.

          How to create custom Directives?

          You can create your own custom directives to use in Angular components.

          Create a basic attribute directive

          You have seen the attribute directive like ngClass and ngStyle. Now, it’s time to create our own attribute directives.

          First, create a folder. Let’s name it “simple-style”. Then, create a file within that folder named as “simple-style.directive.ts”

          import {Directive, ElementRef, OnInit} from '@angular/core';  


           @Directive( {  
          
            selector: '[appSimpleStyle]'  
          
          })  
          
          export class SimpleStyleDirective implements OnInit {  
          
            constructor(private elementRef: ElementRef) {  
          
            }  
          
            ngOnInit() {  
          
            this.elementRef.nativeElement.style.backgroundColor = 'green';  
          
            } 

            Now, you have to inform Angular that you have a new directive. So, you have to add SimpleStyleDirective to app.module.ts and also import it.

            import { BrowserModule } from '@angular/platform-browser';  
            
            import { NgModule } from '@angular/core';  


            import { AppComponent } from './app.component';  
            
            import {SimpleStyleDirective} from './simple-style/simple-style.directive';  


            @NgModule({  
            
              declarations: [  
            
                AppComponent,  
            
                SimpleStyleDirective  
            
              ],  
            
              imports: [  
            
                BrowserModule  
            
              ],  
            
              providers: [],  
            
              bootstrap: [AppComponent]  
            
            })  
            
            export class AppModule { } 

            Now, your directive is created. Let’s check it. Open app.component.html and use your created SimpleStyleDirective

            <p appSimpleStyle>Style me with your created SimpleStyleDirective</p>

            <div class="container">  
              <div class="row">  
             <div class="col-xs-12">  
               <h2>My Servers</h2>  
               <button class="btn btn-primary" (click)="OnAddServer()">Add Server</button>  
             <br><br>  
              
             <ul class="list-group">  
               <li  
               class="list-group-item "  
               *ngFor="let server of servers; let i = index"  
               (click)="onRemoveServer(i)">{{ server }}  
               </li>  
             </ul>  
             <p appSimpleStyle>Style me with your created SimpleStyleDirective</p>  
             </div>  
             </div>  
            </div>  
            </textarea></div>  
            <p><strong>Output:</strong></p>  
            <img src="https://static.javatpoint.com/tutorial/angular7/images/angular7-directives.png" alt="Angular 7 Directives"/>  
            <p>You can see that your created attribute directive is working. Here, you have learnt how to create selector, how to create attribute directory, and also learnt how to use   and also how to use</p>  
              
            <hr/>  
            <div class="nexttopicdiv">  
            <span class="nexttopictext">Next Topic</span><span class="nexttopiclink"><a href="angular-7-ngif-directive">Angular 7 ngIf Directive</a></span>  
            </div>  
            <!-- link -->  
            <br/><br/>  
              
            <div id="bottomnext">  
            <a style="float:left" class="next" href="angular-7-error-fixing">← prev</a>  
            <a style="float:right" class="next" href="angular-7-ngif-directive">next →</a>  
            </div>  
              
            <br/><br/>  
            </td></tr>  
            </table>  
            </div>  
               
              
            <hr class="hrhomebox"/>  
              
            
                       &lt;div>&lt;img class="lazyload" data-src="https://static.javatpoint.com/images/youtube-32.png" style="vertical-align:middle;" alt="Youtube" />  
                       &lt;span class="h3" style="vertical-align:middle;font-size:22px"> For Videos Join Our Youtube Channel: &lt;a href="https://bit.ly/2FOeX6S" target="_blank"> Join Now&lt;/a>&lt;/span>  
                       &lt;/div>  
                       &lt;hr class="hrhomebox"/>  
            <h3 class="h3">Feedback</h3> <ul class="points"> <li>Send your Feedback to [email protected]</li> </ul> <hr class="hrhomebox"/> <h2 class="h2">Help Others, Please Share</h2> <a rel="nofollow" title="Facebook" target="_blank" href="https://www.facebook.com/sharer.php?u=https://www.javatpoint.com/angular-7-directives"><img src="https://www.javatpoint.com/images/facebook32.png" alt="facebook"/></a> <a rel="nofollow" title="Twitter" target="_blank" href="https://twitter.com/share?url=https://www.javatpoint.com/angular-7-directives"><img src="https://www.javatpoint.com/images/twitter32.png" alt="twitter"/></a> <a rel="nofollow" title="Pinterest" target="_blank" href="https://www.pinterest.com/pin/create/button/?url=https://www.javatpoint.com/angular-7-directives"><img src="https://www.javatpoint.com/images/pinterest32.png" alt="pinterest"/></a> <!-- contribute start--> <hr class="hrhomebox"/> <!-- latest tutorials start --> <fieldset class="gra1"> <h2 class="h3">Learn Latest Tutorials</h2> <div class="firsthomecontent">
                                &lt;a href="https://www.javatpoint.com/splunk">  
                                    &lt;div class="homecontent">&lt;img class="lazyload" data-src="https://static.javatpoint.com/images/homeicon/splunk.png" alt="Splunk tutorial" />  
                                        &lt;p>Splunk&lt;/p>  
                                    &lt;/div>  
                                &lt;/a>  
                                &lt;a href="https://www.javatpoint.com/spss">  
                                    &lt;div class="homecontent">&lt;img class="lazyload" data-src="https://static.javatpoint.com/images/homeicon/spss.png" alt="SPSS tutorial" />  
                                        &lt;p>SPSS&lt;/p>  
                                    &lt;/div>  
                                &lt;/a>  
                                &lt;a href="https://www.javatpoint.com/swagger">  
                                    &lt;div class="homecontent">&lt;img class="lazyload" data-src="https://static.javatpoint.com/images/homeicon/swagger.png" alt="Swagger tutorial" />  
                                        &lt;p>Swagger&lt;/p>  
                                    &lt;/div>  
                                &lt;/a>  
                                &lt;a href="https://www.javatpoint.com/t-sql">  
                                    &lt;div class="homecontent">&lt;img class="lazyload" data-src="https://static.javatpoint.com/images/homeicon/transact-sql.png" alt="T-SQL tutorial" />  
                                        &lt;p>Transact-SQL&lt;/p>  
                                    &lt;/div>  
                                &lt;/a>  
                                &lt;a href="https://www.javatpoint.com/tumblr">  
                                    &lt;div class="homecontent">&lt;img class="lazyload" data-src="https://static.javatpoint.com/images/homeicon/tumblr.png" alt="Tumblr tutorial" />  
                                        &lt;p>Tumblr&lt;/p>  
                                    &lt;/div>  
                                &lt;/a>  
                                &lt;a href="https://www.javatpoint.com/reactjs-tutorial">  
                                    &lt;div class="homecontent">&lt;img class="lazyload" data-src="https://static.javatpoint.com/images/homeicon/react.png" alt="React tutorial" />  
                                        &lt;p>ReactJS&lt;/p>  
                                    &lt;/div>  
                                &lt;/a>  
                                &lt;a href="https://www.javatpoint.com/regex">  
                                    &lt;div class="homecontent">&lt;img class="lazyload" data-src="https://static.javatpoint.com/images/homeicon/regex.png" alt="Regex tutorial" />  
                                        &lt;p>Regex&lt;/p>  
                                    &lt;/div>  
                                &lt;/a>  
                                &lt;a href="https://www.javatpoint.com/reinforcement-learning">  
                                    &lt;div class="homecontent">&lt;img class="lazyload" data-src="https://static.javatpoint.com/images/homeicon/react.png" alt="Reinforcement learning tutorial" />  
                                        &lt;p>Reinforcement Learning&lt;/p>  
                                    &lt;/div>  
                                &lt;/a>  
                                &lt;a href="https://www.javatpoint.com/r-tutorial">  
                                    &lt;div class="homecontent">&lt;img class="lazyload" data-src="https://static.javatpoint.com/images/homeicon/r-programming.png" alt="R Programming tutorial" />  
                                        &lt;p>R Programming&lt;/p>  
                                    &lt;/div>  
                                &lt;/a>  
                                &lt;a href="https://www.javatpoint.com/rxjs">  
                                    &lt;div class="homecontent">&lt;img class="lazyload" data-src="https://static.javatpoint.com/images/homeicon/rxjs.png" alt="RxJS tutorial" />  
                                        &lt;p>RxJS&lt;/p>  
                                    &lt;/div>  
                                &lt;/a>  
                                &lt;a href="https://www.javatpoint.com/react-native-tutorial">  
                                    &lt;div class="homecontent">&lt;img class="lazyload" data-src="https://static.javatpoint.com/images/homeicon/react-native.png" alt="React Native tutorial" />  
                                        &lt;p>React Native&lt;/p>  
                                    &lt;/div>  
                                &lt;/a>  
                                &lt;a href="https://www.javatpoint.com/python-design-pattern">  
                                    &lt;div class="homecontent">&lt;img class="lazyload" data-src="https://static.javatpoint.com/images/homeicon/python-design-patterns.png" alt="Python Design Patterns" />  
                                        &lt;p>Python Design Patterns&lt;/p>  
                                    &lt;/div>  
                                &lt;/a>  
                                &lt;a href="https://www.javatpoint.com/python-pillow">  
                                    &lt;div class="homecontent">&lt;img class="lazyload" data-src="https://static.javatpoint.com/images/homeicon/python-pillow.png" alt="Python Pillow tutorial" />  
                                        &lt;p>Python Pillow&lt;/p>  
                                    &lt;/div>  
                                &lt;/a>  
                                &lt;a href="https://www.javatpoint.com/python-turtle-programming">  
                                    &lt;div class="homecontent">&lt;img class="lazyload" data-src="https://static.javatpoint.com/images/homeicon/python-turtle.png" alt="Python Turtle tutorial" />  
                                        &lt;p>Python Turtle&lt;/p>  
                                    &lt;/div>  
                                &lt;/a>  
                                &lt;a href="https://www.javatpoint.com/keras">  
                                    &lt;div class="homecontent">&lt;img class="lazyload" data-src="https://static.javatpoint.com/images/homeicon/keras.png" alt="Keras tutorial" />  
                                        &lt;p>Keras&lt;/p>  
                                    &lt;/div>  
                                &lt;/a>  
            </div> </fieldset> <hr class="hrhomebox"/> <!-- preparation start --> <fieldset class="gra1"> <h2 class="h3">Preparation</h2> <div class="firsthomecontent">
                                &lt;a href="https://www.javatpoint.com/aptitude/quantitative">  
                                    &lt;div class="homecontent">&lt;img class="lazyload" data-src="https://static.javatpoint.com/aptitude/images/quantitative-aptitude-home.png" alt="Aptitude" />  
                                        &lt;p>Aptitude&lt;/p>  
                                    &lt;/div>  
                                &lt;/a>  
                                &lt;a href="https://www.javatpoint.com/reasoning">  
                                    &lt;div class="homecontent">&lt;img class="lazyload" data-src="https://static.javatpoint.com/reasoning/images/reasoning-home.png" alt="Logical Reasoning" />  
                                        &lt;p>Reasoning&lt;/p>  
                                    &lt;/div>  
                                &lt;/a>  
                                &lt;a href="https://www.javatpoint.com/verbal-ability">  
                                    &lt;div class="homecontent">&lt;img class="lazyload" data-src="https://static.javatpoint.com/verbal-ability/images/verbal-ability-home.png" alt="Verbal Ability" />  
                                        &lt;p>Verbal Ability&lt;/p>  
                                    &lt;/div>  
                                &lt;/a>  
                                &lt;a href="https://www.javatpoint.com/interview-questions-and-answers">  
                                    &lt;div class="homecontent">&lt;img class="lazyload" data-src="https://static.javatpoint.com/images/logo/interviewhome.png" alt="Interview Questions" />  
                                        &lt;p>Interview Questions&lt;/p>  
                                    &lt;/div>  
                                &lt;/a>  
                                &lt;a href="https://www.javatpoint.com/company-interview-questions-and-recruitment-process">  
                                    &lt;div class="homecontent">&lt;img class="lazyload" data-src="https://static.javatpoint.com/interview/images/company-home.jpeg" alt="Company Interview Questions" />  
                                        &lt;p>Company Questions&lt;/p>  
                                    &lt;/div>   
                                &lt;/a>   
            </div> </fieldset> <hr class="hrhomebox"/> <!-- trending start --> <fieldset class="gra1"> <h2 class="h3">Trending Technologies</h2> <div class="firsthomecontent">
                                &lt;a href="https://www.javatpoint.com/artificial-intelligence-ai">  
                                    &lt;div class="homecontent">&lt;img class="lazyload" data-src="https://static.javatpoint.com/images/homeicon/artificial-intelligence.png" alt="Artificial Intelligence" />  
                                        &lt;p>Artificial Intelligence&lt;/p>  
                                    &lt;/div>   
                                &lt;/a>   
                                &lt;a href="https://www.javatpoint.com/aws-tutorial">  
                                    &lt;div class="homecontent">&lt;img class="lazyload" data-src="https://static.javatpoint.com/images/homeicon/amazon-web-services.png" alt="AWS Tutorial" />  
                                        &lt;p>AWS&lt;/p>  
                                    &lt;/div>  
                                &lt;/a>  
                                &lt;a href="https://www.javatpoint.com/selenium-tutorial">  
                                    &lt;div class="homecontent">&lt;img class="lazyload" data-src="https://static.javatpoint.com/images/homeicon/selenium.png" alt="Selenium tutorial" />  
                                        &lt;p>Selenium&lt;/p>  
                                    &lt;/div>  
                                &lt;/a>   
                                &lt;a href="https://www.javatpoint.com/cloud-computing">  
                                    &lt;div class="homecontent">&lt;img class="lazyload" data-src="https://static.javatpoint.com/images/homeicon/cloud-computing.png" alt="Cloud Computing" />  
                                        &lt;p>Cloud Computing&lt;/p>  
                                    &lt;/div>  
                                &lt;/a>  
                                &lt;a href="https://www.javatpoint.com/hadoop-tutorial">  
                                    &lt;div class="homecontent">&lt;img class="lazyload" data-src="https://static.javatpoint.com/images/homeicon/hadoop.png" alt="Hadoop tutorial" />  
                                        &lt;p>Hadoop&lt;/p>  
                                    &lt;/div>  
                                &lt;/a>  
                                &lt;a href="https://www.javatpoint.com/reactjs-tutorial">  
                                    &lt;div class="homecontent">&lt;img class="lazyload" data-src="https://static.javatpoint.com/images/homeicon/reactjs.png" alt="ReactJS Tutorial" />  
                                        &lt;p>ReactJS&lt;/p>  
                                    &lt;/div>   
                                &lt;/a>    
                                &lt;a href="https://www.javatpoint.com/data-science">  
                                    &lt;div class="homecontent">&lt;img class="lazyload" data-src="https://static.javatpoint.com/images/homeicon/data-science.png" alt="Data Science Tutorial" />  
                                        &lt;p>Data Science&lt;/p>  
                                    &lt;/div>   
                                &lt;/a>    
                                &lt;a href="https://www.javatpoint.com/angular-7-tutorial">  
                                    &lt;div class="homecontent">&lt;img class="lazyload" data-src="https://static.javatpoint.com/images/homeicon/angular7.png" alt="Angular 7 Tutorial" />  
                                        &lt;p>Angular 7&lt;/p>  
                                    &lt;/div>   
                                &lt;/a>    
                                &lt;a href="https://www.javatpoint.com/blockchain-tutorial">  
                                    &lt;div class="homecontent">&lt;img class="lazyload" data-src="https://static.javatpoint.com/images/homeicon/blockchain.png" alt="Blockchain Tutorial" />  
                                        &lt;p>Blockchain&lt;/p>  
                                    &lt;/div>    
                                &lt;/a>   
                                &lt;a href="https://www.javatpoint.com/git">  
                                    &lt;div class="homecontent">&lt;img class="lazyload" data-src="https://static.javatpoint.com/images/homeicon/git.png" alt="Git Tutorial" />  
                                        &lt;p>Git&lt;/p>  
                                    &lt;/div>   
                                &lt;/a>   
                                  &lt;a href="https://www.javatpoint.com/machine-learning">  
                                    &lt;div class="homecontent">&lt;img class="lazyload" data-src="https://static.javatpoint.com/images/homeicon/machine-learning.png" alt="Machine Learning Tutorial" />  
                                        &lt;p>Machine Learning&lt;/p>   
                                    &lt;/div>       
                                &lt;/a>   
                                  &lt;a href="https://www.javatpoint.com/devops">  
                                    &lt;div class="homecontent">&lt;img class="lazyload" data-src="https://static.javatpoint.com/images/homeicon/devops.png" alt="DevOps Tutorial" />  
                                        &lt;p>DevOps&lt;/p>   
                                    &lt;/div>      
                                &lt;/a>   
            </div> </fieldset> <hr class="hrhomebox"/> <!-- B.Tech / MCA -->
                            &lt;fieldset class="gra1">  
                            &lt;h2 class="h3">B.Tech / MCA&lt;/h2>  
                            &lt;div class="firsthomecontent">  
                                &lt;a href="https://www.javatpoint.com/dbms-tutorial">  
                                    &lt;div class="homecontent">&lt;img class="lazyload" data-src="https://static.javatpoint.com/images/homeicon/dbms.png" alt="DBMS tutorial" />  
                                        &lt;p>DBMS&lt;/p>  
                                    &lt;/div>  
                                &lt;/a>  
                                &lt;a href="https://www.javatpoint.com/data-structure-tutorial">  
                                    &lt;div class="homecontent">&lt;img class="lazyload" data-src="https://static.javatpoint.com/images/homeicon/data-structures.png" alt="Data Structures tutorial" />  
                                        &lt;p>Data Structures&lt;/p>  
                                    &lt;/div>  
                                &lt;/a>   
                                &lt;a href="https://www.javatpoint.com/daa-tutorial">  
                                    &lt;div class="homecontent">&lt;img class="lazyload" data-src="https://static.javatpoint.com/images/homeicon/daa.png" alt="DAA tutorial" />  
                                        &lt;p>DAA&lt;/p>  
                                    &lt;/div>  
                                &lt;/a>  
                                &lt;a href="https://www.javatpoint.com/operating-system">  
                                    &lt;div class="homecontent">&lt;img class="lazyload" data-src="https://static.javatpoint.com/images/homeicon/operating-system.png" alt="Operating System" />  
                                        &lt;p>Operating System&lt;/p>  
                                    &lt;/div>  
                                &lt;/a>  
                                &lt;a href="https://www.javatpoint.com/computer-network-tutorial">  
                                    &lt;div class="homecontent">&lt;img class="lazyload" data-src="https://static.javatpoint.com/images/homeicon/computer-network.png" alt="Computer Network tutorial" />  
                                        &lt;p>Computer Network&lt;/p>  
                                    &lt;/div>  
                                &lt;/a>  
                                &lt;a href="https://www.javatpoint.com/compiler-tutorial">  
                                    &lt;div class="homecontent">&lt;img class="lazyload" data-src="https://static.javatpoint.com/images/homeicon/compiler-design.png" alt="Compiler Design tutorial" />  
                                        &lt;p>Compiler Design&lt;/p>  
                                    &lt;/div>  
                                &lt;/a>  
                                &lt;a href="https://www.javatpoint.com/computer-organization-and-architecture-tutorial">  
                                    &lt;div class="homecontent">&lt;img class="lazyload" data-src="https://static.javatpoint.com/images/homeicon/computer-organization.png" alt="Computer Organization and Architecture" />  
                                        &lt;p>Computer Organization&lt;/p>  
                                    &lt;/div>  
                                &lt;/a>  
                                &lt;a href="https://www.javatpoint.com/discrete-mathematics-tutorial">  
                                    &lt;div class="homecontent">&lt;img class="lazyload" data-src="https://static.javatpoint.com/images/homeicon/discrete-mathematics.png" alt="Discrete Mathematics Tutorial" />  
                                        &lt;p>Discrete Mathematics&lt;/p>  
                                    &lt;/div>  
                                &lt;/a>  
                                &lt;a href="https://www.javatpoint.com/ethical-hacking">  
                                    &lt;div class="homecontent">&lt;img class="lazyload" data-src="https://static.javatpoint.com/images/homeicon/ethical-hacking.png" alt="Ethical Hacking" />  
                                        &lt;p>Ethical Hacking&lt;/p>  
                                    &lt;/div>  
                                &lt;/a>  
                                &lt;a href="https://www.javatpoint.com/computer-graphics-tutorial">  
                                    &lt;div class="homecontent">&lt;img class="lazyload" data-src="https://static.javatpoint.com/images/homeicon/computer-graphics.png" alt="Computer Graphics Tutorial" />  
                                        &lt;p>Computer Graphics&lt;/p>  
                                    &lt;/div>   
                                &lt;/a>  
                                &lt;a href="https://www.javatpoint.com/software-engineering">  
                                    &lt;div class="homecontent">&lt;img class="lazyload" data-src="https://static.javatpoint.com/images/homeicon/software-engineering.png" alt="Software Engineering " />  
                                        &lt;p>Software Engineering&lt;/p>  
                                    &lt;/div>   
                                &lt;/a>   
                                &lt;a href="https://www.javatpoint.com/html-tutorial">  
                                    &lt;div class="homecontent">&lt;img class="lazyload" data-src="https://static.javatpoint.com/images/homeicon/web-technology.png" alt="html tutorial" />  
                                        &lt;p>Web Technology&lt;/p>  
                                    &lt;/div>  
                                &lt;/a>  
                                &lt;a href="https://www.javatpoint.com/cyber-security-tutorial">  
                                    &lt;div class="homecontent">&lt;img class="lazyload" data-src="https://static.javatpoint.com/images/homeicon/cyber-security.png" alt="Cyber Security tutorial" />  
                                        &lt;p>Cyber Security&lt;/p>  
                                    &lt;/div>  
                                &lt;/a>  
                                &lt;a href="https://www.javatpoint.com/automata-tutorial">  
                                    &lt;div class="homecontent">&lt;img class="lazyload" data-src="https://static.javatpoint.com/images/homeicon/automata.png" alt="Automata Tutorial" />  
                                        &lt;p>Automata&lt;/p>  
                                    &lt;/div>   
                                &lt;/a>  
                                  
                                &lt;a href="https://www.javatpoint.com/c-programming-language-tutorial">  
                                    &lt;div class="homecontent">&lt;img class="lazyload" data-src="https://static.javatpoint.com/images/homeicon/c-programming.png" alt="C Language tutorial" />  
                                        &lt;p>C Programming&lt;/p>  
                                    &lt;/div>  
                                &lt;/a>  
                                &lt;a href="https://www.javatpoint.com/cpp-tutorial">  
                                    &lt;div class="homecontent">&lt;img class="lazyload" data-src="https://static.javatpoint.com/images/homeicon/cpp.png" alt="C++ tutorial" />  
                                        &lt;p>C++&lt;/p>  
                                    &lt;/div>  
                                &lt;/a>  
                                &lt;a href="https://www.javatpoint.com/java-tutorial">  
                                    &lt;div class="homecontent">&lt;img class="lazyload" data-src="https://static.javatpoint.com/images/homeicon/new/core-java.png" alt="Java tutorial" />  
                                        &lt;p>Java&lt;/p>  
                                    &lt;/div>  
                                &lt;/a>  
                                &lt;a href="https://www.javatpoint.com/net-framework">  
                                    &lt;div class="homecontent">&lt;img class="lazyload" data-src="https://static.javatpoint.com/images/homeicon/dot-net.png" alt=".Net Framework tutorial" />  
                                        &lt;p>.Net&lt;/p>  
                                    &lt;/div>  
                                &lt;/a>  
                                &lt;a href="https://www.javatpoint.com/python-tutorial">  
                                    &lt;div class="homecontent">&lt;img class="lazyload" data-src="https://static.javatpoint.com/images/homeicon/python.png" alt="Python tutorial" />  
                                        &lt;p>Python&lt;/p>  
                                    &lt;/div>  
                                &lt;/a>  
                                &lt;a href="https://www.javatpoint.com/programs-list">  
                                    &lt;div class="homecontent">&lt;img class="lazyload" data-src="https://static.javatpoint.com/images/homeicon/programs.png" alt="List of Programs" />  
                                        &lt;p>Programs&lt;/p>  
                                    &lt;/div>  
                                &lt;/a>  
                                &lt;a href="https://www.javatpoint.com/control-system-tutorial">  
                                    &lt;div class="homecontent">&lt;img class="lazyload" data-src="https://static.javatpoint.com/images/homeicon/control-system.png" alt="Control Systems tutorial" />  
                                        &lt;p>Control System&lt;/p>  
                                    &lt;/div>  
                                &lt;/a>  
                                &lt;a href="https://www.javatpoint.com/data-mining">  
                                    &lt;div class="homecontent">&lt;img class="lazyload" data-src="https://static.javatpoint.com/images/homeicon/data-mining.png" alt="Data Mining Tutorial" />  
                                        &lt;p>Data Mining&lt;/p>   
                                    &lt;/div>      
                                &lt;/a>   
                                &lt;a href="https://www.javatpoint.com/data-warehouse">  
                                    &lt;div class="homecontent">&lt;img class="lazyload" data-src="https://static.javatpoint.com/images/homeicon/data-warehouse.png" alt="Data Warehouse Tutorial" />  
                                        &lt;p>Data Warehouse&lt;/p>  
                                    &lt;/div>   
                                &lt;/a>   
                          &lt;/div>  
                        &lt;/fieldset>  
            </div> <br><br/><div class="mobilemenu" style="clear:both"> </div></div> <div id="right"> <br/><br/> </div> <div class="right1024" style="float:left;margin-left:10px;margin-top:120px;"> <!-- right1024only --> </div> <br/> <div id="footer" style="clear:both;width:100%"> <script>var _gaq_gaq=_gaq || []; _gaq.push(['_setAccount', 'UA-24880427-1']); _gaq.push(['_trackPageview']); (function(){var ga=document.createElement('script'); ga.type='text/javascript'; ga.async=true; ga.src=('https:'==document.location.protocol ? 'https://ssl' : 'https://www') + '.google-analytics.com/ga.js'; var s=document.getElementsByTagName('script')[0]; s.parentNode.insertBefore(ga, s);})();</script><div style="margin-top:5px;text-align:center"> <sup style="font:16px arial;">Like/Subscribe us for latest updates or newsletter </sup> <a target="_blank" rel="nofollow noopener" href="https://feeds.feedburner.com/javatpointsonoo"><img src="https://static.javatpoint.com/images/social/rss1.png" alt="RSS Feed"/></a> <a target="_blank" rel="nofollow noopener" href="https://feedburner.google.com/fb/a/mailverify?uri=javatpointsonoo"><img src="https://static.javatpoint.com/images/social/mail1.png" alt="Subscribe to Get Email Alerts"/></a> <a rel="nofollow noopener" target="_blank" href="https://www.facebook.com/javatpoint"><img src="https://static.javatpoint.com/images/social/facebook1.jpg" alt="Facebook Page"/></a> <a target="_blank noopener" rel="nofollow" href="https://twitter.com/pagejavatpoint"><img src="https://static.javatpoint.com/images/social/twitter1.png" alt="Twitter Page"/></a> <a target="_blank" rel="nofollow noopener" href="https://www.youtube.com/channel/UCUnYvQVCrJoFWZhKK3O2xLg"><img src="https://static.javatpoint.com/images/youtube32.png" alt="YouTube"/></a> <a target="_blank" rel="nofollow noopener" href="https://javatpoint.blogspot.com"><img src="https://static.javatpoint.com/images/social/blog.png" alt="Blog Page"/></a> </div><footer class="footer1"><div class="column4"><h3>Learn Tutorials</h3><a href="https://www.javatpoint.com/java-tutorial">Learn Java</a><a href="https://www.javatpoint.com/data-structure-tutorial">Learn Data Structures</a><a href="https://www.javatpoint.com/c-programming-language-tutorial">Learn C Programming</a><a href="https://www.javatpoint.com/cpp-tutorial">Learn C++ Tutorial</a><a href="https://www.javatpoint.com/c-sharp-tutorial">Learn C# Tutorial</a><a href="https://www.javatpoint.com/php-tutorial">Learn PHP Tutorial</a><a href="https://www.javatpoint.com/html-tutorial">Learn HTML Tutorial</a><a href="https://www.javatpoint.com/javascript-tutorial">Learn JavaScript Tutorial</a><a href="https://www.javatpoint.com/jquery-tutorial">Learn jQuery Tutorial</a><a href="https://www.javatpoint.com/spring-tutorial">Learn Spring Tutorial</a></div><div class="column4"><h3>Interview Questions</h3><a href="corejava-interview-questions">Java Interview Questions</a><a href="sql-interview-questions">SQL Interview Questions</a><a href="python-interview-questions">Python Interview Questions</a><a href="javascript-interview-questions">JavaScript Interview Questions</a><a href="top-angular-interview-questions">Angular Interview Questions</a><a href="selenium-interview-questions">Selenium Interview Questions</a><a href="spring-boot-interview-questions">Spring Boot Interview Questions</a><a href="job-interview-questions">HR Interview Questions</a><a href="cpp-interview-questions">C++ Interview Questions</a><a href="data-structure-interview-questions">Data Structure Interview Questions</a></div><div class="column4"><h3>About</h3><p>This website is developed to help students on various technologies such as Artificial Intelligence, Machine Learning, C, C++, Python, Java, PHP, HTML, CSS, JavaScript, jQuery, ReactJS, Node.js, AngularJS, Bootstrap, XML, SQL, PL/SQL, MySQL etc. </p><p>This website provides tutorials with examples, code snippets, and practical insights, making it suitable for both beginners and experienced developers.</p><p>There are also many interview questions which will help students to get placed in the companies.</p></div><div class="column4"><h3>Contact</h3><a href="https://www.javatpoint.com/contact-us">Contact Us</a> <!--<a href="https://www.javatpoint.com/subscribe.jsp">Subscribe Us</a>--> <a href="https://www.javatpoint.com/privacy-policy">Privacy Policy</a><a href="https://www.javatpoint.com/sitemap.xml">Sitemap</a><br><a href="https://www.javatpoint.com/sonoo-jaiswal">About Me</a></div></footer><footer class="footer2"><p>© Copyright 2011-2021 www.javatpoint.com. All rights reserved. Developed by Tpoint Tech.</p></footer><div id="bot-root"></div><script> (function() { var e = document.createElement('script'); e.src = 'https://app.pushbrothers.com/js/notification-bot.js?cnfg=a3cc04a1-8471-450e-b01e-c9d752b16eb0'; document.getElementById('bot-root').appendChild(e);}());</script> </div> <!-- auto ad code vi --> </div></div> <script src="https://static.javatpoint.com/js/shcoreandbrush.js"></script><script> dp.SyntaxHighlighter.HighlightAll('code'); </script> <script src="https://static.javatpoint.com/lazysizes.min.js?v=5.8" async></script> </body> </html>

          1. Angular 7 Components

            Components are the key features of Angular. The whole application is built by using different components.

            The core idea behind Angular is to build components. They make your complex application into reusable parts which you can reuse very easily.

            How to create a new component?

            Open WebStorm>> Go to your project source folder>> Expand the app directory and create a new directory named “server”.

            Now, create the component within server directory. Right click on the server directory and create a new file named as “server.component.ts”. It is the newly created component.

            Components are used to build webpages in Angular but they require modules to bundle them together. Now, you have to register our new components in module.

            Creating component with CLI

            Syntax

            ng generate component component_name  
            
            Or  
            
            ng g c component_name  

              Let’s see how to create a new component by using command line.

              Open Command prompt and stop ng serve command if it is running on the browser.

              Type ng generate component server2 to create a new component named server2.

              You can also use a shortcut ng g c server2 to do the same task.

              Angular 7 Components
              Angular 7 Components

              In the above image, you can see that a new component named “server2” is created. It contains the same other components which you have seen when we create a first app..

              1. server2.component.css  
              2. server2.component.html  
              3. server2.component.spec.ts  
              4. server2.component.ts  

              Here, server2.component.spec.ts component is used for testing purpose. You can delete it by right click on that.

              Angular 7 Components
              Angular 7 Components
            1. Angular 7 Architecture

              Angular 7 is a platform and framework which is used to create client applications in HTML and TypeScript. Angular 7 is written in TypeScript.

              Angular 7 implements core and optional functionality as a set of TypeScript libraries which you import in your app.

              NgModules are the basic building blocks of an Angular 7 application. They provide a compilation context for components. An Angular 7 app is defined by a set of NgModules and NgModules collect related code into functional sets.

              An Angular 7 app always has at least a root module which enables bootstrapping, and typically has many other feature modules.

              • Components define views, which are the sets of screen elements that are chosen and modified according to your program logic and data by Angular 7.
              • Components use services, which provide specific functionality not directly related to views. Service providers can be injected into components as dependencies, making your code modular, reusable, and efficient.

              Components

              Components and services both are simply classes with decorators that mark their types and provide metadata which guide Angular to do things.

              Every Angular application always has at least one component known as root component that connects a page hierarchy with page DOM. Each component defines a class that contains application data and logic, and is associated with an HTML template that defines a view to be displayed in a target environment.

              Metadata of Component class:

              • The metadata for a component class associates it with a template that defines a view. A template combines ordinary HTML with Angular directives and binding markup that allow Angular to modify the HTML before rendering it for display.
              • The metadata for a service class provides the information Angular needs to make it available to components through dependency injection (DI).
              Angular 7 Architecture

              Modules

              Angular 7 NgModules are different from other JavaScript modules. Every Angular 7 app has a root module known as AppModule. It provides the bootstrap mechanism that launches the application.

              Generally, every Angular 7 app contains many functional modules.

              Some important features of Anngular 7 Modules:

              • Angular 7 NgModules import the functionalities form other NgModules just like other JavaScript modules.
              • NgModules allow their own functionality to be exported and used by other NgModules. For example, if you want to use the router service in your app, you can import the Router NgModule.

              Template, Directives and Data Binding

              In Angular 7, a template is used to combine HTML with Angular Markup and modify HTML elements before displaying them. Template directives provide program logic, and binding markup connects your application data and the DOM.

              There are two types of data binding:

              • Event Binding: Event binding is used to bind events to your app and respond to user input in the target environment by updating your application data. 
              • Property Binding: Property binding is used to pass data from component class and facilitates you to interpolate values that are computed from your application data into the HTML. 

              Services and Dependency Injection

              In Angular 7, developers create a service class for data or logic that isn’t associated with a specific view, and they want to share across components.

              Dependency Injection (DI) is used to make your component classes lean and efficient. DI doesn’t fetch data from the server, validate user input, or log directly to the console; it simply renders such tasks to services.

              Routing

              In Angular 7, Router is an NgModule which provides a service that facilitates developers to define a navigation path among the different application states and view hierarchies in their app.

              It works in the same way as a browser’s navigation works. i.e.:

              • Enter a URL in the address bar and the browser will navigate to that corresponding page.
              • Click the link on a page and the browser will navigate to a new page.
              • Click the browser’s back or forward buttons and the browser will navigate backward or forward according to your seen history pages.

              How does Router work?

              The router maps URL-like paths to views instead of pages. Whenever a user performs an action, such as clicking a link that would load a new page in the browser, the router intercepts the browser’s behavior, and shows or hides view hierarchies.

              If the router finds that the current application state requires particular functionality, and the module that defines it hasn’t been loaded, the router can lazy-load the module on demand.

              The router interprets a link URL according to your app’s view navigation rules and data state. You can navigate to new views when the user clicks a button or selects from a drop box, or in response to some other stimulus from any source. The router logs activity in the browser’s history, so the back and forward buttons work as well.

              To define navigation rules, you associate navigation paths with your components. A path uses a URL-like syntax that integrates your program data, in much the same way that template syntax integrates your views with your program data. You can then apply program logic to choose which views to show or to hide, in response to user input and your own access rules.

            2. Angular 7 Architecture

              Angular 7 is a platform and framework which is used to create client applications in HTML and TypeScript. Angular 7 is written in TypeScript.

              Angular 7 implements core and optional functionality as a set of TypeScript libraries which you import in your app.

              NgModules are the basic building blocks of an Angular 7 application. They provide a compilation context for components. An Angular 7 app is defined by a set of NgModules and NgModules collect related code into functional sets.

              An Angular 7 app always has at least a root module which enables bootstrapping, and typically has many other feature modules.

              • Components define views, which are the sets of screen elements that are chosen and modified according to your program logic and data by Angular 7.
              • Components use services, which provide specific functionality not directly related to views. Service providers can be injected into components as dependencies, making your code modular, reusable, and efficient.

              Components

              Components and services both are simply classes with decorators that mark their types and provide metadata which guide Angular to do things.

              Every Angular application always has at least one component known as root component that connects a page hierarchy with page DOM. Each component defines a class that contains application data and logic, and is associated with an HTML template that defines a view to be displayed in a target environment.

              Metadata of Component class:

              • The metadata for a component class associates it with a template that defines a view. A template combines ordinary HTML with Angular directives and binding markup that allow Angular to modify the HTML before rendering it for display.
              • The metadata for a service class provides the information Angular needs to make it available to components through dependency injection (DI).

              Read more about Angular 7 component

              Angular 7 Architecture

              Modules

              Angular 7 NgModules are different from other JavaScript modules. Every Angular 7 app has a root module known as AppModule. It provides the bootstrap mechanism that launches the application.

              Generally, every Angular 7 app contains many functional modules.

              Some important features of Anngular 7 Modules:

              • Angular 7 NgModules import the functionalities form other NgModules just like other JavaScript modules.
              • NgModules allow their own functionality to be exported and used by other NgModules. For example, if you want to use the router service in your app, you can import the Router NgModule.

              Template, Directives and Data Binding

              In Angular 7, a template is used to combine HTML with Angular Markup and modify HTML elements before displaying them. Template directives provide program logic, and binding markup connects your application data and the DOM.

              There are two types of data binding:

              • Event Binding: Event binding is used to bind events to your app and respond to user input in the target environment by updating your application data. Read more about event binding
              • Property Binding: Property binding is used to pass data from component class and facilitates you to interpolate values that are computed from your application data into the HTML. Read more about property binding

              Services and Dependency Injection

              In Angular 7, developers create a service class for data or logic that isn’t associated with a specific view, and they want to share across components.

              Dependency Injection (DI) is used to make your component classes lean and efficient. DI doesn’t fetch data from the server, validate user input, or log directly to the console; it simply renders such tasks to services.

              Routing

              In Angular 7, Router is an NgModule which provides a service that facilitates developers to define a navigation path among the different application states and view hierarchies in their app.

              It works in the same way as a browser’s navigation works. i.e.:

              • Enter a URL in the address bar and the browser will navigate to that corresponding page.
              • Click the link on a page and the browser will navigate to a new page.
              • Click the browser’s back or forward buttons and the browser will navigate backward or forward according to your seen history pages.

              How does Router work?

              The router maps URL-like paths to views instead of pages. Whenever a user performs an action, such as clicking a link that would load a new page in the browser, the router intercepts the browser’s behavior, and shows or hides view hierarchies.

              If the router finds that the current application state requires particular functionality, and the module that defines it hasn’t been loaded, the router can lazy-load the module on demand.

              The router interprets a link URL according to your app’s view navigation rules and data state. You can navigate to new views when the user clicks a button or selects from a drop box, or in response to some other stimulus from any source. The router logs activity in the browser’s history, so the back and forward buttons work as well.

              To define navigation rules, you associate navigation paths with your components. A path uses a URL-like syntax that integrates your program data, in much the same way that template syntax integrates your views with your program data. You can then apply program logic to choose which views to show or to hide, in response to user input and your own access rules.

            3. Angular Libraries

              Angular libraries are built as a solution of general problems such as presenting a unified user interface, presenting data, and allowing data entry. Developers can create general solutions for particular domains that can be adapted for re-use in different apps. These solutions can be built as Angular libraries and these libraries can be published and shared as npm packages.

              An Angular library is an angular project but it is different from the Angular app in the terms that it cannot run on its own. It is imported and used in the app.

              Usage of Angular libraries

              • Angular libraries extend Angular’s base functionalities. For example, if you want to add reactive forms to an app, add the library package using ng add @angular/forms, then import the ReactiveFormsModule from the @angular/forms library in your application code.
              • Angular Material is an example of a large, general-purpose library that provides sophisticated, reusable, and adaptable UI components.

              Installing libraries

              Libraries are published as npm packages and integrated with Angular CLI. To integrate reusable library code into an application, we have to install the package and import the provided functionality where we shall use it.

              Syntax

              ng add <lib_name>  

              The ng add command uses the npm package manager to install the library package, and invokes schematics that are included in the package to other scaffolding within the project code, such as adding import statements, fonts, themes, and so on.

              Library typing

              Library packages include typings in .d.ts files. If your library’s package does not include typings and IDE shows an error, you have to install the library’s associated @types/package.

              For example, suppose, you have a library named d1:

              npm install d1 --save  
              
              npm install @types/d1 --save-dev 

              Types defined in a @types/ package for a library installed into the workspace are automatically added to the TypeScript configuration for the project that uses that library. TypeScript looks for types in the node_modules/@types folder by default, so you don’t have to add each type package individually.

              If a library doesn’t contain typings at @types/, you can still use it by manually adding typings for it. You can do it by following:

              Create a typings.d.ts file in your src/ folder. This file is automatically included as global type definition.

              Add the following code in src/typings.d.ts.

              declare module 'host' {  
              
                export interface Host {  
              
                  protocol?: string;  
              
                  hostname?: string;  
              
                  pathname?: string;  
              
                }  
              
                export function parse(url: string, queryString?: string): Host;  
              
              }  

              Add the following code in the component or file that uses the library:

              import * as host from 'host';  
              
              const parsedUrl = host.parse('https://angular.io');  
              
              console.log(parsedUrl.hostname);  

              Updating libraries

              You can update the libraries by using ng update command. It updates individual library versions. The Angular CLI checks the latest published release of the library, and if it finds that the latest version is newer than your installed version, downloads it and updates your package.json to match the latest version.

              Syntax

              ng update <lib_name>   

              Note: When you update Angular to a new version, you must ensure that any libraries you are using are current. If libraries have interdependencies, they also must be updated.

              How to add a library to the runtime global scope

              Legacy JavaScript libraries that are not imported into an app can be added to the runtime global scope and loaded as if they were in a script tag. You have to configure the CLI to do this at build time using the “scripts” and “styles” options of the build target in the CLI configuration file, angular.json.

              For example, to use the Bootstrap 4 library, first install the library and its dependencies using the npm package manager:

              npm install bootstrap --save  

              Add the Bootstrap CSS file to the “styles” array:

              "styles": [  
              
                "node_modules/bootstrap/dist/css/bootstrap.css",  
              
                "src/styles.css"  
              
              ], 

              Creating new libraries

              You can create and publish your own new libraries to extend Angular functionalities. It is generally used when you need to solve the same problem in more than one app (or want to share your solution with other developers), you have a candidate for a library.

              For example: You can create a button that sends users to your company website that would be included in all apps that your company builds.

              Open Angular CLI and use the following syntax to create a new library.

              Syntax

              ng generate library my-lib  

              This will create a projects/my-lib folder in your workspace, which contains a component and a service inside an NgModule. The workspace configuration file, angular.json, is updated with a project of type ‘library’.

              "projects": {  
              
                ...  
              
                "my-lib": {  
              
                  "root": "projects/my-lib",  
              
                  "sourceRoot": "projects/my-lib/src",  
              
                  "projectType": "library",  
              
                  "prefix": "lib",  
              
                  "architect": {  
              
                    "build": {  
              
                      "builder": "@angular-devkit/build-ng-packagr:build",  
              
                      ...

              Now, you can built, test and lint your project using the following commands:

              ng build my-lib  
              
              ng test my-lib  
              
              ng lint my-lib
            4. All Angular CLI commands

              Angular CLI is a command line interface tool which is used to initialize, develop, scaffold, and maintain Angular applications. You can use these command directly on command prompt or indirectly through an interactive UI i.e. Angular Console.

              CommandAliasDescription
              addIt is used to add support for an external library to your project.
              buildbIt compiles an Angular app into an output directory named dist/ at the given output path. Must be executed from within a workspace directory.
              configIt retrieves or sets Angular configuration values in the angular.json file for the workspace.
              docdIt opens the official Angular documentation (angular.io) in a browser, and searches for a given keyword.
              e2eeIt builds and serves an Angular app, then runs end-to-end tests using Protractor.
              generategIt generates and/or modifies files based on a schematic.
              helpIt provides a list of available commands and their short descriptions.
              lintlIt is used to run linting tools on Angular app code in a given project folder.
              newnIt creates a new workspace and an initial Angular app.
              runIt runs an Architect target with an optional custom builder configuration defined in your project.
              servesIt builds and serves your app, rebuilding on file changes.
              testtIt runs unit tests in a project.
              updateIt updates your application and its dependencies. See https://update.angular.io/
              versionvIt utputs Angular CLI version.
              xi18nIt extracts i18n messages from source code.

              ng add Command

              The ng add command is used to add support for an external library to your project. It adds the npm package for a published library to your workspace, and makes your default app project to use that library, in whatever way is specified by the library’s schematic. For example, if you add @angular/pwa, then it will configure your project for PWA support.

              The default app project is the value of defaultProject in angular.json.

              All Angular CLI commands

              Syntax:

              ng add <collection> [options]  

              Parameter Explanation:

              <collection>: It specifies the package which you want to add.

              Options

              –defaults=true|false: When true, it disables interactive input prompts for options with a default.

              –help=true|false|json|JSON: It is used to show a help message in the console. Default: false

              –interactive=true|false: When false, it disables interactive input prompts.

              ng build Command

              The ng build command is used to compile an Angular app into an output directory named dist/ at the given output path. It must be executed from within a workspace directory.

              Syntax:

              ng build <project> [options]  
              
              ng b <project> [options] 

                Parameter Explanation:

                <project>: It specifies the name of the project to build. It can be an app or a library.

                Options

                –aot=true|false: It builds using Ahead of Time compilation. Default: false

                –baseHref=baseHref: It specifies the base url for the application being built.

                –buildEventLog=buildEventLog: (experimental) Output file path for Build Event Protocol events.

                –buildOptimizer=true|false: It enables ‘@angular-devkit/build-optimizer’ optimizations when using the ‘aot’ option. Default: false

                –commonChunk=true|false: It uses a separate bundle containing code used across multiple bundles. Default: true

                –configuration=configuration: A named build target, as specified in the “configurations” section of angular.json. Each named target is accompanied by a configuration of option defaults for that target.

                Aliases: -c

                –deleteOutputPath=true|false: It is used to delete the output path before building. Default: true

                –deployUrl=deployUrl: URL where files will be deployed.

                –es5BrowserSupport=true|false: Enables conditionally loaded ES2015 polyfills. Default: false

                –extractCss=true|false: It is used to extract css from global styles into css files instead of js ones. Default: false

                –extractLicenses=true|false: It is used to extract all licenses in a separate file. Default: false

                –forkTypeChecker=true|false: It is used to run the TypeScript type checker in a forked process. Default: true

                –help=true|false|json|JSON: It is used to show a help message for this command in the console. Default: false

                –i18nFile=i18nFile: Localization file to use for i18n.

                –i18nFormat=i18nFormat: Format of the localization file specified with –i18n-file.

                –i18nLocale=i18nLocale: Locale to use for i18n.

                –i18nMissingTranslation=i18nMissingTranslation: How to handle missing translations for i18n.

                –index=index: The name of the index HTML file.

                –lazyModules: List of additional NgModule files that will be lazy loaded. Lazy router modules will be discovered automatically.

                –main=main: The full path for the main entry point to the app, relative to the current workspace.

                –namedChunks=true|false: Use file name for lazy loaded chunk Default: true

                –ngswConfigPath=ngswConfigPath: Path to ngsw-config.json.

                –optimization=true|false: Enables optimization of the build output.

                –outputHashing= none|all|media|bundles: Define the output filename cache-busting hashing mode.

                Default: none

                –outputPath=outputPath: The full path for the new output directory, relative to the current workspace.

                By default, writes output to a folder named dist/ in the current project.

                –poll: Enable and define the file watching poll time period in milliseconds.

                –polyfills=polyfills: The full path for the polyfills file, relative to the current workspace.

                –preserveSymlinks=true|false: Do not use the real path when resolving modules.

                Default: false

                –prod=true|false: When true, sets the build configuration to the production target. All builds make use of bundling and limited tree-shaking. A production build also runs limited dead code elimination.

                –profile=true|false: Output profile events for Chrome profiler.

                Default: false

                –progress=true|false: Log progress to the console while building.

                –resourcesOutputPath= resourcesOutputPath: The path where style resources will be placed, relative to outputPath.

                –serviceWorker=true|false: Generates a service worker config for production builds. Default: false

                –showCircularDependencies=true|false: Show circular dependency warnings on builds. Default: true

                –sourceMap=true|false: It is used to show Output sourcemaps.

                Default: true

                –statsJson=true|false: It generates a ‘stats.json’ file which can be analyzed using tools such as: ‘webpack-bundle-analyzer’ or https://webpack.github.io/analyse.

                Default: false

                –subresourceIntegrity=true|false: It enables the use of subresource integrity validation.

                Default: false

                –tsConfig=tsConfig: The full path for the TypeScript configuration file, relative to the current workspace.

                –vendorChunk=true|false: It uses a separate bundle containing only vendor libraries.

                Default: true

                –verbose=true|false: It adds more details to output logging.

                Default: false

                –watch=true|false: It runs build when files change.

                Default: false

                ng config Command

                The ng config command is used to retrieve or set Angular configuration values in the angular.json file for the workspace.

                Syntax:

                ng config <jsonPath> <value> [options]  

                Parameter Explanation:

                <jsonPath>: The configuration key to set or query, in JSON path format. For example: “a[3].foo.bar[2]”. If no new value is provided, returns the current value of this key.

                <value>: If provided, a new value for the given configuration key.

                Options

                –global=true|false: When true, it accesses the global configuration in the caller’s home directory.

                Default: false

                Aliases: -g

                –help= true|false|json|JSON: It is used to show a help message for this command in the console.

                Default: false

                ng doc Command

                The ng doc command is used to open the official Angular documentation (angular.io) in a browser, and searches for a given keyword.

                Syntax:

                ng doc <keyword> [options]  
                
                ng d <keyword> [options] 

                  Parameter Explanation:

                  <keyword>: It is used to specify the keyword to search for, as provided in the search bar in angular.io.

                  Options

                  –help=true|false|json|JSON: It is used to show a help message for this command in the console.Default: false

                  –search=true|false: When true, it searches all of angular.io. Otherwise, searches only API reference documentation.

                  Default: false

                  Aliases: -s

                  ng e2e Command

                  It is used to build and serve an Angular app, then runs end-to-end tests using Protractor.

                  Syntax:

                  ng e2e <project> [options]       
                  
                  ng e <project> [options]  

                    It must be executed from within a workspace directory. When you don’t specify the project name, it executes for all projects.

                    Parameter Explanation:

                    <project>: It specifies the name of the project you want to build. It can be an app or a library.

                    Options

                    –baseUrl=baseUrl: It specifies the base URL for protractor to connect to.

                    –configuration=configuration: It is used to specify named build target, as specified in the “configurations” section of angular.json. Each named target is accompanied by a configuration of option defaults for that target.

                    Aliases: -c

                    –devServerTarget=devServerTarget: It specifies dev server target to run tests against.

                    –elementExplorer=true|false: It starts Protractor’s Element Explorer for debugging.

                    Default: false

                    –help= true|false|json|JSON: It shows a help message for this command in the console.

                    Default: false

                    –host=host: Host to listen on.

                    Default: localhost

                    –port: It specifies the port to serve the application.

                    –prod=true|false: When true, it sets the build configuration to the production target. All builds make use of bundling and limited tree-shaking. A production build also runs limited dead code elimination.

                    –protractorConfig= protractorConfig: It specifies the name of the Protractor configuration file.

                    –specs: It overrides specs in the protractor config.

                    –suite=suite: It overrides suite in the protractor config.

                    –webdriverUpdate=true|false: It is used to update webdriver.

                    Default: true

                    ng generate Command

                    The ng generate command is used to generate and/or modify file based on schematic.

                    ng generate <schematic> [options]  
                    
                    ng g <schematic> [options] 

                      Parameter Explanation:

                      <schematic >: It specifies the schematic or collection:schematic which you want to generate. It can take one of the following sub-commands.

                      • appShell
                      • application
                      • class
                      • component
                      • directive
                      • enum
                      • guard
                      • interface
                      • library
                      • module
                      • pipe
                      • service
                      • serviceWorker
                      • universal

                      Schematic Command Explanation

                      appShell:

                      It is used to generate an app shell for running a server-side version of an app.

                      Syntax:

                      ng generate appShell [options]  
                      
                      ng g appShell [options]  

                        application

                        It is used to create a new basic app definition in the “projects” subfolder of the workspace.

                        Syntax:

                        ng generate application <name> [options]  
                        
                        ng g application <name> [options]

                        class

                        It is used to create a new generic class definition in the given or default project.

                        Syntax:

                        ng generate class <name> [options]  
                        
                        ng g class <name> [options] 

                          component

                          It is used to create a new generic component definition in the given or default project.

                          Syntax:

                          ng generate component <name> [options]  
                          
                          ng g component <name> [options]

                          directive

                          It is used to create a new generic directive definition in the given or default project.

                          Syntax:

                          ng generate directive <name> [options]  
                          
                          ng g directive <name> [options]

                          enum

                          It is used to create a new, generic enum definition for the given or default project.

                          Syntax:

                          ng generate enum <name> [options]  
                          
                          ng g enum <name> [options] 

                            enum

                            It is used to create a new, generic enum definition for the given or default project.

                            Syntax:

                            ng generate enum <name> [options]  
                            
                            ng g enum <name> [options]  

                              guard

                              It is used to generate a new, generic route guard definition in the given or default project.

                              Syntax:

                              ng generate enum <name> [options]  
                              
                              ng g enum <name> [options] 

                                interface

                                It is used to create a new generic interface definition in the given or default project.

                                Syntax:

                                ng generate interface <name> <type> [options]  
                                
                                ng g interface <name> <type> [options]  

                                  library

                                  It is used to create a new generic library project in the current workspace.

                                  Syntax:

                                  ng generate library <name> [options]  
                                  
                                  ng g library <name> [options]

                                  module

                                  It is used to create a new generic NgModule definition in the given or default project.

                                  Syntax:

                                  ng generate module <name> [options]  
                                  
                                  ng g module <name> [options] 

                                    pipe

                                    It is used to create a new generic pipe definition in the given or default project.

                                    Syntax:

                                    ng generate pipe <name> [options]  
                                    
                                    ng g pipe <name> [options]  

                                      service

                                      It is used to create a new, generic service definition in the given or default project.

                                      Syntax:

                                      ng generate service <name> [options]  
                                      
                                      ng g service <name> [options]

                                      serviceWorker

                                      This is used to pass this schematic to the “run” command to create a service worker.

                                      Syntax:

                                      ng generate serviceWorker [options]  
                                      
                                      ng g serviceWorker [options] 

                                        universal

                                        This command is used to pass this schematic to the “run” command to set up server-side rendering for an app.

                                        Syntax:

                                        ng generate universal [options]  
                                        
                                        ng g universal [options] 

                                          Options

                                          –defaults=true|false: When true, it disables interactive input prompts for options with a default.

                                          –dryRun=true|false: When true, it runs through and reports activity without writing out results.

                                          Default: false

                                          Aliases: -d

                                          –force=true|false: When true, it forces overwriting of existing files.

                                          Default: false

                                          Aliases: -f

                                          –help=true|false|json|JSON: It is used to show a help message in the console.

                                          Default: false

                                          –interactive=true|false: When false, it disables interactive input prompts.

                                        1. Angular 7 with Bootstrap

                                          How to install Bootstrap for Angular project?

                                          Run the following command on command prompt:

                                          npm install --save bootstrap@3  => The @3  is important!  
                                          Angular 7 with Bootstrap

                                          Further, when you use a project created with Angular CLI 6+ (check via ng v ), you’ll have an angular.json file instead of an .angular-cli.json file. In that file, you still need to add Bootstrap to the styles[] array, but the path should be node_modules/bootstrap/dist/css/bootstrap.min.css , NOT ../node_modules/bootstrap/dist/css/bootstrap.min.css . The leading ../ must not be included.

                                          Angular 7 with Bootstrap

                                          Here, we are using the Angular 7.2.3 version.

                                          How to add bootstrap.css file in the project?

                                          Expand Node Module (library root folder)

                                          Angular 7 with Bootstrap

                                          Go to bootstrap folder and expand it.

                                          Angular 7 with Bootstrap

                                          Go to dist folder and expand dist.

                                          Angular 7 with Bootstrap

                                          Expand css and you will find “bootstrap.css”. Expand bootstrap.css and you will see bootstrap.min.css

                                          Angular 7 with Bootstrap

                                          Open angular.json file and add the bootstrap.min.css in style section.

                                          "styles": [  
                                          
                                            "node_modules/bootstrap/dist/css/bootstrap.min.css",  
                                          
                                            "src/styles.css"  
                                          
                                          ],

                                          Bootstrap is now installed for your Angular 7 project. You can use it now.

                                        2. Angular 7 App files explanation

                                          See the structure of the Angular 7 app on WebStorm IDE (how it looks on IDE). For Angular 7 development, you can use either Visual Studio Code IDE or WebStorm IDE. Both are good. Here, we are using JetBrains WebStorm IDE.

                                          Angular 7 App Files Explanation

                                          Files used in Angular 7 App folder

                                          Angular 7 App files which are mainly used in your project are given below:

                                          • src folder: This is the folder which contains the main code files related to your angular application.
                                          • app folder: The app folder contains the files, you have created for app components.
                                          • app.component.css: This file contains the cascading style sheets code for your app component.
                                          • app.component.html: This file contains the html file related to app component. This is the template file which is used by angular to do the data binding.
                                          • app.component.spec.ts: This file is a unit testing file related to app component. This file is used along with other unit tests. It is run from Angular CLI by the command ng test.
                                          • app.component.ts: This is the most important typescript file which includes the view logic behind the component.
                                          • app.module.ts: This is also a typescript file which includes all the dependencies for the website. This file is used to define the needed modules to be imported, the components to be declared and the main component to be bootstrapped.

                                          Other Important files

                                          • package.json: This is npm configuration file. It includes details about your website’s package dependencies along with details about your own website being a package itself.
                                          • package-lock.json : This is an auto-generated and modified file that gets updated whenever npm does an operation related to node_modules or package.json
                                          • angular.json: It is very important configuration file related to your angular application. It defines the structure of your app and includes any settings associated with your application. Here, you can specify environments on this file (development, production). This is the file where we add Bootstrap file to work with Angular 7.
                                          • .gitignore: This file is related to the source control git.
                                          • .editorconfig: This is a simple file which is used to maintain consistency in code editors to organize some basics such as indentation and whitespaces.
                                          • assets folder: This folder is a placeholder for resource files which are used in the application such as images, locales, translations etc.
                                          • environments folder: The environments folder is used to hold the environment configuration constants that help when building the angular application. The constants are defined in 2 separate .ts files (environment.ts and environment.prod.ts), where these constants are used within the angular.json file by the Angular CLI. For example, if you run the ng build command, it will build the application using the development environment settings, whereas the command ng build ?prod will build the project using the production environment settings.
                                          • browserlist: This file is used by autoprefixer that adjusts the CSS to support a list of defined browsers.
                                          • favicon.ico: This file specifies a small icon that appears next to the browser tab of a website.
                                          • index.html: This is the entry file which holds the high level container for the angular application.
                                          • karma.config.js: This file specifies the config file for the Karma Test Runner, Karma has been developed by the AngularJS team which can run tests for both AngularJS and Angular 2+
                                          • main.ts: As defined in angular.json file, this is the main ts file that will first run. This file bootstraps (starts) the AppModule from app.module.ts , and it can be used to define global configurations.
                                          • polyfills.ts: This file is a set of code that can be used to provide compatibility support for older browsers. Angular 7 code is written mainly in ES6+ language specifications which is getting more adopted in front-end development, so since not all browsers support the full ES6+ specifications, pollyfills can be used to cover whatever feature missing from a given browser.
                                          • styles.css:/ This is a global css file which is used by the angular application.
                                          • tests.ts: This is the main test file that the Angular CLI command ng test will use to traverse all the unit tests within the application and run them.
                                          • tsconfig.json: This is a typescript compiler configuration file.
                                          • tsconfig.app.json: This is used to override the tsconfig.json file with app specific configurations.
                                          • tsconfig.spec.json: This overrides the tsconfig.json file with app specific unit test configurations.