Reactive programming is a programming paradigm dealing with data streams and the propagation of changes. Data streams may be static or dynamic. An example of static data stream is an array or collection of data. It will have an initial quantity and it will not change.
An example for dynamic data stream is event emitters. Event emitters emit the data whenever the event happens. Initially, there may be no events but as the time moves on, events happens and it will gets emitted.
Reactive programming enables the data stream to be emitted from one source called Observable and the emitted data stream to be caught by other sources called Observer through a process called subscription.
This Observable/Observer pattern or simple Observer pattern greatly simplifies complex change detection and necessary updating in the context of the programming.
Reactive Programming in Angular
JavaScript does not have the built-in support for Reactive Programming. RxJs is a JavaScript Library which enables reactive programming in JavaScript. Angular uses RxJs library extensively to do below mentioned advanced concepts −
Data transfer between components.
HTTP client.
Router.
Reactive forms.
Let us learn reactive programming using RxJs library in this chapter.
Observable
As learn earlier, Observable are data sources and they may be static or dynamic. Rxjs provides lot of method to create Observable from common JavaScript Objects. Let us see some of the common methods.
of(): Emit any number of values in a sequence and finally emit a complete notification.
const numbers$ =of(1,2,3,4,5,6,7,8,9,10);
Here,
numbers$ is an Observable object, which when subscribed will emit 1 to 10 in a sequence.
Dollar sign ($) at the end of the variable is to identify that the variable is Observable.
range(): Emit a range of number in sequence.
const numbers$ =range(1,10)
from(): Emit array, promise or iterable.
const numbers$ =from([1,2,3,4,5,6,7,8,9,10]);
ajax(): Fetch a url through AJAX and then emit the response.
Angular internally uses the concept extensively to provide data transfer between components and for reactive forms.
Subscribing process
Subscribing to an Observable is quite easy. Every Observable object will have a method, subscribe for the subscription process. Observer need to implement three callback function to subscribe to the Observable object. They are as follows −
next: Receive and process the value emitted from the Observable
error: Error handling callback
complete: Callback function called when all data from Observable are emitted.
Once the three callback functions are defined, Observable’s subscribe method has to be called as specified below −
numbers$.subscribe(observer);const filterFn =filter((num : number)=> num >5);const filteredNumbers =filterFn(numbers$);
filteredNumbers.subscribe((num : number)=>{this.filteredNumbers.push(num);this.val2 += num });const mapFn =map((num : number)=> num + num );const processedNumbers$ = numbers$.pipe(filterFn, mapFn);
processedNumbers$.subscribe((num : number)=>{this.processedNumbers.push(num);this.val3 += num });const api$ =ajax({
url:'https://httpbin.org/delay/1',
method:'POST',
headers:{'Content-Type':'application/text'},
body:"Hello"});
api$.subscribe(res=>this.apiMessage = res.response.data );const clickEvent$ =fromEvent(document.getElementById('counter'),'click');
clickEvent$.subscribe(()=>this.counter++);}}</pre>
Here,
Used of, range, from, ajax and fromEvent methods to created Observable.
Used filter, map and pipe operator methods to process the data stream.
Callback functions catch the emitted data, process it and then store it in components local variables.
Change the AppComponent template, src/app/app.component.html as specified below −
<h1>{{ title }}</h1><div>
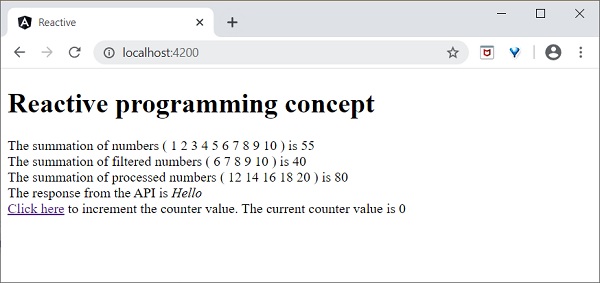
The summation ofnumbers(<span *ngFor="let num of numbers">{{ num }}</span>) is {{ val1 }}</div><div>
The summation of filtered numbers(<span *ngFor="let num of filteredNumbers">{{ num }}</span>) is {{ val2 }}</div><div>
The summation of processed numbers(<span *ngFor="let num of processedNumbers">{{ num }}</span>) is {{ val3 }}</div><div>
The response from the API is <em>{{ apiMessage }}</em></div><div><a id="counter" href="#">Click here</a> to increment the counter value. The current counter value is {{ counter }}<div>
Here,
Shown all the local variable processed by Observer callback functions.
Open the browser, http://localhost:4200.
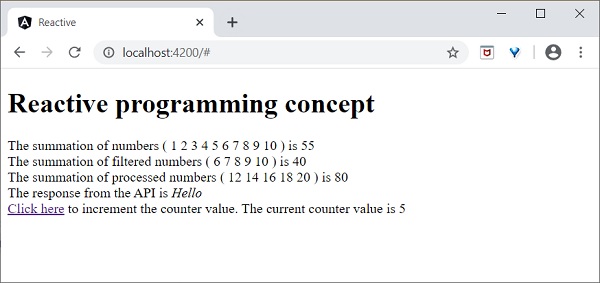
Click the Click here link for five times. For each event, the event will be emitted and forward to the Observer. Observer callback function will be called. The callback function increment the counter for every click and the final result will be as shown below −
Angular framework provides maximum compatibility with previous versions. If Angular Team deprecate a feature in a release, it will wait for 3 more release to completely remove the feature. Angular Team release a major version for every six months. Every version will have active maintenance period of six months and then Long Term Support (LTS) period for another one year. Angular does not introduce breaking changes during these 18 months. If Angular version deprecate a feature in version 5, then it will probably remove it in version 8 or in next releases.
Angular maintains documentation and guides of all version. For example, Angular documentation for version 7 can be checked @ https://v7.angular.io. Angular also provides a detailed upgrade path through https://update.angular.io/ site.
To update Angular application written from previous version, use below command inside the project directory:
ng update @angular/cli@8 @angular/core@8
Let us see some of the important changes introduced in Angular.
HttpModule module and its associated Http service is removed. Use HttpClient service from HttpClientModule module.
/deep/, >>> and :ng-deep component selectors are removed.
Angular default version of TypeScript is 3.4.
Node version supported by Angular is v10 and later.
@ViewChild() and ContentChild() decorator behaviour is changed from dynamic to static.
Lazy loading string syntax in router module is removed and only function based is supported.
Bazel is an open-source build and test tool developed by Google. You can use it to automate the building and testing of software. The reason to develop Bazel was to create a free and open-source build system that provides both speed and correctness. It uses a human-readable, high-level build language.
Angular is a front-end framework that can handle a large scale application, but as the size of your application grows, the build process can slow down significantly. To tackle this, Bazel can be used. Integrating it with Angular can provide several benefits that we are going to explore in this tutorial.
Build Process of Bazel
When Bazel is used, it works in the following steps −
First, the BUILD files relevant to the target are loaded.
In the second step, it creates an action graph after analyzing the inputs and their dependencies. It uses specified build rules during the process.
Executes the build actions on the given inputs to produce the final build outputs.
Features of Bazel
Some of the features of Bazel are as follows:
To describe build properties, Bazel uses abstract and human-readable language.
To speed up the build process, it caches all previously done work and tracks changes to both file content and build commands.
It supports multiple languages and platforms.
Also, it supports multiple repositories.
It is a high-level build language.
Bazel is fast and reliable.
Using Bazel in Angular
Angular supports building the application using bazel. Let us see how to use it to compile and build Angular applications.
First, install @angular/bazel package.
npm install -g @angular/bazel
The above command will install the @angular/bazel package globally. However, note that the Angular team has shifted some of its focus to support Bazel as part of the official Angular CLI tooling. You may also install this package locally in your project if preferred, but the command above should work fine for most setups.
For existing applications, add @angular/bazel as mentioned below:
ng add @angular/bazel
This command adds the necessary Bazel configuration to your existing Angular application. It sets up the BUILD.bazel files and modifies the angular.json file accordingly.
For new application, use below mentioned command:
ng new--collection=@angular/bazel
To build an application using bazel, use below command:
ng newapp-name --collection=@angular/bazel
Here,
leaveBazelFilesOnDisk option will leave the bazel files created during build process, which we can use to build the application directly using bazel.
To build an application using bazel directly, install @bazel/bazelisk and then, use bazelisk build command.
Ivy Compiler is the latest compiler for Angular application released by Angular Team. Currently, Angular is using View Engine compiler to compile Angular application.
In general, Angular compiler has two options to compile an application.
Just In Time (JIT) Compiler
In Just In Time (JIT) compilation, the compiler will be bundled along with the application and send to the browser. Angular application will be compiled in the browser and run just before the execution of application.
Even though JIT provides certain advanced feature, JIT slows down the compilation and also the app bundle will be double the size produced by AOT compiler as it includes compiler as well.
Ahead Of Time (AOT) Compiler
In AOT compilation, the compiler will emit optimised code ready to run inside the browser without any addition step. It will reduce the size of the bundle as well as reduce the compilation time and startup time of the application.
Advantages of Ivy Compiler
Ivy Compiler is the optimised and advanced compiler for Angular. As of Angular, it is not yet complete even though it is useable at this stage. Angular Team is recommending the developer to use it in Angular.
The main advantages of Ivy Compiler are as follows −
Optimized code.
Faster build time.
Reduced bundle size.
Better performance.
How to use Ivy?
Ivy Compiler can be used in Angular application by changing the project setting as specified below −
Open angular.json and set the aot option (projects -> -> architect -> build -> configurations -> production) of the project to true.
Server side Rendering (SSR) is a modern technique to convert a Single Page Application (SPA) running in the browser into a server based application. Usually, in SPA, the server returns a simple index.html file with the reference to the JavaScript based SPA app. The SPA app take over from there, configure the entire application, process the request and then send the final response.
But in SSR supported application, the server as well do all the necessary configuration and then send the final response to the browser. The browser renders the response and start the SPA app. SPA app takeover from there and further request are diverted to SPA app. The flow of SPA and SSR is as shown in below diagram.
Converting a SPA application to SSR provides certain advantages and they are as follows −
Speed: First request is relatively fast. One of the main drawback of SPA is slow initial rendering. Once the application is rendered, SPA app is quite fast. SSR fixes the initial rendering issue.
SEO Friendly: Enables the site to be SEO friendly. Another main disadvantage of SPA is not able to crawled by web crawler for the purpose of SEO. SSR fixes the issue.
Angular Universal
To enable SSR in Angular, Angular should be able to rendered in the server. To make it happen, Angular provides a special technology called Angular Universal. It is quite new technology and it is continuously evolving. Angular Universal knows how to render Angular application in the server. We can upgrade our application to Angular Universal to support SSR.
Web workers enables JavaScript application to run the CPU-intensive in the background so that the application main thread concentrate on the smooth operation of UI. Angular provides support for including Web workers in the application. Let us write a simple Angular application and try to use web workers.
Create a new Angular application using below command −
app refers the location of the web worker to be created.
Angular CLI will generate two new files, tsconfig.worker.json and src/app/app.worker.ts and update three files, tsconfig.app.json, angular.json and src/app/app.component.ts file.
tsconfig.worker.json extends tsconfig.json and includes options to compile web workers.
// tsconfig.app.json [only a snippet]"exclude":["src/test.ts","src/**/*.spec.ts","src/**/*.worker.ts"]
Here,
Basically, it excludes all the worker from compiling as it has separate configuration.
// angular.json (only a snippet) "webWorkerTsConfig": "tsconfig.worker.json"
Here,
angular.json includes the web worker configuration file, tsconfig.worker.json.
// src/app/app.worker.tsaddEventListener('message',({ data })=>{const response =worker response to ${data};postMessage(response);});
Here,
A web worker is created. Web worker is basically a function, which will be called when a message event is fired. The web worker will receive the data send by the caller, process it and then send the response back to the caller.
// src/app/app.component.ts [only a snippet]if(typeof Worker !=='undefined'){// Create a newconst worker =newWorker('./app.worker',{ type:'module'});
   worker.onmessage=({ data })=>{console.log(page got message: ${data});};
   worker.postMessage('hello');}else{// Web Workers are not supported in this environment.// You should add a fallback so that your program still executes correctly.}
Here,
AppComponent create a new worker instance, create a callback function to receive the response and then post the message to the worker.
Restart the application. Since the angular.json file is changed, which is not watched by Angular runner, it is necessary to restart the application. Otherwise, Angular does not identify the new web worker and does not compile it.
Let us create Typescript class, src/app/app.prime.ts to find nth prime numbers.
worker.onmessage=({ data })=>{this.prime10000 = data;};
worker.postMessage(10000);}else{// Web Workers are not supported in this environment.// You should add a fallback so that your program still executes correctly.}}}</pre>
Here,
find10thPrimeNumber is directly using the PrimeCalculator. But, find10000thPrimeNumber is delegating the calculation to web worker, which in turn uses PrimeCalculator.
Change the AppComponent template, src/app/app.commands.html and include two option, one to find 10th prime number and another to find the 10000th prime number.
<h1>{{ title }}</h1><div><a href="#"(click)="find10thPrimeNumber()">Click here</a> to find 10th prime number<div>The 10<sup>th</sup> prime numberis{{ prime10 }}</div><br/><a href="#"(click)="find10000thPrimeNumber()">Click here</a> to find 10000th prime number<div>The 10000<sup>th</sup> prime numberis{{ prime10000 }}</div></div>
Here,
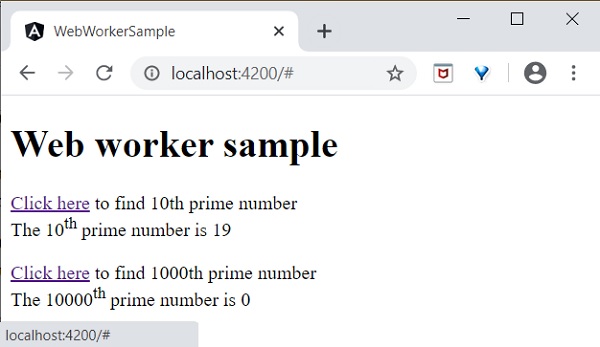
Finding 10000th prime number will take few seconds, but it will not affect other process as it is uses web workers. Just try to find the 10000th prime number first and then, the 10th prime number.
Since, the web worker is calculating 10000th prime number, the UI does not freeze. We can check 10th prime number in the meantime. If we have not used web worker, we could not do anything in the browser as it is actively processing the 10000th prime number.
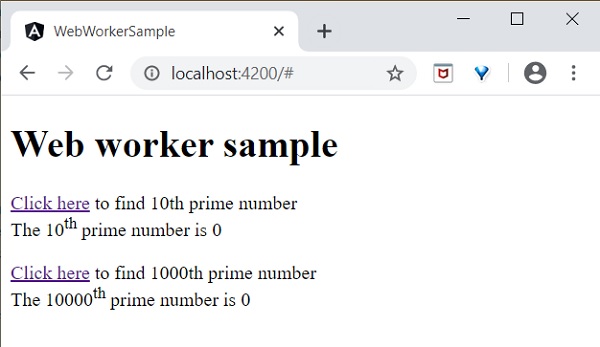
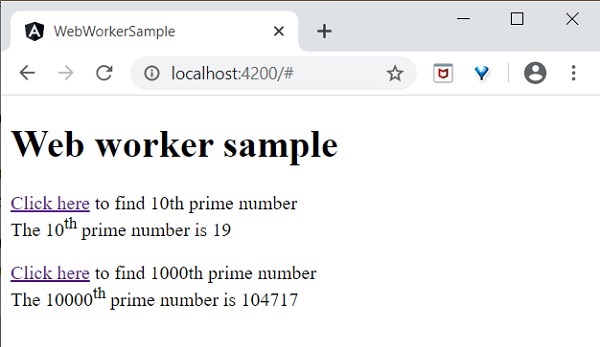
The result of the application is as follows −
Initial state of the application.
Click and try to find the 10000th prime number and then try to find the 10th prime number. The application finds the 10th prime number quite fast and shows it. The application is still processing in the background to find the 10000th prime number.
Both processes are completed.
Web worker enhances the user experience of web application by doing the complex operation in the background and it is quite easy to do it in Angular Application as well.
Accessibility support is one of the important feature of every UI based application. Accessibility is a way of designing the application so that, it is accessible for those having certain disabilities as well. Let us learn the support provided by Angular to develop application with good accessibility.
While using attribute binding, use attr. prefix for ARIA attributes.
Use Angular material component for Accessibility. Some of the useful components are LiveAnnouncer and cdkTrapFocu.
Use native HTML elements wherever possible because native HTML element provides maximum accessibility features. When creating a component, select native html element matching your use case instead of redeveloping the native functionality.
Use NavigationEnd to track and control the focus of the application as it greatly helps in accessibility.
In Angular, Standalone components provide a simplified way to build Angular applications. As the name suggests, standalone components are independent and do not rely on other modules or components.
Note! Yes, standalone components are independent; they no longer depend on the @NgModule. If you try to import a standalone component into an @NgModule, you might encounter errors
Important! The Standalone components were introduced in Angular version 14. Learn more about Angular’s various versions: See more
Standalone components are suitable for small applications that do not require module dependencies. However, when developing a large or complex application with mandatory dependencies for components, this becomes a drawback for standalone components.
Important! Any existing angular applications can optionally and incrementally adopt the new standalone style without any breaking changes.
Standalone vs Non-Standalone Components
Below is a list which differentiate between standalone and non-standalone component:
Standalone
Non-Standalone
Independent: Standalone components do not depend on @NgModule.
Module Dependency: These components must be declared in an @NgModule to be used.
Simplified Structure: Ideal for creating reusable components, directives, or pipes without the need to involve Angular modules.
Complex Structure: Suitable for larger, more complex applications where components are part of a bigger module structure.
The standalone @Component directive contains standalone: true and imports: [].
The non-standalone component does not include these configurations.
How to Create a Standalone Component?
To create an standalone component in your angular application, you need to run the following command:
ng generate component component_name
In the latest version of Angular, this command will automatically create a standalone component, as the application itself supports standalone components by default.
However, in older versions of Angular, running the above command may not create a standalone component. In that case, we need to use the following command or manually set the standalone property and specify the imports.
ng generate component component_name --standalone
The standalone component initial data will look like:
import{ Component}from'@angular/core';@Component({
  selector:'app-root',
  standalone:true,
  imports:[],
  templateUrl:'./app.component.html',
  styleUrl:'./app.component.css'})exportclassAppComponent{
  title ='my-crud-app';}
Here,
The standalone: true property identifies this component as a standalone component.
The imports array is where you can add all the required dependencies for this component.
Verify the Standalone Components
You might be wondering how to determine if a component is standalone. To verify if a component is standalone in Angular, you can check using the following guide lines:
Standalone Property: Check the standalone property in the component’s TypeScript file (.ts file). If the standalone property is set to true, then it’s a standalone component.
Importing Standalone Component: If you try to import the standalone component into a non-standalone module, it should throw an error:
Component imports must be standalone component
Advantages of Standalone Components
Below is a list of some advantages of the Standalone components:
Reusability: These components are self-contained, making them easy to reuse in different parts of the application without any module dependency.
Faster Development: As there is no need to import within the modules, developers can quickly create and integrate new components, speeding up the development process.
Modularity: The Standalone components enable a modular approach, allowing for better organization and maintainability of the codebase.
Internationalization (i18n) is a must required feature for any modern web application. Internationalization enables the application to target any language in the world. Localization is a part of the Internationalization and it enables the application to render in a targeted local language. Angular provides complete support for internationalization and localization feature.
Let us learn how to use Internationalization in Angular by creating a simple hello world application in different languages.
Internationalization in Angular
Follow the steps given below to enable internationalization in Angular:
Step 1: Create a new Angular application using below command −
ng newi18n-sample
Step 2: Navigate to the app folder using the given command −
cd i18n-sample
Step 3: Change the AppComponent’s template as specified below −
<h2>{{ title }}</h2><div>Hello</div><div>The Current time is {{ currentDate | date :'medium'}}</div>
Step 4: Add localize module using below command −
ng add @angular/localize
Step 5: The LOCALE_ID is the Angular variable to refer the current locale. By default, it is set as en_US. Let us change the locale by using useValue: ‘hi’ (for Hindi) in the providers array of app.component.ts. Import the locale data from @angular/common/locales/hi and then, register it using registerLocaleData method. Also, define a local variable named CurrentDate and set current time using Date.now() as specified below:
Authentication is the process matching the visitor of a web application with the pre-defined set of user identity in the system. In other word, it is the process of recognizing the users identity. Authentication is very important process in the system with respect to security.
Authorization is the process of giving permission to the user to access certain resource in the system. Only the authenticated user can be authorized to access a resource.
Let us learn how to do Authentication and Authorization in Angular application in this tutorial.
Guards in Routing
In a web application, a resource is referred by url. Every user in the system will be allowed access a set of urls. For example, an administrator may be assigned all the url coming under administration section.
As we know already, URLs are handled by Routing. Angular routing enables the urls to be guarded and restricted based on programming logic. So, a url may be denied for a normal user and allowed for an administrator.
Angular provides a concept called Router Guards which can be used to prevent unauthorized access to certain part of the application through routing. Angular provides multiple guards and they are as follows:
CanActivate: Used to stop the access to a route.
CanActivateChild: Used to stop the access to a child route.
CanDeactivate: Used to stop ongoing process getting feedback from user. For example, delete process can be stop if the user replies in negative.
Resolve: Used to pre-fetch the data before navigating to the route.
CanLoad: Used to load assets.
Working Example
In this example, we are going to add login and logout functionality to an angular application and secure it using CanActivate guard. Follow the given steps:
Step 1: Create an angular application using the following command −
ng newnew-app
Step 2: Now, navigate to project root folder.
cd new-app
Step 3: Next, we include the Bootstrap into our new-app application using styles option and change the default template to use Bootstrap components. Use the below command to install Bootstrap and JQuery in the project −
npm install --save bootstrap jquery
Now, open angular.json file and set bootstrap and jquery library path −
scripts option is used to include JavaScript library.
Step 4: Create a new service named AuthService to authenticate the user. The command given below will create a service with the name auth inside Services folder.
ng generate service Services/auth
On successful creation of service, you may see the below output on Angular CLI −
import{ Injectable }from'@angular/core';import{ Observable,of, BehaviorSubject }from'rxjs';import{ tap, delay }from'rxjs/operators';
@Injectable({
providedIn:'root'})exportclassAuthService{// Track login state with BehaviorSubjectprivate isUserLoggedInSubject =newBehaviorSubject<boolean>(false);constructor(){// Only initialize sessionStorage on the client-side (browser)if(typeof window !=='undefined'&& window.sessionStorage){const storedLoginState = sessionStorage.getItem('isUserLoggedIn')==='true';this.isUserLoggedInSubject.next(storedLoginState);}}login(userName: string, password: string): Observable<boolean>{const isLoggedIn = userName ==='admin'&& password ==='admin';if(typeof window !=='undefined'&& window.sessionStorage){
sessionStorage.setItem('isUserLoggedIn', isLoggedIn ?'true':'false');}// Update the BehaviorSubject with new login statethis.isUserLoggedInSubject.next(isLoggedIn);returnof(isLoggedIn).pipe(delay(1000),tap(val=> console.log("Is User Authentication successful: "+ val)));}logout():void{if(typeof window !=='undefined'&& window.sessionStorage){
sessionStorage.removeItem('isUserLoggedIn');}// Update the BehaviorSubject to false when logged outthis.isUserLoggedInSubject.next(false);}// Expose the login status as an observablegetisUserLoggedIn$(): Observable<boolean>{returnthis.isUserLoggedInSubject.asObservable();}}</pre>
Here,
We have written two methods, login and logout.
The purpose of the login method is to validate the user and if the user successfully validated, it stores the information in localStorage and then returns true.
Authentication validation is that the user name and password should be admin.
We have not used any backend. Instead, we have simulated a delay of 1s using Observables.
The purpose of the logout method is to invalidate the user and removes the information stored in localStorage.
Step 6: Create a login component using below command −
ng generate component login
Following output will be produced on running the above code −
next: ActivatedRouteSnapshot,
state: RouterStateSnapshot): boolean | UrlTree {let url: string = state.url;returnthis.checkLogin(url);}checkLogin(url: string):true| UrlTree {
console.log("Url: "+ url);// Check if sessionStorage is available (only in the browser)if(typeof window !=='undefined'&& window.sessionStorage){let val = sessionStorage.getItem('isUserLoggedIn');// Check if the value is 'true'if(val ==="true"&& val !=null){// If the user is already logged in and trying to access the login page, redirect to /expensesif(url ==="/login"){returnthis.router.parseUrl('/expenses');}else{returntrue;// User is allowed to proceed}}else{// If the user is not logged in, redirect to /loginreturnthis.router.parseUrl('/login');}}// In case sessionStorage isn't available (for SSR)returnthis.router.parseUrl('/login');}}</pre>
Here,
checkLogin will check whether the localStorage has the user information and if it is available, then it returns true.
If the user is logged in and goes to login page, it will redirect the user to expenses page
If the user is not logged in, then the user will be redirected to login page.
Step 14: Let's add a new component in our application. User will be redirected to this page on successful login.
Here, the command creates the ExpenseEntryList Component and add the necessary code by default.
Step 15: Create a ExpenseEntry interface within src/app/expense-entry-list.component.ts file. Then, add a method named getExpenseEntries() to return list of expense entry (mock items) in ExpenseEntryListComponent. Also, declare a local variable, expenseEntries and load the mock list of expense entries.
title ='Angular Authentication';
isUserLoggedIn: any =false;
router: any;constructor(private authService: AuthService){}ngOnInit(){// Subscribe to the isUserLoggedIn observable from AuthServicethis.authService.isUserLoggedIn$.subscribe(status=>{this.isUserLoggedIn = status;
console.log("Is User Logged In: ",this.isUserLoggedIn);});}logout():void{// Trigger logout in AuthServicethis.authService.logout();// Redirect to the homepage after logoutthis.router.navigate(['/']);}}</pre>
Here, we have added the logic to identify the user status so that we can show login/logout functionality.
Step 20: Start the application using following command −
ng serve
Enter admin as username and password and then, click submit. The application process the login and redirects the user to expense list page as shown below −