CRUD is an acronym (a shortened name) that stands for Create, Read, Update, and Delete. These are the four basic operations performed on data in most databases and web applications such as Employee Management System, LMS, etc. Each operation has its own functionality as follows:
Create: This operation is used to add (create) a new record to the database.
Read: This operation is used to retrieve (view) existing data from the database.
Update: This operation is used to modify (edit) existing data in the database.
Delete: This operation is used to remove (delete) existing data from the database.
Now that we have a basic understanding of CRUD operations. Let’s learn about implementing CRUD operations in Angular and how to perform them using HTTP (HyperText Transfer Protocol).
CRUD Operations in Angular
In Angular, the CRUD (Create, Read, Update, and Delete) operations play an important role in managing data and performing specific tasks. These operations are handled using the Angular HttpClient service class to interact with HTTP RESTful APIs.
These operations allows you as follows:
Create new records (POST requests).
Read existing data (GET requests).
Update existing data (PUT/PATCH requests).
Delete records (DELETE requests).
Let’s discuss these angular operations one by one:
Create Operation
In Angular, the Create operation involves sending a POST request to add (create) a new record to the server. This is done using the HttpClient service class, which provides an easy way to communicate with a RESTful API’s.
Signature
Following is the signature (different from syntax) of the Create operation (which is POST a method) −
URL − The URL to which the Create (POST) request is sent.
body − It represents the data to be sent (updated) to the server. Normally, it will be in JSON format.
options − It represents the options to be sent along with the request, such as headers, query parameters, etc.
Observable<T> − The return type, where ‘T’ represents the expected response type.
Read Operation
In Angular, theRead operation involves sending aGET request toretrieve (get)an existing record from the server. This is done using theHttpClientservice class, which provides an easy way to communicate with RESTfulAPI’s.
Signature
Following is the signature (different from syntax) of the Read operation (which is GET a method) −
url − The URL to which the Read (GET) request is sent.
options − represents the options to be send along with the resource URL.
Observable<T> − The return type, where ‘T’ represents the expected response type.
Update Operation
In Angular, theUpdate operation involves sending aPUT/PATCH request tomodify (update) an existing record on the server. This is done using theHttpClient service class, which provides an easy way to communicate with RESTful API’s.
Signature
Following is the signature (different from syntax) of the Update operation (which is PUT/PATCH a method) −
URL − The URL to which the Update (PUT) request is sent.
body − It represents the data to be sent (updated) to the server. Normally, it will be in JSON format.
options − It represents the options to be sent along with the request, such as headers, query parameters, etc.
Observable<T> − The return type, where ‘T’ represents the expected response type.
Delete Operation
In Angular, theDelete operation involves sending aDELETErequest toremove (delete)an existing record on the server. This is done using theHttpClient service class, which provides an easy way to communicate with RESTfulAPI’s.
Signature
Following is the signature (different from syntax) of the Delete operation (which is DELETE a method) −
URL − The URL to which the Delete (DELETE) request is sent.
options − An object containing HTTP options such as headers, query parameters, etc.
Observable<T> − The return type, where ‘T’ represents the expected response type.
Sample Example
We will create an Angular application named EMS (Employee Management System), where we will implement all four CRUD operations to ‘create’, ‘read’, ‘update’, and ‘delete’ employee data.
Now, let’s see the step-by-step guides for setting up a mini Angular project and implementing all four CRUD operations:
Project Setup
Step 1: Open your friendly IDE’s terminal (e.g, vs code) or node.js command, and go to your favorite workspace as follows:
cd /go/to/your/favorite/workspace
Step 2: To manage your Angular application via commands, install the Angular CLI using the following command:
npm install @angular/cli
//for latest version
npm install @angular/cli@latest
Step 3: Create a new Angular application using the following command (see more):
ng new my-crud-app
Once you run the above command, it will ask you a few questions. You can reply with the default answers as shown below:
? Which stylesheet format would you like to use? (Use arrow keys)
> CSS
  SCSS   [ https://sass-lang.com/documentation/syntax#scss                ]
  Sass   [ https://sass-lang.com/documentation/syntax#the-indented-syntax ]
  Less   [ http://lesscss.org
....
? Which stylesheet format would you like to use? CSS
? Do you want to enable Server-Side Rendering (SSR) and Static Site
Generation (SSG/Prerendering)? Yes
Step 4: Navigate to your “application directory” and run the following commands one by one to create the four components:
cd my-crud-app
------
ng generate component dashboard
ng generate component Create
ng generate component Update
ng generate component View
Step 5: Now, open the app.component.html file, remove everything, and leave only the following:
<router-outlet></router-outlet>
Step 6: Finally, run the application using the following command:
ng serve
Setting up Database
As we set up the application, we are ready to implement the CRUD operations in our Angular my-crud-app application. Let’s set up the database too.
Step 7: Go to your assets folder (cd src/assets), create a .json file (e.g., db.json), and place the dummy data below:
The above data will be treated as the application database (endpoint URL), where we will send all the requests to manipulate data.
Step 8: Now, install the JSON-Server to access the above database as follows:
npm install json-server
Step 9: Run the following command to start the JSON-Server:
cd src -> assets
-------
npx json-server --watch db.json
Open your browser and navigate to http://localhost:3000 (default port) to see the JSON-Server data. To see the employee’s data, navigate to http://localhost:3000/employees.
Setting up Service
Step 10: Install the service to communicate over the HTTP protocol for performing CRUD operations:
ng generate service services/auth
Once the above command is executed successfully, you will be able to see a folder named services containing two files: auth.service.ts and auth.service.spec.ts. We will implement all the CRUD operations in our “auth.service.ts” file.
To work with the HTTP protocol, make sure the HttpClientModule is added and imported into the root component as follows:
Step 11: Open your auth.service.ts file and place the below code:
import{ HttpClient }from'@angular/common/http';import{ Injectable }from'@angular/core';@Injectable({
  providedIn:'root'})exportclassAuthService{private baseURL:string="http://localhost:3000/employees";constructor(private http: HttpClient){}//read employees data ( Read operation)getAllEmployees(){returnthis.http.get(this.baseURL);}//get employee by id (read operation)getEmployeeById(id:any){returnthis.http.get(this.baseURL +"/"+ id);}//create or add new employee (Post operation)createEmployee(obj:any){returnthis.http.post(this.baseURL +"/", obj);}//update employee data (Put operation)updateEmployee(id:any, obj:any){returnthis.http.put(this.baseURL +'/'+ id , obj);}//delete employee (Delete operation)deleteEmployee(id:any){returnthis.http.delete(this.baseURL +"/"+ id);}}
The above service class code will implement all four operations to “read”, “update”, “delete”, and “create” employee data.
Setting up Routing
We need to set up routing that defines the paths for each component so that when the links or buttons are clicked, we can navigate through the different components.
Step 12: Open the app.routes.ts file, and place the below code to navigate to the respective component:
To retrieve (read) all the employee data from the JSON-server, we will use the HTTP GET operation.
Step 13: Open the respective files of the dashboard component in your angular application i.edashboard.component.html,dashboard.component.ts, anddashboard.component.cssfiles, and place the respective code below:dashboard.component.html file,
name:newFormControl(''),
email:newFormControl(''),
mobile:newFormControl(''),
department:newFormControl('')});}createEmp():void{const name =this.createForm.get('name')?.value;if(name.trim().length ==0){alert("Name can't be empty");}else{this.auth.createEmployee(this.createForm.value).subscribe(res =>{this.message ="Employee created successfully...!";setTimeout(()=>{this.router.navigate(['/dashboard']);},1000);});}}}</pre>
Once the new employee is created, the dashboard will look like this:
Updating Employee Data
To update the employee record (data), we will use the HTTP PUT operation.
Step 15: Open the update.component.html, update.component.ts, and update.component.css files and place the respective code below:update.component.html file,
The JSONP is a special technique (of feature) used to bypass the cross-domain (CORS) policies enforced by web browsers. Generally, browsers only support AJAX calls within the same domain. To make AJAX calls to another domain, CORS policies need to be enabled on both the server and the client (browser).
Instead of enabling the CORS policy, the server can send the response in JSONP format. JSONP format is JSON enclosed in a callback function. When the browser receives the response, it executes it as a script. The callback function then processes the response and performs the necessary business logic.
Syntax for the JSONP callback function −
mycallback({//...json data ...});
Here,
mycallback is the name of the function sent by the browser (client).
In Angular, thejsonp()is the method available in theHttpClient service class used to request the server using the JSONP technique. It is similar to the HttpClient get()method with an additional option to set the name of the query parameter used to get the callback function by the server.
An Angular will auto-generate a function to parse the JSON on the client side. Then, it will add a new query parameter to the URL. The name of the query parameter will be the name set in the JSONP call. The value of the query parameter is the name of the function auto-generate by angular.
Signature of the jsonp() Method
The signature (different from syntax) of the HttpClient jsonp() method is as follows −
url − The URL endpoint to which the JSONP request is made.
callback − It represents the callback function name (which will be auto-generated) to be invoked after the JSONP server call.
Observable<any> − The method returns an Observable that emits the JSONP response.
A simple code to demonstrate the JSONP method is as follows −
let jsonp_req =this.http.jsonp<Expense[]>('http://localhost:8000/api/jsonp/expense','callback');

jsonp_req.subscribe(data =>this.expenses = data);
Here,
The this.http is the HttpClient instance.
The jsonp()is a method used to request the server. It does not request the server directly. Instead, it returns an Observable, which can be used to request a server by subscribing to it and getting the actual response in the subscribed function.
The http://localhost/api/jsonp/expenseis the URI (Uniform resource identifier) of the resource.
Angular will auto-generate a function, sayng_jsonp_callback_0, and attach it to the request URL using the second argument of the jsonp() method.
To work out the HTTP client-server communication, we need to set up a web application and need to expose a set of web APIs. The web API can be requested from the client. Let us create a sample server application, Expense API App to provide CRUD REST API (mainly JSONP request) for expenses −
Step 1: Go to your favorite workspace as follows −
cd /go/to/your/favorite/workspace
Step 2: Create a new folder, expense-rest-api, and move into the folder −
mkdir expense-rest-api && cd expense-rest-api
Step 3: Create a new application using the init sub-command provided by the npm command as shown below −
npm init
Once you run the above command, it will ask a few questions and answer all of them with default answers.
Step 4: Install express and cors packages to create node-based web applications −
npm install express cors --save
Step 5: Install SQLite package to store the expenses in the SQLite-based database −
npm install sqlite3 --save
Step 6: Create a new file, sqlitedb.js, and place the below code to initialize the database with expense table and sample expense entries. An expense table will be used to store the expense items −
var sqlite3 =require('sqlite3').verbose()constDBSOURCE="expensedb.sqlite"let db =newsqlite3.Database(DBSOURCE,(err)=>{if(err){
console.error(err.message)throw err
}else{
console.log('Connected to the SQLite database.')
db.run(`CREATE TABLE IF NOT EXISTS expense (
id INTEGER PRIMARY KEY AUTOINCREMENT,
item text,
amount real,
category text,
location text,
spendOn text,
createdOn text
)`,(err)=>{if(err){
console.log(err);}else{var insert ='INSERT INTO expense (item, amount, category, location, spendOn, createdOn) VALUES (?,?,?,?,?,?)'
Here, the code will create six below-mentioned REST API endpoints:
/endpoint returns an OK message to make sure the application is working fine.
/api/jsonp/expense endpoint returns all expense items available in the database in JSONP.
Step 8: Run the application using the command as shown below −
node index.js
Step 9: To test the application and to make sure it is working, open a browser and go to http://localhost:8000/. It should return the below message if the application is working fine −
{
"message": "Ok"
}
Angular Sample Application
Let us create a working angular example to get all expense items from the above server application by usingthe HttpClientservice class and get() method −
Step 1: Create a new angular application by running ng new command as shown below −
? Would you like to add Angular routing? Yes
? Which stylesheet format would you like to use? CSS
Step 2: Enable HTTP communication in the application by importing HttpClientModule in the component configuration file (app.component.ts) as per the latest version −
Step 9 : Call the get() method of this.http (HttpClient instance) object by passing the URL & options and retrieving the expense object from the server. Then, set the expenses into our local variable, expenses −
exportclassListExpensesComponentimplementsOnInit{
expenses: Expense[]=[];constructor(private http: HttpClient){}ngOnInit():void{this.http.jsonp<Expense[]>('http://localhost:8000/api/jsonp/expense','callback').subscribe(data=>{this.expenses = data as Expense[]
console.log(this.expenses)})}}</pre>
Here,
Sets the Expense[] as the type of the object returned by the server. The server will send the array of expense objects in its body in JSON format.
Subscribed to the request (this.http.jsonp) object. Then parsed the subscribed data as an array of expense objects and set it to a local expense variable (this.expenses).
Step 10: The complete code of the ListExpensesComponent is as follows −
import{ Component, OnInit }from'@angular/core';import{ HttpClient, HttpRequest, HttpResponse, HttpEvent }from'@angular/common/http';import Expense from'../Expense';@Component({
selector:'app-list-expenses',
templateUrl:'./list-expenses.component.html',
styleUrls:['./list-expenses.component.css']})exportclassListExpensesComponentimplementsOnInit{
expenses: Expense[]=[];constructor(private http: HttpClient){}ngOnInit():void{this.http.jsonp<Expense[]>('http://localhost:8000/api/jsonp/expense','callback').subscribe( data =>{this.expenses = data as Expense[]console.log(this.expenses)})}}
Step 11: Next, get the expenses object from the component and render it in our component template page (list-expenses.component.html) −
<div><h3>Expenses</h3></div><ul><li *ngFor="let expense of expenses">
{{expense.item}} @ {{expense.location}} for {{expense.amount}} USD on {{expense.spendOn | date:'shortDate' }}
</li></ul>
Step 12: Finally, run the application using the below command −
ng serve
Step 13: Open the browser and navigate to http://localhost:4200/ url and check the output
The HTTP standard verb DELETE can be used in the HTTP protocol to request the deletion of a specific resource (data) on the server. The purpose of the DELETE method is to ask the server to remove a particular piece of data.
In Angular, the HttpClient service class provides a delete() method to delete data on the server. Let’s learn more about this method, including its signature, various options, real-time usage, etc.
Signature of the delete() Method
Following is the signature (different from syntax) of the HttpClient delete() method −
The observe specifies which part of the response has to be observed during the server communication. Based on the observe option, either the full or part of the response will be returned as Observable. The possible values are body, events, and response.
body: Retrieves only the body content of the response from the HTTP request as Observable<R>, where R is based on the responseType option and the requested type (e.g., Expense) of data.
JSON is the format used to interprets the response body
Expense is the requested type used to format the response body and returns as Observable<Expense>.
events: Retrieves the events fired in a response stream along with the corresponding response body as Observable<HttpEvent><R>>, where R is based on the responseType option and the requested type (e.g., Expense) of data.
JSON is the format used to interprets the response body.
Expense is the requested type used to format the response body and returns Observable<HttpEvent<Expense>>.
response: It is used to retrieve the complete response from the HTTP request as Observable<HttpResponse<R>>, where R is based on the responseType option (which we will check in the next section) and the requested type (e.g., Expense) of data. The purpose of the HttpResponse class is to represent the complete HTTP response from the server.
JSON: Interprets the response body as JSON format and returns Observable<R>, where R is the requested type (e.g., Expense) of data. It can be used to represent the result in JSON format.
Based on the observe and responseType, HttpClient returns Observable with a different type variable. Let’s check a few combinations of observe and responseType to better understand this concept.
observe => body and responseType => JSONReturns the Observable. R represents the type variable.
observe => response and responseType => JSONReturns the Observable<HttpResponse>. R represents the type variable and encodes response body.
observe => events and responseType => JSONReturns the Observable<HttpEvent>. R represents the type variable and encodes the response body.
observe => events and responseType => arraybufferReturns the Observable<HttpEvent>. The response body is encoded as ArrayBuffer.
observe => response and responseType => blobReturns the Observable<HttpEvent>. The Response body is encoded as ArrayBuffer.
observe => response and responseType => textReturns the Observable<HttpResponse>. The Response body is encoded as ArrayBuffer.
We can combine observe and responseType to create many more combinations as necessary.
headers
Theheadersspecify the HTTP headers. It can include a standard HTTP header as a key/value pair or can encode the data in the HttpHeaders class. A sample header as a key/value pair is as follows:
{'Content-type':'application/json'}
It specifies that the request content type is JSON. We can also use the HttpHeaders class provided by angular to create HTTP headers. A sample set of header information using HttpHeaders is as follows −
// create header using HttpHeadersconst headers =newHttpHeaders().set('content-type','application/json').set('Access-Control-Allow-Origin','*');this.http.delete<Expense>(<url>,{'observe':'body','responseType':'json',
headers: headers
})
params
Theparamsrepresent the serialized request parameter in application/x-www-form-urlencoded format. It can include params as a key/value pair or can encode the data in the HttpParams class. A sample parameter as a key/value pair is as follows:
{'name':'john'}
It specifies that the request param key is the name, and its value is john. We can also use the HttpParams class provided by angular to create parameters. A sample set of parameters using HttpParams is as follows −
// create parameters using HttpParamsconst params =newHttpParams().set('name','john').set('age',25).set('active',true;this.http.delete<Expense>(<url>,{'observe':'body','responseType':'json',
params: params
})
context
Thecontextsends arbitrary values as key/value pairs with type safety and without key conflict. It is used as a source of information for interceptors acting as middle-ware between client and server. Angular provides a special class, HttpContext to encode the context information. A sample context is as follows:
// create a key using HttpContextTokenexportconstIS_AUTH_ENABLED=newHttpContextToken<boolean>(()=>false);// set data for the contextlet authContext =newHttpContext().set(IS_AUTH_ENABLED,true)this.http.request<Expense>('GET',<url>,{'observe':'body','responseType':'json',
context: authContext
})
Here,
HttpContextToken is used to create the key along with the value type.
IS_AUTH_ENABLED is the key, and its type is boolean.
reportProgress
The reportProgress is used to specify whether to send back the progress of the request (communication) from the server. It can be used to show the progress of large file uploads through web API:
ThetransferCache specifies whether the request should be cached. It accepts the boolean value or HttpTransferCacheOptions value. HttpTransferCacheOptions encode dynamic logic to filter requests to be cached based on a custom filter function and override default cache behavior:
To work out the HTTP client-server communication, we need to set up a web application and expose a set of web API. The web API can be requested from the client. Let us create a sample server application, Expense API App to provide CRUD REST API (mainlyDELETEmethod) for expenses −
Step 1: Go to your favorite workspace as shown below −
cd /go/to/your/favorite/workspace
Step 2: Create a new folder, expense-rest-api, and move into the folder −
mkdir expense-rest-api && cd expense-rest-api
Step 3: Create a new application using the init sub-command provided by the npm command as shown below −
npm init
Once you run the above command, it will ask a few questions and answer all of them with default answers.
Step 4: Install express and cors packages to create node-based web applications −
npm install express cors --save
Step 5: Install SQLite package to store the expenses in the SQLite-based database −
npm install sqlite3 --save
Step 6: Create a new file with the name sqlitedb.js, and add the below code to initialize the database with expense table and sample expense entries. An expense table will be used to store the expense item −
var sqlite3 =require('sqlite3').verbose()constDBSOURCE="expensedb.sqlite"let db =newsqlite3.Database(DBSOURCE,(err)=>{if(err){
  console.error(err.message)throw err   }else{
  console.log('Connected to the SQLite database.')
  db.run(`CREATE TABLE IF NOT EXISTS expense (
     id INTEGER PRIMARY KEY AUTOINCREMENT,
     item text,
     amount real,
     category text,
     location text,
     spendOn text,
     createdOn text
  )`,(err)=>{if(err){
           console.log(err);}else{var insert ='INSERT INTO expense (item, amount, category, location, spendOn, createdOn) VALUES (?,?,?,?,?,?)'
           db.run(insert,['Pizza',10,'Food','KFC','2020-05-26 10:10','2020-05-26 10:10'])
           db.run(insert,['Pizza',9,'Food','Mcdonald','2020-05-28 11:10','2020-05-28 11:10'])
           db.run(insert,['Pizza',12,'Food','Mcdonald','2020-05-29 09:22','2020-05-29 09:22'])
           db.run(insert,['Pizza',15,'Food','KFC','2020-06-06 16:18','2020-06-06 16:18'])
           db.run(insert,['Pizza',14,'Food','Mcdonald','2020-06-01 18:14','2020-05-01 18:14'])}});}});
module.exports = db
Step 7: Open the index.js (if not found, create it manually) and place the below code −
var express =require("express")var cors =require('cors')var db =require("./sqlitedb.js")var app =express()
app.use(cors());var bodyParser =require("body-parser");
app.use(express.urlencoded({ extended:true}));
app.use(express.json());varHTTP_PORT=8000
app.listen(HTTP_PORT,()=>{
console.log("Server running on port %PORT%".replace("%PORT%",HTTP_PORT))});
app.get("/",(req, res, next)=>{
res.json({"message":"Ok"})});
app.get("/api/expense",(req, res, next)=>{var sql ="select * from expense"var params =[]
db.all(sql, params,(err, rows)=>{if(err){
Here, the code will create six below-mentioned REST API endpoints:
/endpoint returns an “OK” message to make sure the application is working fine.
/api/expense endpoint returns all expense items available in the database.
/api/expense/:id endpoint returns the expense entry based on the expense entry id.
/api/expense/:id endpoint with delete verb will delete the expense entry based on the expense entry id.
Step 8: Run the application using the below command −
node index.js
Step 9: To test the application, open your friendly browser (chrome) and go to http://localhost:8000/. It should return the below message if the application is working fine −
{
   "message": "Ok"
}
Angular Sample Application
Let us create an angular application to delete an existing expense on the server using the HttpClient service class:
Step 1: Create a new angular application by running ng new command as shown below −
? Would you like to add Angular routing? Yes
? Which stylesheet format would you like to use? CSS
Step 2: Enable HTTP communication in the application by importing HttpClientModule in the component configuration file (app.component.ts) as per the latest version −
Step 10: Call the get method of this.http (HttpClient instance) object by passing the list expenses URL and options and getting the expense object from the server. Then, set the expenses into our local variable, expenses −
exportclassListExpensesComponentimplementsOnInit{
expenses: Expense[]=[];
newexpense: Expense |null=null;constructor(private http: HttpClient){}ngOnInit():void{this.http.get<Expense[]>('http://localhost:8000/api/expense',{'observe':'body','responseType':'json'}).subscribe( data =>{this.expenses = data as Expense[]console.log(this.expenses)})}}
Here,
Sets the Expense[] as the type of the object returned by the server. The server will send the array of expense objects along with a new expense object in its body in the JSON format.
Subscribed to the request (this.http.get) object. Then parsed the subscribed data as an array of expense objects, and set it to a local expense variable (this.expenses).
Step 11: Add a new delete method and call thedelete()method of this.http (HttpClient instance) object by passing the delete URL −
exportclassListExpensesComponentimplementsOnInit{
expenses: Expense[]=[];
newexpense: Expense |null=null;constructor(private http: HttpClient){}delete(id?: Number):void{if(id){this.http.delete<Expense>('http://localhost:8000/api/expense/'+ id,{'observe':'body','responseType':'json'}).subscribe( data =>{console.log(data)this.http.get<Expense[]>('http://localhost:8000/api/expense',{'observe':'body','responseType':'json'}).subscribe( data =>{this.expenses = data as Expense[]console.log(this.expenses)})});}}ngOnInit():void{this.http.get<Expense[]>('http://localhost:8000/api/expense',{'observe':'body','responseType':'json'}).subscribe( data =>{this.expenses = data as Expense[];console.log(this.expenses);})}}
Step 12: Next, get the expenses list object and render it in our component template page (list-expenses.component.html). Also, add an anchor tag for each expense and set the delete method by passing the corresponding expense ID −
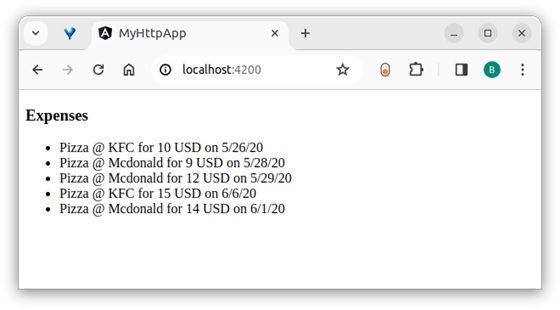
<div><h3>Expenses</h3></div><ul><li *ngFor="let expense of expenses">{{expense.item}} @ {{expense.location}}for{{expense.amount}}USD on {{expense.spendOn | date:'shortDate'}}<a href="delete(expense.id)">delete</a></li></ul>
Here,
When the user clicks the delete link, it will call the delete expense endpoint and delete the expense from the server.
Step 13: The complete code of the ListExpensesComponent is as follows −
}this.http.delete<Expense>('http://localhost:8000/api/expense/1',this.newexpense,{'observe':'body','responseType':'json'}).subscribe( data =>{this.newexpense = data as Expense;console.log(data)});this.http.get<Expense[]>('http://localhost:8000/api/expense',{'observe':'body','responseType':'json'}).subscribe( data =>{this.expenses = data as Expense[]console.log(this.expenses)});}}
Step 14: Finally, run the application using the below command −
ng serve
Step 15: Open the browser and navigate to http://localhost:4200/ URL and check the output −
Here, the output shows our expenses as a list of items except item 1.
The HTTP standard verb PUT can be used in the HTTP protocol to request the creation or update of a resource (data) on the server. The purpose of the PUT method is to send data to the server to create or update the resource based on the provided data.
The server processes the data and either “creates or updates” the requested resource. Once the data is created or updated, the server returns a response to the client.
In Angular, theHttpClientservice class provides aput()method to send data to the server using the HTTP PUT verb. Let us learn more about this method, including its signature, options, and real-time usage.
Signature of the put() Method
The signature (different from syntax) of the HttpClient put() method is as follows −
Observe is used to specify which part of the response has to be observed during the server communication. Based on the observe option, either the full or part of the response will be returned as Observable. The possible values are body, events, and response.
body: Retrieves only the body content of the response from the HTTP request as Observable<R>, where R is based on the responseType option and the requested type (e.g., Expense) of data.
JSON is the format used to interpret the response body.
Expense is the requested type used to format the response body and returns as Observable<Expense>.
events: Retrieves the events fired in a response stream along with the corresponding response body as Observable<HttpEvent><R>>, where R is based on the responseType option and the requested type (e.g., Expense) of data.
JSON is the format used to interpret the response body.
Expense is the requested type used to format the response body and returns Observable<HttpEvent<Expense>>.
response: Retrieves the complete response from the HTTP request as Observable<HttpResponse<R>>, where R is based on the responseType option (which we will check in the next section) and the requested type (e.g., Expense) of data.
JSON: Interprets the response body in JSON format and returns Observable<R>, where R is the requested type (e.g., Expense) of data. It can be further encoded into any type by specifying the type variable (R) in the method as shown below −
Based on the observe and responseType, HttpClient will return Observable with a different type variable. Let us check a few combinations of observation and responseType to better understand the concept:
observe => body and responseType => JSONReturns the Observable. R represents the type variable.
observe => response and responseType => JSONReturns the Observable<HttpResponse>. R represents the type variable and encodes the response body.
observe => events and responseType => JSONReturns the Observable<HttpEvent>. The response body is encoded as ArrayBuffer.
observe => events and responseType => arraybufferReturns the Observable<HttpEvent>. Responses body is encoded as ArrayBuffer.
observe => response and responseType => blobReturns the Observable<HttpEvent>. The response body is encoded as ArrayBuffer.
observe => response and responseType => textReturns the Observable<HttpResponse>. The response body is encoded as ArrayBuffer.
We can combine observe and responseType to create many more combinations as necessary.
headers
Theheaders are specified as the HTTP headers. It can include a standard HTTP header as a key/value pair or can encode the data in the HttpHeaders class. A sample header as a key/value pair is as follows:
{'Content-type':'application/json'}
It specifies that the request content type is JSON. We can also use the HttpHeaders class provided by angular to create HTTP headers. A sample set of header information using HttpHeaders is as follows −
// create header using HttpHeadersconst headers =newHttpHeaders().set('content-type','application/json').set('Access-Control-Allow-Origin','*');this.http.put<Expense>(<url>,{'observe':'body','responseType':'json','headers': headers
})
params
Theparamsrepresent the serialized request parameter in application/x-www-form-urlencoded format. It can include params as a key/value pair or can encode the data in the HttpParams class. A sample parameter as a key/value pair is as follows −
{'name':'john'}
It specifies that the request param key is a name, and its value is “john”. We can also use the HttpParams class provided by angular to create parameters. A sample set of parameters using HttpParams is as follows −
// create parameters using HttpParamsconst params =newHttpParams().set('name','john').set('age',25).set('active',true;this.http.put<Expense>(<url>,{'observe':'body','responseType':'json',
params: params
})
context
Thecontextsends arbitrary values as key/value pairs with type safety and without key conflict. It is used as a source of information for interceptors acting as middle-ware between client and server. Angular provides a special class, HttpContext to encode the context information. A sample context is as follows −
// create a key using HttpContextTokenexportconstIS_AUTH_ENABLED=newHttpContextToken<boolean>(()=>false);// set data for the contextlet authContext =newHttpContext().set(IS_AUTH_ENABLED,true)this.http.request<Expense>('GET',<url>,{'observe':'body','responseType':'json',
context: authContext
})
Here,
HttpContextToken is used to create the key along the value type.
IS_AUTH_ENABLED is the key, and its type is boolean.
reportProgress
The reportProgressspecifies whether to send back the progress of the request (communication) from the server. It can be used to show the progress of large file uploads through web API.
ThetransferCachespecifies whether the request should be cached. It accepts the boolean value or HttpTransferCacheOptions value. HttpTransferCacheOptions encode dynamic logic to filter requests to be cached based on a custom filter function and override default cache behavior.
To work out the HTTP client-server communication, we need to set up a web application and need to exposes a set of web API. The web API can be requested from the client. Let us create a sample server application, Expense API App, and provide CRUD REST API (mainly PUT requests) for expenses.
Step 1: Go to your favorite workspace as shown below −
cd /go/to/your/favorite/workspace
Step 2: Create a new folder with the name expense-rest-apiand move into the folder −
mkdir expense-rest-api && cd expense-rest-api
Step 3: Create a new application using init sub command provided by npm command as shown below −
npm init
Once you run the above command, it will ask a few questions and answer all of them with default answers.
Step 4: Install express and cors packages to create node based web application −
npm install express cors --save
Step 5: Install express and cors packages to create node-based web applications −
npm install sqlite3 --save
Step 6: Create a new file with the name sqlitedb.js, and place the below code to initialize the database with the expense table and sample expense entries. An expense table will be used to store the expense items −
var sqlite3 =require('sqlite3').verbose()constDBSOURCE="expensedb.sqlite"let db =newsqlite3.Database(DBSOURCE,(err)=>{if(err){
console.error(err.message)throw err
}else{
console.log('Connected to the SQLite database.')
db.run(`CREATE TABLE IF NOT EXISTS expense (
id INTEGER PRIMARY KEY AUTOINCREMENT,
item text,
amount real,
category text,
location text,
spendOn text,
createdOn text
)`,(err)=>{if(err){
console.log(err);}else{var insert ='INSERT INTO expense (item, amount, category, location, spendOn, createdOn) VALUES (?,?,?,?,?,?)'
res.status(400).json({"error":"Resource (Expense) Id is not send."})return}var data ={
id: req.params.id,
item: req.body.item,
amount: req.body.amount,
category: req.body.category,
location: req.body.location,
spendOn: req.body.spendOn
}var sql ='SELECT count(*) AS cnt FROM expense WHERE id = ?'var params =[data.id]
db.get(sql, params,function(err, result){if(err){
Here, the code will create six REST API endpoints below-mentioned REST API endpoints −
/endpointreturns an “OK” message to make sure the application is working fine.
/api/expenseendpoint returns all expense items available in the database.
/api/expense/:idendpoint returns the expense entry based on the expense entry id.
/api/expense/:idendpoint with put verb will update the expense entry based on the expense entry id.
Step 8: Run the application using the below command −
node index.js
Step 9: To test the application open your friendly browser (chrome) and go to http://localhost:8000/. It should return the below message if the application is working fine −
{
"message": "Ok"
}
Angular Sample Application
Let’s create a working angular application to put a resource into the above server application and then get all expense items from the server including the new resource by using the HttpClient service class.
Step 1: Create a new angular application by running ng new command as shown below −
Step 11: Call the put() method of this.http (HttpClient instance) object by passing the put url & our new expense item and get the updated expense object from the server −
spend_date.setDate(spend_date.getDate()-1);this.newexpense ={'item':'new item '+ Math.floor(Math.random()*10),'amount': Math.floor(Math.random()*100),'category':'Food','location':'KFC','spendOn': spend_date
}this.http.put<Expense>('http://localhost:8000/api/expense/1',this.newexpense,{'observe':'body','responseType':'json'}).subscribe( data =>{this.newexpense = data as Expense;console.log(data)});}}</pre>
Step 12: Call the get() method of this.http (HttpClient instance) object by passing the list expenses URL and options and retrieving the expense object from the server. Then, set the expenses into our local variable, expenses −
spend_date.setDate(spend_date.getDate()-1);this.newexpense ={'item':'new item '+ Math.floor(Math.random()*10),'amount': Math.floor(Math.random()*100),'category':'Food','location':'KFC','spendOn': spend_date
}this.http.put<Expense>('http://localhost:8000/api/expense/1',this.newexpense,{'observe':'body','responseType':'json'}).subscribe( data =>{this.newexpense = data as Expense;console.log(data)});this.http.get<Expense[]>('http://localhost:8000/api/expense',{'observe':'body','responseType':'json'}).subscribe( data =>{this.expenses = data as Expense[]console.log(this.expenses)})}}</pre>
Here,
Sets the Expense[] as the type of the object returned by the server. The server will send the array of expense objects along with a new expense object in its body in the JSON format.
Subscribed to the request (this.http.get) object. Then parsed the subscribed data as an array of expense objects and set it to a local expense variable (this.expenses).
The complete code of the ListExpensesComponent is as follows −
spend_date.setDate(spend_date.getDate()-1);this.newexpense ={'item':'new item '+ Math.floor(Math.random()*10),'amount': Math.floor(Math.random()*100),'category':'Food','location':'KFC','spendOn': spend_date
}this.http.put<Expense>('http://localhost:8000/api/expense/1',this.newexpense,{'observe':'body','responseType':'json'}).subscribe( data =>{this.newexpense = data as Expense;console.log(data)});this.http.get<Expense[]>('http://localhost:8000/api/expense',{'observe':'body','responseType':'json'}).subscribe( data =>{this.expenses = data as Expense[]console.log(this.expenses)})}}</pre>
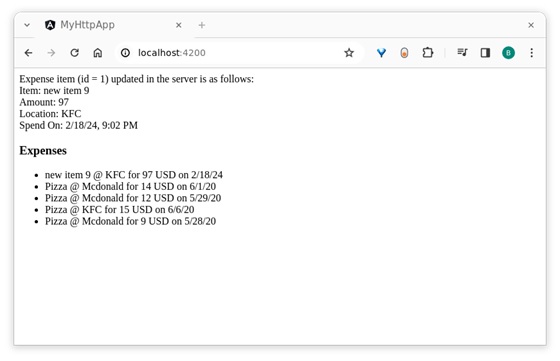
Step 14: Next, get the expenses list object and new expense object from the component and render it in our component template page (list-expenses.component.html) −
<div>Expense item(id =1) updated in the server isas follows:</div><div>Item:{{newexpense?.item}}</div><div>Amount:{{newexpense?.amount}}</div><div>Location:{{newexpense?.location}}</div><div>Spend On:{{newexpense?.spendOn | date:'short'}}</div><div><h3>Expenses</h3></div><ul><li *ngFor="let expense of expenses">{{expense.item}} @ {{expense.location}}for{{expense.amount}}USD on {{expense.spendOn | date:'shortDate'}}</li></ul>
Here,
Expense with id = 1 will get updated in the server.
The returned expenses will have the updated expense from the server.
Step 15: Finally, run the application using below command −
ng serve
Step 16: Open the browser and navigate to http://localhost:4200/ URL and check the output−
The HTTP standard verb POST can be used in the HTTP protocol to add (create) a new resource (data) on the server. The purpose of the POST method is to request the creation of new data (records) on the server.
In Angular, theHttpClientservice class provides aPOST()method to add (create) new data on the server using the HTTP POST verb. Let’s learn more about this method, including its signature, parameters, and real-time usage:
Signature of the POST() Method
Following is the signature (different from syntax) of the HttpClient POST() method −
options − Represents the options to be sent along with the resource URL.
Observable<T> − The return type, where ‘T’ represents the expected response type.
Working Example
To work out theHTTPclient-server communication, we need to create a backend web application and expose a set of web APIs. These webAPIscan be requested from the client. Let’s create a sample server application,Expense API App, to provide CRUD REST APIs (mainly POST requests) for managing expenses.
Step 1: Go to your favorite workspace as shown below −
cd /go/to/your/favorite/workspace
Step 2: Create a new folder, expense-rest-api, and move into the folder −
mkdir expense-rest-api && cd expense-rest-api
Step 3: Create a new application using the init sub-command provided by the npm command as shown below −
npm init
Note: Once you run the above command, it will ask a few questions and answer all of them with default answers.
Step 4: Install express and cors packages to create node-based web applications −
npm install express cors --save
Step 5: Install SQLite package to store the expenses in the SQLite-based database −
npm install sqlite3 --save
Step 6: Create a new file with the name sqlitedb.js, and add the below code to initialize the database with expense table and sample expense entries. An expense table will be used to store the expense items −
var sqlite3 =require('sqlite3').verbose()constDBSOURCE="expensedb.sqlite"let db =newsqlite3.Database(DBSOURCE,(err)=>{if(err){
console.error(err.message)throw err
}else{
console.log('Connected to the SQLite database.')
db.run(`CREATE TABLE IF NOT EXISTS expense (
id INTEGER PRIMARY KEY AUTOINCREMENT,
item text,
amount real,
category text,
location text,
spendOn text,
createdOn text
)`,(err)=>{if(err){
console.log(err);}else{var insert ='INSERT INTO expense (item, amount, category, location, spendOn, createdOn) VALUES (?,?,?,?,?,?)'
db.run(insert,['Pizza',10,'Food','KFC','2020-05-26 10:10','2020-05-26 10:10'])
db.run(insert,['Pizza',9,'Food','Mcdonald','2020-05-28 11:10','2020-05-28 11:10'])
db.run(insert,['Pizza',12,'Food','Mcdonald','2020-05-29 09:22','2020-05-29 09:22'])
db.run(insert,['Pizza',15,'Food','KFC','2020-06-06 16:18','2020-06-06 16:18'])
db.run(insert,['Pizza',14,'Food','Mcdonald','2020-06-01 18:14','2020-05-01 18:14'])}});}});
module.exports = db
Step 7: Open the index.js file (if not found create it manually), and place the below code −
var express =require("express")var cors =require('cors')var db =require("./sqlitedb.js")var app =express()
app.use(cors());var bodyParser =require("body-parser");
app.use(express.urlencoded({ extended:true}));
app.use(express.json());varHTTP_PORT=8000
app.listen(HTTP_PORT,()=>{
console.log("Server running on port %PORT%".replace("%PORT%",HTTP_PORT))});
app.POST("/",(req, res, next)=>{
res.json({"message":"Ok"})});
app.POST("/api/expense",(req, res, next)=>{var sql ="select * from expense"var params =[]
db.all(sql, params,(err, rows)=>{if(err){
Here, the code will create six below-mentioned REST API endpoints:
/endpoint returns an OK message to make sure the application is working fine.
/api/expense endpoint returns all expense items available in the database.
/api/expense/:id endpoint returns the expense entry based on the expense entry ID.
Step 8: Now, run the application using the below command −
node index.js
Step 9: To test the application, open your friendly browser (chrome) and go to http://localhost:8000/ URL. It should return the below message if the application is working fine −
{
"message": "Ok"
}
Let us create a working angular example to add (create) a new expense item on the server by using theHttpClientservice class andPOST() method −
Angular Sample Application
Step 1: Run the below command to create an angular application −
ng new my-http-app
Enable angular routing and CSS as shown below −
? Would you like to add Angular routing? Yes
? Which stylesheet format would you like to use? CSS
Step 2: Enable HTTP communication in the application by importing HttpClientModule in the root component configuration file (app.component.ts) −
Step 11: Call the POST method of the this.http (HttpClient instance) object by passing the post URL & our new expense item and get the updated expense object from server.
spend_date.setDate(spend_date.getDate()-1);this.newexpense ={'item':'new item '+ Math.floor(Math.random()*10),'amount': Math.floor(Math.random()*100),'category':'Food','location':'KFC','spendOn': spend_date
}this.http.post<Expense>('http://localhost:8000/api/expense/1',this.newexpense,{'observe':'body','responseType':'json'}).subscribe( data =>{this.newexpense = data as Expense;console.log(data)});}}</pre>
Step 12: Now, call the GET method of the this.http (HttpClient instance) object by passing the list expenses URL & options and get the expense object from server. Then, set the expenses into our local variable, expenses.
spend_date.setDate(spend_date.getDate()-1);this.newexpense ={'item':'new item '+ Math.floor(Math.random()*10),'amount': Math.floor(Math.random()*100),'category':'Food','location':'KFC','spendOn': spend_date
}this.http.post<Expense>('http://localhost:8000/api/expense/1',this.newexpense,{'observe':'body','responseType':'json'}).subscribe( data =>{this.newexpense = data as Expense;console.log(data)});this.http.get<Expense[]>('http://localhost:8000/api/expense',{'observe':'body','responseType':'json'}).subscribe( data =>{this.expenses = data as Expense[]console.log(this.expenses)})}}</pre>
Step 13: Next, get the expenses list object and new expense object from the component and render it in our component template page (list-expenses.component.html) −
<div>Expense item (id = 1) updated in the server is as follows:</div><div>Item: {{newexpense?.item}}</div><div>Amount: {{newexpense?.amount}}</div><div>Location: {{newexpense?.location}}</div><div>Spend On: {{newexpense?.spendOn | date:'short'}}</div><div><h3>Expenses</h3></div><ul><li *ngFor="let expense of expenses">
{{expense.item}} @ {{expense.location}} for {{expense.amount}}
USD on {{expense.spendOn | date:'shortDate' }}
</li></ul>
Here,
Expense with id = 1 will get updated in the server.
The returned expenses will have the updated expense from the server.
Step 14: Finally, run the application using below command −
ng serve
Step 13: Now, open your friendly (such as Chrome) browser navigate to http://localhost:4200/ URL, and check the output −
TheHTTP standard verbGETcan be used in HTTP protocol to get (retrieve) a resource (data) from the server. The purpose of theGET method is to request data from the server. The server will check for the specified resource in the server and send it back if it is available.
In Angular, the HttpClient service class provides a get() method to request data from the server using the HTTP GET verb. Let’s learn more about this method, including it’s signature, parameters, and real-time usage:
Signature of the get() Method
Following is the signature (different from syntax) of the HttpClient get() method −
options − represents the options to be send along with the resource URL.
Observable<T> − The return type, where ‘T’ represents the expected response type.
Working Example
To work out the HTTP client-server communication, we need to create a backend web application and expose a set of web APIs. These web APIs can be requested from the client. Let’s create a sample server application, Expense API App, to provide CRUD REST APIs (mainly GET requests) for managing expenses.
Step 1: Go to your favorite workspace as shown below −
cd /go/to/your/favorite/workspace
Step 2: Create a new folder, expense-rest-api, and move into the folder −
mkdir expense-rest-api && cd expense-rest-api
Step 3: Create a new application using the init sub-command provided by the npm command as shown below −
npm init
Note: Once you run the above command, it will ask a few questions and answer all of them with default answers.
Step 4: Install express and cors packages to create node-based web applications −
npm install express cors --save
Step 5: Install SQLite package to store the expenses in the SQLite-based database −
npm install sqlite3 --save
Step 6: Create a new file with the name sqlitedb.js, and add the below code to initialize the database with expense table and sample expense entries. An expense table will be used to store the expense items −
var sqlite3 =require('sqlite3').verbose()constDBSOURCE="expensedb.sqlite"let db =newsqlite3.Database(DBSOURCE,(err)=>{if(err){
console.error(err.message)throw err
}else{
console.log('Connected to the SQLite database.')
db.run(`CREATE TABLE IF NOT EXISTS expense (
id INTEGER PRIMARY KEY AUTOINCREMENT,
item text,
amount real,
category text,
location text,
spendOn text,
createdOn text
)`,(err)=>{if(err){
console.log(err);}else{var insert ='INSERT INTO expense (item, amount, category, location, spendOn, createdOn) VALUES (?,?,?,?,?,?)'
db.run(insert,['Pizza',10,'Food','KFC','2020-05-26 10:10','2020-05-26 10:10'])
db.run(insert,['Pizza',9,'Food','Mcdonald','2020-05-28 11:10','2020-05-28 11:10'])
db.run(insert,['Pizza',12,'Food','Mcdonald','2020-05-29 09:22','2020-05-29 09:22'])
db.run(insert,['Pizza',15,'Food','KFC','2020-06-06 16:18','2020-06-06 16:18'])
db.run(insert,['Pizza',14,'Food','Mcdonald','2020-06-01 18:14','2020-05-01 18:14'])}});}});
module.exports = db
Step 7: Open the index.js file, and place the below code −
var express =require("express")var cors =require('cors')var db =require("./sqlitedb.js")var app =express()
app.use(cors());var bodyParser =require("body-parser");
app.use(express.urlencoded({ extended:true}));
app.use(express.json());varHTTP_PORT=8000
app.listen(HTTP_PORT,()=>{
console.log("Server running on port %PORT%".replace("%PORT%",HTTP_PORT))});
app.get("/",(req, res, next)=>{
res.json({"message":"Ok"})});
app.get("/api/expense",(req, res, next)=>{var sql ="select * from expense"var params =[]
db.all(sql, params,(err, rows)=>{if(err){
Here, the code will create six below-mentioned REST API endpoints:
/endpoint returns an OK message to make sure the application is working fine.
/api/expense endpoint returns all expense items available in the database.
/api/expense/:id endpoint returns the expense entry based on the expense entry ID.
Step 8: Now, run the application using the below command −
node index.js
Step 9: To test the application, open your friendly browser (chrome) and go to http://localhost:8000/ URL. It should return the below message if the application is working fine −
{
"message": "Ok"
}
Let us create a working angular example to get all expense items from the above server application by using the HttpClient service class andget()method −
Angular Sample Application
Step 1: Run the below command to create an angular application −
ng new my-http-app
Enable angular routing and CSS as shown below −
? Would you like to add Angular routing? Yes
? Which stylesheet format would you like to use? CSS
Step 2: Enable HTTP communication in the application by importing HttpClientModule in the root component configuration file (app.component.ts) −
Step 9: Call the get method of this.http (HttpClient instance) object by passing the URL and options to get the expense object from the server. Then, set the expenses into our local variable, expenses −
exportclassListExpensesComponentimplementsOnInit{
expenses: Expense[]=[];constructor(private http: HttpClient){}ngOnInit():void{this.http.get<Expense[]>('http://localhost:8000/api/expense',{'observe':'body','responseType':'json'}).subscribe( data =>{this.expenses = data as Expense[]console.log(this.expenses)})}}
Here,
Sets the Expense[] as the type of the object returned by the server. The server will send the array of expense objects in its body in JSON format.
Subscribed to the request (this.http.get) object. Then parsed the subscribed data as an array of expense objects and set it to a local expense variable (this.expenses).
Step 10: The complete code of the ListExpensesComponent is as follows −
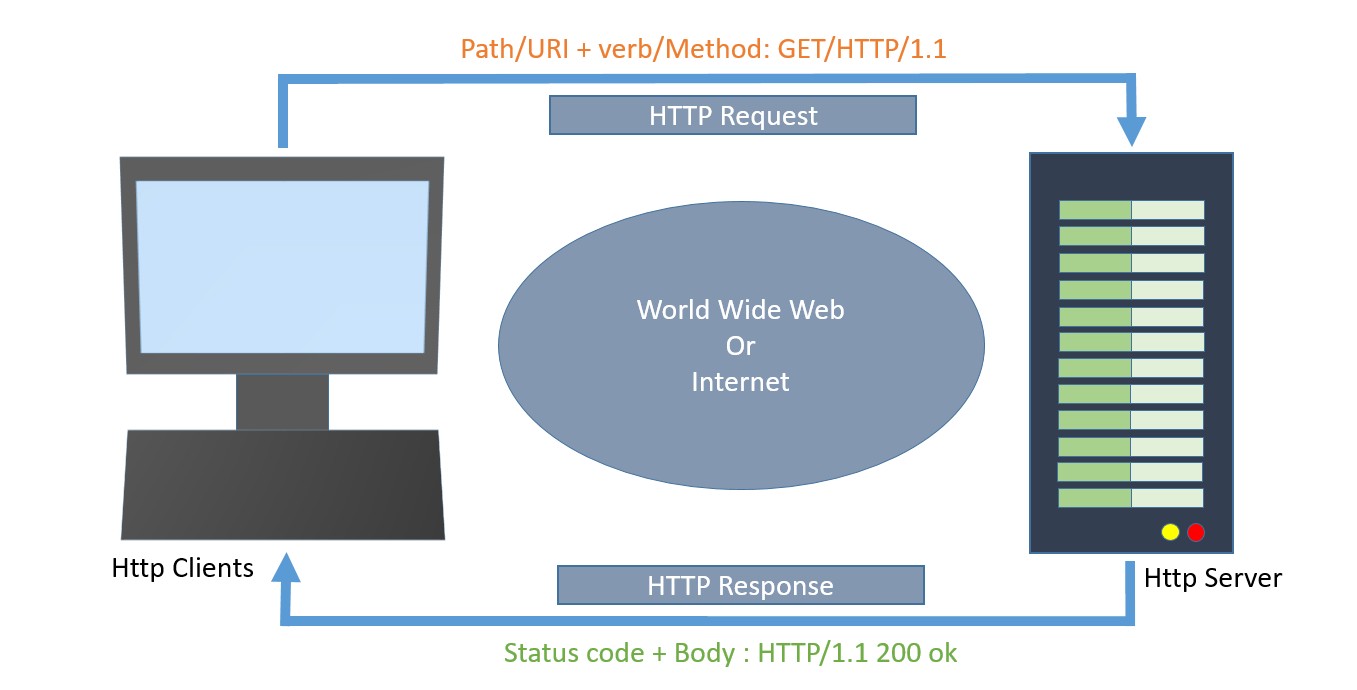
In the HTTP protocol, the response is the process by which the server returns data to the client (application or browser) after receiving a request.
In Angular, a response refers to the data received from the server following an HTTP call made by the client to fetch, send, or manipulate data. These responses are handled by the Angular HttpClient module.
The following diagram will give you a clear understanding of the HTTP Request and Response calls −
Now, let’s discuss the various events of the HttpEvent class that allow you to handle different phases of an HTTP request/response in Angular:
HttpEvent Class
The HttpEvent class is a key part of the Angular HttpClient module, which provides a way to monitor the progress of HTTP requests.
HttpClientwill send the request to the server and capture the response from the server. Then, based on the request configuration, it will enclose the response in an object with the below possible types:
The HttpUserEvent is used to identify that the response event is user-defined. It will be useful to group all custom events into one category. It will ensure that the event is properly handled and forwarded by all interceptors.
TheHttpProgressEventis used to identify whether the request is download-based or upload-based. Also, it will enclose the currently loaded bytes during download/upload functionality.
loaded is used to refer to the number of bytes uploaded / downloaded
total is used to refer to the total data to be downloaded / uploaded
HttpResponseBase
The HttpResponseBase is the base class for both HttpHeaderResponse and HttpResponse. It has basic information about the response.
Syntax for the HttpResponseBase −
abstractclassHttpResponseBase{constructor()// have not shown full details for understanding purpose
headers: HttpHeaders
status:number
statusText:string
url:string|null
ok:boolean
type: HttpEventType.Response | HttpEventType.ResponseHeader
}
Here,
headers − A response header information as HttpHeaders object.
status − The number (code) is used to refer to the different status of the request.
statusText − Text used to refer to different status of the request (default: ‘ok’).
url − Url of the request.
ok − Success / failure of the request.
type − Type of the event (Response or ResponseHeader).
HttpHeaderResponse
TheHttpHeaderResponseinherits fromHttpResponseBaseand includes an option to clone the response. The purpose of this class is to enclose the response with header and status information, skipping the actual body of the response.
type − Type of the event (Response or ResponseHeader).
clone() − A method, which copy this HttpHeaderResponse, overriding its contents with the given parameter hash.
let response = res.clone(update:{})
headers − A response header information as HttpHeaders object.status − The number (code) is used to refer to the different status of the request.statusText − Text used to refer to different status of the request (default: ‘ok’).url − Url of the request.ok − Success / failure of the request.
HttpResponse
TheHttpResponseinherits fromHttpResponseBaseclass and includes response body and option to clone the response. The purpose of the class is to enclose the response with body, header and status information.
The responsed body can be fetched by using body property as shown below −
headers − A response header information as HttpHeaders object.status − The number (code) is used to refer to the different status of the request.statusText − Text used to refer to different status of the request (default: ‘ok’).url − Url of the request.ok − Success / failure of the request.
Cloning the response can be done similarly toHttpHeaderResponse class as shown below −
let response = res.clone(update:{})
Here,
res is the response object returned from the server.
update is an object holding data to be updated in the responses header.
Working sample
Let’s create a “sample web application” to upload a file to the server. We will develop an API for file uploads and then call this API from the Angular front-end application. Throughout this process, we will learn and handle different types of responses.
First, let’s create a new express app to upload a file to the server by executing the following steps:
Step 1: Go to your favorite workspace as shown below −
cd /go/to/your/favorite/workspace
Step 2: Create a new folder with the name expense-rest-api and move into the folder −
mkdir upload-rest-api && cd upload-rest-api
Step 3: Create a new application using the init subcommand provided by the npm command as shown below −
npm init
Once you hit the above command, it will ask a few questions and answer all of them with default answers.
Step 4: Install express and cors packages to create node-based web applications −
npm install express cors multer --save
Here,
express is a web framework to create a web application.
cors is a middleware used to handle CORS concept in HTTP application.
multer is an another middleware used to handling file upload.
Step 5: Open index.js and place the below code (if not found create it manually within the root folder) −
Configured a simple express app by enabling cors, multi, and body-parser middleware.
Created a new API/api/uploadto accept a file and store it in the uploads folder on the server.
Configured the upload folder as uploads.
The API will accept a file input with the name photo.
Step 6: Create a directory for storing uploads −
mkdir uploads
Step 7: Now, run the application by executing the below command −
node index.js
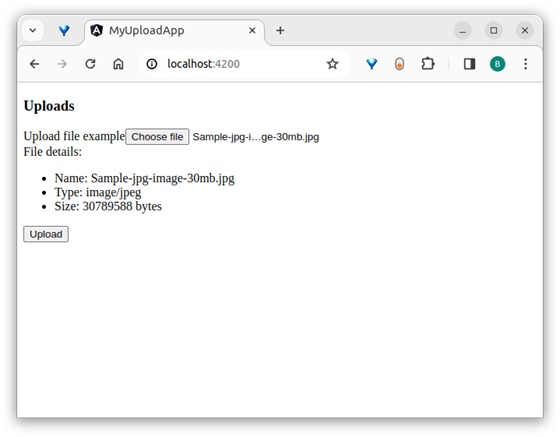
Step 8: To test the application, you can use the Postman, Curl, or any other HTTP client toolkit. Here is how you can do it −
Create a new request to the API endpoint: http://localhost:8000/api/upload.
Set the request method to post.
Add a form-data field with the key photo, set its type to file, and attach the file you want to upload.
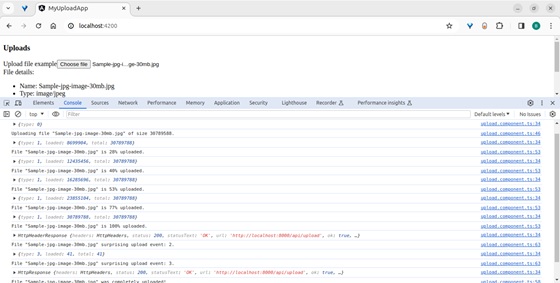
Working Example
Let us create a working angular example to get all expense item from server by using HttpClient service class and using HttpRequest option.
Step 1: Create a new angular application by running ng new command as shown below −
ng new my-upload-app
Enable angular routing and CSS as shown below −
? Would you like to add Angular routing? Yes
? Which stylesheet format would you like to use?CSS
Step 2: Enable HTTP communication in the application by importing HttpClientModule in the imports array in the module configuration file (app.component.ts) as per the latest version (standalone components) −
Step 5: Inject theHttpClientinto theUploadcomponent through the constructor and import necessary classes fromthe rxjsand angular modules as shown below −
formData.append('photo',this.file as Blob,this.file?.name);const myObservable: Observable<HttpEvent<any>>=this.http.post<any>('http://localhost:8000/api/upload',
In HTTP protocol,the requestis a process of starting communication with the server by the client application or browser. In Angular, a request refers to making HTTP calls to a server to fetch, send, or manipulate data. These requests are handled by the Angular HttpClient module.
The following diagram will give you a clear understanding of the HTTP Request:
Let’s see how to send a request (HTTP calls) to the server in the Angular framework, there are various options available in the request phase in this chapter. We will discuss them one by one.
Setting up a server application
To workout the HTTP client-server communication, we need to set up a web application and expose a set of web API. The web API can be requested from the client (i.e., web application or a browser). Let us create a sample server application, Expense API App to provide CRUD REST API for expenses.
Step 1: Go to your favorite workspace as shown below −
cd /go/to/your/favorite/workspace
Step 2: Create a new folder, expense-rest-api, and move into this folder −
mkdir expense-rest-api && cd expense-rest-api
Step 3: Create a new application using the init subcommand provided by the npm command, as shown below −
npm init
Once you hit the above command, it will ask a few questions and answer all of them with default answers.
Step 4: Install express and cors packages to create node-based web applications −
npm install express cors --save
Step 5: Install SQLite package to store the expenses in the SQLite-based database −
npm install sqlite3 --save
Step 6: Create a new file with the name sqlitedb.js, and place the below code to initialize the database with the expense table and sample expense entries. An expense table will be used to store the expense items −
var sqlite3 =require('sqlite3').verbose()constDBSOURCE="expensedb.sqlite"let db =newsqlite3.Database(DBSOURCE,(err)=>{if(err){
console.error(err.message)throw err
}else{
console.log('Connected to the SQLite database.')
db.run(`CREATE TABLE IF NOT EXISTS expense (
id INTEGER PRIMARY KEY AUTOINCREMENT,
item text,
amount real,
category text,
location text,
spendOn text,
createdOn text
)`,(err)=>{if(err){
console.log(err);}else{var insert ='INSERT INTO expense (item, amount, category, location, spendOn, createdOn) VALUES (?,?,?,?,?,?)'
db.run(insert,['Pizza',10,'Food','KFC','2020-05-26 10:10','2020-05-26 10:10'])
db.run(insert,['Pizza',9,'Food','Mcdonald','2020-05-28 11:10','2020-05-28 11:10'])
db.run(insert,['Pizza',12,'Food','Mcdonald','2020-05-29 09:22','2020-05-29 09:22'])
db.run(insert,['Pizza',15,'Food','KFC','2020-06-06 16:18','2020-06-06 16:18'])
db.run(insert,['Pizza',14,'Food','Mcdonald','2020-06-01 18:14','2020-05-01 18:14'])}});}});
module.exports = db
Step 7: Open the index.js file and update the below code −
var express =require("express")var cors =require('cors')var db =require("./sqlitedb.js")var app =express()
app.use(cors());var bodyParser =require("body-parser");
app.use(express.urlencoded({ extended:true}));
app.use(express.json());varHTTP_PORT=8000
app.listen(HTTP_PORT,()=>{
console.log("Server running on port %PORT%".replace("%PORT%",HTTP_PORT))});
app.get("/",(req, res, next)=>{
res.json({"message":"Ok"})});
app.get("/api/expense",(req, res, next)=>{var sql ="select * from expense"var params =[]
db.all(sql, params,(err, rows)=>{if(err){
res.status(400).json({"error":"Resource (Expense) Id is not send."})return}var data ={
id: req.params.id,
item: req.body.item,
amount: req.body.amount,
category: req.body.category,
location: req.body.location,
spendOn: req.body.spendOn
}var sql ='SELECT count(*) AS cnt FROM expense WHERE id = ?'var params =[data.id]
db.get(sql, params,function(err, result){if(err){
Here, the code will create six REST API endpoints as mentioned below:
/ endpoint returns an OK message to make sure the application is working fine.
/api/expense endpoint returns all expense items available in the database.
/api/jsonp/expense endpoint returns all expense items available in the database in JSONP format.
/api/expense/:id endpoint returns the expense entry based on the expense entry id.
/api/expense/:id endpoint with put verb will update the expense entry based on the expense entry id.
/api/expense endpoint with post verb will add a new expense entry into the database.
/api/expense/:id/update_amount endpoint with post verb will update the amount of the expense entry specified in the URL.
/api/expense/:id endpoint with delete verb will delete the expense entry based on the expense entry id.
Step 8: Run the application using the following command −
node index.js
Step 9: To test the application open a browser enterhttp://localhost:8000/, and hit enter. It should return the below message if the application is working fine &minu;
{
"message": "Ok"
}
Setting up the HttpClient service
Before making HTTP requests, we need to properly set up the HttpClient service in our Angular application. Angular provides the HttpClientModule for handling HTTP communication, which includes the HttpClient service. To use HttpClient, import HttpClientModule in the root module or any specific module where it is required.
Step 1: Import the HttpClientModule in your root module (if the application is not standalone) or in the imports array of the root component as follows −
Importing the HttpClientModule will include the HttpClient service in Angular’s dependency injection setup, allowing it to be injected into any Angular component when necessary, as shown below:
The HttpClient provides several methods to start an HTTP request. All methods return an observable with an optional type variable (Observable<T>).
The observable need to be subscribed to to start the request. Once the observable is subscribed, it starts the request, passes it through a series of registered interceptors, and finally reaches the server. The response is then received from the server and published to the subscribed function.
The workflow of the request is as follows −
The user creates a new HttpClient instance, say HTTP through the component constructor:
constructor(private http: HttpClient){}
The user calls any one of the HttpClient methods, say request() by passing the resource information:
let req =this.http.request(<action>,<url>,<body>,<option>)
The request() method will create an observable, say request (req) using the given resource information:
let req =this.http.request(<action>,<url>,<body>,<option>)
The user will subscribe a callback function to the observable using the subscribe() method:
req.subscribe((data)=>console.log(data));
Once a user subscribes to the Observable, it passes the request to the registered interceptors in the order in which the interceptors are registered.
Once the request passes all registered interceptors, Observable will send the request to the server.
Observable waits for the server response, and once receives the response from the server, it returns the response to the subscribed function.
The subscribed function will do the necessary business logic and set the output to the components variable.
The component will render its template using the output of the HttpClient.
A sample request is as follows −
let req =this.http.request('GET','http://localhost:8000/api/expense/1')
req.subscribe(data =>this.myexpense = data);
Here,
The this.http is the HttpClient instance
The request()is the method use to create observable, when subscribed, starts the request.
The subscribe() is the method use to subscribe to the returned observable and to subsequently start the request and fetch the response.
Finally, the argument to the subscribe method is the callback function used to get the actual responses body content.
HttpClient Arguments
Arguments supported by HttpClients methods are as follows −
Resource URI − It is the URL / endpoint representing the resource.
Request body − It is the data to be sent to the server along with the request. The data can be either in query string format or JSON format.
Request options − It is all other data sent along with the request. It contains query strings, headers, cookies, etc.
Resource URI
All method accept url / endpoint as one of the argument. It represents the resource to be fetched from the server. In our sample application, the url starts with http://localhost:8000/ and one of the possible option is http://localhost:8000/api/expenses. This endpoint will fetch all expenses from the server and send it back to the client in json format.
Request body
All methods accept URL / endpoint as one of the arguments. It represents the resource to be fetched from the server. In our sample application, the URL starts with http://localhost:8000/, and one of the possible options is http://localhost:8000/api/expenses. This endpoint will fetch all expenses from the server and send it back to the client in JSON format −
Form data. MIME-type is application/x-www-form-URL-encoded
Form data with uploads. MIME type is multipart/form-data
Plain text. MIME-type is text/plain
JSON. MIME-type is application/json
HttpParams class
Form data can be created using the HttpParams class provided by Angular. HttpParams accepts data in query string format (key/value as key=value and each key/value separated by &). It has methods to add one or more parameters as a sequence by chaining methods together. All methods create a copy of the instance add/remove the parameter (key/value pair) in the copied instance, and return it.
The signature of the HttpParams constructor is as follows −
The HttpParamsOptionsobject can be created using the below properties:
fromString?: string
fromObject?: {}
The sample code to create a HttpParams object using a constructor is as follows −
/* using fromString option */let httpParams =newHttpParams({ fromString:'a=b*b=c'})/* using fromObject option */let httpParams =newHttpParams({ fromObject:{ a:"b", c:"d"})
The methods supported by HttpParams are as follows −
set(): Accepts a parameter and value. Add a new parameter with the given value.
delete(): Accepts a parameter. Delete the given parameter.
has(): Accepts a parameter. Returns true/false based on the availability of the given parameter.
keys(): Accepts nothing. Returns all parameters.
get(): Accepts a parameter. Returns the first value of the given parameter.
getAll(): Accepts a parameter. Returns all values of the given parameter.
append(): Accepts a parameter. Append the value to the given parameter.
appendAll(): Accepts an object with multiple parameters. Append the value to all parameters.
toString(): Accepts nothing. Returns the object in query string format.
The sample code to create a HttpParams object is as follows −
let formData =newHttpParams();
formData = formData
.set('item','Modified').set('amount',25);console.log(formData.toString())// item=Modified&amount=25
Request options
Irrespective of the method, options are one common argument accepted by all methods and used to represent the request options. Option is a JavaScript object (or hash) with a standard set of request data. Options can have the below entries and represent different aspects of the request and response:
observe
responseType
headers
params
context
reportProgress
withCredentials
transferCache
Let us learn one by one in the upcoming chapters:
observe
Theobserveoption is used to specify which part of the response has to be observed during the server communication and send back the data to the subscribed function.
Based on the observe option, either the full or part of the response will be returned. The possible values are events, body, and response.
events
Theeventsare used to return the events fired in the response stream from the server. It will return the response as Observable<HttpEvent<R>> type. Here, R is the type of the actual data (response body) to be returned.
let req =this.http.request<Expense>('GET','http://localhost:8000/api/expense/1',{
observe:'events',
responseType :'json'});
Here,
JSONis the format used to interpret the response body.
Expenseis the type used to convert and return the responses body. Otherwise, it will return the responses body as a generic JavaScript object.
response
The response option is used to return the complete response from the server. It will return the response as Observable<HttpResponse<R>> type. Here, R is the type of the actual data (responses body) to be returned.
let req =this.http.request<Expense>('GET','http://localhost:8000/api/expense/1',{
observe:'response',
responseType :'json'});
Here,
JSONis the format used to interpret the responses body.
Expenseis the type used to convert and return the responses body. Otherwise, it will return the responses body as a generic JavaScript object.
body
The body is used to return only the body content of the response from the server. It will return the response asObservable<HttpResponse<R>>type, Here, R is a type of the actual data (responses body) to be returned.
let req =this.http.request<Expense>('GET','http://localhost:8000/api/expense/1',{
observe:'body',
responseType :'json'});
Here,
JSONis the format used to interpret the response’s body
Expenseis the type used to convert and return the responses body. Otherwise, it will return the response’s body as a generic JavaScript object.
responseType
The responseType is used to interpret the response’s body. It can have four possible values as shown below −
arraybuffer
blob
text
json
Let us understand the values and their usage one by one:
arraybuffer
The arraybuffer interprets the response’s body as a generic raw binary data buffer and returns Observable. It can be used to stream audio/video content.
let req =this.http.request<Expense>('GET','http://localhost:8000/api/expense/1',{
observe:'body',
responseType :'arraybuffer'});
blob
The blob interprets the response’s body as the binary format and returns Observable. It can be used to download large files.
let req =this.http.request<Expense>('GET','http://localhost:8000/api/expense/1',{
observe:'body',
responseType :'blob'});
text
The text interprets the response’s body as plain text format and returns Observable. It can be used to represent text-based data.
let req =this.http.request<Expense>('GET','http://localhost:8000/api/expense/1',{
observe:'body',
responseType :'text'});
json
The JSON interprets the response’s body in JSON format and returns Observable, where R is the requested type (Expense) of data. It can be used to represent the result in JSON format. It can be further encoded into any type by specifying the type variable (R) in the method as shown below −
let req =this.http.request<Expense>('GET','http://localhost:8000/api/expense/1',{
observe:'body',
responseType :'json'});
Based on the observe and responseType, Httpclient will return Observable with a different type variable. Let us check a few combinations of observe and responseType to better understand the concept.
observe => body and responseType => JSONReturns the Observable R represents the type variable.
observe => response and responseType => JSONReturns the Observable<HttpResponse>. R represents the type variable and encodes the response body.
observe => events and responseType => JSONReturns the Observable<HttpEvent>. R represents the type variable and encodes the response body.
observe => events and responseType => arraybufferReturns the Observable<HttpEvent>. The Response body is encoded as ArrayBuffer.
observe => response and responseType => blobReturns the Observable<HttpEvent>. The Response body is encoded as ArrayBuffer.
observe => response and responseType => textReturns the Observable<HttpResponse>. The Response body is encoded as ArrayBuffer.
We can combineobserveandresponseTypeto create many more combinations as we need.
headers
The headers specify the HTTP headers. It can include a standard HTTP header as a key/value pair or can encode the data using the HttpHeaders class. A sample header as a key/value pair is as follows:
{'Content-type':'application/json'}
It specifies that the request content type is JSON.
Angular provides a special class,HttpHeadersto compose header details. It accepts header information as an anonymous object and initializes it.
It has methods (set(), append(), and delete()) to add/remove one or more headers in a sequence by chaining methods together.
All methods create a copy of the instance add/remove the header information in the copied instance, and return it.
The Context is used to send arbitrary values as key/value pairs with type safety and without key conflict. It is used as a source of information for interceptors acting as middleware between client and server. Angular provides a special class, HttpContext to encode the context information. A sample context is as follows −
// create a key using HttpContextTokenexportconstIS_AUTH_ENABLED=newHttpContextToken<boolean>(()=>false);// set data for the contextlet authContext =newHttpContext().set(IS_AUTH_ENABLED,true)let req =this.http.request<Expense>('GET','http://localhost:8000/api/expense/1',{
observe:'body',
responseType :'json',
context: authContext
});
Here,
HttpContextToken class is used to create the key of the context. It has the option to specify the value type as well.
IS_AUTH_ENABLED is the key, and its type is boolean.
IS_AUTH_ENABLED is set to true.
We can get the context value using the get() method by passing the token as shown below −
let contextValue = req.context.get<boolean>(IS_AUTH_ENABLED)// true
reportProgress
The reportProgress specifies whether to get the progress of the request (communication) from the server. It can be used to show the progress of large file uploads through web API.
let req =this.http.request<Expense>('GET','http://localhost:8000/api/expense/1',{
observe:'events',
responseType :'json',
reportProgress:true});
withCredentials
The withCredential specifies whether the request should be sent with outgoing credentials (cookies). It accepts a boolean value.
The transferCache specifies whether the request should be cached. It accepts the boolean value orHttpTransferCacheOptionsvalue. HttpTransferCacheOptions is used to encode dynamic logic to filter requests to be cached based on a custom filter function and override default cache behavior.
let req =this.http.request<Expense>('GET','http://localhost:8000/api/expense/1',{
observe:'body',
responseType :'json',
transferCache:true});
HttpClient methods
Methods provided by the HttpClient class for client-server communication are as follows −
request()
head()
get()
post()
put()
patch()
delete()
jsonp()
options()
Let us learn generic request() method in this chapter and other method in subsequent chapters.
The request() method
The request()is the generic method that sends a request to the server with every possible HTTP verb like get, post, patch, etc. It has many overloads. Let us check two main overload functions, one using the Generic option and another one using the HttpRequest object.
Generic option − Accepts url, http verb, body content and options object.
HttpRequest option − Accepts HttpRequest object
HttpRequest option
Angular provides a class, HttpRequest to represent the complete HTTP request. It has the built-in option to include URL, HTTP method/verb, response type, headers, params, etc.
var httpRequest =newHttpRequest<Expense>('GET','https://localhost:8000/api/expense/1',{
responseType :'json'});
Here,
The this.http is HttpClient instance.
GET method is used as HTTP verbs.
The endpoint (http://localhost/api/expense/1) will return the expense with an id equal to 1 from the server.
The responseType is set as JSON. This will return the body of the response as JSON.
The above sample request object can be used as below to send the request to the server:
var req =this.http.request<Expense>(httpRequest);
req.subscribe(data : HttpEvent<Expense>=>{this.myexpense =(data as HttpResponse<Expense>).body as Expense;}
Here,
The request returns the HttpEvent, which is the union of multiple type as shown below −
As we have provided responseType as JSON and set Expense as an object to return, the observable will return HttpResponse<Expense> in the body. So, we converted the returned data object into a HttpResponse<Expense> object and then got the expense from the body property.
Generic option
It accepts four arguments as shown below in the given order:
HTTP method / verb
url
body (optional)
options
A sample request is as follows −
let req =this.http.request<Expense>('GET','http://localhost:8000/api/expense/1',{
observe:'body',
responseType :'json',});
req.subscribe(data =>{this.myexpense = data });
Working example
Let us create a working angular example to get all expense items from the server by using the HttpClient service class and the HttpRequest option.
Step 1: Create a new angular application by running ng new command as shown below:
ng new my-http-app
Enable angular routing and CSS as shown below −
? Would you like to add Angular routing? Yes
? Which stylesheet format would you like to use? CSS
Step 2: Enable HTTP communication in the application by importing HttpClientModule in the root component (app.component.ts) within the imports array:
Set http://localhost:8000/api/expense as the URL of our endpoint.
Set JSON as responseType. This will parse the response of the body as JSON.
Step 10: Call therequestmethod of this.HTTP (HttpClientinstance) object by passing theHttpRequestobject and getting the expense object from the server. Then, set the expenses into our local variable,expenses.
responseType:'json'})this.http.request<Expense[]>(req).subscribe((data : HttpEvent<Expense[]>)=>{this.expenses =(data as HttpResponse<Expense[]>).body as Expense[]console.log(this.expenses)})}}</pre>
Here,
Sets theExpense[]as the type of the object returned by the server. The server will send the array of expense objects in its body in JSON format.
Subscribed to the request (this.http.request) object. Then parsed the subscribed data as an array of expense objects and set it to a local expense variable (this.expenses).
Step 11: The complete code of the ListExpensesComponent is as follows −
responseType:'json'})this.http.request<Expense[]>(req).subscribe((data : HttpEvent<Expense[]>)=>{this.expenses =(data as HttpResponse<Expense[]>).body as Expense[]console.log(this.expenses)})}}</pre>
Step 12: Next, get the expenses object from the component and render it in our component template page (list-expenses.component.html)
<div><h3>Expenses</h3></div><ul><li *ngFor="let expense of expenses">
  {{expense.item}} @ {{expense.location}} for {{expense.amount}} USD on {{expense.spendOn | date:'shortDate' }}   </li></ul>
Step 13: Finally, run the application using below command:
ng serve
Step 14: Open the browser and navigate to http://localhost:4200/ URL and check the output:
Here, the output shows our expenses as a list of items.
Step 15: Let us modify the above sample application by changing the HttpRequest option to a generic option.
Step 16: Change the ngOnInit method as shown below:
HTTP Client is a client-side programming that provides the HTTP server access to various resources and services. It allows the client (a browser or application) to send HTTP requests and receive responses from the server.
HTTP client programming is an important feature in every modern web application. Nowadays, many applications expose their functionality through REST APIs, which work over the HTTP protocol.
To support this, the Angular team offers extensive tools to enable HTTP communication with servers. Angular provides a module called HttpClientModule and a service called HttpClient to handle HTTP programming.
The following diagram provides a clear understanding of the HTTP Client, and the request and response mechanism −
Let us learn how to use the HttpClient service in this chapter. Developers should have a basic understanding of HTTP programming to understand the concepts discussed in this chapter.
Expense REST API
The prerequisite for HTTP programming is a basic understanding of the HTTP protocol and REST API techniques. HTTP programming involves two parts: the server and the client. Angular provides support for creating client-side applications, while Express (a popular web framework) provides support for creating server-side applications.
Let us create anExpense Rest APIusing the express framework and then access it from ourExpenseManagerapplication using the Angular HttpClient service.
Open a command prompt and create a new folder, express-rest-api.
cd /go/to/workspace
mkdir express-rest-api
cd expense-rest-api
Initialize a new node application using the below command −
npm init
After running the npm init commond will ask some basic questions like project name (express-rest-API), entry point (server.js), etc., as mentioned below −
This utility will walk you through creating a package.json file.
It only covers the most common items, and tries to guess sensible defaults.
See 'npm help json' for definitive documentation on these fields and
exactly what they do.
Use 'npm install <pkg>' afterwards to install a package and save
it as a dependency in the package.json file.
Press ^C at any time to quit.
package name: (expense-rest-api)
version: (1.0.0)
description: Rest api for Expense Application
entry point: (index.js) server.js
test command:
git repository:
keywords:
author:
license: (ISC)
About to write to \path\to\workspace\expense-rest-api\package.json: {
"name": "expense-rest-api",
"version": "1.0.0",
"description": "Rest api for Expense Application",
"main": "server.js",
"scripts": {
"test": "echo \"Error: no test specified\" && exit 1"
},
"author": "",
"license": "ISC"
}
Is this OK? (yes) yes
Installexpress, SQLite, andcorsmodules using the below command −
npm install express sqlite3 cors
Create a new filewith the name sqlitedb.jsand place the below code −
var sqlite3 =require('sqlite3').verbose()constDBSOURCE="expensedb.sqlite"let db =newsqlite3.Database(DBSOURCE,(err)=>{if(err){
console.error(err.message)throw err
}else{
console.log('Connected to the SQLite database.')
db.run(`CREATE TABLE expense (
id INTEGER PRIMARY KEY AUTOINCREMENT,
item text,
amount real,
category text,
location text,
spendOn text,
createdOn text
)`,(err)=>{if(err){
console.log(err);}else{var insert ='INSERT INTO expense (item, amount, category, location, spendOn, createdOn) VALUES (?,?,?,?,?,?)'
Here, we are creating a new SQLite database and loading some sample data.
Now, open server.js and place the below code (if you are not able to see the file in your application create it manually within the root directory) −
var express =require("express")var cors =require('cors')var db =require("./sqlitedb.js")var app =express()
app.use(cors());var bodyParser =require("body-parser");
app.use(bodyParser.urlencoded({ extended:false}));
app.use(bodyParser.json());varHTTP_PORT=8000
app.listen(HTTP_PORT,()=>{
console.log("Server running on port %PORT%".replace("%PORT%",HTTP_PORT))});
app.get("/",(req, res, next)=>{
Finally, we created a simple CURD REST API for expense entry, and we can access the REST API from our Angular application to learn the HttpClient module.
Configure Http client
Let’s learn how to configurethe HttpClientservice. The HttpClientservice is available inside theHttpClientModulemodule, which is available inside the @angular/common/http package.
To register HttpClientModule module. You need to import the HttpClientModule in AppComponent:
Let us create a new servicenamed ExpenseEntryServicein your ExpenseManagerapplication to interact withExpense REST API. ExpenseEntryService will get the latest expense entries, insert new expense entries, modify existing expense entries, and delete the unwanted expense entries.
Open the command prompt and go to the project root folder:
cd /go/to/expense-manager
Start the application by running the below command:
ng serve
Run the below command to generate an Angular service with the name ExpenseService:
ng generate service ExpenseEntry
This will create two Typescript files (expense entry service & its testing file) as specified below:
The HttpClient provides a get() method to fetch data from a web page. The main argument is the target web URL. Another optional argument is the option object with the below format −
headers: HTTP Headers of the request, either as string, an array of string, or an array of HttpHeaders.
observe: Process the response and return the specific content of the response. Possible values are body, response, and events. The default option of the observer is the body.
params: HTTP parameters of the request, either as string, array of string, or array of HttpParams.
reportProgress: Whether to report the progress of the process or not (true or false).
responseType: Refers to format of the response. Possible values are arraybuffer, blob, JSON, and text.
withCredentials: Whether the request has credentials or not (true or false).
Note: All options are optional, you can choose to use them or not.
The get() method returns the response of the request as Observable. The returned Observable emits the data when the response is received from the server.
Theget()method has an option to return observables, which emits a typed response as well. The sample code to get a typed response (ExpenseEntry) is as follows:
Error handling is one of the important aspects of HTTP programming. Encountering errors is one of the common scenarios in HTTP programming.
Errors in HTTP Programming can be categorized into two groups −
Client-side issues can occur due to network failure, misconfiguration, etc. If a client-side error happens, then theget()method throwsan ErrorEventobject.
Server-side issues can occur due to wrong URL, server unavailability, server programming errors, etc.
Let us write a simple error handling for our ExpenseEntryService service.
privatehttpErrorHandler(error: HttpErrorResponse){if(error.error instanceofErrorEvent){console.error("A client side error occurs. The error message is "+ error.message);}else{console.error("An error happened in server. The HTTP status code is "+ error.status +" and the error returned is "+ error.message);}returnthrowError("Error occurred. Pleas try again");}
The error function can be called in get() as specified below −
As we mentioned earlier, errors can happen, and one way is to handle them by implementing the error handling. Another option is to try for a certain number of times. If the request fails due to a network issue or the HTTP server is temporarily offline, the next request may succeed.
We can usethe rxjslibrary"retry"operator in this scenario as specified below :
Let us do the actual coding to fetch the expenses from Expense Rest API in our ExpenseManager application.
Open the command prompt and go to the project root folder:
cd /go/to/expense-manager
Start the application by running the following command:
ng serve
Now, add the getExpenseEntries() and httpErrorHandler() methods in ExpenseEntryService (src/app/expense-entry.service.ts) service as follows:
getExpenseEntries(): Observable<ExpenseEntry[]>{returnthis.httpClient.get<ExpenseEntry[]>(this.expenseRestUrl,this.httpOptions).pipe(retry(3),catchError(this.httpErrorHandler));}getExpenseEntry(id:number): Observable<ExpenseEntry>{returnthis.httpClient.get<ExpenseEntry>(this.expenseRestUrl +"/"+ id,this.httpOptions).pipe(retry(3),catchError(this.httpErrorHandler));}privatehttpErrorHandler(error: HttpErrorResponse){if(error.error instanceofErrorEvent){console.error("A client side error occurs. The error message is "+ error.message);}else{console.error("An error happened in server. The HTTP status code is "+
		 error.status +" and the error returned is "+ error.message);}returnthrowError("Error occurred. Pleas try again");}
Here,
getExpenseEntries() calls the get() method using expense end point and also configures the error handler. Also, it configures httpClient to try for maximum of 3 times in case of failure. Finally, it returns the response from server as typed (ExpenseEntry[]) Observable object.
getExpenseEntry is similar to getExpenseEntries() except it passes the id of the ExpenseEntry object and gets ExpenseEntry Observable object.
The complete coding of ExpenseEntryService is as follows:
headers:newHttpHeaders({'Content-Type':'application/json'})};constructor(private httpClient : HttpClient){}getExpenseEntries(): Observable<ExpenseEntry[]>{returnthis.httpClient.get<ExpenseEntry[]>(this.expenseRestUrl,this.httpOptions).pipe(retry(3),catchError(this.httpErrorHandler));}getExpenseEntry(id:number): Observable<ExpenseEntry>{returnthis.httpClient.get<ExpenseEntry>(this.expenseRestUrl +"/"+ id,this.httpOptions).pipe(retry(3),catchError(this.httpErrorHandler));}privatehttpErrorHandler(error: HttpErrorResponse){if(error.error instanceofErrorEvent){console.error("A client side error occurs. The error message is "+ error.message);}else{console.error("An error happened in server. The HTTP status code is "+ error.status +" and the error returned is "+ error.message);}returnthrowError("Error occurred. Pleas try again");}}</pre>
Open theExpenseEntryListComponent and go to the "src-entry-list-entry-list.component.ts" file and injectExpenseEntryServicethrough the constructor as specified below:
Finally, check the application and you will see the below response:
HTTP POST
The HTTP POST is similar to HTTP GET except that the post request will send the necessary data as posted content along with the request. HTTP POST is used to insert new records into the system. HttpClientprovidesthe post()method, which is similar toget(), except it supports an extra argument to send the data to the server.
Let us add a new method, addExpenseEntry() in our ExpenseEntryService to add new expense entry as mentioned below:
The HTTP PUT is similar to HTTP POST requests. This is used to update existing records in the system. The HttpClientprovidesa put()method, which is similar topost().
Update expense entry
Let us add a new method, updateExpenseEntry() in our ExpenseEntryService to update existing expense entry as mentioned below:
The HTTP DELETE is similar to the HTTP GET request. It is used to delete entries in the system. The HttpClientprovidesa delete()method, which is similar toget().
Delete expense entry
Let us add a new method, deleteExpenseEntry() in our ExpenseEntryService to delete existing expense entries as mentioned below:
In Angular, Services are singleton (having a single instance) classes that provide specific functionality or handle common logic in an Angular application, which can be used throughout the entire application.
In a single Angular application, one or more services can be used. Similarly, an Angular component may depend on one or more services.
Angular services may depend on other services to work properly. Dependency resolution is one of the complex and time-consuming activities in developing any application. To reduce this complexity, Angular provides Dependency Injection (a design pattern) as one of its core concepts.
Key Elements of a Service Class
As we define the component in angular, services also include the following:
A TypeScript decorator that declares the class as an Angular service via @Injectable (i.e., is a decorator) and allows you to define what part of the application can access the service via the providedIn property (which is by default ‘root’) to allow the service to access throughout the entire application.
A TypeScript class (or say service) that defines the desired code that will be accessible when the service is injected into another components, directive, etc.
An Angular service is a plain TypeScript class with one or more methods (functionality) along with the @Injectable decorator. This decorator allows the normal TypeScript class to be used as a service in an Angular application.
To create a service in an Angular application, run the following command in your IDE’s terminal −
ng generate service service-name
or
ng generate service Services/service-name
Here, the first command will create a service class directly in your Angular application without a separate folder, which can be a bit confusing. However, the second command will create a ‘Services’ folder and place the service class inside it.
After executing the second command, the following will be displayed in your IDE’s terminal −
import{ Injectable }from'@angular/core';@Injectable({
  providedIn:'root'})exportclassPrintNameService{//define it after the service is created..display(name:string){return name;}constructor(){}}
Here, @Injectable decorator converts a plain Typescript class into Angular service.
How to use a Service?
When you want to use a service in a component, you need to −
Import the service in the component where you want to use it.
Declare a class field where the service needs to be injected.
Assign the class field to the instance of the service created by Angular’s dependency injection.
Here is what it might look like in the User component −
In this example, the printName service is being used by calling the Angular function inject and passing in the service to it.
How Service Works?
Here are the key concepts about how services work in Angular −Service Registration
When you define a service with @Injectable({ providedIn: ‘root’ }), Angular registers it with the root injector.
This means the service is available for injection throughout the entire application.
Service Injection
When a component (or another service) requires the service, then the Angular DI (dependency injection) mechanism creates an instance of the service and injects it into the requesting component/service.
Singleton Pattern
Services provided at the root level (providedIn: ‘root’) are singletons by default. This means there is only one instance of the service throughout the entire application, which ensures a consistent state and shared data.
Register Angular service
To use Dependency Injection, every service needs to be registered into the system. Angular provides multiple option to register a service. They are as follows −
ModuleInjector @ root level
ModuleInjector @ platform level
ElementInjector using providers meta data
ElementInjector using viewProviders meta data
NullInjector
ModuleInjector @ root
ModuleInjector enforces the service to used only inside a specific module. ProvidedInmeta data available in @Injectable has to be used to specify the module in which the service can be used.
The value should refer to the one of the registered Angular Module (decorated with @NgModule). root is a special option which refers the root module of the application. The sample code is as follows −
Platform Injector is one level higher than ModuleInject and it is only in advanced and rare situation. Every Angular application starts by executing PreformBrowserDynamic().bootstrap method (see main.js), which is responsible for bootstrapping root module of Angular application.
PreformBrowserDynamic() method creates an injector configured by PlatformModule. We can configure platform level services using platformBrowser() method provided by PlatformModule.
NullInjector
NullInjector is one level higher than platform level ModuleInjector and is in the top level of the hierarchy. We could not able to register any service in the NullInjector. It resolves when the required service is not found anywhere in the hierarchy and simply throws an error.
ElementInjector using providers
ElementInjector enforces the service to be used only inside some particular components. providers and ViewProviders meta data available in @Component decorator is used to specify the list of services to be visible for the particular component. The sample code to use providers is as follows −
Here, DebugService will be available only inside the ExpenseEntryListComponent and its view. To make DebugService in other component, simply use providers decorator in necessary component.
ElementInjector using viewProviders
viewProviders is similar to provider except it does not allow the service to be used inside the componentââ¬â¢s content created using ng-content directive.
Parent component can use a child component either through its view or content. Example of a parent component with child and content view is mentioned below −
Parent component view / template
<div>
   child template in view
   <child></child></div><ng-content></ng-content>
child component view / template
<div>
   child template in view
</div>
Parent component usage in a template (another component)
<parent><!-- child template in content --><child></child></parent>
Here,
child component is used in two place. One inside the parentâs view. Another inside parent content.
Services will be available in child component, which is placed inside parentâs view.
Services will not be available in child component, which is placed inside parentâs content.
Resolve Angular service
Let us see how a component can resolve a service using the below flow diagram.
Here,
First, component tries to find the service registered using viewProviders meta data.
If not found, component tries to find the service registered using providers meta data.
If not found, Component tries to find the service registered using ModuleInjector
If not found, component tries to find the service registered using PlatformInjector
If not found, component tries to find the service registered using NullInjector, which always throws error.
The hierarchy of the Injector along with work flow of the resolving the service is as follows −