In this chapter, you will learn in detail about Requests in Laravel.
Retrieving the Request URI
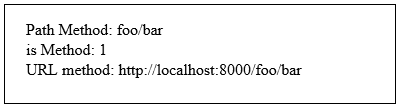
The “path” method is used to retrieve the requested URI. The is method is used to retrieve the requested URI which matches the particular pattern specified in the argument of the method. To get the full URL, we can use the url method.
Example
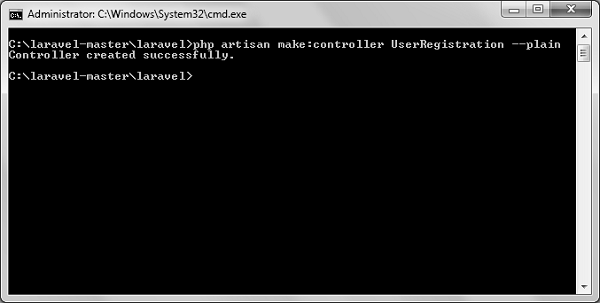
Step 1 − Execute the below command to create a new controller called UriController.
php artisan make:controller UriController –plain
Step 2 − After successful execution of the URL, you will receive the following output −
Step 3 − After creating a controller, add the following code in that file.
app/Http/Controllers/UriController.php
<?php
namespace App\Http\Controllers;
use Illuminate\Http\Request;
use App\Http\Requests;
use App\Http\Controllers\Controller;
class UriController extends Controller {
public function index(Request $request) {
// Usage of path method
$path = $request->path();
echo 'Path Method: '.$path;
echo '<br>';
// Usage of is method
$pattern = $request->is('foo/*');
echo 'is Method: '.$pattern;
echo '<br>';
// Usage of url method
$url = $request->url();
echo 'URL method: '.$url;
}
}
Step 4 − Add the following line in the app/Http/route.php file.
app/Http/route.php
Route::get('/foo/bar','UriController@index');
Step 5 − Visit the following URL.
http://localhost:8000/foo/bar
Step 6 − The output will appear as shown in the following image.
Retrieving Input
The input values can be easily retrieved in Laravel. No matter what method was used “get” or “post”, the Laravel method will retrieve input values for both the methods the same way. There are two ways we can retrieve the input values.
Using the input() method
Using the properties of Request instance
Using the input() method
The input() method takes one argument, the name of the field in form. For example, if the form contains username field then we can access it by the following way.
$name = $request->input('username');
Using the properties of Request instance
Like the input() method, we can get the username property directly from the request instance.
$request->username
Example
Observe the following example to understand more about Requests −
Step 1 − Create a Registration form, where user can register himself and store the form at resources/views/register.php
<html>
<head>
<title>Form Example</title>
</head>
<body>
<form action = "/user/register" method = "post">
<input type = "hidden" name = "_token" value = "<?php echo csrf_token() ?>">
<table>
<tr>
<td>Name</td>
<td><input type = "text" name = "name" /></td>
</tr>
<tr>
<td>Username</td>
<td><input type = "text" name = "username" /></td>
</tr>
<tr>
<td>Password</td>
<td><input type = "text" name = "password" /></td>
</tr>
<tr>
<td colspan = "2" align = "center">
<input type = "submit" value = "Register" />
</td>
</tr>
</table>
</form>
</body>
</html>
Step 2 − Execute the below command to create a UserRegistration controller.
<?php
namespace App\Http\Controllers;
use Illuminate\Http\Request;
use App\Http\Requests;
use App\Http\Controllers\Controller;
class UserRegistration extends Controller {
public function postRegister(Request $request) {
//Retrieve the name input field
$name = $request->input('name');
echo 'Name: '.$name;
echo '<br>';
//Retrieve the username input field
$username = $request->username;
echo 'Username: '.$username;
echo '<br>';
//Retrieve the password input field
$password = $request->password;
echo 'Password: '.$password;
}
}
Step 5 − Add the following line in app/Http/routes.php file.
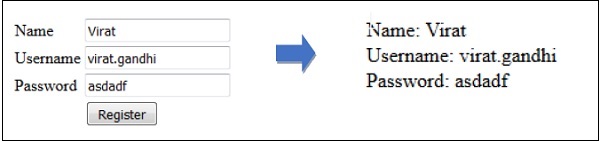
Step 6 − Visit the following URL and you will see the registration form as shown in the below figure. Type the registration details and click Register and you will see on the second page that we have retrieved and displayed the user registration details.
http://localhost:8000/register
Step 7 − The output will look something like as shown in below the following images.
In the MVC framework, the letter ‘C’ stands for Controller. It acts as a directing traffic between Views and Models. In this chapter, you will learn about Controllers in Laravel.
Creating a Controller
Open the command prompt or terminal based on the operating system you are using and type the following command to create controller using the Artisan CLI (Command Line Interface).
Replace the <controller-name> with the name of your controller. This will create a plain constructor as we are passing the argument — plain. If you don’t want to create a plain constructor, you can simply ignore the argument. The created constructor can be seen at app/Http/Controllers.
You will see that some basic coding has already been done for you and you can add your custom coding. The created controller can be called from routes.php by the following syntax.
Syntax
Route::get(‘base URI’,’controller@method’);
Example
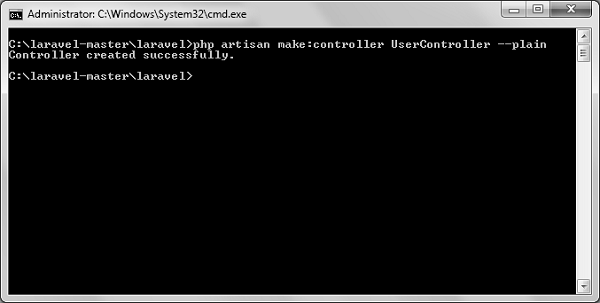
Step 1 − Execute the following command to create UserController.
Step 2 − After successful execution, you will receive the following output.
Step 3 − You can see the created controller at app/Http/Controller/UserController.php with some basic coding already written for you and you can add your own coding based on your need.
<?php

namespace App\Http\Controllers;

use Illuminate\Http\Request;
use App\Http\Requests;
use App\Http\Controllers\Controller;

class UserController extends Controller {
   //
}
Controller Middleware
We have seen middleware before and it can be used with controller also. Middleware can also be assigned to controller’s route or within your controller’s constructor. You can use the middleware method to assign middleware to the controller. The registered middleware can also be restricted to certain method of the controller.
Here we are assigning auth middleware to UserController in profile route.
Assigning Middleware within Controller’s constructor
<?php
namespace App\Http\Controllers;
use Illuminate\Http\Request;
use App\Http\Requests;
use App\Http\Controllers\Controller;
class UserController extends Controller {
public function __construct() {
$this->middleware('auth');
}
}
Here we are assigning auth middleware using the middleware method in the UserController constructor.
Example
Step 1 − Add the following lines of code to the app/Http/routes.php file and save it.
Step 7 − After successful execution of the URL, you will receive the following output −
Step 8 − Copy the following code to app/Http/UserController.php file.
app/Http/UserController.php
<?php
namespace App\Http\Controllers;
use Illuminate\Http\Request;
use App\Http\Requests;
use App\Http\Controllers\Controller;
class UserController extends Controller {
public function __construct() {
Step 9 − Now launch the php’s internal web server by executing the following command, if you haven’t executed it yet.
php artisan serve
Step 10 − Visit the following URL.
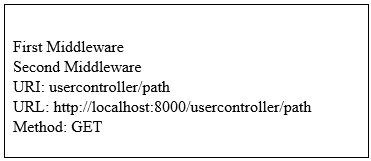
http://localhost:8000/usercontroller/path
Step 11 − The output will appear as shown in the following image.
Explore our latest online courses and learn new skills at your own pace. Enroll and become a certified expert to boost your career.
Restful Resource Controllers
Often while making an application we need to perform CRUD (Create, Read, Update, Delete) operations. Laravel makes this job easy for us. Just create a controller and Laravel will automatically provide all the methods for the CRUD operations. You can also register a single route for all the methods in routes.php file.
Example
Step 1 − Create a controller called MyController by executing the following command.
php artisan make:controller MyController
Step 2 − Add the following code in
app/Http/Controllers/MyController.php file.
app/Http/Controllers/MyController.php
<?php

namespace App\Http\Controllers;

use Illuminate\Http\Request;
use App\Http\Requests;
use App\Http\Controllers\Controller;

class MyController extends Controller {
   public function index() {
  echo 'index';   }
   public function create() {
  echo 'create';   }
   public function store(Request $request) {
  echo 'store';   }
   public function show($id) {
  echo 'show';   }
   public function edit($id) {
  echo 'edit';   }
   public function update(Request $request, $id) {
  echo 'update';   }
   public function destroy($id) {
  echo 'destroy';   }
}
Step 3 − Add the following line of code in app/Http/routes.php file.
app/Http/routes.php
Route::resource('my','MyController');
Step 4 − We are now registering all the methods of MyController by registering a controller with resource. Below is the table of actions handled by resource controller.
Verb
Path
Action
Route Name
GET
/my
index
my.index
GET
/my/create
create
my.create
POST
/my
store
my.store
GET
/my/{my}
show
my.show
GET
/my/{my}/edit
edit
my.edit
PUT/PATCH
/my/{my}
update
my.update
DELETE
/my/{my}
destroy
my.destroy
Step 5 − Try executing the URLs shown in the following table.
URL
Description
Output Image
http://localhost:8000/my
Executes index method of MyController.php
index
http://localhost:8000/my/create
Executes create method of MyController.php
create
http://localhost:8000/my/1
Executes show method of MyController.php
show
http://localhost:8000/my/1/edit
Executes edit method of MyController.php
edit
Implicit Controllers
Implicit Controllers allow you to define a single route to handle every action in the controller. You can define it in route.php file with Route:controller method as shown below.
Replace the <class-name-of-the-controller> with the class name that you have given to your controller.
The method name of the controller should start with HTTP verb like get or post. If you start it with get, it will handle only get request and if it starts with post then it will handle the post request. After the HTTP verb you can, you can give any name to the method but it should follow the title case version of the URI.
Example
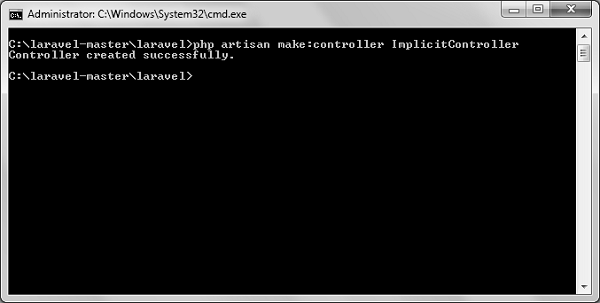
Step 1 − Execute the below command to create a controller. We have kept the class name ImplicitController. You can give any name of your choice to the class.
Step 2 − After successful execution of step 1, you will receive the following output −
Step 3 − Copy the following code to
app/Http/Controllers/ImplicitController.php file.
app/Http/Controllers/ImplicitController.php
<?php

namespace App\Http\Controllers;

use Illuminate\Http\Request;
use App\Http\Requests;
use App\Http\Controllers\Controller;

class ImplicitController extends Controller {
   /**
  * Responds to requests to GET /test   */
   public function getIndex() {
  echo 'index method';   }

   /**
  * Responds to requests to GET /test/show/1   */
   public function getShow($id) {
  echo 'show method';   }

   /**
  * Responds to requests to GET /test/admin-profile   */
   public function getAdminProfile() {
  echo 'admin profile method';   }

   /**
  * Responds to requests to POST /test/profile   */
   public function postProfile() {
  echo 'profile method';   }
}
Step 4 − Add the following line to app/Http/routes.php file to route the requests to specified controller.
app/Http/routes.php
Route::controller('test','ImplicitController');
Constructor Injection
The Laravel service container is used to resolve all Laravel controllers. As a result, you are able to type-hint any dependencies your controller may need in its constructor. The dependencies will automatically be resolved and injected into the controller instance.
Example
Step 1 − Add the following code to app/Http/routes.php file.
app/Http/routes.php
class MyClass{
   public $foo = 'bar';
}
Route::get('/myclass','ImplicitController@index');
Step 2 − Add the following code to
app/Http/Controllers/ImplicitController.php file.
app/Http/Controllers/ImplicitController.php
<?php
namespace App\Http\Controllers;
use Illuminate\Http\Request;
use App\Http\Requests;
use App\Http\Controllers\Controller;
class ImplicitController extends Controller {
private $myclass;
public function __construct(\MyClass $myclass) {
$this->myclass = $myclass;
}
public function index() {
dd($this->myclass);
}
}
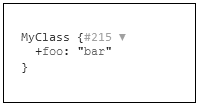
Step 3 − Visit the following URL to test the constructor injection.
http://localhost:8000/myclass
Step 4 − The output will appear as shown in the following image.
Method Injection
In addition to constructor injection, you may also type — hint dependencies on your controller’s action methods.
Example
Step 1 − Add the following code to app/Http/routes.php file.
app/Http/routes.php
class MyClass{
   public $foo = 'bar';
}
Route::get('/myclass','ImplicitController@index');
Step 2 − Add the following code to
app/Http/Controllers/ImplicitController.php file.
app/Http/Controllers/ImplicitController.php
<?php

namespace App\Http\Controllers;

use Illuminate\Http\Request;
use App\Http\Requests;
use App\Http\Controllers\Controller;

class ImplicitController extends Controller {
   public function index(\MyClass $myclass) {
  dd($myclass);   }
}
Step 3 − Visit the following URL to test the constructor injection.
Namespaces can be defined as a class of elements in which each element has a unique name to that associated class. It may be shared with elements in other classes.
Declaration of namespace
The use keyword allows the developers to shorten the namespace.
use <namespace-name>;
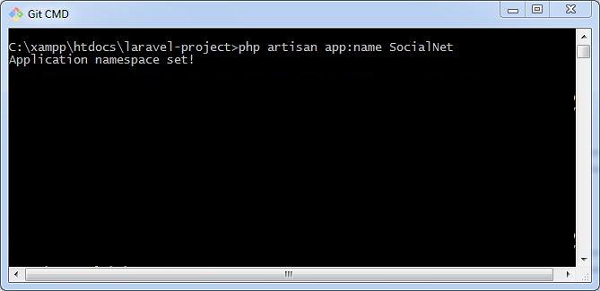
The default namespace used in Laravel is App, however a user can change the namespace to match with web application. Creating user defined namespace with artisan command is mentioned as follows −
php artisan app:name SocialNet
The namespace once created can include various functionalities which can be used in controllers and various classes.
Middleware acts as a bridge between a request and a response. It is a type of filtering mechanism. This chapter explains you the middleware mechanism in Laravel.
Laravel includes a middleware that verifies whether the user of the application is authenticated or not. If the user is authenticated, it redirects to the home page otherwise, if not, it redirects to the login page.
Middleware can be created by executing the following command −
php artisan make:middleware <middleware-name>
Replace the <middleware-name> with the name of your middleware. The middleware that you create can be seen at app/Http/Middleware directory.
Example
Observe the following example to understand the middleware mechanism −
Step 1 − Let us now create AgeMiddleware. To create that, we need to execute the following command −
php artisan make:middleware AgeMiddleware
Step 2 − After successful execution of the command, you will receive the following output −
Step 3 − AgeMiddleware will be created at app/Http/Middleware. The newly created file will have the following code already created for you.
<?php

namespace App\Http\Middleware;
use Closure;

class AgeMiddleware {
   public function handle($request, Closure $next) {
  return $next($request);   }
}
Registering Middleware
We need to register each and every middleware before using it. There are two types of Middleware in Laravel.
Global Middleware
Route Middleware
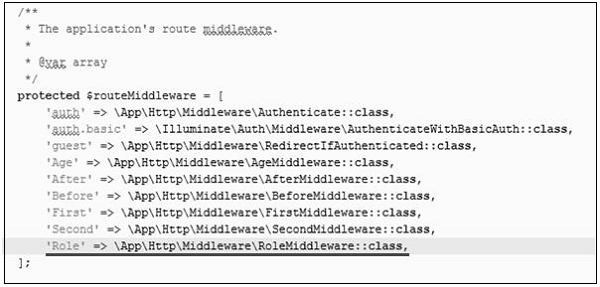
The Global Middleware will run on every HTTP request of the application, whereas the Route Middleware will be assigned to a specific route. The middleware can be registered at app/Http/Kernel.php. This file contains two properties $middleware and $routeMiddleware. $middleware property is used to register Global Middleware and $routeMiddleware property is used to register route specific middleware.
To register the global middleware, list the class at the end of $middleware property.
We have created AgeMiddleware in the previous example. We can now register it in route specific middleware property. The code for that registration is shown below.
The following is the code for app/Http/Kernel.php −
<?php
namespace App\Http;
use Illuminate\Foundation\Http\Kernel as HttpKernel;
class Kernel extends HttpKernel {
protected $middleware = [
We can also pass parameters with the Middleware. For example, if your application has different roles like user, admin, super admin etc. and you want to authenticate the action based on role, this can be achieved by passing parameters with middleware. The middleware that we create contains the following function and we can pass our custom argument after the $next argument.
public function handle($request, Closure $next) {
   return $next($request);
}
Example
Step 1 − Create RoleMiddleware by executing the following command −
php artisan make:middleware RoleMiddleware
Step 2 − After successful execution, you will receive the following output −
Step 3 − Add the following code in the handle method of the newly created RoleMiddlewareat app/Http/Middleware/RoleMiddleware.php.
<?php
namespace App\Http\Middleware;
use Closure;
class RoleMiddleware {
public function handle($request, Closure $next, $role) {
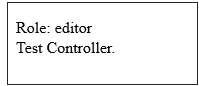
echo "Role: ".$role;
return $next($request);
}
}
Step 4 − Register the RoleMiddleware in app\Http\Kernel.php file. Add the line highlighted in gray color in that file to register RoleMiddleware.
Step 5 − Execute the following command to create TestController −
Step 6 − After successful execution of the above step, you will receive the following output −
Step 7 − Copy the following lines of code to app/Http/TestController.php file.
app/Http/TestController.php
<?php
namespace App\Http\Controllers;
use Illuminate\Http\Request;
use App\Http\Requests;
use App\Http\Controllers\Controller;
class TestController extends Controller {
public function index() {
echo "<br>Test Controller.";
}
}
Step 8 − Add the following line of code in app/Http/routes.php file.
Step 9 − Visit the following URL to test the Middleware with parameters
http://localhost:8000/role
Step 10 − The output will appear as shown in the following image.
Explore our latest online courses and learn new skills at your own pace. Enroll and become a certified expert to boost your career.
Terminable Middleware
Terminable middleware performs some task after the response has been sent to the browser. This can be accomplished by creating a middleware with terminate method in the middleware. Terminable middleware should be registered with global middleware. The terminate method will receive two arguments $request and $response. Terminate method can be created as shown in the following code.
Example
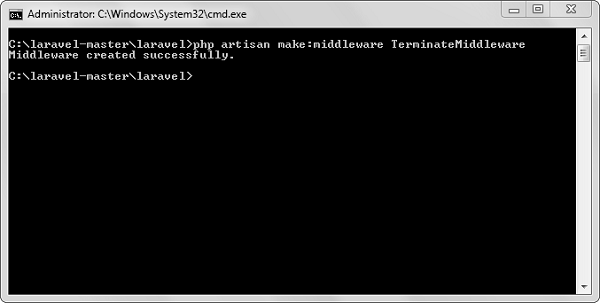
Step 1 − Create TerminateMiddleware by executing the below command.
php artisan make:middleware TerminateMiddleware
Step 2 − The above step will produce the following output −
Step 3 − Copy the following code in the newly created TerminateMiddleware at app/Http/Middleware/TerminateMiddleware.php.
<?php
namespace App\Http\Middleware;
use Closure;
class TerminateMiddleware {
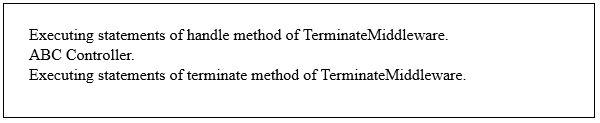
public function handle($request, Closure $next) {
echo "Executing statements of handle method of TerminateMiddleware.";
return $next($request);
}
public function terminate($request, $response) {
echo "<br>Executing statements of terminate method of TerminateMiddleware.";
}
}
Step 4 − Register the TerminateMiddleware in app\Http\Kernel.php file. Add the line highlighted in gray color in that file to register TerminateMiddleware.
Step 5 − Execute the following command to create ABCController.
php artisan make:controller ABCController --plain
Step 6 − After the successful execution of the URL, you will receive the following output −
Step 7 − Copy the following code to app/Http/ABCController.php file.
app/Http/ABCController.php
<?php
namespace App\Http\Controllers;
use Illuminate\Http\Request;
use App\Http\Requests;
use App\Http\Controllers\Controller;
class ABCController extends Controller {
public function index() {
echo "<br>ABC Controller.";
}
}
Step 8 − Add the following line of code in app/Http/routes.php file.
In Laravel, all requests are mapped with the help of routes. Basic routing routes the request to the associated controllers. This chapter discusses routing in Laravel.
Routing in Laravel includes the following categories −
Basic Routing
Route parameters
Named Routes
Basic Routing
All the application routes are registered within the app/routes.php file. This file tells Laravel for the URIs it should respond to and the associated controller will give it a particular call. The sample route for the welcome page can be seen as shown in the screenshot given below −
Route::get ('/', function () {
   return view('welcome');});
Example
Observe the following example to understand more about Routing −
app/Http/routes.php
<?php
Route::get('/', function () {
   return view('welcome');
});
<div class = "container">
<div class = "content">
<div class = "title">Laravel 5.1</div>
</div>
</div>
</body>
</html>
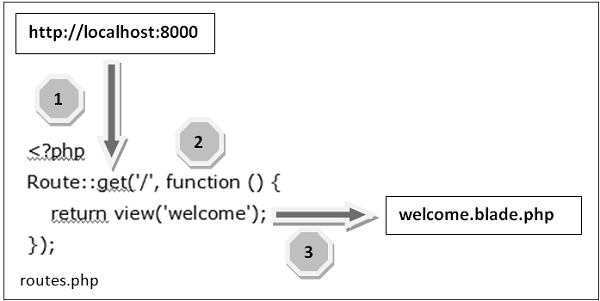
The routing mechanism is shown in the image given below −
Let us now understand the steps involved in routing mechanism in detail −
Step 1 − Initially, we should execute the root URL of the application.
Step 2 − Now, the executed URL should match with the appropriate method in the route.php file. In the present case, it should match the method and the root (‘/’) URL. This will execute the related function.
Step 3 − The function calls the template file resources/views/welcome.blade.php. Next, the function calls the view() function with argument ‘welcome’ without using the blade.php.
This will produce the HTML output as shown in the image below −
Route Parameters
Sometimes in the web application, you may need to capture the parameters passed with the URL. For this, you should modify the code in routes.php file.
You can capture the parameters in routes.php file in two ways as discussed here −
Required Parameters
These parameters are those which should be mandatorily captured for routing the web application. For example, it is important to capture the user’s identification number from the URL. This can be possible by defining route parameters as shown below −
Sometimes developers can produce parameters as optional and it is possible with the inclusion of ? after the parameter name in URL. It is important to keep the default value mentioned as a parameter name. Look at the following example that shows how to define an optional parameter −
Route::get('user/{name?}', function ($name = 'TutorialsPoint') { return $name;});
The example above checks if the value matches to TutorialsPoint and accordingly routes to the defined URL.
Explore our latest online courses and learn new skills at your own pace. Enroll and become a certified expert to boost your career.
Named Routes
Named routes allow a convenient way of creating routes. The chaining of routes can be specified using name method onto the route definition. The following code shows an example for creating named routes with controller −
In the previous chapter, we have seen that the basic configuration files of Laravel are included in the config directory. In this chapter, let us discuss the categories included in the configuration.
Environment Configuration
Environment variables are those which provide a list of web services to your web application. All the environment variables are declared in the .env file which includes the parameters required for initializing the configuration.
By default, the .env file includes following parameters −
While working with basic configuration files of Laravel, the following points are to be noted −
The .env file should not be committed to the application source control, since each developer or user has some predefined environment configuration for the web application.
For backup options, the development team should include the .env.example file, which should contain the default configuration.
Retrieval of Environment Variables
All the environment variables declared in the .env file can be accessed by env-helper functions which will call the respective parameter. These variables are also listed into $_ENV global variable whenever application receives a request from the user end. You can access the environment variable as shown below −
'env' => env('APP_ENV', 'production'),
env-helper functions are called in the app.php file included in the config folder. The above given example is calling for the basic local parameter.
Accessing Configuration Values
You can easily access the configuration values anywhere in the application using the global config helper function. In case if the configuration values are not initialized, default values are returned.
For example, to set the default time zone, the following code is used −
config(['app.timezone' => 'Asia/Kolkata']);
Explore our latest online courses and learn new skills at your own pace. Enroll and become a certified expert to boost your career.
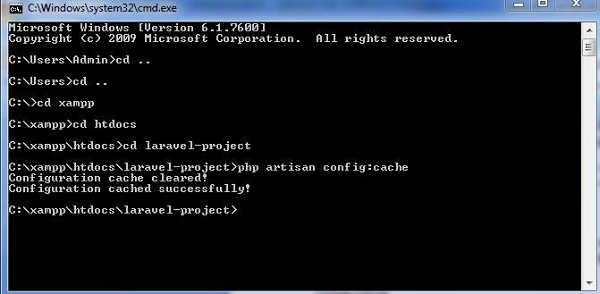
Caching of Configuration
To increase the performance and to boost the web application, it is important to cache all the configuration values. The command for caching the configuration values is −
config:cache
The following screenshot shows caching in a systematic approach −
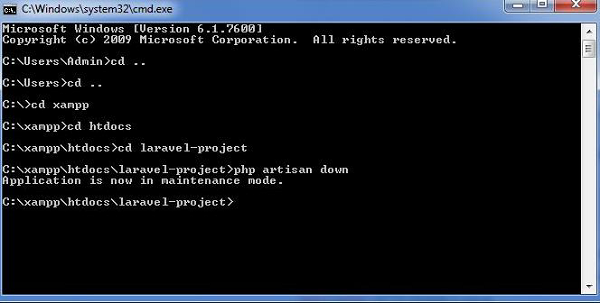
Maintenance Mode
Sometimes you may need to update some configuration values or perform maintenance on your website. In such cases, keeping it in maintenance mode, makes it easier for you. Such web applications which are kept in maintenance mode, throw an exception namely MaintenanceModeException with a status code of 503.
You can enable the maintenance mode on your Laravel web application using the following command −
php artisan down
The following screenshot shows how the web application looks when it is down −
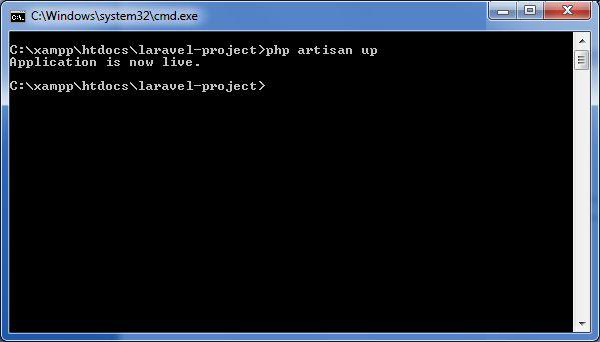
Once you finish working on updates and other maintenance, you can disable the maintenance mode on your web application using following command −
php artisan up
Now, you can find that the website shows the output with proper functioning and depicting that the maintenance mode is now removed as shown below −
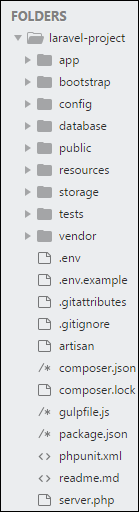
The application structure in Laravel is basically the structure of folders, sub-folders and files included in a project. Once we create a project in Laravel, we get an overview of the application structure as shown in the image here.
The snapshot shown here refers to the root folder of Laravel namely laravel-project. It includes various sub-folders and files. The analysis of folders and files, along with their functional aspects is given below −
App
It is the application folder and includes the entire source code of the project. It contains events, exceptions and middleware declaration. The app folder comprises various sub folders as explained below −
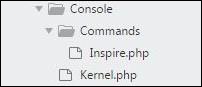
Console
Console includes the artisan commands necessary for Laravel. It includes a directory named Commands, where all the commands are declared with the appropriate signature. The file Kernal.php calls the commands declared in Inspire.php.
If we need to call a specific command in Laravel, then we should make appropriate changes in this directory.
Events
This folder includes all the events for the project.
Events are used to trigger activities, raise errors or necessary validations and provide greater flexibility. Laravel keeps all the events under one directory. The default file included is event.php where all the basic events are declared.
Exceptions
This folder contains all the methods needed to handle exceptions. It also contains the file handle.php that handles all the exceptions.
Http
The Http folder has sub-folders for controllers, middleware and application requests. As Laravel follows the MVC design pattern, this folder includes model, controllers and views defined for the specific directories.
The Middleware sub-folder includes middleware mechanism, comprising the filter mechanism and communication between response and request.
The Requests sub-folder includes all the requests of the application.
Jobs
The Jobs directory maintains the activities queued for Laravel application. The base class is shared among all the Jobs and provides a central location to place them under one roof.
Listeners
Listeners are event-dependent and they include methods which are used to handle events and exceptions. For example, the login event declared includes a LoginListener event.
Policies
Policies are the PHP classes which includes the authorization logic. Laravel includes a feature to create all authorization logic within policy classes inside this sub folder.
Providers
This folder includes all the service providers required to register events for core servers and to configure a Laravel application.
Bootstrap
This folder encloses all the application bootstrap scripts. It contains a sub-folder namely cache, which includes all the files associated for caching a web application. You can also find the file app.php, which initializes the scripts necessary for bootstrap.
Explore our latest online courses and learn new skills at your own pace. Enroll and become a certified expert to boost your career.
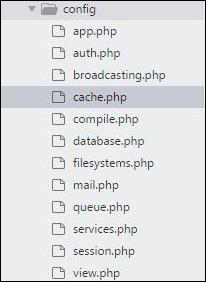
Config
The config folder includes various configurations and associated parameters required for the smooth functioning of a Laravel application. Various files included within the config folder are as shown in the image here. The filenames work as per the functionality associated with them.
Database
As the name suggests, this directory includes various parameters for database functionalities. It includes three sub-directories as given below −
Seeds − This contains the classes used for unit testing database.
Migrations − This folder helps in queries for migrating the database used in the web application.
Factories − This folder is used to generate large number of data records.
Public
It is the root folder which helps in initializing the Laravel application. It includes the following files and folders −
.htaccess − This file gives the server configuration.
javascript and css − These files are considered as assets.
index.php − This file is required for the initialization of a web application.
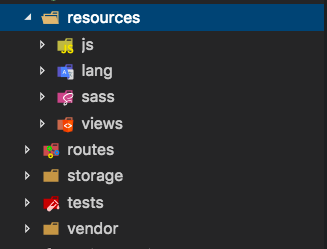
Resources
Resources directory contains the files which enhances your web application. The sub-folders included in this directory and their purpose is explained below −
assets − The assets folder include files such as LESS and SCSS, that are required for styling the web application.
lang − This folder includes configuration for localization or internalization.
views − Views are the HTML files or templates which interact with end users and play a primary role in MVC architecture.
Observe that the resources directory will be flattened instead of having an assets folder. The pictorial representation of same is shown below −
Storage
This is the folder that stores all the logs and necessary files which are needed frequently when a Laravel project is running. The sub-folders included in this directory and their purpose is given below −
app − This folder contains the files that are called in succession.
framework − It contains sessions, cache and views which are called frequently.
Logs − All exceptions and error logs are tracked in this sub folder.
Tests
All the unit test cases are included in this directory. The naming convention for naming test case classes is camel_case and follows the convention as per the functionality of the class.
Vendor
Laravel is completely based on Composer dependencies, for example to install Laravel setup or to include third party libraries, etc. The Vendor folder includes all the composer dependencies.
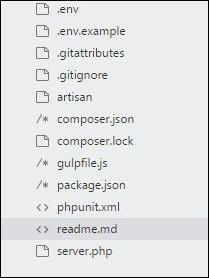
In addition to the above mentioned files, Laravel also includes some other files which play a primary role in various functionalities such as GitHub configuration, packages and third party libraries.
The files included in the application structure are shown below −
For managing dependencies, Laravel uses composer. Make sure you have a Composer installed on your system before you install Laravel. In this chapter, you will see the installation process of Laravel.
You will have to follow the steps given below for installing Laravel onto your system −
Step 1 − Visit the following URL and download composer to install it on your system.
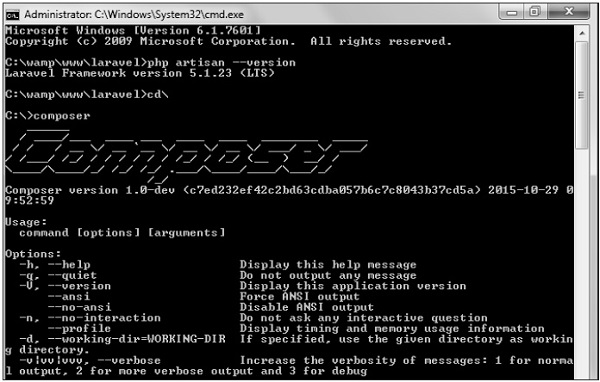
Step 2 − After the Composer is installed, check the installation by typing the Composer command in the command prompt as shown in the following screenshot.
Step 3 − Create a new directory anywhere in your system for your new Laravel project. After that, move to path where you have created the new directory and type the following command there to install Laravel.
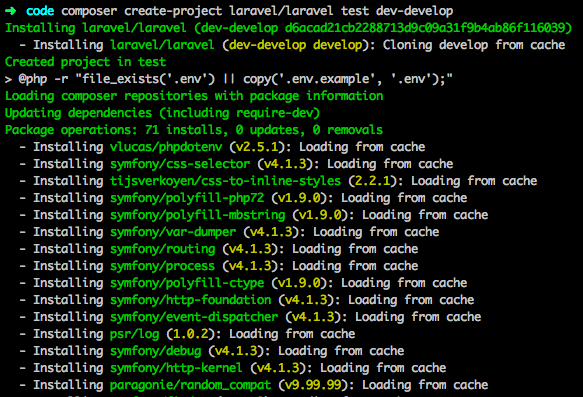
Now, we will focus on installation of version 5.7. In Laravel version 5.7, you can install the complete framework by typing the following command −
composer create-project laravel/laravel test dev-develop
The output of the command is as shown below −
The Laravel framework can be directly installed with develop branch which includes the latest framework.
Step 4 − The above command will install Laravel in the current directory. Start the Laravel service by executing the following command.
php artisan serve
Step 5 − After executing the above command, you will see a screen as shown below −
Step 6 − Copy the URL underlined in gray in the above screenshot and open that URL in the browser. If you see the following screen, it implies Laravel has been installed successfully.
Laravel is an open-source PHP framework, which is robust and easy to understand. It follows a model-view-controller design pattern. Laravel reuses the existing components of different frameworks which helps in creating a web application. The web application thus designed is more structured and pragmatic.
Laravel offers a rich set of functionalities which incorporates the basic features of PHP frameworks like CodeIgniter, Yii and other programming languages like Ruby on Rails. Laravel has a very rich set of features which will boost the speed of web development.
If you are familiar with Core PHP and Advanced PHP, Laravel will make your task easier. It saves a lot time if you are planning to develop a website from scratch. Moreover, a website built in Laravel is secure and prevents several web attacks.
Advantages of Laravel
Laravel offers you the following advantages, when you are designing a web application based on it −
The web application becomes more scalable, owing to the Laravel framework.
Considerable time is saved in designing the web application, since Laravel reuses the components from other framework in developing web application.
It includes namespaces and interfaces, thus helps to organize and manage resources.
Composer
Composer is a tool which includes all the dependencies and libraries. It allows a user to create a project with respect to the mentioned framework (for example, those used in Laravel installation). Third party libraries can be installed easily with help of composer.
All the dependencies are noted in composer.json file which is placed in the source folder.
Artisan
Command line interface used in Laravel is called Artisan. It includes a set of commands which assists in building a web application. These commands are incorporated from Symphony framework, resulting in add-on features in Laravel 5.1 (latest version of Laravel).
Features of Laravel
Laravel offers the following key features which makes it an ideal choice for designing web applications −
Modularity
Laravel provides 20 built in libraries and modules which helps in enhancement of the application. Every module is integrated with Composer dependency manager which eases updates.
Testability
Laravel includes features and helpers which helps in testing through various test cases. This feature helps in maintaining the code as per the requirements.
Routing
Laravel provides a flexible approach to the user to define routes in the web application. Routing helps to scale the application in a better way and increases its performance.
Configuration Management
A web application designed in Laravel will be running on different environments, which means that there will be a constant change in its configuration. Laravel provides a consistent approach to handle the configuration in an efficient way.
Query Builder and ORM
Laravel incorporates a query builder which helps in querying databases using various simple chain methods. It provides ORM (Object Relational Mapper) and ActiveRecord implementation called Eloquent.
Schema Builder
Schema Builder maintains the database definitions and schema in PHP code. It also maintains a track of changes with respect to database migrations.
Template Engine
Laravel uses the Blade Template engine, a lightweight template language used to design hierarchical blocks and layouts with predefined blocks that include dynamic content.
E-mail
Laravel includes a mail class which helps in sending mail with rich content and attachments from the web application.
Authentication
User authentication is a common feature in web applications. Laravel eases designing authentication as it includes features such as register, forgot password and send password reminders.
Redis
Laravel uses Redis to connect to an existing session and general-purpose cache. Redis interacts with session directly.
Queues
Laravel includes queue services like emailing large number of users or a specified Cron job. These queues help in completing tasks in an easier manner without waiting for the previous task to be completed.
Event and Command Bus
Laravel 5.1 includes Command Bus which helps in executing commands and dispatch events in a simple way. The commands in Laravel act as per the application’s lifecycle.