Category: Tutorial

https://cdn3d.iconscout.com/3d/premium/thumb/blog-writing-3d-icon-download-in-png-blend-fbx-gltf-file-formats–creative-content-article-marketing-pack-business-icons-6578772.png?f=webp

  • Session

    Sessions are used to store information about the user across the requests. Laravel provides various drivers like file, cookie, apc, array, Memcached, Redis, and database to handle session data. By default, file driver is used because it is lightweight. Session can be configured in the file stored at config/session.php.

    Accessing Session Data

    To access the session data, we need an instance of session which can be accessed via HTTP request. After getting the instance, we can use the get() method, which will take one argument, “key”, to get the session data.

    $value = $request->session()->get('key');
    

    You can use all() method to get all session data instead of get() method.

    Storing Session Data

    Data can be stored in session using the put() method. The put() method will take two arguments, the “key” and the “value”.

    $request->session()->put('key', 'value');
    

    Explore our latest online courses and learn new skills at your own pace. Enroll and become a certified expert to boost your career.

    Deleting Session Data

    The forget() method is used to delete an item from the session. This method will take “key” as the argument.

    $request->session()->forget('key');
    

    Use flush() method instead of forget() method to delete all session data. Use the pull() method to retrieve data from session and delete it afterwards. The pull() method will also take key as the argument. The difference between the forget() and the pull() method is that forget() method will not return the value of the session and pull() method will return it and delete that value from session.

    Example

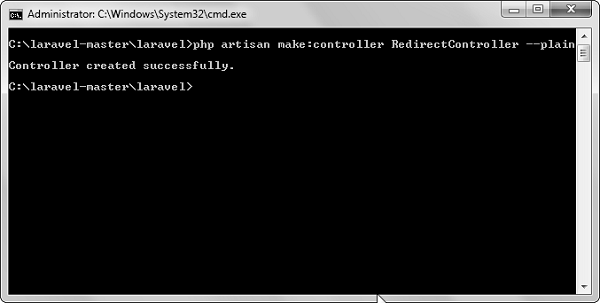
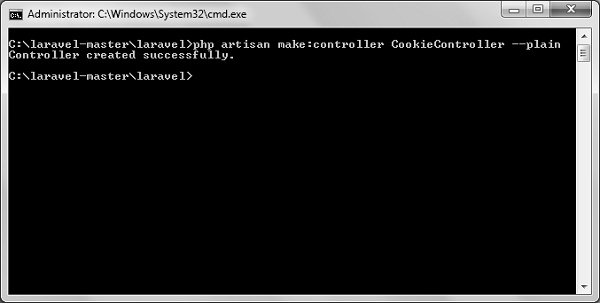
    Step 1 − Create a controller called SessionController by executing the following command.

    php artisan make:controller SessionController --plain
    

    Step 2 − After successful execution, you will receive the following output −

    SessionController

    Step 3 − Copy the following code in a file at

    app/Http/Controllers/SessionController.php.

    app/Http/Controllers/SessionController.php

    <?php
    
    namespace App\Http\Controllers;
    
    use Illuminate\Http\Request;
    use App\Http\Requests;
    use App\Http\Controllers\Controller;
    
    class SessionController extends Controller {
       public function accessSessionData(Request $request) {
    
      if($request-&gt;session()-&gt;has('my_name'))
         echo $request-&gt;session()-&gt;get('my_name');
      else
         echo 'No data in the session';
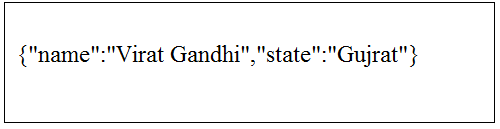
    } public function storeSessionData(Request $request) {
      $request-&gt;session()-&gt;put('my_name','Virat Gandhi');
      echo "Data has been added to session";
    } public function deleteSessionData(Request $request) {
      $request-&gt;session()-&gt;forget('my_name');
      echo "Data has been removed from session.";
    } }

    Step 4 − Add the following lines at app/Http/routes.php file.

    app/Http/routes.php

    Route::get('session/get','SessionController@accessSessionData');
    Route::get('session/set','SessionController@storeSessionData');
    Route::get('session/remove','SessionController@deleteSessionData');
    

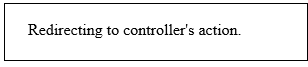
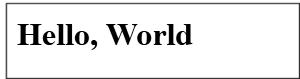
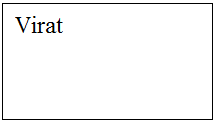
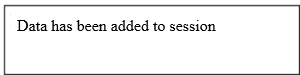
    Step 5 − Visit the following URL to set data in session.

    http://localhost:8000/session/set
    

    Step 6 − The output will appear as shown in the following image.

    Data in Session

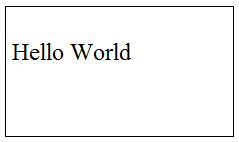
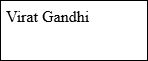
    Step 7 − Visit the following URL to get data from session.

    http://localhost:8000/session/get
    

    Step 8 − The output will appear as shown in the following image.

    Virat Gandhi

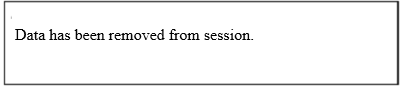
    Step 9 − Visit the following URL to remove session data.

    http://localhost:8000/session/remove
    

    Step 10 − You will see a message as shown in the following image.

    Session
  • Localization

    Localization feature of Laravel supports different language to be used in application. You need to store all the strings of different language in a file and these files are stored at resources/views directory. You should create a separate directory for each supported language. All the language files should return an array of keyed strings as shown below.

    <?php
    return [
       'welcome' => 'Welcome to the application'
    ];

    Example

    Step 1 − Create 3 files for languages − English, French, and German. Save English file at resources/lang/en/lang.php

    <?php
       return [
    
      'msg' =&gt; 'Laravel Internationalization example.'
    ]; ?>

    Step 2 − Save French file at resources/lang/fr/lang.php.

    <?php
       return [
    
      'msg' =&gt; 'Exemple Laravel internationalisation.'
    ]; ?>

    Step 3 − Save German file at resources/lang/de/lang.php.

    <?php
       return [
    
      'msg' =&gt; 'Laravel Internationalisierung Beispiel.' 
    ]; ?>

    Step 4 − Create a controller called LocalizationController by executing the following command.

    php artisan make:controller LocalizationController --plain
    

    Step 5 − After successful execution, you will receive the following output −

    LocalizationController

    Step 6 − Copy the following code to file

    app/Http/Controllers/LocalizationController.php

    app/Http/Controllers/LocalizationController.php

    <?php
    
    namespace App\Http\Controllers;
    
    use Illuminate\Http\Request;
    use App\Http\Requests;
    use App\Http\Controllers\Controller;
    
    class LocalizationController extends Controller {
       public function index(Request $request,$locale) {
    
      //set’s application’s locale
      app()-&gt;setLocale($locale);
      
      //Gets the translated message and displays it
      echo trans('lang.msg');
    } }

    Step 7 − Add a route for LocalizationController in app/Http/routes.php file. Notice that we are passing {locale} argument after localization/ which we will use to see output in different language.

    app/Http/routes.php

    Route::get('localization/{locale}','LocalizationController@index');
    

    Step 8 − Now, let us visit the different URLs to see all different languages. Execute the below URL to see output in English language.

    http://localhost:8000/localization/en
    

    Step 9 − The output will appear as shown in the following image.

    Laravel Internationalization

    Step 10 − Execute the below URL to see output in French language.

    http://localhost:8000/localization/fr
    

    Step 11 − The output will appear as shown in the following image.

    French Example

    Step 12 − Execute the below URL to see output in German language

    http://localhost:8000/localization/de
    

    Step 13 − The output will appear as shown in the following image.

    German Example
  • Forms

    Laravel provides various in built tags to handle HTML forms easily and securely. All the major elements of HTML are generated using Laravel. To support this, we need to add HTML package to Laravel using composer.

    Example 1

    Step 1 − Execute the following command to proceed with the same.

    composer require illuminate/html
    

    Step 2 − This will add HTML package to Laravel as shown in the following image.

    HTML Package

    Step 3 − Now, we need to add the package shown above to Laravel configuration file which is stored at config/app.php. Open this file and you will see a list of Laravel service providers as shown in the following image. Add HTML service provider as indicated in the outlined box in the following image.

    Laravel Service

    Step 4 − Add aliases in the same file for HTML and Form. Notice the two lines indicated in the outlined box in the following image and add those two lines.

    Outlined Box

    Step 5 − Now everything is setup. Let’s see how we can use various HTML elements using Laravel tags.

    Opening a Form

    {{ Form::open(array('url' => 'foo/bar')) }}
       //
    {{ Form::close() }}
    

    Generating a Label Element

    echo Form::label('email', 'E-Mail Address');
    

    Generating a Text Input

    echo Form::text('username');
    

    Specifying a Default Value

    echo Form::text('email', '[email protected]');
    

    Generating a Password Input

    echo Form::password('password');
    

    Generating a File Input

    echo Form::file('image');
    

    Generating a Checkbox Or Radio Input

    echo Form::checkbox('name', 'value');
    echo Form::radio('name', 'value');
    

    Generating a Checkbox Or Radio Input That Is Checked

    echo Form::checkbox('name', 'value', true);
    echo Form::radio('name', 'value', true);
    

    Generating a Drop-Down List

    echo Form::select('size', array('L' => 'Large', 'S' => 'Small'));
    

    Generating A Submit Button

    echo Form::submit('Click Me!');
    

    Example 2

    Step 1 − Copy the following code to create a view called

    resources/views/form.php.

    resources/views/form.php

    <html>
       <body>
    
      
      &lt;?php
         echo Form::open(array('url' =&gt; 'foo/bar'));
            echo Form::text('username','Username');
            echo '&lt;br/&gt;';
            
            echo Form::text('email', '[email protected]');
            echo '&lt;br/&gt;';
     
            echo Form::password('password');
            echo '&lt;br/&gt;';
            
            echo Form::checkbox('name', 'value');
            echo '&lt;br/&gt;';
            
            echo Form::radio('name', 'value');
            echo '&lt;br/&gt;';
            
            echo Form::file('image');
            echo '&lt;br/&gt;';
            
            echo Form::select('size', array('L' =&gt; 'Large', 'S' =&gt; 'Small'));
            echo '&lt;br/&gt;';
            
            echo Form::submit('Click Me!');
         echo Form::close();
      ?&gt;
    </body> </html>

    Step 2 − Add the following line in app/Http/routes.php to add a route for view form.php

    app/Http/routes.php

    Route::get('/form',function() {
       return view('form');
    });
    

    Step 3 − Visit the following URL to see the form.

    http://localhost:8000/form
    

    Step 4 − The output will appear as shown in the following image.

    View Form
  • Errors and Logging

    This chapter deals with errors and logging in Laravel projects and how to work on them.

    Errors

    A project while underway, is borne to have a few errors. Errors and exception handling is already configured for you when you start a new Laravel project. Normally, in a local environment we need to see errors for debugging purposes. We need to hide these errors from users in production environment. This can be achieved with the variable APP_DEBUG set in the environment file .env stored at the root of the application.

    For local environment the value of APP_DEBUG should be true but for production it needs to be set to false to hide errors.

    Note − After changing the APP_DEBUG variable, you should restart the Laravel server.

    Logging

    Logging is an important mechanism by which system can log errors that are generated. It is useful to improve the reliability of the system. Laravel supports different logging modes like single, daily, syslog, and errorlog modes. You can set these modes in config/app.php file.

    'log' => 'daily'
    

    You can see the generated log entries in storage/logs/laravel.log file.

  • Working With Database

    Laravel has made processing with database very easy. Laravel currently supports following 4 databases −

    • MySQL
    • Postgres
    • SQLite
    • SQL Server

    The query to the database can be fired using raw SQL, the fluent query builder, and the Eloquent ORM. To understand the all CRUD (Create, Read, Update, Delete) operations with Laravel, we will use simple student management system.

    Connecting to Database

    Configure the database in config/database.php file and create the college database with structure in MySQL as shown in the following table.

    Database: College

    Table: student

    Column NameColumn DatatypeExtra
    Idint(11)Primary key | Auto increment
    Namevarchar(25)

    We will see how to add, delete, update and retrieve records from database using Laravel in student table.

    Sr.No.Record & Description
    1Insert RecordsWe can insert the record using the DB facade with insert method.
    2Retrieve RecordsAfter configuring the database, we can retrieve the records using the DB facade with select method.
    3Update RecordsWe can update the records using the DB facade with update method.
    4Delete RecordsWe can delete the record using the DB facade with the delete method.
  • Redirections

    Named route is used to give specific name to a route. The name can be assigned using the “as” array key.

    Route::get('user/profile', ['as' => 'profile', function () {
       //
    }]);
    

    Note − Here, we have given the name profile to a route user/profile.

    Redirecting to Named Routes

    Example

    Observe the following example to understand more about Redirecting to named routes −

    Step 1 − Create a view called test.php and save it at

    resources/views/test.php.

    <html>
       <body>
    
      &lt;h1&gt;Example of Redirecting to Named Routes&lt;/h1&gt;
    </body> </html>

    Step 2 − In routes.php, we have set up the route for test.php file. We have renamed it to testing. We have also set up another route redirect which will redirect the request to the named route testing.

    app/Http/routes.php

    Route::get('/test', ['as'=>'testing',function() {
       return view('test2');
    }]);
    
    Route::get('redirect',function() {
       return redirect()->route('testing');
    });
    

    Step 3 − Visit the following URL to test the named route example.

    http://localhost:8000/redirect
    

    Step 4 − After execution of the above URL, you will be redirected to http://localhost:8000/test as we are redirecting to the named route testing.

    Step 5 − After successful execution of the URL, you will receive the following output −

    Virat Gandhi

    Redirecting to Controller Actions

    Not only named route but we can also redirect to controller actions. We need to simply pass the controller and name of the action to the action method as shown in the following example. If you want to pass a parameter, you can pass it as the second argument of the action method.

    return redirect()->action(‘NameOfController@methodName’,[parameters]);
    

    Example

    Step 1 − Execute the following command to create a controller called RedirectController.

    php artisan make:controller RedirectController --plain
    

    Step 2 − After successful execution, you will receive the following output −

    Redirect Controller

    Step 3 − Copy the following code to file

    app/Http/Controllers/RedirectController.php.

    app/Http/Controllers/RedirectController.php

    <?php
    
    namespace App\Http\Controllers;
    
    use Illuminate\Http\Request;
    use App\Http\Requests;
    use App\Http\Controllers\Controller;
    
    class RedirectController extends Controller {
       public function index() {
    
      echo "Redirecting to controller's action.";
    } }

    Step 4 − Add the following lines in app/Http/routes.php.

    app/Http/routes.php

    Route::get('rr','RedirectController@index');
    Route::get('/redirectcontroller',function() {
       return redirect()->action('RedirectController@index');
    });
    

    Step 5 − Visit the following URL to test the example.

    http://localhost:8000/redirectcontroller
    

    Step 6 − The output will appear as shown in the following image.

    RedirectController.jpg
  • Blade Templates

    Laravel 5.1 introduces the concept of using Blade, a templating engine to design a unique layout. The layout thus designed can be used by other views, and includes a consistent design and structure.

    When compared to other templating engines, Blade is unique in the following ways −

    • It does not restrict the developer from using plain PHP code in views.
    • The blade views thus designed, are compiled and cached until they are modified.
    Welcome Blade

    The complete directory structure of Laravel is shown in the screenshot given here.

    You can observe that all views are stored in the resources/views directory and the default view for Laravel framework is welcome.blade.php.

    Please note that other blade templates are also created similarly.

    Steps for Creating a Blade Template Layout

    You will have to use the following steps to create a blade template layout −

    Step 1

    • Create a layout folder inside the resources/views folder. We are going to use this folder to store all layouts together.
    • Create a file name master.blade.php which will have the following code associated with it −
    <html>
       <head>
    
      &lt;title&gt;DemoLaravel - @yield('title')&lt;/title&gt;
    </head> <body>
      @yield('content')
    </body> </html>

    Step 2

    In this step, you should extend the layout. Extending a layout involves defining the child elements. Laravel uses the Blade @extends directive for defining the child elements.

    When you are extending a layout, please note the following points −

    • Views defined in the Blade Layout injects the container in a unique way.
    • Various sections of view are created as child elements.
    • Child elements are stored in layouts folder as child.blade.php

    An example that shows extending the layout created above is shown here −

    @extends('layouts.app')
    @section('title', 'Page Title')
    @section('sidebar')
       @parent
    <p>This refers to the master sidebar.</p>
    @endsection
    @section('content')
    <p>This is my body content.</p>
    @endsection

    Step 3

    To implement the child elements in views, you should define the layout in the way it is needed.

    Landing Page

    Observe the screenshot shown here. You can find that each of links mentioned in the landing page are hyperlinks. Please note that you can also create them as child elements with the help of blade templates by using the procedure given above.

  • Views

    In MVC framework, the letter “V” stands for Views. It separates the application logic and the presentation logic. Views are stored in resources/views directory. Generally, the view contains the HTML which will be served by the application.

    Example

    Observe the following example to understand more about Views −

    Step 1 − Copy the following code and save it at resources/views/test.php

    <html>
       <body>
    
      &lt;h1&gt;Hello, World&lt;/h1&gt;
    </body> </html>

    Step 2 − Add the following line in app/Http/routes.php file to set the route for the above view.

    app/Http/routes.php

    Route::get('/test', function() {
       return view('test');
    });
    

    Step 3 − Visit the following URL to see the output of the view.

    http://localhost:8000/test
    

    Step 4 − The output will appear as shown in the following image.

    Understanding Views

    Passing Data to Views

    While building application it may be required to pass data to the views. Pass an array to view helper function. After passing an array, we can use the key to get the value of that key in the HTML file.

    Example

    Observe the following example to understand more about passing data to views −

    Step 1 − Copy the following code and save it at resources/views/test.php

    <html>
       <body>
    
      &lt;h1&gt;&lt;?php echo $name; ?&gt;&lt;/h1&gt;
    </body> </html>

    Step 2 − Add the following line in app/Http/routes.php file to set the route for the above view.

    app/Http/routes.php

    Route::get('/test', function() {
       return view('test',[‘name’=>’Virat Gandhi’]);
    });
    

    Step 3 − The value of the key name will be passed to test.php file and $name will be replaced by that value.

    Step 4 − Visit the following URL to see the output of the view.

    http://localhost:8000/test
    

    Step 5 − The output will appear as shown in the following image.

    Virat Gandhi

    Sharing Data with all Views

    We have seen how we can pass data to views but at times, there is a need to pass data to all the views. Laravel makes this simpler. There is a method called share() which can be used for this purpose. The share() method will take two arguments, key and value. Typically share() method can be called from boot method of service provider. We can use any service provider, AppServiceProvider or our own service provider.

    Example

    Observe the following example to understand more about sharing data with all views −

    Step 1 − Add the following line in app/Http/routes.php file.

    app/Http/routes.php

    Route::get('/test', function() {
       return view('test');
    });
    
    Route::get('/test2', function() {
       return view('test2');
    });
    

    Step 2 − Create two view files — test.php and test2.php with the same code. These are the two files which will share data. Copy the following code in both the files. resources/views/test.php & resources/views/test2.php

    <html>
       <body>
    
      &lt;h1&gt;&lt;?php echo $name; ?&gt;&lt;/h1&gt;
    </body> </html>

    Step 3 − Change the code of boot method in the file app/Providers/AppServiceProvider.php as shown below. (Here, we have used share method and the data that we have passed will be shared with all the views.) app/Providers/AppServiceProvider.php

    <?php
    
    namespace App\Providers;
    use Illuminate\Support\ServiceProvider;
    
    class AppServiceProvider extends ServiceProvider {
       
       /**
    
      * Bootstrap any application services.
      *
      * @return void
    */ public function boot() {
      view()-&gt;share('name', 'Virat Gandhi');
    } /**
      * Register any application services.
      *
      * @return void
    */ public function register() {
      //
    } }

    Step 4 − Visit the following URLs.

    http://localhost:8000/test
    http://localhost:8000/test2
    

    Step 5 − The output will appear as shown in the following image.

    Virat Gandhi
  • Response

    A web application responds to a user’s request in many ways depending on many parameters. This chapter explains you in detail about responses in Laravel web applications.

    Basic Response

    Laravel provides several different ways to return response. Response can be sent either from route or from controller. The basic response that can be sent is simple string as shown in the below sample code. This string will be automatically converted to appropriate HTTP response.

    Example

    Step 1 − Add the following code to app/Http/routes.php file.

    app/Http/routes.php

    Route::get('/basic_response', function () {
       return 'Hello World';
    });
    

    Step 2 − Visit the following URL to test the basic response.

    http://localhost:8000/basic_response
    

    Step 3 − The output will appear as shown in the following image.

    Basic Response

    Attaching Headers

    The response can be attached to headers using the header() method. We can also attach the series of headers as shown in the below sample code.

    return response($content,$status)
       ->header('Content-Type', $type)
       ->header('X-Header-One', 'Header Value')
       ->header('X-Header-Two', 'Header Value');

    Example

    Observe the following example to understand more about Response −

    Step 1 − Add the following code to app/Http/routes.php file.

    app/Http/routes.php

    Route::get('/header',function() {
       return response("Hello", 200)->header('Content-Type', 'text/html');
    });

    Step 2 − Visit the following URL to test the basic response.

    http://localhost:8000/header
    

    Step 3 − The output will appear as shown in the following image.

    Hello

    Explore our latest online courses and learn new skills at your own pace. Enroll and become a certified expert to boost your career.

    Attaching Cookies

    The withcookie() helper method is used to attach cookies. The cookie generated with this method can be attached by calling withcookie() method with response instance. By default, all cookies generated by Laravel are encrypted and signed so that they can’t be modified or read by the client.

    Example

    Observe the following example to understand more about attaching cookies −

    Step 1 − Add the following code to app/Http/routes.php file.

    app/Http/routes.php

    Route::get('/cookie',function() {
       return response("Hello", 200)->header('Content-Type', 'text/html')
    
      -&gt;withcookie('name','Virat Gandhi');
    });

    Step 2 − Visit the following URL to test the basic response.

    http://localhost:8000/cookie
    

    Step 3 − The output will appear as shown in the following image.

    Hello

    JSON Response

    JSON response can be sent using the json method. This method will automatically set the Content-Type header to application/json. The json method will automatically convert the array into appropriate json response.

    Example

    Observe the following example to understand more about JSON Response −

    Step 1 − Add the following line in app/Http/routes.php file.

    app/Http/routes.php

    Route::get('json',function() {
       return response()->json(['name' => 'Virat Gandhi', 'state' => 'Gujarat']);
    });

    Step 2 − Visit the following URL to test the json response.

    http://localhost:8000/json
    

    Step 3 − The output will appear as shown in the following image.

    Json Response
  • Cookie

    Cookies play an important role while dealing a user’s session on a web application. In this chapter, you will learn about working with cookies in Laravel based web applications.

    Creating a Cookie

    Cookie can be created by global cookie helper of Laravel. It is an instance of Symfony\Component\HttpFoundation\Cookie. The cookie can be attached to the response using the withCookie() method. Create a response instance of Illuminate\Http\Response class to call the withCookie() method. Cookie generated by the Laravel are encrypted and signed and it can’t be modified or read by the client.

    Here is a sample code with explanation.

    //Create a response instance
    $response = new Illuminate\Http\Response('Hello World');
    
    //Call the withCookie() method with the response method
    $response->withCookie(cookie('name', 'value', $minutes));
    
    //return the response
    return $response;

    Cookie() method will take 3 arguments. First argument is the name of the cookie, second argument is the value of the cookie and the third argument is the duration of the cookie after which the cookie will get deleted automatically.

    Cookie can be set forever by using the forever method as shown in the below code.

    $response->withCookie(cookie()->forever('name', 'value'));
    

    Retrieving a Cookie

    Once we set the cookie, we can retrieve the cookie by cookie() method. This cookie() method will take only one argument which will be the name of the cookie. The cookie method can be called by using the instance of Illuminate\Http\Request.

    Here is a sample code.

    //’name’ is the name of the cookie to retrieve the value of
    $value = $request->cookie('name');
    

    Example

    Observe the following example to understand more about Cookies −

    Step 1 − Execute the below command to create a controller in which we will manipulate the cookie.

    php artisan make:controller CookieController --plain
    

    Step 2 − After successful execution, you will receive the following output −

    CookieController

    Step 3 − Copy the following code in

    app/Http/Controllers/CookieController.php file.

    app/Http/Controllers/CookieController.php

    <?php
    
    namespace App\Http\Controllers;
    
    use Illuminate\Http\Request;
    use Illuminate\Http\Response;
    use App\Http\Requests;
    use App\Http\Controllers\Controller;
    
    class CookieController extends Controller {
       public function setCookie(Request $request) {
    
      $minutes = 1;
      $response = new Response('Hello World');
      $response-&gt;withCookie(cookie('name', 'virat', $minutes));
      return $response;
    } public function getCookie(Request $request) {
      $value = $request-&gt;cookie('name');
      echo $value;
    } }

    Step 4 − Add the following line in app/Http/routes.php file.

    app/Http/routes.php

    Route::get('/cookie/set','CookieController@setCookie');
    Route::get('/cookie/get','CookieController@getCookie');
    

    Step 5 − Visit the following URL to set the cookie.

    http://localhost:8000/cookie/set
    

    Step 6 − The output will appear as shown below. The window appearing in the screenshot is taken from firefox but depending on your browser, cookie can also be checked from the cookie option.

    Hello World

    Step 7 − Visit the following URL to get the cookie from the above URL.

    http://localhost:8000/cookie/get
    

    Step 8 − The output will appear as shown in the following image.

    Virat