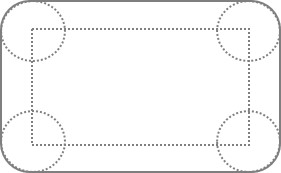
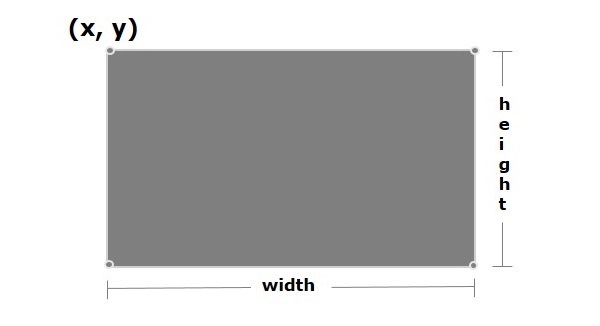
In geometry, a rounded rectangle is defined as a 2D shape that contains arched edges instead of sharp edges. It is obtained by placing four different circles on a sharp-edged rectangle with its vertices as their centers. The edges of this rounded rectangle are common tangents drawn against these circles as shown in the image below.
In a rounded rectangle, the length and width are of same measurement as the sharp-edged rectangle that is enclosed within it.
Rounded Rectangle in JavaFX
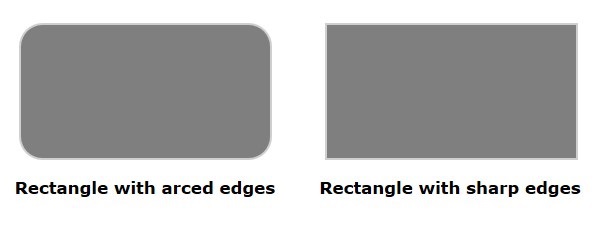
In JavaFX, you can draw a rectangle either with sharp edges or with arched edges as shown in the following diagram.
The one with arched edges is known as a rounded rectangle, as it does not contain vertices. This figure is mainly used in various applications of design and optics, and has two additional properties namely −
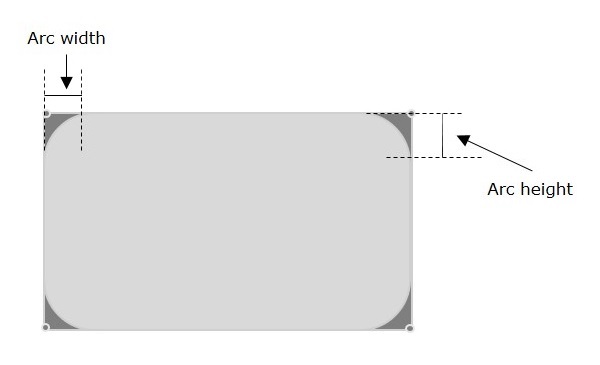
arcHeight − The vertical diameter of the arc, at the corners of a rounded rectangle.
arcWidth − The horizontal diameter of the arc at the corners of a rounded rectangle.
By default, JavaFX creates a rectangle with sharp edges unless you set the height and width of the arc to +ve values (0<) using their respective setter methods setArcHeight() and setArcWidth().
Drawing Rounded Rectangle
In order to draw a rounded rectangle in JavaFX, you also instantiate the class named Rectangle in the javafx.scene.shape package. In addition to that, you also have to set arc properties of a rounded rectangle as shown below −
Follow all the other steps mentioned in the Drawing a Rectangle chapter of this tutorial, to launch a JavaFX application with a rounded rectangle.
Example
Following is a program which generates a rounded rectangle using JavaFX. Save this code in a file with the name RoundedRectangle.java.
importjavafx.application.Application;importjavafx.scene.Group;importjavafx.scene.Scene;importjavafx.stage.Stage;importjavafx.scene.shape.Rectangle;publicclassRoundedRectangleextendsApplication{@Overridepublicvoidstart(Stage stage){//Drawing a Rectangle Rectangle rectangle =newRectangle();//Setting the properties of the rectangle
rectangle.setX(150.0f);
rectangle.setY(75.0f);
rectangle.setWidth(300.0f);
rectangle.setHeight(150.0f);//Setting the height and width of the arc
rectangle.setArcWidth(30.0);
rectangle.setArcHeight(20.0);//Creating a Group object Group root =newGroup(rectangle);//Creating a scene object Scene scene =newScene(root,600,300);//Setting title to the Stage
stage.setTitle("Drawing a Rectangle");//Adding scene to the stage
stage.setScene(scene);//Displaying the contents of the stage
stage.show();}publicstaticvoidmain(String args[]){launch(args);}}</code></pre>
Compile and execute the saved java file from the command prompt using the following commands.
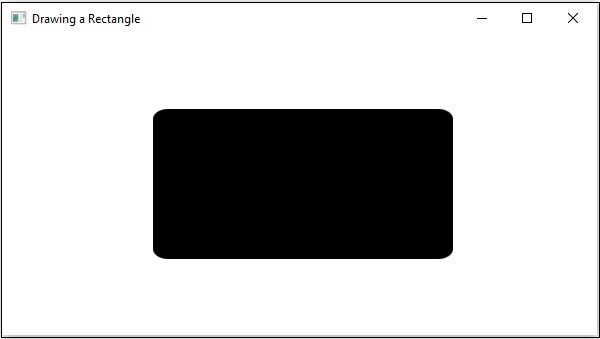
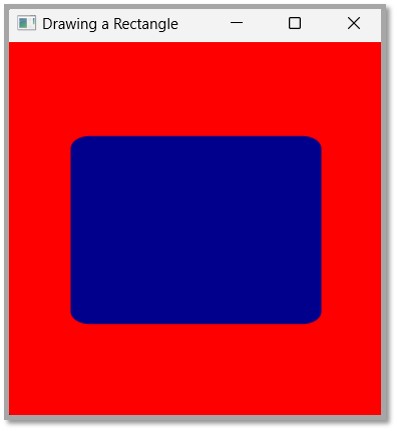
On executing, the above program generates a JavaFX window displaying a rounded rectangle as shown below.
Example
Let us see another example drawing a rounded rectangle using JavaFX. In addition, let us apply some CSS like adding a background color in this example. Save this code in a file with the name CSSRoundedRectangle.java.
importjavafx.application.Application;importjavafx.scene.Group;importjavafx.scene.Scene;importjavafx.stage.Stage;importjavafx.scene.paint.Color;importjavafx.scene.shape.Rectangle;publicclassCSSRoundedRectangleextendsApplication{@Overridepublicvoidstart(Stage stage){//Drawing a Rectangle Rectangle rectangle =newRectangle();//Setting the properties of the rectangle
rectangle.setX(50.0f);
rectangle.setY(75.0f);
rectangle.setWidth(200.0f);
rectangle.setHeight(150.0f);//Setting the height and width of the arc
rectangle.setArcWidth(30.0);
rectangle.setArcHeight(20.0);//Colour the rounded rectangle
rectangle.setFill(Color.DARKBLUE);//Creating a Group object Group root =newGroup(rectangle);//Creating a scene object Scene scene =newScene(root,300,300);
scene.setFill(Color.RED);//Setting title to the Stage
stage.setTitle("Drawing a Rectangle");//Adding scene to the stage
stage.setScene(scene);//Displaying the contents of the stage
stage.show();}publicstaticvoidmain(String args[]){launch(args);}}</code></pre>
Compile and execute the saved java file from the command prompt using the following commands.
In general, a rectangle is a four-sided polygon that has two pairs of parallel and concurrent sides with all interior angles as right angles.
It is described by two parameters namely −
height − The vertical length of the rectangle is known as height.
width − The horizontal length of the rectangle is known as width.
Rectangle in JavaFX
In JavaFX, a Rectangle is represented by a class named Rectangle. This class belongs to the package javafx.scene.shape.
By instantiating this class, you can create a Rectangle node in JavaFX.
This class has 4 properties of the double datatype namely −
X − The x coordinate of the start point (upper left) of the rectangle.
Y − The y coordinate of the start point (upper left) of the rectangle.
Width − The width of the rectangle.
height − The height of the rectangle.
To draw a rectangle, you need to pass values to these properties, either by passing them to the constructor of this class, in the same order, at the time of instantiation.
Steps to Draw a Rectangle
You need to follow the steps given below to draw a rectangle in JavaFX.
Step 1: Creating a Rectangle
To create a rectangle in JavaFX, instantiate the class named Rectangle of the package javafx.scene.shape as shown below −
//Creating a rectangle object Rectangle rectangle =newRectangle();
As the entire code is written within the start() method of Application class, the Rectangle class is also instantiated within it as shown below −
Specify the x, y coordinates of the starting point (upper left), height and the width of the rectangle, that is needed to be drawn. You can do this by setting the properties x, y, height and width, using their respective setter methods.
In this step, the Group class of package javafx.scene is instantiated by passing the Rectangle object as a parameter value to its constructor as follows −
Group root =newGroup(rectangle);
Step 4: Launching Application
Once the 2D object is created, follow the given steps below to launch the application properly −
Firstly, instantiate the class named Scene by passing the Group object as a parameter value to its constructor. To this constructor, you can also pass dimensions of the application screen as optional parameters.
Then, set the title to the stage using the setTitle() method of the Stage class.
Now, a Scene object is added to the stage using the setScene() method of the class named Stage.
Display the contents of the scene using the method named show().
Lastly, the application is launched with the help of the launch() method.
Example
Following is the program which generates a rectangle JavaFX. Save this code in a file with the name RectangleExample.java.
importjavafx.application.Application;importjavafx.scene.Group;importjavafx.scene.Scene;importjavafx.stage.Stage;importjavafx.scene.shape.Rectangle;publicclassRectangleExampleextendsApplication{@Overridepublicvoidstart(Stage stage){//Drawing a Rectangle Rectangle rectangle =newRectangle();//Setting the properties of the rectangle
rectangle.setX(150.0f);
rectangle.setY(75.0f);
rectangle.setWidth(300.0f);
rectangle.setHeight(150.0f);//Creating a Group object Group root =newGroup(rectangle);//Creating a scene object Scene scene =newScene(root,600,300);//Setting title to the Stage
stage.setTitle("Drawing a Rectangle");//Adding scene to the stage
stage.setScene(scene);//Displaying the contents of the stage
stage.show();}publicstaticvoidmain(String args[]){launch(args);}}</code></pre>
Compile and execute the saved java file from the command prompt using the following commands.
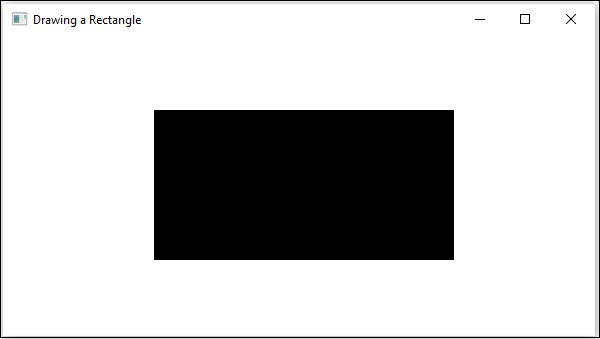
On executing, the above program generates a JavaFX window displaying a rectangle as shown in the following screenshot.
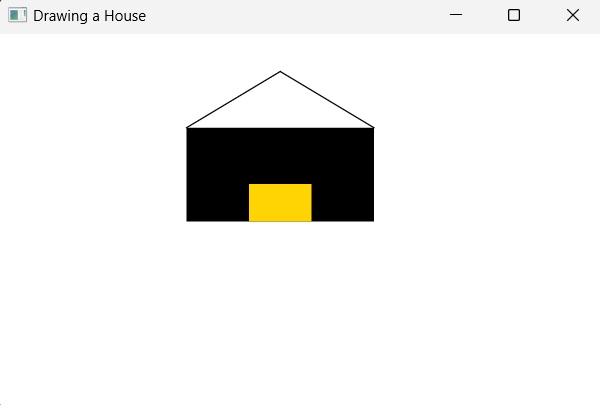
Example - Drawing a House
Let us see another example where we try to draw a house using a rectangle. Here, we use two rectangles and two lines to finish a basic version of cartoon house. We will name this file RectangleHouse.java.
importjavafx.application.Application;importjavafx.scene.Group;importjavafx.scene.Scene;importjavafx.stage.Stage;importjavafx.scene.shape.Rectangle;importjavafx.scene.shape.Line;importjavafx.scene.paint.Color;publicclassRectangleHouseextendsApplication{@Overridepublicvoidstart(Stage stage){//Drawing a Rectangle Rectangle rectangle1 =newRectangle();Rectangle rectangle2 =newRectangle(200.0f,120.0f,50.0f,30.0f);
rectangle2.setFill(Color.hsb(50,1,1));//Setting the properties of the rectangle
rectangle1.setX(150.0f);
rectangle1.setY(75.0f);
rectangle1.setWidth(150.0f);
rectangle1.setHeight(75.0f);// Setting the properties of Lines// without setter methodsLine line1 =newLine(150,75,225,30);Line line2 =newLine(225,30,300,75);//Creating a Group object Group root =newGroup();
root.getChildren().addAll(rectangle1, rectangle2, line1, line2);//Creating a scene object Scene scene =newScene(root,600,300);//Setting title to the Stage
stage.setTitle("Drawing a House");//Adding scene to the stage
stage.setScene(scene);//Displaying the contents of the stage
stage.show();}publicstaticvoidmain(String args[]){launch(args);}}</code></pre>
Compile and execute the saved java file from the command prompt using the following commands.
Generally, a line is a geometrical structure which is infinitely long on a multi-dimensional plane (Say, an XY plane). This geometrical figure does not have any start and end points; neither does it have measurable dimensions like width, depth etc. Even though a line is a one-dimensional object, it can still exist in two or higher dimensional planes.
However, a segment of this line with both start and end points, called the “line segment” is used in everyday geometry; which is also the figure that we learn how to create using JavaFX, in this chapter. It is drawn as shown in the image below.
Line in JavaFX
In JavaFX, a line, or a line segment, is represented by a class named Line. This class belongs to the package javafx.scene.shape. By instantiating this class, you can create a line node in JavaFX.
This class has 4 properties of the double datatype namely −
startX − The x coordinate of the start point of the line.
startY − The y coordinate of the start point of the line.
endX − The x coordinate of the end point of the line.
endY − The y coordinate of the end point of the line.
To draw a line, you need to pass values to these properties, either by passing them to the constructor of this class, in the same order, at the time of instantiation.
Steps to Draw a Line in JavaFX
Follow the steps given below to Draw a Line in JavaFX.
Step 1: Creating a Line
You can create a line in JavaFX by instantiating the class named Line which belongs to a package javafx.scene.shape. Instantiate this class as shown below −
//Creating a line object Line line =newLine();
Note that the entire code to implement JavaFX graphics, which includes the instantiation of Line class, must be written within the start() method of Application class, as shown below −
publicclassClassNameextendsApplication{publicvoidstart(Stage primaryStage)throwsException{// Write code hereLine line =newLine();}}
Step 2: Setting Properties to the Line
Specify the coordinates to draw the line on an XY plane by setting the properties startX, startY, endX and endY, using their respective setter methods as shown in the following code block.
Instantiate the Group class of package javafx.scene, by passing the Line object as a parameter value to its constructor as follows −
Group root =newGroup(line);
Step 4: Launching Application
Once the 2D object is created, follow the given steps below to launch the application properly −
Firstly, instantiate the class named Scene by passing the Group object as a parameter value to its constructor. To this constructor, you can also pass dimensions of the application screen as optional parameters.
Then, set the title to the stage using the setTitle() method of the Stage class.
Now, a Scene object is added to the stage using the setScene() method of the class named Stage.
Display the contents of the scene using the method named show().
Lastly, the application is launched with the help of the launch() method.
Example
Following is the program which generates a straight line using JavaFX. Save this code in a file with the name DrawingLine.java.
importjavafx.application.Application;importjavafx.scene.Group;importjavafx.scene.Scene;importjavafx.scene.shape.Line;importjavafx.stage.Stage;publicclassDrawingLineextendsApplication{@Overridepublicvoidstart(Stage stage){//Creating a line objectLine line =newLine();//Setting the properties to a line
line.setStartX(100.0);
line.setStartY(150.0);
line.setEndX(500.0);
line.setEndY(150.0);//Creating a Group Group root =newGroup(line);//Creating a Scene Scene scene =newScene(root,600,300);//Setting title to the scene
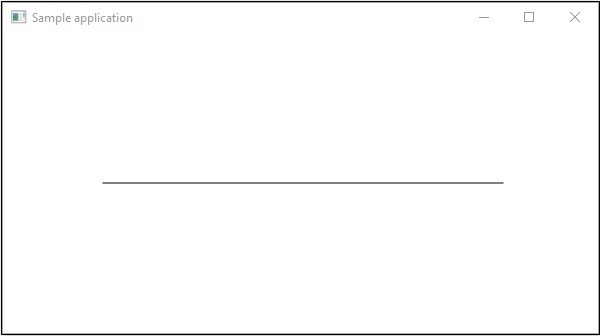
stage.setTitle("Sample application");//Adding the scene to the stage
stage.setScene(scene);//Displaying the contents of a scene
stage.show();}publicstaticvoidmain(String args[]){launch(args);}}</code></pre>
Compile and execute the saved java file from the command prompt using the following commands.
On executing, the above program generates a JavaFX window displaying a straight line as shown below.
Learn Java in-depth with real-world projects through our Java certification course. Enroll and become a certified expert to boost your career.
Drawing Multiple Lines
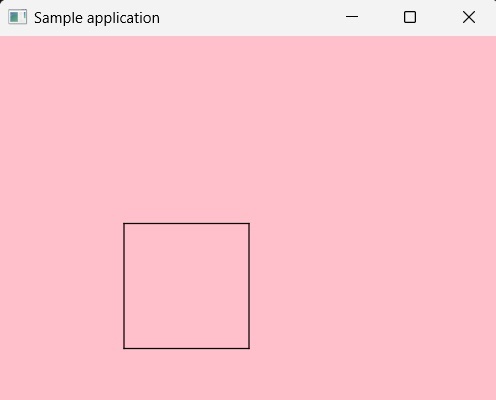
You can also draw multiple lines on a single application by grouping all the lines together using addAll() function. An example demonstrating the same is as follows. In here, we are drawing a square using four lines and coloring the background "pink". Save this code in a file with the name DrawingMultipleLines.java.
Example
importjavafx.application.Application;importjavafx.scene.Group;importjavafx.scene.Scene;importjavafx.scene.paint.Color;importjavafx.scene.shape.Line;importjavafx.stage.Stage;publicclassDrawingMultipleLinesextendsApplication{@Overridepublicvoidstart(Stage stage){//Creating a line objectLine line1 =newLine();//Setting the properties to a line
line1.setStartX(100.0);
line1.setStartY(150.0);
line1.setEndX(200.0);
line1.setEndY(150.0);// Setting Properties to other lines// without setter methodsLine line2 =newLine(200,150,200,250);Line line3 =newLine(200,250,100,250);Line line4 =newLine(100,250,100,150);//Creating a Group Group root =newGroup();
root.getChildren().addAll(line1,line2,line3,line4);//Creating a Scene Scene scene =newScene(root,400,400,Color.PINK);//Setting title to the scene
stage.setTitle("Sample application");//Adding the scene to the stage
stage.setScene(scene);//Displaying the contents of a scene
stage.show();}publicstaticvoidmain(String args[]){launch(args);}}</code></pre>
Compile and execute the saved java file from the command prompt using the following commands.
In the previous chapter, we have seen the basic application of JavaFX, where we learnt how to create an empty window and how to draw a line on an XY plane of JavaFX. In addition to the line, we can also draw several other 2D shapes.
2D Shape
In general, a 2D shape is a geometrical figure that can be drawn on the XY plane, these include Line, Rectangle, Circle, etc.
Using the JavaFX library, you can draw −
Predefined shapes such as Line, Rectangle, Circle, Ellipse, Polygon, Polyline, Cubic Curve, Quad Curve, Arc.
Path elements such as MoveTO Path Element, Line, Horizontal Line, Vertical Line, Cubic Curve, Quadratic Curve, Arc.
In addition to these, you can also draw a 2D shape by parsing SVG path.
Each of the above mentioned 2D shape is represented by a class and all these classes belongs to the package javafx.scene.shape. The class named Shape is the base class of all the 2-Dimensional shapes in JavaFX.
Creating a 2D Shape in JavaFX
To create a chart, you need to −
Instantiate the respective class of the required shape.
Set the properties of the shape.
Add the shape object to the group.
Instantiating the Respective Class
To create a 2 Dimensional shape, first of all you need to instantiate its respective class. For example, if you want to create a circle you need to instantiate the class named Circle as follows −
Circle circle =newCircle();
Setting the Properties of the Shape
After instantiating the class, you need to set the properties for the shape using the setter methods. For example, you can set the X, Y coordinates of the center of the Circle class and its radius, using the following setter methods −
// Setting the Properties of a circle
circle.setCenterX(300.0f);
circle.setCenterY(135.0f);
circle.setRadius(100.0f);
Adding the Shape Object to the Group
Finally, you need to add the circle object to the group by passing it as a parameter of the constructor as shown below.
//Creating a Group object Group root =newGroup(circle);
Learn Java in-depth with real-world projects through our Java certification course. Enroll and become a certified expert to boost your career.
Various 2D Shapes available in JavaFX
The following table gives you the list of various shapes (classes) provided by JavaFX.
S.No
Shape & Description
1
LineA line is a geometrical structure joining two point. The Line class of the package javafx.scene.shape represents a line in the XY plane.
2
RectangleIn general, a rectangle is a four-sided polygon that has two pairs of parallel and concurrent sides with all interior angles as right angles. In JavaFX, a Rectangle is represented by a class named Rectangle. This class belongs to the package javafx.scene.shape.
3
Rounded RectangleIn JavaFX, you can draw a rectangle either with sharp edges or with arched edges and The one with arched edges is known as a rounded rectangle.
4
CircleA circle is a line forming a closed loop, every point on which is a fixed distance from a centre point. In JavaFX, a circle is represented by a class named Circle. This class belongs to the package javafx.scene.shape.
5
EllipseAn ellipse is defined by two points, each called a focus. If any point on the ellipse is taken, the sum of the distances to the focus points is constant. The size of the ellipse is determined by the sum of these two distances.In JavaFX, an ellipse is represented by a class named Ellipse. This class belongs to the package javafx.scene.shape.
6
PolygonA closed shape formed by a number of coplanar line segments connected end to end. In JavaFX, a polygon is represented by a class named Polygon. This class belongs to the package javafx.scene.shape.
7
PolylineA polyline is same a polygon except that a polyline is not closed in the end. Or, continuous line composed of one or more line segments. In JavaFX, a Polyline is represented by a class named Polygon. This class belongs to the package javafx.scene.shape.
8
Cubic CurveA cubic curve is a Bezier parametric curve in the XY plane is a curve of degree 3. In JavaFX, a Cubic Curve is represented by a class named CubicCurve. This class belongs to the package javafx.scene.shape.
9
QuadCurveA quadratic curve is a Bezier parametric curve in the XY plane is a curve of degree 2. In JavaFX, a QuadCurve is represented by a class named QuadCurve. This class belongs to the package javafx.scene.shape.
10
ArcAn arc is part of a curve. In JavaFX, an arc is represented by a class named Arc. This class belongs to the package − javafx.scene.shape.Types Of ArcIn addition to this we can draw three types of arc’s Open, Chord, Round.
11
SVGPathIn JavaFX, we can construct images by parsing SVG paths. Such shapes are represented by the class named SVGPath. This class belongs to the package javafx.scene.shape. This class has a property named content of String datatype. This represents the SVG Path encoded string, from which the image should be drawn..
Properties of 2D Objects
For all the 2-Dimensional objects, you can set various properties like fill, stroke, StrokeType, etc. The following section discusses various properties of 2D objects.
Stroke Type Property
Stroke Width Property
Stroke Fill Property
Stroke Property
Stroke Line Property
Stroke Miter Limit Property
Stroke Line Cap Property
Smooth Property
We will learn about these properties in detail, in further sections of this tutorial.
Operations on 2D Objects
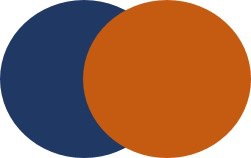
If we add more than one shape to a group, the first shape is overlapped by the second one as shown below.
In addition to the transformations (rotate, scale, translate, etc.), transitions (animations), you can also perform three operations on 2D objects namely − Union, Subtraction and Intersection.
Union Operation: This operation takes two or more shapes as inputs and returns the area occupied by them.
Intersection Operation: This operation takes two or more shapes as inputs and returns the intersection area between them.
Subtraction Operation: This operation takes two or more shapes as an input. Then, it returns the area of the first shape excluding the area overlapped by the second one.
As we have already learned, JavaFX is an open source free software platform, that allows a user to develop client applications that work consistently across various devices. Using JavaFX, one can create Graphical User Interface applications (GUIs), and Internet or Desktop applications as well. All these applications will be developed in Java.
In this chapter, we will discuss the structure of a JavaFX application in detail and also learn to create a JavaFX application with an example.
JavaFX Application Structure
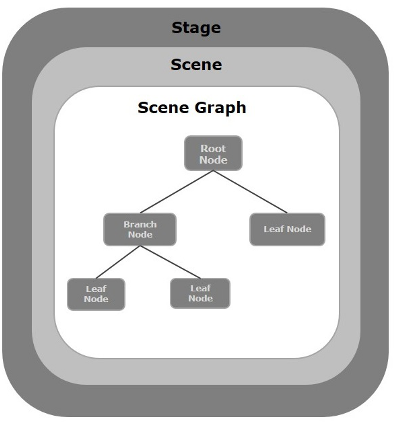
In general, a JavaFX application will have three major components namely Stage, Scene and Nodes as shown in the following diagram.
Stage
A stage (a window) contains all the objects of a JavaFX application. It is represented by Stage class of the package javafx.stage. The primary stage is created by the platform itself. The created stage object is passed as an argument to the start() method of the Application class (explained in the next section).
A stage has two parameters determining its position namely Width and Height. It is divided as Content Area and Decorations (Title Bar and Borders).
There are five types of stages available −
Decorated
Undecorated
Transparent
Unified
Utility
You have to call the show() method to display the contents of a stage.
Scene
A scene represents the physical contents of a JavaFX application. It contains all the contents of a scene graph. The class Scene of the package javafx.scene represents the scene object. At an instance, the scene object is added to only one stage.
You can create a scene by instantiating the Scene Class. You can opt for the size of the scene by passing its dimensions (height and width) along with the root node to its constructor.
Scene Graph and Nodes
A scene graph is a tree-like data structure (hierarchical) representing the contents of a scene. In contrast, a node is a visual/graphical object of a scene graph.
A node may include −
Geometrical (Graphical) objects (2D and 3D) such as − Circle, Rectangle, Polygon, etc.
UI Controls such as − Button, Checkbox, Choice Box, Text Area, etc.
Containers (Layout Panes) such as Border Pane, Grid Pane, Flow Pane, etc.
Media elements such as Audio, Video and Image Objects.
The Node Class of the package javafx.scene represents a node in JavaFX, this class is the super class of all the nodes.
A node is of three types −
Root Node − The first Scene Graph is known as the Root node.
Branch Node/Parent Node − The node with child nodes are known as branch/parent nodes. The abstract class named Parent of the package javafx.scene is the base class of all the parent nodes, and those parent nodes will be of the following types −
Group − A group node is a collective node that contains a list of children nodes. Whenever the group node is rendered, all its child nodes are rendered in order. Any transformation, effect state applied on the group will be applied to all the child nodes.
Region − It is the base class of all the JavaFX Node based UI Controls, such as Chart, Pane and Control.
WebView − This node manages the web engine and displays its contents.
Leaf Node − The node without child nodes is known as the leaf node. For example, Rectangle, Ellipse, Box, ImageView, MediaView are examples of leaf nodes.
It is mandatory to pass the root node to the scene graph. If the Group is passed as root, all the nodes will be clipped to the scene and any alteration in the size of the scene will not affect the layout of the scene.
Creating a JavaFX Application
To create a JavaFX application, you need to instantiate the Application class and implement its abstract method start(). In this method, we will write the code for the JavaFX Application.
Application Class
The Application class of the package javafx.application is the entry point of the application in JavaFX. To create a JavaFX application, you need to inherit this class and implement its abstract method start(). In this method, you need to write the entire code for the JavaFX graphics
In the main method, you have to launch the application using the launch() method. This method internally calls the start() method of the Application class as shown in the following program.
Code for JavaFX application.
(Stage, scene, scene graph)
*/}publicstaticvoidmain(String args[]){launch(args);}}</code></pre>
Within the start() method, in order to create a typical JavaFX application, you need to follow the steps given below −
Prepare a scene graph with the required nodes.
Prepare a Scene with the required dimensions and add the scene graph (root node of the scene graph) to it.
Prepare a stage and add the scene to the stage and display the contents of the stage.
Preparing the Scene Graph
As per your application, you need to prepare a scene graph with required nodes. Since the root node is the first node, you need to create a root node. As a root node, you can choose from the Group, Region or WebView.
Group − A Group node is represented by the class named Group which belongs to the package javafx.scene, you can create a Group node by instantiating this class as shown below.
Group root =newGroup();
The getChildren() method of the Group class gives you an object of the ObservableList class which holds the nodes. We can retrieve this object and add nodes to it as shown below.
//Retrieving the observable list object ObservableList list = root.getChildren();//Setting the text object as a node
list.add(NodeObject);
We can also add Node objects to the group, just by passing them to the Group class and to its constructor at the time of instantiation, as shown below.
Group root =newGroup(NodeObject);
Region − It is the Base class of all the JavaFX Node-based UI Controls, such as −
Chart − This class is the base class of all the charts and it belongs to the package javafx.scene.chart.This class has two sub classes, which are − PieChart and XYChart. These two in turn have subclasses such as AreaChart, BarChart, BubbleChart, etc. used to draw different types of XY-Plane Charts in JavaFX.You can use these classes to embed charts in your application.
Pane − A Pane is the base class of all the layout panes such as AnchorPane, BorderPane, DialogPane, etc. This class belong to a package that is called as − javafx.scene.layout.You can use these classes to insert predefined layouts in your application.
Control − It is the base class of the User Interface controls such as Accordion, ButtonBar, ChoiceBox, ComboBoxBase, HTMLEditor, etc. This class belongs to the package javafx.scene.control.You can use these classes to insert various UI elements in your application.
In a Group, you can instantiate any of the above-mentioned classes and use them as root nodes, as shown in the following program.
Example
//Creating a Stack Pane StackPane pane =newStackPane();//Adding text area to the pane ObservableList list = pane.getChildren();
list.add(NodeObject);
WebView − This node manages the web engine and displays its contents.
Following is a diagram representing the node class hierarchy of JavaFX.
Preparing the Scene
A JavaFX scene is represented by the Scene class of the package javafx.scene. You can create a Scene by instantiating this class as shown in the following code block.
While instantiating, it is mandatory to pass the root object to the constructor of the scene class.
Scene scene =newScene(root);
You can also pass two parameters of double type representing the height and width of the scene as shown below.
Scene scene =newScene(root,600,300);
Preparing the Stage
This is the container of any JavaFX application and it provides a window for the application. It is represented by the Stage class of the package javafx.stage. An object of this class is passed as a parameter of the start() method of the Application class.
Using this object, you can perform various operations on the stage. Primarily you can perform the following −
Set the title for the stage using the method setTitle().
Attach the scene object to the stage using the setScene() method.
Display the contents of the scene using the show() method as shown below.
//Setting the title to Stage.
primaryStage.setTitle("Sample application");//Setting the scene to Stage
primaryStage.setScene(scene);//Displaying the stage
primaryStage.show();
Learn Java in-depth with real-world projects through our Java certification course. Enroll and become a certified expert to boost your career.
Lifecycle of JavaFX Application
The JavaFX Application class has three life cycle methods, which are −
start() − The entry point method where the JavaFX graphics code is to be written.
stop() − An empty method which can be overridden, here you can write the logic to stop the application.
init() − An empty method which can be overridden, but you cannot create stage or scene in this method.
In addition to these, it provides a static method named launch() to launch JavaFX application.
Since the launch() method is static, you need to call it from a static context (main generally). Whenever a JavaFX application is launched, the following actions will be carried out (in the same order).
An instance of the application class is created.
Init() method is called.
The start() method is called.
The launcher waits for the application to finish and calls the stop() method.
Terminating the JavaFX Application
When the last window of the application is closed, the JavaFX application is terminated implicitly. You can turn this behavior off by passing the Boolean value “False” to the static method setImplicitExit() (should be called from a static context).
You can terminate a JavaFX application explicitly using the methods Platform.exit() or System.exit(int).
Example - Creating an Empty Window
This section teaches you how to create a JavaFX sample application which displays an empty window. Following are the steps −
Step 1: Creating a Class
Create a Java class and inherit the Application class of the package javafx.application and implement the start() method of this class as follows.
In the start() method creates a group object by instantiating the class named Group, which belongs to the package javafx.scene, as follows.
Group root =newGroup();
Step 3: Creating a Scene Object
Create a Scene by instantiating the class named Scene which belongs to the package javafx.scene. To this class, pass the Group object (root), created in the previous step.
In addition to the root object, you can also pass two double parameters representing height and width of the screen along with the object of the Group class as follows.
Scene scene =newScene(root,600,300);
Step 4: Setting the Title of the Stage
You can set the title to the stage using the setTitle() method of the Stage class. The primaryStage is a Stage object which is passed to the start method of the scene class, as a parameter.
Using the primaryStage object, set the title of the scene as Sample Application as shown below.
primaryStage.setTitle("Sample Application");
Step 5: Adding Scene to the Stage
You can add a Scene object to the stage using the method setScene() of the class named Stage. Add the Scene object prepared in the previous steps using this method as shown below.
primaryStage.setScene(scene);
Step 6: Displaying the Contents of the Stage
Display the contents of the scene using the method named show() of the Stage class as follows.
primaryStage.show();
Step 7: Launching the Application
Launch the JavaFX application by calling the static method launch() of the Application class from the main method as follows.
The following program generates an empty JavaFX window. Save this code in a file with the name JavafxSample.java
Example
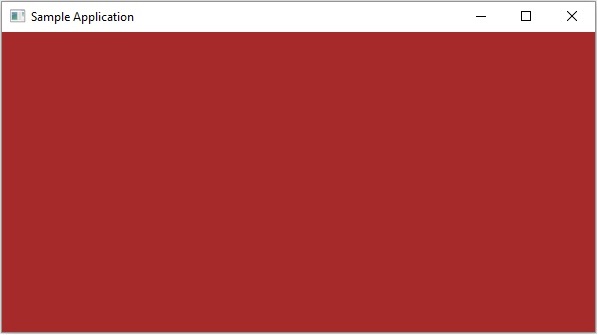
importjavafx.application.Application;importjavafx.scene.Group;importjavafx.scene.Scene;importjavafx.scene.paint.Color;importjavafx.stage.Stage;publicclassJavafxSampleextendsApplication{@Overridepublicvoidstart(Stage primaryStage)throwsException{//creating a Group object Group group =newGroup();//Creating a Scene by passing the group object, height and width Scene scene =newScene(group ,600,300);//setting color to the scene
scene.setFill(Color.BROWN);//Setting the title to Stage.
primaryStage.setTitle("Sample Application");//Adding the scene to Stage
primaryStage.setScene(scene);//Displaying the contents of the stage
primaryStage.show();}publicstaticvoidmain(String args[]){launch(args);}}</code></pre>
Compile and execute the saved java file from the command prompt using the following commands.
On executing, the above program generates a JavaFX window as shown below.
Example - Drawing a Straight Line
In the previous example, we have seen how to create an empty stage, now in this example let us try to draw a straight line using the JavaFX library.
This code to draw a line also follows the same steps mentioned in the previous example. However, the difference occurs in the start() method, where we create a group object by instantiating the class named Group, which belongs to the package javafx.scene. Pass the Line (node) object, that is created using setter methods, as a parameter to the constructor of the Group class, in order to add it to the group.
Save this code in a file with the name DrawingLine.java.
importjavafx.application.Application;importjavafx.scene.Group;importjavafx.scene.Scene;importjavafx.scene.shape.Line;importjavafx.stage.Stage;publicclassDrawingLineextendsApplication{@Overridepublicvoidstart(Stage stage){//Creating a line object Line line =newLine();//Setting the properties to a line
line.setStartX(100.0);
line.setStartY(150.0);
line.setEndX(500.0);
line.setEndY(150.0);//Creating a Group Group root =newGroup(line);//Creating a Scene Scene scene =newScene(root,600,300);//Setting title to the scene
stage.setTitle("Sample application");//Adding the scene to the stage
stage.setScene(scene);//Displaying the contents of a scene
stage.show();}publicstaticvoidmain(String args[]){launch(args);}}</code></pre>
Compile and execute the saved java file from the command prompt using the following commands.
On executing, the above program generates a JavaFX window displaying a straight line as shown below.
Example - Displaying Text
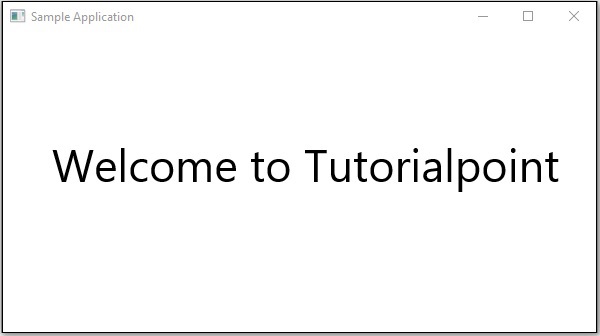
We can also embed text in JavaFX scene. This example shows how to embed text in JavaFX. Save this code in a file with name DisplayingText.java.
importjavafx.application.Application;importjavafx.collections.ObservableList;importjavafx.scene.Group;importjavafx.scene.Scene;importjavafx.stage.Stage;importjavafx.scene.text.Font;importjavafx.scene.text.Text;publicclassDisplayingTextextendsApplication{@Overridepublicvoidstart(Stage stage){//Creating a Text object Text text =newText();//Setting font to the text
text.setFont(newFont(45));//setting the position of the text
text.setX(50);
text.setY(150);//Setting the text to be added.
text.setText("Welcome to Tutorialspoint");//Creating a Group object Group root =newGroup();//Retrieving the observable list object ObservableList list = root.getChildren();//Setting the text object as a node to the group object
list.add(text);//Creating a scene object Scene scene =newScene(root,600,300);//Setting title to the Stage
stage.setTitle("Sample Application");//Adding scene to the stage
stage.setScene(scene);//Displaying the contents of the stage
stage.show();}publicstaticvoidmain(String args[]){launch(args);}}</code></pre>
Compile and execute the saved java file from the command prompt using the following commands.
JavaFX is a software platform that allows developers to build various content-rich client applications, which operate consistently across several platforms. It is a complete API with a rich set of classes and interfaces to build GUI applications with rich graphics. Some of the important packages of this API are −
javafx.animation − Contains classes to add transition based animations such as fill, fade, rotate, scale and translation, to the JavaFX nodes.
javafx.application − Contains a set of classes responsible for the JavaFX application life cycle.
javafx.css − Contains classes to add CSS–like styling to JavaFX GUI applications.
javafx.event − Contains classes and interfaces to deliver and handle JavaFX events.
javafx.geometry − Contains classes to define 2D objects and perform operations on them.
javafx.stage − This package holds the top level container classes for JavaFX application.
javafx.scene − This package provides classes and interfaces to support the scene graph. In addition, it also provides sub-packages such as canvas, chart, control, effect, image, input, layout, media, paint, shape, text, transform, web, etc. There are several components that support this rich API of JavaFX.
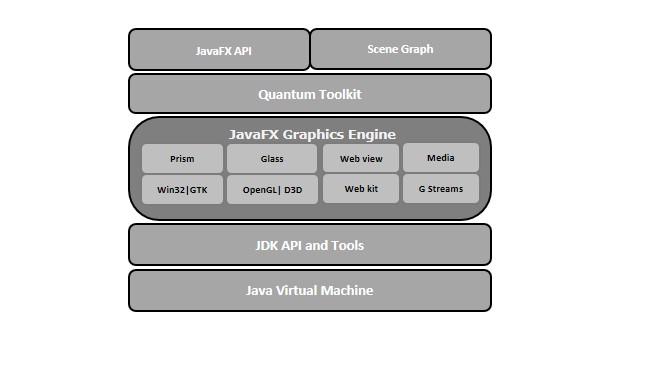
In this chapter, let us learn the architectural design of this JavaFX platform and how its components are interconnected.
JavaFX Architecture
The following illustration shows the architecture of JavaFX API. Here you can see the components that support JavaFX API.
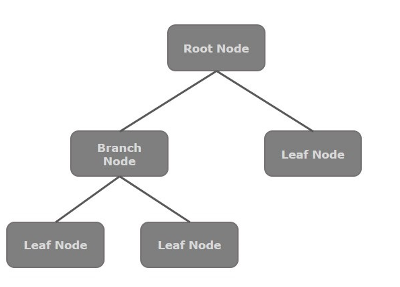
Scene Graph
In JavaFX, the GUI Applications were coded using a Scene Graph. A Scene Graph is the starting point of the construction of the GUI Application. It holds the (GUI) application primitives that are termed as nodes.
A node is a visual/graphical object and it may include −
Geometrical (Graphical) objects − (2D and 3D) such as circle, rectangle, polygon, etc.
UI controls − such as Button, Checkbox, Choice box, Text Area, etc.
Containers − (layout panes) such as Border Pane, Grid Pane, Flow Pane, etc.
Media elements − such as audio, video and image objects.
In general, a collection of nodes makes a scene graph. All these nodes are arranged in a hierarchical order as shown below.
Each node in the scene graph has a single parent, and the node which does not contain any parents is known as the root node.
In the same way, every node has one or more children, and the node without children is termed as leaf node; a node with children is termed as a branch node.
A node instance can be added to a scene graph only once. The nodes of a scene graph can have Effects, Opacity, Transforms, Event Handlers, Event Handlers, Application Specific States.
Learn Java in-depth with real-world projects through our Java certification course. Enroll and become a certified expert to boost your career.
Prism
Prism is a high performance hardware–accelerated graphical pipeline that is used to render the graphics in JavaFX. It can render both 2-D and 3-D graphics.
To render graphics, a Prism uses −
DirectX 9 on Windows XP and Vista.
DirectX 11 on Windows 7.
OpenGL on Mac and Linux, Embedded Systems.
In case the hardware support for graphics on the system is not sufficient, then Prism uses the software render path to process the graphics.
When used with a supported Graphic Card or GPU, it offers smoother graphics. Just in case the system does not support a graphic card, then Prism defaults to the software rendering stack (either of the above two).
GWT (Glass Windowing Toolkit)
As the name suggests, GWT provides services to manage Windows, Timers, Surfaces and Event Queues. GWT connects the JavaFX Platform to the Native Operating System.
Quantum Toolkit
It is an abstraction over the low-level components of Prism, Glass, Media Engine, and Web Engine. It ties Prism and GWT together and makes them available to JavaFX.
WebView
Using JavaFX, you can also embed HTML content in to a scene graph. WebView is the component of JavaFX which is used to process this content. It uses a technology called Web Kit, which is an internal open-source web browser engine. This component supports different web technologies like HTML5, CSS, JavaScript, DOM and SVG.
Using WebView, you can −
Render HTML content from local or remote URL.
Support history and provide Back and Forward navigation.
Reload the content.
Apply effects to the web component.
Edit the HTML content.
Execute JavaScript commands.
Handle events.
In general, using WebView, you can control web content from Java.
Media Engine
The JavaFX media engine is based on an open-source engine known as a Streamer. This media engine supports the playback of video and audio content.
The JavaFX media engine provides support for audio for the following file formats −
Audio
MP3WAVAIFF
Video
FLV
The package javafx.scene.media contains the classes and interfaces to provide media functionality in JavaFX. It is provided in the form of three components, which are −
Microsoft Visual Studio Code also allows you to create a JavaFX application. You do not need any extra plug-ins or installations to create a non-modular project. Instead we just update the run configurations, like Netbeans and Eclipse IDE.
In this chapter, we will install the latest version of Microsoft Visual Studio Code to work with the latest version of JavaFX SDK.
Installing Visual Studio Code
Like NetBeans, Microsoft VSCode also provides inbuilt support for JavaFX. Thus, you can create any application using JavaFX without any additional plug-ins. To set up the VSCode environment, you need to follow the steps given below.
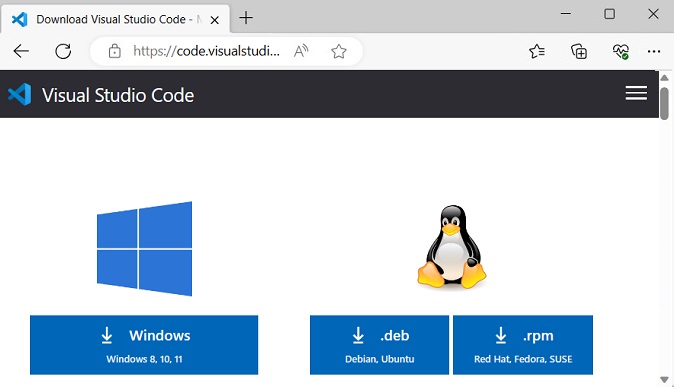
Step 1 − Go to the Visual Studio Code website and click the appropriate download link given.
A file named VSCodeUserSetup-x64-1.73.1.exe will start downloading. Once the download is done, run this file to start the installation.
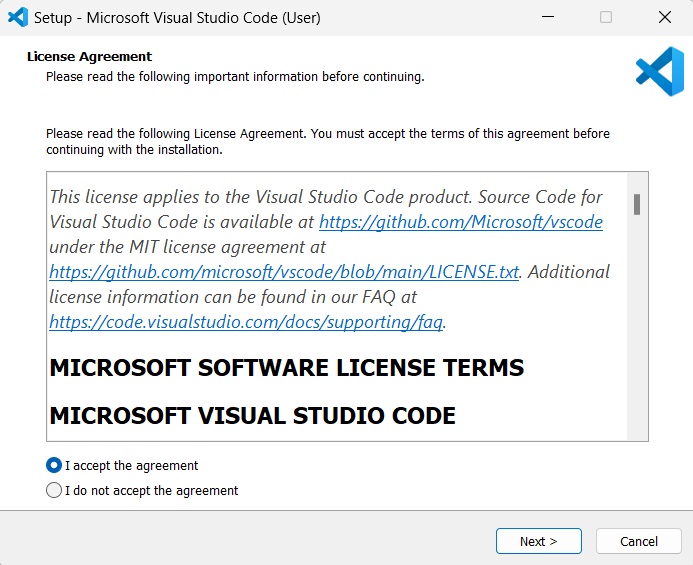
Step 2 − Then, a new setup window pops up with the license agreement. You can read the agreement and click “I agree” in order to start the installation.
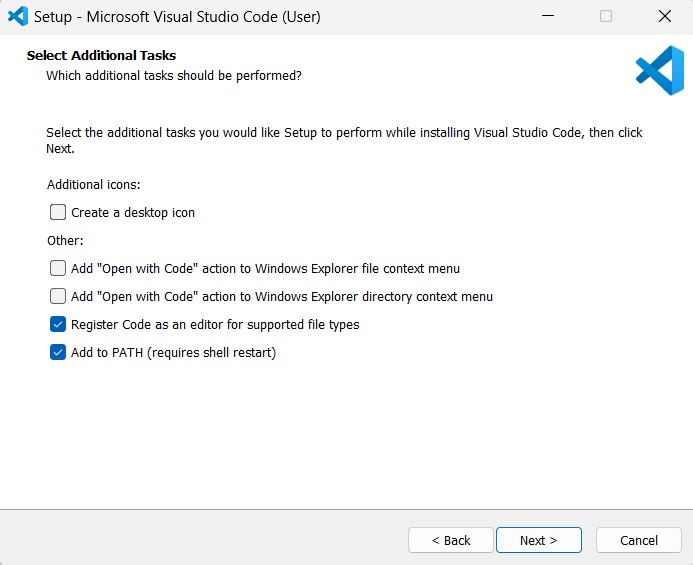
Step 3 − Now, you are asked to perform few additional tasks, like creating a desktop shortcut for VSCode, etc. Check the boxes that you want to perform and click ‘Next’.
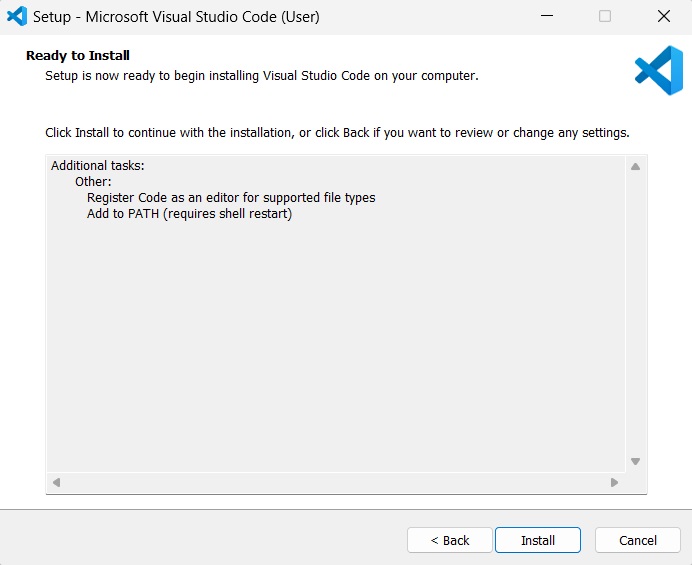
Step 4 − Your Visual Studio Code is now ready to be installed. Click ‘install’ to begin the installation.
Step 5 − This step shows the process of installation. This might take a while to finish.
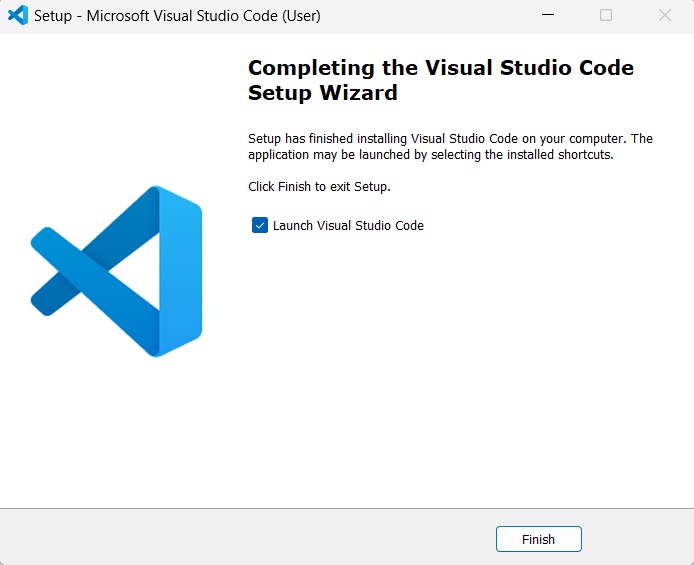
Step 6 − Once your installation is finished, you can click on “Finish” as shown in the image below.
The app is launched immediately after you click ‘finish’. If you don’t want to launch it just yet, you can uncheck the Launch check box in this step.
Creating JavaFX Project in Visual Studio Code
Once your Visual Studio Code is installed, you can create a JavaFX application by following the steps below.
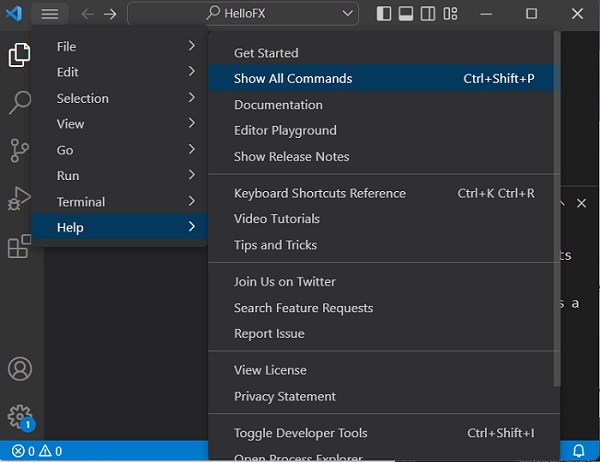
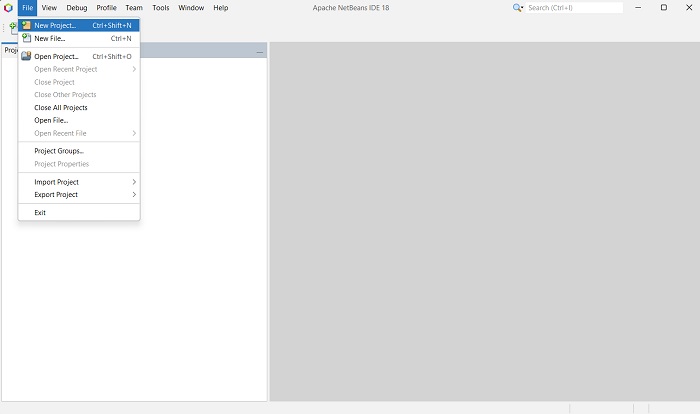
Step 1 − Go to “Help -> Show All Commands”
Step 2 − Then, find “Java: Create Java Project…” command and run it.
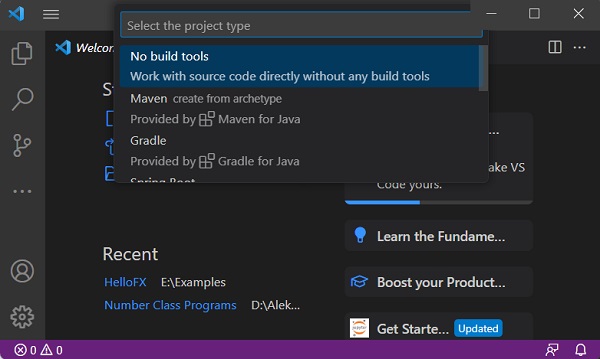
Step 3 − In this step, click on the “No build tools” command as shown in the image below, because we are not trying to use any build tools like Maven and Gradle etc.
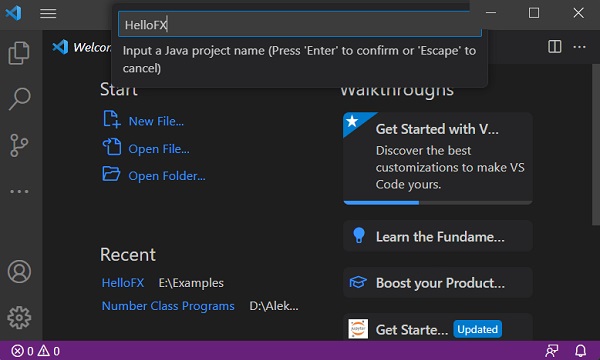
Step 4 − Now, input a Java project folder name to store the codes for JavaFX application.
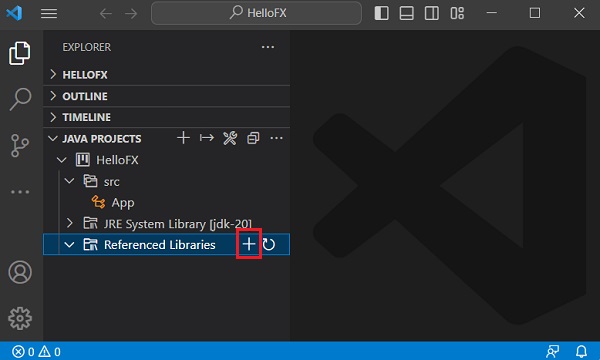
Step 5 − You must add JavaFX dependencies to your project. This is done by simply importing all the JAR files within the “lib” folder of JavaFX SDK, by clicking on the ‘+’ symbol beside Referenced Libraries.
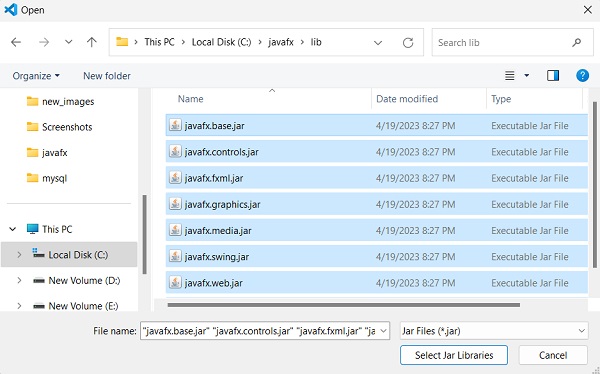
Step 6 − Select all the .jar files present in the “lib” directory of JavaFX SDK.
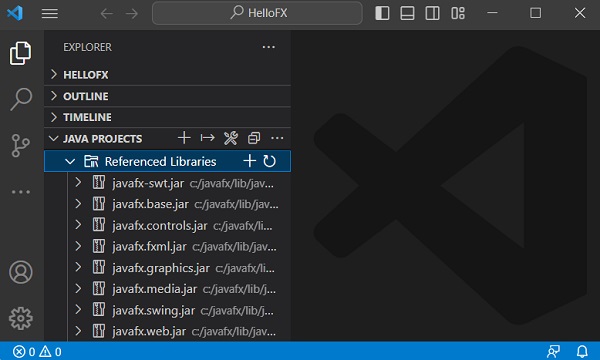
Step 7 − As you can see, all the .jar files are now imported to Referenced Libraries.
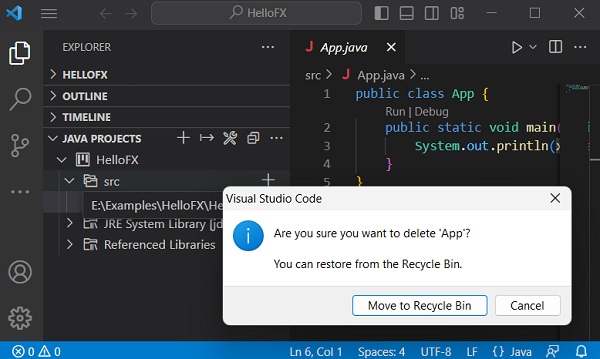
Step 8 − Now, delete the pre-existing App.java file in the src library to avoid runtime errors.
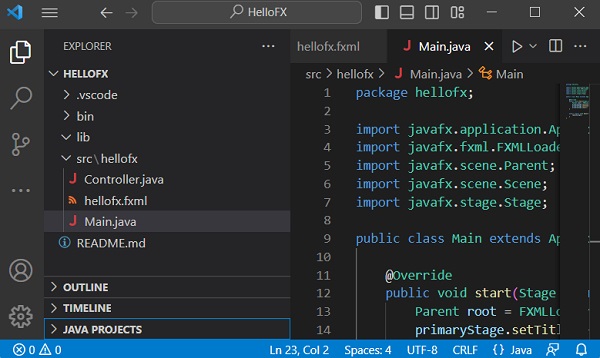
Step 9 − Create the files containing relevant code to execute under the src library. As a sample, we are creating a “hellofx” package and created “Main.java”, “hellofx.fxml” and “Controller.java” files within it. Look in the screenshot below.
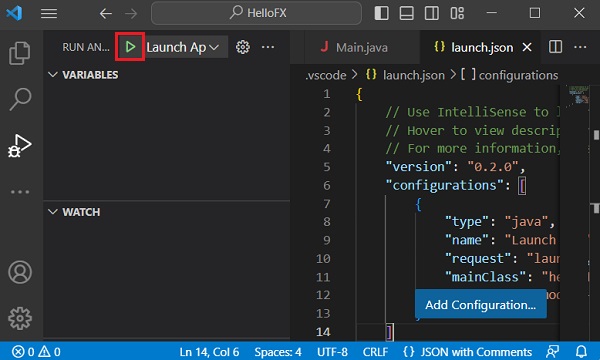
Step 10 − In the “Run and Debug” viewlet, click on the “create a launch.json file”.
Step 11 − Once the launch.json file is created, update the “<Java_lib_path>” to the “lib” path of JavaFX SDK in your system and click the green button highlighted in the image below. This will run your JavaFX application.
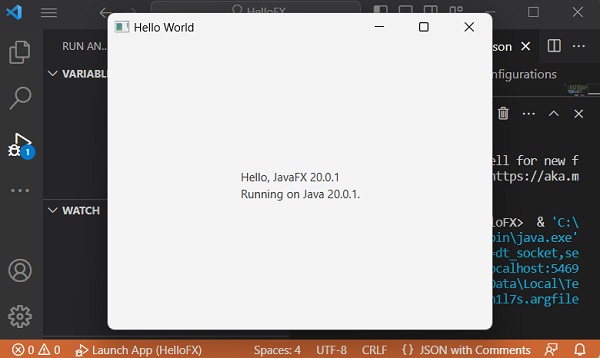
Step 12 − A new window pops up displaying the output of your sample JavaFX application.
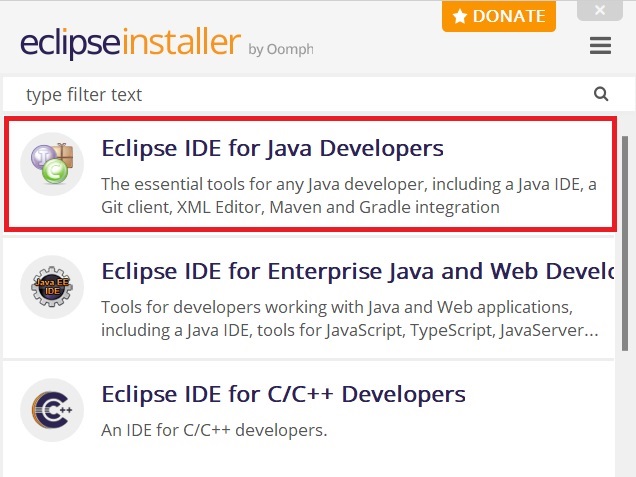
Eclipse is an integrated development environment (IDE) used in Java programming. It contains a workspace and an extensible plug-in system in order to customize the environment. You can also use JavaFX with Eclipse.
This chapter explains the steps to create a JavaFX application in Eclipse IDE. We will be using the latest versions of both JavaFX SDK and Eclipse.
Installing JavaFX in Eclipse
A plug-in named e(fx)clipse is available in Eclipse IDE to support JavaFX. You can use the following steps to set JavaFX in Eclipse. First of all, make sure that you have Eclipse in your system. If not, download and install Eclipse in your system.
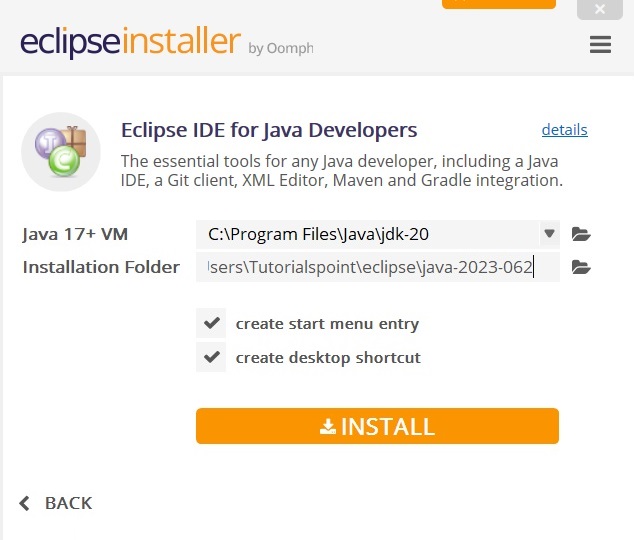
To install Eclipse IDE, follow the given steps below −
Step 1 − Visit the eclipse.org website.
Click the download button for the file named eclipse-inst-jre-win64.exe to be downloaded.
Run the file downloaded for the eclipse installation to begin.
Step 2 − Select the highlighted option in the image below for the installation to begin.
Step 3 − Click on the install button to install the chosen Eclipse IDE version.
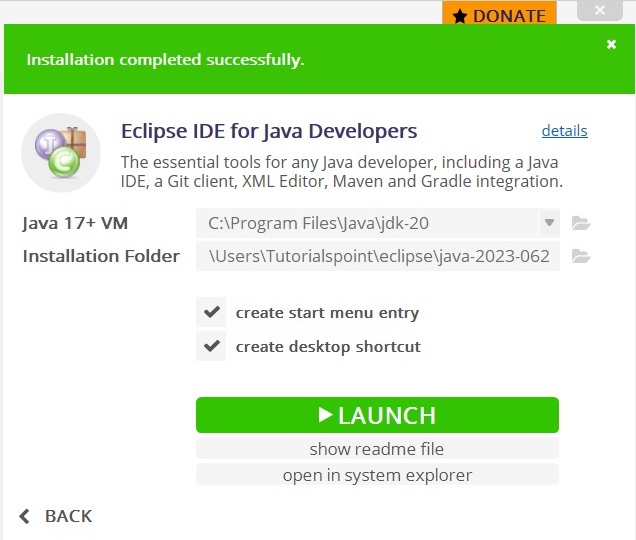
Step 4 − This step starts the installation of Eclipse IDE and it may take a while.
Step 5 − Lastly, launch the application to see the welcome page.
Installing JavaFX Plug-In
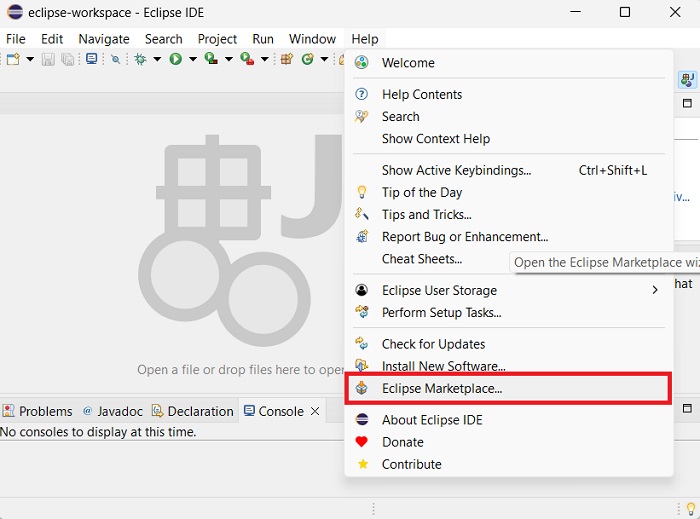
Once Eclipse is installed, follow the steps given below to install e(fx)clipse plug-in in your system.
Step 1 − Open the Help menu in Eclipse and select Eclipse Marketplace option as shown below.
Upon clicking, it will display the new window containing all the plug-ins, as shown in the following screenshot.
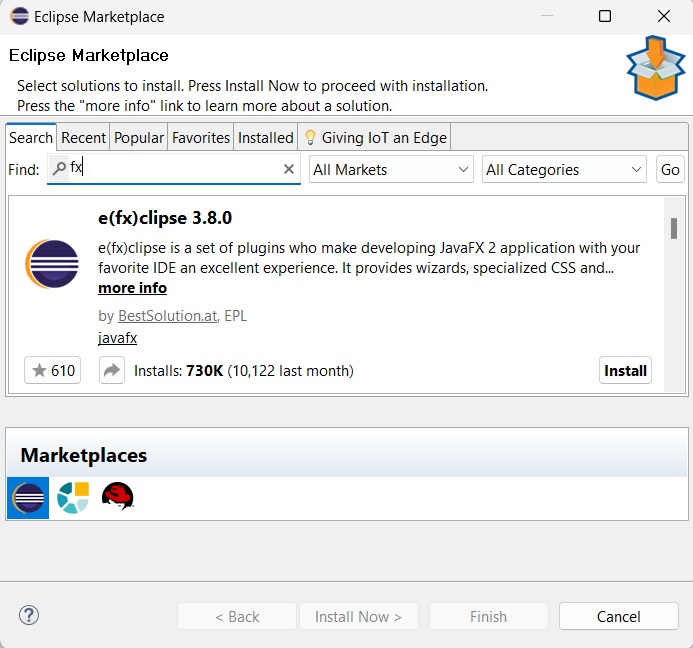
Step 2 − In the Find text box, search for e(fx)clipse plug-in using the ‘fx’ keyword.
Step 3 − Once retrieved, click the Install button to install JavaFX plug-in in Eclipse.
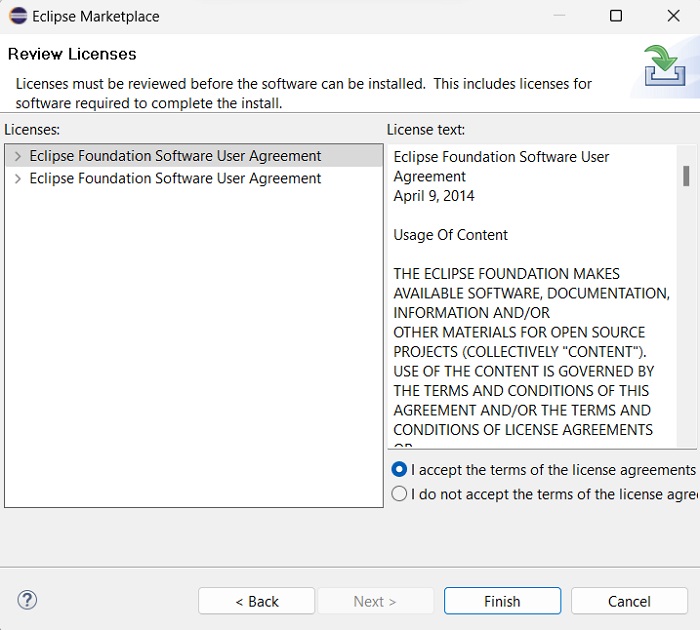
Step 4 − In the next window, you will see a license agreement for JavaFX that you have to agree to. Select “I agree” and click “finish”.
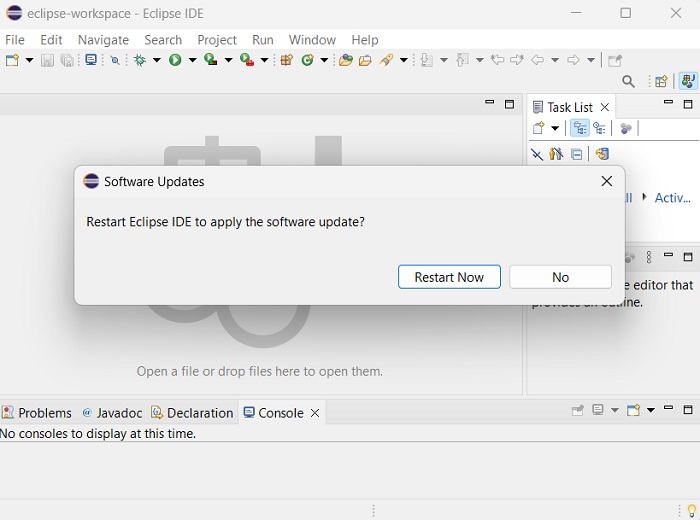
Step 5 − Once the plug-in is installed, the eclipse will need to be restarted. So, click the restart option as shown below.
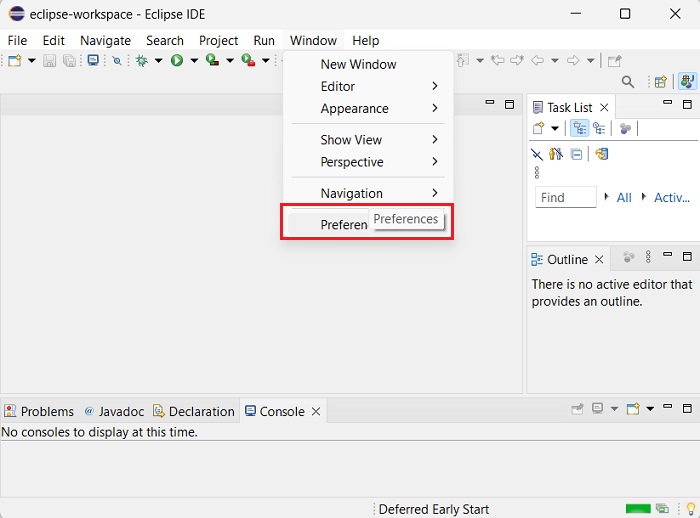
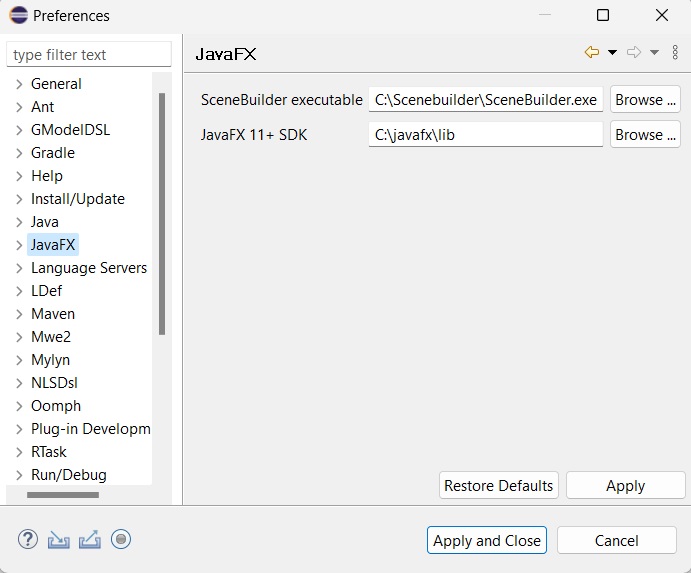
Step 6 − You will have to set the preferences by pointing to the installation directory of JavaFX. For that, in the “Window” menu, click on “Preferences” as shown below.
Step 7 − Click on “JavaFX” option and point to the “lib” directory of JavaFX SDK as shown in the screenshot. If you have “Scenebuilder” installed, you can point to the installation directory of Scenebuilder as well, like shown.
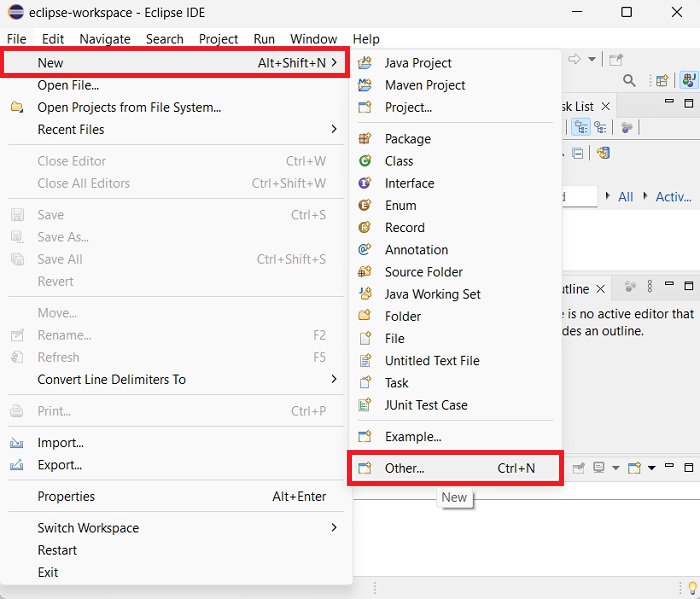
Step 8 − Now that JavaFX preferences are set, you are ready to create a new JavaFX project. Go to “File -> New -> Other”.
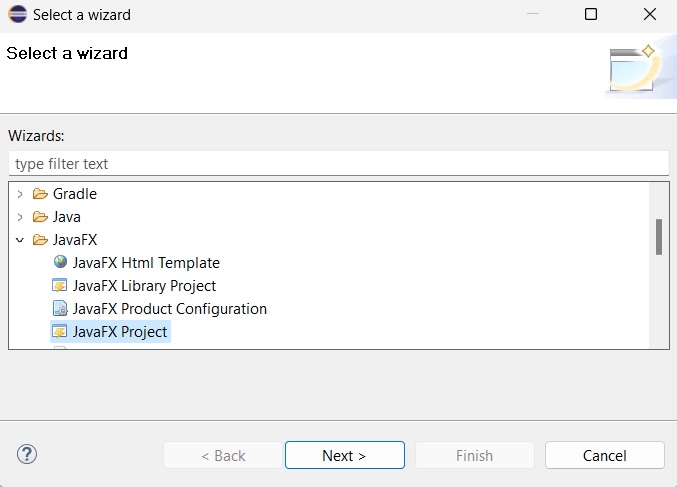
Step 9 − Then, you will get a window where you can see a list of wizards provided by Eclipse to create a project. Expand the JavaFX wizard, select JavaFX Project and click the Next button as shown in the following screenshot.
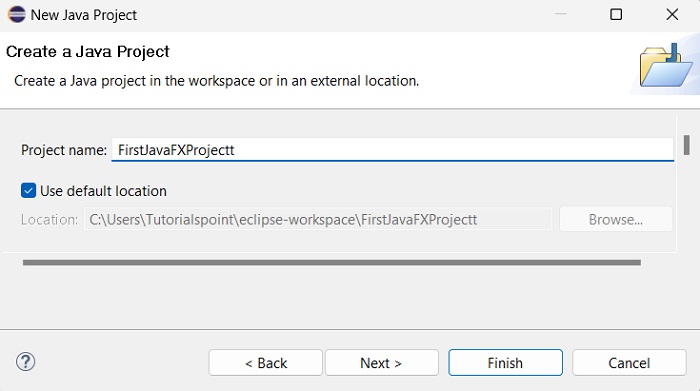
Step 10 − On clicking Next, a New Project Wizard opens. Here, you can type the required project name and click Finish.
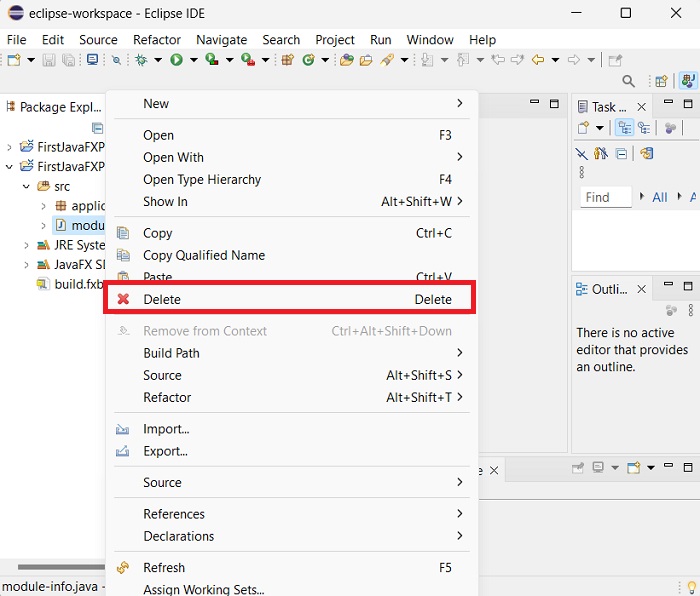
Step 11 − On clicking Finish, an application is created with the given name (FirstJavaFXProjectt). A module_info.java file is automatically created as well, which needs to be deleted in order to avoid errors while running our project.
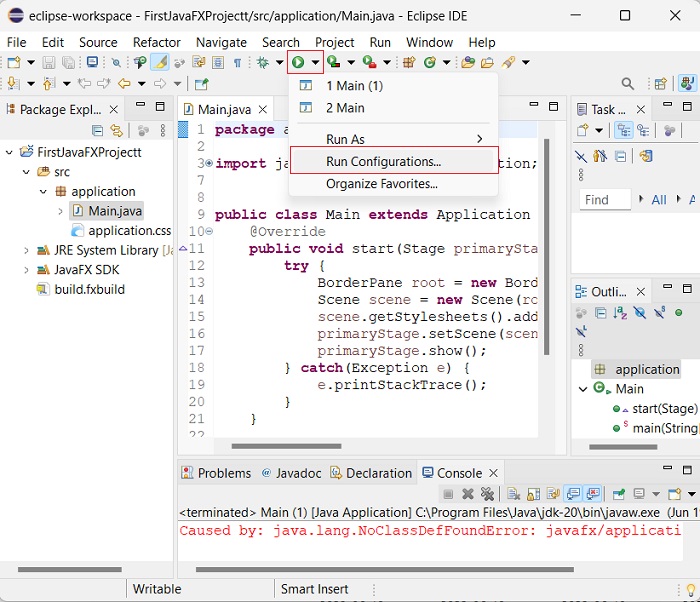
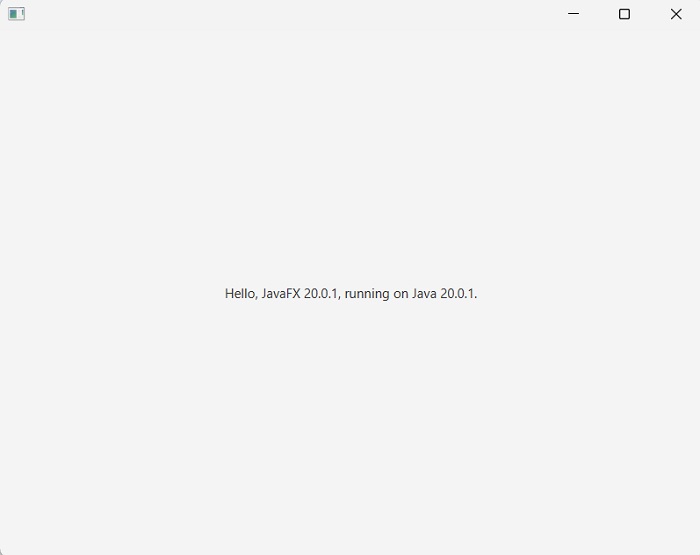
Step 12 − In the sub-package named application, a program with the name Main.java is created as shown below. Before executing this file, we must add VM arguments. For that, go to the “Run” symbol and click “Run configurations” as shown in the screenshot below.
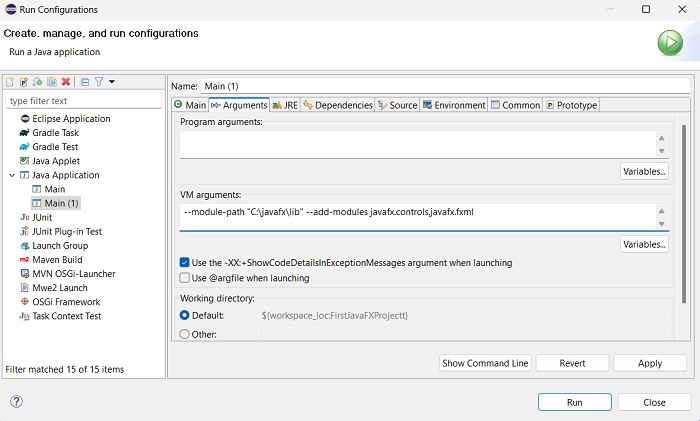
Step 13 − In the “Arguments” tab, add the following VM arguments −
Apache Netbeans is a free and open source integrated development environment (IDE) to develop applications using Java. And it allows you to create applications using JavaFX.
This chapter demonstrates how to create a JavaFX application in Netbeans. We will be installing the latest versions of both JavaFX SDK and Apache Netbeans.
Setting NetBeans Environment of JavaFX
NetBeans18 provides inbuilt support for JavaFX. On installing this, you can create a JavaFX application without any additional plugins or JAR files. To set up the NetBeans environment, you will need to follow the steps that are given below.
Step 1 − Visit the NetBeans website NetBeans website and click the Download button in order to download the NetBeans software.
Step 2 − On clicking this button, a file named Apache-NetBeans-18-bin-windows-x64.exe will be downloaded onto your system. Run this file in order to install it. On running this file, a NetBeans installer will start as shown in the following screenshot.
After completion of the configuration, you will see the Welcome Page of the installer.
Step 3 − Click the Next button and proceed with the installation.
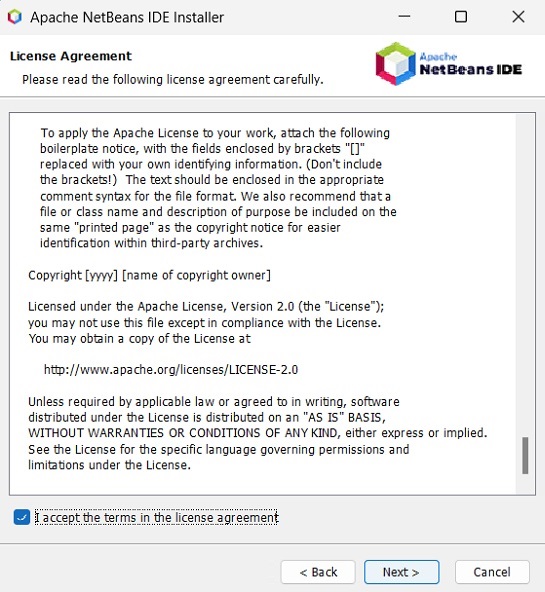
Step 4 − The next window holds the NETBEANS IDE 18 license agreement. Read it carefully and accept the agreement by checking the checkbox at “I accept the terms in the license agreement” and then click the Next button.
Step 5 − Choose the destination directory where you need the Netbeans 18 to be installed. Furthermore, you can also browse through the directory where Java Development Kit is installed in your system and click on the Next button.
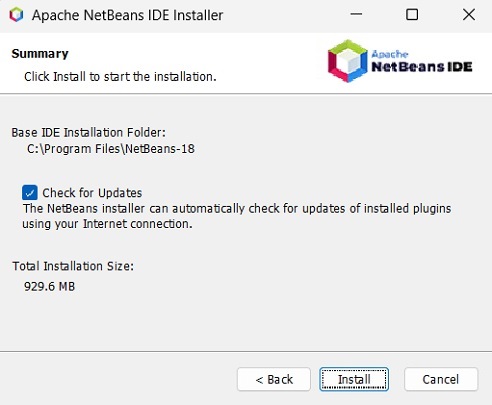
Step 6 − Check the Check for Updates box for automatic updates and click the Install button to start the installation.
Step 7 − The wizard will then start preparing the installation data.
Step 8 − This step starts the installation of NetBeans IDE 18 and it may take a while.
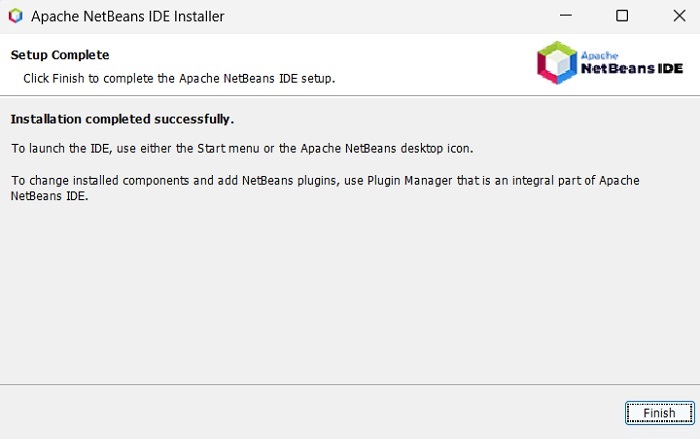
Step 9 − Once the process is complete, click the Finish button to finish the installation.
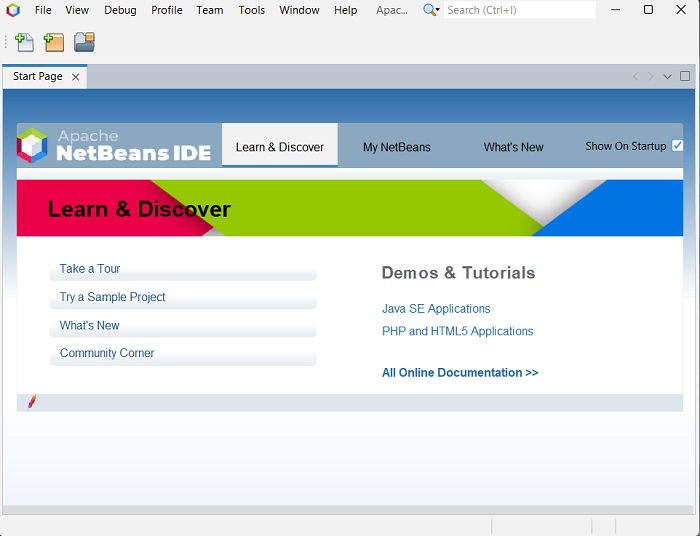
Step 10 − Once you launch the NetBeans IDE, you will see the start page as shown in the following screenshot.
Step 11 − In the file menu, select New Project… to open the New project wizard as shown in the following screenshot.
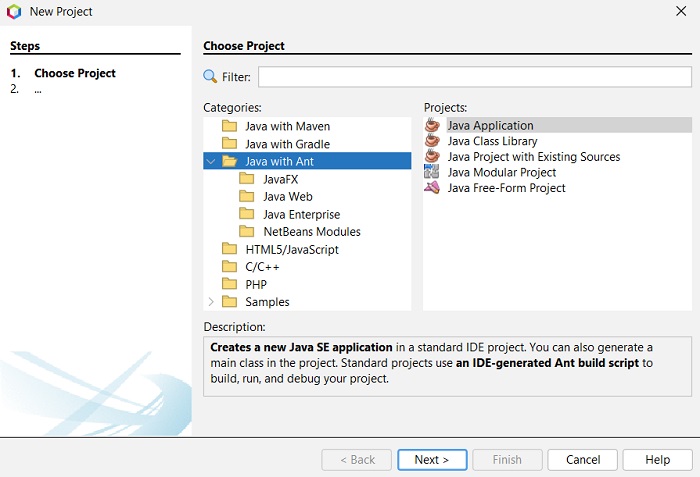
Step 12 − In the New Project wizard, select Java with Ant and click on Next. It starts creating a new Java Application for you.
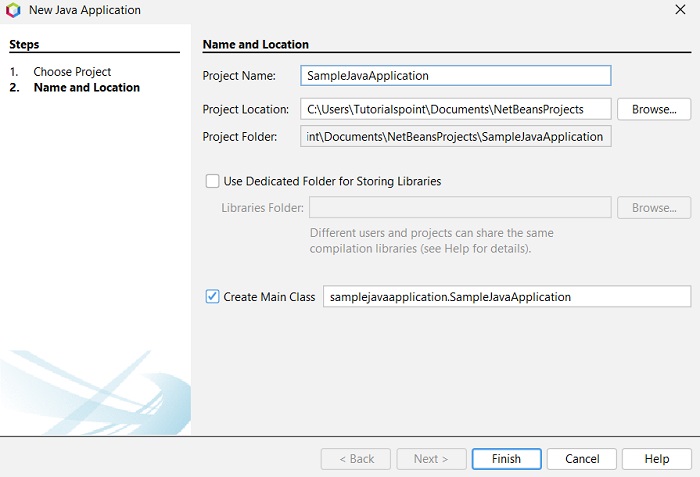
Step 13 − Select the name of the project and location of the project in the New Java Application window and then click Finish. It creates a sample application with the given name.
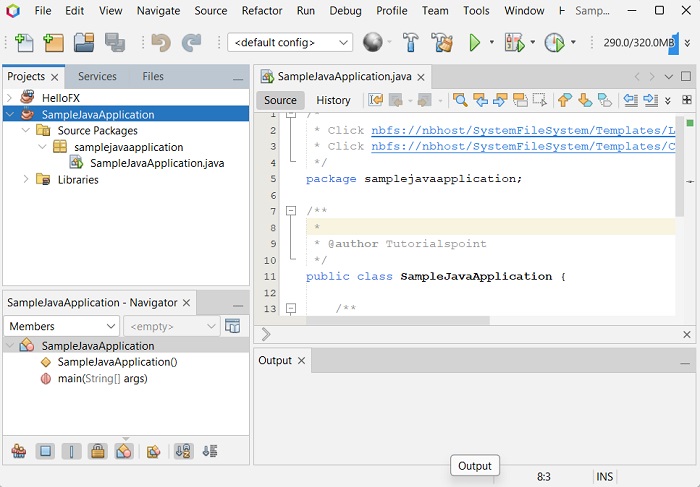
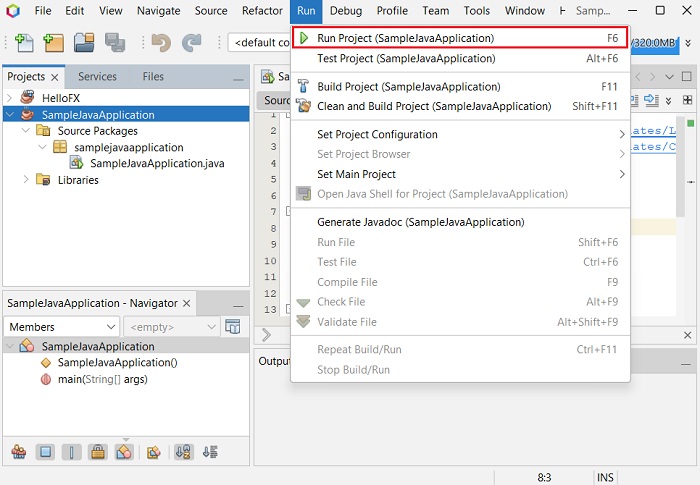
In this instance, an application with a name SampleJavaApplication is created. Within this application, the NetBeans IDE will generate a Java program with the name SampleJavaApplication.java. As shown in the following screenshot, this program will be created inside NetBeans Source Packages → samplejavaapplication.
Step 14 − Right-click on the file and select Run Project to run this code as shown in the following screenshot.
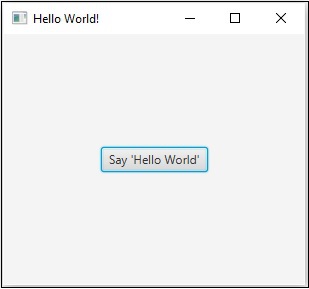
This automatically created program contains the code which generates a simple JavaFX window having a button with the label Say ‘Hello World’ in it. Every time you click on this button, the string Hello World will be displayed on the console as shown below.
From Java8 onwards, the JDK (Java Development Kit) includes JavaFX library in it. Therefore, to run JavaFX applications, you simply need to install Java8 or later version in your system.
The latest version of JDK, as of today, is 20.0.1. So, this tutorial will work with JavaFX versions supported by JDK20.
In addition to it, IDE’s like Eclipse and NetBeans provide support for JavaFX. This chapter teaches you how to set the environment to run JavaFX Applications locally.
Installing Java20
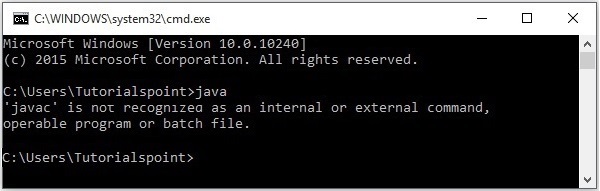
First of all, you will have to verify whether there is Java Installed in your system or not by opening the command prompt and typing the command “Java” in it.
If you haven’t installed Java in your system, the command prompt displays the message shown in the following screenshot.
You can install Java by following the steps given below.
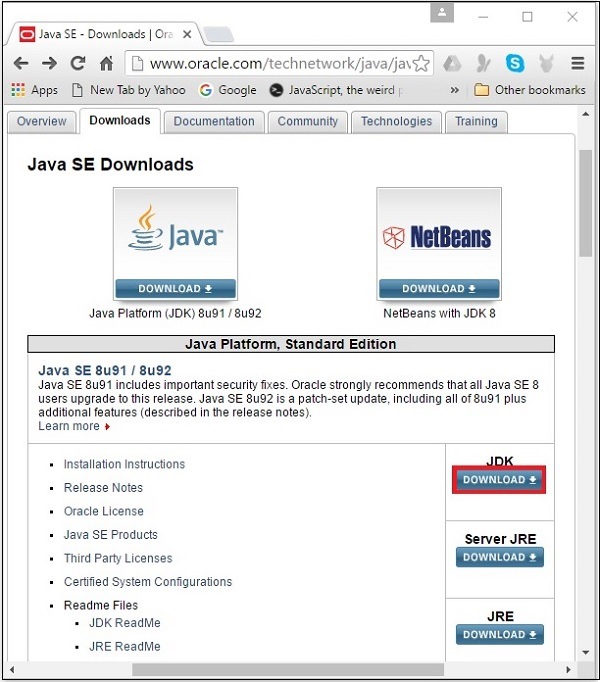
Step 1 − Visit the JavaSE Downloads Page, click on the JDK Download button as highlighted in the following screenshot
Step 2 − On clicking the highlighted link, the Java20 Development Kit suitable for Windows 64-bit Operating System will be downloaded onto your system.
Step 3 − Run the downloaded binary executable file to start the installation of JDK20.
Step 4 − Change the installation directory if needed, else keep the default ones and proceed further.
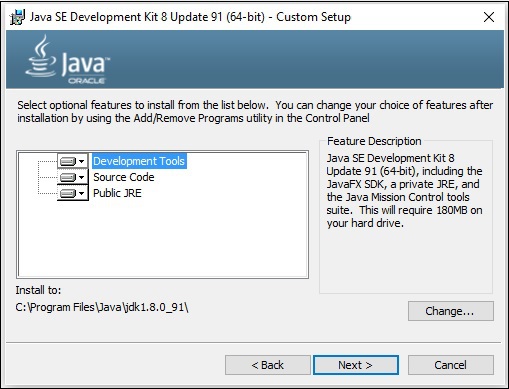
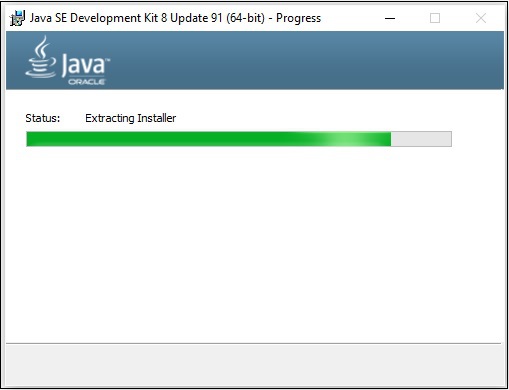
Step 5 − On selecting the destination folder and clicking Next, the JavaFX installation process starts displaying the progress bar.
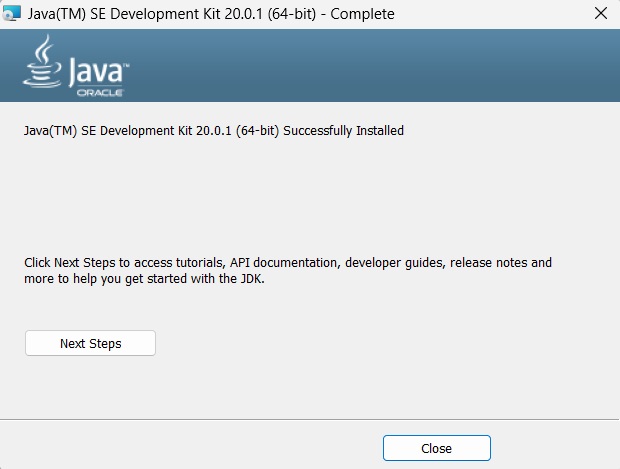
Step 6 − Finish the installation process by clicking the Close button as shown in the following screenshot.
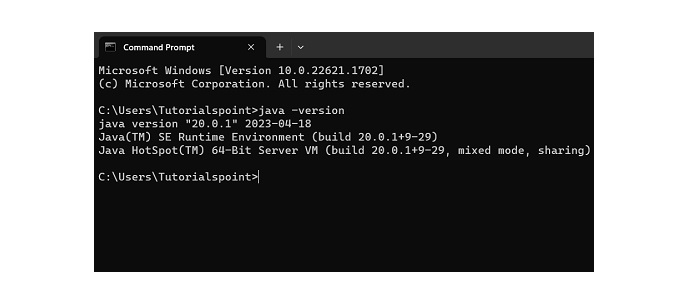
Step 7 − To verify if the installation is done properly, go to the command prompt and execute the ‘java -version’ command as shown below −
Setting up the Path for Windows
After installing Java, you need to set the path variables. Assume that you have installed Java in C:\Program Files\java\jdk-20 directory.
Now you can follow the steps that are given below −
Right-click on ‘My Computer/This PC’ and select ‘Properties’.
Then, select ‘Advanced System Settings’.
Click on the ‘Environment Variables’ button under the ‘Advanced’ tab.
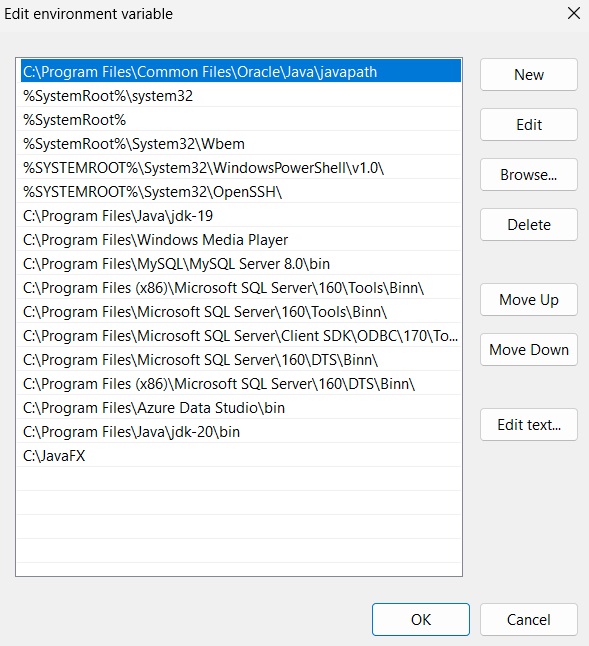
Now, alter the ‘Path’ variable so that it also contains the path to the Java executable. For Example, if the path is currently set to ‘C:\WINDOWS\SYSTEM32’, then change your path to read ‘C:\WINDOWS\SYSTEM32; C:\Program Files\java\jdk-20\bin’.
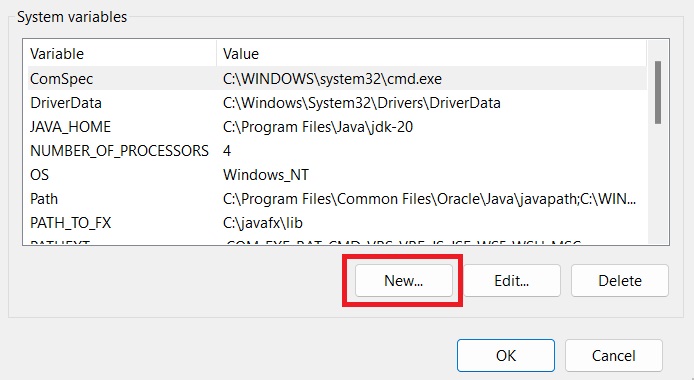
Also, create a new system variable by clicking ‘New’ under System variables as shown below.
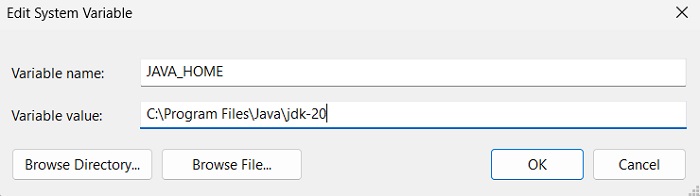
Name the new variable as “JAVA_HOME” and point it to the JDK installation directory.
Learn Java in-depth with real-world projects through our Java certification course. Enroll and become a certified expert to boost your career.
Installing JavaFX SDK
Now, you have to install the JavaFX SDK to access the command-line tools and technologies to develop application content.
In order to use the JavaFX SDK to run a program, follow the steps given below −
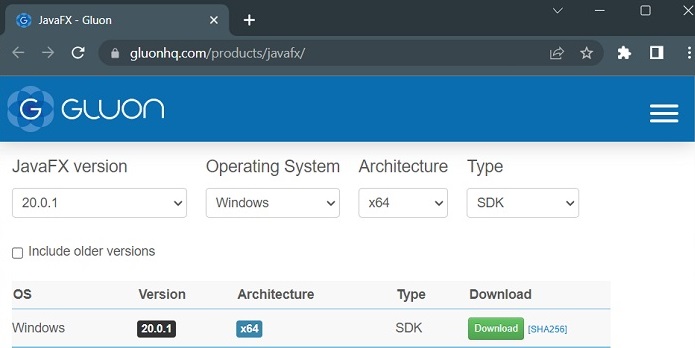
Step 1 − Download an appropriate JavaFX runtime for your operating system (here, we are downloading JavaFX 20) from the JavaFX – Gluon page.
Step 2 − A .zip folder will be downloaded containing tools required to develop content for applications. Unzip this folder to any desired location (say, “C:/JavaFX”).
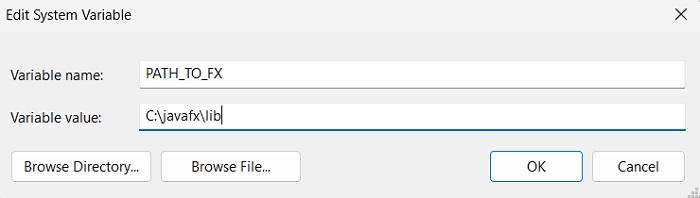
Step 3 − Now, right-click on ‘My Computer/This PC’ and select ‘Properties’. Then, select ‘Advanced System Settings’. Click on the ‘Environment Variables’ button under the ‘Advanced’ tab. Create a new environment variable and name it “PATH_TO_FX” pointing to the lib directory of the JavaFX runtime.
This will now allow you to compile and run JavaFX applications from the command line using the downloaded JavaFX runtime.