In the previous chapters, we have learned about various 2D shapes and how they are drawn in a JavaFX application. However, it is necessary to make your application as attractive as possible for better user experience. This also includes enhancing the look and feel of your 2D shapes within your JavaFX application.
JavaFX provides a set of properties for this purpose. They are used to improve the quality of your shapes on the application. In this chapter, we will learn about Stroke Width property in detail.
Stroke Width Property
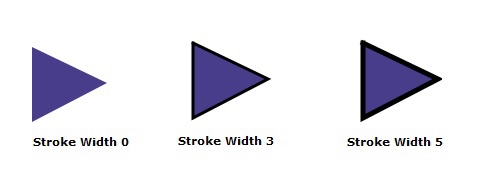
The Stroke Width Property is used to set thickness of the boundary line of a 2D shape. This property is of the type double and it represents the width of the boundary line of the shape. You can set the stroke width using the method setStrokeWidth() as follows −
Path.setStrokeWidth(3.0)
By default, the value of the stroke with of a shape is 1.0. Following is a diagram of a triangle with different values of stroke width.
Example
In this example, we will try to create a 2D shape, say a circle, and set a value to its stroke width. Save this file with the name StrokeWidthExample.java.
importjavafx.application.Application;importjavafx.scene.Group;importjavafx.scene.Scene;importjavafx.scene.shape.Circle;importjavafx.scene.shape.Shape;importjavafx.scene.paint.Color;importjavafx.stage.Stage;publicclassStrokeWidthExampleextendsApplication{@Overridepublicvoidstart(Stage stage){//Creating a Circle Circle circle =newCircle(150.0f,150.0f,50.0f);
circle.setFill(Color.WHITE);
circle.setStroke(Color.BLACK);
circle.setStrokeWidth(6.0);//Creating a Group object Group root =newGroup(circle);//Creating a scene object Scene scene =newScene(root,300,300);//Setting title to the Stage
stage.setTitle("Drawing a Circle");//Adding scene to the stage
stage.setScene(scene);//Displaying the contents of the stage
stage.show();}publicstaticvoidmain(String args[]){launch(args);}}</code></pre>
Compile and execute the saved java file from the command prompt using the following commands.
On executing, the above program generates a JavaFX window displaying a circle with a stroke width as shown below.
Learn Java in-depth with real-world projects through our Java certification course. Enroll and become a certified expert to boost your career.
Example
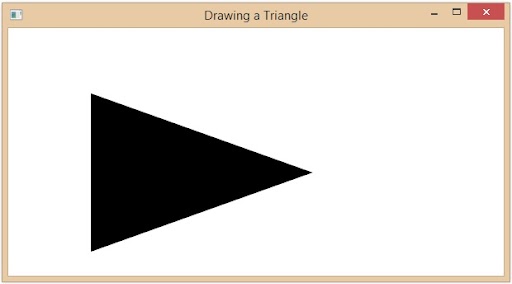
Now, let us try to draw a Triangle shape with relatively larger width and observe the results. Save this file with the name StrokeWidthTriangle.java.
importjavafx.application.Application;importjavafx.scene.Group;importjavafx.scene.Scene;importjavafx.scene.shape.Polygon;importjavafx.scene.shape.Shape;importjavafx.scene.paint.Color;importjavafx.stage.Stage;publicclassStrokeWidthTriangleextendsApplication{@Overridepublicvoidstart(Stage stage){//Creating a Triangle Polygon triangle =newPolygon();//Adding coordinates to the polygon
triangle.setFill(Color.WHITE);
triangle.setStroke(Color.BLACK);
triangle.setStrokeWidth(100.0);//Creating a Group object Group root =newGroup(triangle);//Creating a scene object Scene scene =newScene(root,600,300);//Setting title to the Stage
stage.setTitle("Drawing a Triangle");//Adding scene to the stage
stage.setScene(scene);//Displaying the contents of the stage
stage.show();}publicstaticvoidmain(String args[]){launch(args);}}</code></pre>
Compile and execute the saved Java file from the command prompt using the following commands.
Two dimensional(2D) shapes, in geometry, are usually referred to as structures that has only two dimensions of measure, commonly length and breadth, and lie on an XY plane. These structures can either be open or closed figures.
Open figures include curves like Cubic curve, Quadrilateral curve, etc. whereas closed figures include all types of polygons, circles etc.
In JavaFX, these 2D shapes can be drawn on an application by importing the javafx.scene.shape package. However, to improve the quality of a shape, there are various properties and operations that can be performed on it.
In this chapter, we will learn about Stroke Type property in detail.
Stroke Type Property
The Stroke Type property of 2D shapes is used to specify the type of boundary line a 2D shape must have. In JavaFX, this property is set using the StrokeType class. You can set the type of the stroke using the method setStrokeType() as follows −
Path.setStrokeType(StrokeType.stroke_type);
The stroke_type of a shape can be −
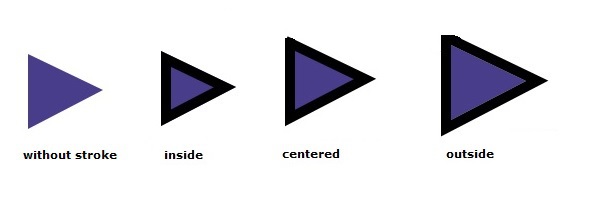
Inside − The boundary line will be drawn inside the edge (outline) of the shape (StrokeType.INSIDE).
Outside − The boundary line will be drawn outside the edge (outline) of the shape (StrokeType.OUTSIDE).
Centered − The boundary line will be drawn in such a way that the edge (outline) of the shape passes exactly thorough the center of the line (StrokeType.CENTERED).
By default, the stroke type of a shape is centered. Following is the diagram of a triangle with different Stroke Types −
Example
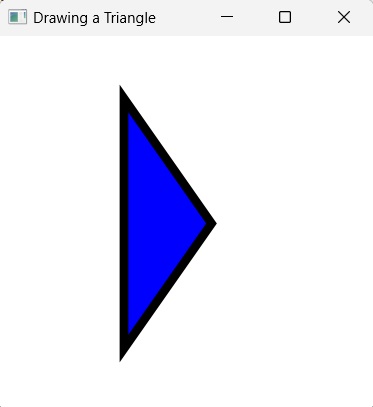
Let us see an example demonstrating the usage of StrokeType property on a 2D shape. Save this file with the name StrokeTypeExample.java.
importjavafx.application.Application;importjavafx.scene.Group;importjavafx.scene.Scene;importjavafx.scene.shape.Polygon;importjavafx.scene.shape.StrokeType;importjavafx.scene.paint.Color;importjavafx.stage.Stage;publicclassStrokeTypeExampleextendsApplication{@Overridepublicvoidstart(Stage stage){//Creating a Triangle Polygon triangle =newPolygon();//Adding coordinates to the polygon
triangle.getPoints().addAll(newDouble[]{100.0,50.0,170.0,150.0,100.0,250.0,});
triangle.setFill(Color.BLUE);
triangle.setStroke(Color.BLACK);
triangle.setStrokeWidth(7.0);
triangle.setStrokeType(StrokeType.CENTERED);//Creating a Group object Group root =newGroup(triangle);//Creating a scene object Scene scene =newScene(root,300,300);//Setting title to the Stage
stage.setTitle("Drawing a Triangle");//Adding scene to the stage
stage.setScene(scene);//Displaying the contents of the stage
stage.show();}publicstaticvoidmain(String args[]){launch(args);}}</code></pre>
Compile and execute the saved java file from the command prompt using the following commands.
On executing, the above program generates a JavaFX window displaying a triangle with centered stroke type as shown below.
Learn Java in-depth with real-world projects through our Java certification course. Enroll and become a certified expert to boost your career.
Example
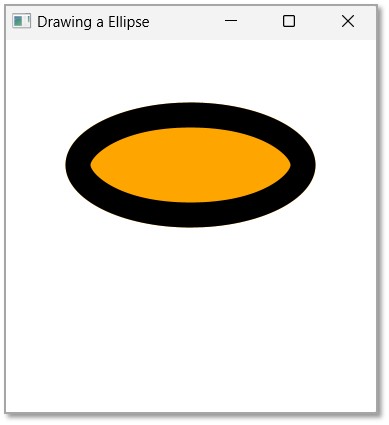
Let us see an example demonstrating the usage of INSIDE StrokeType property on a 2D shape. We are using a larger width here in order to properly show the difference between INSIDE and CENTERED stroke types from previous example. Save this file with the name StrokeTypeEllipse.java.
importjavafx.application.Application;importjavafx.scene.Group;importjavafx.scene.Scene;importjavafx.scene.shape.Ellipse;importjavafx.scene.shape.StrokeType;importjavafx.scene.paint.Color;importjavafx.stage.Stage;publicclassStrokeTypeEllipseextendsApplication{@Overridepublicvoidstart(Stage stage){//Drawing an ellipse Ellipse ellipse =newEllipse();//Setting the properties of the ellipse
ellipse.setFill(Color.ORANGE);
ellipse.setStroke(Color.BLACK);
ellipse.setStrokeWidth(20.0);
ellipse.setStrokeType(StrokeType.INSIDE);//Creating a Group object Group root =newGroup(ellipse);//Creating a scene object Scene scene =newScene(root,300,300);//Setting title to the Stage
stage.setTitle("Drawing a Ellipse");//Adding scene to the stage
stage.setScene(scene);//Displaying the contents of the stage
stage.show();}publicstaticvoidmain(String args[]){launch(args);}}</code></pre>
Compile and execute the saved java file from the command prompt using the following commands.
SVG (Scalable Vector Graphics) is an XML based language to define vector based graphics. The <path> element in the SVG library is the most powerful while drawing basic shapes. Using paths, you can draw lines, curves, arcs, and also various complex shapes including them.
Even though a path is similar to the polyline element while creating complex shapes, the scale of complex shapes drawn using a polyline element is not larger than shapes drawn using path element.
A path in SVG is defined by only one parameter. This parameter holds series of commands, like line, curve or arc commands. And each of these commands are instantiated using a single letter; for example, the letter ‘M’ calls the “Move To” command, the letter ‘L’ calls the “line” command and ‘C’ calls “Curve” command. And these letters can either be specified as either a lowercase or an uppercase letter. The lowercase letter specifies relative coordinates, while the uppercase letter specifies absolute coordinates.
The same concept of SVGPath is adopted by JavaFX, in order to create objects.
SVG Path in JavaFX
In JavaFX we can construct images by parsing SVG paths. Such shapes are represented by the class named SVGPath. This class belongs to the package javafx.scene.shape.
By instantiating this class, you can create a node which is created by parsing an SVG path in JavaFX.
This class has a property named content of String datatype. This represents the SVG Path encoded string, from which the image should be drawn.
To draw a shape by parsing an SVG path, you need to pass values to this property, using the method named setContent() of this class as follows −
setContent(value);
Steps to Draw SVGPath
To Draw a shape by parsing an SVGPath in JavaFX, follow the steps given below.
Step 1: Creating an Object of the SVGPath Class
You can create a required shape in JavaFX by parsing an SVGPath. To do so, instantiate the class named SVGPath which belongs to a package javafx.scene.shape. You can instantiate this class inside the start() method as follows.
publicclassClassNameextendsApplication{publicvoidstart(Stage primaryStage)throwsException{//Creating an object of the class SVGPath SVGPath svgpath =newSVGPath();}}
Step 2: Setting the SVGPath
Set the content for the SVG object using the method setContent(). To this method, you need to pass the SVGPath. Using which, a shape should be drawn in the form of a string as shown in the following code block.
String path ="M 100 100 L 300 100 L 200 300 z";//Setting the SVGPath in the form of string
svgPath.setContent(path);
Step 3: Adding SVGPath to Group
In the start() method, instantiate the Group class by passing the SVGPath object as a parameter value to its constructor −
Group root =newGroup(svgpath);
Step 4: Launching Application
Once the 2D object is created, follow the given steps below to launch the application properly −
Firstly, instantiate the class named Scene by passing the Group object as a parameter value to its constructor. To this constructor, you can also pass dimensions of the application screen as optional parameters.
Then, set the title to the stage using the setTitle() method of the Stage class.
Now, a Scene object is added to the stage using the setScene() method of the class named Stage.
Display the contents of the scene using the method named show().
Lastly, the application is launched with the help of the launch() method.
Example
Following is a program which generates a 2D shape constructed with lines by parsing SVG path using JavaFX. Save this code in a file with the name SVGExample.java.
importjavafx.application.Application;importjavafx.scene.Group;importjavafx.scene.Scene;importjavafx.scene.shape.SVGPath;importjavafx.stage.Stage;publicclassSVGExampleextendsApplication{@Overridepublicvoidstart(Stage stage){//Creating a SVGPath object SVGPath svgPath =newSVGPath();String path ="M 100 100 L 300 100 L 200 300 z";//Setting the SVGPath in the form of string
svgPath.setContent(path);//Creating a Group object Group root =newGroup(svgPath);//Creating a scene object Scene scene =newScene(root,600,300);//Setting title to the Stage
stage.setTitle("Drawing a Triangle");//Adding scene to the stage
stage.setScene(scene);//Displaying the contents of the stage
stage.show();}publicstaticvoidmain(String args[]){launch(args);}}</code></pre>
Compile and execute the saved java file from the command prompt using the following commands.
On executing, the above program generates a JavaFX window displaying a triangle, which is drawn by parsing the SVG path as shown below.
Example
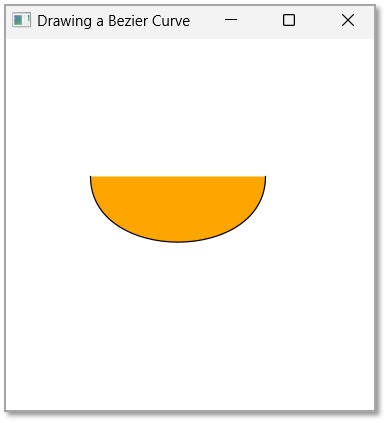
You can also construct complex shapes from curves and arcs using an SVG path. Following example creates a cubic curve using an SVG Path. Save this code in a file with the name SVGCurveExample.java.
importjavafx.application.Application;importjavafx.scene.Group;importjavafx.scene.Scene;importjavafx.scene.paint.Color;importjavafx.scene.shape.SVGPath;importjavafx.stage.Stage;publicclassSVGCurveExampleextendsApplication{@Overridepublicvoidstart(Stage stage){//Creating a SVGPath object SVGPath svgPath =newSVGPath();String path ="M 70 110 C 70 180, 210 180, 210 110";//Setting the SVGPath in the form of string
svgPath.setContent(path);// Setting the stroke and fill of the path
svgPath.setStroke(Color.BLACK);
svgPath.setFill(Color.ORANGE);//Creating a Group object Group root =newGroup(svgPath);//Creating a scene object Scene scene =newScene(root,300,300);//Setting title to the Stage
stage.setTitle("Drawing a Bezier Curve");//Adding scene to the stage
stage.setScene(scene);//Displaying the contents of the stage
stage.show();}publicstaticvoidmain(String args[]){launch(args);}}</code></pre>
Compile and execute the saved java file from the command prompt using the following commands.
An arc in simple geometry is defined as a portion of a circumference of an ellipse or a circle. Or, simply put, it is a curve that is joins two end points. An arc also encloses an angle less than or equal to 360 degrees at the centre of the circle. It is described by the following properties −
length − The distance along the arc.
angle − The angle the curve makes at the centre of the circle.
radiusX − The width of the full Ellipse of which the current arc is a part of.
radiusY − The height of the full Ellipse of which the current arc is a part of.
If both radiusX and radiusY are same, then the arc is a part of a circle circumference.
Arc in JavaFX
In JavaFX, an arc is represented by a class named Arc. This class belongs to the package javafx.scene.shape.
By instantiating this class, you can create an arc node in JavaFX.
This class has a few properties of the double datatype namely −
centerX − The x coordinate of the center of the arc.
centerY − The y coordinate of the center of the arc.
radiusX − The width of the full ellipse of which the current arc is a part of.
radiusY − The height of the full ellipse of which the current arc is a part of.
startAngle − The starting angle of the arc in degrees.
length − The angular extent of the arc in degrees.
To draw an arc, you need to pass values to these properties, either by passing them to the constructor of this class, in the same order, at the time of instantiation, or, by using their respective setter methods.
Types of Arc
In JavaFX, you can draw three kinds of arc’s namely −
Open − An arc which is not closed at all is known as an open arc.
Chord − A chord is a type of an arc which is closed by straight line.
Round − The Round arc is an arc which is closed by joining the starting and ending point to the center of the ellipse.
You can set the type of the arc using the method setType() by passing any of the following properties − ArcType.OPEN, ArcType.CHORD, ArcType.Round.
Learn Java in-depth with real-world projects through our Java certification course. Enroll and become a certified expert to boost your career.
Steps to Draw Arc
To Draw an arc in JavaFX, follow the steps given below.
Step 1: Creating an Arc
You can create an arc in JavaFX by instantiating the class named Arc which belongs to a package javafx.scene.shape. You can instantiate this class inside the start() method of Application class as shown below.
publicclassClassNameextendsApplication{publicvoidstart(Stage primaryStage)throwsException{//Creating an object of the class Arc Arc arc =newArc();}}
Step 2: Setting Properties to the Arc
Specify the x, y coordinates of the center of the Ellipse (of which this arc is a part of). These coordinates include – radiusX, radiusY, start angle and length of the arc using their respective setter methods as shown in the following code block.
//Setting the properties of the arc
arc.setCenterX(300.0f);
arc.setCenterY(150.0f);
arc.setRadiusX(90.0f);
arc.setRadiusY(90.0f);
arc.setStartAngle(40.0f);
arc.setLength(239.0f);
Step 3: Setting the Type of the Arc
You can also set the type of the arc (round, chord open) by using the setType() method as shown in the following code block.
//Setting the type of the arc
arc.setType(ArcType.ROUND);
Step 4: Adding Arc Object to Group
In the start() method, instantiate a Group class by passing the arc object, which was created in the previous step, as a parameter value to its constructor −
Group root =newGroup(arc);
Step 5: Launching Application
Once the 2D object is created, follow the given steps below to launch the application properly −
Firstly, instantiate the class named Scene by passing the Group object as a parameter value to its constructor. To this constructor, you can also pass dimensions of the application screen as optional parameters.
Then, set the title to the stage using the setTitle() method of the Stage class.
Now, a Scene object is added to the stage using the setScene() method of the class named Stage.
Display the contents of the scene using the method named show().
Lastly, the application is launched with the help of the launch() method.
Example
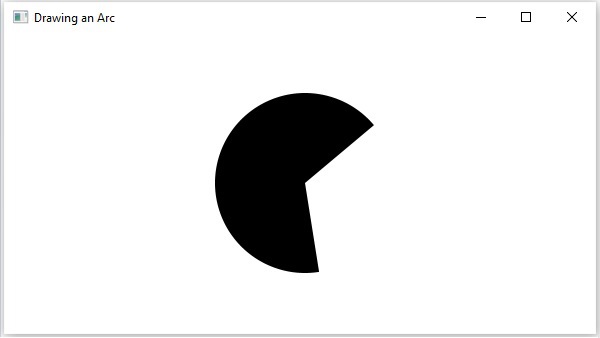
Following is a program which generates an arc. Save this code in a file with the name ArcExample.java.
importjavafx.application.Application;importjavafx.scene.Group;importjavafx.scene.Scene;importjavafx.stage.Stage;importjavafx.scene.shape.Arc;importjavafx.scene.shape.ArcType;publicclassArcExampleextendsApplication{publicvoidstart(Stage stage){//Drawing an arc Arc arc =newArc();//Setting the properties of the arc
arc.setCenterX(300.0f);
arc.setCenterY(150.0f);
arc.setRadiusX(90.0f);
arc.setRadiusY(90.0f);
arc.setStartAngle(40.0f);
arc.setLength(239.0f);//Setting the type of the arc
arc.setType(ArcType.ROUND);//Creating a Group object Group root =newGroup(arc);//Creating a scene object Scene scene =newScene(root,600,300);//Setting title to the Stage
stage.setTitle("Drawing an Arc");//Adding scene to the stage
stage.setScene(scene);//Displaying the contents of the stage
stage.show();}publicstaticvoidmain(String args[]){launch(args);}}</code></pre>
Compile and execute the saved Java file from the command prompt using the following commands.
On executing, the above program generates a JavaFX window displaying an arc as shown in the following screenshot.
Example
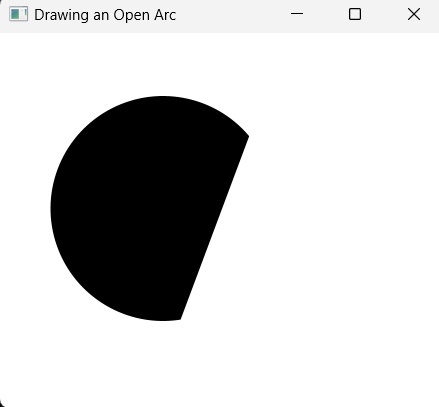
Let us try to draw another arc of type "Open" in the following example. Save this code in a file with the name ArcOpen.java.
importjavafx.application.Application;importjavafx.scene.Group;importjavafx.scene.Scene;importjavafx.stage.Stage;importjavafx.scene.shape.Arc;importjavafx.scene.shape.ArcType;publicclassArcOpenextendsApplication{publicvoidstart(Stage stage){//Drawing an arc Arc arc =newArc();//Setting the properties of the arc
arc.setCenterX(300.0f);
arc.setCenterY(150.0f);
arc.setRadiusX(90.0f);
arc.setRadiusY(90.0f);
arc.setStartAngle(40.0f);
arc.setLength(239.0f);//Setting the type of the arc
arc.setType(ArcType.OPEN);//Creating a Group object Group root =newGroup(arc);//Creating a scene object Scene scene =newScene(root,600,300);//Setting title to the Stage
stage.setTitle("Drawing an Open Arc");//Adding scene to the stage
stage.setScene(scene);//Displaying the contents of the stage
stage.show();}publicstaticvoidmain(String args[]){launch(args);}}</code></pre>
Compile and execute the saved Java file from the command prompt using the following commands.
On executing, the above program generates a JavaFX window displaying an arc as shown in the following screenshot.
Example
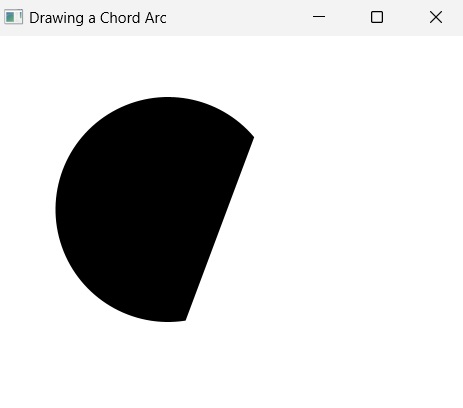
Now we will try to draw another arc of type "Chord" in the following example. Save this code in a file with the name ArcChord.java.
importjavafx.application.Application;importjavafx.scene.Group;importjavafx.scene.Scene;importjavafx.stage.Stage;importjavafx.scene.shape.Arc;importjavafx.scene.shape.ArcType;publicclassArcChordextendsApplication{publicvoidstart(Stage stage){//Drawing an arc Arc arc =newArc();//Setting the properties of the arc
arc.setCenterX(300.0f);
arc.setCenterY(150.0f);
arc.setRadiusX(90.0f);
arc.setRadiusY(90.0f);
arc.setStartAngle(40.0f);
arc.setLength(239.0f);//Setting the type of the arc
arc.setType(ArcType.CHORD);//Creating a Group object Group root =newGroup(arc);//Creating a scene object Scene scene =newScene(root,600,300);//Setting title to the Stage
stage.setTitle("Drawing a Chord Arc");//Adding scene to the stage
stage.setScene(scene);//Displaying the contents of the stage
stage.show();}publicstaticvoidmain(String args[]){launch(args);}}</code></pre>
Compile and execute the saved Java file from the command prompt using the following commands.
Mathematically, a quadratic curve is one that is described by a quadratic function like − y = ax2 + bx + c.
In computer graphics Bezier curves are used. These are parametric curves which appear reasonably smooth at all scales. These Bezier curves are drawn based on points on an XY plane.
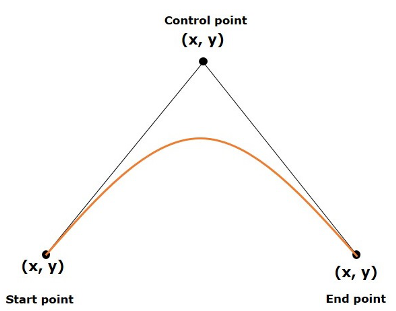
A quadratic curve is a Bezier parametric curve in the XY plane which is a curve of degree 2. It is drawn using three points: start point, end point and control point as shown in the following diagram
Quad Curve in JavaFX
In JavaFX, a Quad Curve is represented by a class named QuadCurve. This class belongs to the package javafx.scene.shape.
By instantiating this class, you can create a QuadCurve node in JavaFX.
This class has 6 properties of the double datatype namely −
startX − The x coordinate of the starting point of the curve.
startY − The y coordinate of the starting point of the curve.
controlX − The x coordinate of the control point of the curve.
controlY − The y coordinate of the control point of the curve.
endX − The x coordinate of the end point of the curve.
endY − The y coordinate of the end point of the curve.
To draw a Quad Curve, you need to pass values to these properties. This can be done either by passing them to the constructor of this class, in the same order, at the time of instantiation; or by using appropriate setter methods.
Steps to Draw Quad Curve
To Draw a Bezier Quadrilateral Curve in JavaFX, follow the steps given below.
Step 1: Creating a Quad Curve
You can create a Quad Curve in JavaFX by instantiating the class named QuadCurve which belongs to a package javafx.scene.shape. You can then instantiate this class in start() method of Application class as shown in the following code block.
publicclassClassNameextendsApplication{publicvoidstart(Stage primaryStage)throwsException{//Creating an object of the class QuadCurve QuadCurve quadcurve =newQuadCurve();}}
Step 2: Setting Properties to the Quad Curve
Specify the x, y coordinates of the three points: start point, end point and control points, of the required curve, using their respective setter methods as shown in the following code block.
//Adding properties to the Quad Curve
quadCurve.setStartX(100.0);
quadCurve.setStartY(220.0f);
quadCurve.setEndX(500.0f);
quadCurve.setEndY(220.0f);
quadCurve.setControlX(250.0f);
quadCurve.setControlY(0.0f);
Or, by using their respective setter methods as follows −
In the start() method, instantiate a Group class by passing the previously created QuadCurve object as a parameter value to its constructor −
Group root =newGroup(quadcurve);
Step 4: Launching Application
Once the 2D object is created, follow the given steps below to launch the application properly −
Firstly, instantiate the class named Scene by passing the Group object as a parameter value to its constructor. To this constructor, you can also pass dimensions of the application screen as optional parameters.
Then, set the title to the stage using the setTitle() method of the Stage class.
Now, a Scene object is added to the stage using the setScene() method of the class named Stage.
Display the contents of the scene using the method named show().
Lastly, the application is launched with the help of the launch() method.
Example
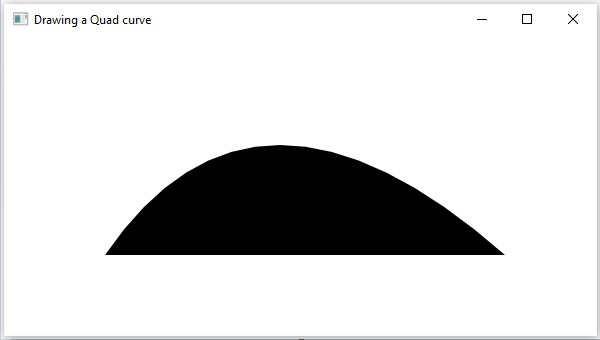
Following is a program which generates a quadrilateral curve using JavaFX. Save this code in a file with the name QuadCurveExample.java.
importjavafx.application.Application;importjavafx.scene.Group;importjavafx.scene.Scene;importjavafx.stage.Stage;importjavafx.scene.shape.QuadCurve;publicclassQuadCurveExampleextendsApplication{@Overridepublicvoidstart(Stage stage){//Creating a QuadCurve QuadCurve quadCurve =newQuadCurve();//Adding properties to the Quad Curve
quadCurve.setStartX(100.0);
quadCurve.setStartY(220.0f);
quadCurve.setEndX(500.0f);
quadCurve.setEndY(220.0f);
quadCurve.setControlX(250.0f);
quadCurve.setControlY(0.0f);//Creating a Group object Group root =newGroup(quadCurve);//Creating a scene object Scene scene =newScene(root,600,300);//Setting title to the Stage
stage.setTitle("Drawing a Quad curve");//Adding scene to the stage
stage.setScene(scene);//Displaying the contents of the stage
stage.show();}publicstaticvoidmain(String args[]){launch(args);}}</code></pre>
Compile and execute the saved java file from the command prompt using the following commands.
On executing, the above program generates a JavaFX window displaying a Bezier quadrilateral curve as shown in the following screenshot.
Example
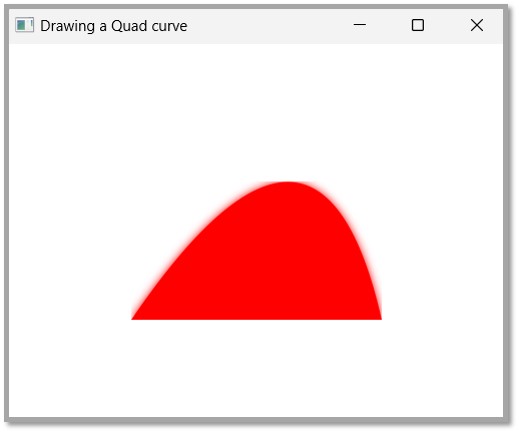
Now, you can also draw this quadrilateral curve by applying any effect, say bloom effect, as shown in the example below. Save the code in a file named QuadCurveEffect.java.
importjavafx.application.Application;importjavafx.scene.Group;importjavafx.scene.Scene;importjavafx.scene.effect.Bloom;importjavafx.stage.Stage;importjavafx.scene.paint.Color;importjavafx.scene.shape.QuadCurve;publicclassQuadCurveEffectextendsApplication{@Overridepublicvoidstart(Stage stage){//Creating a QuadCurve QuadCurve quadCurve =newQuadCurve();//Adding properties to the Quad Curve
quadCurve.setFill(Color.RED);//Instantiating the Bloom class Bloom bloom =newBloom();//setting threshold for bloom
bloom.setThreshold(0.1);//Applying bloom effect to quadCurve
quadCurve.setEffect(bloom);//Creating a Group object Group root =newGroup(quadCurve);//Creating a scene object Scene scene =newScene(root,400,300);//Setting title to the Stage
stage.setTitle("Drawing a Quad curve");//Adding scene to the stage
stage.setScene(scene);//Displaying the contents of the stage
stage.show();}publicstaticvoidmain(String args[]){launch(args);}}</code></pre>
Compile and execute the saved java file from the command prompt using the following commands.
A Cubic Curve is described by a third-degree polynomial function of two variables, and can be written in the following form −
These Bezier curves are generally used in computer graphics. They are parametric curves which appear reasonably smooth at all scales. These curves are drawn based on points on the XY plane.
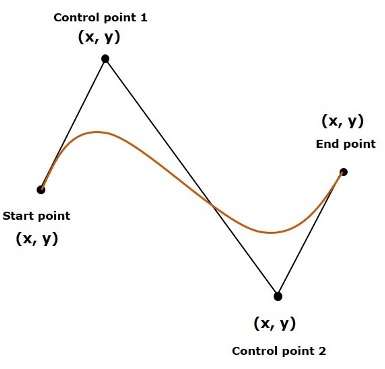
A cubic curve is a Bezier parametric curve in the XY plane is a curve of degree 3. It is drawn using four points − Start Point, End Point, Control Point and Control Point2 as shown in the following diagram.
Cubic Curve in JavaFX
In JavaFX, a Cubic Curve is represented by a class named CubicCurve. This class belongs to the package javafx.scene.shape.
By instantiating this class, you can create a CubicCurve node in JavaFX.
This class has 8 properties of the double datatype namely −
startX − The x coordinate of the starting point of the curve.
startY − The y coordinate of the starting point of the curve.
controlX1 − The x coordinate of the first control point of the curve.
controlY1 − The y coordinate of the first control point of the curve.
controlX2 − The x coordinate of the second control point of the curve.
controlY2 − The y coordinate of the second control point of the curve.
endX − The x coordinate of the end point of the curve.
endY − The y coordinate of the end point of the curve.
To draw a cubic curve, you need to pass values to these properties, either by passing them to the constructor of this class, in the same order, at the time of instantiation, or by using their respective setter methods.
Steps to Draw Cubic Curve
To draw a Bezier cubic curve in JavaFX, follow the steps given below.
Step 1: Creating a Cubic Curve
You can create a Cubic Curve in JavaFX by instantiating the class named CubicCurve which belongs to a package javafx.scene.shape. You can instantiate this class inside the start() method of Application class as follows.
publicclassClassNameextendsApplication{@Overridepublicvoidstart(Stage primaryStage)throwsException{//Creating an object of the class CubicCurve CubicCurve cubiccurve =newCubicCurve();}}
Step 2: Setting Properties to the Cubic Curve
Specify the x, y coordinates of the four points: start point, end point, control point1 and control point2 of the required curve, using their respective setter methods as shown in the following code block.
Instantiate a Group class in the start() method by passing the previously created CubicCurve object as a parameter to its constructor.
Group root =newGroup(cubiccurve);
Step 4: Launching Application
Once the 2D object is created, follow the given steps below to launch the application properly −
Firstly, instantiate the class named Scene by passing the Group object as a parameter value to its constructor. To this constructor, you can also pass dimensions of the application screen as optional parameters.
Then, set the title to the stage using the setTitle() method of the Stage class.
Now, a Scene object is added to the stage using the setScene() method of the class named Stage.
Display the contents of the scene using the method named show().
Lastly, the application is launched with the help of the launch() method.
Example
Following is a program which generates a Bezier CubicCurve using JavaFX. Save this code in a file with the name CubicCurveExample.java.
importjavafx.application.Application;importjavafx.scene.Group;importjavafx.scene.Scene;importjavafx.stage.Stage;importjavafx.scene.shape.CubicCurve;publicclassCubicCurveExampleextendsApplication{@Overridepublicvoidstart(Stage stage){//Drawing a cubic curve CubicCurve cubicCurve =newCubicCurve();//Setting properties to cubic curve
cubicCurve.setStartX(100.0f);
cubicCurve.setStartY(150.0f);
cubicCurve.setControlX1(400.0f);
cubicCurve.setControlY1(40.0f);
cubicCurve.setControlX2(175.0f);
cubicCurve.setControlY2(250.0f);
cubicCurve.setEndX(500.0f);
cubicCurve.setEndY(150.0f);//Creating a Group object Group root =newGroup(cubicCurve);//Creating a scene object Scene scene =newScene(root,600,300);//Setting title to the Stage
stage.setTitle("Drawing a cubic curve");//Adding scene to the stage
stage.setScene(scene);//Displaying the contents of the stage
stage.show();}publicstaticvoidmain(String args[]){launch(args);}}</code></pre>
Compile and execute the saved java file from the command prompt using the following commands.
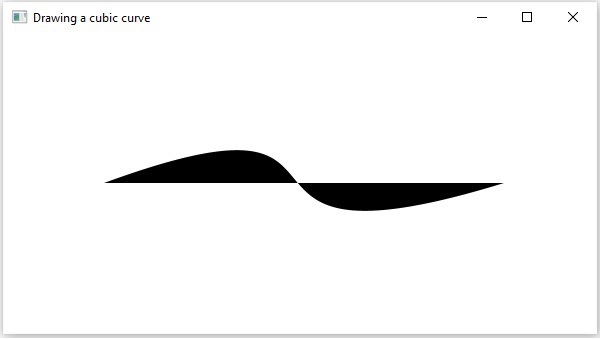
On executing, the above program generates a JavaFX window displaying a Bezier cubic curve as shown below.
Example
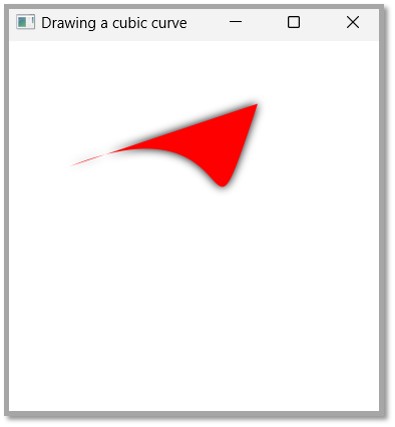
In the following example, we are trying to apply the DropShadow effect on a Cubic Curve drawn. Save this code in a file with the name CubicCurveEffect.java.
importjavafx.application.Application;importjavafx.scene.Group;importjavafx.scene.Scene;importjavafx.scene.effect.DropShadow;importjavafx.stage.Stage;importjavafx.scene.paint.Color;importjavafx.scene.shape.CubicCurve;publicclassCubicCurveEffectextendsApplication{@Overridepublicvoidstart(Stage stage){//Drawing a cubic curve CubicCurve cubicCurve =newCubicCurve();//Setting properties to cubic curve
cubicCurve.setFill(Color.RED);//Instantiating the DropShadow class DropShadow ds =newDropShadow();//Applying DropShadow effect to cubicCurve
cubicCurve.setEffect(ds);//Creating a Group object Group root =newGroup(cubicCurve);//Creating a scene object Scene scene =newScene(root,300,300);//Setting title to the Stage
stage.setTitle("Drawing a cubic curve");//Adding scene to the stage
stage.setScene(scene);//Displaying the contents of the stage
stage.show();}publicstaticvoidmain(String args[]){launch(args);}}</code></pre>
Compile and execute the saved java file from the command prompt using the following commands.
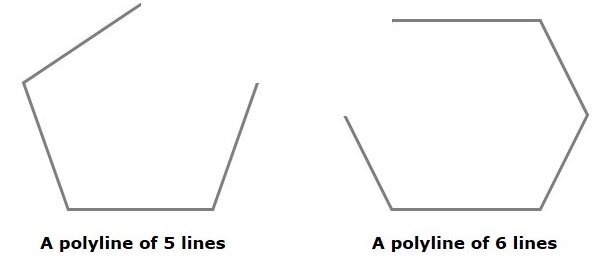
Polyline is defined as a continuous structure that is formed by combining multiple line segments with some vertices. These vertices are addressed as endpoints. Thus, a polyline can be constructed by specifying these endpoints through which these line segments are to be drawn.
It consists of various properties like Points, width, color, start and end caps, type of join, stroke pattern etc. A Polyline is same as a polygon except that a polyline is not closed in the end. Or, continuous line composed of one or more line segments.
In short, we can say a polygon is an open figure formed by coplanar line segments.
Polyline in JavaFX
In JavaFX, a Polyline is represented by a class named Polygon. This class belongs to the package javafx.scene.shape..
By instantiating this class, you can create polyline node in JavaFX. You need to pass the x, y coordinates of the points by which the polyline should be defined in the form of a double array.
You can pass the double array as a parameter of the constructor of this class as shown below −
Polyline polyline =newPolyline(doubleArray);
Or, by using the getPoints() method as follows −
polyline.getPoints().addAll(newDouble[]{List of XY coordinates separated by commas });
Steps to Draw Polyline
To Draw a Polyline in JavaFX, follow the steps given below.
Step 1: Creating a Polyline
You can create a line in JavaFX by instantiating the class named Line which belongs to a package javafx.scene.shape. You can instantiate this class in start() method as follows.
publicclassClassNameextendsApplication{@Overridepublicvoidstart(Stage primaryStage)throwsException{//Creating an object of the class Polyline Polyline polyline =newPolyline();}}
Step 2: Setting Properties to the Polyline
Specify a double array holding the XY coordinates of the points of the required polyline (hexagon in this example) separated by commas. You can do this by using the getPoints() method of the Polyline class as shown in the following code block.
//Adding coordinates to the hexagon
polyline.getPoints().addAll(newDouble[]{200.0,50.0,400.0,50.0,450.0,150.0,400.0,250.0,200.0,250.0,150.0,150.0,});
Step 3: Adding Polyline Object to Group
In the start() method, instantiate the class named Group, which belongs to the package javafx.scene, by passing the Polyline object, created in the previous step, as a parameter value to its constructor.
Group root =newGroup(polyline);
Step 4: Launching Application
Once the 2D object is created, follow the given steps below to launch the application properly −
Firstly, instantiate the class named Scene by passing the Group object as a parameter value to its constructor. To this constructor, you can also pass dimensions of the application screen as optional parameters.
Then, set the title to the stage using the setTitle() method of the Stage class.
Now, a Scene object is added to the stage using the setScene() method of the class named Stage.
Display the contents of the scene using the method named show().
Lastly, the application is launched with the help of the launch() method.
Example
Following is a program which generates a polyline using JavaFX. Save this code in a file with the name PolylineExample1.java.
importjavafx.application.Application;importjavafx.scene.Group;importjavafx.scene.Scene;importjavafx.stage.Stage;importjavafx.scene.shape.PolylinepublicclassPolylineExample1extendsApplication{@Overridepublicvoidstart(Stage stage){//Creating a polyline Polyline polyline =newPolyline();//Adding coordinates to the polygon
polyline.getPoints().addAll(newDouble[]{200.0,50.0,400.0,50.0,450.0,150.0,400.0,250.0,200.0,250.0,150.0,150.0,});//Creating a Group object Group root =newGroup(polyline);//Creating a scene object Scene scene =newScene(root,600,300);//Setting title to the Stage
stage.setTitle("Drawing a Polyline");//Adding scene to the stage
stage.setScene(scene);//Displaying the contents of the stage
stage.show();}publicstaticvoidmain(String args[]){launch(args);}}</code></pre>
Compile and execute the saved java file from the command prompt using the following commands.
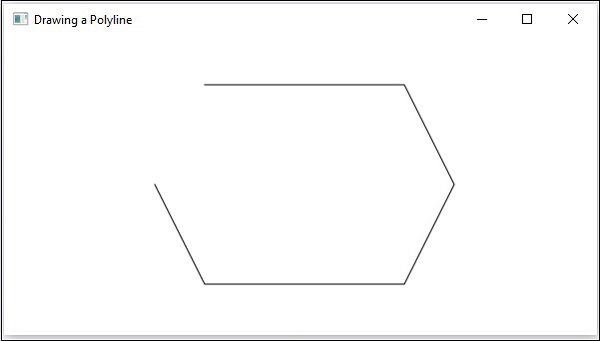
On executing, the above program generates a JavaFX window displaying a polyline as shown below.
Example
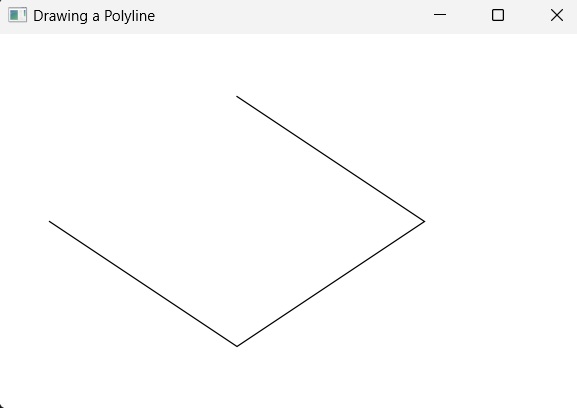
In this example, let us try to draw a polyline of 4 vertices. You can save the file name as PolylineExample2.java.
importjavafx.application.Application;importjavafx.scene.Group;importjavafx.scene.Scene;importjavafx.scene.shape.Polyline;importjavafx.stage.Stage;publicclassPolylineExample2extendsApplication{@Overridepublicvoidstart(Stage stage){//Creating a Polyline Polyline polyline =newPolyline();//Adding coordinates to the polygon
polyline.getPoints().addAll(newDouble[]{300.0,50.0,450.0,150.0,300.0,250.0,150.0,150.0,});//Creating a Group object Group root =newGroup(polyline);//Creating a scene object Scene scene =newScene(root,600,300);//Setting title to the Stage
stage.setTitle("Drawing a Polyline");//Adding scene to the stage
stage.setScene(scene);//Displaying the contents of the stage
stage.show();}publicstaticvoidmain(String args[]){launch(args);}}</code></pre>
Compile and execute the saved java file from the command prompt using the following commands.
Polygon is geometrically defined as a closed shape formed by a number of coplanar line segments connected from end to end. The name “polygon” is derived from the Greek words, “poly” meaning “many” and “gonia” meaning “angles”.
A polygon is described by two parameters, namely, the length of its sides and the measures of its interior angles.
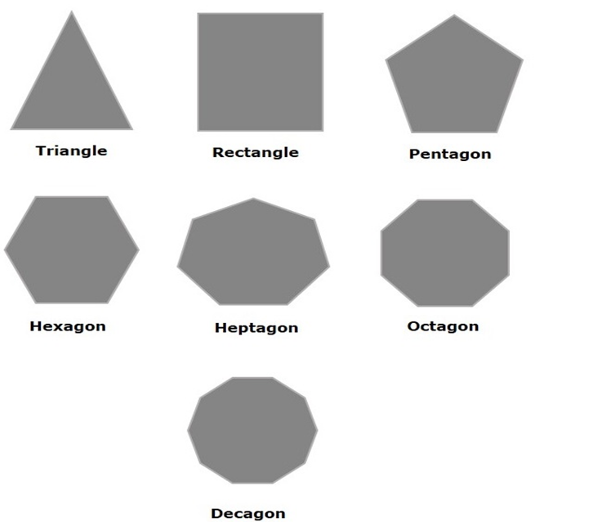
There are various types of Polygons based on the numbers of sides and angles. They are listed below −
If a polygon has three sides, then it is referred to as a triangle.
If a polygon has four sides, then it is known as quadrilateral. Shapes like rectangles, squares, parallelogram etc., are all types of quadrilaterals.
If a polygon has five sides, then it is known as a pentagon. Similarly, the polygon with six sides is called hexagon, seven sides is heptagon, eight sides is octagon etc.
Polygon in JavaFX
In JavaFX, a polygon is represented by a class named Polygon. This class belongs to the package javafx.scene.shape.
By instantiating this class, you can create a polygon node in JavaFX. You need to pass the x, y coordinates of the points by which the polygon should be defined in the form of a double array.
You can pass the double array as a parameter of the constructor of this class as shown below −
Polygon polygon =newPolygon(doubleArray);
Or, by using the getPoints() method as follows −
polygon.getPoints().addAll(newDouble[]{List of XY coordinates separated by commas });
Steps to Draw Polygon
To draw a polygon in JavaFX, follow the steps given below.
Step 1: Creating a Polygon
Create a polygon in JavaFX by instantiating the class named Polygon which belongs to a package javafx.scene.shape within the start() method. You can instantiate this class as follows.
publicclassClassNameextendsApplication{publicvoidstart(Stage primaryStage)throwsException{//Creating an object of the class Polygon Polygon hexagon =newPolygon();}}
Step 2: Setting Properties to the Polygon
Specify a double array holding the XY coordinates of the points of the required polygon (hexagon in this example) separated by commas, using the getPoints() method of the Polygon class, as follows.
//Adding coordinates to the hexagon
hexagon.getPoints().addAll(newDouble[]{200.0,50.0,400.0,50.0,450.0,150.0,400.0,250.0,200.0,250.0,150.0,150.0,})
Step 3: Adding Polygon Object to Group
In the start() method, instantiate the class named Group, which belongs to the package javafx.scene, by passing the Polygon object, created in the previous step, as a parameter value to its constructor.
Group root =newGroup(hexagon);
Step 4: Launching Application
Once the 2D object is created, follow the given steps below to launch the application properly −
Firstly, instantiate the class named Scene by passing the Group object as a parameter value to its constructor. To this constructor, you can also pass dimensions of the application screen as optional parameters.
Then, set the title to the stage using the setTitle() method of the Stage class.
Now, a Scene object is added to the stage using the setScene() method of the class named Stage.
Display the contents of the scene using the method named show().
Lastly, the application is launched with the help of the launch() method.
Example
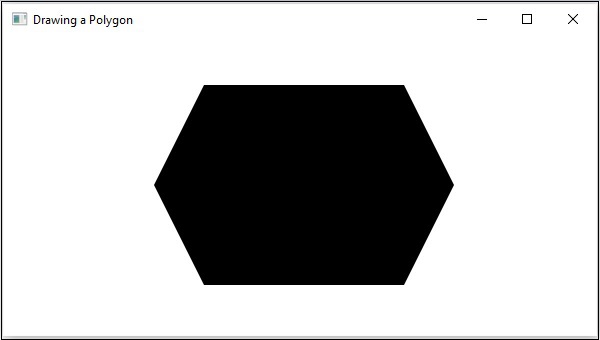
Following is a program which generates a Polygon (hexagon) using JavaFX. Save this code in a file with the name PolygonExample.java.
importjavafx.application.Application;importjavafx.scene.Group;importjavafx.scene.Scene;importjavafx.scene.shape.Polygon;importjavafx.stage.Stage;publicclassPolygonExampleextendsApplication{@Overridepublicvoidstart(Stage stage){//Creating a Polygon Polygon polygon =newPolygon();//Adding coordinates to the polygon
polygon.getPoints().addAll(newDouble[]{200.0,50.0,400.0,50.0,450.0,150.0,400.0,250.0,200.0,250.0,150.0,150.0,});//Creating a Group object Group root =newGroup(polygon);//Creating a scene object Scene scene =newScene(root,600,300);//Setting title to the Stage
stage.setTitle("Drawing a Polygon");//Adding scene to the stage
stage.setScene(scene);//Displaying the contents of the stage
stage.show();}publicstaticvoidmain(String args[]){launch(args);}}</code></pre>
Compile and execute the saved java file from the command prompt using the following commands.
On executing, the above program generates a JavaFX window displaying a polygon as shown below.
Example
Now, let us try to draw polygons other than a hexagon, say a rhombus. Save this code in a file with the name RhombusExample.java.
importjavafx.application.Application;importjavafx.scene.Group;importjavafx.scene.Scene;importjavafx.scene.shape.Polygon;importjavafx.stage.Stage;publicclassRhombusExampleextendsApplication{@Overridepublicvoidstart(Stage stage){//Creating a Polygon Polygon polygon =newPolygon();//Adding coordinates to the polygon
polygon.getPoints().addAll(newDouble[]{300.0,50.0,450.0,150.0,300.0,250.0,150.0,150.0,});//Creating a Group object Group root =newGroup(polygon);//Creating a scene object Scene scene =newScene(root,600,300);//Setting title to the Stage
stage.setTitle("Drawing a Polygon");//Adding scene to the stage
stage.setScene(scene);//Displaying the contents of the stage
stage.show();}publicstaticvoidmain(String args[]){launch(args);}}</code></pre>
Compile and execute the saved java file from the command prompt using the following commands.
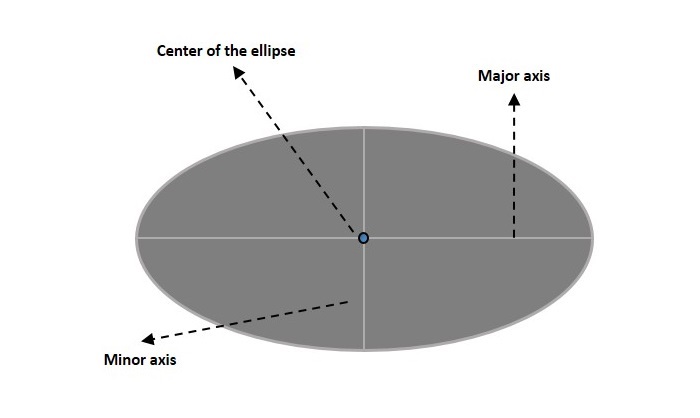
An Ellipse is defined by two points, each called a focus. If any point on the Ellipse is taken, the sum of the distances to the focus points is constant. The size of the Ellipse is determined by the sum of these two distances. The sum of these distances is equal to the length of the major axis (the longest diameter of the ellipse). A circle is, in fact, a special case of an Ellipse.
An Ellipse has three properties which are −
Centre − A point inside the Ellipse which is the midpoint of the line segment linking the two foci. The intersection of the major and minor axes.
Major axis − The longest diameter of an ellipse.
Minor axis − The shortest diameter of an ellipse.
Ellipse in JavaFX
In JavaFX, an Ellipse is represented by a class named Ellipse. This class belongs to the package javafx.scene.shape.
By instantiating this class, you can create an Ellipse node in JavaFX.
This class has 4 properties of the double datatype namely −
centerX − The x coordinate of the center of the ellipse in pixels.
centerY − The y coordinate of the center of the ellipse in pixels.
radiusX − The width of the ellipse pixels.
radiusY − The height of the ellipse pixels.
To draw an ellipse, you need to pass values to these properties, either by passing them to the constructor of this class in the same order, or by using setter methods.
Steps to Draw Ellipse
Follow the steps given below to draw an Ellipse in JavaFX.
Step 1: Creating an Ellipse
You can create an Ellipse in JavaFX by instantiating the class named Ellipse which belongs to a package javafx.scene.shape, inside the start() method. You can instantiate this class as follows.
publicclassClassNameextendsApplication{publicvoidstart(Stage primaryStage)throwsException{//Creating an Ellipse object Ellipse ellipse =newEllipse();}}
Step 2: Setting Properties to the Ellipse
Specify the x, y coordinates of the center of the Ellipse → the width of the Ellipse along x axis and y axis (major and minor axises), of the circle by setting the properties X, Y, RadiusX and RadiusY.
This can be done by using their respective setter methods as shown in the following code block.
In the start() method, create a group object by instantiating the class named Group, which belongs to the package javafx.scene. This class is instantiated by passing the Ellipse (node) object created in the previous step as a parameter to the constructor of the Group class. This should be done in order to add it to the group as shown in the following code block −
Group root =newGroup(ellipse);
Step 4: Launching Application
Once the 2D object is created, follow the given steps below to launch the application properly −
Firstly, instantiate the class named Scene by passing the Group object as a parameter value to its constructor. To this constructor, you can also pass dimensions of the application screen as optional parameters.
Then, set the title to the stage using the setTitle() method of the Stage class.
Now, a Scene object is added to the stage using the setScene() method of the class named Stage.
Display the contents of the scene using the method named show().
Lastly, the application is launched with the help of the launch() method.
Example
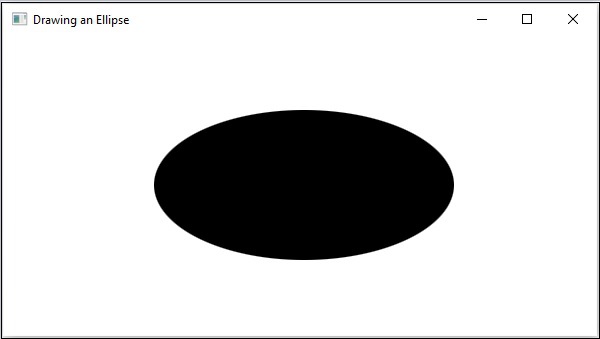
Following is a program which generates an Ellipse using JavaFX. Save this code in a file with the name EllipseExample.java.
importjavafx.application.Application;importjavafx.scene.Group;importjavafx.scene.Scene;importjavafx.stage.Stage;importjavafx.scene.shape.Ellipse;publicclassEllipseExampleextendsApplication{@Overridepublicvoidstart(Stage stage){//Drawing an ellipse Ellipse ellipse =newEllipse();//Setting the properties of the ellipse
ellipse.setCenterX(300.0f);
ellipse.setCenterY(150.0f);
ellipse.setRadiusX(150.0f);
ellipse.setRadiusY(75.0f);//Creating a Group object Group root =newGroup(ellipse);//Creating a scene object Scene scene =newScene(root,600,300);//Setting title to the Stage
stage.setTitle("Drawing an Ellipse");//Adding scene to the stage
stage.setScene(scene);//Displaying the contents of the stage
stage.show();}publicstaticvoidmain(String args[]){launch(args);}}</code></pre>
Compile and execute the saved Java file from the command prompt using the following commands.
On executing, the above program generates a JavaFX window displaying an ellipse as shown below.
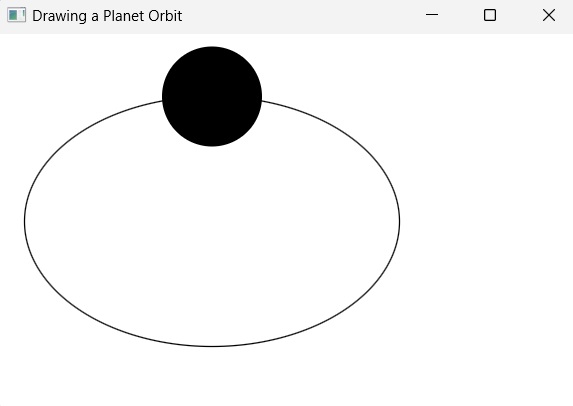
Example
In another example given below, let us try to draw an elliptical orbit of a circular planet. Name this file as PlanetOrbit.java.
importjavafx.application.Application;importjavafx.scene.Group;importjavafx.scene.Scene;importjavafx.stage.Stage;importjavafx.scene.shape.Ellipse;importjavafx.scene.shape.Circle;importjavafx.scene.paint.Color;importjavafx.animation.PathTransition;importjavafx.application.Application;importjavafx.stage.Stage;importjavafx.util.Duration;publicclassPlanetOrbitextendsApplication{@Overridepublicvoidstart(Stage stage){//Drawing an orbit Ellipse orbit =newEllipse();
orbit.setFill(Color.WHITE);
orbit.setStroke(Color.BLACK);//Setting the properties of the ellipse
orbit.setCenterX(300.0f);
orbit.setCenterY(150.0f);
orbit.setRadiusX(150.0f);
orbit.setRadiusY(100.0f);// Drawing a circular planetCircle planet =newCircle(300.0f,50.0f,40.0f);//Creating the animationPathTransition pathTransition =newPathTransition();
pathTransition.setDuration(Duration.millis(1000));
pathTransition.setNode(planet);
pathTransition.setPath(orbit);
pathTransition.setOrientation(PathTransition.OrientationType.ORTHOGONAL_TO_TANGENT);
pathTransition.setCycleCount(50);
pathTransition.setAutoReverse(false);
pathTransition.play();//Creating a Group object Group root =newGroup();
root.getChildren().addAll(orbit, planet);//Creating a scene object Scene scene =newScene(root,600,300);//Setting title to the Stage
stage.setTitle("Drawing a Planet Orbit");//Adding scene to the stage
stage.setScene(scene);//Displaying the contents of the stage
stage.show();}publicstaticvoidmain(String args[]){launch(args);}}</code></pre>
Compile and execute the saved Java file from the command prompt using the following commands.
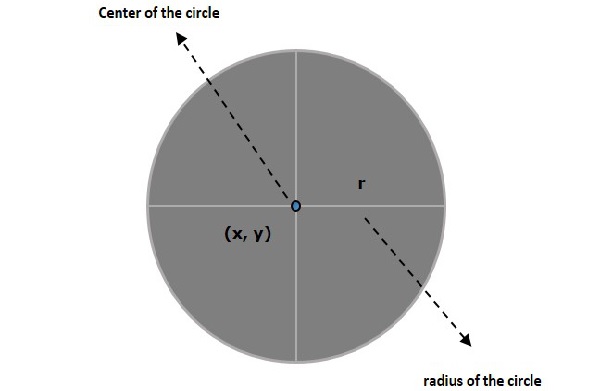
A circle is the locus of all points at a fixed distance (radius of circle) from a fixed point (the centre of circle). In other words, a circle is a line forming a closed loop, every point on which is a fixed distance from a centre point.
A circle is defined by two parameters namely −
Centre − It is a point inside the circle. All points on the circle are equidistant (same distance) from the centre point.
Radius − The radius is the distance from the centre to any point on the circle. It is half the diameter.
Circle in JavaFX
In JavaFX, a circle is represented by a class named Circle. This class belongs to the package javafx.scene.shape.
By instantiating this class, you can create a Circle node in JavaFX.
This class has 3 properties of the double datatype namely −
centerX − The x coordinate of the center of a circle.
centerY − The y coordinate of the center of a circle.
radius − The radius of the circle in pixels.
To draw a circle, you need to pass values to these properties, either by passing them to the constructor of this class, in the same order, at the time of instantiation or by using setter methods.
Steps to Draw a Circle
Follow the steps given below to draw a Circle in JavaFX.
Step 1: Creating a Circle
You can create a circle in JavaFX by instantiating the class named Circle which belongs to a package javafx.scene.shape. The entire JavaFX code must be written inside the start() method of Application class as shown below −
publicclassClassNameextendsApplication{publicvoidstart(Stage primaryStage)throwsException{// Creating a circle object Circle circle =newCircle();}}
Step 2: Setting Properties to the Circle
Specify the x, y coordinates of the center of the circle and the radius of the circle by setting the properties X, Y, and radius using their respective setter methods, within the start() method, as shown in the following code block.
Instantiate the Group class of package javafx.scene, by passing the Circle object as a parameter value to its constructor as follows −
Group root =newGroup(circle);
Step 4: Launching Application
Once the 2D object is created, follow the given steps below to launch the application properly −
Firstly, instantiate the class named Scene by passing the Group object as a parameter value to its constructor. To this constructor, you can also pass dimensions of the application screen as optional parameters.
Then, set the title to the stage using the setTitle() method of the Stage class.
Now, a Scene object is added to the stage using the setScene() method of the class named Stage.
Display the contents of the scene using the method named show().
Lastly, the application is launched with the help of the launch() method.
Example
Following is a program which generates a circle using JavaFX. Save this code in a file with the name CircleExample.java.
importjavafx.application.Application;importjavafx.scene.Group;importjavafx.scene.Scene;importjavafx.stage.Stage;importjavafx.scene.shape.Circle;publicclassCircleExampleextendsApplication{@Overridepublicvoidstart(Stage stage){//Drawing a Circle Circle circle =newCircle();//Setting the properties of the circle
circle.setCenterX(300.0f);
circle.setCenterY(135.0f);
circle.setRadius(100.0f);//Creating a Group object Group root =newGroup(circle);//Creating a scene object Scene scene =newScene(root,600,300);//Setting title to the Stage
stage.setTitle("Drawing a Circle");//Adding scene to the stage
stage.setScene(scene);//Displaying the contents of the stage
stage.show();}publicstaticvoidmain(String args[]){launch(args);}}</code></pre>
Compile and execute the saved java file from the command prompt using the following commands.
On executing, the above program generates a JavaFX window displaying a circle as shown below.
Example
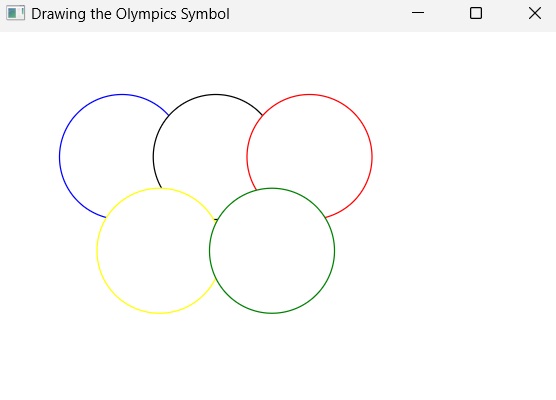
Let us see another example to draw a circle as a part of the Olympics symbol. Name the file as OlympicCircle.java.
importjavafx.application.Application;importjavafx.scene.Group;importjavafx.scene.Scene;importjavafx.scene.paint.Color;importjavafx.stage.Stage;importjavafx.scene.shape.Circle;publicclassOlympicCircleextendsApplication{@Overridepublicvoidstart(Stage stage){//Drawing a Circle Circle circle1 =newCircle(100.0f,50.0f,50.0f);
circle1.setStroke(Color.BLUE);
circle1.setFill(Color.WHITE);Circle circle2 =newCircle(175.0f,50.0f,50.0f);
circle2.setStroke(Color.BLACK);
circle2.setFill(Color.WHITE);Circle circle3 =newCircle(250.0f,50.0f,50.0f);
circle3.setStroke(Color.RED);
circle3.setFill(Color.WHITE);Circle circle4 =newCircle(75.0f,125.0f,50.0f);
circle4.setStroke(Color.YELLOW);
circle4.setFill(Color.WHITE);Circle circle5 =newCircle(150.0f,125.0f,50.0f);
circle5.setStroke(Color.GREEN);
circle5.setFill(Color.WHITE);//Creating a Group object Group root =newGroup();
root.getChildren().addAll(circle1,circle2,circle3,circle4,circle5);//Creating a scene object Scene scene =newScene(root,600,300);//Setting title to the Stage
stage.setTitle("Drawing the Olympics Symbol");//Adding scene to the stage
stage.setScene(scene);//Displaying the contents of the stage
stage.show();}publicstaticvoidmain(String args[]){launch(args);}}</code></pre>
Compile and execute the saved java file from the command prompt using the following commands.