Like Linear Gradient Pattern, there are various types of gradient patterns that depict the way they’re flowed. The other types are Radial, Angular, Reflected, Diamond gradient patterns. In this chapter, we will learn about the Radial Gradient Pattern.
The Radial Gradient Pattern is another type of gradient pattern that starts from a center point and flows in a circular manner up to a radius. Simply put, the radial gradient contains two or more color stops in the form of concentric circles.
JavaFX also provides this type of color pattern to fill circular type of 2D shapes, like a regular circle or an ellipse etc.
Applying Radial Gradient Pattern
To apply a Radial Gradient Pattern to the nodes, instantiate the GradientPattern class and pass its object to the setFill(), setStroke() methods.
The constructor of this class accepts a few parameters, some of which are −
startX, startY − These double properties represent the x and y coordinates of the starting point of the gradient.
endX, endY − These double properties represent the x and y coordinates of the ending point of the gradient.
cycleMethod − This argument defines how the regions outside the color gradient bounds are defined by the starting and ending points and how they should be filled.
proportional − This is a Boolean Variable; on setting this property to true the start and end locations are set to a proportion.
Stops − This argument defines the color-stop points along the gradient line.
//Setting the radial gradient Stop[] stops =newStop[]{newStop(0.0,Color.WHITE),newStop(0.3,Color.RED),newStop(1.0,Color.DARKRED)};RadialGradient radialGradient =newRadialGradient(0,0,300,178,60,false,CycleMethod.NO_CYCLE, stops);
Example
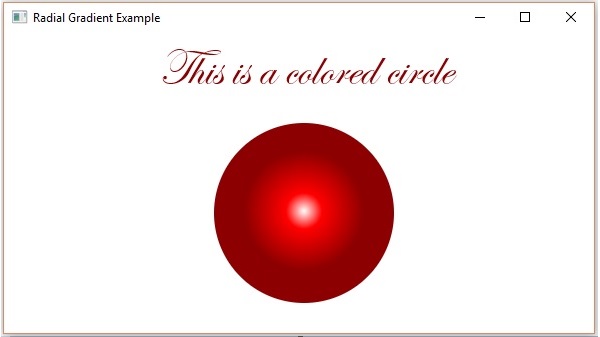
Following is an example which demonstrates how to apply a radial gradient pattern to the nodes in JavaFX. Here, we are creating a circle and a text nodes and applying gradient pattern to them.
Save this code in a file with the name RadialGradientExample.java.
importjavafx.application.Application;importjavafx.scene.Group;importjavafx.scene.Scene;importjavafx.scene.paint.Color;importjavafx.scene.paint.CycleMethod;importjavafx.scene.paint.RadialGradient;importjavafx.scene.paint.Stop;importjavafx.stage.Stage;importjavafx.scene.shape.Circle;importjavafx.scene.text.Font;importjavafx.scene.text.Text;publicclassRadialGradientExampleextendsApplication{@Overridepublicvoidstart(Stage stage){//Drawing a Circle Circle circle =newCircle();//Setting the properties of the circle
circle.setCenterX(300.0f);
circle.setCenterY(180.0f);
circle.setRadius(90.0f);//Drawing a text Text text =newText("This is a colored circle");//Setting the font of the text
text.setFont(Font.font("Edwardian Script ITC",50));//Setting the position of the text
text.setX(155);
text.setY(50);//Setting the radial gradient Stop[] stops =newStop[]{newStop(0.0,Color.WHITE),newStop(0.3,Color.RED),newStop(1.0,Color.DARKRED)};RadialGradient radialGradient =newRadialGradient(0,0,300,178,60,false,CycleMethod.NO_CYCLE, stops);//Setting the radial gradient to the circle and text
circle.setFill(radialGradient);
text.setFill(radialGradient);//Creating a Group object Group root =newGroup(circle, text);//Creating a scene object Scene scene =newScene(root,600,300);//Setting title to the Stage
stage.setTitle("Radial Gradient Example");//Adding scene to the stage
stage.setScene(scene);//Displaying the contents of the stage
stage.show();}publicstaticvoidmain(String args[]){launch(args);}}</code></pre>
Compile and execute the saved java file from the command prompt using the following commands.
On executing, the above program generates a JavaFX window as follows −
Example
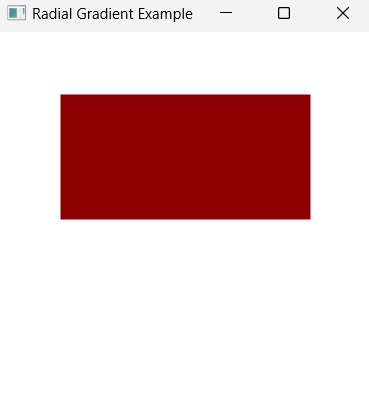
Radial Gradient Pattern does not work with shapes that are non-circular; i.e., you can only apply radial gradient on circular and elliptical shapes.
In the following example, let us try to apply the radial gradient pattern on a Rectangular shape. Save this code in a file with the name RectangleRadialGradient.java.
Apart from solid colors, you can also display a color gradient in JavaFX. A color gradient, in color science, is defined as the progression of colors depending on their positions. Hence, a color gradient is also known as color ramp or color progression.
Traditionally, a color gradient contains colors arranged sequentially or linearly. However, in a linear gradient pattern, the colors are flowing in a single direction. Even if the shape to be coloured is not linear, like a circle or an ellipse, the colors would still be arranged in one direction.
Let us learn how to apply the linear gradient pattern on 2D shapes in this chapter.
Applying Linear Gradient Pattern
To apply a Linear Gradient Pattern to the nodes, instantiate the LinearGradient class and pass its object to the setFill(), setStroke() methods.
The constructor of this class accepts five parameters namely −
startX, startY − These double properties represent the x and y coordinates of the starting point of the gradient.
endX, endY − These double properties represent the x and y coordinates of the ending point of the gradient.
cycleMethod − This argument defines how the regions outside the color gradient bounds, defined by the starting and ending points, should be filled.
proportional − This is a Boolean Variable; on setting this property to true, the start and end locations are set to a proportion.
Stops − This argument defines the color-stop points along the gradient line.
//Setting the linear gradient Stop[] stops =newStop[]{newStop(0,Color.DARKSLATEBLUE),newStop(1,Color.DARKRED)};LinearGradient linearGradient =newLinearGradient(0,0,1,0,true,CycleMethod.NO_CYCLE, stops);
Example 1
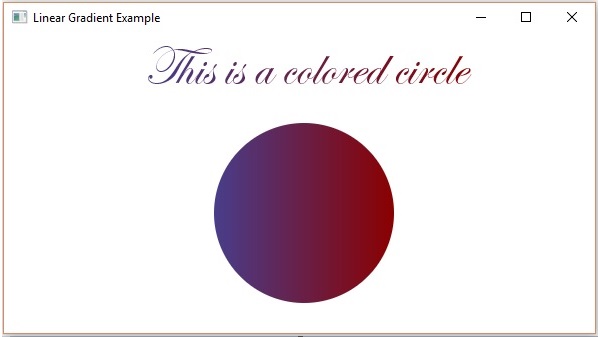
Following is an example which demonstrates how to apply a gradient pattern to the nodes in JavaFX. Here, we are creating a circle and a text nodes and applying linear gradient pattern to them.
Save this code in a file with name LinearGradientExample.java.
importjavafx.application.Application;importjavafx.scene.Group;importjavafx.scene.Scene;importjavafx.scene.paint.Color;importjavafx.scene.paint.CycleMethod;importjavafx.scene.paint.LinearGradient;importjavafx.scene.paint.Stop;importjavafx.stage.Stage;importjavafx.scene.shape.Circle;importjavafx.scene.text.Font;importjavafx.scene.text.Text;publicclassLinearGradientExampleextendsApplication{@Overridepublicvoidstart(Stage stage){//Drawing a Circle Circle circle =newCircle();//Setting the properties of the circle
circle.setCenterX(300.0f);
circle.setCenterY(180.0f);
circle.setRadius(90.0f);//Drawing a text Text text =newText("This is a colored circle");//Setting the font of the text
text.setFont(Font.font("Edwardian Script ITC",55));//Setting the position of the text
text.setX(140);
text.setY(50);//Setting the linear gradient Stop[] stops =newStop[]{newStop(0,Color.DARKSLATEBLUE),newStop(1,Color.DARKRED)};LinearGradient linearGradient =newLinearGradient(0,0,1,0,true,CycleMethod.NO_CYCLE, stops);//Setting the linear gradient to the circle and text
circle.setFill(linearGradient);
text.setFill(linearGradient);//Creating a Group object Group root =newGroup(circle, text);//Creating a scene object Scene scene =newScene(root,600,300);//Setting title to the Stage
stage.setTitle("Linear Gradient Example");//Adding scene to the stage
stage.setScene(scene);//Displaying the contents of the stage
stage.show();}publicstaticvoidmain(String args[]){launch(args);}}</code></pre>
Compile and execute the saved java file from the command prompt using the following commands.
On executing, the above program generates a JavaFX window as follows −
Example 2
Apart from circle, you can also apply this type of gradient on other closed shapes like Polygons. Here, we are creating a triangle and coloring it with a certain linear gradient pattern.
Save this code in a file with name TriangleLinearGradient.java.
When you draw a 2D shape in a JavaFX application, you might have observed that, by default, it is colored black. But, the color black is not always suitable for all types of applications a user creates. Hence, JavaFX allows you to change this default color into whichever color the user deems perfect for their application.
To apply colors to an application, JavaFX provides various classes in the package javafx.scene.paint package. This package contains an abstract class named Paint and it is the base class of all the classes that are used to apply colors.
Using these classes, you can apply colors in the following patterns −
Uniform − In this pattern, color is applied uniformly throughout node.
Image Pattern − This lets you to fill the region of the node with an image pattern.
Gradient − In this pattern, the color applied to the node varies from one point to the other. It has two kinds of gradients namely Linear Gradient and Radial Gradient.
All those node classes to which you can apply color such as Shape, Text (including Scene), have methods named setFill() and setStroke(). These will help to set the color values of the nodes and their strokes respectively.
These methods accept an object of type Paint. Therefore, to create either of these type of images, you need to instantiate these classes and pass the object as a parameter to these methods.
Applying Color to the Nodes
To set uniform color pattern to the nodes, you need to pass an object of the class color to the setFill(), setStroke() methods as follows −
//Setting color to the text Color color =newColor.BEIGE
text.setFill(color);//Setting color to the stroke Color color =newColor.DARKSLATEBLUE
circle.setStroke(color);
In the above code block, we are using the static variables of the color class to create a color object.
In the same way, you can also use the RGB values or HSB standard of coloring or web hash codes of colors as shown below −
//creating color object by passing RGB values Color c =Color.rgb(0,0,255);//creating color object by passing HSB valuesColor c =Color.hsb(270,1.0,1.0);//creating color object by passing the hash code for web Color c =Color.web("0x0000FF",1.0);
Example
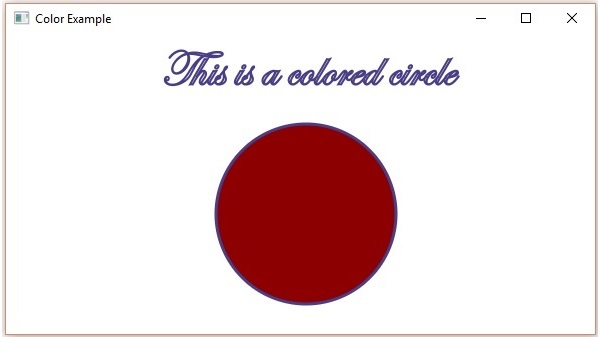
Following is an example which demonstrates, how to apply color to the nodes in JavaFX. Here, we are creating a circle and text nodes and applying colors to them.
Save this code in a file with the name ColorExample.java.
importjavafx.application.Application;importjavafx.scene.Group;importjavafx.scene.Scene;importjavafx.scene.paint.Color;importjavafx.stage.Stage;importjavafx.scene.shape.Circle;importjavafx.scene.text.Font;importjavafx.scene.text.Text;publicclassColorExampleextendsApplication{@Overridepublicvoidstart(Stage stage){//Drawing a Circle Circle circle =newCircle();//Setting the properties of the circle
circle.setCenterX(300.0f);
circle.setCenterY(180.0f);
circle.setRadius(90.0f);//Setting color to the circle
circle.setFill(Color.DARKRED);//Setting the stroke width
circle.setStrokeWidth(3);//Setting color to the stroke
circle.setStroke(Color.DARKSLATEBLUE);//Drawing a text Text text =newText("This is a colored circle");//Setting the font of the text
text.setFont(Font.font("Edwardian Script ITC",50));//Setting the position of the text
text.setX(155);
text.setY(50);//Setting color to the text
text.setFill(Color.BEIGE);
text.setStrokeWidth(2);
text.setStroke(Color.DARKSLATEBLUE);//Creating a Group object Group root =newGroup(circle, text);//Creating a scene object Scene scene =newScene(root,600,300);//Setting title to the Stage
stage.setTitle("Color Example");//Adding scene to the stage
stage.setScene(scene);//Displaying the contents of the stage
stage.show();}publicstaticvoidmain(String args[]){launch(args);}}</code></pre>
Compile and execute the saved java file from the command prompt using the following commands.
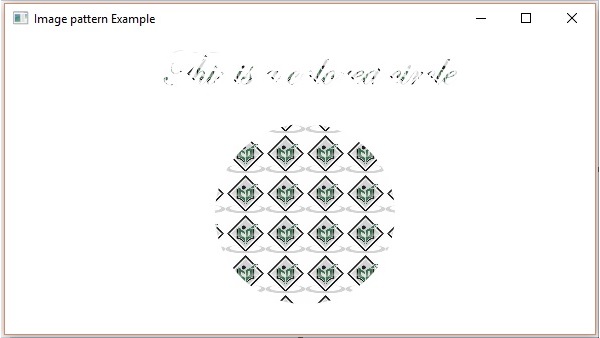
Following is an example which demonstrates how to apply image pattern to the nodes in JavaFX. Here, we are creating a circle and a text node and applying an image pattern to them.
Save this code in a file with name ImagePatternExample.java.
importjavafx.application.Application;importjavafx.scene.Group;importjavafx.scene.Scene;importjavafx.scene.image.Image;importjavafx.scene.paint.Color;importjavafx.scene.paint.ImagePattern;importjavafx.scene.paint.Stop;importjavafx.stage.Stage;importjavafx.scene.shape.Circle;importjavafx.scene.text.Font;importjavafx.scene.text.Text;publicclassImagePatternExampleextendsApplication{@Overridepublicvoidstart(Stage stage){//Drawing a Circle Circle circle =newCircle();//Setting the properties of the circle
circle.setCenterX(300.0f);
circle.setCenterY(180.0f);
circle.setRadius(90.0f);//Drawing a text Text text =newText("This is a colored circle");//Setting the font of the text
text.setFont(Font.font("Edwardian Script ITC",50));//Setting the position of the text
text.setX(155);
text.setY(50);//Setting the image pattern String link ="https://encrypted-tbn1.gstatic.com"+"/images?q=tbn:ANd9GcRQub4GvEezKMsiIf67U"+"rOxSzQuQ9zl5ysnjRn87VOC8tAdgmAJjcwZ2qM";Image image =newImage(link);ImagePattern radialGradient =newImagePattern(image,20,20,40,40,false);//Setting the linear gradient to the circle and text
circle.setFill(radialGradient);
text.setFill(radialGradient);//Creating a Group object Group root =newGroup(circle, text);//Creating a scene object Scene scene =newScene(root,600,300);//Setting title to the Stage
stage.setTitle("Image pattern Example");//Adding scene to the stage
stage.setScene(scene);//Displaying the contents of the stage
stage.show();}publicstaticvoidmain(String args[]){launch(args);}}</code></pre>
Compile and execute the saved java file from the command prompt using the following commands.
The Path Element Arc is used to draw an arc to a point in the specified coordinates from the current position.
It is represented by a class named ArcTo. This class belongs to the package javafx.scene.shape.
This class has 4 properties of the double datatype namely −
X − The x coordinate of the center of the arc.
Y − The y coordinate of the center of the arc.
radiusX − The width of the full ellipse of which the current arc is a part of.
radiusY − The height of the full ellipse of which the current arc is a part of.
To draw the Path element arc, you need to pass values to these properties This can be done by passing them to the constructor of this class, in the same order, at the time of instantiation; Or, by using their respective setter methods.
Steps to draw PathElement Arc
To draw an arc to a specified point from the current position in JavaFX, follow the steps given below.
Step 1: Creating a Path Object
Create a Path object by instantiating the Path class inside the start() method of Application class as shown below.
publicclassClassNameextendsApplication{@Overridepublicvoidstart(Stage primaryStage)throwsException{//Creating a Path object Path path =newPath();}}
Step 2: Create a Path
Create the MoveTo path element and set the XY coordinates to the starting point of the line to the coordinates (100, 150). This can be done using the methods setX() and setY() of the class MoveTo as shown below.
//Moving to the starting point MoveTo moveTo =newMoveTo();
moveTo.setX(100.0f);
moveTo.setY(150.0f);
Step 3: Creating an Object of the Class ArcTo
Create the path element quadratic curve by instantiating the class named ArcTo, which belongs to the package javafx.scene.shape as shown below −
//Creating an object of the class ArcTo ArcTo arcTo =newArcTo()
Step 4: Setting Properties to the Arc Element
Specify the x, y coordinates of the center of the ellipse (of which this arc is a part of). Then you can specify the radiusX, radiusY, start angle, and length of the arc using their respective setter methods as shown below.
//setting properties of the path element arc
arcTo.setX(300.0);
arcTo.setY(50.0);
   arcTo.setRadiusX(50.0);
arcTo.setRadiusY(50.0);
Step 5: Adding Elements to the Observable List of Path Class
Add the path elements MoveTo and arcTo, created in the previous steps to the observable list of the Path class as follows −
//Adding the path elements to Observable list of the Path class
path.getElements().add(moveTo);
path.getElements().add(cubicCurveTo);
Step 6: Launching Application
Once the Arc path object is created, follow the given steps below to launch the application properly −
Firstly, instantiate the class named Scene by passing the Group object as a parameter value to its constructor. To this constructor, you can also pass dimensions of the application screen as optional parameters.
Then, set the title to the stage using the setTitle() method of the Stage class.
Now, a Scene object is added to the stage using the setScene() method of the class named Stage.
Display the contents of the scene using the method named show().
Lastly, the application is launched with the help of the launch() method.
Example
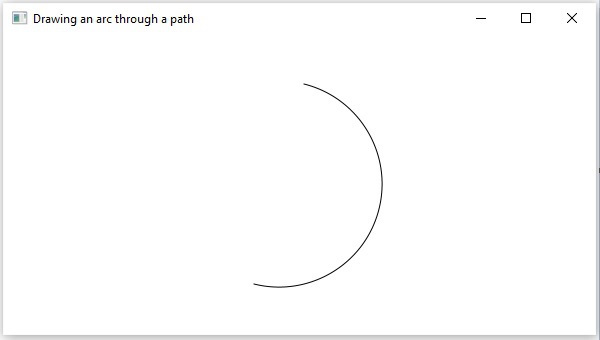
Following is a program that draws an arc from the current point to a specified position using the class Path of JavaFX. Save this code in a file with the name ArcExample.java.
importjavafx.application.Application;importjavafx.scene.Group;importjavafx.scene.Scene;importjavafx.stage.Stage;importjavafx.scene.shape.ArcTo;importjavafx.scene.shape.MoveTo;importjavafx.scene.shape.Path;publicclassArcExampleextendsApplication{@Overridepublicvoidstart(Stage stage){//Creating an object of the class Path Path path =newPath();//Moving to the starting point MoveTo moveTo =newMoveTo();
moveTo.setX(250.0);
moveTo.setY(250.0);//Instantiating the arcTo class ArcTo arcTo =newArcTo();//setting properties of the path element arc
arcTo.setX(300.0);
arcTo.setY(50.0);
arcTo.setRadiusX(50.0);
arcTo.setRadiusY(50.0);//Adding the path elements to Observable list of the Path class
path.getElements().add(moveTo);
path.getElements().add(arcTo);//Creating a Group object Group root =newGroup(path);//Creating a scene object Scene scene =newScene(root,600,300);//Setting title to the Stage
stage.setTitle("Drawing an arc through a path");//Adding scene to the stage
stage.setScene(scene);//Displaying the contents of the stage
stage.show();}publicstaticvoidmain(String args[]){launch(args);}}</code></pre>
Compile and execute the saved java file from the command prompt using the following commands.
On executing, the above program generates a JavaFX window displaying an arc, which is drawn from the current position to the specified point, as shown below.
Example
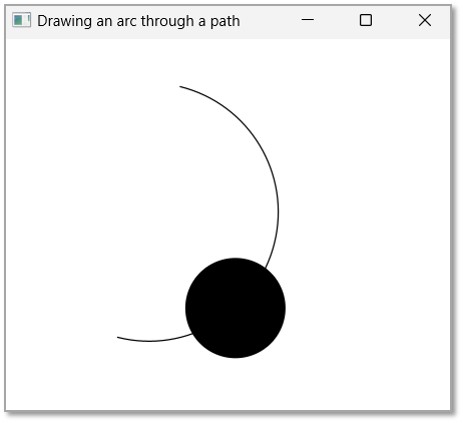
Let us try to draw an ArcTo Path in JavaFX to create a pendulum object with a circular pendulum moving to and fro on an Arc Path. Save this code in a file with the name ArcToAnimation.java.
importjavafx.application.Application;importjavafx.animation.PathTransition;importjavafx.scene.Group;importjavafx.scene.Scene;importjavafx.stage.Stage;importjavafx.scene.shape.*;importjavafx.scene.shape.MoveTo;importjavafx.scene.shape.Path;importjavafx.util.Duration;publicclassArcToAnimationextendsApplication{@Overridepublicvoidstart(Stage stage){// Drawing a circleCircle circle =newCircle(300.0f,50.0f,40.0f);//Creating an object of the class Path Path path =newPath();//Moving to the starting point MoveTo moveTo =newMoveTo();
moveTo.setX(250.0);
moveTo.setY(250.0);//Instantiating the arcTo class ArcTo arcTo =newArcTo();//setting properties of the path element arc
arcTo.setX(300.0);
arcTo.setY(50.0);
arcTo.setRadiusX(50.0);
arcTo.setRadiusY(50.0);//Adding the path elements to Observable list of the Path class
path.getElements().add(moveTo);
path.getElements().add(arcTo);//Creating a path transition PathTransition pathTransition =newPathTransition();//Setting the duration of the path transition
pathTransition.setDuration(Duration.millis(1000));//Setting the node
pathTransition.setNode(circle);//Setting the path
pathTransition.setPath(path);//Setting the orientation of the path
pathTransition.setOrientation(PathTransition.OrientationType.ORTHOGONAL_TO_TANGENT);//Setting the cycle count for the transition
pathTransition.setCycleCount(50);//Setting auto reverse value to true
pathTransition.setAutoReverse(true);//Playing the animation
pathTransition.play();//Creating a Group object Group root =newGroup();
root.getChildren().addAll(circle, path);//Creating a scene object Scene scene =newScene(root,600,300);//Setting title to the Stage
stage.setTitle("Drawing an arc through a path");//Adding scene to the stage
stage.setScene(scene);//Displaying the contents of the stage
stage.show();}publicstaticvoidmain(String args[]){launch(args);}}</code></pre>
Compile and execute the saved java file from the command prompt using the following commands.
A Cubic curve is a two dimensional structure that is a type of a Bezier curve. A Bezier curve is defined as a curve that passes through a set of control points (P0…Pn). It is called a Cubic curve when the number of control points are 4 (or, if the order of the curve is 3).
JavaFX also provides a CubicCurve Path object to draw a more complex shape. Here, we will be considering only the end points of the Cubic Curve and the control points in order to construct a Path object. Let us see how to construct it in detail further.
CubicCurve Path Object
The path element cubic curve is used to draw a cubic curve to a point in the specified coordinates from the current position.
It is represented by a class named CubicCurveTo. This class belongs to the package javafx.scene.shape.
This class has 6 properties of the double datatype namely −
setX − The x coordinate of the point to which a curve is to be drawn from the current position.
setX − The y coordinate of the point to which a curve is to be drawn from the current position.
controlX1 − The x coordinate of the 1st control point of the curve.
controlY1 − The y coordinate of the 1st control point of the curve.
controlX2 − The x coordinate of the 2nd control point of the curve.
controlY2 − The y coordinate of the 2nd control point of the curve.
To draw a cubic curve, you need to pass values to these properties. This can be done by passing them to the constructor of this class. These should be in the same order as they were at the time of instantiation; Or, by using their respective setter methods.
Steps to draw PathElement Cubic Curve
To draw a cubic curve to a specified point from the current position in JavaFX, follow the steps given below.
Step 1: Creating a Class
Create a Cubic Curve Path object inside the start() method of the Application class as shown below.
publicclassClassNameextendsApplication{@Overridepublicvoidstart(Stage primaryStage)throwsException{//Creating a Path object Path path =newPath();}}
Step 2: Create a Path
Create the MoveTo path element and set the XY coordinates to the starting point of the line to the coordinates (100, 150). This can be done using the methods setX() and setY() of the class MoveTo as shown below.
//Moving to the starting point MoveTo moveTo =newMoveTo();
moveTo.setX(100.0f);
moveTo.setY(150.0f);
Step 3: Creating an Object of the Class CubicCurveTo
Create the path element quadratic curve by instantiating the class named CubicCurveTo, which belongs to the package javafx.scene.shape as shown below −
//Creating an object of the class CubicCurveTo CubicCurveTo cubicCurveTo=newCubicCurveTo();
Step 4: Setting Properties to the Cubic Curve Element
Specify the coordinates of the point to which a cubic curve is to be drawn from the current position. Then you should set the properties x, y, controlX1, controlY1, controlX2, controlY2 and the coordinates of the control point by their setter methods as shown below.
//Setting properties of the class CubicCurve
cubicCurveTo.setControlX1(400.0f);
cubicCurveTo.setControlY1(40.0f);
cubicCurveTo.setControlX2(175.0f);
cubicCurveTo.setControlY2(250.0f);
cubicCurveTo.setX(500.0f);
cubicCurveTo.setY(150.0f);
Step 5: Adding Elements to the Observable List of Path Class
Add the path elements → MoveTo and CubicCurveTo, created in the previous steps to the observable list of the Path class as follows −
//Adding the path elements to Observable list of the Path class
path.getElements().add(moveTo);
path.getElements().add(cubicCurveTo);
Step 6: Launching Application
Once the CubicCurveTo path object is created, follow the given steps below to launch the application properly −
Firstly, instantiate the class named Scene by passing the Group object as a parameter value to its constructor. To this constructor, you can also pass dimensions of the application screen as optional parameters.
Then, set the title to the stage using the setTitle() method of the Stage class.
Now, a Scene object is added to the stage using the setScene() method of the class named Stage.
Display the contents of the scene using the method named show().
Lastly, the application is launched with the help of the launch() method.
Example
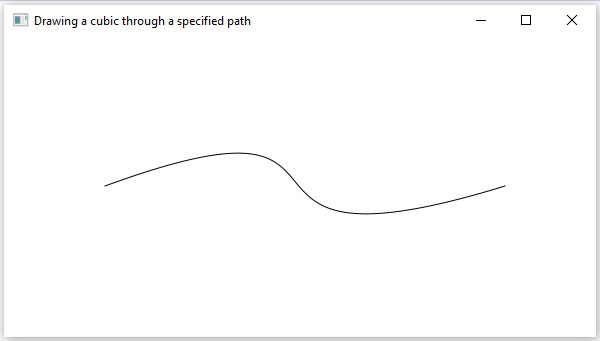
Following is the program which draws a cubic curve from the current point to a specified position using the class named Path of JavaFX. Save this code in a file with the name CubicCurveToExample.java.
importjavafx.application.Application;importjavafx.scene.Group;importjavafx.scene.Scene;importjavafx.stage.Stage;importjavafx.scene.shape.CubicCurveTo;importjavafx.scene.shape.MoveTo;importjavafx.scene.shape.Path;publicclassCubicCurveToExampleextendsApplication{@Overridepublicvoidstart(Stage stage){//Creating an object of the class named Path Path path =newPath();//Moving to the starting point MoveTo moveTo =newMoveTo();
moveTo.setX(100.0);
moveTo.setY(150.0);//Instantiating the class CubicCurve CubicCurveTo cubicCurveTo =newCubicCurveTo();//Setting properties of the class CubicCurve
cubicCurveTo.setControlX1(400.0f);
cubicCurveTo.setControlY1(40.0f);
cubicCurveTo.setControlX2(175.0f);
cubicCurveTo.setControlY2(250.0f);
cubicCurveTo.setX(500.0f);
cubicCurveTo.setY(150.0f);//Adding the path elements to Observable list of the Path class
path.getElements().add(moveTo);
path.getElements().add(cubicCurveTo);//Creating a Group object Group root =newGroup(path);//Creating a scene object Scene scene =newScene(root,600,300);//Setting title to the Stage
stage.setTitle("Drawing a cubic through a specified path");//Adding scene to the stage
stage.setScene(scene);//Displaying the contents of the stage
stage.show();}publicstaticvoidmain(String args[]){launch(args);}}</code></pre>
Compile and execute the saved java file from the command prompt using the following commands.
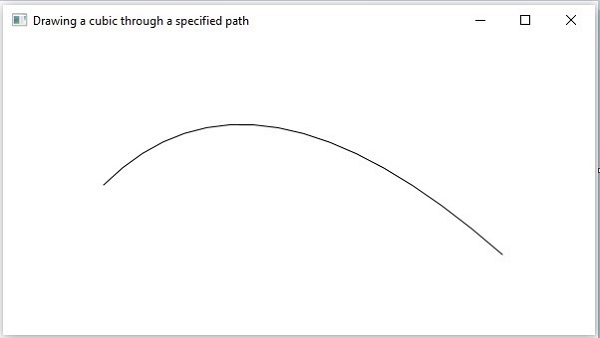
On executing, the above program generates a JavaFX window displaying a Cubic curve. This is drawn from the current position to the specified point as shown below.
Example
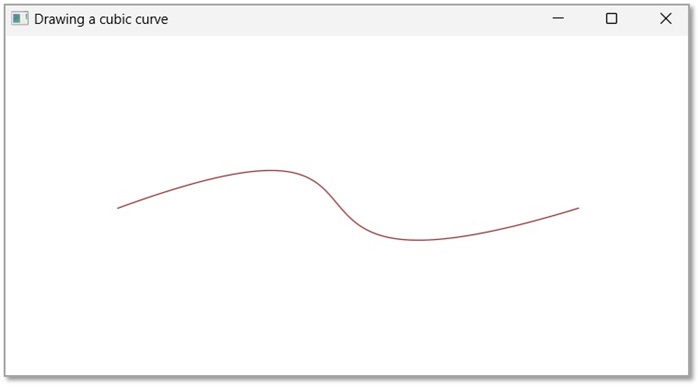
In another example, we are trying to apply Stroke Transition Animation on Cubic Curve Path. Here, the stroke of said 2D shape is set to change its color from BLACK to BROWN. Save this code in a file with the name CubicCurveToAnimation.java.
importjavafx.application.Application;importjavafx.animation.StrokeTransition;importjavafx.scene.Group;importjavafx.scene.Scene;importjavafx.stage.Stage;importjavafx.scene.shape.CubicCurveTo;importjavafx.util.Duration;importjavafx.scene.shape.MoveTo;importjavafx.scene.shape.Path;importjavafx.scene.paint.Color;publicclassCubicCurveToAnimationextendsApplication{@Overridepublicvoidstart(Stage stage){//Creating an object of the class named Path Path path =newPath();//Moving to the starting point MoveTo moveTo =newMoveTo();
moveTo.setX(100.0);
moveTo.setY(150.0);//Instantiating the class CubicCurve CubicCurveTo cubicCurveTo =newCubicCurveTo();//Setting properties of the class CubicCurve
cubicCurveTo.setControlX1(400.0f);
cubicCurveTo.setControlY1(40.0f);
cubicCurveTo.setControlX2(175.0f);
cubicCurveTo.setControlY2(250.0f);
cubicCurveTo.setX(500.0f);
cubicCurveTo.setY(150.0f);//Adding the path elements to Observable list of the Path class
path.getElements().add(moveTo);
path.getElements().add(cubicCurveTo);//creating stroke transition StrokeTransition st =newStrokeTransition();//Setting the duration of the transition
st.setDuration(Duration.millis(1000));//Setting the shape for the transition
st.setShape(path);//Setting the fromValue property of the transition (color)
st.setFromValue(Color.BLACK);//Setting the toValue property of the transition (color)
st.setToValue(Color.BROWN);//Setting the cycle count for the transition
st.setCycleCount(50);//Setting auto reverse value to false
st.setAutoReverse(false);//Playing the animation
st.play();//Creating a Group object Group root =newGroup(path);//Creating a scene object Scene scene =newScene(root,600,300);//Setting title to the Stage
stage.setTitle("Drawing a cubic curve");//Adding scene to the stage
stage.setScene(scene);//Displaying the contents of the stage
stage.show();}publicstaticvoidmain(String args[]){launch(args);}}</code></pre>
Compile and execute the saved java file from the command prompt using the following commands.
On executing, the above program generates a JavaFX window displaying a Cubic curve with the Stroke transition. This is drawn from the current position to the specified point as shown below.
Quadratic Curve or QuadCurve is generally defined as the curve that is defined by a quadratic equation. In JavaFX, we make use of 6 different properties to create this QuadCurve node. And to create a complex shape using QuadCurve, we would have to specify these properties everytime it is required.
JavaFX makes this process simpler by providing a QuadCurve path object that takes lesser number of properties to draw it.
We will learn about the QuadCurve Path object in detail further in this chapter.
QuadCurve Path Object
The path element quadratic curve is used to draw a quadratic curve to a point in the specified coordinates from the current position.
It is represented by a class named QuadraticCurveTo. This class belongs to the package javafx.scene.shape.
This class has 4 properties of the double datatype namely −
setX − The x coordinate of the point to which a curve is to be drawn from the current position.
setY − The y coordinate of the point to which a curve is to be drawn from the current position.
controlX − The x coordinate of the control point of the curve.
controlY − The y coordinate of the control point of the curve.
To draw a quadratic curve, you need to pass values to these properties. This can be done either by passing them to the constructor of this class, in the same order, at the time of instantiation; Or, by using their respective setter methods.
Steps to draw PathElement Quadratic Curve
To draw a quadratic curve to a specified point from the current position in JavaFX, follow the steps given below.
Step 1: Creating a Path Object
Instantiate the Path class to create a Path object within the start() method of Application class as shown below −
publicclassClassNameextendsApplication{@Overridepublicvoidstart(Stage primaryStage)throwsException{//Creating a Path object Path path =newPath();}}
Step 2: Create a Path
Create the MoveTo path element and set the XY coordinates to the starting point of the line to the coordinates (100, 150). This can be done by using the methods setX() and setY() of the class MoveTo as shown below.
//Moving to the starting point MoveTo moveTo =newMoveTo();
moveTo.setX(100.0f);
moveTo.setY(150.0f);
Step 3: Creating an Object of the Class QuadCurveTo
Create the path element Quadratic Curve by instantiating the class named QuadCurveTo which belongs to the package javafx.scene.shape as follows.
//Creating an object of the class QuadCurveTo QuadCurveTo quadCurveTo =newQuadCurveTo()
Step 4: Setting Properties to the Quadratic Curve Element
Specify the coordinates of the point to which a Quadratic Curve is to be drawn from the current position. Then you should set the properties x, y, controlx, controlY and the coordinates of the control point by their setter methods as shown below.
//Setting properties of the class QuadCurve
quadCurveTo.setX(500.0f);
quadCurveTo.setY(220.0f);
quadCurveTo.setControlX(250.0f);
quadCurveTo.setControlY(0.0f);
Step 5: Adding Elements to the Observable List of the Path Class
Add the path elements MoveTo and QuadraticCurveTo created in the previous steps to the observable list of the Path class as follows −
//Adding the path elements to Observable list of the Path class
path.getElements().add(moveTo);
path.getElements().add(quadCurveTo)
Step 6: Launching Application
Once the QuadCurveTo path object is created, follow the given steps below to launch the application properly −
Firstly, instantiate the class named Scene by passing the Group object as a parameter value to its constructor. To this constructor, you can also pass dimensions of the application screen as optional parameters.
Then, set the title to the stage using the setTitle() method of the Stage class.
Now, a Scene object is added to the stage using the setScene() method of the class named Stage.
Display the contents of the scene using the method named show().
Lastly, the application is launched with the help of the launch() method.
Example 1
Following is a program which draws a quadratic curve from the current point to a specified position using the class named Path of JavaFX. Save this code in a file with the name QuadCurveToExample.java.
importjavafx.application.Application;importjavafx.scene.Group;importjavafx.scene.Scene;importjavafx.stage.Stage;importjavafx.scene.shape.MoveTo;importjavafx.scene.shape.Path;importjavafx.scene.shape.QuadCurveTo;publicclassQuadCurveToExampleextendsApplication{@Overridepublicvoidstart(Stage stage){//Creating an object of the class named Path Path path =newPath();//Moving to the starting point MoveTo moveTo =newMoveTo();
moveTo.setX(100.0);
moveTo.setY(150.0);//Instantiating the class QuadCurve QuadCurveTo quadCurveTo =newQuadCurveTo();//Setting properties of the class QuadCurve
quadCurveTo.setX(500.0f);
quadCurveTo.setY(220.0f);
quadCurveTo.setControlX(250.0f);
quadCurveTo.setControlY(0.0f);//Adding the path elements to Observable list of the Path class
path.getElements().add(moveTo);
path.getElements().add(quadCurveTo);//Creating a Group object Group root =newGroup(path);//Creating a scene object Scene scene =newScene(root,600,300);//Setting title to the Stage
stage.setTitle("Drawing a QuadCurve through a specified path");//Adding scene to the stage
stage.setScene(scene);//Displaying the contents of the stage
stage.show();}publicstaticvoidmain(String args[]){launch(args);}}</code></pre>
Compile and execute the saved java file from the command prompt using the following commands.
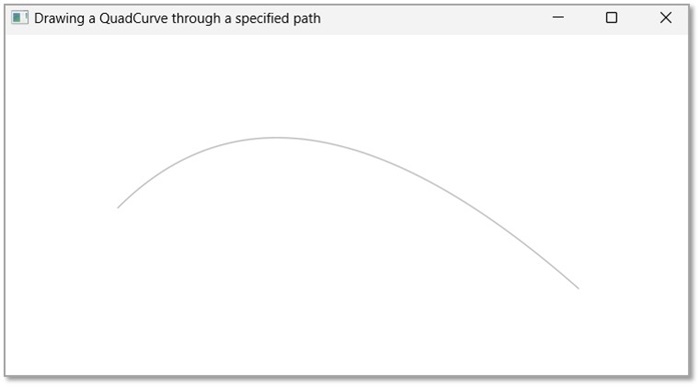
On executing, the above program generates a JavaFX window displaying a quadratic curve. This is drawn from the current position to the specified point as shown below.
Example 2
In this example, let us try to apply some animation to this QuadCurve Path. Here, we are drawing a sample QuadCurve and applying the Fade Transition to it. Save this code in a file with the name QuadCurveToAnimation.java.
importjavafx.application.Application;importjavafx.animation.FadeTransition;importjavafx.scene.Group;importjavafx.scene.Scene;importjavafx.stage.Stage;importjavafx.scene.shape.MoveTo;importjavafx.scene.shape.Path;importjavafx.scene.shape.QuadCurveTo;importjavafx.util.Duration;publicclassQuadCurveToAnimationextendsApplication{@Overridepublicvoidstart(Stage stage){//Creating an object of the class named Path Path path =newPath();//Moving to the starting point MoveTo moveTo =newMoveTo();
moveTo.setX(100.0);
moveTo.setY(150.0);//Instantiating the class QuadCurve QuadCurveTo quadCurveTo =newQuadCurveTo();//Setting properties of the class QuadCurve
quadCurveTo.setX(500.0f);
quadCurveTo.setY(220.0f);
quadCurveTo.setControlX(250.0f);
quadCurveTo.setControlY(0.0f);//Adding the path elements to Observable list of the Path class
path.getElements().add(moveTo);
path.getElements().add(quadCurveTo);//Creating the fade Transition FadeTransition fadeTransition =newFadeTransition();
fadeTransition.setDuration(Duration.millis(1000));//Setting the node for Transition
fadeTransition.setNode(path);//Setting the property fromValue of the transition (opacity)
fadeTransition.setFromValue(1.0);//Setting the property toValue of the transition (opacity)
fadeTransition.setToValue(0.3);//Setting the cycle count for the transition
fadeTransition.setCycleCount(50);//Setting auto reverse value to false
fadeTransition.setAutoReverse(false);//Playing the animation
fadeTransition.play();//Creating a Group object Group root =newGroup(path);//Creating a scene object Scene scene =newScene(root,600,300);//Setting title to the Stage
stage.setTitle("Drawing a QuadCurve through a specified path");//Adding scene to the stage
stage.setScene(scene);//Displaying the contents of the stage
stage.show();}publicstaticvoidmain(String args[]){launch(args);}}</code></pre>
Compile and execute the saved java file from the command prompt using the following commands.
On executing, the above program generates a JavaFX window displaying a quadratic curve that is fading out. This is drawn from the current position to the specified point as shown below.
The path element VLineTo is used to draw a vertical line to a point in the specified coordinates from the current position.
It is represented by a class named VLineTo. This class belongs to the package javafx.scene.shape.
This class has a property of the double datatype namely −
Y − The y coordinate of the point to which a vertical is to be drawn from the current position.
To draw the path element vertical line, you need to pass a value to this property. This can be done either by passing it to the constructor of this class at the time of instantiation; Or, by using its respective setter methods.
Steps to draw PathElement Vertical Line
To draw a vertical line to a specified point from the current position in JavaFX, follow the steps given below.
Step 1: Creating a Class
Create a Java class and inherit the Application class of the package javafx.application and implement the start() method of this class. Then create a path object by instantiating the Path class as follows.
publicclassClassNameextendsApplication{@Overridepublicvoidstart(Stage primaryStage)throwsException{//Creating a Path object Path path =newPath()}}
Step 2: Create a Path
Create the MoveTo path element and set XY coordinates to the starting point of the line to the coordinates (100, 150). This can be done by using the methods setX() and setY() of the class MoveTo as shown below.
//Moving to the starting point MoveTo moveTo =newMoveTo();
moveTo.setX(100.0f);
moveTo.setY(150.0f)
Step 3: Creating an object of the class VLineTo
Create the path element vertical line by instantiating the class named VLineTo, which belongs to the package javafx.scene.shape as follows.
//Creating an object of the class VLineTo VLineTo vLineTo =newVLineTo();
Step 4:Setting Properties to the Element Vertical Line
Specify the coordinates of the point to which a vertical line is to be drawn from the current position. This can be done by setting the properties x and y using their respective setter methods as shown in the following code block.
//Setting the Properties of the vertical line element
lineTo.setX(500.0f);
lineTo.setY(150.0f);
Step 5: Adding Elements to the Observable List of the Path Class
Add the path elements MoveTo and VlineTo created in the previous steps to the observable list of the Path class as follows −
//Adding the path elements to Observable list of the Path class
path.getElements().add(moveTo);
path.getElements().add(VlineTo);
Step 6: Launching Application
Once the VLineTo path object is created, follow the given steps below to launch the application properly −
Firstly, instantiate the class named Scene by passing the Group object as a parameter value to its constructor. To this constructor, you can also pass dimensions of the application screen as optional parameters.
Then, set the title to the stage using the setTitle() method of the Stage class.
Now, a Scene object is added to the stage using the setScene() method of the class named Stage.
Display the contents of the scene using the method named show().
Lastly, the application is launched with the help of the launch() method.
Example 1
Following is a program which draws a vertical line from the current point to a specified position using the class Path of JavaFX. Save this code in a file with the name − VLineToExample.java.
importjavafx.application.Application;importjavafx.scene.Group;importjavafx.scene.Scene;importjavafx.stage.Stage;importjavafx.scene.shape.VLineTo;importjavafx.scene.shape.MoveTo;importjavafx.scene.shape.Path;publicclassVLineToExampleextendsApplication{@Overridepublicvoidstart(Stage stage){//Creating an object of the Path class Path path =newPath();//Moving to the starting point MoveTo moveTo =newMoveTo();
moveTo.setX(100.0);
moveTo.setY(150.0);//Instantiating the VLineTo class VLineTo vLineTo =newVLineTo();//Setting the properties of the path element vertical line
vLineTo.setY(10.0);//Adding the path elements to Observable list of the Path class
path.getElements().add(moveTo);
path.getElements().add(vLineTo);//Creating a Group object Group root =newGroup(path);//Creating a scene object Scene scene =newScene(root,600,300);//Setting title to the Stage
stage.setTitle("Drawing a vertical line");//Adding scene to the stage
stage.setScene(scene);//Displaying the contents of the stage
stage.show();}publicstaticvoidmain(String args[]){launch(args);}}</code></pre>
Compile and execute the saved java file from the command prompt using the following commands.
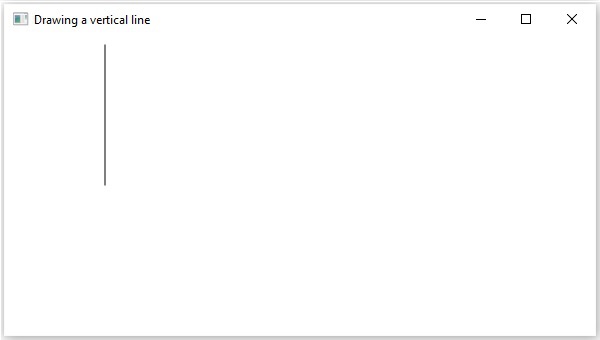
On executing, the above program generates a JavaFX window displaying a vertical line, which is drawn from the current position to the specified point, as shown below.
Example 2
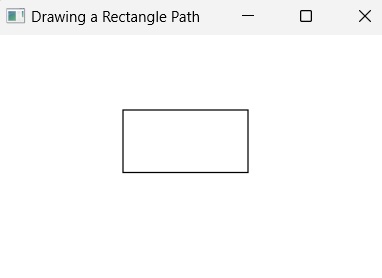
Following is a program which draws a rectangle using both vertical lines and horizontal lines using the class Path of JavaFX. Save this code in a file with the name − VLineToRectangle.java.
importjavafx.application.Application;importjavafx.scene.Group;importjavafx.scene.Scene;importjavafx.stage.Stage;importjavafx.scene.shape.HLineTo;importjavafx.scene.shape.LineTo;importjavafx.scene.shape.MoveTo;importjavafx.scene.shape.Path;publicclassVLineToRectangleextendsApplication{@Overridepublicvoidstart(Stage stage){//Creating an object of the Path class Path path =newPath();//Drawing a triangular pathMoveTo moveTo =newMoveTo();
moveTo.setX(200.0);
moveTo.setY(150.0);HLineTo hLineTo =newHLineTo();
hLineTo.setX(100.0);MoveTo moveTo2 =newMoveTo();
moveTo2.setX(100.0);
moveTo2.setY(150.0);LineTo lineTo =newLineTo();
lineTo.setX(150.0);
lineTo.setY(50.0);MoveTo moveTo3 =newMoveTo();
moveTo3.setX(150.0);
moveTo3.setY(50.0);LineTo lineTo2 =newLineTo();
lineTo2.setX(200.0);
lineTo2.setY(150.0);//Adding the path elements to Observable list of the Path class
path.getElements().add(moveTo);
path.getElements().add(hLineTo);
path.getElements().add(moveTo2);
path.getElements().add(lineTo);
path.getElements().add(moveTo3);
path.getElements().add(lineTo2);//Creating a Group object Group root =newGroup(path);//Creating a scene object Scene scene =newScene(root,600,300);//Setting title to the Stage
stage.setTitle("Drawing a Triangular Path");//Adding scene to the stage
stage.setScene(scene);//Displaying the contents of the stage
stage.show();}publicstaticvoidmain(String args[]){launch(args);}}</code></pre>
Compile and execute the saved java file from the command prompt using the following commands.
The path element HLineTo is used to draw a horizontal line to a point in the specified coordinates from the current position.
It is represented by a class named HLineTo. This class belongs to the package javafx.scene.shape.
This class has a property of the double datatype namely −
X − The x coordinate of the point to which a horizontal line is to be drawn from the current position.
To draw a path element horizontal line, you need to pass a value to this property. This can be either done by passing it to the constructor of this class, at the time of instantiation; Or, by using their respective setter methods.
Steps to draw PathElement Horizontal Line
Follow the steps given below to draw a horizontal line to a specified point from the current position in JavaFX.
Step 1: Creating a Path Object
We first create a Path object by instantiating the Path class within the start() method of Application class as shown below −
publicclassClassNameextendsApplication{@Overridepublicvoidstart(Stage primaryStage)throwsException{//Creating a Path object Path path =newPath()}}
Step 2: Setting the Initial Point
Create the MoveTo path element and set XY coordinates to starting point of the line to the coordinates (100, 150). This can be done by using the methods setX() and setY() of the class MoveTo as shown below.
//Moving to the starting point  MoveTo moveTo =newMoveTo();
moveTo.setX(100.0f);
moveTo.setY(150.0f);
Step 3: Creating an Object of the Class HLineTo
Create the path element horizontal line by instantiating the class named HLineTo which belongs to the package javafx.scene.shape as shown below.
//Creating an object of the class HLineTo HLineTo hLineTo =newHLineTo();
Step 4: Setting Properties to the Horizontal Line Element
Specify the x coordinate of the point to which a horizontal line is to be drawn from the current position. This can be done by setting the property x, using the method setX() of the HLineTo class as shown below.
//Setting the Properties of the horizontal line element
hlineTo.setX(400)
Step 5: Adding Elements to the Observable List of Path Class
Add the path elements MoveTo and HlineTo created in the previous steps to the observable list of the Path class as shown below −
//Adding the path elements to Observable list of the Path class
path.getElements().add(moveTo);
path.getElements().add(hlineTo);
Step 6: Launching Application
Once the HLineTo path object is created, follow the given steps below to launch the application properly −
Firstly, instantiate the class named Scene by passing the Group object as a parameter value to its constructor. To this constructor, you can also pass dimensions of the application screen as optional parameters.
Then, set the title to the stage using the setTitle() method of the Stage class.
Now, a Scene object is added to the stage using the setScene() method of the class named Stage.
Display the contents of the scene using the method named show().
Lastly, the application is launched with the help of the launch() method.
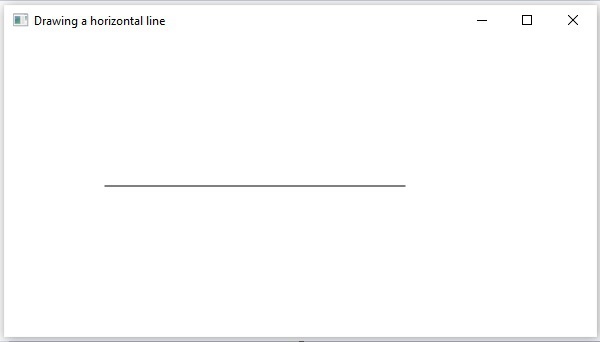
Example
Following is a program which draws a horizontal line from the current point to a specified position using the class Path of JavaFX. Save this code in a file with the name − HLineToExample.java.
importjavafx.application.Application;importjavafx.scene.Group;importjavafx.scene.Scene;importjavafx.stage.Stage;importjavafx.scene.shape.HLineTo;importjavafx.scene.shape.MoveTo;importjavafx.scene.shape.Path;publicclassHLineToExampleextendsApplication{@Overridepublicvoidstart(Stage stage){//Creating an object of the Path class Path path =newPath();//Moving to the starting point MoveTo moveTo =newMoveTo();
moveTo.setX(100.0);
moveTo.setY(150.0);//Instantiating the HLineTo class HLineTo hLineTo =newHLineTo();//Setting the properties of the path element horizontal line
hLineTo.setX(10.0);//Adding the path elements to Observable list of the Path class
path.getElements().add(moveTo);
path.getElements().add(hLineTo);//Creating a Group object Group root =newGroup(path);//Creating a scene object Scene scene =newScene(root,600,300);//Setting title to the Stage
stage.setTitle("Drawing a horizontal line");//Adding scene to the stage
stage.setScene(scene);//Displaying the contents of the stage
stage.show();}publicstaticvoidmain(String args[]){launch(args);}}</code></pre>
Compile and execute the saved java file from the command prompt using the following commands.
On executing, the above program generates a JavaFX window displaying a horizontal line, which is drawn from the current position to the specified point, as shown below.
Example
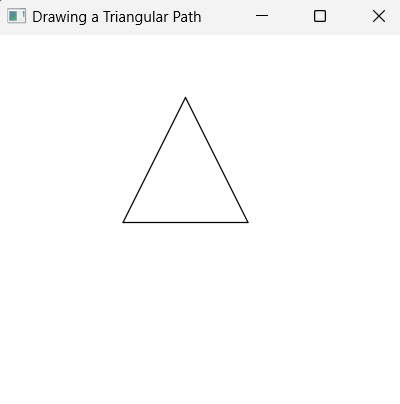
In this example, we are trying to draw a more complex path, i.e. triangle, using the horizontal line. Save this code in a file with the name − HLineToTriangle.java.
importjavafx.application.Application;importjavafx.scene.Group;importjavafx.scene.Scene;importjavafx.stage.Stage;importjavafx.scene.shape.HLineTo;importjavafx.scene.shape.LineTo;importjavafx.scene.shape.MoveTo;importjavafx.scene.shape.Path;publicclassHLineToTriangleextendsApplication{@Overridepublicvoidstart(Stage stage){//Creating an object of the Path class Path path =newPath();//Drawing a triangular pathMoveTo moveTo =newMoveTo();
moveTo.setX(200.0);
moveTo.setY(150.0);HLineTo hLineTo =newHLineTo();
hLineTo.setX(100.0);MoveTo moveTo2 =newMoveTo();
moveTo2.setX(100.0);
moveTo2.setY(150.0);LineTo lineTo =newLineTo();
lineTo.setX(150.0);
lineTo.setY(50.0);MoveTo moveTo3 =newMoveTo();
moveTo3.setX(150.0);
moveTo3.setY(50.0);LineTo lineTo2 =newLineTo();
lineTo2.setX(200.0);
lineTo2.setY(150.0);//Adding the path elements to Observable list of the Path class
path.getElements().add(moveTo);
path.getElements().add(hLineTo);
path.getElements().add(moveTo2);
path.getElements().add(lineTo);
path.getElements().add(moveTo3);
path.getElements().add(lineTo2);//Creating a Group object Group root =newGroup(path);//Creating a scene object Scene scene =newScene(root,600,300);//Setting title to the Stage
stage.setTitle("Drawing a Triangular Path");//Adding scene to the stage
stage.setScene(scene);//Displaying the contents of the stage
stage.show();}publicstaticvoidmain(String args[]){launch(args);}}</code></pre>
Compile and execute the saved java file from the command prompt using the following commands.
In geometry, a line is one of the most basic figures, which can be combined with other figures in different ways to create more complex structures. For example, a polygon is a closed geomtrical figure that is composed of several lines. In JavaFX, using a primitive 2D shape line to construct such complex figures is quite cumbersome. Thus, we make use of path objects to draw a line from one position to another on a two dimensional plane.
Using the Path class, we can draw a 2D shape from one position to another on a plane to create a path object. Previously, we have seen constructing complex figures like Olympics symbols, House etc. by casually using 2D shapes. In this chapter, let us learn how to construct such complex figures using path.
JavaFX Path Object LineTo
The path element line is used to draw a straight line to a point in the specified coordinates from the current position.
It is represented by a class named LineTo. This class belongs to the package javafx.scene.shape.
This class has 2 properties of the double datatype namely −
X − The x coordinate of the point to which a line is to be drawn from the current position.
Y − The y coordinate of the point to which a line is to be drawn from the current position.
To draw a line, you need to pass values to these properties. This can be either done by passing them to the constructor of this class, in the same order, at the time of instantiation; Or, by using their respective setter methods.
Steps to draw PathElement Line
To draw a line to a specified point from the current position in JavaFX, follow the steps given below.
Step 1: Creating a Path Class Object
Create a Java class and inherit the Application class of the package javafx.application and implement the start() method in this class. Then create a path class object within it as follows.
publicclassClassNameextendsApplication{@Overridepublicvoidstart(Stage primaryStage)throwsException{//Creating a Path object Path path =newPath();}}
Step 2: Setting the Path
Create the MoveTo path element and set the XY coordinates to starting point of the line to the coordinates (100, 150). This can be done using the methods setX() and setY() of the class MoveTo as shown below.
//Moving to the starting point MoveTo moveTo =newMoveTo();
moveTo.setX(100.0f);
moveTo.setY(150.0f);
Step 3: Creating an Object of the Class LineTo
Create the path element line by instantiating the class named LineTo which belongs to the package javafx.scene.shape as follows.
//Creating an object of the class LineTo LineTo lineTo =newLineTo();
Step 4: Setting Properties to the Line Element
Specify the coordinates of the point to which a line is to be drawn from the current position. This can be done by setting the properties x and y using their respective setter methods as shown in the following code block.
//Setting the Properties of the line element
lineTo.setX(500.0f);
lineTo.setY(150.0f);
Step 5: Adding Elements to the Observable List of the Path Class
Add the path elements MoveTo and LineTo created in the previous steps to the observable list of the Path class as shown below −
//Adding the path elements to Observable list of the Path class
path.getElements().add(moveTo);
path.getElements().add(lineTo);
Step 6: Launching Application
Once the LineTo path object is created, follow the given steps below to launch the application properly −
Firstly, instantiate the class named Scene by passing the Group object as a parameter value to its constructor. To this constructor, you can also pass dimensions of the application screen as optional parameters.
Then, set the title to the stage using the setTitle() method of the Stage class.
Now, a Scene object is added to the stage using the setScene() method of the class named Stage.
Display the contents of the scene using the method named show().
Lastly, the application is launched with the help of the launch() method.
Example 1
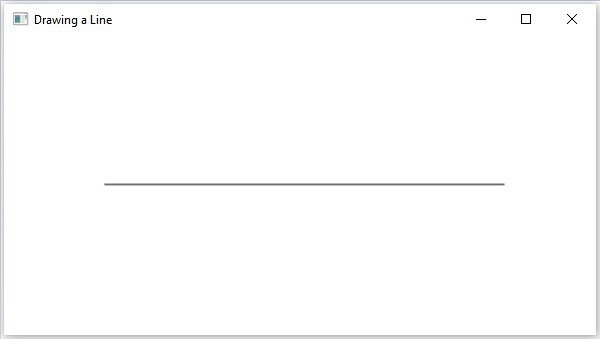
The following program shows how to draw a straight line from the current point to a specified position using the class Path of JavaFX. Save this code in a file with the name LineToExample.java.
importjavafx.application.Application;importjavafx.scene.Group;importjavafx.scene.Scene;importjavafx.scene.shape.LineTo;importjavafx.scene.shape.MoveTo;importjavafx.scene.shape.Path;importjavafx.stage.Stage;publicclassLineToExampleextendsApplication{@Overridepublicvoidstart(Stage stage){//Creating a Path object Path path =newPath();//Moving to the starting point MoveTo moveTo =newMoveTo();
moveTo.setX(100.0f);
moveTo.setY(150.0f);//Instantiating the LineTo class LineTo lineTo =newLineTo();//Setting the Properties of the line element
lineTo.setX(500.0f);
lineTo.setY(150.0f);//Adding the path elements to Observable list of the Path class
path.getElements().add(moveTo);
path.getElements().add(lineTo);//Creating a Group object Group root =newGroup(path);//Creating a scene object Scene scene =newScene(root,600,300);//Setting title to the Stage
stage.setTitle("Drawing a Line");//Adding scene to the stage
stage.setScene(scene);//Displaying the contents of the stage
stage.show();}publicstaticvoidmain(String args[]){launch(args);}}</code></pre>
Compile and execute the saved java file from the command prompt using the following commands.
On executing, the above program generates a JavaFX window displaying a straight line, which is drawn from the current position to the specified point, as shown below.
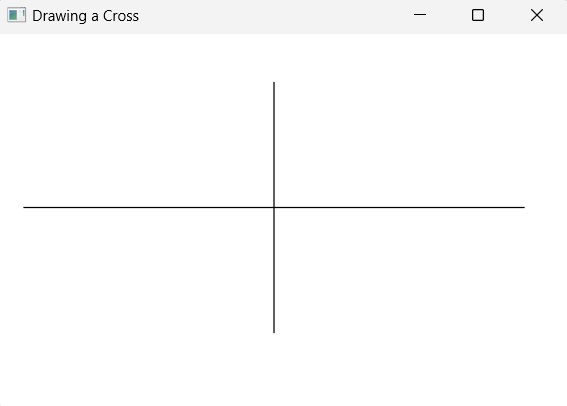
Example 2
Not just a single line, you can also add multiple lines to the JavaFX application in order to create more complex shapes. In this example, we will try to draw a simple cross figure. Save this code in a file with the name LineToCross.java.
importjavafx.application.Application;importjavafx.scene.Group;importjavafx.scene.Scene;importjavafx.scene.shape.LineTo;importjavafx.scene.shape.MoveTo;importjavafx.scene.shape.Path;importjavafx.stage.Stage;publicclassLineToCrossextendsApplication{@Overridepublicvoidstart(Stage stage){//Creating a Path object Path path =newPath();//Moving to the starting point MoveTo moveTo =newMoveTo();
moveTo.setX(100.0f);
moveTo.setY(150.0f);//Instantiating the LineTo class LineTo lineTo =newLineTo();//Setting the Properties of the line element
lineTo.setX(500.0f);
lineTo.setY(150.0f);//Adding the path elements to Observable list of the Path class
path.getElements().add(moveTo);
path.getElements().add(lineTo);//Creating a Group object Group root =newGroup(path);//Creating a scene object Scene scene =newScene(root,600,300);//Setting title to the Stage
stage.setTitle("Drawing a Line");//Adding scene to the stage
stage.setScene(scene);//Displaying the contents of the stage
stage.show();}publicstaticvoidmain(String args[]){launch(args);}}</code></pre>
Compile and execute the saved java file from the command prompt using the following commands.
In the previous 2D shapes chapters, we have seen how to draw some simple predefined shapes by instantiating classes and setting respective parameters.
But, just these predefined shapes are not sufficient to build more complex shapes other than the primitives provided by the javafx.shape package.
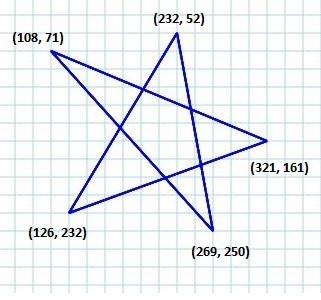
For example, if you want to draw a graphical element as shown in the following diagram, you cannot rely on those simple shapes. Even if you succeed constructing it using the Line shapes, the program becomes way to complex and inefficient.
To make this efficient, JavaFX introduced a concept called Path where a multiple edges that join a sequence of vertices together.
The Path Class
To draw such complex structures JavaFX provides a class named Path. This class represents the geometrical outline of a shape.
It is attached to an observable list which holds various Path Elements such as moveTo, LineTo, HlineTo, VlineTo, ArcTo, QuadCurveTo, CubicCurveTo.
On instantiating, this class constructs a path based on the given path elements.
You can pass the path elements to this class while instantiating it as follows−
The Path Element MoveTo is used to move the current position of the path to a specified point. It is generally used to set the starting point of a shape drawn using the path elements.
It is represented by a class named LineTo of the package javafx.scene.shape. It has 2 properties of the double datatype namely −
X − The x coordinate of the point to which a line is to be drawn from the current position.
Y − The y coordinate of the point to which a line is to be drawn from the current position.
You can create a move to path element by instantiating the MoveTo class and passing the x, y coordinates of the new point as follows −
MoveTo moveTo =newMoveTo(x, y);
If you don’t pass any values to the constructor, then the new point will be set to (0,0).
You can also set values to the x, y coordinate, using their respective setter methods as follows −
setX(value);setY(value);
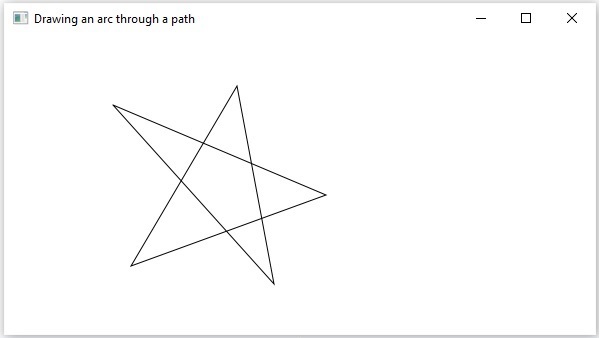
Example – Drawing a Complex Path
In this example, we will show how to draw the following shape using the Path, MoveTo and Line classes.
Save this code in a file with the name ComplexShape.java.
importjavafx.application.Application;importjavafx.scene.Group;importjavafx.scene.Scene;importjavafx.stage.Stage;importjavafx.scene.shape.LineTo;importjavafx.scene.shape.MoveTo;importjavafx.scene.shape.Path;publicclassComplexShapeextendsApplication{@Overridepublicvoidstart(Stage stage){//Creating a Path Path path =newPath();//Moving to the starting point MoveTo moveTo =newMoveTo(108,71);//Creating 1st line LineTo line1 =newLineTo(321,161);//Creating 2nd line LineTo line2 =newLineTo(126,232);//Creating 3rd line LineTo line3 =newLineTo(232,52);//Creating 4th line LineTo line4 =newLineTo(269,250);//Creating 4th line LineTo line5 =newLineTo(108,71);//Adding all the elements to the path
path.getElements().add(moveTo);
path.getElements().addAll(line1, line2, line3, line4, line5);//Creating a Group object Group root =newGroup(path);//Creating a scene object Scene scene =newScene(root,600,300);//Setting title to the Stage
stage.setTitle("Drawing an arc through a path");//Adding scene to the stage
stage.setScene(scene);//Displaying the contents of the stage
stage.show();}publicstaticvoidmain(String args[]){launch(args);}}</code></pre>
Compile and execute the saved java file from the command prompt using the following commands.
On executing, the above program generates a JavaFX window displaying the following output −
Following are the various path elements (classes) provided by JavaFX. These classes exist in the package javafx.shape. All these classes inherit the class PathElement.
S.No
Shape & Description
1
LineToThe path element line is used to draw a straight line to a point in the specified coordinates from the current position. It is represented by a class named LineTo. This class belongs to the package javafx.scene.shape.
2
HlineToThe path element HLineTo is used to draw a horizontal line to a point in the specified coordinates from the current position. It is represented by a class named HLineTo. This class belongs to the package javafx.scene.shape.
3
VLineToThe path element vertical line is used to draw a vertical line to a point in the specified coordinates from the current position. It is represented by a class named VLineTo. This class belongs to the package javafx.scene.shape.
4
QuadCurveToThe path element quadratic curve is used to draw a quadratic curve to a point in the specified coordinates from the current position. It is represented by a class named QuadraticCurveTo. This class belongs to the package javafx.scene.shape.
5
CubicCurveToThe path element cubic curve is used to draw a cubic curve to a point in the specified coordinates from the current position. It is represented by a class named CubicCurveTo. This class belongs to the package javafx.scene.shape.
6
ArcToThe path element Arc is used to draw an arc to a point in the specified coordinates from the current position. It is represented by a class named ArcTo. This class belongs to the package javafx.scene.shape.