In this chapter, we will discuss on the different aspects of setting up a congenial environment for Java.
Local Environment Setup
If you are still willing to set up your environment for Java programming language, then this section guides you on how to download and set up Java on your machine. Following are the steps to set up the environment.
Java SE is freely available from the link Download Java. You can download a version based on your operating system.
Follow the instructions to download Java and run the .exe to install Java on your machine. Once you installed Java on your machine, you will need to set environment variables to point to correct installation directories −
Setting Up the Path for Windows
Assuming you have installed Java in c:\Program Files\java\jdk directory −
Right-click on ‘My Computer’ and select ‘Properties’.
Click the ‘Environment variables’ button under the ‘Advanced’ tab.
Now, alter the ‘Path’ variable so that it also contains the path to the Java executable. Example, if the path is currently set to ‘C:\WINDOWS\SYSTEM32’, then change your path to read ‘C:\WINDOWS\SYSTEM32;c:\Program Files\java\jdk\bin’.
Setting Up the Path for Linux, UNIX, Solaris, FreeBSD
Environment variable PATH should be set to point to where the Java binaries have been installed. Refer to your shell documentation, if you have trouble doing this.
Example, if you use bash as your shell, then you would add the following line to the end of your ‘.bashrc: export PATH = /path/to/java:$PATH’
Popular Java Editors
To write your Java programs, you will need a text editor. There are even more sophisticated IDEs available in the market. But for now, you can consider one of the following −
Notepad − On Windows machine, you can use any simple text editor like Notepad (Recommended for this tutorial), TextPad.
Netbeans − A Java IDE that is open-source and free which can be downloaded from https://netbeans.org/index.html.
Eclipse − A Java IDE developed by the eclipse open-source community and can be downloaded from https://www.eclipse.org/.
Java is a multi-threaded programming language which means we can develop multi-threaded program using Java. A multi-threaded program contains two or more parts that can run concurrently and each part can handle a different task at the same time making optimal use of the available resources specially when your computer has multiple CPUs.
By definition, multitasking is when multiple processes share common processing resources such as a CPU. Multi-threading extends the idea of multitasking into applications where you can subdivide specific operations within a single application into individual threads. Each of the threads can run in parallel. The OS divides processing time not only among different applications, but also among each thread within an application.
Multi-threading enables you to write in a way where multiple activities can proceed concurrently in the same program.
Life Cycle of a Thread
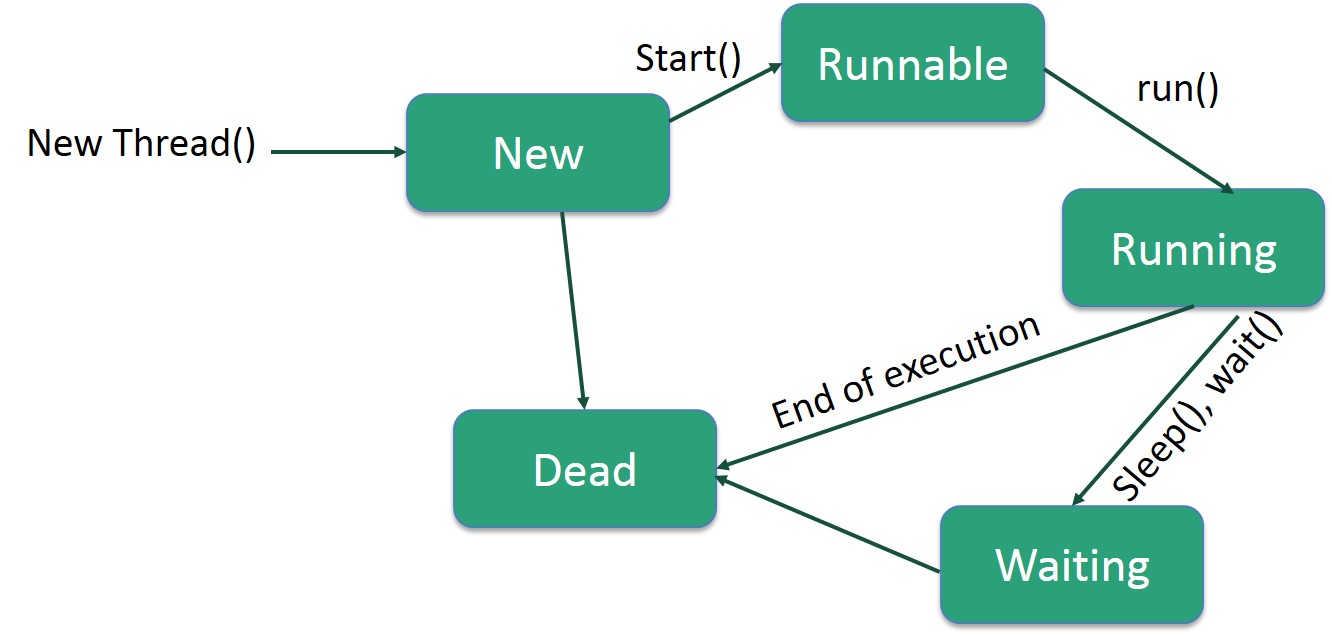
A thread goes through various stages in its life cycle. For example, a thread is born, started, runs, and then dies. The following diagram shows the complete life cycle of a thread.
Following are the stages of the life cycle −
New − A new thread begins its life cycle in the new state. It remains in this state until the program starts the thread. It is also referred to as a born thread.
Runnable − After a newly born thread is started, the thread becomes runnable. A thread in this state is considered to be executing its task.
Waiting − Sometimes, a thread transitions to the waiting state while the thread waits for another thread to perform a task. A thread transitions back to the runnable state only when another thread signals the waiting thread to continue executing.
Timed Waiting − A runnable thread can enter the timed waiting state for a specified interval of time. A thread in this state transitions back to the runnable state when that time interval expires or when the event it is waiting for occurs.
Terminated (Dead) − A runnable thread enters the terminated state when it completes its task or otherwise terminates.
Thread Priorities
Every Java thread has a priority that helps the operating system determine the order in which threads are scheduled.
Java thread priorities are in the range between MIN_PRIORITY (a constant of 1) and MAX_PRIORITY (a constant of 10). By default, every thread is given priority NORM_PRIORITY (a constant of 5).
Threads with higher priority are more important to a program and should be allocated processor time before lower-priority threads. However, thread priorities cannot guarantee the order in which threads execute and are very much platform dependent.
Learn Java in-depth with real-world projects through our Java certification course. Enroll and become a certified expert to boost your career.
Create a Thread by Implementing a Runnable Interface
If your class is intended to be executed as a thread then you can achieve this by implementing a Runnable interface. You will need to follow three basic steps −
Step 1
As a first step, you need to implement a run() method provided by a Runnable interface. This method provides an entry point for the thread and you will put your complete business logic inside this method. Following is a simple syntax of the run() method −
public void run( )
Step 2
As a second step, you will instantiate a Thread object using the following constructor −
Thread(Runnable threadObj, String threadName);
Where, threadObj is an instance of a class that implements the Runnable interface and threadName is the name given to the new thread.
Step 3
Once a Thread object is created, you can start it by calling start() method, which executes a call to run( ) method. Following is a simple syntax of start() method −
void start();
Example
Here is an example that creates a new thread and starts running it −
The second way to create a thread is to create a new class that extends Thread class using the following two simple steps. This approach provides more flexibility in handling multiple threads created using available methods in Thread class.
Step 1
You will need to override run( ) method available in Thread class. This method provides an entry point for the thread and you will put your complete business logic inside this method. Following is a simple syntax of run() method −
public void run( )
Step 2
Once Thread object is created, you can start it by calling start() method, which executes a call to run( ) method. Following is a simple syntax of start() method −
void start( );
Example
Here is the preceding program rewritten to extend the Thread −