In proxy pattern, a class represents functionality of another class. This type of design pattern comes under structural pattern.
In proxy pattern, we create object having original object to interface its functionality to outer world.
Implementation
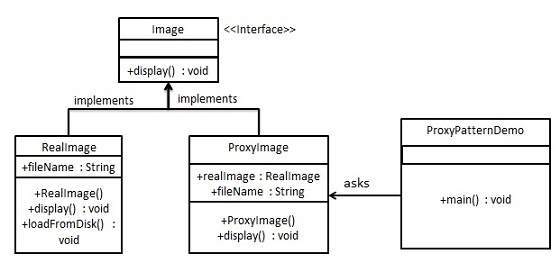
We are going to create an Image interface and concrete classes implementing the Image interface. ProxyImage is a a proxy class to reduce memory footprint of RealImage object loading.
ProxyPatternDemo, our demo class, will use ProxyImage to get an Image object to load and display as it needs.
Step 1
Create an interface.
Image.java
public interface Image {
   void display();
}
Explore our latest online courses and learn new skills at your own pace. Enroll and become a certified expert to boost your career.
Step 2
Create concrete classes implementing the same interface.
RealImage.java
public class RealImage implements Image {

   private String fileName;

   public RealImage(String fileName){
  this.fileName = fileName;
  loadFromDisk(fileName);   }

   @Override
   public void display() {
  System.out.println("Displaying " + fileName);   }

   private void loadFromDisk(String fileName){
  System.out.println("Loading " + fileName);   }
}
ProxyImage.java
public class ProxyImage implements Image{

   private RealImage realImage;
   private String fileName;

   public ProxyImage(String fileName){
  this.fileName = fileName;   }

   @Override
   public void display() {
  if(realImage == null){
     realImage = new RealImage(fileName);
  }
  realImage.display();   }
}
Step 3
Use the ProxyImage to get object of RealImage class when required.
ProxyPatternDemo.java
public class ProxyPatternDemo {
public static void main(String[] args) {
Image image = new ProxyImage("test_10mb.jpg");
//image will be loaded from disk
image.display();
System.out.println("");
//image will not be loaded from disk
image.display();
Flyweight pattern is primarily used to reduce the number of objects created and to decrease memory footprint and increase performance. This type of design pattern comes under structural pattern as this pattern provides ways to decrease object count thus improving the object structure of application.
Flyweight pattern tries to reuse already existing similar kind objects by storing them and creates new object when no matching object is found. We will demonstrate this pattern by drawing 20 circles of different locations but we will create only 5 objects. Only 5 colors are available so color property is used to check already existing Circle objects.
Implementation
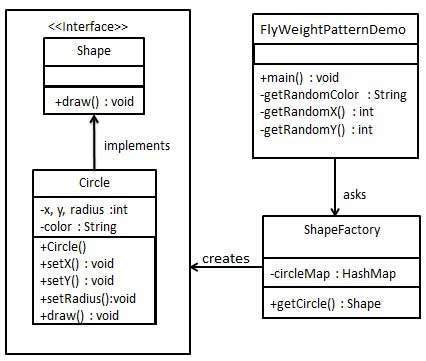
We are going to create a Shape interface and concrete class Circle implementing the Shape interface. A factory class ShapeFactory is defined as a next step.
ShapeFactory has a HashMap of Circle having key as color of the Circle object. Whenever a request comes to create a circle of particular color to ShapeFactory, it checks the circle object in its HashMap, if object of Circle found, that object is returned otherwise a new object is created, stored in hashmap for future use, and returned to client.
FlyWeightPatternDemo, our demo class, will use ShapeFactory to get a Shape object. It will pass information (red / green / blue/ black / white) to ShapeFactory to get the circle of desired color it needs.
Step 1
Create an interface.
Shape.java
public interface Shape {
   void draw();
}
Explore our latest online courses and learn new skills at your own pace. Enroll and become a certified expert to boost your career.
Step 2
Create concrete class implementing the same interface.
Circle.java
public class Circle implements Shape {
   private String color;
   private int x;
   private int y;
   private int radius;

   public Circle(String color){
  this.color = color;		   }

   public void setX(int x) {
  this.x = x;   }

   public void setY(int y) {
  this.y = y;   }

   public void setRadius(int radius) {
  this.radius = radius;   }

   @Override
   public void draw() {
  System.out.println("Circle: Draw() [Color : " + color + ", x : " + x + ", y :" + y + ", radius :" + radius);   }
}
Step 3
Create a factory to generate object of concrete class based on given information.
ShapeFactory.java
import java.util.HashMap;

public class ShapeFactory {

   // Uncomment the compiler directive line and
   // javac *.java will compile properly.
   // @SuppressWarnings("unchecked")
   private static final HashMap circleMap = new HashMap();

   public static Shape getCircle(String color) {
  Circle circle = (Circle)circleMap.get(color);
  if(circle == null) {
     circle = new Circle(color);
     circleMap.put(color, circle);
     System.out.println("Creating circle of color : " + color);
  }
  return circle;   }
}
Step 4
Use the factory to get object of concrete class by passing an information such as color.
FlyweightPatternDemo.java
public class FlyweightPatternDemo {
private static final String colors[] = { "Red", "Green", "Blue", "White", "Black" };
public static void main(String[] args) {
for(int i=0; i < 20; ++i) {
Circle circle = (Circle)ShapeFactory.getCircle(getRandomColor());
circle.setX(getRandomX());
circle.setY(getRandomY());
circle.setRadius(100);
circle.draw();
}
Creating circle of color : Black
Circle: Draw() [Color : Black, x : 36, y :71, radius :100
Creating circle of color : Green
Circle: Draw() [Color : Green, x : 27, y :27, radius :100
Creating circle of color : White
Circle: Draw() [Color : White, x : 64, y :10, radius :100
Creating circle of color : Red
Circle: Draw() [Color : Red, x : 15, y :44, radius :100
Circle: Draw() [Color : Green, x : 19, y :10, radius :100
Circle: Draw() [Color : Green, x : 94, y :32, radius :100
Circle: Draw() [Color : White, x : 69, y :98, radius :100
Creating circle of color : Blue
Circle: Draw() [Color : Blue, x : 13, y :4, radius :100
Circle: Draw() [Color : Green, x : 21, y :21, radius :100
Circle: Draw() [Color : Blue, x : 55, y :86, radius :100
Circle: Draw() [Color : White, x : 90, y :70, radius :100
Circle: Draw() [Color : Green, x : 78, y :3, radius :100
Circle: Draw() [Color : Green, x : 64, y :89, radius :100
Circle: Draw() [Color : Blue, x : 3, y :91, radius :100
Circle: Draw() [Color : Blue, x : 62, y :82, radius :100
Circle: Draw() [Color : Green, x : 97, y :61, radius :100
Circle: Draw() [Color : Green, x : 86, y :12, radius :100
Circle: Draw() [Color : Green, x : 38, y :93, radius :100
Circle: Draw() [Color : Red, x : 76, y :82, radius :100
Circle: Draw() [Color : Blue, x : 95, y :82, radius :100
Facade pattern hides the complexities of the system and provides an interface to the client using which the client can access the system. This type of design pattern comes under structural pattern as this pattern adds an interface to existing system to hide its complexities.
This pattern involves a single class which provides simplified methods required by client and delegates calls to methods of existing system classes.
Implementation
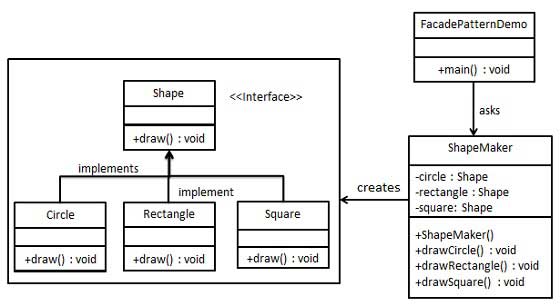
We are going to create a Shape interface and concrete classes implementing the Shape interface. A facade class ShapeMaker is defined as a next step.
ShapeMaker class uses the concrete classes to delegate user calls to these classes. FacadePatternDemo, our demo class, will use ShapeMaker class to show the results.
Step 1
Create an interface.
Shape.java
public interface Shape {
   void draw();
}
Explore our latest online courses and learn new skills at your own pace. Enroll and become a certified expert to boost your career.
Step 2
Create concrete classes implementing the same interface.
Rectangle.java
public class Rectangle implements Shape {

   @Override
   public void draw() {
  System.out.println("Rectangle::draw()");   }
}
Square.java
public class Square implements Shape {

   @Override
   public void draw() {
  System.out.println("Square::draw()");   }
}
Circle.java
public class Circle implements Shape {

   @Override
   public void draw() {
  System.out.println("Circle::draw()");   }
}
Step 3
Create a facade class.
ShapeMaker.java
public class ShapeMaker {
   private Shape circle;
   private Shape rectangle;
   private Shape square;

   public ShapeMaker() {
  circle = new Circle();
  rectangle = new Rectangle();
  square = new Square();   }

   public void drawCircle(){
  circle.draw();   }
   public void drawRectangle(){
  rectangle.draw();   }
   public void drawSquare(){
  square.draw();   }
}
Step 4
Use the facade to draw various types of shapes.
FacadePatternDemo.java
public class FacadePatternDemo {
public static void main(String[] args) {
Decorator pattern allows a user to add new functionality to an existing object without altering its structure. This type of design pattern comes under structural pattern as this pattern acts as a wrapper to existing class.
This pattern creates a decorator class which wraps the original class and provides additional functionality keeping class methods signature intact.
We are demonstrating the use of decorator pattern via following example in which we will decorate a shape with some color without alter shape class.
Implementation
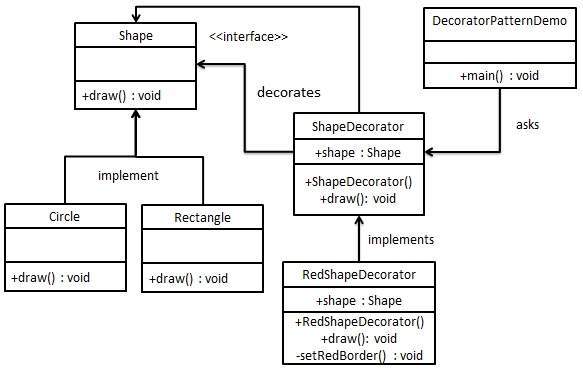
We’re going to create a Shape interface and concrete classes implementing the Shape interface. We will then create an abstract decorator class ShapeDecorator implementing the Shape interface and having Shape object as its instance variable.
RedShapeDecorator is concrete class implementing ShapeDecorator.
DecoratorPatternDemo, our demo class will use RedShapeDecorator to decorate Shape objects.
Step 1
Create an interface.
Shape.java
public interface Shape {
   void draw();
}
Explore our latest online courses and learn new skills at your own pace. Enroll and become a certified expert to boost your career.
Step 2
Create concrete classes implementing the same interface.
Rectangle.java
public class Rectangle implements Shape {

   @Override
   public void draw() {
  System.out.println("Shape: Rectangle");   }
}
Circle.java
public class Circle implements Shape {

   @Override
   public void draw() {
  System.out.println("Shape: Circle");   }
}
Step 3
Create abstract decorator class implementing the Shape interface.
ShapeDecorator.java
public abstract class ShapeDecorator implements Shape {
   protected Shape decoratedShape;

   public ShapeDecorator(Shape decoratedShape){
  this.decoratedShape = decoratedShape;   }

   public void draw(){
  decoratedShape.draw();   }
}
Step 4
Create concrete decorator class extending the ShapeDecorator class.
RedShapeDecorator.java
public class RedShapeDecorator extends ShapeDecorator {
public RedShapeDecorator(Shape decoratedShape) {
Use the RedShapeDecorator to decorate Shape objects.
DecoratorPatternDemo.java
public class DecoratorPatternDemo {
   public static void main(String[] args) {

  Shape circle = new Circle();
  Shape redCircle = new RedShapeDecorator(new Circle());
  Shape redRectangle = new RedShapeDecorator(new Rectangle());
  System.out.println("Circle with normal border");
  circle.draw();
  System.out.println("\nCircle of red border");
  redCircle.draw();
  System.out.println("\nRectangle of red border");
  redRectangle.draw();   }
}
Step 6
Verify the output.
Circle with normal border
Shape: Circle

Circle of red border
Shape: Circle
Border Color: Red

Rectangle of red border
Shape: Rectangle
Border Color: Red
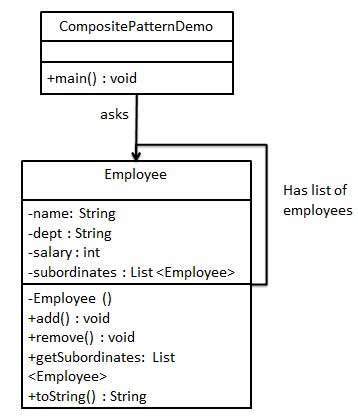
Composite pattern is used where we need to treat a group of objects in similar way as a single object. Composite pattern composes objects in term of a tree structure to represent part as well as whole hierarchy. This type of design pattern comes under structural pattern as this pattern creates a tree structure of group of objects.
This pattern creates a class that contains group of its own objects. This class provides ways to modify its group of same objects.
We are demonstrating use of composite pattern via following example in which we will show employees hierarchy of an organization.
Implementation
We have a class Employee which acts as composite pattern actor class. CompositePatternDemo, our demo class will use Employee class to add department level hierarchy and print all employees.
Step 1
Create Employee class having list of Employee objects.
Employee.java
import java.util.ArrayList;
import java.util.List;
public class Employee {
private String name;
private String dept;
private int salary;
private List<Employee> subordinates;
// constructor
public Employee(String name,String dept, int sal) {
//print all employees of the organization
System.out.println(CEO);
for (Employee headEmployee : CEO.getSubordinates()) {
System.out.println(headEmployee);
for (Employee employee : headEmployee.getSubordinates()) {
System.out.println(employee);
}
}
}
}
Step 3
Verify the output.
Employee :[ Name : John, dept : CEO, salary :30000 ]
Employee :[ Name : Robert, dept : Head Sales, salary :20000 ]
Employee :[ Name : Richard, dept : Sales, salary :10000 ]
Employee :[ Name : Rob, dept : Sales, salary :10000 ]
Employee :[ Name : Michel, dept : Head Marketing, salary :20000 ]
Employee :[ Name : Laura, dept : Marketing, salary :10000 ]
Employee :[ Name : Bob, dept : Marketing, salary :10000 ]
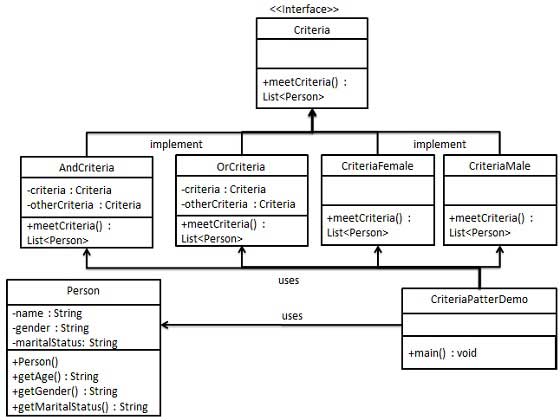
Filter pattern or Criteria pattern is a design pattern that enables developers to filter a set of objects using different criteria and chaining them in a decoupled way through logical operations. This type of design pattern comes under structural pattern as this pattern combines multiple criteria to obtain single criteria.
Implementation
We’re going to create a Person object, Criteria interface and concrete classes implementing this interface to filter list of Person objects. CriteriaPatternDemo, our demo class uses Criteria objects to filter List of Person objects based on various criteria and their combinations.
Step 1
Create a class on which criteria is to be applied.
Person.java
public class Person {
private String name;
private String gender;
private String maritalStatus;
public Person(String name, String gender, String maritalStatus){
Criteria male = new CriteriaMale();
Criteria female = new CriteriaFemale();
Criteria single = new CriteriaSingle();
Criteria singleMale = new AndCriteria(single, male);
Criteria singleOrFemale = new OrCriteria(single, female);
System.out.println("\nSingle Or Females: ");
printPersons(singleOrFemale.meetCriteria(persons));
}
public static void printPersons(List<Person> persons){
for (Person person : persons) {
System.out.println("Person : [ Name : " + person.getName() + ", Gender : " + person.getGender() + ", Marital Status : " + person.getMaritalStatus() + " ]");
}
}
}
Step 5
Verify the output.
Males:
Person : [ Name : Robert, Gender : Male, Marital Status : Single ]
Person : [ Name : John, Gender : Male, Marital Status : Married ]
Person : [ Name : Mike, Gender : Male, Marital Status : Single ]
Person : [ Name : Bobby, Gender : Male, Marital Status : Single ]

Females:
Person : [ Name : Laura, Gender : Female, Marital Status : Married ]
Person : [ Name : Diana, Gender : Female, Marital Status : Single ]

Single Males:
Person : [ Name : Robert, Gender : Male, Marital Status : Single ]
Person : [ Name : Mike, Gender : Male, Marital Status : Single ]
Person : [ Name : Bobby, Gender : Male, Marital Status : Single ]

Single Or Females:
Person : [ Name : Robert, Gender : Male, Marital Status : Single ]
Person : [ Name : Diana, Gender : Female, Marital Status : Single ]
Person : [ Name : Mike, Gender : Male, Marital Status : Single ]
Person : [ Name : Bobby, Gender : Male, Marital Status : Single ]
Person : [ Name : Laura, Gender : Female, Marital Status : Married ]
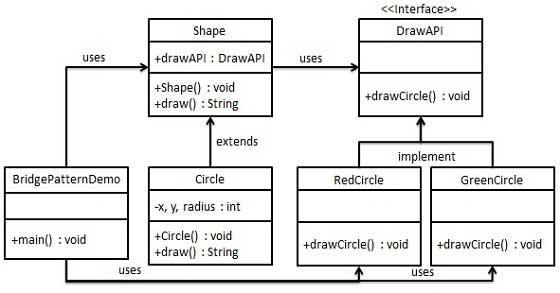
Bridge is used when we need to decouple an abstraction from its implementation so that the two can vary independently. This type of design pattern comes under structural pattern as this pattern decouples implementation class and abstract class by providing a bridge structure between them.
This pattern involves an interface which acts as a bridge which makes the functionality of concrete classes independent from interface implementer classes. Both types of classes can be altered structurally without affecting each other.
We are demonstrating use of Bridge pattern via following example in which a circle can be drawn in different colors using same abstract class method but different bridge implementer classes.
Implementation
We have a DrawAPI interface which is acting as a bridge implementer and concrete classes RedCircle, GreenCircle implementing the DrawAPI interface. Shape is an abstract class and will use object of DrawAPI. BridgePatternDemo, our demo class will use Shape class to draw different colored circle.
Step 1
Create bridge implementer interface.
DrawAPI.java
public interface DrawAPI {
   public void drawCircle(int radius, int x, int y);
}
Explore our latest online courses and learn new skills at your own pace. Enroll and become a certified expert to boost your career.
Step 2
Create concrete bridge implementer classes implementing the DrawAPI interface.
RedCircle.java
public class RedCircle implements DrawAPI {
@Override
public void drawCircle(int radius, int x, int y) {
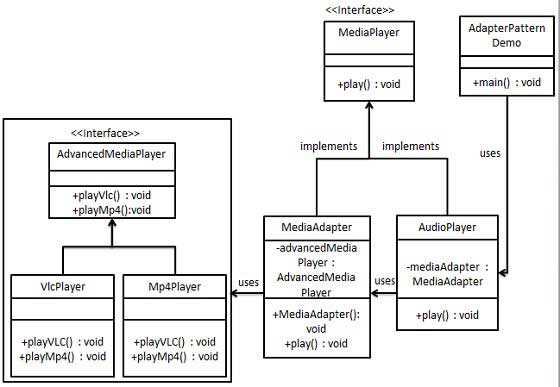
Adapter pattern works as a bridge between two incompatible interfaces. This type of design pattern comes under structural pattern as this pattern combines the capability of two independent interfaces.
This pattern involves a single class which is responsible to join functionalities of independent or incompatible interfaces. A real life example could be a case of card reader which acts as an adapter between memory card and a laptop. You plugin the memory card into card reader and card reader into the laptop so that memory card can be read via laptop.
We are demonstrating use of Adapter pattern via following example in which an audio player device can play mp3 files only and wants to use an advanced audio player capable of playing vlc and mp4 files.
Implementation
We have a MediaPlayer interface and a concrete class AudioPlayer implementing the MediaPlayer interface. AudioPlayer can play mp3 format audio files by default.
We are having another interface AdvancedMediaPlayer and concrete classes implementing the AdvancedMediaPlayer interface. These classes can play vlc and mp4 format files.
We want to make AudioPlayer to play other formats as well. To attain this, we have created an adapter class MediaAdapter which implements the MediaPlayer interface and uses AdvancedMediaPlayer objects to play the required format.
AudioPlayer uses the adapter class MediaAdapter passing it the desired audio type without knowing the actual class which can play the desired format. AdapterPatternDemo, our demo class will use AudioPlayer class to play various formats.
Step 1
Create interfaces for Media Player and Advanced Media Player.
MediaPlayer.java
public interface MediaPlayer {
   public void play(String audioType, String fileName);
}
AdvancedMediaPlayer.java
public interface AdvancedMediaPlayer {
   public void playVlc(String fileName);
   public void playMp4(String fileName);
}
Explore our latest online courses and learn new skills at your own pace. Enroll and become a certified expert to boost your career.
Step 2
Create concrete classes implementing the AdvancedMediaPlayer interface.
VlcPlayer.java
public class VlcPlayer implements AdvancedMediaPlayer{
@Override
public void playVlc(String fileName) {
Create adapter class implementing the MediaPlayer interface.
MediaAdapter.java
public class MediaAdapter implements MediaPlayer {
AdvancedMediaPlayer advancedMusicPlayer;
public MediaAdapter(String audioType){
if(audioType.equalsIgnoreCase("vlc") ){
advancedMusicPlayer = new VlcPlayer();
}else if (audioType.equalsIgnoreCase("mp4")){
advancedMusicPlayer = new Mp4Player();
}
}
@Override
public void play(String audioType, String fileName) {
Create concrete class implementing the MediaPlayer interface.
AudioPlayer.java
public class AudioPlayer implements MediaPlayer {
   MediaAdapter mediaAdapter;

   @Override
   public void play(String audioType, String fileName) {

  //inbuilt support to play mp3 music files
  if(audioType.equalsIgnoreCase("mp3")){
     System.out.println("Playing mp3 file. Name: " + fileName);
  }

  //mediaAdapter is providing support to play other file formats
  else if(audioType.equalsIgnoreCase("vlc") || audioType.equalsIgnoreCase("mp4")){
     mediaAdapter = new MediaAdapter(audioType);
     mediaAdapter.play(audioType, fileName);
  }

  else{
     System.out.println("Invalid media. " + audioType + " format not supported");
  }   }
}
Step 5
Use the AudioPlayer to play different types of audio formats.
AdapterPatternDemo.java
public class AdapterPatternDemo {
   public static void main(String[] args) {
  AudioPlayer audioPlayer = new AudioPlayer();
  audioPlayer.play("mp3", "beyond the horizon.mp3");
  audioPlayer.play("mp4", "alone.mp4");
  audioPlayer.play("vlc", "far far away.vlc");
  audioPlayer.play("avi", "mind me.avi");   }
}
Step 6
Verify the output.
Playing mp3 file. Name: beyond the horizon.mp3
Playing mp4 file. Name: alone.mp4
Playing vlc file. Name: far far away.vlc
Invalid media. avi format not supported
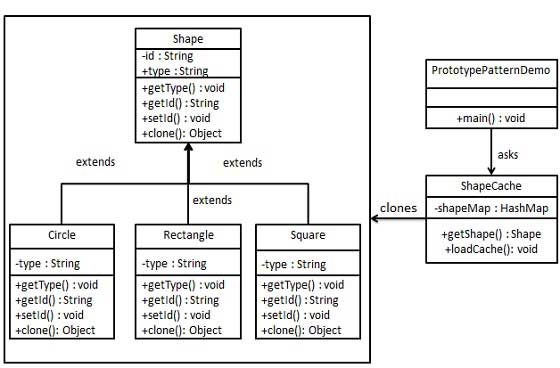
Prototype pattern refers to creating duplicate object while keeping performance in mind. This type of design pattern comes under creational pattern as this pattern provides one of the best ways to create an object.
This pattern involves implementing a prototype interface which tells to create a clone of the current object. This pattern is used when creation of object directly is costly. For example, an object is to be created after a costly database operation. We can cache the object, returns its clone on next request and update the database as and when needed thus reducing database calls.
Implementation
We’re going to create an abstract class Shape and concrete classes extending the Shape class. A class ShapeCache is defined as a next step which stores shape objects in a Hashtable and returns their clone when requested.
PrototypPatternDemo, our demo class will use ShapeCache class to get a Shape object.
Step 1
Create an abstract class implementing Clonable interface.
Shape.java
public abstract class Shape implements Cloneable {
private String id;
protected String type;
abstract void draw();
public String getType(){
}
// for each shape run database query and create shape
// shapeMap.put(shapeKey, shape);
// for example, we are adding three shapes
public static void loadCache() {
Circle circle = new Circle();
circle.setId("1");
shapeMap.put(circle.getId(),circle);
Square square = new Square();
square.setId("2");
shapeMap.put(square.getId(),square);
Rectangle rectangle = new Rectangle();
rectangle.setId("3");
shapeMap.put(rectangle.getId(), rectangle);
}
}
Step 4
PrototypePatternDemo uses ShapeCache class to get clones of shapes stored in a Hashtable.
PrototypePatternDemo.java
public class PrototypePatternDemo {
public static void main(String[] args) {
Builder pattern builds a complex object using simple objects and using a step by step approach. This type of design pattern comes under creational pattern as this pattern provides one of the best ways to create an object.
A Builder class builds the final object step by step. This builder is independent of other objects.
Implementation
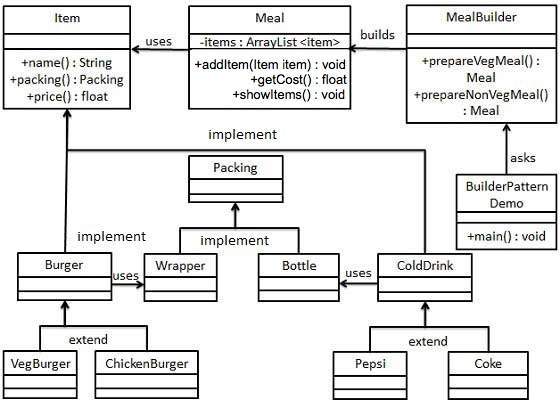
We have considered a business case of fast-food restaurant where a typical meal could be a burger and a cold drink. Burger could be either a Veg Burger or Chicken Burger and will be packed by a wrapper. Cold drink could be either a coke or pepsi and will be packed in a bottle.
We are going to create an Item interface representing food items such as burgers and cold drinks and concrete classes implementing the Item interface and a Packing interface representing packaging of food items and concrete classes implementing the Packing interface as burger would be packed in wrapper and cold drink would be packed as bottle.
We then create a Meal class having ArrayList of Item and a MealBuilder to build different types of Meal objects by combining Item. BuilderPatternDemo, our demo class will use MealBuilder to build a Meal.
Step 1
Create an interface Item representing food item and packing.
Item.java
public interface Item {
   public String name();
   public Packing packing();
   public float price();
}
Packing.java
public interface Packing {
   public String pack();
}
Explore our latest online courses and learn new skills at your own pace. Enroll and become a certified expert to boost your career.
Step 2
Create concrete classes implementing the Packing interface.
Wrapper.java
public class Wrapper implements Packing {

   @Override
   public String pack() {
  return "Wrapper";   }
}
Bottle.java
public class Bottle implements Packing {

   @Override
   public String pack() {
  return "Bottle";   }
}
Step 3
Create abstract classes implementing the item interface providing default functionalities.
Burger.java
public abstract class Burger implements Item {

   @Override
   public Packing packing() {
  return new Wrapper();   }

   @Override
   public abstract float price();
}
ColdDrink.java
public abstract class ColdDrink implements Item {

	@Override
	public Packing packing() {
   return new Bottle();	}

	@Override
	public abstract float price();
}
Step 4
Create concrete classes extending Burger and ColdDrink classes
VegBurger.java
public class VegBurger extends Burger {

   @Override
   public float price() {
  return 25.0f;   }

   @Override
   public String name() {
  return "Veg Burger";   }
}
ChickenBurger.java
public class ChickenBurger extends Burger {

   @Override
   public float price() {
  return 50.5f;   }

   @Override
   public String name() {
  return "Chicken Burger";   }
}
Coke.java
public class Coke extends ColdDrink {

   @Override
   public float price() {
  return 30.0f;   }

   @Override
   public String name() {
  return "Coke";   }
}
Pepsi.java
public class Pepsi extends ColdDrink {

   @Override
   public float price() {
  return 35.0f;   }

   @Override
   public String name() {
  return "Pepsi";   }
}
Step 5
Create a Meal class having Item objects defined above.
Meal.java
import java.util.ArrayList;
import java.util.List;
public class Meal {
private List<Item> items = new ArrayList<Item>();
public void addItem(Item item){