Category: 03. Design Patterns

https://cdn-icons-png.freepik.com/512/8361/8361102.png

  • Strategy Pattern

    In Strategy pattern, a class behavior or its algorithm can be changed at run time. This type of design pattern comes under behavior pattern.

    In Strategy pattern, we create objects which represent various strategies and a context object whose behavior varies as per its strategy object. The strategy object changes the executing algorithm of the context object.

    Implementation

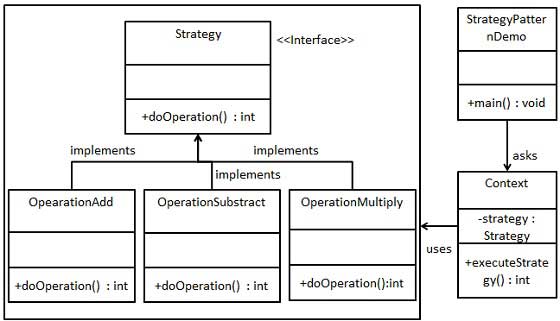
    We are going to create a Strategy interface defining an action and concrete strategy classes implementing the Strategy interface. Context is a class which uses a Strategy.

    StrategyPatternDemo, our demo class, will use Context and strategy objects to demonstrate change in Context behaviour based on strategy it deploys or uses.

    Strategy Pattern UML Diagram

    Step 1

    Create an interface.

    Strategy.java

    public interface Strategy {
       public int doOperation(int num1, int num2);
    }

    Explore our latest online courses and learn new skills at your own pace. Enroll and become a certified expert to boost your career.

    Step 2

    Create concrete classes implementing the same interface.

    OperationAdd.java

    public class OperationAdd implements Strategy{
       @Override
       public int doOperation(int num1, int num2) {
    
      return num1 + num2;
    } }

    OperationSubstract.java

    public class OperationSubstract implements Strategy{
       @Override
       public int doOperation(int num1, int num2) {
    
      return num1 - num2;
    } }

    OperationMultiply.java

    public class OperationMultiply implements Strategy{
       @Override
       public int doOperation(int num1, int num2) {
    
      return num1 * num2;
    } }

    Step 3

    Create Context Class.

    Context.java

    public class Context {
       private Strategy strategy;
    
       public Context(Strategy strategy){
    
      this.strategy = strategy;
    } public int executeStrategy(int num1, int num2){
      return strategy.doOperation(num1, num2);
    } }

    Step 4

    Use the Context to see change in behaviour when it changes its Strategy.

    StrategyPatternDemo.java

    public class StrategyPatternDemo {
       public static void main(String[] args) {
    
      Context context = new Context(new OperationAdd());		
      System.out.println("10 + 5 = " + context.executeStrategy(10, 5));
      context = new Context(new OperationSubstract());		
      System.out.println("10 - 5 = " + context.executeStrategy(10, 5));
      context = new Context(new OperationMultiply());		
      System.out.println("10 * 5 = " + context.executeStrategy(10, 5));
    } }

    Step 5

    Verify the output.

    10 + 5 = 15
    10 - 5 = 5
    10 * 5 = 50
    
  • Null Object Pattern

    In Null Object pattern, a null object replaces check of NULL object instance. Instead of putting if check for a null value, Null Object reflects a do nothing relationship. Such Null object can also be used to provide default behaviour in case data is not available.

    In Null Object pattern, we create an abstract class specifying various operations to be done, concrete classes extending this class and a null object class providing do nothing implemention of this class and will be used seemlessly where we need to check null value.

    Implementation

    We are going to create a AbstractCustomer abstract class defining opearations. Here the name of the customer and concrete classes extending the AbstractCustomer class. A factory class CustomerFactory is created to return either RealCustomer or NullCustomer objects based on the name of customer passed to it.

    NullPatternDemo, our demo class, will use CustomerFactory to demonstrate the use of Null Object pattern.

    Null Object Pattern UML Diagram

    Step 1

    Create an abstract class.

    AbstractCustomer.java

    public abstract class AbstractCustomer {
       protected String name;
       public abstract boolean isNil();
       public abstract String getName();
    }

    Explore our latest online courses and learn new skills at your own pace. Enroll and become a certified expert to boost your career.

    Step 2

    Create concrete classes extending the above class.

    RealCustomer.java

    public class RealCustomer extends AbstractCustomer {
    
       public RealCustomer(String name) {
    
      this.name = name;		
    } @Override public String getName() {
      return name;
    } @Override public boolean isNil() {
      return false;
    } }

    NullCustomer.java

    public class NullCustomer extends AbstractCustomer {
    
       @Override
       public String getName() {
    
      return "Not Available in Customer Database";
    } @Override public boolean isNil() {
      return true;
    } }

    Step 3

    Create CustomerFactory Class.

    CustomerFactory.java

    public class CustomerFactory {
    	
       public static final String[] names = {"Rob", "Joe", "Julie"};
    
       public static AbstractCustomer getCustomer(String name){
       
    
      for (int i = 0; i < names.length; i++) {
         if (names[i].equalsIgnoreCase(name)){
            return new RealCustomer(name);
         }
      }
      return new NullCustomer();
    } }

    Step 4

    Use the CustomerFactory to get either RealCustomer or NullCustomer objects based on the name of customer passed to it.

    NullPatternDemo.java

    public class NullPatternDemo {
       public static void main(String[] args) {
    
    
      AbstractCustomer customer1 = CustomerFactory.getCustomer("Rob");
      AbstractCustomer customer2 = CustomerFactory.getCustomer("Bob");
      AbstractCustomer customer3 = CustomerFactory.getCustomer("Julie");
      AbstractCustomer customer4 = CustomerFactory.getCustomer("Laura");
      System.out.println("Customers");
      System.out.println(customer1.getName());
      System.out.println(customer2.getName());
      System.out.println(customer3.getName());
      System.out.println(customer4.getName());
    } }

    Step 5

    Verify the output.

    Customers
    Rob
    Not Available in Customer Database
    Julie
    Not Available in Customer Database
    
  • State Pattern

    In State pattern a class behavior changes based on its state. This type of design pattern comes under behavior pattern.

    In State pattern, we create objects which represent various states and a context object whose behavior varies as its state object changes.

    Implementation

    We are going to create a State interface defining an action and concrete state classes implementing the State interface. Context is a class which carries a State.

    StatePatternDemo, our demo class, will use Context and state objects to demonstrate change in Context behavior based on type of state it is in.

    State Pattern UML Diagram

    Step 1

    Create an interface.

    State.java

    public interface State {
       public void doAction(Context context);
    }

    Explore our latest online courses and learn new skills at your own pace. Enroll and become a certified expert to boost your career.

    Step 2

    Create concrete classes implementing the same interface.

    StartState.java

    public class StartState implements State {
    
       public void doAction(Context context) {
    
      System.out.println("Player is in start state");
      context.setState(this);	
    } public String toString(){
      return "Start State";
    } }

    StopState.java

    public class StopState implements State {
    
       public void doAction(Context context) {
    
      System.out.println("Player is in stop state");
      context.setState(this);	
    } public String toString(){
      return "Stop State";
    } }

    Step 3

    Create Context Class.

    Context.java

    public class Context {
       private State state;
    
       public Context(){
    
      state = null;
    } public void setState(State state){
      this.state = state;		
    } public State getState(){
      return state;
    } }

    Step 4

    Use the Context to see change in behaviour when State changes.

    StatePatternDemo.java

    public class StatePatternDemo {
       public static void main(String[] args) {
    
      Context context = new Context();
      StartState startState = new StartState();
      startState.doAction(context);
      System.out.println(context.getState().toString());
      StopState stopState = new StopState();
      stopState.doAction(context);
      System.out.println(context.getState().toString());
    } }

    Step 5

    Verify the output.

    Player is in start state
    Start State
    Player is in stop state
    Stop State
    
  • Observer Pattern

    Observer pattern is used when there is one-to-many relationship between objects such as if one object is modified, its depenedent objects are to be notified automatically. Observer pattern falls under behavioral pattern category.

    Implementation

    Observer pattern uses three actor classes. Subject, Observer and Client. Subject is an object having methods to attach and detach observers to a client object. We have created an abstract class Observer and a concrete class Subject that is extending class Observer.

    ObserverPatternDemo, our demo class, will use Subject and concrete class object to show observer pattern in action.

    Observer Pattern UML Diagram

    Step 1

    Create Subject class.

    Subject.java

    import java.util.ArrayList;
    import java.util.List;
    
    public class Subject {
    	
       private List<Observer> observers = new ArrayList<Observer>();
       private int state;
    
       public int getState() {
    
      return state;
    } public void setState(int state) {
      this.state = state;
      notifyAllObservers();
    } public void attach(Observer observer){
      observers.add(observer);		
    } public void notifyAllObservers(){
      for (Observer observer : observers) {
         observer.update();
      }
    } }

    Explore our latest online courses and learn new skills at your own pace. Enroll and become a certified expert to boost your career.

    Step 2

    Create Observer class.

    Observer.java

    public abstract class Observer {
       protected Subject subject;
       public abstract void update();
    }

    Step 3

    Create concrete observer classes

    BinaryObserver.java

    public class BinaryObserver extends Observer{
    
       public BinaryObserver(Subject subject){
    
      this.subject = subject;
      this.subject.attach(this);
    } @Override public void update() {
      System.out.println( "Binary String: " + Integer.toBinaryString( subject.getState() ) ); 
    } }

    OctalObserver.java

    public class OctalObserver extends Observer{
    
       public OctalObserver(Subject subject){
    
      this.subject = subject;
      this.subject.attach(this);
    } @Override public void update() {
     System.out.println( "Octal String: " + Integer.toOctalString( subject.getState() ) ); 
    } }

    HexaObserver.java

    public class HexaObserver extends Observer{
    
       public HexaObserver(Subject subject){
    
      this.subject = subject;
      this.subject.attach(this);
    } @Override public void update() {
      System.out.println( "Hex String: " + Integer.toHexString( subject.getState() ).toUpperCase() ); 
    } }

    Step 4

    Use Subject and concrete observer objects.

    ObserverPatternDemo.java

    public class ObserverPatternDemo {
       public static void main(String[] args) {
    
      Subject subject = new Subject();
      new HexaObserver(subject);
      new OctalObserver(subject);
      new BinaryObserver(subject);
      System.out.println("First state change: 15");	
      subject.setState(15);
      System.out.println("Second state change: 10");	
      subject.setState(10);
    } }

    Step 5

    Verify the output.

    First state change: 15
    Hex String: F
    Octal String: 17
    Binary String: 1111
    Second state change: 10
    Hex String: A
    Octal String: 12
    Binary String: 1010
    
  • Memento Pattern

    Memento pattern is used to restore state of an object to a previous state. Memento pattern falls under behavioral pattern category.

    Implementation

    Memento pattern uses three actor classes. Memento contains state of an object to be restored. Originator creates and stores states in Memento objects and Caretaker object is responsible to restore object state from Memento. We have created classes MementoOriginator and CareTaker.

    MementoPatternDemo, our demo class, will use CareTaker and Originator objects to show restoration of object states.

    Memento Pattern UML Diagram

    Step 1

    Create Memento class.

    Memento.java

    public class Memento {
       private String state;
    
       public Memento(String state){
    
      this.state = state;
    } public String getState(){
      return state;
    } }

    Explore our latest online courses and learn new skills at your own pace. Enroll and become a certified expert to boost your career.

    Step 2

    Create Originator class

    Originator.java

    public class Originator {
       private String state;
    
       public void setState(String state){
    
      this.state = state;
    } public String getState(){
      return state;
    } public Memento saveStateToMemento(){
      return new Memento(state);
    } public void getStateFromMemento(Memento memento){
      state = memento.getState();
    } }

    Step 3

    Create CareTaker class

    CareTaker.java

    import java.util.ArrayList;
    import java.util.List;
    
    public class CareTaker {
       private List<Memento> mementoList = new ArrayList<Memento>();
    
       public void add(Memento state){
    
      mementoList.add(state);
    } public Memento get(int index){
      return mementoList.get(index);
    } }

    Step 4

    Use CareTaker and Originator objects.

    MementoPatternDemo.java

    public class MementoPatternDemo {
       public static void main(String[] args) {
       
    
      Originator originator = new Originator();
      CareTaker careTaker = new CareTaker();
      
      originator.setState("State #1");
      originator.setState("State #2");
      careTaker.add(originator.saveStateToMemento());
      
      originator.setState("State #3");
      careTaker.add(originator.saveStateToMemento());
      
      originator.setState("State #4");
      System.out.println("Current State: " + originator.getState());		
      
      originator.getStateFromMemento(careTaker.get(0));
      System.out.println("First saved State: " + originator.getState());
      originator.getStateFromMemento(careTaker.get(1));
      System.out.println("Second saved State: " + originator.getState());
    } }

    Step 5

    Verify the output.

    Current State: State #4
    First saved State: State #2
    Second saved State: State #3
    
  • Mediator Pattern

    Mediator pattern is used to reduce communication complexity between multiple objects or classes. This pattern provides a mediator class which normally handles all the communications between different classes and supports easy maintenance of the code by loose coupling. Mediator pattern falls under behavioral pattern category.

    Implementation

    We are demonstrating mediator pattern by example of a chat room where multiple users can send message to chat room and it is the responsibility of chat room to show the messages to all users. We have created two classes ChatRoom and UserUser objects will use ChatRoom method to share their messages.

    MediatorPatternDemo, our demo class, will use User objects to show communication between them.

    Mediator Pattern UML Diagram

    Step 1

    Create mediator class.

    ChatRoom.java

    import java.util.Date;
    
    public class ChatRoom {
       public static void showMessage(User user, String message){
    
      System.out.println(new Date().toString() + " &#91;" + user.getName() + "] : " + message);
    } }

    Explore our latest online courses and learn new skills at your own pace. Enroll and become a certified expert to boost your career.

    Step 2

    Create user class

    User.java

    public class User {
       private String name;
    
       public String getName() {
    
      return name;
    } public void setName(String name) {
      this.name = name;
    } public User(String name){
      this.name  = name;
    } public void sendMessage(String message){
      ChatRoom.showMessage(this,message);
    } }

    Step 3

    Use the User object to show communications between them.

    MediatorPatternDemo.java

    public class MediatorPatternDemo {
       public static void main(String[] args) {
    
      User robert = new User("Robert");
      User john = new User("John");
      robert.sendMessage("Hi! John!");
      john.sendMessage("Hello! Robert!");
    } }

    Step 4

    Verify the output.

    Thu Jan 31 16:05:46 IST 2013 [Robert] : Hi! John!
    Thu Jan 31 16:05:46 IST 2013 [John] : Hello! Robert!
    
  • Iterator Pattern

    Iterator pattern is very commonly used design pattern in Java and .Net programming environment. This pattern is used to get a way to access the elements of a collection object in sequential manner without any need to know its underlying representation.

    Iterator pattern falls under behavioral pattern category.

    Implementation

    We’re going to create a Iterator interface which narrates navigation method and a Container interface which retruns the iterator . Concrete classes implementing the Container interface will be responsible to implement Iterator interface and use it

    IteratorPatternDemo, our demo class will use NamesRepository, a concrete class implementation to print a Names stored as a collection in NamesRepository.

    Iterator Pattern UML Diagram

    Step 1

    Create interfaces.

    Iterator.java

    public interface Iterator {
       public boolean hasNext();
       public Object next();
    }

    Container.java

    public interface Container {
       public Iterator getIterator();
    }

    Explore our latest online courses and learn new skills at your own pace. Enroll and become a certified expert to boost your career.

    Step 2

    Create concrete class implementing the Container interface. This class has inner class NameIterator implementing the Iterator interface.

    NameRepository.java

    public class NameRepository implements Container {
       public String names[] = {"Robert" , "John" ,"Julie" , "Lora"};
    
       @Override
       public Iterator getIterator() {
    
      return new NameIterator();
    } private class NameIterator implements Iterator {
      int index;
      @Override
      public boolean hasNext() {
      
         if(index &lt; names.length){
            return true;
         }
         return false;
      }
      @Override
      public Object next() {
      
         if(this.hasNext()){
            return names&#91;index++];
         }
         return null;
      }		
    } }

    Step 3

    Use the NameRepository to get iterator and print names.

    IteratorPatternDemo.java

    public class IteratorPatternDemo {
    	
       public static void main(String[] args) {
    
      NameRepository namesRepository = new NameRepository();
      for(Iterator iter = namesRepository.getIterator(); iter.hasNext();){
         String name = (String)iter.next();
         System.out.println("Name : " + name);
      } 	
    } }

    Step 4

    Verify the output.

    Name : Robert
    Name : John
    Name : Julie
    Name : Lora
    
  • Interpreter Pattern

    Interpreter pattern provides a way to evaluate language grammar or expression. This type of pattern comes under behavioral pattern. This pattern involves implementing an expression interface which tells to interpret a particular context. This pattern is used in SQL parsing, symbol processing engine etc.

    Implementation

    We are going to create an interface Expression and concrete classes implementing the Expression interface. A class TerminalExpression is defined which acts as a main interpreter of context in question. Other classes OrExpressionAndExpression are used to create combinational expressions.

    InterpreterPatternDemo, our demo class, will use Expression class to create rules and demonstrate parsing of expressions.

    Interpreter Pattern UML Diagram

    Step 1

    Create an expression interface.

    Expression.java

    public interface Expression {
       public boolean interpret(String context);
    }

    Explore our latest online courses and learn new skills at your own pace. Enroll and become a certified expert to boost your career.

    Step 2

    Create concrete classes implementing the above interface.

    TerminalExpression.java

    public class TerminalExpression implements Expression {
    	
       private String data;
    
       public TerminalExpression(String data){
    
      this.data = data; 
    } @Override public boolean interpret(String context) {
      if(context.contains(data)){
         return true;
      }
      return false;
    } }

    OrExpression.java

    public class OrExpression implements Expression {
    	 
       private Expression expr1 = null;
       private Expression expr2 = null;
    
       public OrExpression(Expression expr1, Expression expr2) { 
    
      this.expr1 = expr1;
      this.expr2 = expr2;
    } @Override public boolean interpret(String context) {
      return expr1.interpret(context) || expr2.interpret(context);
    } }

    AndExpression.java

    public class AndExpression implements Expression {
    	 
       private Expression expr1 = null;
       private Expression expr2 = null;
    
       public AndExpression(Expression expr1, Expression expr2) { 
    
      this.expr1 = expr1;
      this.expr2 = expr2;
    } @Override public boolean interpret(String context) {
      return expr1.interpret(context) &amp;&amp; expr2.interpret(context);
    } }

    Step 3

    InterpreterPatternDemo uses Expression class to create rules and then parse them.

    InterpreterPatternDemo.java

    public class InterpreterPatternDemo {
    
       //Rule: Robert and John are male
       public static Expression getMaleExpression(){
    
      Expression robert = new TerminalExpression("Robert");
      Expression john = new TerminalExpression("John");
      return new OrExpression(robert, john);		
    } //Rule: Julie is a married women public static Expression getMarriedWomanExpression(){
      Expression julie = new TerminalExpression("Julie");
      Expression married = new TerminalExpression("Married");
      return new AndExpression(julie, married);		
    } public static void main(String[] args) {
      Expression isMale = getMaleExpression();
      Expression isMarriedWoman = getMarriedWomanExpression();
      System.out.println("John is male? " + isMale.interpret("John"));
      System.out.println("Julie is a married women? " + isMarriedWoman.interpret("Married Julie"));
    } }

    Step 4

    Verify the output.

    John is male? true
    Julie is a married women? true
    
  • Command Pattern

    Command pattern is a data driven design pattern and falls under behavioral pattern category. A request is wrapped under an object as command and passed to invoker object. Invoker object looks for the appropriate object which can handle this command and passes the command to the corresponding object which executes the command.

    Implementation

    We have created an interface Order which is acting as a command. We have created a Stock class which acts as a request. We have concrete command classes BuyStock and SellStock implementing Order interface which will do actual command processing. A class Broker is created which acts as an invoker object. It can take and place orders.

    Broker object uses command pattern to identify which object will execute which command based on the type of command. CommandPatternDemo, our demo class, will use Broker class to demonstrate command pattern.

    Command Pattern UML Diagram

    Step 1

    Create a command interface.

    Order.java

    public interface Order {
       void execute();
    }

    Explore our latest online courses and learn new skills at your own pace. Enroll and become a certified expert to boost your career.

    Step 2

    Create a request class.

    Stock.java

    public class Stock {
    	
       private String name = "ABC";
       private int quantity = 10;
    
       public void buy(){
    
      System.out.println("Stock &#91; Name: "+name+", 
         Quantity: " + quantity +" ] bought");
    } public void sell(){
      System.out.println("Stock &#91; Name: "+name+", 
         Quantity: " + quantity +" ] sold");
    } }

    Step 3

    Create concrete classes implementing the Order interface.

    BuyStock.java

    public class BuyStock implements Order {
       private Stock abcStock;
    
       public BuyStock(Stock abcStock){
    
      this.abcStock = abcStock;
    } public void execute() {
      abcStock.buy();
    } }

    SellStock.java

    public class SellStock implements Order {
       private Stock abcStock;
    
       public SellStock(Stock abcStock){
    
      this.abcStock = abcStock;
    } public void execute() {
      abcStock.sell();
    } }

    Step 4

    Create command invoker class.

    Broker.java

    import java.util.ArrayList;
    import java.util.List;
    
       public class Broker {
       private List<Order> orderList = new ArrayList<Order>(); 
    
       public void takeOrder(Order order){
    
      orderList.add(order);		
    } public void placeOrders(){
      for (Order order : orderList) {
         order.execute();
      }
      orderList.clear();
    } }

    Step 5

    Use the Broker class to take and execute commands.

    CommandPatternDemo.java

    public class CommandPatternDemo {
       public static void main(String[] args) {
    
      Stock abcStock = new Stock();
      BuyStock buyStockOrder = new BuyStock(abcStock);
      SellStock sellStockOrder = new SellStock(abcStock);
      Broker broker = new Broker();
      broker.takeOrder(buyStockOrder);
      broker.takeOrder(sellStockOrder);
      broker.placeOrders();
    } }

    Step 6

    Verify the output.

    Stock [ Name: ABC, Quantity: 10 ] bought
    Stock [ Name: ABC, Quantity: 10 ] sold
    
  • Chain of Responsibility Pattern

    As the name suggests, the chain of responsibility pattern creates a chain of receiver objects for a request. This pattern decouples sender and receiver of a request based on type of request. This pattern comes under behavioral patterns.

    In this pattern, normally each receiver contains reference to another receiver. If one object cannot handle the request then it passes the same to the next receiver and so on.

    Implementation

    We have created an abstract class AbstractLogger with a level of logging. Then we have created three types of loggers extending the AbstractLogger. Each logger checks the level of message to its level and print accordingly otherwise does not print and pass the message to its next logger.

    Chain of Responsibility Pattern UML Diagram

    Step 1

    Create an abstract logger class.

    AbstractLogger.java

    public abstract class AbstractLogger {
       public static int INFO = 1;
       public static int DEBUG = 2;
       public static int ERROR = 3;
    
       protected int level;
    
       //next element in chain or responsibility
       protected AbstractLogger nextLogger;
    
       public void setNextLogger(AbstractLogger nextLogger){
    
      this.nextLogger = nextLogger;
    } public void logMessage(int level, String message){
      if(this.level &lt;= level){
         write(message);
      }
      if(nextLogger !=null){
         nextLogger.logMessage(level, message);
      }
    } abstract protected void write(String message); }

    Explore our latest online courses and learn new skills at your own pace. Enroll and become a certified expert to boost your career.

    Step 2

    Create concrete classes extending the logger.

    ConsoleLogger.java

    public class ConsoleLogger extends AbstractLogger {
    
       public ConsoleLogger(int level){
    
      this.level = level;
    } @Override protected void write(String message) {
      System.out.println("Standard Console::Logger: " + message);
    } }

    ErrorLogger.java

    public class ErrorLogger extends AbstractLogger {
    
       public ErrorLogger(int level){
    
      this.level = level;
    } @Override protected void write(String message) {
      System.out.println("Error Console::Logger: " + message);
    } }

    FileLogger.java

    public class FileLogger extends AbstractLogger {
    
       public FileLogger(int level){
    
      this.level = level;
    } @Override protected void write(String message) {
      System.out.println("File::Logger: " + message);
    } }

    Step 3

    Create different types of loggers. Assign them error levels and set next logger in each logger. Next logger in each logger represents the part of the chain.

    ChainPatternDemo.java

    public class ChainPatternDemo {
    	
       private static AbstractLogger getChainOfLoggers(){
    
    
      AbstractLogger errorLogger = new ErrorLogger(AbstractLogger.ERROR);
      AbstractLogger fileLogger = new FileLogger(AbstractLogger.DEBUG);
      AbstractLogger consoleLogger = new ConsoleLogger(AbstractLogger.INFO);
      errorLogger.setNextLogger(fileLogger);
      fileLogger.setNextLogger(consoleLogger);
      return errorLogger;	
    } public static void main(String[] args) {
      AbstractLogger loggerChain = getChainOfLoggers();
      loggerChain.logMessage(AbstractLogger.INFO, 
         "This is an information.");
      loggerChain.logMessage(AbstractLogger.DEBUG, 
         "This is an debug level information.");
      loggerChain.logMessage(AbstractLogger.ERROR, 
         "This is an error information.");
    } }

    Step 4

    Verify the output.

    Standard Console::Logger: This is an information.
    File::Logger: This is an debug level information.
    Standard Console::Logger: This is an debug level information.
    Error Console::Logger: This is an error information.
    File::Logger: This is an error information.
    Standard Console::Logger: This is an error information.