Prewitt operator is used for edge detection in an image. It detects two types of edges: vertical edges and horizontal edges.
We use OpenCV function filter2D to apply Prewitt operator to images. It can be found under Imgproc package. Its syntax is given below −
filter2D(src, dst, depth , kernel, anchor, delta, BORDER_DEFAULT );
The function arguments are described below −
| Sr.No. | Argument & Description |
|---|---|
| 1 | srcIt is source image. |
| 2 | dstIt is destination image. |
| 3 | depthIt is the depth of dst. A negative value (such as -1) indicates that the depth is the same as the source. |
| 4 | kernelIt is the kernel to be scanned through the image. |
| 5 | anchorIt is the position of the anchor relative to its kernel. The location Point (-1, -1) indicates the center by default. |
| 6 | deltaIt is a value to be added to each pixel during the convolution. By default it is 0. |
| 7 | BORDER_DEFAULTWe let this value by default. |
Apart from the filter2D method, there are other methods provide by the Imgproc class. They are described briefly −
| Sr.No. | Method & Description |
|---|---|
| 1 | cvtColor(Mat src, Mat dst, int code, int dstCn)It converts an image from one color space to another. |
| 2 | dilate(Mat src, Mat dst, Mat kernel)It dilates an image by using a specific structuring element. |
| 3 | equalizeHist(Mat src, Mat dst)It equalizes the histogram of a grayscale image. |
| 4 | filter2D(Mat src, Mat dst, int depth, Mat kernel, Point anchor, double delta)It convolves an image with the kernel. |
| 5 | GaussianBlur(Mat src, Mat dst, Size ksize, double sigmaX)It blurs an image using a Gaussian filter. |
| 6 | integral(Mat src, Mat sum)It calculates the integral of an image. |
Example
The following example demonstrates the use of Imgproc class to apply Prewitt operator to an image of Grayscale.
import org.opencv.core.Core;
import org.opencv.core.CvType;
import org.opencv.core.Mat;

import org.opencv.highgui.Highgui;
import org.opencv.imgproc.Imgproc;

public class convolution {
   public static void main( String[] args ) {
  try {
     int kernelSize = 9;
     System.loadLibrary( Core.NATIVE_LIBRARY_NAME );

     Mat source = Highgui.imread("grayscale.jpg", Highgui.CV_LOAD_IMAGE_GRAYSCALE);
     Mat destination = new Mat(source.rows(),source.cols(),source.type());

     Mat kernel = new Mat(kernelSize,kernelSize, CvType.CV_32F) {
        {
           put(0,0,-1);
           put(0,1,0);
           put(0,2,1);
           put(1,0-1);
           put(1,1,0);
           put(1,2,1);
           put(2,0,-1);
           put(2,1,0);
           put(2,2,1);
        }
     };

     Imgproc.filter2D(source, destination, -1, kernel);
     Highgui.imwrite("output.jpg", destination);

  } catch (Exception e) {
     System.out.println("Error: " + e.getMessage());
  }   }
}
Output
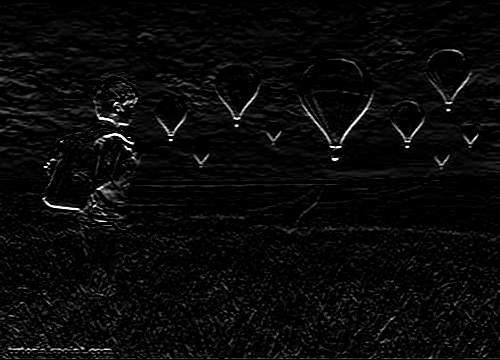
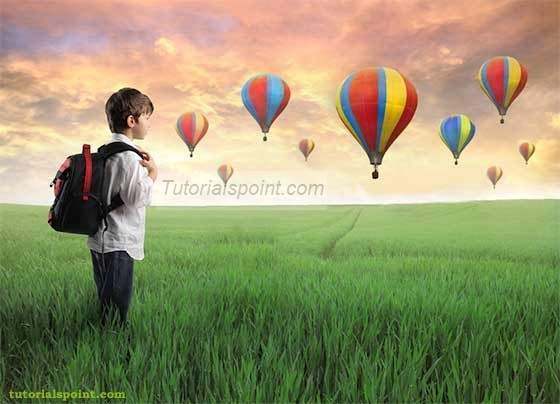
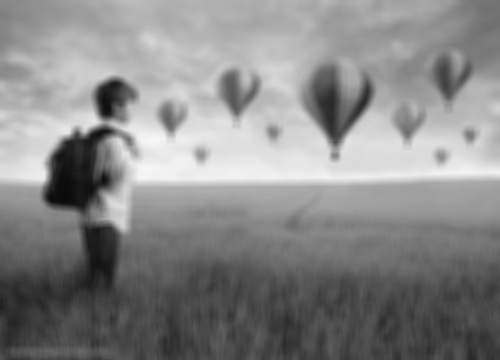
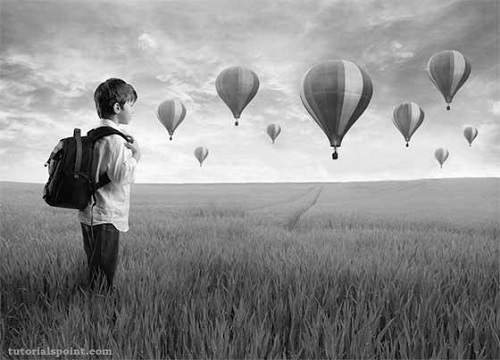
When you execute the given code, the following output is seen −
Original Image
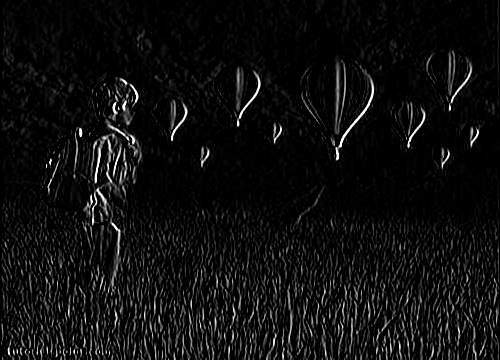
This original image is convolved with the Prewitt operator of vertical edges as given below −
Vertical direction
| -1 | 0 | 1 |
| -1 | 0 | 1 |
| -1 | 0 | 1 |
Convolved Image(Vertical Direction)
This original image has also been convolved with the Prewitt operator of horizontal edges, which is given below −
Horizontal Direction
| -1 | -1 | -1 |
| 0 | 0 | 0 |
| 1 | 1 | 1 |
Convolved Image(Horizontal Direction)