In order to change color space of one image to another using OpenCV, we read image into BufferedImage and convert it into Mat Object. Its syntax is given below −
File input = new File("digital_image_processing.jpg");
BufferedImage image = ImageIO.read(input);
//convert Buffered Image to Mat.
OpenCv allows many color conversion types, all of which can be found in the Imgproc class. Some of the types are described briefly −
Sr.No.
Color Conversion Type
1
COLOR_RGB2BGR
2
COLOR_RGB2BGRA
3
COLOR_RGB2GRAY
4
COLOR_RGB2HLS
5
COLOR_RGB2HSV
6
COLOR_RGB2Luv
7
COLOR_RGB2YUV
8
COLOR_RGB2Lab
From any of the color conversion type, just pass the appropriate one into method cvtColor() in the Imgproc class. Its syntax is given below −
When you execute the given example, it converts an image name digital_image_processing.jpg to its equivalent HSV color space image and writes it on hard disk with name hsv.jpg.
In order to convert a color image to Grayscale image using OpenCV, we read the image into BufferedImage and convert it into Mat Object. Its syntax is given below −
File input = new File("digital_image_processing.jpg");
BufferedImage image = ImageIO.read(input);
//convert Buffered Image to Mat.
Then you can transform the image from RGB to Grayscale format by using method cvtColor() in the Imgproc class. Its syntax is given below −
byte[] data = ((DataBufferByte) image.getRaster().getDataBuffer()).getData();
Mat mat = new Mat(image.getHeight(), image.getWidth(), CvType.CV_8UC3);
mat.put(0, 0, data);
Mat mat1 = new Mat(image.getHeight(),image.getWidth(),CvType.CV_8UC1);
Imgproc.cvtColor(mat, mat1, Imgproc.COLOR_RGB2GRAY);
When you execute the given example, it converts an image name digital_image_processing.jpg to its equivalent Grayscale image and writes it on hard disk with name grayscale.jpg.
OpenCV is released under a BSD license and hence it is free for both academic and commercial use. It has C++, C, Python, and Java interfaces, and it supports Windows, Linux, Mac OS, iOS, and Android.
OpenCV was designed for computational efficiency and with a strong focus on real-time applications. Written in optimized C/C++, the library can take advantage of multi-core processing.
Some of the basic features of OpenCV are described below −
Sr.No.
Feature & Description
1
Smoothing ImagesThis involves applying Blur, GaussianBlur, medianBlur, and bilateral Filter.
2
Eroding and DilatingIt can apply two very common morphology operators − Dilation and Erosion.
3
Morphology TransformationsOpenCV function morphologyEx to apply Morphological Transformation such as opening, closing, TopHat, and BlackHat etc.
4
Image PyramidsOpenCV functions pyrUp and pyrDown to down sample or up sample a given image.
4
Basic Thresholding OperationsIt can perform basic thresholding operations using OpenCV function threshold.
5
Adding borders to your imagesOpenCV function copyMakeBorder is used to set the borders(extra padding to your image).
7
RemappingIn OpenCV, the function remap offers a simple remapping implementation.
8
Histogram CalculationFor simple purposes, OpenCV implements the function calcHist, which calculates the histogram of a set of arrays (usually images or image planes). It can operate with up to 32 dimensions.
Integrating OpenCV
These following steps explain how to integrate OpenCV into your applications.
Download OpenCV
You can download OpenCV from their official Website here.
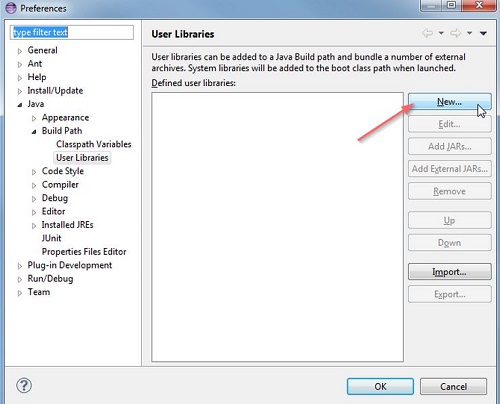
Create User Library
Further, we create a user library of OpenCV, so that we can use it as a future project.
Launch Eclipse
Select Window -> Preferences from the menu.
Navigate under Java -> Build Path -> User Libraries and click New.
Now enter the name for your library. For example, OpenCV-2.4.6.
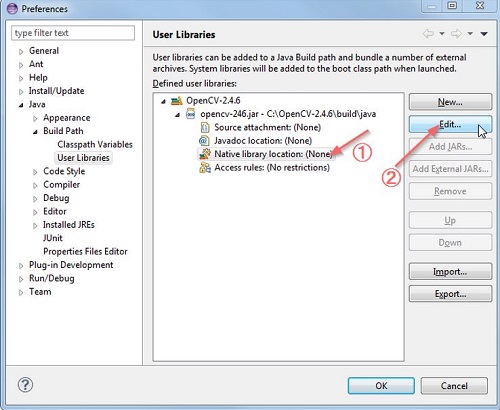
After that, select your new user library(i.e. OpenCV-2.4.6) and click on Add External JARs.
Browse through C:\OpenCV-2.4.6\build\java\ and select opencv-246.jar. After adding the jar, extend the opencv-246.jar and select Native library location and press Edit.
Select External Folder… and browse to select the folder C:\OpenCV-2.4.6\build\java\x64. If you have a 32-bit system, you need to select the x86 folder instead of x64.
Press Ok and you are done.
Now your user library is created. Now you can reuse this configuration in any of the project.
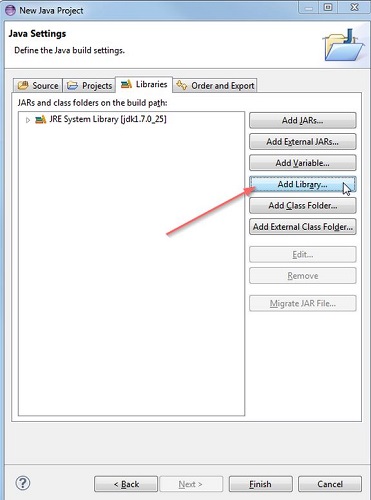
Create OpenCV Project
Create a new java project in eclipse.
On the Java Settings step, under Libraries tab, select Add Library… and select OpenCV-2.4.6, then click Finish.
In this chapter, we explore some of the free image processing libraries that are widely used and can be easily integrated in the project. These libraries include −
ImageJ
Fiji
Commons Imaging
ImageMagick
Endrov
LeadTools
OpenCv
ImageJ
ImageJ is a public domain Java image processing program inspired by NIH Image for the Macintosh. It can display, edit, analyze, process, save, and print 8-bit, 16-bit, and 32-bit images.
Some of the basic features of ImageJ are described below −
Sr.No.
Feature & Description
1
Runs EverywhereImageJ is written in Java, which allows it to run on Linux, Mac OS X and Windows, in both 32-bit and 64-bit modes.
2
Open SourceImageJ and its Java source code are freely available and in the public domain.
3
ToolkitUse ImageJ as an image processing toolkit (class library) to develop applets, servlets, or applications.
4
Data Types8-bit grayscale or indexed color, 16-bit unsigned integer, 32-bit floating-point, and RGB color.
5
File FormatsOpen and save GIF, JPEG, BMP, PNG, PGM, FITS, and ASCII. Open DICOM. Open TIFFs, GIFs, JPEGs, DICOMs, and raw data using a URL.
6
SelectionsCreate rectangular, elliptical, or irregular area selections. Create line and point selections.
7
Image EnhancementSupports smoothing, sharpening, edge detection, median filtering, and thresholding on both 8-bit grayscale and RGB color images.
8
Color ProcessingSplit a 32-bit color image into RGB or HSV components. Merge 8-bit components into a color image.
Fiji
Fiji is an image processing package. It can be described as a distribution of ImageJ (and ImageJ2) together with Java, Java3D, and a lot of plug-ins organized into a coherent menu structure. Fiji compares to ImageJ as Ubuntu compares to Linux.
Apart from the ImageJ basic features, some of the advanced features of Fiji are described below −
Sr.No.
Feature & Description
1
Registering 3D imagesThis involves Elastic Alignment and Montage, Feature Extraction, Image Stabilizer etc.
2
Segmenting imagesIt offers more than 35 types of segmentation.
3
Useful keyboard short cutsFuji has a lot of keyboard short-cuts.
4
ScriptingAllow scripting with Macros, in JavaScript, JRuby, Jython, Clojure, and Beanshell.
5
Developing Plug-insUse the Script Editor to start developing plug-ins and then run the plug-ins.
6
ImageJ TricksImageJ is easy to use, but sometimes you wish for some function that is actually implemented, yet you do not know how to trigger.
Learn Java in-depth with real-world projects through our Java certification course. Enroll and become a certified expert to boost your career.
Commons Imaging
Apache Commons Imaging, previously known as Apache Commons Sanselan, is a library that reads and writes a variety of image formats, including fast parsing of image information such as(size, color, space, ICC profile, etc.) and the meta data.
Some of the basic features of ImageJ are described below −
Sr.No.
Feature & Description
1
JavaApache Commons Imaging is written in 100% pure Java. It executes on any JVM, and any platform, without modification.
2
Image FormatsIt reads and writes a wide variety of image formats, and supports some variations and encodings missed by all or most other libraries.
3
Metadata supportIt supports reading and writing a variety of meta data in a structured way, including EXIF meta data.
4
Network FriendlyIt is network-friendly. Commons Imaging only reads the data it needs, and caches what is read so that it is not too heavy on the network.
5
Easy to useIt is designed to be very easy to use. It has a simple, clean interface. Most operations are a single Imaging method calls.
6
TransparentCommons Imaging aims to be transparent. There are no hidden buffers to dispose, no native memory to free, no background threads.
7
Open SourceIt is Free Software/Open Source. It is available under the Apache Software License.
8
Color ConversionsThe ColorConversions class offers methods to convert between the following color spaces − CIE-L*CH, CIE-L*ab, CIE-L*uv, CMY, CMYK, HSL, HSV, Hunter-Lab, RGB, XYZ, and YXY.
ImageMagick
ImageMagick is a software suite to create, edit, compose, or convert bitmap images. It can read and write images in more than 100 formats including DPX, EXR, GIF, JPEG, JPEG-2000, PDF, PNG, Postscript, SVG, and TIFF. Use ImageMagick to resize, flip, mirror, rotate, distort, shear, and transform images, adjust image colors, apply various special effects, or draw text, lines, polygons, ellipses, and Bezier curve.
Some of the basic features of ImageMagick are described below −
Sr.No.
Feature & Description
1
Format conversionIt converts an image from one format to another (e.g. PNG to JPEG).
2
TransformIt can resize, rotate, crop, flip or trim an image.
3
TransparencyIt renders portions of an image invisible.
4
DrawIt adds shapes or text to an image.
5
DecorateIt adds a border or frame to an image.
6
Special effectsIt can Blur, sharpen, threshold, or tint an image.
7
AnimationIt can create a GIF animation sequence from a group of images.
8
CompositeIt can overlap one image over another.
9
Morphology of shapesIt extracts features, describe shapes and recognize patterns in images.
10
Encipher or decipher an imageIt converts ordinary images into unintelligible gibberish and back again.
Endrov
Endrov is a multi-purpose image analysis program. It is written independently and designed to address many of the shortcomings of other free software and many commercial packages.
Some of the basic features of Endrov are described below −
Sr.No.
Feature & Description
1
View dataIt views data, in 2D and 3D. Designed to handle complex 4D data schemes and unlimited number of channels, where each channel can have its own X, Y, and Z resolution.
2
Annotate your imagesIt annotates your images, automatically or by hand, to understand them and get statistics.
3
Undo and RedoIt can undo and redo for all operations.
4
Lazy EvaluationIt is designed from the ground to handle large image sets. Endrov uses lazy evaluation, a concept mostly available in research programming languages.
5
Scripting languageIt supports graphical scripting language, as well as traditional scripting.
6
JavaWritten in Java. Plug-in architecture allows easy extension with new Java plug-ins. It can interact with Matlab.
7
FormatsIt accesses almost all commercial and open file formats using Bio-formats.
8
Microscopic ProcessingIt can control all your microscopes with one program and do on-the-fly image analysis.
LEADTOOLS
LEADTOOLS provides over 200 image processing functions in several categories including document cleanup, medical image enhancement, color conversion and correction, noise reduction, edge detection, and more.
Some of the basic features of LEADTOOLS are described below −
Sr.No.
Feature & Description
1
Scanned Document Image ProcessingThis powerful collection of functions can read scanned documents of artefacts and imperfections such as punched holes, skewed angles, borders, dust speckles, and more.
2
Medical Image ProcessingEnhance the image or highlight the details by shifting, selecting, subtracting, and removing the background for better visuals.
3
Geometric TransformationThese functions can be used to clean, align, correct images, or apply artistic 3D effects.
4
Brightness and ContrastThese functions can be used to enhance images, apply artistic effects, or aid in diagnostic evaluation of medical images.
5
Color Space ConversionThey can add image color space functionality to single and multi-threaded applications including IIS and Windows WF hosted applications.
6
Color CorrectionThese functions are used to correct images with swapped color channels, balance color intensities or perform various image analysis tasks.
7
Image EnhancementThese functions are used to correct common errors in photography such as red-eye and imbalanced colors as well as aid in diagnostic evaluation of medical images.
8
Region of InterestThese functions are used to create and modify regions of interest in images to perform image processing functions on specific portions of an image, save time in bar-code, and OCR recognition or perform various image analysis tasks.
OpenCV
OpenCV is released under a BSD license and hence it is free for both academic and commercial use. It has C++, C, Python, and Java interfaces and it supports Windows, Linux, Mac OS, iOS, and Android. OpenCV was designed for computational efficiency and with a strong focus on real-time applications. Written in optimized C/C++, the library can take advantage of multi-core processing.
Some basic features of OpenCV are described briefly −
Sr.No.
Feature & Description
1
Smoothing ImagesThis involves applying Blur, GaussianBlur, medianBlur and bilateral Filter.
2
Eroding and DilatingIt can apply two very common morphology operators − Dilation and Erosion.
3
Morphology TransformationsOpenCV function morphologyEx to apply Morphological Transformation such as opening, closing, TopHat, and BlackHat etc.
4
Image PyramidsOpenCV functions pyrUp and pyrDown to down sample or up sample a given image.
4
Basic Thresholding OperationsPerform basic thresholding operations using OpenCV function threshold.
5
Adding borders to your imagesOpenCV function copyMakeBorder is used to set the borders (extra padding to your image).
7
RemappingIn OpenCV, the function remap offers a simple remapping implementation.
8
Histogram CalculationFor simple purposes, OpenCV implements the function calcHist, which calculates the histogram of a set of arrays (usually images or image planes). It can operate with up to 32 dimensions.
In the resize function, we pass source image, destination image and its size, zooming factor, and the interpolation method to use.
The interpolation methods available are described below −
Sr.No.
Interpolation method & Description
1
INTER_NEARESTIt is nearest-neighbour interpolation.
2
INTER_LINEARIt is bilinear interpolation (used by default).
3
INTER_AREAIt is resampling using pixel area relation. It may be a preferred method for image decimation, as it gives more-free results.
4
INTER_CUBICIt is a bi-cubic interpolation over 4×4 pixel neighbourhood.
5
INTER_LANCZOS4It is a Lanczos interpolation over 8×8 pixel neighbourhood.
Apart from the resize method, there are other methods provided by the Imgproc class. They are described briefly −
Sr.No.
Method & Description
1
cvtColor(Mat src, Mat dst, int code, int dstCn)It converts an image from one color space to another.
2
dilate(Mat src, Mat dst, Mat kernel)It dilates an image by using a specific structuring element.
3
equalizeHist(Mat src, Mat dst)It equalizes the histogram of a grayscale image.
4
filter2D(Mat src, Mat dst, int ddepth, Mat kernel, Point anchor, double delta)It convolves an image with the kernel.
5
GaussianBlur(Mat src, Mat dst, Size ksize, double sigmaX)It blurs an image using a Gaussian filter.
6
integral(Mat src, Mat sum)It calculates the integral of an image.
Example
The following example demonstrates the use of Imgproc class to apply zooming to an image.
import org.opencv.core.Core;
import org.opencv.core.Mat;

import org.opencv.highgui.Highgui;
import org.opencv.imgproc.Imgproc;

public class Main {
   public static void main( String[] args ) {

  try {
     int zoomingFactor = 2;
     System.loadLibrary( Core.NATIVE_LIBRARY_NAME );

     Mat source = Highgui.imread("image.jpg", Highgui.CV_LOAD_IMAGE_GRAYSCALE);
     Mat destination = new Mat(source.rows() * zoomingFactor, source.cols()*  zoomingFactor,source.type());

     Imgproc.resize(source, destination, destination.size(),  zoomingFactor,zoomingFactor,Imgproc.INTER_NEAREST);
     Highgui.imwrite("zoomed.jpg", destination);

  } catch (Exception e) {
     System.out.println("Error: "+e.getMessage());
  }   }
}
Output
When you execute the given code, the following output is seen −
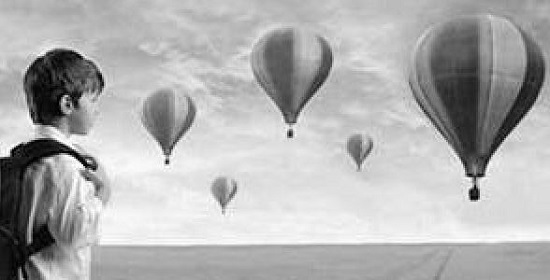
In weighted average filter, we gave more weight to the center value, due to which the contribution of center becomes more than the rest of the values. Due to weighted average filtering, we can control the blurring of image.
We use OpenCV function filter2D to apply weighted average filter to images. It can be found under Imgproc package. Its syntax is given below −
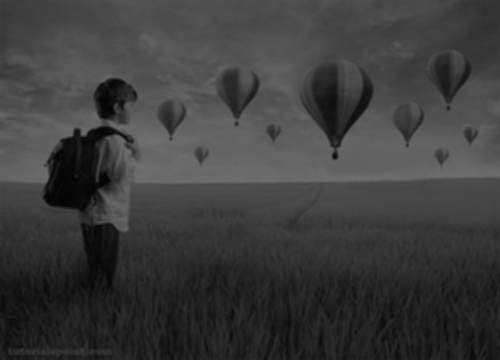
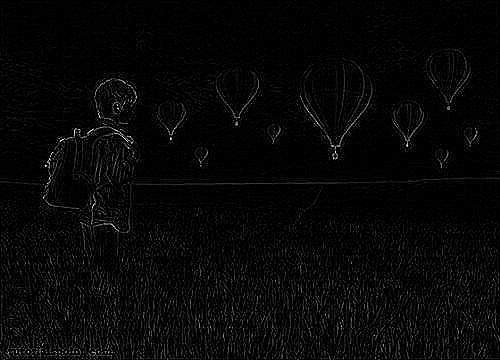
Laplacian Operator is also a derivative operator which is used to find edges in an image. The major difference between Laplacian and other operators like Prewitt, Sobel, Robinson, and Kirsch is that these all are first order derivative masks but Laplacian is a second order derivative mask.
We use OpenCV function filter2D to apply Laplacian operator to images. It can be found under Imgproc package. Its syntax is given below −
depthIt is the depth of dst. A negative value (such as -1) indicates that the depth is the same as the source.
4
kernelIt is the kernel to be scanned through the image.
5
anchorIt is the position of the anchor relative to its kernel. The location Point (-1, -1) indicates the center by default.
6
deltaIt is a value to be added to each pixel during the convolution. By default it is 0.
7
BORDER_DEFAULTWe let this value by default.
Apart from the filter2D() method, there are other methods provided by the Imgproc class. They are described briefly −
Sr.No.
Method & Description
1
cvtColor(Mat src, Mat dst, int code, int dstCn)It converts an image from one color space to another.
2
dilate(Mat src, Mat dst, Mat kernel)It dilates an image by using a specific structuring element.
3
equalizeHist(Mat src, Mat dst)It equalizes the histogram of a grayscale image.
4
filter2D(Mat src, Mat dst, int depth, Mat kernel, Point anchor, double delta)It convolves an image with the kernel.
5
GaussianBlur(Mat src, Mat dst, Size ksize, double sigmaX)It blurs an image using a Gaussian filter.
6
integral(Mat src, Mat sum)It calculates the integral of an image.
Example
The following example demonstrates the use of Imgproc class to apply Laplacian operator to an image of Grayscale.
import org.opencv.core.Core;
import org.opencv.core.CvType;
import org.opencv.core.Mat;
import org.opencv.highgui.Highgui;
import org.opencv.imgproc.Imgproc;
public class convolution {
public static void main( String[] args ) {
try {
int kernelSize = 9;
System.loadLibrary( Core.NATIVE_LIBRARY_NAME );
Mat source = Highgui.imread("grayscale.jpg", Highgui.CV_LOAD_IMAGE_GRAYSCALE);
Mat destination = new Mat(source.rows(),source.cols(),source.type());
Mat kernel = new Mat(kernelSize,kernelSize, CvType.CV_32F) {
{
put(0,0,0);
put(0,1,-1)
put(0,2,0);
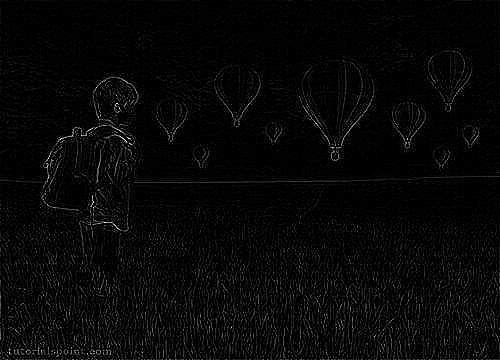
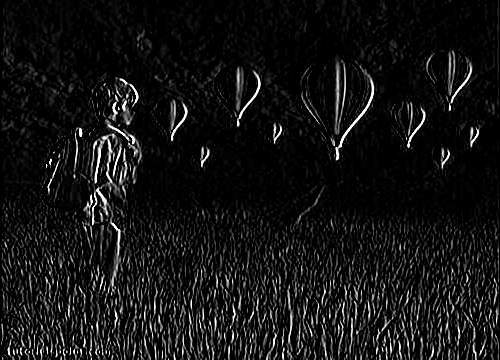
Robinson compass masks are yet another type of derivative masks which are used for edge detection. This operator is also known as direction mask. In this operator we take one mask and rotate it in all the eight major directions to get edges of the eight directions.
We are going to use OpenCV function filter2D to apply Robinson operator to images. It can be found under Imgproc package. Its syntax is given below −
depthIt is the depth of dst. A negative value (such as -1) indicates that the depth is the same as the source.
4
kernelIt is the kernel to be scanned through the image.
5
anchorIt is the position of the anchor relative to its kernel. The location Point(-1, -1) indicates the center by default.
6
deltaIt is a value to be added to each pixel during the convolution. By default it is 0.
7
BORDER_DEFAULTWe let this value by default.
Apart from the filter2D method, there are other methods provided by the Imgproc class. They are described briefly −
Sr.No.
Method & Description
1
cvtColor(Mat src, Mat dst, int code, int dstCn)It converts an image from one color space to another.
2
dilate(Mat src, Mat dst, Mat kernel)It dilates an image by using a specific structuring element.
3
equalizeHist(Mat src, Mat dst)It equalizes the histogram of a grayscale image.
4
filter2D(Mat src, Mat dst, int depth, Mat kernel, Point anchor, double delta)It convolves an image with the kernel.
5
GaussianBlur(Mat src, Mat dst, Size ksize, double sigmaX)It blurs an image using a Gaussian filter.
6
integral(Mat src, Mat sum)It calculates the integral of an image.
Example
The following example demonstrates the use of Imgproc class to apply Robinson operator to an image of Grayscale.
import org.opencv.core.Core;
import org.opencv.core.CvType;
import org.opencv.core.Mat;
import org.opencv.highgui.Highgui;
import org.opencv.imgproc.Imgproc;
public class convolution {
public static void main( String[] args ) {
try {
int kernelSize = 9;
System.loadLibrary( Core.NATIVE_LIBRARY_NAME );
Mat source = Highgui.imread("grayscale.jpg", Highgui.CV_LOAD_IMAGE_GRAYSCALE);
Mat destination = new Mat(source.rows(),source.cols(),source.type());
Mat kernel = new Mat(kernelSize,kernelSize, CvType.CV_32F) {
{
put(0,0,-1);
put(0,1,0);
put(0,2,1);
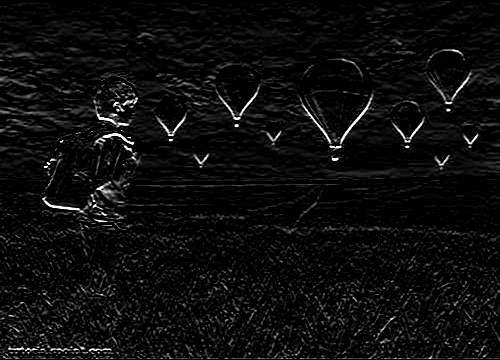
Kirsch compass masks are yet another type of derivative mask which are used for edge detection. This operator is also known as direction mask. In this operator we take one mask and rotate it in all the eight compass directions to get edges of the eight directions.
We are going to use OpenCV function filter2D to apply Kirsch operator to images. It can be found under Imgproc package. Its syntax is given below −
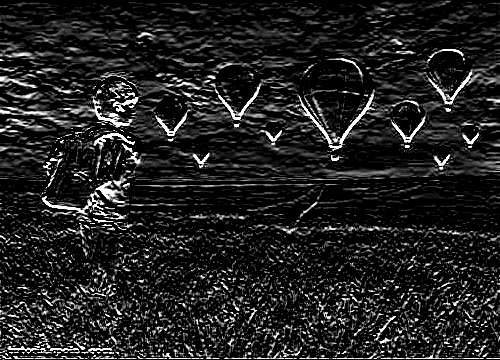
Sobel operator is very similar to Prewitt operator. It is also a derivative mask and is used for edge detection. Sobel operator is used to detect two kinds of edges in an image: Vertical direction edges and Horizontal direction edges.
We are going to use OpenCV function filter2D to apply Sobel operator to images. It can be found under Imgproc package. Its syntax is given below −
depthIt is the depth of dst. A negative value (such as -1) indicates that the depth is the same as the source.
4
kernelIt is the kernel to be scanned through the image.
5
anchorIt is the position of the anchor relative to its kernel. The location Point (-1, -1) indicates the center by default.
6
deltaIt is a value to be added to each pixel during the convolution. By default it is 0.
7
BORDER_DEFAULTWe let this value by default.
Apart from the filter2D method, there are other methods provide by the Imgproc class. They are described briefly −
Sr.No.
Method & Description
1
cvtColor(Mat src, Mat dst, int code, int dstCn)It converts an image from one color space to another.
2
dilate(Mat src, Mat dst, Mat kernel)It dilates an image by using a specific structuring element.
3
equalizeHist(Mat src, Mat dst)It equalizes the histogram of a grayscale image.
4
filter2D(Mat src, Mat dst, int depth, Mat kernel, Point anchor, double delta)It convolves an image with the kernel.
5
GaussianBlur(Mat src, Mat dst, Size ksize, double sigmaX)It blurs an image using a Gaussian filter.
6
integral(Mat src, Mat sum)It calculates the integral of an image.
Example
The following example demonstrates the use of Imgproc class to apply Sobel operator to an image of Grayscale.
import org.opencv.core.Core;
import org.opencv.core.CvType;
import org.opencv.core.Mat;
import org.opencv.highgui.Highgui;
import org.opencv.imgproc.Imgproc;
public class convolution {
public static void main( String[] args ) {
try {
int kernelSize = 9;
System.loadLibrary( Core.NATIVE_LIBRARY_NAME );
Mat source = Highgui.imread("grayscale.jpg", Highgui.CV_LOAD_IMAGE_GRAYSCALE);
Mat destination = new Mat(source.rows(),source.cols(),source.type());
Mat kernel = new Mat(kernelSize,kernelSize, CvType.CV_32F) {
{
put(0,0,-1);
put(0,1,0);
put(0,2,1);