Category: 5. Advanced

https://cdn3d.iconscout.com/3d/premium/thumb/3d-software-settings-icon-download-in-png-blend-fbx-gltf-file-formats–setting-configuration-preferences-printing-pack-science-technology-icons-8549424.png?f=webp

  • Ajax

    Ajax essentially is a combination of technologies that are integrated together to reduce the number of page loads. We generally use Ajax to ease end-user experience. Using Ajax in Django can be done by directly using an Ajax library like JQuery or others. Let’s say you want to use JQuery, then you need to download and serve the library on your server through Apache or others. Then use it in your template, just like you might do while developing any Ajax-based application.

    Another way of using Ajax in Django is to use the Django Ajax framework. The most commonly used is django-dajax which is a powerful tool to easily and super-quickly develop asynchronous presentation logic in web applications, using Python and almost no JavaScript source code. It supports four of the most popular Ajax frameworks: Prototype, jQuery, Dojo and MooTools.

    Using Django-dajax

    First thing to do is to install django-dajax. This can be done using easy_install or pip −

    $ pip install django_dajax
    $ easy_install django_dajax
    

    This will automatically install django-dajaxice, required by django-dajax. We then need to configure both dajax and dajaxice.

    Add dajax and dajaxice in your project settings.py in INSTALLED_APPS option −

    INSTALLED_APPS += (
       'dajaxice',
       'dajax'
    )

    Make sure in the same settings.py file, you have the following −

    TEMPLATE_LOADERS = (
       'django.template.loaders.filesystem.Loader',
       'django.template.loaders.app_directories.Loader',
       'django.template.loaders.eggs.Loader',
    )
    
    TEMPLATE_CONTEXT_PROCESSORS = (
       'django.contrib.auth.context_processors.auth',
       'django.core.context_processors.debug',
       'django.core.context_processors.i18n',
       'django.core.context_processors.media',
       'django.core.context_processors.static',
       'django.core.context_processors.request',
       'django.contrib.messages.context_processors.messages'
    )
    
    STATICFILES_FINDERS = (
       'django.contrib.staticfiles.finders.FileSystemFinder',
       'django.contrib.staticfiles.finders.AppDirectoriesFinder',
       'dajaxice.finders.DajaxiceFinder',
    )
    
    DAJAXICE_MEDIA_PREFIX = 'dajaxice'

    Now go to the myapp/url.py file and make sure you have the following to set dajax URLs and to load dajax statics js files −

    from dajaxice.core import dajaxice_autodiscover, dajaxice_config
    from django.contrib.staticfiles.urls import staticfiles_urlpatterns
    from django.conf import settings
    
    Then dajax urls:
    
    urlpatterns += patterns('',
       url(r'^%s/' % settings.DAJAXICE_MEDIA_PREFIX, include('dajaxice.urls')),)
    	
    urlpatterns += staticfiles_urlpatterns()

    Let us create a simple form based on our Dreamreal model to store it, using Ajax (means no refresh).

    At first, we need our Dreamreal form in myapp/form.py.

    class DreamrealForm(forms.Form):
       website = forms.CharField(max_length = 100)
       name = forms.CharField(max_length = 100)
       phonenumber = forms.CharField(max_length = 50)
       email = forms.CharField(max_length = 100)

    Then we need an ajax.py file in our application: myapp/ajax.py. That’s where is our logic, that’s where we put the function that will be saving our form then return the popup −

    from dajaxice.utils import deserialize_form
    from myapp.form import DreamrealForm
    from dajax.core import Dajax
    from myapp.models import Dreamreal
    
    @dajaxice_register
    def send_form(request, form):
       dajax = Dajax()
       form = DreamrealForm(deserialize_form(form))
       
       if form.is_valid():
    
      dajax.remove_css_class('#my_form input', 'error')
      dr = Dreamreal()
      dr.website = form.cleaned_data.get('website')
      dr.name = form.cleaned_data.get('name')
      dr.phonenumber = form.cleaned_data.get('phonenumber')
      dr.save()
      
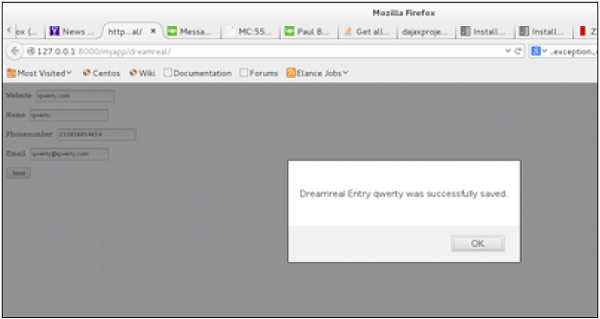
      dajax.alert("Dreamreal Entry %s was successfully saved." % 
         form.cleaned_data.get('name'))
    else:
      dajax.remove_css_class('#my_form input', 'error')
      for error in form.errors:
         dajax.add_css_class('#id_%s' % error, 'error')
    return dajax.json()

    Now let’s create the dreamreal.html template, which has our form −

    <html>
       <head></head>
       <body>
       
    
      &lt;form action = "" method = "post" id = "my_form" accept-charset = "utf-8"&gt;
         {{ form.as_p }}
         &lt;p&gt;&lt;input type = "button" value = "Send" onclick = "send_form();"&gt;&lt;/p&gt;
      &lt;/form&gt;
      
    </body> </html>

    Add the view that goes with the template in myapp/views.py −

    def dreamreal(request):
       form = DreamrealForm()
       return render(request, 'dreamreal.html', locals())

    Add the corresponding URL in myapp/urls.py −

    url(r'^dreamreal/', 'dreamreal', name = 'dreamreal'),
    

    Now let’s add the necessary in our template to make the Ajax work −

    At the top of the file add −

    {% load static %}
    {% load dajaxice_templatetags %}

    And in the <head> section of our dreamreal.html template add −

    We are using the JQuery library for this example, so add −

    <script src = "{% static '/static/jquery-1.11.3.min.js' %}" 
       type = "text/javascript" charset = "utf-8"></script>
    <script src = "{% static '/static/dajax/jquery.dajax.core.js' %}"></script>

    The Ajax function that will be called on click −

    <script>
    
       function send_form(){
    
      Dajaxice.myapp.send_form(Dajax.process,{'form':$('#my_form').serialize(true)});
    } </script>

    Note that you need the “jquery-1.11.3.min.js” in your static files directory, and also the jquery.dajax.core.js. To make sure all dajax static files are served under your static directory, run −

    $python manage.py collectstatic
    

    Note − Sometimes the jquery.dajax.core.js can be missing, if that happens, just download the source and take that file and put it under your static folder.

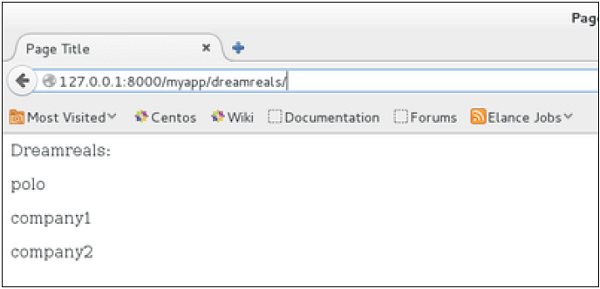
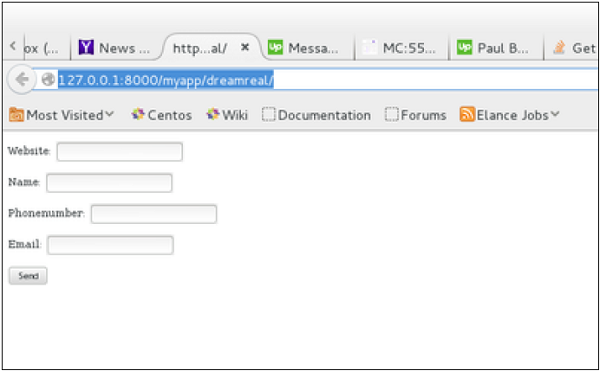
    You will get to see the following screen, upon accessing /myapp/dreamreal/ −

    Using Django-dajax

    On submit, you will get the following screen −

    Using Django-dajax Response
  • RSS

    Django comes with a syndication feed generating framework. With it you can create RSS or Atom feeds just by subclassing django.contrib.syndication.views.Feed class.

    Let’s create a feed for the latest comments done on the app (Also see Django – Comments Framework chapter). For this, let’s create a myapp/feeds.py and define our feed (You can put your feeds classes anywhere you want in your code structure).

    from django.contrib.syndication.views import Feed
    from django.contrib.comments import Comment
    from django.core.urlresolvers import reverse
    
    class DreamrealCommentsFeed(Feed):
       title = "Dreamreal's comments"
       link = "/drcomments/"
       description = "Updates on new comments on Dreamreal entry."
    
       def items(self):
    
      return Comment.objects.all().order_by("-submit_date")&#91;:5]
    def item_title(self, item):
      return item.user_name
    def item_description(self, item):
      return item.comment
    def item_link(self, item):
      return reverse('comment', kwargs = {'object_pk':item.pk})</code></pre>
    • In our feed class, titlelink, and description attributes correspond to the standard RSS <title><link> and <description> elements.
    • The items method, return the elements that should go in the feed as item element. In our case the last five comments.
    • The item_title method, will get what will go as title for our feed item. In our case the title, will be the user name.
    • The item_description method, will get what will go as description for our feed item. In our case the comment itself.
    • The item_link method will build the link to the full item. In our case it will get you to the comment.

    Now that we have our feed, let's add a comment view in views.py to display our comment −

    from django.contrib.comments import Comment
    
    def comment(request, object_pk):
       mycomment = Comment.objects.get(object_pk = object_pk)
       text = '<strong>User :</strong> %s <p>'%mycomment.user_name</p>
       text += '<strong>Comment :</strong> %s <p>'%mycomment.comment</p>
       return HttpResponse(text)

    We also need some URLs in our myapp urls.py for mapping −

    from myapp.feeds import DreamrealCommentsFeed
    from django.conf.urls import patterns, url
    
    urlpatterns += patterns('',
       url(r'^latest/comments/', DreamrealCommentsFeed()),
       url(r'^comment/(?P\w+)/', 'comment', name = 'comment'),
    )

    When accessing /myapp/latest/comments/ you will get our feed −

    Django RSS Example

    Then clicking on one of the usernames will get you to: /myapp/comment/comment_id as defined in our comment view before and you will get −

    Django RSS Redirected Page

    Thus, defining a RSS feed is just a matter of sub-classing the Feed class and making sure the URLs (one for accessing the feed and one for accessing the feed elements) are defined. Just as comment, this can be attached to any model in your app.

  • Comments

    Before starting, note that the Django Comments framework is deprecated, since the 1.5 version. Now you can use external feature for doing so, but if you still want to use it, it’s still included in version 1.6 and 1.7. Starting version 1.8 it’s absent but you can still get the code on a different GitHub account.

    The comments framework makes it easy to attach comments to any model in your app.

    To start using the Django comments framework −

    Edit the project settings.py file and add ‘django.contrib.sites’, and ‘django.contrib.comments’, to INSTALLED_APPS option −

    INSTALLED_APPS += ('django.contrib.sites', 'django.contrib.comments',)

    Get the site id −

    >>> from django.contrib.sites.models import Site
    >>> Site().save()
    >>> Site.objects.all()[0].id
    u'56194498e13823167dd43c64'

    Set the id you get in the settings.py file −

    SITE_ID = u'56194498e13823167dd43c64'
    

    Sync db, to create all the comments table or collection −

    python manage.py syncdb
    

    Add the comment app’s URLs to your project’s urls.py −

    from django.conf.urls import include
    url(r'^comments/', include('django.contrib.comments.urls')),

    Now that we have the framework installed, let’s change our hello templates to tracks comments on our Dreamreal model. We will list, save comments for a specific Dreamreal entry whose name will be passed as parameter to the /myapp/hello URL.

    Dreamreal Model

    class Dreamreal(models.Model):
    
       website = models.CharField(max_length = 50)
       mail = models.CharField(max_length = 50)
       name = models.CharField(max_length = 50)
       phonenumber = models.IntegerField()
    
       class Meta:
    
      db_table = "dreamreal"</code></pre>

    hello view

    def hello(request, Name):
       today = datetime.datetime.now().date()
       daysOfWeek = ['Mon', 'Tue', 'Wed', 'Thu', 'Fri', 'Sat', 'Sun']
       dreamreal = Dreamreal.objects.get(name = Name)
       return render(request, 'hello.html', locals())

    hello.html template

    {% extends "main_template.html" %}
    {% load comments %}
    {% block title %}My Hello Page{% endblock %}
    {% block content %}
    
    <p>
       Our Dreamreal Entry:
       <p><strong>Name :</strong> {{dreamreal.name}}</p>
       <p><strong>Website :</strong> {{dreamreal.website}}</p>
       <p><strong>Phone :</strong> {{dreamreal.phonenumber}}</p>
       <p><strong>Number of comments :<strong> 
       {% get_comment_count for dreamreal as comment_count %} {{ comment_count }}</p>
       <p>List of comments :</p>
       {% render_comment_list for dreamreal %}
    </p>
    
    {% render_comment_form for dreamreal %}
    {% endblock %}

    Finally the mapping URL to our hello view −

    url(r'^hello/(?P<Name>\w+)/', 'hello', name = 'hello'),
    

    Now,

    • In our template (hello.html), load the comments framework with − {% load comments %}
    • We get the number of comments for the Dreamreal object pass by the view − {% get_comment_count for dreamreal as comment_count %}
    • We get the list of comments for the objects − {% render_comment_list for dreamreal %}
    • We display the default comments form − {% render_comment_form for dreamreal %}

    When accessing /myapp/hello/steve you will get the comments info for the Dreamreal entry whose name is Steve. Accessing that URL will get you −

    Django Comments Example

    On posting a comment, you will get redirected to the following page −

    Comments Redirected Page

    If you go to /myapp/hello/steve again, you will get to see the following page −

    Number of Comments

    As you can see, the number of comments is 1 now and you have the comment under the list of comments line.

  • Caching

    To cache something is to save the result of an expensive calculation, so that you don’t perform it the next time you need it. Following is a pseudo code that explains how caching works −

    given a URL, try finding that page in the cache
    
    if the page is in the cache:
       return the cached page
    else:
       generate the page
       save the generated page in the cache (for next time)
       return the generated page

    Django comes with its own caching system that lets you save your dynamic pages, to avoid calculating them again when needed. The good point in Django Cache framework is that you can cache −

    • The output of a specific view.
    • A part of a template.
    • Your entire site.

    To use cache in Django, first thing to do is to set up where the cache will stay. The cache framework offers different possibilities – cache can be saved in database, on file system or directly in memory. Setting is done in the settings.py file of your project.

    Setting Up Cache in Database

    Just add the following in the project settings.py file −

    CACHES = {
       'default': {
    
      'BACKEND': 'django.core.cache.backends.db.DatabaseCache',
      'LOCATION': 'my_table_name',
    } }

    For this to work and to complete the setting, we need to create the cache table ‘my_table_name’. For this, you need to do the following −

    python manage.py createcachetable
    

    Setting Up Cache in File System

    Just add the following in the project settings.py file −

    CACHES = {
       'default': {
    
      'BACKEND': 'django.core.cache.backends.filebased.FileBasedCache',
      'LOCATION': '/var/tmp/django_cache',
    } }

    Setting Up Cache in Memory

    This is the most efficient way of caching, to use it you can use one of the following options depending on the Python binding library you choose for the memory cache −

    CACHES = {
       'default': {
    
      'BACKEND': 'django.core.cache.backends.memcached.MemcachedCache',
      'LOCATION': '127.0.0.1:11211',
    } }

    Or

    CACHES = {
       'default': {
    
      'BACKEND': 'django.core.cache.backends.memcached.MemcachedCache',
      'LOCATION': 'unix:/tmp/memcached.sock',
    } }

    Caching the Entire Site

    The simplest way of using cache in Django is to cache the entire site. This is done by editing the MIDDLEWARE_CLASSES option in the project settings.py. The following need to be added to the option −

    MIDDLEWARE_CLASSES += (
       'django.middleware.cache.UpdateCacheMiddleware',
       'django.middleware.common.CommonMiddleware',
       'django.middleware.cache.FetchFromCacheMiddleware',
    )

    Note that the order is important here, Update should come before Fetch middleware.

    Then in the same file, you need to set −

    CACHE_MIDDLEWARE_ALIAS – The cache alias to use for storage.
    CACHE_MIDDLEWARE_SECONDS – The number of seconds each page should be cached.
    

    Caching a View

    If you don’t want to cache the entire site you can cache a specific view. This is done by using the cache_page decorator that comes with Django. Let us say we want to cache the result of the viewArticles view −

    from django.views.decorators.cache import cache_page
    
    @cache_page(60 * 15)
    
    def viewArticles(request, year, month):
       text = "Displaying articles of : %s/%s"%(year, month)
       return HttpResponse(text)

    As you can see cache_page takes the number of seconds you want the view result to be cached as parameter. In our example above, the result will be cached for 15 minutes.

    Note − As we have seen before the above view was map to −

    urlpatterns = patterns('myapp.views',
       url(r'^articles/(?P<month>\d{2})/(?P<year>\d{4})/', 'viewArticles', name = 'articles'),)

    Since the URL is taking parameters, each different call will be cached separately. For example, request to /myapp/articles/02/2007 will be cached separately to /myapp/articles/03/2008.

    Caching a view can also directly be done in the url.py file. Then the following has the same result as the above. Just edit your myapp/url.py file and change the related mapped URL (above) to be −

    urlpatterns = patterns('myapp.views',
       url(r'^articles/(?P<month>\d{2})/(?P<year>\d{4})/', 
       cache_page(60 * 15)('viewArticles'), name = 'articles'),)

    And, of course, it’s no longer needed in myapp/views.py.

    Caching a Template Fragment

    You can also cache parts of a template, this is done by using the cache tag. Let’s take our hello.html template −

    {% extends "main_template.html" %}
    {% block title %}My Hello Page{% endblock %}
    {% block content %}
    
    Hello World!!!<p>Today is {{today}}</p>
    We are
    {% if today.day == 1 %}
    
    the first day of month.
    {% elif today == 30 %}
    
    the last day of month.
    {% else %}
    
    I don't know.
    {%endif%}
    
    <p>
       {% for day in days_of_week %}
       {{day}}
    </p>
    
    {% endfor %}
    {% endblock %}

    And to cache the content block, our template will become −

    {% load cache %}
    {% extends "main_template.html" %}
    {% block title %}My Hello Page{% endblock %}
    {% cache 500 content %}
    {% block content %}
    
    Hello World!!!<p>Today is {{today}}</p>
    We are
    {% if today.day == 1 %}
    
    the first day of month.
    {% elif today == 30 %}
    
    the last day of month.
    {% else %}
    
    I don't know.
    {%endif%}
    
    <p>
       {% for day in days_of_week %}
       {{day}}
    </p>
    
    {% endfor %}
    {% endblock %}
    {% endcache %}

    As you can see above, the cache tag will take 2 parameters − the time you want the block to be cached (in seconds) and the name to be given to the cache fragment.

  • Cookies Handling

    Sometimes you might want to store some data on a per-site-visitor basis as per the requirements of your web application. Always keep in mind, that cookies are saved on the client side and depending on your client browser security level, setting cookies can at times work and at times might not.

    To illustrate cookies handling in Django, let’s create a system using the login system we created before. The system will keep you logged in for X minute of time, and beyond that time, you will be out of the app.

    For this, you will need to set up two cookies, last_connection and username.

    At first, let’s change our login view to store our username and last_connection cookies −

    from django.template import RequestContext
    
    def login(request):
       username = "not logged in"
       
       if request.method == "POST":
    
      #Get the posted form
      MyLoginForm = LoginForm(request.POST)
    if MyLoginForm.is_valid():
      username = MyLoginForm.cleaned_data&#91;'username']
    else:
      MyLoginForm = LoginForm()
    response = render_to_response(request, 'loggedin.html', {"username" : username},
      context_instance = RequestContext(request))
    response.set_cookie('last_connection', datetime.datetime.now()) response.set_cookie('username', datetime.datetime.now()) return response

    As seen in the view above, setting cookie is done by the set_cookie method called on the response not the request, and also note that all cookies values are returned as string.

    Let’s now create a formView for the login form, where we won’t display the form if cookie is set and is not older than 10 second −

    def formView(request):
       if 'username' in request.COOKIES and 'last_connection' in request.COOKIES:
    
      username = request.COOKIES&#91;'username']
      
      last_connection = request.COOKIES&#91;'last_connection']
      last_connection_time = datetime.datetime.strptime(last_connection&#91;:-7], 
         "%Y-%m-%d %H:%M:%S")
      
      if (datetime.datetime.now() - last_connection_time).seconds &lt; 10:
         return render(request, 'loggedin.html', {"username" : username})
      else:
         return render(request, 'login.html', {})
    else:
      return render(request, 'login.html', {})</code></pre>

    As you can see in the formView above accessing the cookie you set, is done via the COOKIES attribute (dict) of the request.

    Now let’s change the url.py file to change the URL so it pairs with our new view −

    from django.conf.urls import patterns, url
    from django.views.generic import TemplateView
    
    urlpatterns = patterns('myapp.views',
       url(r'^connection/','formView', name = 'loginform'),
       url(r'^login/', 'login', name = 'login'))

    When accessing /myapp/connection, you will get the following page −

    Django Cookies Handling

    And you will get redirected to the following screen on submit −

    Cookies Handling Redirected Page

    Now, if you try to access /myapp/connection again in the 10 seconds range, you will get redirected to the second screen directly. And if you access /myapp/connection again out of this range you will get the login form (screen 1).

  • Apache Setup

    So far, in our examples, we have used the Django dev web server. But this server is just for testing and is not fit for production environment. Once in production, you need a real server like Apache, Nginx, etc. Let’s discuss Apache in this chapter.

    Serving Django applications via Apache is done by using mod_wsgi. So the first thing is to make sure you have Apache and mod_wsgi installed. Remember, when we created our project and we looked at the project structure, it looked like −

    myproject/
       manage.py
       myproject/
    
      __init__.py
      settings.py
      urls.py
      wsgi.py

    The wsgi.py file is the one taking care of the link between Django and Apache.

    Let’s say we want to share our project (myproject) with Apache. We just need to set Apache to access our folder. Assume we put our myproject folder in the default “/var/www/html”. At this stage, accessing the project will be done via 127.0.0.1/myproject. This will result in Apache just listing the folder as shown in the following snapshot.

    Django Apache Setup

    As seen, Apache is not handling Django stuff. For this to be taken care of, we need to configure Apache in httpd.conf. So open the httpd.conf and add the following line −

    WSGIScriptAlias / /var/www/html/myproject/myproject/wsgi.py
    WSGIPythonPath /var/www/html/myproject/
    
    <Directory /var/www/html/myproject/>
       <Files wsgi.py>
    
      Order deny,allow
      Allow from all
    </Files> </Directory>

    If you can access the login page as 127.0.0.1/myapp/connection, you will get to see the following page −

    Login Page
  • File Uploading

    It is generally useful for a web app to be able to upload files (profile picture, songs, pdf, words…..). Let’s discuss how to upload files in this chapter.

    Uploading an Image

    Before starting to play with an image, make sure you have the Python Image Library (PIL) installed. Now to illustrate uploading an image, let’s create a profile form, in our myapp/forms.py −

    #-*- coding: utf-8 -*-
    from django import forms
    
    class ProfileForm(forms.Form):
       name = forms.CharField(max_length = 100)
       picture = forms.ImageFields()

    As you can see, the main difference here is just the forms.ImageField. ImageField will make sure the uploaded file is an image. If not, the form validation will fail.

    Now let’s create a “Profile” model to save our uploaded profile. This is done in myapp/models.py −

    from django.db import models
    
    class Profile(models.Model):
       name = models.CharField(max_length = 50)
       picture = models.ImageField(upload_to = 'pictures')
    
       class Meta:
    
      db_table = "profile"</code></pre>

    As you can see for the model, the ImageField takes a compulsory argument: upload_to. This represents the place on the hard drive where your images will be saved. Note that the parameter will be added to the MEDIA_ROOT option defined in your settings.py file.

    Now that we have the Form and the Model, let's create the view, in myapp/views.py −

    #-*- coding: utf-8 -*-
    from myapp.forms import ProfileForm
    from myapp.models import Profile
    
    def SaveProfile(request):
       saved = False
       
       if request.method == "POST":
    
      #Get the posted form
      MyProfileForm = ProfileForm(request.POST, request.FILES)
      
      if MyProfileForm.is_valid():
         profile = Profile()
         profile.name = MyProfileForm.cleaned_data&#91;"name"]
         profile.picture = MyProfileForm.cleaned_data&#91;"picture"]
         profile.save()
         saved = True
    else:
      MyProfileForm = Profileform()
    return render(request, 'saved.html', locals())

    The part not to miss is, there is a change when creating a ProfileForm, we added a second parameters: request.FILES. If not passed the form validation will fail, giving a message that says the picture is empty.

    Now, we just need the saved.html template and the profile.html template, for the form and the redirection page −

    myapp/templates/saved.html −

    <html>
       <body>
       
    
      {% if saved %}
         &lt;strong&gt;Your profile was saved.&lt;/strong&gt;
      {% endif %}
      
      {% if not saved %}
         &lt;strong&gt;Your profile was not saved.&lt;/strong&gt;
      {% endif %}
      
    </body> </html>

    myapp/templates/profile.html −

    <html>
       <body>
       
    
      &lt;form name = "form" enctype = "multipart/form-data" 
         action = "{% url "myapp.views.SaveProfile" %}" method = "POST" &gt;{% csrf_token %}
         
         &lt;div style = "max-width:470px;"&gt;
            &lt;center&gt;  
               &lt;input type = "text" style = "margin-left:20%;" 
               placeholder = "Name" name = "name" /&gt;
            &lt;/center&gt;
         &lt;/div&gt;
         &lt;br&gt;
         
         &lt;div style = "max-width:470px;"&gt;
            &lt;center&gt; 
               &lt;input type = "file" style = "margin-left:20%;" 
                  placeholder = "Picture" name = "picture" /&gt;
            &lt;/center&gt;
         &lt;/div&gt;
         &lt;br&gt;
         
         &lt;div style = "max-width:470px;"&gt;
            &lt;center&gt; 
            
               &lt;button style = "border:0px;background-color:#4285F4; margin-top:8%; 
                  height:35px; width:80%; margin-left:19%;" type = "submit" value = "Login" &gt;
                  &lt;strong&gt;Login&lt;/strong&gt;
               &lt;/button&gt;
               
            &lt;/center&gt;
         &lt;/div&gt;
         
      &lt;/form&gt;
      
    </body> </html>

    Next, we need our pair of URLs to get started: myapp/urls.py

    from django.conf.urls import patterns, url
    from django.views.generic import TemplateView
    
    urlpatterns = patterns(
       'myapp.views', url(r'^profile/',TemplateView.as_view(
    
      template_name = 'profile.html')), url(r'^saved/', 'SaveProfile', name = 'saved')
    )

    When accessing "/myapp/profile", we will get the following profile.html template rendered −

    Uploading Image

    And on form post, the saved template will be rendered −

    Form Post Template

    We have a sample for image, but if you want to upload another type of file, not just image, just replace the ImageField in both Model and Form with FileField.

  • Form Processing

    Creating forms in Django, is really similar to creating a model. Here again, we just need to inherit from Django class and the class attributes will be the form fields. Let’s add a forms.py file in myapp folder to contain our app forms. We will create a login form.

    myapp/forms.py

    #-*- coding: utf-8 -*-
    from django import forms
    
    class LoginForm(forms.Form):
       user = forms.CharField(max_length = 100)
       password = forms.CharField(widget = forms.PasswordInput())

    As seen above, the field type can take “widget” argument for html rendering; in our case, we want the password to be hidden, not displayed. Many others widget are present in Django: DateInput for dates, CheckboxInput for checkboxes, etc.

    Using Form in a View

    There are two kinds of HTTP requests, GET and POST. In Django, the request object passed as parameter to your view has an attribute called “method” where the type of the request is set, and all data passed via POST can be accessed via the request.POST dictionary.

    Let’s create a login view in our myapp/views.py −

    #-*- coding: utf-8 -*-
    from myapp.forms import LoginForm
    
    def login(request):
       username = "not logged in"
       
       if request.method == "POST":
    
      #Get the posted form
      MyLoginForm = LoginForm(request.POST)
      
      if MyLoginForm.is_valid():
         username = MyLoginForm.cleaned_data&#91;'username']
    else:
      MyLoginForm = Loginform()
    return render(request, 'loggedin.html', {"username" : username})

    The view will display the result of the login form posted through the loggedin.html. To test it, we will first need the login form template. Let’s call it login.html.

    <html>
       <body>
    
      
      &lt;form name = "form" action = "{% url "myapp.views.login" %}" 
         method = "POST" &gt;{% csrf_token %}
         
         &lt;div style = "max-width:470px;"&gt;
            &lt;center&gt; 
               &lt;input type = "text" style = "margin-left:20%;" 
                  placeholder = "Identifiant" name = "username" /&gt;
            &lt;/center&gt;
         &lt;/div&gt;
         &lt;br&gt;
         
         &lt;div style = "max-width:470px;"&gt;
            &lt;center&gt;
               &lt;input type = "password" style = "margin-left:20%;" 
                  placeholder = "password" name = "password" /&gt;
            &lt;/center&gt;
         &lt;/div&gt;
         &lt;br&gt;
         
         &lt;div style = "max-width:470px;"&gt;
            &lt;center&gt; 
            
               &lt;button style = "border:0px; background-color:#4285F4; margin-top:8%;
                  height:35px; width:80%;margin-left:19%;" type = "submit" 
                  value = "Login" &gt;
                  &lt;strong&gt;Login&lt;/strong&gt;
               &lt;/button&gt;
               
            &lt;/center&gt;
         &lt;/div&gt;
         
      &lt;/form&gt;
      
    </body> </html>

    The template will display a login form and post the result to our login view above. You have probably noticed the tag in the template, which is just to prevent Cross-site Request Forgery (CSRF) attack on your site.

    {% csrf_token %}
    

    Once we have the login template, we need the loggedin.html template that will be rendered after form treatment.

    <html>
       
       <body>
    
      You are : &lt;strong&gt;{{username}}&lt;/strong&gt;
    </body> </html>

    Now, we just need our pair of URLs to get started: myapp/urls.py

    from django.conf.urls import patterns, url
    from django.views.generic import TemplateView
    
    urlpatterns = patterns('myapp.views',
       url(r'^connection/',TemplateView.as_view(template_name = 'login.html')),
       url(r'^login/', 'login', name = 'login'))

    When accessing “/myapp/connection”, we will get the following login.html template rendered −

    Login HTML Template

    On the form post, the form is valid. In our case make sure to fill the two fields and you will get −

    Form Validation

    In case your username is polo, and you forgot the password. You will get the following message −

    Form Invalid Message

    Using Our Own Form Validation

    In the above example, when validating the form −

    MyLoginForm.is_valid()
    

    We only used Django self-form validation engine, in our case just making sure the fields are required. Now let’s try to make sure the user trying to login is present in our DB as Dreamreal entry. For this, change the myapp/forms.py to −

    #-*- coding: utf-8 -*-
    from django import forms
    from myapp.models import Dreamreal
    
    class LoginForm(forms.Form):
       user = forms.CharField(max_length = 100)
       password = forms.CharField(widget = forms.PasswordInput())
    
       def clean_message(self):
    
      username = self.cleaned_data.get("username")
      dbuser = Dreamreal.objects.filter(name = username)
      
      if not dbuser:
         raise forms.ValidationError("User does not exist in our db!")
      return username</code></pre>

    Now, after calling the "is_valid" method, we will get the correct output, only if the user is in our database. If you want to check a field of your form, just add a method starting by "clean_" then your field name to your form class. Raising a forms.ValidationError is important.

  • Generic Views

    In some cases, writing views, as we have seen earlier is really heavy. Imagine you need a static page or a listing page. Django offers an easy way to set those simple views that is called generic views.

    Unlike classic views, generic views are classes not functions. Django offers a set of classes for generic views in django.views.generic, and every generic view is one of those classes or a class that inherits from one of them.

    There are 10+ generic classes −

    >>> import django.views.generic
    >>> dir(django.views.generic)
    
    ['ArchiveIndexView', 'CreateView', 'DateDetailView', 'DayArchiveView', 
       'DeleteView', 'DetailView', 'FormView', 'GenericViewError', 'ListView', 
       'MonthArchiveView', 'RedirectView', 'TemplateView', 'TodayArchiveView', 
       'UpdateView', 'View', 'WeekArchiveView', 'YearArchiveView', '__builtins__', 
       '__doc__', '__file__', '__name__', '__package__', '__path__', 'base', 'dates', 
       'detail', 'edit', 'list']

    This you can use for your generic view. Let’s look at some example to see how it works.

    Static Pages

    Let’s publish a static page from the “static.html” template.

    Our static.html −

    <html>
       <body> 
    
      This is a static page!!! 
    </body> </html>

    If we did that the way we learned before, we would have to change the myapp/views.py to be −

    from django.shortcuts import render
    
    def static(request):
       return render(request, 'static.html', {})

    and myapp/urls.py to be −

    from django.conf.urls import patterns, url
    
    urlpatterns = patterns("myapp.views", url(r'^static/', 'static', name = 'static'),)

    The best way is to use generic views. For that, our myapp/views.py will become −

    from django.views.generic import TemplateView
    
    class StaticView(TemplateView):
       template_name = "static.html"

    And our myapp/urls.py we will be −

    from myapp.views import StaticView
    from django.conf.urls import patterns
    
    urlpatterns = patterns("myapp.views", (r'^static/$', StaticView.as_view()),)

    When accessing /myapp/static you get −

    Static Page

    For the same result we can also, do the following −

    • No change in the views.py
    • Change the url.py file to be −
    from django.views.generic import TemplateView
    from django.conf.urls import patterns, url
    
    urlpatterns = patterns("myapp.views",
       url(r'^static/',TemplateView.as_view(template_name = 'static.html')),)

    As you can see, you just need to change the url.py file in the second method.

    List and Display Data from DB

    We are going to list all entries in our Dreamreal model. Doing so is made easy by using the ListView generic view class. Edit the url.py file and update it as −

    from django.views.generic import ListView
    from django.conf.urls import patterns, url
    
    urlpatterns = patterns(
       "myapp.views", url(r'^dreamreals/', ListView.as_view(model = Dreamreal, 
    
      template_name = "dreamreal_list.html")),
    )

    Important to note at this point is that the variable pass by the generic view to the template is object_list. If you want to name it yourself, you will need to add a context_object_name argument to the as_view method. Then the url.py will become −

    from django.views.generic import ListView
    from django.conf.urls import patterns, url
    
    urlpatterns = patterns("myapp.views",
       url(r'^dreamreals/', ListView.as_view(
    
      template_name = "dreamreal_list.html")),
      model = Dreamreal, context_object_name = ”dreamreals_objects” ,)</code></pre>

    The associated template will then be −

    {% extends "main_template.html" %}
    {% block content %}
    Dreamreals:<p>
    {% for dr in object_list %}
    {{dr.name}}</p>
    {% endfor %}
    {% endblock %}

    Accessing /myapp/dreamreals/ will produce the following page −

    List and Display Data from DB
  • Sending E-mails

    Django comes with a ready and easy-to-use light engine to send e-mail. Similar to Python you just need an import of smtplib. In Django you just need to import django.core.mail. To start sending e-mail, edit your project settings.py file and set the following options −

    • EMAIL_HOST − smtp server.
    • EMAIL_HOST_USER − Login credential for the smtp server.
    • EMAIL_HOST_PASSWORD − Password credential for the smtp server.
    • EMAIL_PORT − smtp server port.
    • EMAIL_USE_TLS or _SSL − True if secure connection.

    Sending a Simple E-mail

    Let’s create a “sendSimpleEmail” view to send a simple e-mail.

    from django.core.mail import send_mail
    from django.http import HttpResponse
    
    def sendSimpleEmail(request,emailto):
       res = send_mail("hello paul", "comment tu vas?", "[email protected]", [emailto])
       return HttpResponse('%s'%res)

    Here is the details of the parameters of send_mail −

    • subject − E-mail subject.
    • message − E-mail body.
    • from_email − E-mail from.
    • recipient_list − List of receivers’ e-mail address.
    • fail_silently − Bool, if false send_mail will raise an exception in case of error.
    • auth_user − User login if not set in settings.py.
    • auth_password − User password if not set in settings.py.
    • connection − E-mail backend.
    • html_message − (new in Django 1.7) if present, the e-mail will be multipart/alternative.

    Let’s create a URL to access our view −

    from django.conf.urls import patterns, url
    
    urlpatterns = paterns('myapp.views', url(r'^simpleemail/(?P<emailto>
       [\w.%+-]+@[A-Za-z0-9.-]+\.[A-Za-z]{2,4})/', 
       'sendSimpleEmail' , name = 'sendSimpleEmail'),)

    So when accessing /myapp/simpleemail/[email protected], you will get the following page −

    Sending Simple E-mail

    Sending Multiple Mails with send_mass_mail

    The method returns the number of messages successfully delivered. This is same as send_mail but takes an extra parameter; datatuple, our sendMassEmail view will then be −

    from django.core.mail import send_mass_mail
    from django.http import HttpResponse
    
    def sendMassEmail(request,emailto):
       msg1 = ('subject 1', 'message 1', '[email protected]', [emailto1])
       msg2 = ('subject 2', 'message 2', '[email protected]', [emailto2])
       res = send_mass_mail((msg1, msg2), fail_silently = False)
       return HttpResponse('%s'%res)

    Let’s create a URL to access our view −

    from django.conf.urls import patterns, url
    
    urlpatterns = paterns('myapp.views', url(r'^massEmail/(?P<emailto1>
       [\w.%+-]+@[A-Za-z0-9.-]+\.[A-Za-z]{2,4})/(?P<emailto2>
       [\w.%+-]+@[A-Za-z0-9.-]+\.[A-Za-z]{2,4})', 'sendMassEmail' , name = 'sendMassEmail'),)

    When accessing /myapp/massemail/[email protected]/[email protected]/, we get −

    Sending Multiple Mails

    send_mass_mail parameters details are −

    • datatuples − A tuple where each element is like (subject, message, from_email, recipient_list).
    • fail_silently − Bool, if false send_mail will raise an exception in case of error.
    • auth_user − User login if not set in settings.py.
    • auth_password − User password if not set in settings.py.
    • connection − E-mail backend.

    As you can see in the above image, two messages were sent successfully.

    Note − In this example we are using Python smtp debuggingserver, that you can launch using −

    $python -m smtpd -n -c DebuggingServer localhost:1025
    

    This means all your sent e-mails will be printed on stdout, and the dummy server is running on localhost:1025.

    Sending e-mails to admins and managers using mail_admins and mail_managers methods

    These methods send e-mails to site administrators as defined in the ADMINS option of the settings.py file, and to site managers as defined in MANAGERS option of the settings.py file. Let’s assume our ADMINS and MANAGERS options look like −

    ADMINS = ((‘polo’, ‘[email protected]’),)

    MANAGERS = ((‘popoli’, ‘[email protected]’),)

    from django.core.mail import mail_admins
    from django.http import HttpResponse
    
    def sendAdminsEmail(request):
       res = mail_admins('my subject', 'site is going down.')
       return HttpResponse('%s'%res)

    The above code will send an e-mail to every admin defined in the ADMINS section.

    from django.core.mail import mail_managers
    from django.http import HttpResponse
    
    def sendManagersEmail(request):
       res = mail_managers('my subject 2', 'Change date on the site.')
       return HttpResponse('%s'%res)

    The above code will send an e-mail to every manager defined in the MANAGERS section.

    Parameters details −

    • Subject − E-mail subject.
    • message − E-mail body.
    • fail_silently − Bool, if false send_mail will raise an exception in case of error.
    • connection − E-mail backend.
    • html_message − (new in Django 1.7) if present, the e-mail will be multipart/alternative.

    Sending HTML E-mail

    Sending HTML message in Django >= 1.7 is as easy as −

    from django.core.mail import send_mail
    
    from django.http import HttpResponse
       res = send_mail("hello paul", "comment tu vas?", "[email protected]", 
    
         &#91;"[email protected]"], html_message=")</code></pre>

    This will produce a multipart/alternative e-mail.

    But for Django < 1.7 sending HTML messages is done via the django.core.mail.EmailMessage class then calling 'send' on the object −

    Let's create a "sendHTMLEmail" view to send an HTML e-mail.

    from django.core.mail import EmailMessage
    from django.http import HttpResponse
    
    def sendHTMLEmail(request , emailto):
       html_content = "<strong>Comment tu vas?</strong>"
       email = EmailMessage("my subject", html_content, "[email protected]", [emailto])
       email.content_subtype = "html"
       res = email.send()
       return HttpResponse('%s'%res)

    Parameters details for the EmailMessage class creation −

    • Subject − E-mail subject.
    • message − E-mail body in HTML.
    • from_email − E-mail from.
    • to − List of receivers’ e-mail address.
    • bcc − List of “Bcc” receivers’ e-mail address.
    • connection − E-mail backend.

    Let's create a URL to access our view −

    from django.conf.urls import patterns, url
    
    urlpatterns = paterns('myapp.views', url(r'^htmlemail/(?P<emailto>
       [\w.%+-]+@[A-Za-z0-9.-]+\.[A-Za-z]{2,4})/', 
       'sendHTMLEmail' , name = 'sendHTMLEmail'),)

    When accessing /myapp/htmlemail/[email protected], we get −

    Sending HTML E-mail

    Sending E-mail with Attachment

    This is done by using the 'attach' method on the EmailMessage object.

    A view to send an e-mail with attachment will be −

    from django.core.mail import EmailMessage
    from django.http import HttpResponse
    
    def sendEmailWithAttach(request, emailto):
       html_content = "Comment tu vas?"
       email = EmailMessage("my subject", html_content, "[email protected]", emailto])
       email.content_subtype = "html"
       
       fd = open('manage.py', 'r')
       email.attach('manage.py', fd.read(), 'text/plain')
       
       res = email.send()
       return HttpResponse('%s'%res)

    Details on attach arguments −

    • filename − The name of the file to attach.
    • content − The content of the file to attach.
    • mimetype − The attachment's content mime type.