Django’s ORM API provides useful functionality for performing CRUD operations on the data stored in the tables of relational databases.
The create(), update() and delete() methods perform their respective operations on an already existing table. However, you often need to make changes to the model structure itself, by adding, deleting or altering the attributes of the model. Django’s admin interface can be helpful in handling these activities.
The Migration System in Django
Django has a powerful migration system that deals with the process of updating a model.
Django propagates the changes you make to your models (adding a field, deleting a model, etc.) into your database schema with the help Migrations mechanism. The migrations-related commands are executed with the manage.py script.
The following commands are available −
migrate − Responsible for applying and unapplying migrations.
makemigrations − Responsible for creating new migrations based on the changes made to the models.
sqlmigrate − Displays the SQL statements for a migration.
showmigrations − Lists a project’s migrations and their status.
When you first set up a Django project, it automatically installs certain apps. They are listed in the INSTALLED_APPS section in the settings.py module.
Most of these apps are used in the admin interface to create and manage the users, groups, authorization, etc., and the data related to these apps is stored in the respective tables.
We need to run the following migrate command for the first time to create the table structure required for INSTALLED_APPS −
python manage.py migrate
Running the above command will create a package called migrations inside the app package folder. All the subsequent migration scripts are stored in it.
Subsequently, when you create a new app (with startapp command), you also need to add it in the INSTALLED_APPS list. Next, you declare the models required for the new app. Here, you need to create the database tables required for the new app.
The makemigrations Command
Let us add a new model in the models.py module as follows −
from django.db import models
# Create your models here.classDreamreal(models.Model):
website = models.CharField(max_length=50)
mail = models.CharField(max_length=50)
name = models.CharField(max_length=50)
phonenumber = models.IntegerField()def__str__(self):return"Website: {} Email: {} Name: {} Ph.: {}".format(self.website, self.mail, self.name, self.phonenumber)classMeta:
db_table ="dreamreal"</code></pre>
To propagate the new model in the database, run the makemigrations command −
python manage.py makemigrations
A migrations script 0001_initial.py will be created in the migrations folder. It contains a Migrations class. The migrate command as used initially, uses this script to create a new table in the database that has been configured in the DATABASES section of settings.py −
Python manage.py migrate
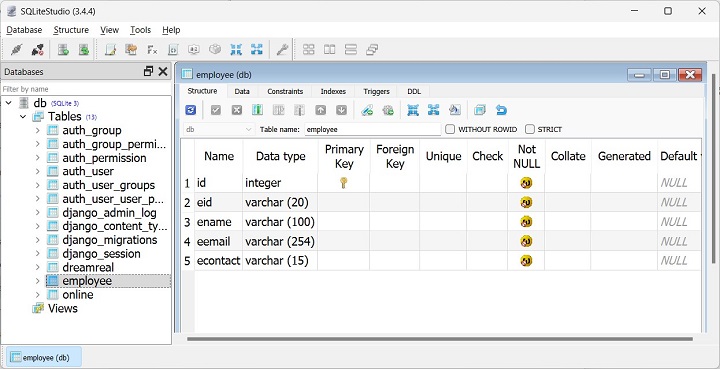
Eventually, you decide to add a new model class named Employee, as given below −
Django ORM uses the Active Record pattern for the interaction between a model class and its mapped database table. An instance of the model class corresponds to a single row in the table. Any of the attributes of the object results in updating the corresponding row.
In this chapter, we will focus on the different ways available in Django to update an already existing row in a relational database.
We shall use the Dreamreal model as given below for the exercise −
It is assumed that you have already performed the migrations and added a few objects in the model.
Update Object From Shell
Django has a useful feature with which you can invoke a Python shell inside the Django project’s environment. Use the shell command with the manage.py script −
python manage.py shell
In front of the Python prompt, import the Dreamreal model −
>>>from myapp.models import Dreamreal
The model.objects attribute returns the model Manager, and its all() method returns a QuerySet. We can limit the objects in the set by applying the filter.
To return the object with its primary key as 2, use the following statement −
obj = Dreamreal.objects.filter(pk =2)
The model class has the get() instance method with which we can change the value of one or more attributes.
obj.update(f1=v1, f2=v2,...)
Let us update the name of the object with “pk = 2” −
obj.update(name='example')
The model manager also has a get() method that fetches a single instance corresponding to the given keyword argument −
obj = Dreamreal.objects.get(phonenumber =2376970)
We can use a simple assignment to update an attribute. Let us change the phone number −
obj.phonenumber =24642367570
To make the change persistent, you need to call the save() method −
obj.save()
Perform Update Operation by Calling a View Function
Let us now perform the update operation by calling a view function. Define the update() function in views.py file. This function receives the primary key as the argument from its mapped URL.
from django.shortcuts import render
from django.http import HttpResponse
from myapp.models import Dreamreal

defupdate(request, pk):
   obj = Dreamreal.objects.get(pk=pk)
   obj.name="admin"
   obj.save()return HttpResponse("Update successful")
We also need to register this view in the urls.py file by adding a new path −
Run the Django server and visit the URL http://localhost:8000/myapp/update/2. The browser emits the update success message.
Instead of using the hard-coded values as in the above example, we would like the data to be accepted from the user. We need to populate a HTML form with the object data corresponding to the primary key.
Modify the update() View Function
Modify the update() view function as shown −
from django.shortcuts import render
from django.http import HttpResponse
from myapp.models import Dreamreal
defupdate(request, pk):
obj = Dreamreal.objects.get(pk=pk)if request.method =="POST":
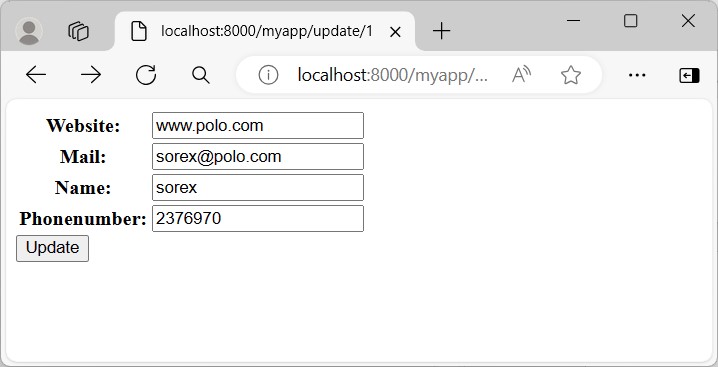
Visiting the URL http://localhost:8000/myapp/update/2 renders a HTML form pre-populated with the data belonging to pk=2. User can update the name and phonenumber fields.
Using ModelForm for Update
Next, we shall use the ModelForm class to render a HTML form with its input elements corresponding to the model field types. Let use the DereamrealForm class that inherits the Modelform
from django import forms
from.models import Dreamreal
classDreamrealForm(forms.ModelForm):classMeta:
Note − Here, we have set the readonly property of the website and mail fields in the class constructor.
The View function update() receives the primary key argument from the URL as before. When this function is called with POST method, the form data is used to update the existing object.
When the GET method is used, Django fetches the object corresponding to the primary key, and uses its attributes to populate the HTML form −
Visit the http://localhost:8000/myapp/update/1 URL to display the HTML form with its fields filled with the record with pk=1. You can change the values and submit for the corresponding object to be updated.
The UpdateView Class
Django defines a collection of generic view classes. The UpdateView class is specially designed for performing the INSERT query operation.
We define a subclass of UpdateView class and set its template_name property to myform.html that we have already created.
Add the following code in views.py file −
from django.views.generic.edit import UpdateView
classDRUpdateView(UpdateView):
model = Dreamreal
fields ='__all__'
template_name ="myform.html"
success_url ="../success/"
To register this view, we need to update the urls.py file for our app. Note that, to register a generic view, we use the as_view() method.
We need not change the myform.html script, as it renders the HTML script based on the respective model.
Visit the updateview/1 URL to render the form pre-filled with the object having primary key = 1. Try and change one or more values and update the table.
Django has its own Object Relation Model (ORM) that maps a Python class with a table in a relational database. The ORM mechanism helps in performing CRUD operations in object-oriented manner. In this chapter, we shall learn about different methods of inserting a new data.
By default, Django uses a SQLite database. A model in Django is a class inherited from the “django.db.models” class.
Let us use the following Dreamreal model in “models.py” file for learning how to insert data in the mapped table −
from django.db import models
classDreamreal(models.Model):
website = models.CharField(max_length=50)
mail = models.CharField(max_length=50)
name = models.CharField(max_length=50)
phonenumber = models.IntegerField()classMeta:
db_table ="dreamreal"</code></pre>
After declaring a model, we need to perform the migrations −
Django has a useful feature with which you can invoke a Python shell inside the Django project’s environment. Use the shell command with the manage.py script −
python manage.py shell
In front of the Python prompt, import the Dreamreal model −
>>>from myapp.models import Dreamreal
We can construct an object of this class and call its save() method so that the corresponding row is added in the table
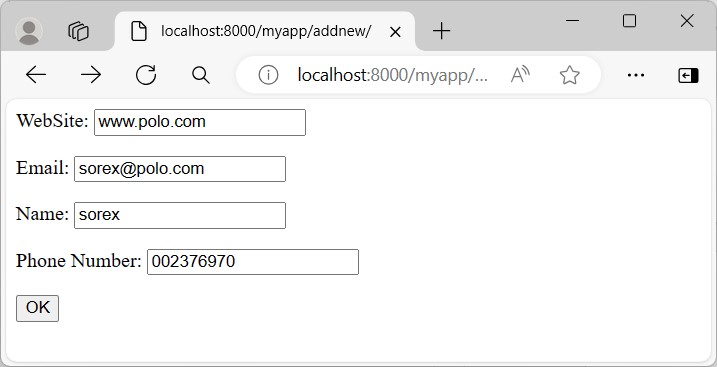
Instead of using the hard-coded values as in the above example, we would like the data to be accepted from the user. For this purpose, create an HTML form in myform.html file.
Note that the form’s action attribute is also set to the same URL mapping the addnew() function. Hence, we need to check the request.method. If it’s GET method, the blank form is rendered. If it’s POST method, the form data is parsed and used for inserting a new record.
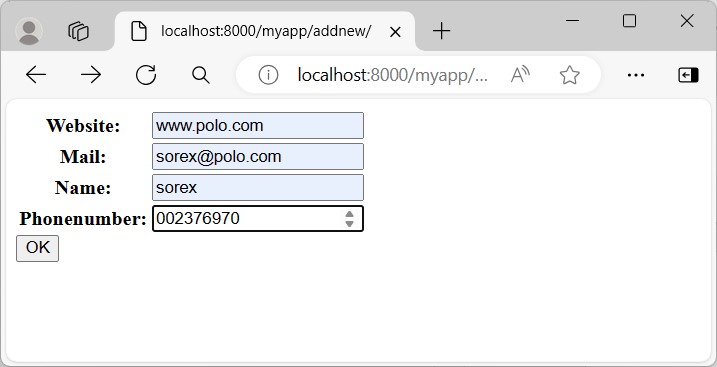
The Model Form
Django has a ModelForm class that automatically renders a HTML form with its structure matching with the attributes of a model class.
We define a DreamRealForm class in forms.py file under the app folder that uses the Dreamreal model as the basis.
from django import forms
from.models import Dreamreal
classDreamrealForm(forms.ModelForm):classMeta:
model = Dreamreal
fields ="__all__"</code></pre>
An object of the model form is rendered on the HTML form. In case the request method is POST, the save() method of the ModelForm class automatically validates the form and saves a new record.
A model is a class that represents table or collection in our DB, and where every attribute of the class is a field of the table or collection. Models are defined in the app/models.py (in our example: myapp/models.py)
Creating a Model
Following is a Dreamreal model created as an example −
from django.db import models
class Dreamreal(models.Model):
website = models.CharField(max_length = 50)
mail = models.CharField(max_length = 50)
name = models.CharField(max_length = 50)
phonenumber = models.IntegerField()
class Meta:
db_table = "dreamreal"</code></pre>
Every model inherits from django.db.models.Model.
Our class has 4 attributes (3 CharField and 1 Integer), those will be the table fields.
The Meta class with the db_table attribute lets us define the actual table or collection name. Django names the table or collection automatically: myapp_modelName. This class will let you force the name of the table to what you like.
After creating your model, you will need Django to generate the actual database −
$python manage.py syncdb
Manipulating Data (CRUD)
Let's create a "crudops" view to see how we can do CRUD operations on models. Our myapp/views.py will then look like −
myapp/views.py
from myapp.models import Dreamreal
from django.http import HttpResponse
def crudops(request):
#Creating an entry
dreamreal = Dreamreal(
website = "www.polo.com", mail = "[email protected]",
name = "sorex", phonenumber = "002376970"
)
dreamreal.save()
#Read ALL entries
objects = Dreamreal.objects.all()
res ='Printing all Dreamreal entries in the DB : <br>'
for elt in objects:
res += elt.name+"<br>"
#Read a specific entry:
sorex = Dreamreal.objects.get(name = "sorex")
res += 'Printing One entry <br>'
res += sorex.name
#Delete an entry
res += '<br> Deleting an entry <br>'
sorex.delete()
#Update
dreamreal = Dreamreal(
website = "www.polo.com", mail = "[email protected]",
name = "sorex", phonenumber = "002376970"
Let's explore other manipulations we can do on Models. Note that the CRUD operations were done on instances of our model, now we will be working directly with the class representing our model.
Let's create a 'datamanipulation' view in myapp/views.py
from myapp.models import Dreamreal
from django.http import HttpResponse
def datamanipulation(request):
res = ''
#Filtering data:
qs = Dreamreal.objects.filter(name = "paul")
res += "Found : %s results<br>"%len(qs)
#Ordering results
qs = Dreamreal.objects.order_by("name")
for elt in qs:
res += elt.name + '<br>'
return HttpResponse(res)
Linking Models
Django ORM offers 3 ways to link models −
One of the first case we will see here is the one-to-many relationships. As you can see in the above example, Dreamreal company can have multiple online websites. Defining that relation is done by using django.db.models.ForeignKey −
myapp/models.py
from django.db import models
class Dreamreal(models.Model):
website = models.CharField(max_length = 50)
mail = models.CharField(max_length = 50)
name = models.CharField(max_length = 50)
phonenumber = models.IntegerField()
online = models.ForeignKey('Online', default = 1)
class Meta:
db_table = "dreamreal"
class Online(models.Model):
domain = models.CharField(max_length = 30)
class Meta:
db_table = "online"</code></pre>
As you can see in our updated myapp/models.py, we added the online model and linked it to our Dreamreal model.
Let's check how all of this is working via manage.py shell −
First let’s create some companies (Dreamreal entries) for testing in our Django shell −
Accessing attribute of the hosting company (Dreamreal entry) from an online domain is simple −
>>> on1.company.name
And if we want to know all the online domain hosted by a Company in Dreamreal we will use the code −
>>> dr1.online_set.all()
To get a QuerySet, note that all manipulating method we have seen before (filter, all, exclude, order_by....)
You can also access the linked model attributes for filtering operations, let's say you want to get all online domains where the Dreamreal name contains 'company' −
Note − That kind of query is just supported for SQL DB. It won’t work for non-relational DB where joins doesn’t exist and there are two '_'.
But that's not the only way to link models, you also have OneToOneField, a link that guarantees that the relation between two objects is unique. If we used the OneToOneField in our example above, that would mean for every Dreamreal entry only one Online entry is possible and in the other way to.
And the last one, the ManyToManyField for (n-n) relation between tables. Note, those are relevant for SQL based DB.