Author: saqibkhan

  • Interpreter Pattern

    Interpreter pattern provides a way to evaluate language grammar or expression. This type of pattern comes under behavioral pattern. This pattern involves implementing an expression interface which tells to interpret a particular context. This pattern is used in SQL parsing, symbol processing engine etc.

    Implementation

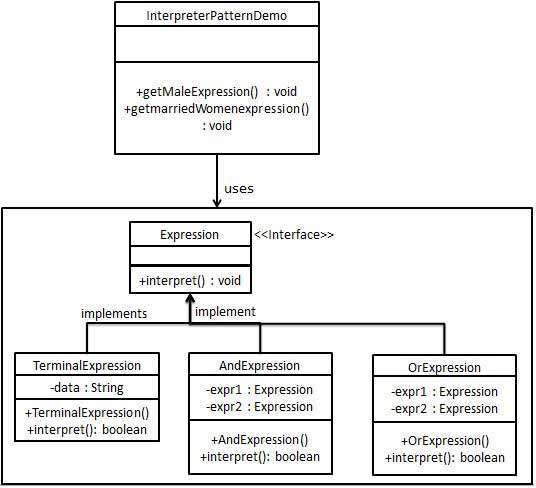
    We are going to create an interface Expression and concrete classes implementing the Expression interface. A class TerminalExpression is defined which acts as a main interpreter of context in question. Other classes OrExpressionAndExpression are used to create combinational expressions.

    InterpreterPatternDemo, our demo class, will use Expression class to create rules and demonstrate parsing of expressions.

    Interpreter Pattern UML Diagram

    Step 1

    Create an expression interface.

    Expression.java

    public interface Expression {
       public boolean interpret(String context);
    }

    Explore our latest online courses and learn new skills at your own pace. Enroll and become a certified expert to boost your career.

    Step 2

    Create concrete classes implementing the above interface.

    TerminalExpression.java

    public class TerminalExpression implements Expression {
    	
       private String data;
    
       public TerminalExpression(String data){
    
      this.data = data; 
    } @Override public boolean interpret(String context) {
      if(context.contains(data)){
         return true;
      }
      return false;
    } }

    OrExpression.java

    public class OrExpression implements Expression {
    	 
       private Expression expr1 = null;
       private Expression expr2 = null;
    
       public OrExpression(Expression expr1, Expression expr2) { 
    
      this.expr1 = expr1;
      this.expr2 = expr2;
    } @Override public boolean interpret(String context) {
      return expr1.interpret(context) || expr2.interpret(context);
    } }

    AndExpression.java

    public class AndExpression implements Expression {
    	 
       private Expression expr1 = null;
       private Expression expr2 = null;
    
       public AndExpression(Expression expr1, Expression expr2) { 
    
      this.expr1 = expr1;
      this.expr2 = expr2;
    } @Override public boolean interpret(String context) {
      return expr1.interpret(context) && expr2.interpret(context);
    } }

    Step 3

    InterpreterPatternDemo uses Expression class to create rules and then parse them.

    InterpreterPatternDemo.java

    public class InterpreterPatternDemo {
    
       //Rule: Robert and John are male
       public static Expression getMaleExpression(){
    
      Expression robert = new TerminalExpression("Robert");
      Expression john = new TerminalExpression("John");
      return new OrExpression(robert, john);		
    } //Rule: Julie is a married women public static Expression getMarriedWomanExpression(){
      Expression julie = new TerminalExpression("Julie");
      Expression married = new TerminalExpression("Married");
      return new AndExpression(julie, married);		
    } public static void main(String[] args) {
      Expression isMale = getMaleExpression();
      Expression isMarriedWoman = getMarriedWomanExpression();
      System.out.println("John is male? " + isMale.interpret("John"));
      System.out.println("Julie is a married women? " + isMarriedWoman.interpret("Married Julie"));
    } }

    Step 4

    Verify the output.

    John is male? true
    Julie is a married women? true
    
  • Command Pattern

    Command pattern is a data driven design pattern and falls under behavioral pattern category. A request is wrapped under an object as command and passed to invoker object. Invoker object looks for the appropriate object which can handle this command and passes the command to the corresponding object which executes the command.

    Implementation

    We have created an interface Order which is acting as a command. We have created a Stock class which acts as a request. We have concrete command classes BuyStock and SellStock implementing Order interface which will do actual command processing. A class Broker is created which acts as an invoker object. It can take and place orders.

    Broker object uses command pattern to identify which object will execute which command based on the type of command. CommandPatternDemo, our demo class, will use Broker class to demonstrate command pattern.

    Command Pattern UML Diagram

    Step 1

    Create a command interface.

    Order.java

    public interface Order {
       void execute();
    }

    Explore our latest online courses and learn new skills at your own pace. Enroll and become a certified expert to boost your career.

    Step 2

    Create a request class.

    Stock.java

    public class Stock {
    	
       private String name = "ABC";
       private int quantity = 10;
    
       public void buy(){
    
      System.out.println("Stock [ Name: "+name+", 
         Quantity: " + quantity +" ] bought");
    } public void sell(){
      System.out.println("Stock [ Name: "+name+", 
         Quantity: " + quantity +" ] sold");
    } }

    Step 3

    Create concrete classes implementing the Order interface.

    BuyStock.java

    public class BuyStock implements Order {
       private Stock abcStock;
    
       public BuyStock(Stock abcStock){
    
      this.abcStock = abcStock;
    } public void execute() {
      abcStock.buy();
    } }

    SellStock.java

    public class SellStock implements Order {
       private Stock abcStock;
    
       public SellStock(Stock abcStock){
    
      this.abcStock = abcStock;
    } public void execute() {
      abcStock.sell();
    } }

    Step 4

    Create command invoker class.

    Broker.java

    import java.util.ArrayList;
    import java.util.List;
    
       public class Broker {
       private List<Order> orderList = new ArrayList<Order>(); 
    
       public void takeOrder(Order order){
    
      orderList.add(order);		
    } public void placeOrders(){
      for (Order order : orderList) {
         order.execute();
      }
      orderList.clear();
    } }

    Step 5

    Use the Broker class to take and execute commands.

    CommandPatternDemo.java

    public class CommandPatternDemo {
       public static void main(String[] args) {
    
      Stock abcStock = new Stock();
      BuyStock buyStockOrder = new BuyStock(abcStock);
      SellStock sellStockOrder = new SellStock(abcStock);
      Broker broker = new Broker();
      broker.takeOrder(buyStockOrder);
      broker.takeOrder(sellStockOrder);
      broker.placeOrders();
    } }

    Step 6

    Verify the output.

    Stock [ Name: ABC, Quantity: 10 ] bought
    Stock [ Name: ABC, Quantity: 10 ] sold
    
  • Chain of Responsibility Pattern

    As the name suggests, the chain of responsibility pattern creates a chain of receiver objects for a request. This pattern decouples sender and receiver of a request based on type of request. This pattern comes under behavioral patterns.

    In this pattern, normally each receiver contains reference to another receiver. If one object cannot handle the request then it passes the same to the next receiver and so on.

    Implementation

    We have created an abstract class AbstractLogger with a level of logging. Then we have created three types of loggers extending the AbstractLogger. Each logger checks the level of message to its level and print accordingly otherwise does not print and pass the message to its next logger.

    Chain of Responsibility Pattern UML Diagram

    Step 1

    Create an abstract logger class.

    AbstractLogger.java

    public abstract class AbstractLogger {
       public static int INFO = 1;
       public static int DEBUG = 2;
       public static int ERROR = 3;
    
       protected int level;
    
       //next element in chain or responsibility
       protected AbstractLogger nextLogger;
    
       public void setNextLogger(AbstractLogger nextLogger){
    
      this.nextLogger = nextLogger;
    } public void logMessage(int level, String message){
      if(this.level &lt;= level){
         write(message);
      }
      if(nextLogger !=null){
         nextLogger.logMessage(level, message);
      }
    } abstract protected void write(String message); }

    Explore our latest online courses and learn new skills at your own pace. Enroll and become a certified expert to boost your career.

    Step 2

    Create concrete classes extending the logger.

    ConsoleLogger.java

    public class ConsoleLogger extends AbstractLogger {
    
       public ConsoleLogger(int level){
    
      this.level = level;
    } @Override protected void write(String message) {
      System.out.println("Standard Console::Logger: " + message);
    } }

    ErrorLogger.java

    public class ErrorLogger extends AbstractLogger {
    
       public ErrorLogger(int level){
    
      this.level = level;
    } @Override protected void write(String message) {
      System.out.println("Error Console::Logger: " + message);
    } }

    FileLogger.java

    public class FileLogger extends AbstractLogger {
    
       public FileLogger(int level){
    
      this.level = level;
    } @Override protected void write(String message) {
      System.out.println("File::Logger: " + message);
    } }

    Step 3

    Create different types of loggers. Assign them error levels and set next logger in each logger. Next logger in each logger represents the part of the chain.

    ChainPatternDemo.java

    public class ChainPatternDemo {
    	
       private static AbstractLogger getChainOfLoggers(){
    
    
      AbstractLogger errorLogger = new ErrorLogger(AbstractLogger.ERROR);
      AbstractLogger fileLogger = new FileLogger(AbstractLogger.DEBUG);
      AbstractLogger consoleLogger = new ConsoleLogger(AbstractLogger.INFO);
      errorLogger.setNextLogger(fileLogger);
      fileLogger.setNextLogger(consoleLogger);
      return errorLogger;	
    } public static void main(String[] args) {
      AbstractLogger loggerChain = getChainOfLoggers();
      loggerChain.logMessage(AbstractLogger.INFO, 
         "This is an information.");
      loggerChain.logMessage(AbstractLogger.DEBUG, 
         "This is an debug level information.");
      loggerChain.logMessage(AbstractLogger.ERROR, 
         "This is an error information.");
    } }

    Step 4

    Verify the output.

    Standard Console::Logger: This is an information.
    File::Logger: This is an debug level information.
    Standard Console::Logger: This is an debug level information.
    Error Console::Logger: This is an error information.
    File::Logger: This is an error information.
    Standard Console::Logger: This is an error information.
    
  • Proxy Pattern

    In proxy pattern, a class represents functionality of another class. This type of design pattern comes under structural pattern.

    In proxy pattern, we create object having original object to interface its functionality to outer world.

    Implementation

    We are going to create an Image interface and concrete classes implementing the Image interface. ProxyImage is a a proxy class to reduce memory footprint of RealImage object loading.

    ProxyPatternDemo, our demo class, will use ProxyImage to get an Image object to load and display as it needs.

    Proxy Pattern UML Diagram

    Step 1

    Create an interface.

    Image.java

    public interface Image {
       void display();
    }

    Explore our latest online courses and learn new skills at your own pace. Enroll and become a certified expert to boost your career.

    Step 2

    Create concrete classes implementing the same interface.

    RealImage.java

    public class RealImage implements Image {
    
       private String fileName;
    
       public RealImage(String fileName){
    
      this.fileName = fileName;
      loadFromDisk(fileName);
    } @Override public void display() {
      System.out.println("Displaying " + fileName);
    } private void loadFromDisk(String fileName){
      System.out.println("Loading " + fileName);
    } }

    ProxyImage.java

    public class ProxyImage implements Image{
    
       private RealImage realImage;
       private String fileName;
    
       public ProxyImage(String fileName){
    
      this.fileName = fileName;
    } @Override public void display() {
      if(realImage == null){
         realImage = new RealImage(fileName);
      }
      realImage.display();
    } }

    Step 3

    Use the ProxyImage to get object of RealImage class when required.

    ProxyPatternDemo.java

    public class ProxyPatternDemo {
    	
       public static void main(String[] args) {
    
      Image image = new ProxyImage("test_10mb.jpg");
      //image will be loaded from disk
      image.display(); 
      System.out.println("");
      
      //image will not be loaded from disk
      image.display(); 	
    } }

    Step 4

    Verify the output.

    Loading test_10mb.jpg
    Displaying test_10mb.jpg
    
    Displaying test_10mb.jpg
    
  • Flyweight Pattern

    Flyweight pattern is primarily used to reduce the number of objects created and to decrease memory footprint and increase performance. This type of design pattern comes under structural pattern as this pattern provides ways to decrease object count thus improving the object structure of application.

    Flyweight pattern tries to reuse already existing similar kind objects by storing them and creates new object when no matching object is found. We will demonstrate this pattern by drawing 20 circles of different locations but we will create only 5 objects. Only 5 colors are available so color property is used to check already existing Circle objects.

    Implementation

    We are going to create a Shape interface and concrete class Circle implementing the Shape interface. A factory class ShapeFactory is defined as a next step.

    ShapeFactory has a HashMap of Circle having key as color of the Circle object. Whenever a request comes to create a circle of particular color to ShapeFactory, it checks the circle object in its HashMap, if object of Circle found, that object is returned otherwise a new object is created, stored in hashmap for future use, and returned to client.

    FlyWeightPatternDemo, our demo class, will use ShapeFactory to get a Shape object. It will pass information (red / green / blue/ black / white) to ShapeFactory to get the circle of desired color it needs.

    Flyweight Pattern UML Diagram

    Step 1

    Create an interface.

    Shape.java

    public interface Shape {
       void draw();
    }

    Explore our latest online courses and learn new skills at your own pace. Enroll and become a certified expert to boost your career.

    Step 2

    Create concrete class implementing the same interface.

    Circle.java

    public class Circle implements Shape {
       private String color;
       private int x;
       private int y;
       private int radius;
    
       public Circle(String color){
    
      this.color = color;		
    } public void setX(int x) {
      this.x = x;
    } public void setY(int y) {
      this.y = y;
    } public void setRadius(int radius) {
      this.radius = radius;
    } @Override public void draw() {
      System.out.println("Circle: Draw() &#91;Color : " + color + ", x : " + x + ", y :" + y + ", radius :" + radius);
    } }

    Step 3

    Create a factory to generate object of concrete class based on given information.

    ShapeFactory.java

    import java.util.HashMap;
    
    public class ShapeFactory {
    
       // Uncomment the compiler directive line and
       // javac *.java will compile properly.
       // @SuppressWarnings("unchecked")
       private static final HashMap circleMap = new HashMap();
    
       public static Shape getCircle(String color) {
    
      Circle circle = (Circle)circleMap.get(color);
      if(circle == null) {
         circle = new Circle(color);
         circleMap.put(color, circle);
         System.out.println("Creating circle of color : " + color);
      }
      return circle;
    } }

    Step 4

    Use the factory to get object of concrete class by passing an information such as color.

    FlyweightPatternDemo.java

    public class FlyweightPatternDemo {
       private static final String colors[] = { "Red", "Green", "Blue", "White", "Black" };
       public static void main(String[] args) {
    
    
      for(int i=0; i &lt; 20; ++i) {
         Circle circle = (Circle)ShapeFactory.getCircle(getRandomColor());
         circle.setX(getRandomX());
         circle.setY(getRandomY());
         circle.setRadius(100);
         circle.draw();
      }
    } private static String getRandomColor() {
      return colors&#91;(int)(Math.random()*colors.length)];
    } private static int getRandomX() {
      return (int)(Math.random()*100 );
    } private static int getRandomY() {
      return (int)(Math.random()*100);
    } }

    Step 5

    Verify the output.

    Creating circle of color : Black
    Circle: Draw() [Color : Black, x : 36, y :71, radius :100
    Creating circle of color : Green
    Circle: Draw() [Color : Green, x : 27, y :27, radius :100
    Creating circle of color : White
    Circle: Draw() [Color : White, x : 64, y :10, radius :100
    Creating circle of color : Red
    Circle: Draw() [Color : Red, x : 15, y :44, radius :100
    Circle: Draw() [Color : Green, x : 19, y :10, radius :100
    Circle: Draw() [Color : Green, x : 94, y :32, radius :100
    Circle: Draw() [Color : White, x : 69, y :98, radius :100
    Creating circle of color : Blue
    Circle: Draw() [Color : Blue, x : 13, y :4, radius :100
    Circle: Draw() [Color : Green, x : 21, y :21, radius :100
    Circle: Draw() [Color : Blue, x : 55, y :86, radius :100
    Circle: Draw() [Color : White, x : 90, y :70, radius :100
    Circle: Draw() [Color : Green, x : 78, y :3, radius :100
    Circle: Draw() [Color : Green, x : 64, y :89, radius :100
    Circle: Draw() [Color : Blue, x : 3, y :91, radius :100
    Circle: Draw() [Color : Blue, x : 62, y :82, radius :100
    Circle: Draw() [Color : Green, x : 97, y :61, radius :100
    Circle: Draw() [Color : Green, x : 86, y :12, radius :100
    Circle: Draw() [Color : Green, x : 38, y :93, radius :100
    Circle: Draw() [Color : Red, x : 76, y :82, radius :100
    Circle: Draw() [Color : Blue, x : 95, y :82, radius :100
    
  • Facade Pattern

    Facade pattern hides the complexities of the system and provides an interface to the client using which the client can access the system. This type of design pattern comes under structural pattern as this pattern adds an interface to existing system to hide its complexities.

    This pattern involves a single class which provides simplified methods required by client and delegates calls to methods of existing system classes.

    Implementation

    We are going to create a Shape interface and concrete classes implementing the Shape interface. A facade class ShapeMaker is defined as a next step.

    ShapeMaker class uses the concrete classes to delegate user calls to these classes. FacadePatternDemo, our demo class, will use ShapeMaker class to show the results.

    Facade Pattern UML Diagram

    Step 1

    Create an interface.

    Shape.java

    public interface Shape {
       void draw();
    }

    Explore our latest online courses and learn new skills at your own pace. Enroll and become a certified expert to boost your career.

    Step 2

    Create concrete classes implementing the same interface.

    Rectangle.java

    public class Rectangle implements Shape {
    
       @Override
       public void draw() {
    
      System.out.println("Rectangle::draw()");
    } }

    Square.java

    public class Square implements Shape {
    
       @Override
       public void draw() {
    
      System.out.println("Square::draw()");
    } }

    Circle.java

    public class Circle implements Shape {
    
       @Override
       public void draw() {
    
      System.out.println("Circle::draw()");
    } }

    Step 3

    Create a facade class.

    ShapeMaker.java

    public class ShapeMaker {
       private Shape circle;
       private Shape rectangle;
       private Shape square;
    
       public ShapeMaker() {
    
      circle = new Circle();
      rectangle = new Rectangle();
      square = new Square();
    } public void drawCircle(){
      circle.draw();
    } public void drawRectangle(){
      rectangle.draw();
    } public void drawSquare(){
      square.draw();
    } }

    Step 4

    Use the facade to draw various types of shapes.

    FacadePatternDemo.java

    public class FacadePatternDemo {
       public static void main(String[] args) {
    
      ShapeMaker shapeMaker = new ShapeMaker();
      shapeMaker.drawCircle();
      shapeMaker.drawRectangle();
      shapeMaker.drawSquare();		
    } }

    Step 5

    Verify the output.

    Circle::draw()
    Rectangle::draw()
    Square::draw()
    
  • Decorator Pattern

    Decorator pattern allows a user to add new functionality to an existing object without altering its structure. This type of design pattern comes under structural pattern as this pattern acts as a wrapper to existing class.

    This pattern creates a decorator class which wraps the original class and provides additional functionality keeping class methods signature intact.

    We are demonstrating the use of decorator pattern via following example in which we will decorate a shape with some color without alter shape class.

    Implementation

    We’re going to create a Shape interface and concrete classes implementing the Shape interface. We will then create an abstract decorator class ShapeDecorator implementing the Shape interface and having Shape object as its instance variable.

    RedShapeDecorator is concrete class implementing ShapeDecorator.

    DecoratorPatternDemo, our demo class will use RedShapeDecorator to decorate Shape objects.

    Decorator Pattern UML Diagram

    Step 1

    Create an interface.

    Shape.java

    public interface Shape {
       void draw();
    }

    Explore our latest online courses and learn new skills at your own pace. Enroll and become a certified expert to boost your career.

    Step 2

    Create concrete classes implementing the same interface.

    Rectangle.java

    public class Rectangle implements Shape {
    
       @Override
       public void draw() {
    
      System.out.println("Shape: Rectangle");
    } }

    Circle.java

    public class Circle implements Shape {
    
       @Override
       public void draw() {
    
      System.out.println("Shape: Circle");
    } }

    Step 3

    Create abstract decorator class implementing the Shape interface.

    ShapeDecorator.java

    public abstract class ShapeDecorator implements Shape {
       protected Shape decoratedShape;
    
       public ShapeDecorator(Shape decoratedShape){
    
      this.decoratedShape = decoratedShape;
    } public void draw(){
      decoratedShape.draw();
    } }

    Step 4

    Create concrete decorator class extending the ShapeDecorator class.

    RedShapeDecorator.java

    public class RedShapeDecorator extends ShapeDecorator {
    
       public RedShapeDecorator(Shape decoratedShape) {
    
      super(decoratedShape);		
    } @Override public void draw() {
      decoratedShape.draw();	       
      setRedBorder(decoratedShape);
    } private void setRedBorder(Shape decoratedShape){
      System.out.println("Border Color: Red");
    } }

    Step 5

    Use the RedShapeDecorator to decorate Shape objects.

    DecoratorPatternDemo.java

    public class DecoratorPatternDemo {
       public static void main(String[] args) {
    
    
      Shape circle = new Circle();
      Shape redCircle = new RedShapeDecorator(new Circle());
      Shape redRectangle = new RedShapeDecorator(new Rectangle());
      System.out.println("Circle with normal border");
      circle.draw();
      System.out.println("\nCircle of red border");
      redCircle.draw();
      System.out.println("\nRectangle of red border");
      redRectangle.draw();
    } }

    Step 6

    Verify the output.

    Circle with normal border
    Shape: Circle
    
    Circle of red border
    Shape: Circle
    Border Color: Red
    
    Rectangle of red border
    Shape: Rectangle
    Border Color: Red
    
  • Composite Pattern

    Composite pattern is used where we need to treat a group of objects in similar way as a single object. Composite pattern composes objects in term of a tree structure to represent part as well as whole hierarchy. This type of design pattern comes under structural pattern as this pattern creates a tree structure of group of objects.

    This pattern creates a class that contains group of its own objects. This class provides ways to modify its group of same objects.

    We are demonstrating use of composite pattern via following example in which we will show employees hierarchy of an organization.

    Implementation

    We have a class Employee which acts as composite pattern actor class. CompositePatternDemo, our demo class will use Employee class to add department level hierarchy and print all employees.

    Composite Pattern UML Diagram

    Step 1

    Create Employee class having list of Employee objects.

    Employee.java

    import java.util.ArrayList;
    import java.util.List;
    
    public class Employee {
       private String name;
       private String dept;
       private int salary;
       private List<Employee> subordinates;
    
       // constructor
       public Employee(String name,String dept, int sal) {
    
      this.name = name;
      this.dept = dept;
      this.salary = sal;
      subordinates = new ArrayList&lt;Employee&gt;();
    } public void add(Employee e) {
      subordinates.add(e);
    } public void remove(Employee e) {
      subordinates.remove(e);
    } public List<Employee> getSubordinates(){
     return subordinates;
    } public String toString(){
      return ("Employee :&#91; Name : " + name + ", dept : " + dept + ", salary :" + salary+" ]");
    } }

    Explore our latest online courses and learn new skills at your own pace. Enroll and become a certified expert to boost your career.

    Step 2

    Use the Employee class to create and print employee hierarchy.

    CompositePatternDemo.java

    public class CompositePatternDemo {
       public static void main(String[] args) {
       
    
      Employee CEO = new Employee("John","CEO", 30000);
      Employee headSales = new Employee("Robert","Head Sales", 20000);
      Employee headMarketing = new Employee("Michel","Head Marketing", 20000);
      Employee clerk1 = new Employee("Laura","Marketing", 10000);
      Employee clerk2 = new Employee("Bob","Marketing", 10000);
      Employee salesExecutive1 = new Employee("Richard","Sales", 10000);
      Employee salesExecutive2 = new Employee("Rob","Sales", 10000);
      CEO.add(headSales);
      CEO.add(headMarketing);
      headSales.add(salesExecutive1);
      headSales.add(salesExecutive2);
      headMarketing.add(clerk1);
      headMarketing.add(clerk2);
      //print all employees of the organization
      System.out.println(CEO); 
      
      for (Employee headEmployee : CEO.getSubordinates()) {
         System.out.println(headEmployee);
         
         for (Employee employee : headEmployee.getSubordinates()) {
            System.out.println(employee);
         }
      }		
    } }

    Step 3

    Verify the output.

    Employee :[ Name : John, dept : CEO, salary :30000 ]
    Employee :[ Name : Robert, dept : Head Sales, salary :20000 ]
    Employee :[ Name : Richard, dept : Sales, salary :10000 ]
    Employee :[ Name : Rob, dept : Sales, salary :10000 ]
    Employee :[ Name : Michel, dept : Head Marketing, salary :20000 ]
    Employee :[ Name : Laura, dept : Marketing, salary :10000 ]
    Employee :[ Name : Bob, dept : Marketing, salary :10000 ]
  • Filter Pattern

    Filter pattern or Criteria pattern is a design pattern that enables developers to filter a set of objects using different criteria and chaining them in a decoupled way through logical operations. This type of design pattern comes under structural pattern as this pattern combines multiple criteria to obtain single criteria.

    Implementation

    We’re going to create a Person object, Criteria interface and concrete classes implementing this interface to filter list of Person objects. CriteriaPatternDemo, our demo class uses Criteria objects to filter List of Person objects based on various criteria and their combinations.

    Filter Pattern UML Diagram

    Step 1

    Create a class on which criteria is to be applied.

    Person.java

    public class Person {
    	
       private String name;
       private String gender;
       private String maritalStatus;
    
       public Person(String name, String gender, String maritalStatus){
    
      this.name = name;
      this.gender = gender;
      this.maritalStatus = maritalStatus;		
    } public String getName() {
      return name;
    } public String getGender() {
      return gender;
    } public String getMaritalStatus() {
      return maritalStatus;
    } }

    Explore our latest online courses and learn new skills at your own pace. Enroll and become a certified expert to boost your career.

    Step 2

    Create an interface for Criteria.

    Criteria.java

    import java.util.List;
    
    public interface Criteria {
       public List<Person> meetCriteria(List<Person> persons);
    }

    Step 3

    Create concrete classes implementing the Criteria interface.

    CriteriaMale.java

    import java.util.ArrayList;
    import java.util.List;
    
    public class CriteriaMale implements Criteria {
    
       @Override
       public List<Person> meetCriteria(List<Person> persons) {
    
      List&lt;Person&gt; malePersons = new ArrayList&lt;Person&gt;(); 
      
      for (Person person : persons) {
         if(person.getGender().equalsIgnoreCase("MALE")){
            malePersons.add(person);
         }
      }
      return malePersons;
    } }

    CriteriaFemale.java

    import java.util.ArrayList;
    import java.util.List;
    
    public class CriteriaFemale implements Criteria {
    
       @Override
       public List<Person> meetCriteria(List<Person> persons) {
    
      List&lt;Person&gt; femalePersons = new ArrayList&lt;Person&gt;(); 
      
      for (Person person : persons) {
         if(person.getGender().equalsIgnoreCase("FEMALE")){
            femalePersons.add(person);
         }
      }
      return femalePersons;
    } }

    CriteriaSingle.java

    import java.util.ArrayList;
    import java.util.List;
    
    public class CriteriaSingle implements Criteria {
    
       @Override
       public List<Person> meetCriteria(List<Person> persons) {
    
      List&lt;Person&gt; singlePersons = new ArrayList&lt;Person&gt;(); 
      
      for (Person person : persons) {
         if(person.getMaritalStatus().equalsIgnoreCase("SINGLE")){
            singlePersons.add(person);
         }
      }
      return singlePersons;
    } }

    AndCriteria.java

    import java.util.List;
    
    public class AndCriteria implements Criteria {
    
       private Criteria criteria;
       private Criteria otherCriteria;
    
       public AndCriteria(Criteria criteria, Criteria otherCriteria) {
    
      this.criteria = criteria;
      this.otherCriteria = otherCriteria; 
    } @Override public List<Person> meetCriteria(List<Person> persons) {
      List&lt;Person&gt; firstCriteriaPersons = criteria.meetCriteria(persons);		
      return otherCriteria.meetCriteria(firstCriteriaPersons);
    } }

    OrCriteria.java

    import java.util.List;
    
    public class OrCriteria implements Criteria {
    
       private Criteria criteria;
       private Criteria otherCriteria;
    
       public OrCriteria(Criteria criteria, Criteria otherCriteria) {
    
      this.criteria = criteria;
      this.otherCriteria = otherCriteria; 
    } @Override public List<Person> meetCriteria(List<Person> persons) {
      List&lt;Person&gt; firstCriteriaItems = criteria.meetCriteria(persons);
      List&lt;Person&gt; otherCriteriaItems = otherCriteria.meetCriteria(persons);
      for (Person person : otherCriteriaItems) {
         if(!firstCriteriaItems.contains(person)){
            firstCriteriaItems.add(person);
         }
      }	
      return firstCriteriaItems;
    } }

    Step4

    Use different Criteria and their combination to filter out persons.

    CriteriaPatternDemo.java

    import java.util.ArrayList;
    import java.util.List;
    
    public class CriteriaPatternDemo {
       public static void main(String[] args) {
    
      List&lt;Person&gt; persons = new ArrayList&lt;Person&gt;();
      persons.add(new Person("Robert","Male", "Single"));
      persons.add(new Person("John", "Male", "Married"));
      persons.add(new Person("Laura", "Female", "Married"));
      persons.add(new Person("Diana", "Female", "Single"));
      persons.add(new Person("Mike", "Male", "Single"));
      persons.add(new Person("Bobby", "Male", "Single"));
      Criteria male = new CriteriaMale();
      Criteria female = new CriteriaFemale();
      Criteria single = new CriteriaSingle();
      Criteria singleMale = new AndCriteria(single, male);
      Criteria singleOrFemale = new OrCriteria(single, female);
      System.out.println("Males: ");
      printPersons(male.meetCriteria(persons));
      System.out.println("\nFemales: ");
      printPersons(female.meetCriteria(persons));
      System.out.println("\nSingle Males: ");
      printPersons(singleMale.meetCriteria(persons));
      System.out.println("\nSingle Or Females: ");
      printPersons(singleOrFemale.meetCriteria(persons));
    } public static void printPersons(List<Person> persons){
      for (Person person : persons) {
         System.out.println("Person : &#91; Name : " + person.getName() + ", Gender : " + person.getGender() + ", Marital Status : " + person.getMaritalStatus() + " ]");
      }
    } }

    Step 5

    Verify the output.

    Males: 
    Person : [ Name : Robert, Gender : Male, Marital Status : Single ]
    Person : [ Name : John, Gender : Male, Marital Status : Married ]
    Person : [ Name : Mike, Gender : Male, Marital Status : Single ]
    Person : [ Name : Bobby, Gender : Male, Marital Status : Single ]
    
    Females: 
    Person : [ Name : Laura, Gender : Female, Marital Status : Married ]
    Person : [ Name : Diana, Gender : Female, Marital Status : Single ]
    
    Single Males: 
    Person : [ Name : Robert, Gender : Male, Marital Status : Single ]
    Person : [ Name : Mike, Gender : Male, Marital Status : Single ]
    Person : [ Name : Bobby, Gender : Male, Marital Status : Single ]
    
    Single Or Females: 
    Person : [ Name : Robert, Gender : Male, Marital Status : Single ]
    Person : [ Name : Diana, Gender : Female, Marital Status : Single ]
    Person : [ Name : Mike, Gender : Male, Marital Status : Single ]
    Person : [ Name : Bobby, Gender : Male, Marital Status : Single ]
    Person : [ Name : Laura, Gender : Female, Marital Status : Married ]
    
  • Bridge Pattern

    Bridge is used when we need to decouple an abstraction from its implementation so that the two can vary independently. This type of design pattern comes under structural pattern as this pattern decouples implementation class and abstract class by providing a bridge structure between them.

    This pattern involves an interface which acts as a bridge which makes the functionality of concrete classes independent from interface implementer classes. Both types of classes can be altered structurally without affecting each other.

    We are demonstrating use of Bridge pattern via following example in which a circle can be drawn in different colors using same abstract class method but different bridge implementer classes.

    Implementation

    We have a DrawAPI interface which is acting as a bridge implementer and concrete classes RedCircleGreenCircle implementing the DrawAPI interface. Shape is an abstract class and will use object of DrawAPIBridgePatternDemo, our demo class will use Shape class to draw different colored circle.

    Bridge Pattern UML Diagram

    Step 1

    Create bridge implementer interface.

    DrawAPI.java

    public interface DrawAPI {
       public void drawCircle(int radius, int x, int y);
    }

    Explore our latest online courses and learn new skills at your own pace. Enroll and become a certified expert to boost your career.

    Step 2

    Create concrete bridge implementer classes implementing the DrawAPI interface.

    RedCircle.java

    public class RedCircle implements DrawAPI {
       @Override
       public void drawCircle(int radius, int x, int y) {
    
      System.out.println("Drawing Circle&#91; color: red, radius: " + radius + ", x: " + x + ", " + y + "]");
    } }

    GreenCircle.java

    public class GreenCircle implements DrawAPI {
       @Override
       public void drawCircle(int radius, int x, int y) {
    
      System.out.println("Drawing Circle&#91; color: green, radius: " + radius + ", x: " + x + ", " + y + "]");
    } }

    Step 3

    Create an abstract class Shape using the DrawAPI interface.

    Shape.java

    public abstract class Shape {
       protected DrawAPI drawAPI;
       
       protected Shape(DrawAPI drawAPI){
    
      this.drawAPI = drawAPI;
    } public abstract void draw(); }

    Step 4

    Create concrete class implementing the Shape interface.

    Circle.java

    public class Circle extends Shape {
       private int x, y, radius;
    
       public Circle(int x, int y, int radius, DrawAPI drawAPI) {
    
      super(drawAPI);
      this.x = x;  
      this.y = y;  
      this.radius = radius;
    } public void draw() {
      drawAPI.drawCircle(radius,x,y);
    } }

    Step 5

    Use the Shape and DrawAPI classes to draw different colored circles.

    BridgePatternDemo.java

    public class BridgePatternDemo {
       public static void main(String[] args) {
    
      Shape redCircle = new Circle(100,100, 10, new RedCircle());
      Shape greenCircle = new Circle(100,100, 10, new GreenCircle());
      redCircle.draw();
      greenCircle.draw();
    } }

    Step 6

    Verify the output.

    Drawing Circle[ color: red, radius: 10, x: 100, 100]
    Drawing Circle[  color: green, radius: 10, x: 100, 100]