Author: saqibkhan

  • MVC Pattern

    MVC Pattern stands for Model-View-Controller Pattern. This pattern is used to separate application’s concerns.

    • Model – Model represents an object or JAVA POJO carrying data. It can also have logic to update controller if its data changes.
    • View – View represents the visualization of the data that model contains.
    • Controller – Controller acts on both model and view. It controls the data flow into model object and updates the view whenever data changes. It keeps view and model separate.

    Implementation

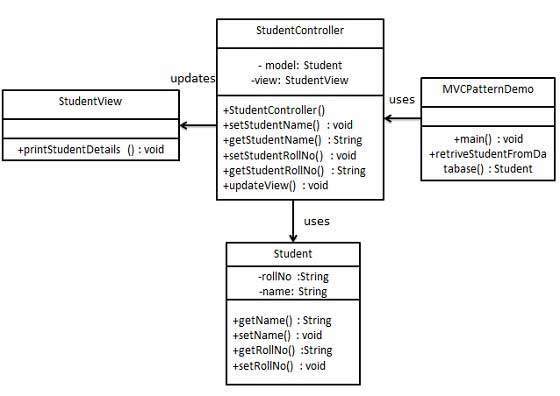
    We are going to create a Student object acting as a model.StudentView will be a view class which can print student details on console and StudentController is the controller class responsible to store data in Student object and update view StudentView accordingly.

    MVCPatternDemo, our demo class, will use StudentController to demonstrate use of MVC pattern.

    MVC Pattern UML Diagram

    Step 1

    Create Model.

    Student.java

    public class Student {
       private String rollNo;
       private String name;
       
       public String getRollNo() {
    
      return rollNo;
    } public void setRollNo(String rollNo) {
      this.rollNo = rollNo;
    } public String getName() {
      return name;
    } public void setName(String name) {
      this.name = name;
    } }

    Explore our latest online courses and learn new skills at your own pace. Enroll and become a certified expert to boost your career.

    Step 2

    Create View.

    StudentView.java

    public class StudentView {
       public void printStudentDetails(String studentName, String studentRollNo){
    
      System.out.println("Student: ");
      System.out.println("Name: " + studentName);
      System.out.println("Roll No: " + studentRollNo);
    } }

    Step 3

    Create Controller.

    StudentController.java

    public class StudentController {
       private Student model;
       private StudentView view;
    
       public StudentController(Student model, StudentView view){
    
      this.model = model;
      this.view = view;
    } public void setStudentName(String name){
      model.setName(name);		
    } public String getStudentName(){
      return model.getName();		
    } public void setStudentRollNo(String rollNo){
      model.setRollNo(rollNo);		
    } public String getStudentRollNo(){
      return model.getRollNo();		
    } public void updateView(){
      view.printStudentDetails(model.getName(), model.getRollNo());
    } }

    Step 4

    Use the StudentController methods to demonstrate MVC design pattern usage.

    MVCPatternDemo.java

    public class MVCPatternDemo {
       public static void main(String[] args) {
    
    
      //fetch student record based on his roll no from the database
      Student model  = retriveStudentFromDatabase();
      //Create a view : to write student details on console
      StudentView view = new StudentView();
      StudentController controller = new StudentController(model, view);
      controller.updateView();
      //update model data
      controller.setStudentName("John");
      controller.updateView();
    } private static Student retriveStudentFromDatabase(){
      Student student = new Student();
      student.setName("Robert");
      student.setRollNo("10");
      return student;
    } }

    Step 5

    Verify the output.

    Student: 
    Name: Robert
    Roll No: 10
    Student: 
    Name: John
    Roll No: 10
    
  • Visitor Pattern

    In Visitor pattern, we use a visitor class which changes the executing algorithm of an element class. By this way, execution algorithm of element can vary as and when visitor varies. This pattern comes under behavior pattern category. As per the pattern, element object has to accept the visitor object so that visitor object handles the operation on the element object.

    Implementation

    We are going to create a ComputerPart interface defining accept opearation.KeyboardMouseMonitor and Computer are concrete classes implementing ComputerPart interface. We will define another interface ComputerPartVisitor which will define a visitor class operations. Computer uses concrete visitor to do corresponding action.

    VisitorPatternDemo, our demo class, will use Computer and ComputerPartVisitor classes to demonstrate use of visitor pattern.

    Visitor Pattern UML Diagram

    Step 1

    Define an interface to represent element.

    ComputerPart.java

    public interface ComputerPart {
       public void accept(ComputerPartVisitor computerPartVisitor);
    }

    Explore our latest online courses and learn new skills at your own pace. Enroll and become a certified expert to boost your career.

    Step 2

    Create concrete classes extending the above class.

    Keyboard.java

    public class Keyboard implements ComputerPart {
    
       @Override
       public void accept(ComputerPartVisitor computerPartVisitor) {
    
      computerPartVisitor.visit(this);
    } }

    Monitor.java

    public class Monitor implements ComputerPart {
    
       @Override
       public void accept(ComputerPartVisitor computerPartVisitor) {
    
      computerPartVisitor.visit(this);
    } }

    Mouse.java

    public class Mouse implements ComputerPart {
    
       @Override
       public void accept(ComputerPartVisitor computerPartVisitor) {
    
      computerPartVisitor.visit(this);
    } }

    Computer.java

    public class Computer implements ComputerPart {
    	
       ComputerPart[] parts;
    
       public Computer(){
    
      parts = new ComputerPart[] {new Mouse(), new Keyboard(), new Monitor()};		
    } @Override public void accept(ComputerPartVisitor computerPartVisitor) {
      for (int i = 0; i < parts.length; i++) {
         parts[i].accept(computerPartVisitor);
      }
      computerPartVisitor.visit(this);
    } }

    Step 3

    Define an interface to represent visitor.

    ComputerPartVisitor.java

    public interface ComputerPartVisitor {
    	public void visit(Computer computer);
    	public void visit(Mouse mouse);
    	public void visit(Keyboard keyboard);
    	public void visit(Monitor monitor);
    }

    Step 4

    Create concrete visitor implementing the above class.

    ComputerPartDisplayVisitor.java

    public class ComputerPartDisplayVisitor implements ComputerPartVisitor {
    
       @Override
       public void visit(Computer computer) {
    
      System.out.println("Displaying Computer.");
    } @Override public void visit(Mouse mouse) {
      System.out.println("Displaying Mouse.");
    } @Override public void visit(Keyboard keyboard) {
      System.out.println("Displaying Keyboard.");
    } @Override public void visit(Monitor monitor) {
      System.out.println("Displaying Monitor.");
    } }

    Step 5

    Use the ComputerPartDisplayVisitor to display parts of Computer.

    VisitorPatternDemo.java

    public class VisitorPatternDemo {
       public static void main(String[] args) {
    
    
      ComputerPart computer = new Computer();
      computer.accept(new ComputerPartDisplayVisitor());
    } }

    Step 6

    Verify the output.

    Displaying Mouse.
    Displaying Keyboard.
    Displaying Monitor.
    Displaying Computer.
    
  • Template Pattern

    In Template pattern, an abstract class exposes defined way(s)/template(s) to execute its methods. Its subclasses can override the method implementation as per need but the invocation is to be in the same way as defined by an abstract class. This pattern comes under behavior pattern category.

    Implementation

    We are going to create a Game abstract class defining operations with a template method set to be final so that it cannot be overridden. Cricket and Football are concrete classes that extend Game and override its methods.

    TemplatePatternDemo, our demo class, will use Game to demonstrate use of template pattern.

    Template Pattern UML Diagram

    Step 1

    Create an abstract class with a template method being final.

    Game.java

    public abstract class Game {
       abstract void initialize();
       abstract void startPlay();
       abstract void endPlay();
    
       //template method
       public final void play(){
    
    
      //initialize the game
      initialize();
      //start game
      startPlay();
      //end game
      endPlay();
    } }

    Explore our latest online courses and learn new skills at your own pace. Enroll and become a certified expert to boost your career.

    Step 2

    Create concrete classes extending the above class.

    Cricket.java

    public class Cricket extends Game {
    
       @Override
       void endPlay() {
    
      System.out.println("Cricket Game Finished!");
    } @Override void initialize() {
      System.out.println("Cricket Game Initialized! Start playing.");
    } @Override void startPlay() {
      System.out.println("Cricket Game Started. Enjoy the game!");
    } }

    Football.java

    public class Football extends Game {
    
       @Override
       void endPlay() {
    
      System.out.println("Football Game Finished!");
    } @Override void initialize() {
      System.out.println("Football Game Initialized! Start playing.");
    } @Override void startPlay() {
      System.out.println("Football Game Started. Enjoy the game!");
    } }

    Step 3

    Use the Game‘s template method play() to demonstrate a defined way of playing game.

    TemplatePatternDemo.java

    public class TemplatePatternDemo {
       public static void main(String[] args) {
    
    
      Game game = new Cricket();
      game.play();
      System.out.println();
      game = new Football();
      game.play();		
    } }

    Step 4

    Verify the output.

    Cricket Game Initialized! Start playing.
    Cricket Game Started. Enjoy the game!
    Cricket Game Finished!
    
    Football Game Initialized! Start playing.
    Football Game Started. Enjoy the game!
    Football Game Finished!
    
  • Strategy Pattern

    In Strategy pattern, a class behavior or its algorithm can be changed at run time. This type of design pattern comes under behavior pattern.

    In Strategy pattern, we create objects which represent various strategies and a context object whose behavior varies as per its strategy object. The strategy object changes the executing algorithm of the context object.

    Implementation

    We are going to create a Strategy interface defining an action and concrete strategy classes implementing the Strategy interface. Context is a class which uses a Strategy.

    StrategyPatternDemo, our demo class, will use Context and strategy objects to demonstrate change in Context behaviour based on strategy it deploys or uses.

    Strategy Pattern UML Diagram

    Step 1

    Create an interface.

    Strategy.java

    public interface Strategy {
       public int doOperation(int num1, int num2);
    }

    Explore our latest online courses and learn new skills at your own pace. Enroll and become a certified expert to boost your career.

    Step 2

    Create concrete classes implementing the same interface.

    OperationAdd.java

    public class OperationAdd implements Strategy{
       @Override
       public int doOperation(int num1, int num2) {
    
      return num1 + num2;
    } }

    OperationSubstract.java

    public class OperationSubstract implements Strategy{
       @Override
       public int doOperation(int num1, int num2) {
    
      return num1 - num2;
    } }

    OperationMultiply.java

    public class OperationMultiply implements Strategy{
       @Override
       public int doOperation(int num1, int num2) {
    
      return num1 * num2;
    } }

    Step 3

    Create Context Class.

    Context.java

    public class Context {
       private Strategy strategy;
    
       public Context(Strategy strategy){
    
      this.strategy = strategy;
    } public int executeStrategy(int num1, int num2){
      return strategy.doOperation(num1, num2);
    } }

    Step 4

    Use the Context to see change in behaviour when it changes its Strategy.

    StrategyPatternDemo.java

    public class StrategyPatternDemo {
       public static void main(String[] args) {
    
      Context context = new Context(new OperationAdd());		
      System.out.println("10 + 5 = " + context.executeStrategy(10, 5));
      context = new Context(new OperationSubstract());		
      System.out.println("10 - 5 = " + context.executeStrategy(10, 5));
      context = new Context(new OperationMultiply());		
      System.out.println("10 * 5 = " + context.executeStrategy(10, 5));
    } }

    Step 5

    Verify the output.

    10 + 5 = 15
    10 - 5 = 5
    10 * 5 = 50
    
  • Null Object Pattern

    In Null Object pattern, a null object replaces check of NULL object instance. Instead of putting if check for a null value, Null Object reflects a do nothing relationship. Such Null object can also be used to provide default behaviour in case data is not available.

    In Null Object pattern, we create an abstract class specifying various operations to be done, concrete classes extending this class and a null object class providing do nothing implemention of this class and will be used seemlessly where we need to check null value.

    Implementation

    We are going to create a AbstractCustomer abstract class defining opearations. Here the name of the customer and concrete classes extending the AbstractCustomer class. A factory class CustomerFactory is created to return either RealCustomer or NullCustomer objects based on the name of customer passed to it.

    NullPatternDemo, our demo class, will use CustomerFactory to demonstrate the use of Null Object pattern.

    Null Object Pattern UML Diagram

    Step 1

    Create an abstract class.

    AbstractCustomer.java

    public abstract class AbstractCustomer {
       protected String name;
       public abstract boolean isNil();
       public abstract String getName();
    }

    Explore our latest online courses and learn new skills at your own pace. Enroll and become a certified expert to boost your career.

    Step 2

    Create concrete classes extending the above class.

    RealCustomer.java

    public class RealCustomer extends AbstractCustomer {
    
       public RealCustomer(String name) {
    
      this.name = name;		
    } @Override public String getName() {
      return name;
    } @Override public boolean isNil() {
      return false;
    } }

    NullCustomer.java

    public class NullCustomer extends AbstractCustomer {
    
       @Override
       public String getName() {
    
      return "Not Available in Customer Database";
    } @Override public boolean isNil() {
      return true;
    } }

    Step 3

    Create CustomerFactory Class.

    CustomerFactory.java

    public class CustomerFactory {
    	
       public static final String[] names = {"Rob", "Joe", "Julie"};
    
       public static AbstractCustomer getCustomer(String name){
       
    
      for (int i = 0; i < names.length; i++) {
         if (names[i].equalsIgnoreCase(name)){
            return new RealCustomer(name);
         }
      }
      return new NullCustomer();
    } }

    Step 4

    Use the CustomerFactory to get either RealCustomer or NullCustomer objects based on the name of customer passed to it.

    NullPatternDemo.java

    public class NullPatternDemo {
       public static void main(String[] args) {
    
    
      AbstractCustomer customer1 = CustomerFactory.getCustomer("Rob");
      AbstractCustomer customer2 = CustomerFactory.getCustomer("Bob");
      AbstractCustomer customer3 = CustomerFactory.getCustomer("Julie");
      AbstractCustomer customer4 = CustomerFactory.getCustomer("Laura");
      System.out.println("Customers");
      System.out.println(customer1.getName());
      System.out.println(customer2.getName());
      System.out.println(customer3.getName());
      System.out.println(customer4.getName());
    } }

    Step 5

    Verify the output.

    Customers
    Rob
    Not Available in Customer Database
    Julie
    Not Available in Customer Database
    
  • State Pattern

    In State pattern a class behavior changes based on its state. This type of design pattern comes under behavior pattern.

    In State pattern, we create objects which represent various states and a context object whose behavior varies as its state object changes.

    Implementation

    We are going to create a State interface defining an action and concrete state classes implementing the State interface. Context is a class which carries a State.

    StatePatternDemo, our demo class, will use Context and state objects to demonstrate change in Context behavior based on type of state it is in.

    State Pattern UML Diagram

    Step 1

    Create an interface.

    State.java

    public interface State {
       public void doAction(Context context);
    }

    Explore our latest online courses and learn new skills at your own pace. Enroll and become a certified expert to boost your career.

    Step 2

    Create concrete classes implementing the same interface.

    StartState.java

    public class StartState implements State {
    
       public void doAction(Context context) {
    
      System.out.println("Player is in start state");
      context.setState(this);	
    } public String toString(){
      return "Start State";
    } }

    StopState.java

    public class StopState implements State {
    
       public void doAction(Context context) {
    
      System.out.println("Player is in stop state");
      context.setState(this);	
    } public String toString(){
      return "Stop State";
    } }

    Step 3

    Create Context Class.

    Context.java

    public class Context {
       private State state;
    
       public Context(){
    
      state = null;
    } public void setState(State state){
      this.state = state;		
    } public State getState(){
      return state;
    } }

    Step 4

    Use the Context to see change in behaviour when State changes.

    StatePatternDemo.java

    public class StatePatternDemo {
       public static void main(String[] args) {
    
      Context context = new Context();
      StartState startState = new StartState();
      startState.doAction(context);
      System.out.println(context.getState().toString());
      StopState stopState = new StopState();
      stopState.doAction(context);
      System.out.println(context.getState().toString());
    } }

    Step 5

    Verify the output.

    Player is in start state
    Start State
    Player is in stop state
    Stop State
    
  • Observer Pattern

    Observer pattern is used when there is one-to-many relationship between objects such as if one object is modified, its depenedent objects are to be notified automatically. Observer pattern falls under behavioral pattern category.

    Implementation

    Observer pattern uses three actor classes. Subject, Observer and Client. Subject is an object having methods to attach and detach observers to a client object. We have created an abstract class Observer and a concrete class Subject that is extending class Observer.

    ObserverPatternDemo, our demo class, will use Subject and concrete class object to show observer pattern in action.

    Observer Pattern UML Diagram

    Step 1

    Create Subject class.

    Subject.java

    import java.util.ArrayList;
    import java.util.List;
    
    public class Subject {
    	
       private List<Observer> observers = new ArrayList<Observer>();
       private int state;
    
       public int getState() {
    
      return state;
    } public void setState(int state) {
      this.state = state;
      notifyAllObservers();
    } public void attach(Observer observer){
      observers.add(observer);		
    } public void notifyAllObservers(){
      for (Observer observer : observers) {
         observer.update();
      }
    } }

    Explore our latest online courses and learn new skills at your own pace. Enroll and become a certified expert to boost your career.

    Step 2

    Create Observer class.

    Observer.java

    public abstract class Observer {
       protected Subject subject;
       public abstract void update();
    }

    Step 3

    Create concrete observer classes

    BinaryObserver.java

    public class BinaryObserver extends Observer{
    
       public BinaryObserver(Subject subject){
    
      this.subject = subject;
      this.subject.attach(this);
    } @Override public void update() {
      System.out.println( "Binary String: " + Integer.toBinaryString( subject.getState() ) ); 
    } }

    OctalObserver.java

    public class OctalObserver extends Observer{
    
       public OctalObserver(Subject subject){
    
      this.subject = subject;
      this.subject.attach(this);
    } @Override public void update() {
     System.out.println( "Octal String: " + Integer.toOctalString( subject.getState() ) ); 
    } }

    HexaObserver.java

    public class HexaObserver extends Observer{
    
       public HexaObserver(Subject subject){
    
      this.subject = subject;
      this.subject.attach(this);
    } @Override public void update() {
      System.out.println( "Hex String: " + Integer.toHexString( subject.getState() ).toUpperCase() ); 
    } }

    Step 4

    Use Subject and concrete observer objects.

    ObserverPatternDemo.java

    public class ObserverPatternDemo {
       public static void main(String[] args) {
    
      Subject subject = new Subject();
      new HexaObserver(subject);
      new OctalObserver(subject);
      new BinaryObserver(subject);
      System.out.println("First state change: 15");	
      subject.setState(15);
      System.out.println("Second state change: 10");	
      subject.setState(10);
    } }

    Step 5

    Verify the output.

    First state change: 15
    Hex String: F
    Octal String: 17
    Binary String: 1111
    Second state change: 10
    Hex String: A
    Octal String: 12
    Binary String: 1010
    
  • Memento Pattern

    Memento pattern is used to restore state of an object to a previous state. Memento pattern falls under behavioral pattern category.

    Implementation

    Memento pattern uses three actor classes. Memento contains state of an object to be restored. Originator creates and stores states in Memento objects and Caretaker object is responsible to restore object state from Memento. We have created classes MementoOriginator and CareTaker.

    MementoPatternDemo, our demo class, will use CareTaker and Originator objects to show restoration of object states.

    Memento Pattern UML Diagram

    Step 1

    Create Memento class.

    Memento.java

    public class Memento {
       private String state;
    
       public Memento(String state){
    
      this.state = state;
    } public String getState(){
      return state;
    } }

    Explore our latest online courses and learn new skills at your own pace. Enroll and become a certified expert to boost your career.

    Step 2

    Create Originator class

    Originator.java

    public class Originator {
       private String state;
    
       public void setState(String state){
    
      this.state = state;
    } public String getState(){
      return state;
    } public Memento saveStateToMemento(){
      return new Memento(state);
    } public void getStateFromMemento(Memento memento){
      state = memento.getState();
    } }

    Step 3

    Create CareTaker class

    CareTaker.java

    import java.util.ArrayList;
    import java.util.List;
    
    public class CareTaker {
       private List<Memento> mementoList = new ArrayList<Memento>();
    
       public void add(Memento state){
    
      mementoList.add(state);
    } public Memento get(int index){
      return mementoList.get(index);
    } }

    Step 4

    Use CareTaker and Originator objects.

    MementoPatternDemo.java

    public class MementoPatternDemo {
       public static void main(String[] args) {
       
    
      Originator originator = new Originator();
      CareTaker careTaker = new CareTaker();
      
      originator.setState("State #1");
      originator.setState("State #2");
      careTaker.add(originator.saveStateToMemento());
      
      originator.setState("State #3");
      careTaker.add(originator.saveStateToMemento());
      
      originator.setState("State #4");
      System.out.println("Current State: " + originator.getState());		
      
      originator.getStateFromMemento(careTaker.get(0));
      System.out.println("First saved State: " + originator.getState());
      originator.getStateFromMemento(careTaker.get(1));
      System.out.println("Second saved State: " + originator.getState());
    } }

    Step 5

    Verify the output.

    Current State: State #4
    First saved State: State #2
    Second saved State: State #3
    
  • Mediator Pattern

    Mediator pattern is used to reduce communication complexity between multiple objects or classes. This pattern provides a mediator class which normally handles all the communications between different classes and supports easy maintenance of the code by loose coupling. Mediator pattern falls under behavioral pattern category.

    Implementation

    We are demonstrating mediator pattern by example of a chat room where multiple users can send message to chat room and it is the responsibility of chat room to show the messages to all users. We have created two classes ChatRoom and UserUser objects will use ChatRoom method to share their messages.

    MediatorPatternDemo, our demo class, will use User objects to show communication between them.

    Mediator Pattern UML Diagram

    Step 1

    Create mediator class.

    ChatRoom.java

    import java.util.Date;
    
    public class ChatRoom {
       public static void showMessage(User user, String message){
    
      System.out.println(new Date().toString() + " &#91;" + user.getName() + "] : " + message);
    } }

    Explore our latest online courses and learn new skills at your own pace. Enroll and become a certified expert to boost your career.

    Step 2

    Create user class

    User.java

    public class User {
       private String name;
    
       public String getName() {
    
      return name;
    } public void setName(String name) {
      this.name = name;
    } public User(String name){
      this.name  = name;
    } public void sendMessage(String message){
      ChatRoom.showMessage(this,message);
    } }

    Step 3

    Use the User object to show communications between them.

    MediatorPatternDemo.java

    public class MediatorPatternDemo {
       public static void main(String[] args) {
    
      User robert = new User("Robert");
      User john = new User("John");
      robert.sendMessage("Hi! John!");
      john.sendMessage("Hello! Robert!");
    } }

    Step 4

    Verify the output.

    Thu Jan 31 16:05:46 IST 2013 [Robert] : Hi! John!
    Thu Jan 31 16:05:46 IST 2013 [John] : Hello! Robert!
    
  • Iterator Pattern

    Iterator pattern is very commonly used design pattern in Java and .Net programming environment. This pattern is used to get a way to access the elements of a collection object in sequential manner without any need to know its underlying representation.

    Iterator pattern falls under behavioral pattern category.

    Implementation

    We’re going to create a Iterator interface which narrates navigation method and a Container interface which retruns the iterator . Concrete classes implementing the Container interface will be responsible to implement Iterator interface and use it

    IteratorPatternDemo, our demo class will use NamesRepository, a concrete class implementation to print a Names stored as a collection in NamesRepository.

    Iterator Pattern UML Diagram

    Step 1

    Create interfaces.

    Iterator.java

    public interface Iterator {
       public boolean hasNext();
       public Object next();
    }

    Container.java

    public interface Container {
       public Iterator getIterator();
    }

    Explore our latest online courses and learn new skills at your own pace. Enroll and become a certified expert to boost your career.

    Step 2

    Create concrete class implementing the Container interface. This class has inner class NameIterator implementing the Iterator interface.

    NameRepository.java

    public class NameRepository implements Container {
       public String names[] = {"Robert" , "John" ,"Julie" , "Lora"};
    
       @Override
       public Iterator getIterator() {
    
      return new NameIterator();
    } private class NameIterator implements Iterator {
      int index;
      @Override
      public boolean hasNext() {
      
         if(index &lt; names.length){
            return true;
         }
         return false;
      }
      @Override
      public Object next() {
      
         if(this.hasNext()){
            return names&#91;index++];
         }
         return null;
      }		
    } }

    Step 3

    Use the NameRepository to get iterator and print names.

    IteratorPatternDemo.java

    public class IteratorPatternDemo {
    	
       public static void main(String[] args) {
    
      NameRepository namesRepository = new NameRepository();
      for(Iterator iter = namesRepository.getIterator(); iter.hasNext();){
         String name = (String)iter.next();
         System.out.println("Name : " + name);
      } 	
    } }

    Step 4

    Verify the output.

    Name : Robert
    Name : John
    Name : Julie
    Name : Lora