Author: saqibkhan

  • Creating a MAC

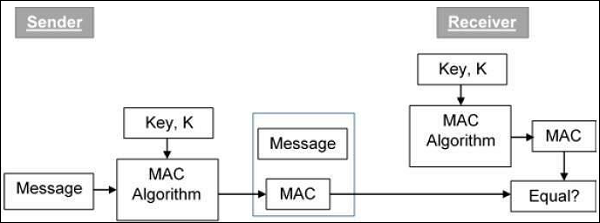
    MAC (Message Authentication Code) algorithm is a symmetric key cryptographic technique to provide message authentication. For establishing MAC process, the sender and receiver share a symmetric key K.

    Essentially, a MAC is an encrypted checksum generated on the underlying message that is sent along with a message to ensure message authentication.

    The process of using MAC for authentication is depicted in the following illustration −

    Creating MAC

    In Java the Mac class of the javax.crypto package provides the functionality of message authentication code. Follow the steps given below to create message authentication code using this class.

    Step 1: Create a KeyGenerator object

    The KeyGenerator class provides getInstance() method which accepts a String variable representing the required key-generating algorithm and returns a KeyGenerator object that generates secret keys.

    Create KeyGenerator object using the getInstance() method as shown below.

    //Creating a KeyGenerator object
    KeyGenerator keyGen = KeyGenerator.getInstance("DES");
    

    Step 2: Create SecureRandom object

    The SecureRandom class of the java.Security package provides a strong random number generator which is used to generate random numbers in Java. Instantiate this class as shown below.

    //Creating a SecureRandom object
    SecureRandom secRandom = new SecureRandom();
    

    Learn Java in-depth with real-world projects through our Java certification course. Enroll and become a certified expert to boost your career.

    Step 3: Initialize the KeyGenerator

    The KeyGenerator class provides a method named init() this method accepts the SecureRandom object and initializes the current KeyGenerator.

    Initialize the KeyGenerator object created in the previous step using this method.

    //Initializing the KeyGenerator
    keyGen.init(secRandom);
    

    Step 4: Generate key

    Generate key using generateKey() method of the KeyGenerator class as shown below.

    //Creating/Generating a key
    Key key = keyGen.generateKey();
    

    Step 5: Initialize the Mac object

    The init() method of the Mac class accepts an Key object and initializes the current Mac object using the given key.

    //Initializing the Mac object
    mac.init(key);
    

    Step 6: Finish the mac operation

    The doFinal() method of the Mac class is used to finish the Mac operation. Pass the required data in the form of byte array to this method and finsh the operation as shown below.

    //Computing the Mac
    String msg = new String("Hi how are you");
    byte[] bytes = msg.getBytes();
    byte[] macResult = mac.doFinal(bytes);
    

    Example

    The following example demonstrates the generation of Message Authentication Code (MAC) using JCA. Here, we take a simple message “Hi how are you” and, generate a Mac for that message.

    import java.security.Key;
    import java.security.SecureRandom;
    
    import javax.crypto.KeyGenerator;
    import javax.crypto.Mac;
    
    public class MacSample {
       public static void main(String args[]) throws Exception{
    
      //Creating a KeyGenerator object
      KeyGenerator keyGen = KeyGenerator.getInstance("DES");
      //Creating a SecureRandom object
      SecureRandom secRandom = new SecureRandom();
      //Initializing the KeyGenerator
      keyGen.init(secRandom);
      //Creating/Generating a key
      Key key = keyGen.generateKey();	 
      //Creating a Mac object
      Mac mac = Mac.getInstance("HmacSHA256");
      //Initializing the Mac object
      mac.init(key);
      //Computing the Mac
      String msg = new String("Hi how are you");
      byte[] bytes = msg.getBytes();      
      byte[] macResult = mac.doFinal(bytes);
      System.out.println("Mac result:");
      System.out.println(new String(macResult));     
    } }

    Output

    The above program will generate the following output −

    Mac result:
    HÖ„^ǃÎ_Utbh…?š_üzØSSÜh_ž_œa0ŽV?
    
  • Message Digest

    Hash functions are extremely useful and appear in almost all information security applications.

    A hash function is a mathematical function that converts a numerical input value into another compressed numerical value. The input to the hash function is of arbitrary length but output is always of fixed length.

    Values returned by a hash function are called message digest or simply hash values. The following picture illustrated hash function.

    Message Digest

    Java provides a class named MessageDigest which belongs to the package java.security. This class supports algorithms such as SHA-1, SHA 256, MD5 algorithms to convert an arbitrary length message to a message digest.

    To convert a given message to a message digest, follow the steps given below −

    Step 1: Create a MessageDigest object

    The MessageDigest class provides a method named getInstance(). This method accepts a String variable specifying the name of the algorithm to be used and returns a MessageDigest object implementing the specified algorithm.

    Create MessageDigest object using the getInstance() method as shown below.

    MessageDigest md = MessageDigest.getInstance("SHA-256");
    

    Step 2: Pass data to the created MessageDigest object

    After creating the message digest object, you need to pass the message/data to it. You can do so using the update() method of the MessageDigest class, this method accepts a byte array representing the message and adds/passes it to the above created MessageDigest object.

    md.update(msg.getBytes());
    

    Learn Java in-depth with real-world projects through our Java certification course. Enroll and become a certified expert to boost your career.

    Step 3: Generate the message digest

    You can generate the message digest using the digest() method od the MessageDigest class this method computes the hash function on the current object and returns the message digest in the form of byte array.

    Generate the message digest using the digest method.

    byte[] digest = md.digest();
    

    Example

    Following is an example which reads data from a file and generate a message digest and prints it.

    import java.security.MessageDigest;
    import java.util.Scanner;
    
    public class MessageDigestExample {
       public static void main(String args[]) throws Exception{
    
      //Reading data from user
      Scanner sc = new Scanner(System.in);
      System.out.println("Enter the message");
      String message = sc.nextLine();
      //Creating the MessageDigest object  
      MessageDigest md = MessageDigest.getInstance("SHA-256");
      //Passing data to the created MessageDigest Object
      md.update(message.getBytes());
      
      //Compute the message digest
      byte[] digest = md.digest();      
      System.out.println(digest);  
     
      //Converting the byte array in to HexString format
      StringBuffer hexString = new StringBuffer();
      
      for (int i = 0;i<digest.length;i++) {
         hexString.append(Integer.toHexString(0xFF & digest[i]));
      }
      System.out.println("Hex format : " + hexString.toString());     
    } }

    Output

    The above program generates the following output −

    Enter the message
    Hello how are you
    [B@55f96302
    Hex format: 2953d33828c395aebe8225236ba4e23fa75e6f13bd881b9056a3295cbd64d3
    
  • Introduction

    Cryptography is the art and science of making a cryptosystem that is capable of providing information security.

    Cryptography deals with the actual securing of digital data. It refers to the design of mechanisms based on mathematical algorithms that provide fundamental information security services. You can think of cryptography as the establishment of a large toolkit containing different techniques in security applications.

    What is Cryptanalysis?

    The art and science of breaking the cipher text is known as cryptanalysis.

    Cryptanalysis is the sister branch of cryptography and they both co-exist. The cryptographic process results in the cipher text for transmission or storage. It involves the study of cryptographic mechanism with the intention to break them. Cryptanalysis is also used during the design of the new cryptographic techniques to test their security strengths.

    Cryptography Primitives

    Cryptography primitives are nothing but the tools and techniques in Cryptography that can be selectively used to provide a set of desired security services −

    • Encryption
    • Hash functions
    • Message Authentication codes (MAC)
    • Digital Signatures

    Learn Java in-depth with real-world projects through our Java certification course. Enroll and become a certified expert to boost your career.

    Cryptography in Java

    The Java Cryptography Architecture (JCA) is a set of API’s to implement concepts of modern cryptography such as digital signatures, message digests, certificates, encryption, key generation and management, and secure random number generation etc.

    Using JCA developers can build their applications integrating security in them.

    To integrate security in your applications rather than depending on the complicated security algorithms you can easily call the respective API’s provided in JCA for required services.

  • Transfer Object Pattern

    The Transfer Object pattern is used when we want to pass data with multiple attributes in one shot from client to server. Transfer object is also known as Value Object. Transfer Object is a simple POJO class having getter/setter methods and is serializable so that it can be transferred over the network. It does not have any behavior. Server Side business class normally fetches data from the database and fills the POJO and send it to the client or pass it by value. For client, transfer object is read-only. Client can create its own transfer object and pass it to server to update values in database in one shot. Following are the entities of this type of design pattern.

    • Business Object – Business Service fills the Transfer Object with data.
    • Transfer Object – Simple POJO having methods to set/get attributes only.
    • Client – Client either requests or sends the Transfer Object to Business Object.

    Implementation

    We are going to create a StudentBO as Business Object,Student as Transfer Object representing our entities.

    TransferObjectPatternDemo, our demo class, is acting as a client here and will use StudentBO and Student to demonstrate Transfer Object Design Pattern.

    Transfer Object Pattern UML Diagram

    Step 1

    Create Transfer Object.

    StudentVO.java

    public class StudentVO {
       private String name;
       private int rollNo;
    
       StudentVO(String name, int rollNo){
    
      this.name = name;
      this.rollNo = rollNo;
    } public String getName() {
      return name;
    } public void setName(String name) {
      this.name = name;
    } public int getRollNo() {
      return rollNo;
    } public void setRollNo(int rollNo) {
      this.rollNo = rollNo;
    } }

    Explore our latest online courses and learn new skills at your own pace. Enroll and become a certified expert to boost your career.

    Step 2

    Create Business Object.

    StudentBO.java

    import java.util.ArrayList;
    import java.util.List;
    
    public class StudentBO {
    	
       //list is working as a database
       List<StudentVO> students;
    
       public StudentBO(){
    
      students = new ArrayList&lt;StudentVO&gt;();
      StudentVO student1 = new StudentVO("Robert",0);
      StudentVO student2 = new StudentVO("John",1);
      students.add(student1);
      students.add(student2);		
    } public void deleteStudent(StudentVO student) {
      students.remove(student.getRollNo());
      System.out.println("Student: Roll No " + student.getRollNo() + ", deleted from database");
    } //retrive list of students from the database public List<StudentVO> getAllStudents() {
      return students;
    } public StudentVO getStudent(int rollNo) {
      return students.get(rollNo);
    } public void updateStudent(StudentVO student) {
      students.get(student.getRollNo()).setName(student.getName());
      System.out.println("Student: Roll No " + student.getRollNo() +", updated in the database");
    } }

    Step 3

    Use the StudentBO to demonstrate Transfer Object Design Pattern.

    TransferObjectPatternDemo.java

    public class TransferObjectPatternDemo {
       public static void main(String[] args) {
    
      StudentBO studentBusinessObject = new StudentBO();
      //print all students
      for (StudentVO student : studentBusinessObject.getAllStudents()) {
         System.out.println("Student: &#91;RollNo : " + student.getRollNo() + ", Name : " + student.getName() + " ]");
      }
      //update student
      StudentVO student = studentBusinessObject.getAllStudents().get(0);
      student.setName("Michael");
      studentBusinessObject.updateStudent(student);
      //get the student
      student = studentBusinessObject.getStudent(0);
      System.out.println("Student: &#91;RollNo : " + student.getRollNo() + ", Name : " + student.getName() + " ]");
    } }

    Step 4

    Verify the output.

    Student: [RollNo : 0, Name : Robert ]
    Student: [RollNo : 1, Name : John ]
    Student: Roll No 0, updated in the database
    Student: [RollNo : 0, Name : Michael ]
    
  • Service Locator Pattern

    The service locator design pattern is used when we want to locate various services using JNDI lookup. Considering high cost of looking up JNDI for a service, Service Locator pattern makes use of caching technique. For the first time a service is required, Service Locator looks up in JNDI and caches the service object. Further lookup or same service via Service Locator is done in its cache which improves the performance of application to great extent. Following are the entities of this type of design pattern.

    • Service – Actual Service which will process the request. Reference of such service is to be looked upon in JNDI server.
    • Context / Initial Context – JNDI Context carries the reference to service used for lookup purpose.
    • Service Locator – Service Locator is a single point of contact to get services by JNDI lookup caching the services.
    • Cache – Cache to store references of services to reuse them
    • Client – Client is the object that invokes the services via ServiceLocator.

    Implementation

    We are going to create a ServiceLocator,InitialContextCacheService as various objects representing our entities.Service1 and Service2 represent concrete services.

    ServiceLocatorPatternDemo, our demo class, is acting as a client here and will use ServiceLocator to demonstrate Service Locator Design Pattern.

    Service Locator Pattern UML Diagram

    Step 1

    Create Service interface.

    Service.java

    public interface Service {
       public String getName();
       public void execute();
    }

    Explore our latest online courses and learn new skills at your own pace. Enroll and become a certified expert to boost your career.

    Step 2

    Create concrete services.

    Service1.java

    public class Service1 implements Service {
       public void execute(){
    
      System.out.println("Executing Service1");
    } @Override public String getName() {
      return "Service1";
    } }

    Service2.java

    public class Service2 implements Service {
       public void execute(){
    
      System.out.println("Executing Service2");
    } @Override public String getName() {
      return "Service2";
    } }

    Step 3

    Create InitialContext for JNDI lookup

    InitialContext.java

    public class InitialContext {
       public Object lookup(String jndiName){
       
    
      if(jndiName.equalsIgnoreCase("SERVICE1")){
         System.out.println("Looking up and creating a new Service1 object");
         return new Service1();
      }
      else if (jndiName.equalsIgnoreCase("SERVICE2")){
         System.out.println("Looking up and creating a new Service2 object");
         return new Service2();
      }
      return null;		
    } }

    Step 4

    Create Cache

    Cache.java

    import java.util.ArrayList;
    import java.util.List;
    
    public class Cache {
    
       private List<Service> services;
    
       public Cache(){
    
      services = new ArrayList&lt;Service&gt;();
    } public Service getService(String serviceName){
      for (Service service : services) {
         if(service.getName().equalsIgnoreCase(serviceName)){
            System.out.println("Returning cached  " + serviceName + " object");
            return service;
         }
      }
      return null;
    } public void addService(Service newService){
      boolean exists = false;
      
      for (Service service : services) {
         if(service.getName().equalsIgnoreCase(newService.getName())){
            exists = true;
         }
      }
      if(!exists){
         services.add(newService);
      }
    } }

    Step 5

    Create Service Locator

    ServiceLocator.java

    public class ServiceLocator {
       private static Cache cache;
    
       static {
    
      cache = new Cache();		
    } public static Service getService(String jndiName){
      Service service = cache.getService(jndiName);
      if(service != null){
         return service;
      }
      InitialContext context = new InitialContext();
      Service service1 = (Service)context.lookup(jndiName);
      cache.addService(service1);
      return service1;
    } }

    Step 6

    Use the ServiceLocator to demonstrate Service Locator Design Pattern.

    ServiceLocatorPatternDemo.java

    public class ServiceLocatorPatternDemo {
       public static void main(String[] args) {
    
      Service service = ServiceLocator.getService("Service1");
      service.execute();
      service = ServiceLocator.getService("Service2");
      service.execute();
      service = ServiceLocator.getService("Service1");
      service.execute();
      service = ServiceLocator.getService("Service2");
      service.execute();		
    } }

    Step 7

    Verify the output.

    Looking up and creating a new Service1 object
    Executing Service1
    Looking up and creating a new Service2 object
    Executing Service2
    Returning cached  Service1 object
    Executing Service1
    Returning cached  Service2 object
    Executing Service2
    
  • Intercepting Filter Pattern

    The intercepting filter design pattern is used when we want to do some pre-processing / post-processing with request or response of the application. Filters are defined and applied on the request before passing the request to actual target application. Filters can do the authentication/ authorization/ logging or tracking of request and then pass the requests to corresponding handlers. Following are the entities of this type of design pattern.

    • Filter – Filter which will performs certain task prior or after execution of request by request handler.
    • Filter Chain – Filter Chain carries multiple filters and help to execute them in defined order on target.
    • Target – Target object is the request handler
    • Filter Manager – Filter Manager manages the filters and Filter Chain.
    • Client – Client is the object who sends request to the Target object.

    Implementation

    We are going to create a FilterChain,FilterManagerTargetClient as various objects representing our entities.AuthenticationFilter and DebugFilter represent concrete filters.

    InterceptingFilterDemo, our demo class, will use Client to demonstrate Intercepting Filter Design Pattern.

    Intercepting Filter Pattern UML Diagram

    Step 1

    Create Filter interface.

    Filter.java

    public interface Filter {
       public void execute(String request);
    }

    Explore our latest online courses and learn new skills at your own pace. Enroll and become a certified expert to boost your career.

    Step 2

    Create concrete filters.

    AuthenticationFilter.java

    public class AuthenticationFilter implements Filter {
       public void execute(String request){
    
      System.out.println("Authenticating request: " + request);
    } }

    DebugFilter.java

    public class DebugFilter implements Filter {
       public void execute(String request){
    
      System.out.println("request log: " + request);
    } }

    Step 3

    Create Target

    Target.java

    public class Target {
       public void execute(String request){
    
      System.out.println("Executing request: " + request);
    } }

    Step 4

    Create Filter Chain

    FilterChain.java

    import java.util.ArrayList;
    import java.util.List;
    
    public class FilterChain {
       private List<Filter> filters = new ArrayList<Filter>();
       private Target target;
    
       public void addFilter(Filter filter){
    
      filters.add(filter);
    } public void execute(String request){
      for (Filter filter : filters) {
         filter.execute(request);
      }
      target.execute(request);
    } public void setTarget(Target target){
      this.target = target;
    } }

    Step 5

    Create Filter Manager

    FilterManager.java

    public class FilterManager {
       FilterChain filterChain;
    
       public FilterManager(Target target){
    
      filterChain = new FilterChain();
      filterChain.setTarget(target);
    } public void setFilter(Filter filter){
      filterChain.addFilter(filter);
    } public void filterRequest(String request){
      filterChain.execute(request);
    } }

    Step 6

    Create Client

    Client.java

    public class Client {
       FilterManager filterManager;
    
       public void setFilterManager(FilterManager filterManager){
    
      this.filterManager = filterManager;
    } public void sendRequest(String request){
      filterManager.filterRequest(request);
    } }

    Step 7

    Use the Client to demonstrate Intercepting Filter Design Pattern.

    InterceptingFilterDemo.java

    public class InterceptingFilterDemo {
       public static void main(String[] args) {
    
      FilterManager filterManager = new FilterManager(new Target());
      filterManager.setFilter(new AuthenticationFilter());
      filterManager.setFilter(new DebugFilter());
      Client client = new Client();
      client.setFilterManager(filterManager);
      client.sendRequest("HOME");
    } }

    Step 8

    Verify the output.

    Authenticating request: HOME
    request log: HOME
    Executing request: HOME
    
  • Front Controller Pattern

    The front controller design pattern is used to provide a centralized request handling mechanism so that all requests will be handled by a single handler. This handler can do the authentication/ authorization/ logging or tracking of request and then pass the requests to corresponding handlers. Following are the entities of this type of design pattern.

    • Front Controller – Single handler for all kinds of requests coming to the application (either web based/ desktop based).
    • Dispatcher – Front Controller may use a dispatcher object which can dispatch the request to corresponding specific handler.
    • View – Views are the object for which the requests are made.

    Implementation

    We are going to create a FrontController and Dispatcher to act as Front Controller and Dispatcher correspondingly. HomeView and StudentView represent various views for which requests can come to front controller.

    FrontControllerPatternDemo, our demo class, will use FrontController to demonstrate Front Controller Design Pattern.

    Front Controller Pattern UML Diagram

    Step 1

    Create Views.

    HomeView.java

    public class HomeView {
       public void show(){
    
      System.out.println("Displaying Home Page");
    } }

    StudentView.java

    public class StudentView {
       public void show(){
    
      System.out.println("Displaying Student Page");
    } }

    Explore our latest online courses and learn new skills at your own pace. Enroll and become a certified expert to boost your career.

    Step 2

    Create Dispatcher.

    Dispatcher.java

    public class Dispatcher {
       private StudentView studentView;
       private HomeView homeView;
       
       public Dispatcher(){
    
      studentView = new StudentView();
      homeView = new HomeView();
    } public void dispatch(String request){
      if(request.equalsIgnoreCase("STUDENT")){
         studentView.show();
      }
      else{
         homeView.show();
      }	
    } }

    Step 3

    Create FrontController

    FrontController.java

    public class FrontController {
    	
       private Dispatcher dispatcher;
    
       public FrontController(){
    
      dispatcher = new Dispatcher();
    } private boolean isAuthenticUser(){
      System.out.println("User is authenticated successfully.");
      return true;
    } private void trackRequest(String request){
      System.out.println("Page requested: " + request);
    } public void dispatchRequest(String request){
      //log each request
      trackRequest(request);
      
      //authenticate the user
      if(isAuthenticUser()){
         dispatcher.dispatch(request);
      }	
    } }

    Step 4

    Use the FrontController to demonstrate Front Controller Design Pattern.

    FrontControllerPatternDemo.java

    public class FrontControllerPatternDemo {
       public static void main(String[] args) {
       
    
      FrontController frontController = new FrontController();
      frontController.dispatchRequest("HOME");
      frontController.dispatchRequest("STUDENT");
    } }

    Step 5

    Verify the output.

    Page requested: HOME
    User is authenticated successfully.
    Displaying Home Page
    Page requested: STUDENT
    User is authenticated successfully.
    Displaying Student Page
    
  • Data Access Object Pattern

    Data Access Object Pattern or DAO pattern is used to separate low level data accessing API or operations from high level business services. Following are the participants in Data Access Object Pattern.

    • Data Access Object Interface – This interface defines the standard operations to be performed on a model object(s).
    • Data Access Object concrete class – This class implements above interface. This class is responsible to get data from a data source which can be database / xml or any other storage mechanism.
    • Model Object or Value Object – This object is simple POJO containing get/set methods to store data retrieved using DAO class.

    Implementation

    We are going to create a Student object acting as a Model or Value Object.StudentDao is Data Access Object Interface.StudentDaoImpl is concrete class implementing Data Access Object Interface. DaoPatternDemo, our demo class, will use StudentDao to demonstrate the use of Data Access Object pattern.

    Data Access Object Pattern UML Diagram

    Step 1

    Create Value Object.

    Student.java

    public class Student {
       private String name;
       private int rollNo;
    
       Student(String name, int rollNo){
    
      this.name = name;
      this.rollNo = rollNo;
    } public String getName() {
      return name;
    } public void setName(String name) {
      this.name = name;
    } public int getRollNo() {
      return rollNo;
    } public void setRollNo(int rollNo) {
      this.rollNo = rollNo;
    } }

    Explore our latest online courses and learn new skills at your own pace. Enroll and become a certified expert to boost your career.

    Step 2

    Create Data Access Object Interface.

    StudentDao.java

    import java.util.List;
    
    public interface StudentDao {
       public List<Student> getAllStudents();
       public Student getStudent(int rollNo);
       public void updateStudent(Student student);
       public void deleteStudent(Student student);
    }
    

    Step 3

    Create concrete class implementing above interface.

    StudentDaoImpl.java

    import java.util.ArrayList;
    import java.util.List;
    
    public class StudentDaoImpl implements StudentDao {
    	
       //list is working as a database
       List<Student> students;
    
       public StudentDaoImpl(){
    
      students = new ArrayList&lt;Student&gt;();
      Student student1 = new Student("Robert",0);
      Student student2 = new Student("John",1);
      students.add(student1);
      students.add(student2);		
    } @Override public void deleteStudent(Student student) {
      students.remove(student.getRollNo());
      System.out.println("Student: Roll No " + student.getRollNo() + ", deleted from database");
    } //retrive list of students from the database @Override public List<Student> getAllStudents() {
      return students;
    } @Override public Student getStudent(int rollNo) {
      return students.get(rollNo);
    } @Override public void updateStudent(Student student) {
      students.get(student.getRollNo()).setName(student.getName());
      System.out.println("Student: Roll No " + student.getRollNo() + ", updated in the database");
    } }

    Step 4

    Use the StudentDao to demonstrate Data Access Object pattern usage.

    DaoPatternDemo.java

    public class DaoPatternDemo {
       public static void main(String[] args) {
    
      StudentDao studentDao = new StudentDaoImpl();
      //print all students
      for (Student student : studentDao.getAllStudents()) {
         System.out.println("Student: &#91;RollNo : " + student.getRollNo() + ", Name : " + student.getName() + " ]");
      }
      //update student
      Student student =studentDao.getAllStudents().get(0);
      student.setName("Michael");
      studentDao.updateStudent(student);
      //get the student
      studentDao.getStudent(0);
      System.out.println("Student: &#91;RollNo : " + student.getRollNo() + ", Name : " + student.getName() + " ]");		
    } }

    Step 5

    Verify the output.

    Student: [RollNo : 0, Name : Robert ]
    Student: [RollNo : 1, Name : John ]
    Student: Roll No 0, updated in the database
    Student: [RollNo : 0, Name : Michael ]
    
  • Composite Entity Pattern

    Composite Entity pattern is used in EJB persistence mechanism. A Composite entity is an EJB entity bean which represents a graph of objects. When a composite entity is updated, internally dependent objects beans get updated automatically as being managed by EJB entity bean. Following are the participants in Composite Entity Bean.

    • Composite Entity – It is primary entity bean. It can be coarse grained or can contain a coarse grained object to be used for persistence purpose.
    • Coarse-Grained Object – This object contains dependent objects. It has its own life cycle and also manages life cycle of dependent objects.
    • Dependent Object – Dependent object is an object which depends on coarse grained object for its persistence lifecycle.
    • Strategies – Strategies represents how to implement a Composite Entity.

    Implementation

    We are going to create CompositeEntity object acting as CompositeEntity. CoarseGrainedObject will be a class which contains dependent objects. CompositeEntityPatternDemo, our demo class will use Client class to demonstrate use of Composite Entity pattern.

    Composite Entity Pattern UML Diagram

    Step 1

    Create Dependent Objects.

    DependentObject1.java

    public class DependentObject1 {
    	
       private String data;
    
       public void setData(String data){
    
      this.data = data; 
    } public String getData(){
      return data;
    } }

    DependentObject2.java

    public class DependentObject2 {
    	
       private String data;
    
       public void setData(String data){
    
      this.data = data; 
    } public String getData(){
      return data;
    } }

    Explore our latest online courses and learn new skills at your own pace. Enroll and become a certified expert to boost your career.

    Step 2

    Create Coarse Grained Object.

    CoarseGrainedObject.java

    public class CoarseGrainedObject {
       DependentObject1 do1 = new DependentObject1();
       DependentObject2 do2 = new DependentObject2();
    
       public void setData(String data1, String data2){
    
      do1.setData(data1);
      do2.setData(data2);
    } public String[] getData(){
      return new String&#91;] {do1.getData(),do2.getData()};
    } }

    Step 3

    Create Composite Entity.

    CompositeEntity.java

    public class CompositeEntity {
       private CoarseGrainedObject cgo = new CoarseGrainedObject();
    
       public void setData(String data1, String data2){
    
      cgo.setData(data1, data2);
    } public String[] getData(){
      return cgo.getData();
    } }

    Step 4

    Create Client class to use Composite Entity.

    Client.java

    public class Client {
       private CompositeEntity compositeEntity = new CompositeEntity();
    
       public void printData(){
       
    
      for (int i = 0; i &lt; compositeEntity.getData().length; i++) {
         System.out.println("Data: " + compositeEntity.getData()&#91;i]);
      }
    } public void setData(String data1, String data2){
      compositeEntity.setData(data1, data2);
    } }

    Step 5

    Use the Client to demonstrate Composite Entity design pattern usage.

    CompositeEntityPatternDemo.java

    public class CompositeEntityPatternDemo {
       public static void main(String[] args) {
       
    
       Client client = new Client();
       client.setData("Test", "Data");
       client.printData();
       client.setData("Second Test", "Data1");
       client.printData();
    } }

    Step 6

    Verify the output.

    Data: Test
    Data: Data
    Data: Second Test
    Data: Data1
    
  • Business Delegate Pattern

    Business Delegate Pattern is used to decouple presentation tier and business tier. It is basically use to reduce communication or remote lookup functionality to business tier code in presentation tier code. In business tier we have following entities.

    • Client – Presentation tier code may be JSP, servlet or UI java code.
    • Business Delegate – A single entry point class for client entities to provide access to Business Service methods.
    • LookUp Service – Lookup service object is responsible to get relative business implementation and provide business object access to business delegate object.
    • Business Service – Business Service interface. Concrete classes implement this business service to provide actual business implementation logic.

    Implementation

    We are going to create a ClientBusinessDelegateBusinessServiceLookUpServiceJMSService and EJBService representing various entities of Business Delegate patterns.

    BusinessDelegatePatternDemo, our demo class, will use BusinessDelegate and Client to demonstrate use of Business Delegate pattern.

    Business Delegate Pattern UML Diagram

    Step 1

    Create BusinessService Interface.

    BusinessService.java

    public interface BusinessService {
       public void doProcessing();
    }

    Explore our latest online courses and learn new skills at your own pace. Enroll and become a certified expert to boost your career.

    Step 2

    Create concrete Service classes.

    EJBService.java

    public class EJBService implements BusinessService {
    
       @Override
       public void doProcessing() {
    
      System.out.println("Processing task by invoking EJB Service");
    } }

    JMSService.java

    public class JMSService implements BusinessService {
    
       @Override
       public void doProcessing() {
    
      System.out.println("Processing task by invoking JMS Service");
    } }

    Step 3

    Create Business Lookup Service.

    BusinessLookUp.java

    public class BusinessLookUp {
       public BusinessService getBusinessService(String serviceType){
       
    
      if(serviceType.equalsIgnoreCase("EJB")){
         return new EJBService();
      }
      else {
         return new JMSService();
      }
    } }

    Step 4

    Create Business Delegate.

    BusinessDelegate.java

    public class BusinessDelegate {
       private BusinessLookUp lookupService = new BusinessLookUp();
       private BusinessService businessService;
       private String serviceType;
    
       public void setServiceType(String serviceType){
    
      this.serviceType = serviceType;
    } public void doTask(){
      businessService = lookupService.getBusinessService(serviceType);
      businessService.doProcessing();		
    } }

    Step 5

    Create Client.

    Client.java

    public class Client {
    	
       BusinessDelegate businessService;
    
       public Client(BusinessDelegate businessService){
    
      this.businessService  = businessService;
    } public void doTask(){
      businessService.doTask();
    } }

    Step 6

    Use BusinessDelegate and Client classes to demonstrate Business Delegate pattern.

    BusinessDelegatePatternDemo.java

    public class BusinessDelegatePatternDemo {
    	
       public static void main(String[] args) {
    
    
      BusinessDelegate businessDelegate = new BusinessDelegate();
      businessDelegate.setServiceType("EJB");
      Client client = new Client(businessDelegate);
      client.doTask();
      businessDelegate.setServiceType("JMS");
      client.doTask();
    } }

    Step 7

    Verify the output.

    Processing task by invoking EJB Service
    Processing task by invoking JMS Service