In geometry, a line is one of the most basic figures, which can be combined with other figures in different ways to create more complex structures. For example, a polygon is a closed geomtrical figure that is composed of several lines. In JavaFX, using a primitive 2D shape line to construct such complex figures is quite cumbersome. Thus, we make use of path objects to draw a line from one position to another on a two dimensional plane.
Using the Path class, we can draw a 2D shape from one position to another on a plane to create a path object. Previously, we have seen constructing complex figures like Olympics symbols, House etc. by casually using 2D shapes. In this chapter, let us learn how to construct such complex figures using path.
JavaFX Path Object LineTo
The path element line is used to draw a straight line to a point in the specified coordinates from the current position.
It is represented by a class named LineTo. This class belongs to the package javafx.scene.shape.
This class has 2 properties of the double datatype namely −
X − The x coordinate of the point to which a line is to be drawn from the current position.
Y − The y coordinate of the point to which a line is to be drawn from the current position.
To draw a line, you need to pass values to these properties. This can be either done by passing them to the constructor of this class, in the same order, at the time of instantiation; Or, by using their respective setter methods.
Steps to draw PathElement Line
To draw a line to a specified point from the current position in JavaFX, follow the steps given below.
Step 1: Creating a Path Class Object
Create a Java class and inherit the Application class of the package javafx.application and implement the start() method in this class. Then create a path class object within it as follows.
publicclassClassNameextendsApplication{@Overridepublicvoidstart(Stage primaryStage)throwsException{//Creating a Path object Path path =newPath();}}
Step 2: Setting the Path
Create the MoveTo path element and set the XY coordinates to starting point of the line to the coordinates (100, 150). This can be done using the methods setX() and setY() of the class MoveTo as shown below.
//Moving to the starting point MoveTo moveTo =newMoveTo();
moveTo.setX(100.0f);
moveTo.setY(150.0f);
Step 3: Creating an Object of the Class LineTo
Create the path element line by instantiating the class named LineTo which belongs to the package javafx.scene.shape as follows.
//Creating an object of the class LineTo LineTo lineTo =newLineTo();
Step 4: Setting Properties to the Line Element
Specify the coordinates of the point to which a line is to be drawn from the current position. This can be done by setting the properties x and y using their respective setter methods as shown in the following code block.
//Setting the Properties of the line element
lineTo.setX(500.0f);
lineTo.setY(150.0f);
Step 5: Adding Elements to the Observable List of the Path Class
Add the path elements MoveTo and LineTo created in the previous steps to the observable list of the Path class as shown below −
//Adding the path elements to Observable list of the Path class
path.getElements().add(moveTo);
path.getElements().add(lineTo);
Step 6: Launching Application
Once the LineTo path object is created, follow the given steps below to launch the application properly −
Firstly, instantiate the class named Scene by passing the Group object as a parameter value to its constructor. To this constructor, you can also pass dimensions of the application screen as optional parameters.
Then, set the title to the stage using the setTitle() method of the Stage class.
Now, a Scene object is added to the stage using the setScene() method of the class named Stage.
Display the contents of the scene using the method named show().
Lastly, the application is launched with the help of the launch() method.
Example 1
The following program shows how to draw a straight line from the current point to a specified position using the class Path of JavaFX. Save this code in a file with the name LineToExample.java.
importjavafx.application.Application;importjavafx.scene.Group;importjavafx.scene.Scene;importjavafx.scene.shape.LineTo;importjavafx.scene.shape.MoveTo;importjavafx.scene.shape.Path;importjavafx.stage.Stage;publicclassLineToExampleextendsApplication{@Overridepublicvoidstart(Stage stage){//Creating a Path object Path path =newPath();//Moving to the starting point MoveTo moveTo =newMoveTo();
moveTo.setX(100.0f);
moveTo.setY(150.0f);//Instantiating the LineTo class LineTo lineTo =newLineTo();//Setting the Properties of the line element
lineTo.setX(500.0f);
lineTo.setY(150.0f);//Adding the path elements to Observable list of the Path class
path.getElements().add(moveTo);
path.getElements().add(lineTo);//Creating a Group object Group root =newGroup(path);//Creating a scene object Scene scene =newScene(root,600,300);//Setting title to the Stage
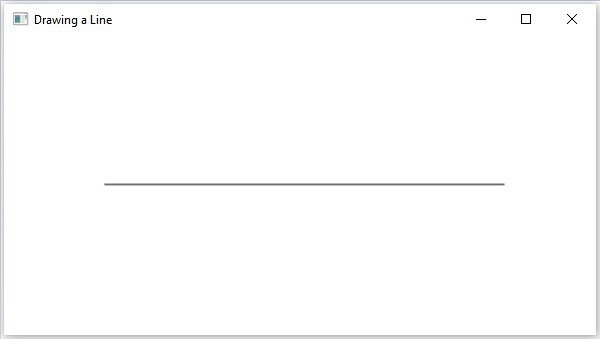
stage.setTitle("Drawing a Line");//Adding scene to the stage
stage.setScene(scene);//Displaying the contents of the stage
stage.show();}publicstaticvoidmain(String args[]){launch(args);}}</code></pre>
Compile and execute the saved java file from the command prompt using the following commands.
On executing, the above program generates a JavaFX window displaying a straight line, which is drawn from the current position to the specified point, as shown below.
Example 2
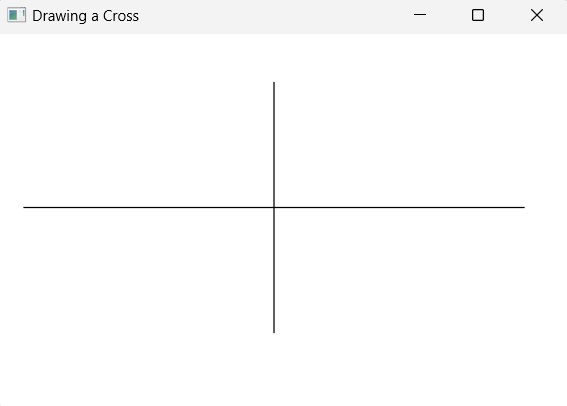
Not just a single line, you can also add multiple lines to the JavaFX application in order to create more complex shapes. In this example, we will try to draw a simple cross figure. Save this code in a file with the name LineToCross.java.
importjavafx.application.Application;importjavafx.scene.Group;importjavafx.scene.Scene;importjavafx.scene.shape.LineTo;importjavafx.scene.shape.MoveTo;importjavafx.scene.shape.Path;importjavafx.stage.Stage;publicclassLineToCrossextendsApplication{@Overridepublicvoidstart(Stage stage){//Creating a Path object Path path =newPath();//Moving to the starting point MoveTo moveTo =newMoveTo();
moveTo.setX(100.0f);
moveTo.setY(150.0f);//Instantiating the LineTo class LineTo lineTo =newLineTo();//Setting the Properties of the line element
lineTo.setX(500.0f);
lineTo.setY(150.0f);//Adding the path elements to Observable list of the Path class
path.getElements().add(moveTo);
path.getElements().add(lineTo);//Creating a Group object Group root =newGroup(path);//Creating a scene object Scene scene =newScene(root,600,300);//Setting title to the Stage
stage.setTitle("Drawing a Line");//Adding scene to the stage
stage.setScene(scene);//Displaying the contents of the stage
stage.show();}publicstaticvoidmain(String args[]){launch(args);}}</code></pre>
Compile and execute the saved java file from the command prompt using the following commands.
In the previous 2D shapes chapters, we have seen how to draw some simple predefined shapes by instantiating classes and setting respective parameters.
But, just these predefined shapes are not sufficient to build more complex shapes other than the primitives provided by the javafx.shape package.
For example, if you want to draw a graphical element as shown in the following diagram, you cannot rely on those simple shapes. Even if you succeed constructing it using the Line shapes, the program becomes way to complex and inefficient.
To make this efficient, JavaFX introduced a concept called Path where a multiple edges that join a sequence of vertices together.
The Path Class
To draw such complex structures JavaFX provides a class named Path. This class represents the geometrical outline of a shape.
It is attached to an observable list which holds various Path Elements such as moveTo, LineTo, HlineTo, VlineTo, ArcTo, QuadCurveTo, CubicCurveTo.
On instantiating, this class constructs a path based on the given path elements.
You can pass the path elements to this class while instantiating it as follows−
The Path Element MoveTo is used to move the current position of the path to a specified point. It is generally used to set the starting point of a shape drawn using the path elements.
It is represented by a class named LineTo of the package javafx.scene.shape. It has 2 properties of the double datatype namely −
X − The x coordinate of the point to which a line is to be drawn from the current position.
Y − The y coordinate of the point to which a line is to be drawn from the current position.
You can create a move to path element by instantiating the MoveTo class and passing the x, y coordinates of the new point as follows −
MoveTo moveTo =newMoveTo(x, y);
If you don’t pass any values to the constructor, then the new point will be set to (0,0).
You can also set values to the x, y coordinate, using their respective setter methods as follows −
setX(value);setY(value);
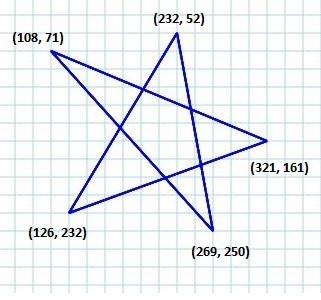
Example – Drawing a Complex Path
In this example, we will show how to draw the following shape using the Path, MoveTo and Line classes.
Save this code in a file with the name ComplexShape.java.
importjavafx.application.Application;importjavafx.scene.Group;importjavafx.scene.Scene;importjavafx.stage.Stage;importjavafx.scene.shape.LineTo;importjavafx.scene.shape.MoveTo;importjavafx.scene.shape.Path;publicclassComplexShapeextendsApplication{@Overridepublicvoidstart(Stage stage){//Creating a Path Path path =newPath();//Moving to the starting point MoveTo moveTo =newMoveTo(108,71);//Creating 1st line LineTo line1 =newLineTo(321,161);//Creating 2nd line LineTo line2 =newLineTo(126,232);//Creating 3rd line LineTo line3 =newLineTo(232,52);//Creating 4th line LineTo line4 =newLineTo(269,250);//Creating 4th line LineTo line5 =newLineTo(108,71);//Adding all the elements to the path
path.getElements().add(moveTo);
path.getElements().addAll(line1, line2, line3, line4, line5);//Creating a Group object Group root =newGroup(path);//Creating a scene object Scene scene =newScene(root,600,300);//Setting title to the Stage
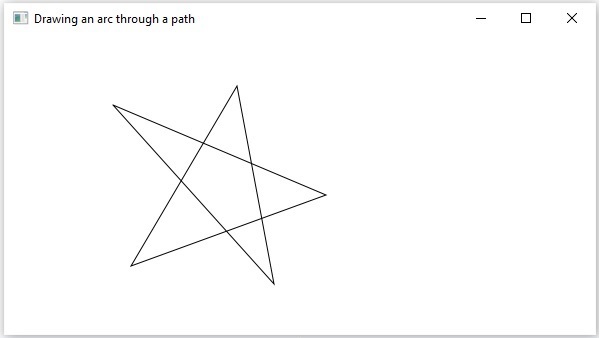
stage.setTitle("Drawing an arc through a path");//Adding scene to the stage
stage.setScene(scene);//Displaying the contents of the stage
stage.show();}publicstaticvoidmain(String args[]){launch(args);}}</code></pre>
Compile and execute the saved java file from the command prompt using the following commands.
On executing, the above program generates a JavaFX window displaying the following output −
Following are the various path elements (classes) provided by JavaFX. These classes exist in the package javafx.shape. All these classes inherit the class PathElement.
S.No
Shape & Description
1
LineToThe path element line is used to draw a straight line to a point in the specified coordinates from the current position. It is represented by a class named LineTo. This class belongs to the package javafx.scene.shape.
2
HlineToThe path element HLineTo is used to draw a horizontal line to a point in the specified coordinates from the current position. It is represented by a class named HLineTo. This class belongs to the package javafx.scene.shape.
3
VLineToThe path element vertical line is used to draw a vertical line to a point in the specified coordinates from the current position. It is represented by a class named VLineTo. This class belongs to the package javafx.scene.shape.
4
QuadCurveToThe path element quadratic curve is used to draw a quadratic curve to a point in the specified coordinates from the current position. It is represented by a class named QuadraticCurveTo. This class belongs to the package javafx.scene.shape.
5
CubicCurveToThe path element cubic curve is used to draw a cubic curve to a point in the specified coordinates from the current position. It is represented by a class named CubicCurveTo. This class belongs to the package javafx.scene.shape.
6
ArcToThe path element Arc is used to draw an arc to a point in the specified coordinates from the current position. It is represented by a class named ArcTo. This class belongs to the package javafx.scene.shape.
As the name suggests, the subtraction operation will subtract the elements of a set from another set. Most people are generally confused between the intersection operation, the two operations completely differ with respect to their operations. While intersection operation retrieves the common elements between two sets, the subtraction operation finds the common elements between two sets and removes them from the first set. If there are elements in second set that are not present in the first set, they are ignored.
Like other operations, the subtraction operation is also adopted in computer programming. It is available as difference operator in few programming languages; but in JavaFX, this operation can be used on 2D shapes.
Subtraction Operation in JavaFX
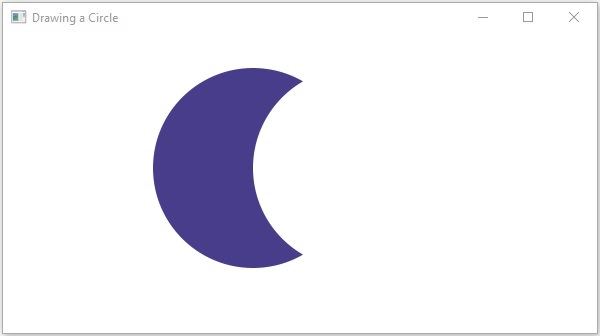
In JavaFX, the subtraction operation works with the area covered by two or more 2D shapes. It eliminates the area of the second shape from the area of the first shape. If the areas of these two shapes are fully exclusive, the area of first shape is retained as the result. Technically, this operation takes two or more shapes as an input. Then, it returns the area of the first shape excluding the area overlapped by the second one as shown below.
You can perform the Subtraction Operation on the shapes using the method named subtract(). Since this is a static method, you should call it using the class name (Shape or its subclasses) as shown below.
Shape shape =Shape.subtract(circle1, circle2);
Following is an example of the Subtraction Operation. In here, we are drawing two circles and performing a subtraction operation on them.
Save this code in a file with name SubtractionExample.java.
Example
importjavafx.application.Application;importjavafx.scene.Group;importjavafx.scene.Scene;importjavafx.scene.paint.Color;importjavafx.stage.Stage;importjavafx.scene.shape.Circle;importjavafx.scene.shape.Shape;publicclassSubtractionExampleextendsApplication{@Overridepublicvoidstart(Stage stage){//Drawing Circle1 Circle circle1 =newCircle();//Setting the position of the circle
circle1.setCenterX(250.0f);
circle1.setCenterY(135.0f);//Setting the radius of the circle
circle1.setRadius(100.0f);//Setting the color of the circle
circle1.setFill(Color.DARKSLATEBLUE);//Drawing Circle2 Circle circle2 =newCircle();//Setting the position of the circle
circle2.setCenterX(350.0f);
circle2.setCenterY(135.0f);//Setting the radius of the circle
circle2.setRadius(100.0f);//Setting the color of the circle
circle2.setFill(Color.BLUE);//Performing subtraction operation on the circle Shape shape =Shape.subtract(circle1, circle2);//Setting the fill color to the result
shape.setFill(Color.DARKSLATEBLUE);//Creating a Group object Group root =newGroup(shape);//Creating a scene object Scene scene =newScene(root,600,300);//Setting title to the Stage
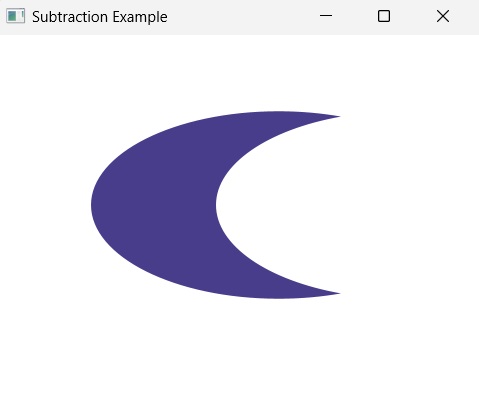
stage.setTitle("Subtraction Example");//Adding scene to the stage
stage.setScene(scene);//Displaying the contents of the stage
stage.show();}publicstaticvoidmain(String args[]){launch(args);}}</code></pre>
Compile and execute the saved java file from the command prompt using the following commands.
On executing, the above program generates a JavaFX window displaying the following output −
Example
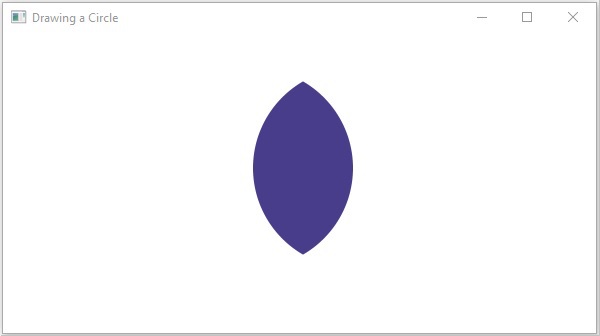
Now, let us try to perform subtraction operation on two ellipses where we will subtract the area of second ellipse from the first ellipse. Save this file under the name EllipseSubtractionOperation.java.
ellipse1.setCenterX(250.0f);
ellipse1.setCenterY(100.0f);
ellipse1.setRadiusX(150.0f);
ellipse1.setRadiusY(75.0f);
ellipse1.setFill(Color.BLUE);Ellipse ellipse2 =newEllipse();
ellipse2.setCenterX(350.0f);
ellipse2.setCenterY(100.0f);
ellipse2.setRadiusX(150.0f);
ellipse2.setRadiusY(75.0f);
ellipse2.setFill(Color.RED);Shape shape =Shape.subtract(ellipse1, ellipse2);//Setting the fill color to the result
shape.setFill(Color.DARKSLATEBLUE);//Creating a Group object Group root =newGroup(shape);//Creating a scene object Scene scene =newScene(root,600,300);//Setting title to the Stage
stage.setTitle("Subtraction Example");//Adding scene to the stage
stage.setScene(scene);//Displaying the contents of the stage
stage.show();}publicstaticvoidmain(String args[]){launch(args);}}</code></pre>
Compile and execute the saved java file from the command prompt using the following commands.
Similar to the Union operation, the intersection operation was fundamentally used in set theory. As the name suggests, this operation is defined as the intersection of two different sets into one. Hence, the common elements from two or more sets are retrieved; ignoring duplicate elements. This concept is then adopted by various techniques in computer programming.
For instance, it is also used in programming languages like C, C++, Java, Python etc. as an operator or a method. Similarly, JavaFX also provides intersection operation on 2D shapes.
Intersection Operation in JavaFX
JavaFX allows you to perform intersection operation on 2D shapes, where, the areas of two or more shapes are intersected together and the common area of these shapes is obtained as a result. Thus, this operation takes two or more shapes as inputs and returns the intersection area between them as shown below.
You can perform an intersection operation on the shapes using the method named intersect(). Since this is a static method, you should call it using the class name (Shape or its subclasses) as shown below.
Shape shape =Shape.intersect(circle1, circle2);
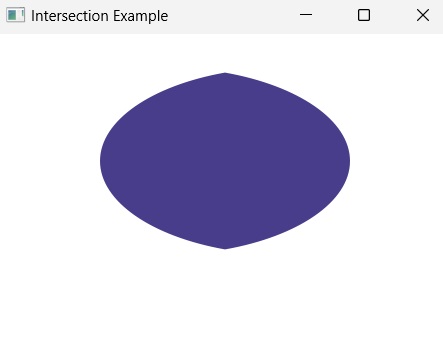
Following is an example of the intersection operation. In here, we are drawing two circles and performing a intersection operation on them. Save this code in a file with the name IntersectionExample.java
Example
importjavafx.application.Application;importjavafx.scene.Group;importjavafx.scene.Scene;importjavafx.scene.paint.Color;importjavafx.stage.Stage;importjavafx.scene.shape.Circle;importjavafx.scene.shape.Shape;publicclassIntersectionExampleextendsApplication{@Overridepublicvoidstart(Stage stage){//Drawing Circle1 Circle circle1 =newCircle();//Setting the position of the circle
circle1.setCenterX(250.0f);
circle1.setCenterY(135.0f);//Setting the radius of the circle
circle1.setRadius(100.0f);//Setting the color of the circle
circle1.setFill(Color.DARKSLATEBLUE);//Drawing Circle2 Circle circle2 =newCircle();//Setting the position of the circle
circle2.setCenterX(350.0f);
circle2.setCenterY(135.0f);//Setting the radius of the circle
circle2.setRadius(100.0f);//Setting the color of the circle
circle2.setFill(Color.BLUE);//Performing intersection operation on the circle Shape shape =Shape.intersect(circle1, circle2);//Setting the fill color to the result
shape.setFill(Color.DARKSLATEBLUE);//Creating a Group object Group root =newGroup(shape);//Creating a scene object Scene scene =newScene(root,600,300);//Setting title to the Stage
stage.setTitle("Intersection Example");//Adding scene to the stage
stage.setScene(scene);//Displaying the contents of the stage
stage.show();}publicstaticvoidmain(String args[]){launch(args);}}</code></pre>
Compile and execute the saved java file from the command prompt using the following commands.
On executing, the above program generates a JavaFX window displaying the following output −
Example
Now, let us try to perform intersection operation on two elliptical shapes (to retrieve the common area between them). Save this file under the name EllipseIntersectionOperation.java.
ellipse1.setCenterX(250.0f);
ellipse1.setCenterY(100.0f);
ellipse1.setRadiusX(150.0f);
ellipse1.setRadiusY(75.0f);
ellipse1.setFill(Color.BLUE);Ellipse ellipse2 =newEllipse();
ellipse2.setCenterX(350.0f);
ellipse2.setCenterY(100.0f);
ellipse2.setRadiusX(150.0f);
ellipse2.setRadiusY(75.0f);
ellipse2.setFill(Color.RED);Shape shape =Shape.intersect(ellipse1, ellipse2);//Setting the fill color to the result
shape.setFill(Color.DARKSLATEBLUE);//Creating a Group object Group root =newGroup(shape);//Creating a scene object Scene scene =newScene(root,600,300);//Setting title to the Stage
stage.setTitle("Intersection Example");//Adding scene to the stage
stage.setScene(scene);//Displaying the contents of the stage
stage.show();}publicstaticvoidmain(String args[]){launch(args);}}</code></pre>
Compile and execute the saved java file from the command prompt using the following commands.
f you look at it mathematically, the Union operation was fundamentally used in the concept of set theory. This operation is defined as the combination of two different sets into one. In here, all the elements of one set and merged within another set, regardless of any duplicities. This concept is then adopted by various techniques in computer programming.
For instance, union operation when performed in SQL combines two or more result-sets into one common result set. It is also used in programming languages like C, C++, Java, Python etc. as an operator or a method.
Similarly, JavaFX also provides union operation on 2D shapes.
Union Operation in JavaFX
JavaFX provides union operation which can be performed on 2D shapes. In here, the areas of two or more shapes are combined together to form a bigger and a more complex shape. Thus, the union operation takes two or more shapes as inputs and returns the combined area occupied by them as shown below.
You can perform union operation on the shapes using the method called union(). Since this is a static method, you should call it using the class name (Shape or its subclasses) as shown below.
Shape shape =Shape.subtract(circle1, circle2);
Example
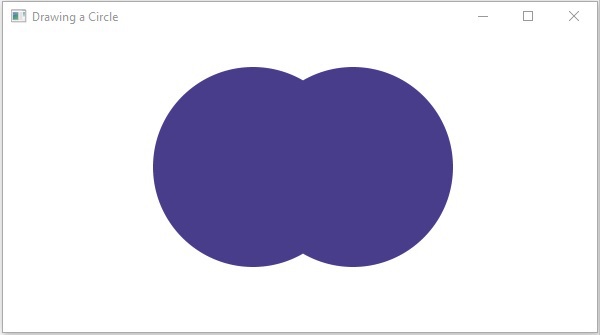
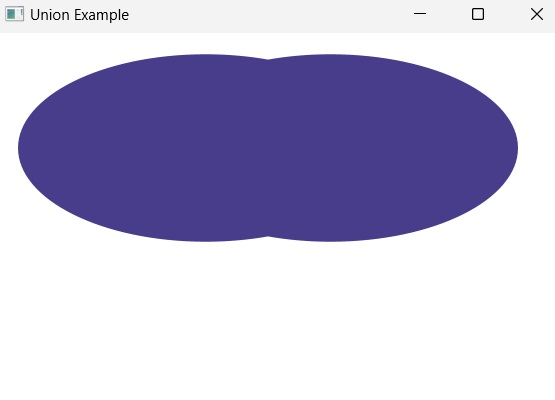
Following is an example of the union operation. In here, we are drawing two circles and performing a union operation on them. Save this code in a file with the name unionExample.java.
importjavafx.application.Application;importjavafx.scene.Group;importjavafx.scene.Scene;importjavafx.scene.paint.Color;importjavafx.stage.Stage;importjavafx.scene.shape.Circle;importjavafx.scene.shape.Shape;publicclassUnionExampleextendsApplication{@Overridepublicvoidstart(Stage stage){//Drawing Circle1 Circle circle1 =newCircle();//Setting the position of the circle
circle1.setCenterX(250.0f);
circle1.setCenterY(135.0f);//Setting the radius of the circle
circle1.setRadius(100.0f);//Setting the color of the circle
circle1.setFill(Color.DARKSLATEBLUE);//Drawing Circle2 Circle circle2 =newCircle();//Setting the position of the circle
circle2.setCenterX(350.0f);
circle2.setCenterY(135.0f);//Setting the radius of the circle
circle2.setRadius(100.0f);//Setting the color of the circle
circle2.setFill(Color.BLUE);//Performing union operation on the circle Shape shape =Shape.union(circle1, circle2);//Setting the fill color to the result
shape.setFill(Color.DARKSLATEBLUE);//Creating a Group object Group root =newGroup(shape);//Creating a scene object Scene scene =newScene(root,600,300);//Setting title to the Stage
stage.setTitle("Union Example");//Adding scene to the stage
stage.setScene(scene);//Displaying the contents of the stage
stage.show();}publicstaticvoidmain(String args[]){launch(args);}}</code></pre>
Compile and execute the saved java file from the command prompt using the following commands.
ellipse1.setCenterX(250.0f);
ellipse1.setCenterY(100.0f);
ellipse1.setRadiusX(150.0f);
ellipse1.setRadiusY(75.0f);
ellipse1.setFill(Color.BLUE);Ellipse ellipse2 =newEllipse();
ellipse2.setCenterX(350.0f);
ellipse2.setCenterY(100.0f);
ellipse2.setRadiusX(150.0f);
ellipse2.setRadiusY(75.0f);
ellipse2.setFill(Color.RED);Shape shape =Shape.union(ellipse1, ellipse2);//Setting the fill color to the result
shape.setFill(Color.DARKSLATEBLUE);//Creating a Group object Group root =newGroup(shape);//Creating a scene object Scene scene =newScene(root,600,300);//Setting title to the Stage
stage.setTitle("Union Example");//Adding scene to the stage
stage.setScene(scene);//Displaying the contents of the stage
stage.show();}publicstaticvoidmain(String args[]){launch(args);}}</code></pre>
Compile and execute the saved java file from the command prompt using the following commands.
Geometrically, a 2D shape is defined as any figure that can be displayed on a two-dimensional plane. Various applications these days make use of such shapes to develop an element or improve the look of their interface.
For example, consider any mobile game application. These games contain various 2D shapes on their interface in order to enhance the user experience of the game. Or, a template editor where several 2D shapes are used to give options to the application user.
JavaFX provides various nodes to create these 2D shapes like Line, Circle, Rectangle, other Polygons etc. However, to offer permutations and combinations of these shapes, JavaFX also allows you to perform some operations on them. In this chapter, let us briefly learn more about the operations provided.
JavaFX Operations on 2D Shapes
JavaFX provides various operations mainly to create complex shapes from the simpler shapes. For instance, we learned how to draw a house in the previous chapters of 2D shapes. We had to use several shapes like rectangles, lines etc. to create the final complex house shape; by making use of these operations, we can either merge two shapes easily or remove some area from it.
There are three operations available in JavaFX that can be performed on 2D shapes. They are listed below −
Union Operation
Intersection Operation
Subtraction Operation
Usually, 2D shapes have a certain area they cover in an application. These three operations are performed on the area covered by these shapes by adding the area together, or subtracting a shape area from another shape, etc.
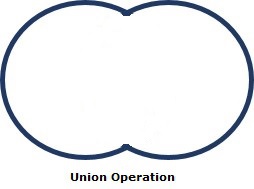
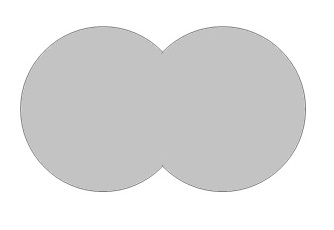
Union Operation
Union Operation is generally defined as the combination of two or more elements in an application. In JavaFX, a union operation can be performed on 2D shapes where two or more shapes are taken as inputs and combines the area of them together. This operation is fundamentally represented in the form of a following venn diagram −
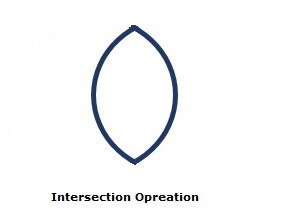
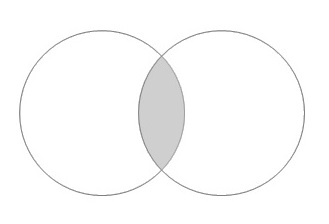
Intersection Operation
Intersection operation retains the common elements from two or more sets. When used with 2D shapes in JavaFX, the common area of two or more shapes will be retained. This is also known as the intersected area of the objects. Look at the image shown below for better understanding.
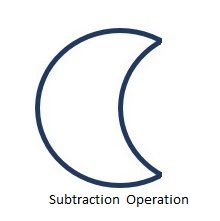
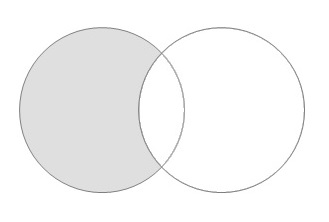
Subtraction Operation
Subtraction Operation, also known as the Difference Operation, subtracts the elements of one set from another set. If some elements are not present in the first set (the set from which another set is being subtracted), they are ignored. In JavaFX, an area of a 2D shape is subtracted from the area of another 2D shape as long as they intersect.
Smoothing is a more common process seen in Statistics or Image processing. It is defined as a process in which coordinates or data points are averaged with their neighbouring points of a series, such as a time series, or image. This results in the effect of blurring the sharp edges in the smoothed data. Smoothing is sometimes referred to as filtering, because smoothing has the effect of suppressing high frequency signal and enhancing low frequency signal.
The process of smoothing is done usually to fine scale an image or a data set. In JavaFX, using this property on 2D shapes will fine tune the edges.
Smooth Property
The smooth property in JavaFX is used to smoothen the edges of a certain 2D shape. This property is of the type Boolean. If this value is true, then the edges of the shape will be smooth.
You can set value to this property using the method setSmooth() as follows −
path.setSmooth(false);
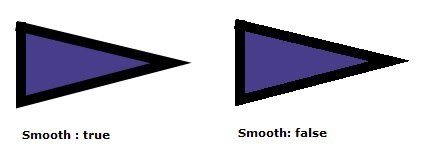
By default, the smooth value is true. Following is a diagram of a triangle with both smooth values.
Example
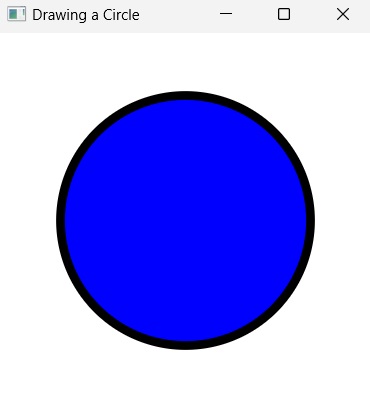
In the following example, we will try to smoothen the edges of a 2D shape, say a circle. Save this file with the name SmoothExample.java.
importjavafx.application.Application;importjavafx.scene.Group;importjavafx.scene.Scene;importjavafx.scene.shape.Circle;importjavafx.scene.shape.StrokeLineCap;importjavafx.scene.paint.Color;importjavafx.stage.Stage;publicclassSmoothExampleextendsApplication{@Overridepublicvoidstart(Stage stage){//Creating a Circle Circle circle =newCircle(150.0,150.0,100.0);
circle.setFill(Color.BLUE);
circle.setStroke(Color.BLACK);
circle.setStrokeWidth(5.0);
circle.setSmooth(true);//Creating a Group object Group root =newGroup(circle);//Creating a scene object Scene scene =newScene(root,300,300);//Setting title to the Stage
stage.setTitle("Drawing a Circle");//Adding scene to the stage
stage.setScene(scene);//Displaying the contents of the stage
stage.show();}publicstaticvoidmain(String args[]){launch(args);}}</code></pre>
Compile and execute the saved java file from the command prompt using the following commands.
A line in geometry is usually one dimensional figure with negligible width that exists in a two dimensional plane. However, like other 2D figures, JavaFX also provides ways to enhance the quality of a line. This includes setting the structure of its edges in a different ways.
The ends of a line are also known as end caps. These end caps are sharp, by default. However, using various properties provided by JavaFX, a user can change the structure of these end caps. This property is known as Stroke Line Cap Property.
Stroke Line Cap Property
The Stroke Line Cap specifies/defines the end cap style of the line. This property is of the type StrokeLineCap and can be set using the method setStrokeLineCap() of javafx.scene.shape.Shape class as shown in the following code block −
line.setStrokeLineCap(StrokeLineCap.SQUARE);
The stroke line cap can be −
Butt − The butt line cap is applied at the end of the lines (StrokeLineCap.BUTT).
Square − The square line cap is applied at the end of the lines (StrokeLineCap.SQUARE).
Round − The round line cap is applied at the end of the lines (StrokeLineCap.ROUND).
By default, the Stroke Line cap a shape is square. Following is the diagram of a triangle with different line cap types.
Example
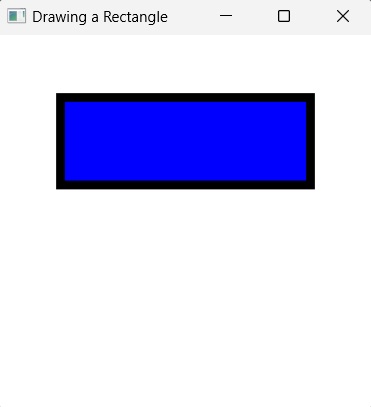
Let us see an example demonstrating the usage of Stroke Line Cap property on a rectangle. We do not use this property on shapes with no edges. Save this file with the name StrokeLineCapExample.java.
importjavafx.application.Application;importjavafx.scene.Group;importjavafx.scene.Scene;importjavafx.scene.shape.Rectangle;importjavafx.scene.shape.StrokeLineCap;importjavafx.scene.paint.Color;importjavafx.stage.Stage;publicclassStrokeLineCapExampleextendsApplication{@Overridepublicvoidstart(Stage stage){//Creating a Triangle Rectangle rect =newRectangle(50.0,50.0,200.0,70.0);
rect.setFill(Color.BLUE);
rect.setStroke(Color.BLACK);
rect.setStrokeWidth(7.0);
rect.setStrokeLineCap(StrokeLineCap.BUTT);//Creating a Group object Group root =newGroup(rect);//Creating a scene object Scene scene =newScene(root,300,300);//Setting title to the Stage
stage.setTitle("Drawing a Rectangle");//Adding scene to the stage
stage.setScene(scene);//Displaying the contents of the stage
stage.show();}publicstaticvoidmain(String args[]){launch(args);}}</code></pre>
Compile and execute the saved java file from the command prompt using the following commands.
JavaFX allows a user to create a 2D object using multiple lines, instead of having classes for each 2D shape that exists. There are several shapes that do not fall under the category of conventional 2D shapes. In such cases you can join multiple lines to form an unconventional 2D shape, by applying several properties supported by JavaFX on these line while combining them together. One such property is Stroke Line Join Property.
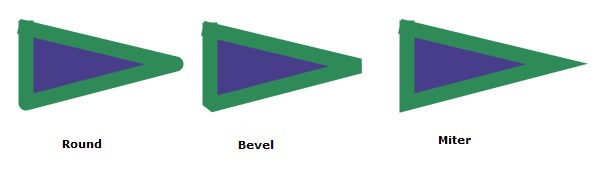
The Stroke Line Join Property is used to set the type of the joint while combining multiple line objects to form another 2D shape. This property is of three types as follows −
Bevel − In bevel join, the outside edges of the intersection are connected with a line segment.
Miter − In miter join, the outside edges of the intersection are joined together forming a sharp edge.
Round − In round join, the outside edges of the intersection are joined by rounding off the corner, the radius of this will be exactly half the width of the join.
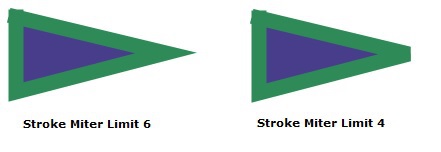
By default, the Stroke Line Joining a shape is miter. However, this miter join also has additional properties to make the join better. This property is known as Stroke Miter Limit Property.
Stroke Miter Limit Property
This property is of the type double. It represents the limit for the distance between the inside point of the joint and the outside point of the joint. If the distance between these two points exceeds the given limit, the miter is cut at the edge.
You can set value to this property using the method setStroke() as follows −
path.setStrokeMiterLimit(4);
By default, the stroke miter limit value id 10 of the stroke is black. Following is a diagram of a triangle with different stroke limits.
Example
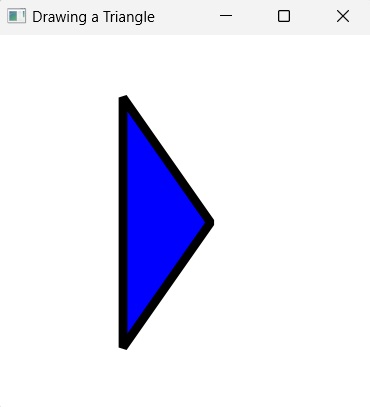
Let us see an example demonstrating the usage of Stroke Line Join property on a triangle. Save this file with the name StrokeMiterLimitExample.java.
importjavafx.application.Application;importjavafx.scene.Group;importjavafx.scene.Scene;importjavafx.scene.shape.Polygon;importjavafx.scene.shape.StrokeLineJoin;importjavafx.scene.paint.Color;importjavafx.stage.Stage;publicclassStrokeMiterLimitExampleextendsApplication{@Overridepublicvoidstart(Stage stage){//Creating a Triangle Polygon triangle =newPolygon();//Adding coordinates to the polygon
triangle.getPoints().addAll(newDouble[]{100.0,50.0,170.0,150.0,100.0,250.0,});
triangle.setFill(Color.BLUE);
triangle.setStroke(Color.BLACK);
triangle.setStrokeWidth(7.0);
triangle.setStrokeMiterLimit(4.0);//Creating a Group object Group root =newGroup(triangle);//Creating a scene object Scene scene =newScene(root,300,300);//Setting title to the Stage
stage.setTitle("Drawing a Triangle");//Adding scene to the stage
stage.setScene(scene);//Displaying the contents of the stage
stage.show();}publicstaticvoidmain(String args[]){launch(args);}}</code></pre>
Compile and execute the saved java file from the command prompt using the following commands.
On executing, the above program generates a JavaFX window displaying a triangle with stroke line join of miter limit 4 as shown below.
Learn Java in-depth with real-world projects through our Java certification course. Enroll and become a certified expert to boost your career.
Example
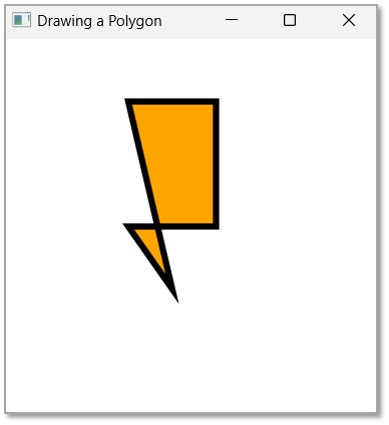
Let us see an example demonstrating the usage of Stroke Miter Limit property on a polygon. In here, we will try to pass a value that is relatively higher than the default miter limit. Save this file with the name StrokeMiterLimitPolygon.java.
importjavafx.application.Application;importjavafx.scene.Group;importjavafx.scene.Scene;importjavafx.scene.shape.Polygon;importjavafx.scene.shape.StrokeLineJoin;importjavafx.scene.paint.Color;importjavafx.stage.Stage;publicclassStrokeMiterLimitPolygonextendsApplication{@Overridepublicvoidstart(Stage stage){//Creating a Polygon Polygon polygon =newPolygon();//Adding coordinates to the polygon
polygon.getPoints().addAll(newDouble[]{100.0,50.0,170.0,50.0,170.0,150.0,100.0,150.0,135.0,200.0,});
polygon.setFill(Color.ORANGE);
polygon.setStroke(Color.BLACK);
polygon.setStrokeWidth(5.0);
polygon.setStrokeLineJoin(StrokeLineJoin.MITER);
polygon.setStrokeMiterLimit(1000.0);//Creating a Group object Group root =newGroup(polygon);//Creating a scene object Scene scene =newScene(root,300,300);//Setting title to the Stage
stage.setTitle("Drawing a Polygon");//Adding scene to the stage
stage.setScene(scene);//Displaying the contents of the stage
stage.show();}publicstaticvoidmain(String args[]){launch(args);}}</code></pre>
Compile and execute the saved java file from the command prompt using the following commands.
JavaFX does not just support drawing a single 2D shape at a time, but also allows you to join multiple 2D shape objects to form another bigger object. For instance, you can use the Rectangle class to draw a rectangle object and also join four line objects together to form a rectangle.
In such cases where multiple lines are used to form a 2D shape, JavaFX supports various properties to be applied on these line while combining them together. One such property is Stroke Line Join Property.
Stroke Line Join Property
The Stroke Line Join Property is used to designate the shape of the joint used to combine two line objects while forming another shape.
This property is of the type StrokeLineJoin, it represents the type of joining that is used at the edges of the shape.
The stroke line join is of three types. It is represented by the three constants of StrokeLineJoin as follows −
Bevel − In bevel join, the outside edges of the intersection are connected with a line segment.
Miter − In miter join, the outside edges of the intersection are joined together forming a sharp edge.
Round − In round join, the outside edges of the intersection are joined by rounding off the corner, the radius of this will be exactly half the width of the join.
You can set the line join of the stroke using the method setStrokeLineJoin() as follows −
The Type_of_Join can be set using any of the following keywords:
StrokeLineJoin.BEVEL − To set the stroke line join to bevel join.
StrokeLineJoin.MITER − To set the stroke line join to miter join.
StrokeLineJoin.ROUND − To set the stroke line join to round join.
By default, the Stroke Line Joining a shape is miter. Following is a diagram of a triangle with different line join types −
Example
Let us see an example demonstrating the usage of Stroke Line Join property on a triangle. Save this file with the name StrokeLineJoinExample.java.
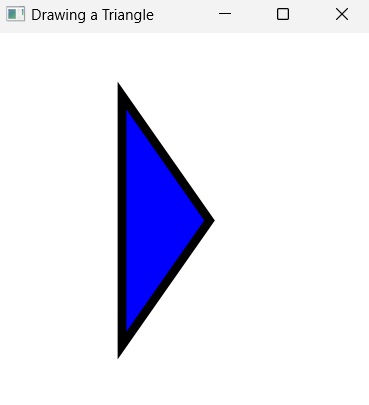
importjavafx.application.Application;importjavafx.scene.Group;importjavafx.scene.Scene;importjavafx.scene.shape.Polygon;importjavafx.scene.shape.StrokeLineJoin;importjavafx.scene.paint.Color;importjavafx.stage.Stage;publicclassStrokeLineJoinExampleextendsApplication{@Overridepublicvoidstart(Stage stage){//Creating a Triangle Polygon triangle =newPolygon();//Adding coordinates to the polygon
triangle.getPoints().addAll(newDouble[]{100.0,50.0,170.0,150.0,100.0,250.0,});
triangle.setFill(Color.BLUE);
triangle.setStroke(Color.BLACK);
triangle.setStrokeWidth(7.0);
triangle.setStrokeLineJoin(StrokeLineJoin.BEVEL);//Creating a Group object Group root =newGroup(triangle);//Creating a scene object Scene scene =newScene(root,300,300);//Setting title to the Stage
stage.setTitle("Drawing a Triangle");//Adding scene to the stage
stage.setScene(scene);//Displaying the contents of the stage
stage.show();}publicstaticvoidmain(String args[]){launch(args);}}</code></pre>
Compile and execute the saved java file from the command prompt using the following commands.
On executing, the above program generates a JavaFX window displaying a triangle with bevel stroke line join as shown below.
Learn Java in-depth with real-world projects through our Java certification course. Enroll and become a certified expert to boost your career.
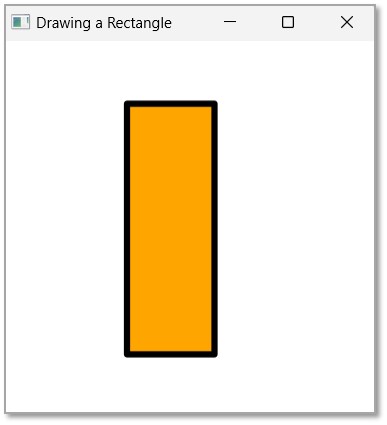
Example
Let us see an example demonstrating the usage of ROUND Stroke Line Join property on a Rectangle. Save this file with the name StrokeLineJoinRectangle.java.
importjavafx.application.Application;importjavafx.scene.Group;importjavafx.scene.Scene;importjavafx.scene.shape.Polygon;importjavafx.scene.shape.StrokeLineJoin;importjavafx.scene.paint.Color;importjavafx.stage.Stage;publicclassStrokeLineJoinRectangleextendsApplication{@Overridepublicvoidstart(Stage stage){//Creating a Rectangle Polygon rectangle =newPolygon();//Adding coordinates to the polygon
rectangle.getPoints().addAll(newDouble[]{100.0,50.0,170.0,50.0,170.0,250.0,100.0,250.0,});
rectangle.setFill(Color.ORANGE);
rectangle.setStroke(Color.BLACK);
rectangle.setStrokeWidth(5.0);
rectangle.setStrokeLineJoin(StrokeLineJoin.ROUND);//Creating a Group object Group root =newGroup(rectangle);//Creating a scene object Scene scene =newScene(root,300,300);//Setting title to the Stage
stage.setTitle("Drawing a Rectangle");//Adding scene to the stage
stage.setScene(scene);//Displaying the contents of the stage
stage.show();}publicstaticvoidmain(String args[]){launch(args);}}</code></pre>
Compile and execute the saved java file from the command prompt using the following commands.