Author: saqibkhan

  • Core Classes

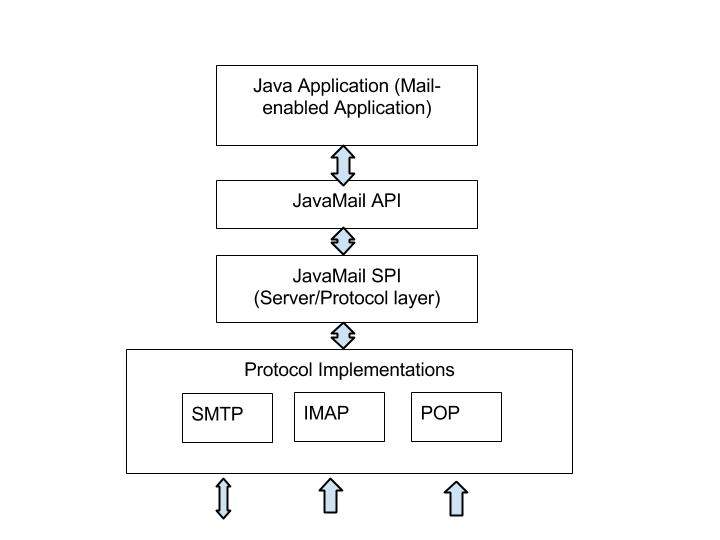
    The JavaMail API consists of some interfaces and classes used to send, read, and delete e-mail messages. Though there are many packages in the JavaMail API, will cover the main two packages that are used in Java Mail API frequently: javax.mail and javax.mail.internet package. These packages contain all the JavaMail core classes. They are:

    ClassDescription
    javax.mail.SessionThe key class of the API. A multithreaded object represents the connection factory.
    javax.mail.MessageAn abstract class that models an e-mail message. Subclasses provide the actual implementations.
    javax.mail.AddressAn abstract class that models the addresses (from and to addresses) in a message. Subclasses provide the specific implementations.
    javax.mail.AuthenticatorAn abstract class used to protect mail resources on the mail server.
    javax.mail.TransportAn abstract class that models a message transport mechanism for sending an e-mail message.
    javax.mail.StoreAn abstract class that models a message store and its access protocol, for storing and retrieving messages. A Store is divided into Folders.
    javax.mail.FolderAn abstract class that represents a folder of mail messages. It can contain subfolders.
    javax.mail.internet.MimeMessageMessage is an abstract class, hence must work with a subclass; in most cases, you’ll use a MimeMessage. A MimeMessage is an e-mail message that understands MIME types and headers.
    javax.mail.internet.InternetAddressThis class represents an Internet email address using the syntax of RFC822. Typical address syntax is of the form [email protected] or Personal Name <[email protected]>.

    Let us study each of these classes in detail and in the subsequent chapters we shall study examples using each of these.

    Session Class

    The Session class is the primary class of the JavaMail API and it is not subclassed. The Session object acts as the connection factory for the JavaMail API, which handles both configuration setting and authentication.

    Session object can be created in the following ways:

    • By looking up the administered object stored in the JNDI serviceInitialContext ctx = new InitialContext(); Session session = (Session) ctx.lookup(“usersMailSession”);usersMailSession is the JNDI name object used as the administered object for the Session object. usersMailSession can be created and configured with the required parameters as name/value pairs, including information such as the mail server hostname, the user account sending the mail, and the protocols supported by the Session object.
    • Another method of creating the Session object is based on the programmatic approach in which you can use a java.util.Properties object to override some of the default information, such as the mail server name, username, password, and other information that can be shared across your entire application.

    The constructor for Session class is private. Hence the Session class provides two methods (listed below) which get the Session object.

    • getDefaultInstance(): There are two methods to get the session object by using the getDefaultInstance() method. It returns the default session.public static Session getDefaultInstance(Properties props) public static Session getDefaultInstance(Properties props,Authenticator auth)
    • getInstance(): There are two methods to get the session object by using the getInstance() method. It returns the new session.public static Session getInstance(Properties props) public static Session getInstance(Properties props,Authenticator auth)

    Message Class

    With Session object created we now move on to creating a message that will be sent. The message type will be javax.mail.Message.

    • Message is an abstract class. Hence its subclass javax.mail.internet.MimeMessage class is mostly used.
    • To create the message, you need to pass session object in MimeMessage class constructor. For example:MimeMessage message=new MimeMessage(session);
    • Once the message object is created we need to store information in it. Message class implements the javax.mail.Part interface while javax.mail.internet. MimeMessage implements javax.mail.internet.MimePart. You can either use message.setContent() or mimeMessage.setText() to store the content.
    • Commonly used methods of MimeMessage class areMethodDescriptionpublic void setFrom(Address address)used to set the from header field.public void addRecipients(Message.RecipientType type, String addresses)used to add the given address to the recipient type.public void setSubject(String subject)used to set the subject header field.public void setText(String textmessage)used to set the text as the message content using text/plain MIME type.

    Learn Java in-depth with real-world projects through our Java certification course. Enroll and become a certified expert to boost your career.

    Address Class

    Now that we have a Session and Message (with content stored in it) objects, we need to address the letter by using Address object.

    • Address is an abstract class. Hence its subclass javax.mail.internet.InternetAddress class is mostly used.
    • Address can be created by just passing email address:Address address = new InternetAddress(“[email protected]”);
    • Another way of creating Address is by passing name alogwith the email address:Address address = new InternetAddress(“[email protected]”, Manisha);
    • You can also set the To, From, CC, BCC fields as below
      • message.setFrom(address)
      • message.addRecipient(type, address)
      • Three predefined address types are objects with one of these values:
        • Message.RecipientType.TO
        • Message.RecipientType.CC
        • Message.RecipientType.BCC

    Authenticator Class

    The class Authenticator represents an object that knows how to obtain authentication for a network connection. Usually, it will do this by prompting the user for information.

    • Authenticator is an abstract class. You create a subclass PasswordAuthentication, passing a username and password to its constructor.
    • You must register the Authenticator with the Session when you create session object.

    Following is an example of Authenticator use:

    Properties props = new Properties();
    //Override props with any customized data
    PasswordAuthentication auth = new PasswordAuthentication("manisha", "pswrd")
    Session session = Session.getDefaultInstance(props, auth);

    Transport Class

    Transport class is used as a message transport mechanism. This class normally uses the SMTP protocol to send a message.

    • It is an abstract class.
    • You can use the default version of the class by just calling the static send() method:Transport.send(message);
    • The other way to send message is by getting a specific instance from the session for your protocol, pass along the username and password (blank if unnecessary), send the message, and close the connection:message.saveChanges(); // implicit with send() //Get transport for session Transport transport = session.getTransport(“smtp”); //Connect transport.connect(host, username, password); //repeat if necessary transport.sendMessage(message, message.getAllRecipients()); //Done, close the connection transport.close();

    Store Class

    An abstract class that models a message store and its access protocol, for storing and retrieving messages. Subclasses provide actual implementations. Store extends the Service class, which provides many common methods for naming stores, connecting to stores, and listening to connection events.

    Clients gain access to a Message Store by obtaining a Store object that implements the database access protocol. Most message stores require the user to be authenticated before they allow access. The connect method performs that authentication.

    Store store = session.getStore("pop3");
    store.connect(host, username, password);

    Folder Class

    Folder is an abstract class that represents a folder for mail messages. Subclasses implement protocol specific Folders. Folders can contain subfolders as well as messages, thus providing a hierarchical structure.

    After connecting to the Store, you can then get a Folder, which must be opened before you can read messages from it.

    Folder folder = store.getFolder("INBOX");
    folder.open(Folder.READ_ONLY);
    Message message[] = folder.getMessages();

    The getFolder(String name) method for a Folder object returns the named subfolder. Close the both the Store and Folder connection once reading mail is done.

    We can see the Store and Folder relation the image below:

    JavaMail API Store and Folder Relation

    As we can see, for each user account, the server has a store which is the storage of user’s messages. The store is divided into folders, and the “inbox” folder is the primarily folder which contains e-mail messages. A folder can contain both messages and sub-folders.

  • Environment Setup

    To send an e-mail using your Java Application is simple enough but to start with you should have JavaMail API and Java Activation Framework (JAF) installed on your machine.

    You will need the JavaBeans Activation Framework (JAF) extension that provides the javax.activation package only when you’re not using Java SE 6 or newer.

    • You can download latest version of JavaMail (Version 1.5.0) from Java’s standard website.
    • You can download latest version of JAF (Version 1.1.1) from Java’s standard website.

    Download and unzip these files, in the newly created top level directories you will find a number of jar files for both the applications. You need to add mail.jar and activation.jar files in your CLASSPATH.

    SMTP server

    To send emails, you must have SMTP server that is responsible to send mails. You can use one of the following techniques to get the SMTP server:

    • Install and use any SMTP server such as Postfix server (for Ubuntu), Apache James server (Java Apache Mail Enterprise Server)etc. (or)
    • Use the SMTP server provided by the host provider for eg: free SMTP provide by JangoSMTP site is relay.jangosmtp.net (or)
    • Use the SMTP Server provided by companies e.g. gmail, yahoo, etc.

    The examples in the subsequent chapters, we’ve used the free JangoSMTP server to send email. You can create an account by visiting this site and configure your email adress.

  • Overview

    The JavaMail API provides a platform-independent and protocol-independent framework to build mail and messaging applications. The JavaMail API provides a set of abstract classes defining objects that comprise a mail system. It is an optional package (standard extension) for reading, composing, and sending electronic messages.

    JavaMail provides elements that are used to construct an interface to a messaging system, including system components and interfaces. While this specification does not define any specific implementation, JavaMail does include several classes that implement RFC822 and MIME Internet messaging standards. These classes are delivered as part of the JavaMail class package.

    Following are some of the protocols supported in JavaMail API:

    • SMTP: Acronym for Simple Mail Transfer Protocol. It provides a mechanism to deliver email.
    • POP: Acronym for Post Office Protocol. POP is the mechanism most people on the Internet use to get their mail. It defines support for a single mailbox for each user. RFC 1939 defines this protocol.
    • IMAP: Acronym for Internet Message Access Protocol. It is an advanced protocol for receiving messages. It provides support for multiple mailbox for each user, in addition to, mailbox can be shared by multiple users. It is defined in RFC 2060.
    • MIME: Acronym for Multipurpose Internet Mail Extensions. . It is not a mail transfer protocol. Instead, it defines the content of what is transferred: the format of the messages, attachments, and so on. There are many different documents that take effect here: RFC 822, RFC 2045, RFC 2046, and RFC 2047. As a user of the JavaMail API, you usually don’t need to worry about these formats. However, these formats do exist and are used by your programs.
    • NNTP and Others:There are many protocols that are provided by third-party providers. Some of them are Network News Transfer Protocol (NNTP), Secure Multipurpose Internet Mail Extensions (S/MIME) etc.

    Details of these will be covered in the subsequent chapters.

    Architecture

    As said above the java application uses JavaMail API to compose, send and receive emails.The following figure illustrates the architecture of JavaMail:

    JavaMail API Architecture

    The abstract mechanism of JavaMail API is similar to other J2EE APIs, such as JDBC, JNDI, and JMS. As seen the architecture diagram above, JavaMail API is divided into two main parts:

    • An application-independent part: An application-programming interface (API) is used by the application components to send and receive mail messages, independent of the underlying provider or protocol used.
    • A service-dependent part: A service provider interface (SPI) speaks the protocol-specific languages, such as SMTP, POP, IMAP, and Network News Transfer Protocol (NNTP). It is used to plug in a provider of an e-mail service to the J2EE platform.
  • Box Blur Effect

    In general, Blur means becoming unclear, on applying blur effect to a node it is made unclear. Box Blur is a kind of blur effect provided by JavaFX. In this effect, to apply blur to node, a simple box filter is used.

    The class named BoxBlur of the package javafx.scene.effect represents the BoxBlur effect, this class contains four properties, which are −

    • height − This property is of double type representing the vertical size of the effect.
    • width − This property is of double type representing the horizontal size of the effect.
    • input − This property is of the type effect and it represents an input to the BoxBlur effect.
    • iterations − This property is of an integer type representing the number of iterations of the effect, which are to be applied on the node. This is done to improve its quality or smoothness.

    Example

    Following is an example demonstrating the box blur effect. In here, we are drawing the text “Welcome to Tutorialspoint” filled with DARKSEAGREEN color and applying the Box Blur effect to it.

    Save this code in a file with the name BoxBlurEffectExample.java.

    importjavafx.application.Application;importjavafx.scene.Group;importjavafx.scene.Scene;importjavafx.scene.effect.BoxBlur;importjavafx.scene.paint.Color;importjavafx.stage.Stage;importjavafx.scene.text.Font;importjavafx.scene.text.FontWeight;importjavafx.scene.text.Text;publicclassBoxBlurEffectExampleextendsApplication{@Overridepublicvoidstart(Stage stage){//Creating a Text object Text text =newText();//Setting font to the text 
    
      text.setFont(Font.font(null,FontWeight.BOLD,40));//setting the position of the text 
      text.setX(60); 
      text.setY(150);//Setting the text to be added. 
      text.setText("Welcome to Tutorialspoint");//Setting the color of the text 
      text.setFill(Color.DARKSEAGREEN);//Instantiating the BoxBlur class BoxBlur boxblur =newBoxBlur();//Setting the width of the box filter 
      boxblur.setWidth(8.0f);//Setting the height of the box filter 
      boxblur.setHeight(3.0f);//Setting the no of iterations  
      boxblur.setIterations(3);//Applying BoxBlur effect to the text 
      text.setEffect(boxblur);//Creating a Group object  Group root =newGroup(text);//Creating a scene object Scene scene =newScene(root,600,300);//Setting title to the Stage 
      stage.setTitle("Sample Application");//Adding scene to the stage 
      stage.setScene(scene);//Displaying the contents of the stage 
      stage.show();}publicstaticvoidmain(String args&#91;]){launch(args);}}</code></pre>

    Compile and execute the saved java file from the command prompt using the following commands.

    javac --module-path %PATH_TO_FX%--add-modules javafx.controls BoxBlurEffectExample.java 
    java --module-path %PATH_TO_FX%--add-modules javafx.controls BoxBlurEffectExample

    Output

    On executing, the above program generates a JavaFX window as shown below.

    Box Blur Effect
  • Glow Effect

    Just like the Bloom Effect, the Glow Effect also makes the given input image to glow. This effect makes the pixels of the input much brighter.

    The class named Glow of the package javafx.scene.effect represents the glow effect. This class contains two properties namely −

    • input − This property is of the type Effect and it represents an input to the glow effect.
    • level − This property is of the type double; it represents intensity of the glow. The range of the level value is 0.0 to 1.0.

    Example

    The following program is an example demonstrating the Glow Effect of JavaFX. In here, we are embedding the following image (Tutorialspoint Logo) in JavaFX scene using Image and ImageView classes. This will be done at the position 100, 70 and with fit height and fit width 200 and 400 respectively.

    To this image, we are applying the Glow Effect with the level value 0.9. Save this code in a file with the name GlowEffectExample.java.

    importjavafx.application.Application;importjavafx.scene.Group;importjavafx.scene.Scene;importjavafx.scene.effect.Glow;importjavafx.scene.image.Image;importjavafx.scene.image.ImageView;importjavafx.stage.Stage;publicclassGlowEffectExampleextendsApplication{@Overridepublicvoidstart(Stage stage){//Creating an image Image image =newImage("http://www.tutorialspoint.com/green/images/logo.png");//Setting the image view ImageView imageView =newImageView(image);//setting the fit width of the image view 
    
      imageView.setFitWidth(200);//Setting the preserve ratio of the image view 
      imageView.setPreserveRatio(true);//Instantiating the Glow class Glow glow =newGlow();//setting level of the glow effect 
      glow.setLevel(0.9);//Applying bloom effect to text 
      imageView.setEffect(glow);//Creating a Group object  Group root =newGroup(imageView);//Creating a scene object Scene scene =newScene(root,600,300);//Setting title to the Stage 
      stage.setTitle("Sample Application");//Adding scene to the stage 
      stage.setScene(scene);//Displaying the contents of the stage 
      stage.show();}publicstaticvoidmain(String args&#91;]){launch(args);}}</code></pre>

    Compile and execute the saved java file from the command prompt using the following commands.

    javac --module-path %PATH_TO_FX%--add-modules javafx.controls GlowEffectExample.java 
    java --module-path %PATH_TO_FX%--add-modules javafx.controls GlowEffectExample

    Output

    On executing, the above program generates a JavaFX window as shown below.

  • Bloom Effect

    The Bloom effect in JavaFX will make the pixels in some portions of the node are made to glow.

    The class named Bloom of the package javafx.scene.effect represents the bloom effect. This class contains two properties, which are −

    • input − This property is of the type Effect and it represents an input to the bloom effect.
    • threshold − This property is of the type double; this represents a threshold value of luminosity of the pixels of the node. All those pixels having luminosity greater than equal to this value are made to glow. The range of the threshold value is 0.0 to 1.0.

    Example

    Following is an example demonstrating the bloom effect. We will be drawing a text “Welcome to Tutorialspoint” and applying the bloom effect to it with a threshold value 1.0.

    Save this code in a file with the name BloomEffectExample.java.

    importjavafx.application.Application;importjavafx.scene.Group;importjavafx.scene.Scene;importjavafx.scene.effect.Bloom;importjavafx.scene.paint.Color;importjavafx.scene.shape.Rectangle;importjavafx.stage.Stage;importjavafx.scene.text.Font;importjavafx.scene.text.FontWeight;importjavafx.scene.text.Text;publicclassBloomEffectExampleextendsApplication{@Overridepublicvoidstart(Stage stage){//Creating a Text object Text text =newText();//Setting font to the text
    
      text.setFont(Font.font(null,FontWeight.BOLD,40));//setting the position of the text  
      text.setX(60); 
      text.setY(150);//Setting the text to be embedded. 
      text.setText("Welcome to Tutorialspoint");//Setting the color of the text 
      text.setFill(Color.DARKSEAGREEN);//Instantiating the Rectangle class Rectangle rectangle =newRectangle();//Setting the position of the rectangle 
      rectangle.setX(50.0f); 
      rectangle.setY(80.0f);//Setting the width of the rectangle 
      rectangle.setWidth(500.0f);//Setting the height of the rectangle 
      rectangle.setHeight(120.0f);//Setting the color of the rectangle 
      rectangle.setFill(Color.TEAL);//Instantiating the Bloom class Bloom bloom =newBloom();//setting threshold for bloom 
      bloom.setThreshold(0.1);//Applying bloom effect to text 
      text.setEffect(bloom);//Creating a Group object  Group root =newGroup(rectangle, text);//Creating a scene object Scene scene =newScene(root,600,300);//Setting title to the Stage 
      stage.setTitle("Sample Application");//Adding scene to the stage 
      stage.setScene(scene);//Displaying the contents of the stage 
      stage.show();}publicstaticvoidmain(String args&#91;]){launch(args);}}</code></pre>

    Compile and execute the saved java file from the command prompt using the following commands.

    javac --module-path %PATH_TO_FX%--add-modules javafx.controls BloomEffectExample.java 
    java --module-path %PATH_TO_FX%--add-modules javafx.controls BloomEffectExample

    Output

    On executing, the above program generates a JavaFX window as shown below.

    Bloom Effect
  • Blend Effect

    In general, blend means mixture of two or more different things or substances. If we apply the blend effect, it will take the pixels of two different inputs. This will be done at the same location and it produces a combined output based on the blend mode.

    For example, if we draw two objects the top object covers the bottom one. On applying the blend effect, the pixels of the two objects in the overlap area are combined and displayed based on the input mode.

    Blend effect Applied

    The class named Blend of the package javafx.scene.effect represents the blend effect, this class contains four properties, which are −

    • bottomInput − This property is of the type Effect and it represents the bottom input to the blend effect.
    • topInput − This property is of the type Effect and it represents the top input to the blend effect.
    • opacity − This property is of double type and it represents the opacity value modulated with the top input.
    • mode − This property is of the type BlendMode and it represents the mode used to blend the two inputs together.

    Example

    Following is an example demonstrating the blend effect. In here, we are drawing a circle filled with BROWN color, on top of it lies a BLUEVIOLET ColorInput.

    We have applied the blend effect choosing a multiply mode In the overlap area, the colors of the two objects were multiplied and displayed.

    Save this code in a file with the name BlendEffectExample.java.

    importjavafx.application.Application;importjavafx.scene.Group;importjavafx.scene.Scene;importjavafx.stage.Stage;importjavafx.scene.shape.Circle;importjavafx.scene.effect.Blend;importjavafx.scene.effect.BlendMode;importjavafx.scene.effect.ColorInput;importjavafx.scene.paint.Color;publicclassBlendEffectExampleextendsApplication{@Overridepublicvoidstart(Stage stage){//Drawing a Circle Circle circle =newCircle();//Setting the center of the Circle
    
      circle.setCenterX(75.0f); 
      circle.setCenterY(75.0f);//Setting radius of the circle 
      circle.setRadius(30.0f);//Setting the fill color of the circle 
      circle.setFill(Color.BROWN);//Instantiating the blend class Blend blend =newBlend();//Preparing the to input object ColorInput topInput =newColorInput(35,30,75,40,Color.BLUEVIOLET);//setting the top input to the blend object 
      blend.setTopInput(topInput);//setting the blend mode 
      blend.setMode(BlendMode.SRC_OVER);//Applying the blend effect to circle  
      circle.setEffect(blend);//Creating a Group object  Group root =newGroup(circle);//Creating a scene object Scene scene =newScene(root,150,150);//Setting title to the Stage 
      stage.setTitle("Blend Example");//Adding scene to the stage 
      stage.setScene(scene);//Displaying the contents of the stage 
      stage.show();}publicstaticvoidmain(String args&#91;]){launch(args);}}</code></pre>

    Compile and execute the saved java file from the command prompt using the following commands.

    javac --module-path %PATH_TO_FX%--add-modules javafx.controls BlendEffectExample.java 
    java --module-path %PATH_TO_FX%--add-modules javafx.controls BlendEffectExample

    Output

    On executing, the above program generates a JavaFX window as shown below.

    Blend Effect Example

    Blend Modes

    S.NOMode & DescriptionOutput
    1ADDIn this mode, the color values of the top and bottom inputs are added and displayed.Add Mode
    2MULTIPLYIn this mode, the color values of the top and bottom inputs are multiplied and displayed.MULTIPLY Mode
    3DIFFERENCEIn this mode, among the color values of the top and bottom inputs, the darker one is subtracted from the lighter one and displayed.DIFFERENCE Mode
    4REDIn this mode, the red components of the bottom input were replaced by the red components of the top input.RED Mode
    5BLUEIn this mode, the blue components of the bottom input were replaced by the blue components of the top input.BLUE Mode
    6GREENIn this mode, the green components of the bottom input were replaced by the green components of the top input.GREEN MODE
    7EXCLUSIONIn this mode, the color components of the two inputs were multiplied and doubled. Then they are subtracted from the sum of the color components of the bottom input. The resultant is then displayed.EXCLUSION Mode
    8COLOR_BURNIn this mode, the inverse of the bottom input color component was divided by the top input color component. Thus, the obtained value is inverted and displayed.COLOR BURN
    9COLOR_DODGEIn this mode, the bottom input color components were divided by the inverse of the top input color components and thus obtained value is inverted and displayed.COLOR DODGE
    10LIGHTENIn this mode, the lighter color component, among the both inputs are displayed.Lighten
    11DARKENIn this mode, the darker color component, among the top and bottom inputs is displayed.Darken
    12SCREENIn this mode, the color components of the top and bottom inputs were inverted, multiplied and thus obtained value is inverted and displayed.Screen
    13OVERLAYIn this mode, based on the bottom input color, the color components of the two input values were multiplied or screened and the resultant is displayed.Overlay
    14HARD_LIGHTIn this mode, based on the top input color, the color components of the two input values were multiplied or screened and the resultant is displayed.Hard Light
    15SOFT_LIGHIn this mode, based on the top input color, the color components of the two input values were softened or lightened and the resultant is displayed.Soft Light
    16SRC_ATOPIn this mode, the over lapping area is filled with the color component of the bottom input. While the nonoverlapping area is filled with the color component of the top input.SRC ATOP
    17SRC_OVERIn this mode, the top input is drawn over the bottom input.SRC OVER
  • Image Input Effect

    Image input effect in JavaFX just embeds an image to the JavaFX screen. Just like in the Color Input effect, it is used to pass the specified colored rectangular region as an input to another effect. An Image Input effect is used to pass the specified image as an input to another effect.

    On applying this effect, the image specified will not be modified. This effect is applied to any node.

    The class named ImageInput of the package javafx.scene.effect represents the Image Input effect, this class contains three properties, which are −

    • x − This property is of Double type; it represents the x coordinate of the position of the source image.
    • y − This property is of Double type; it represents the y coordinate of the position of the source image.
    • source − his property is of Image type; it represents image that is to be used as a source to this effect. (Passed as input)

    Example

    The following program is an example demonstrating the Image input effect. In here, we are creating an image input at the position 150, 100, and taking the following image (tutorialspoint logo) as a source for this effect.

    We are creating a rectangle and applying this effect to it. Save this code in a file with the name ImageInputEffectExample.java.

    importjavafx.application.Application;importjavafx.scene.Group;importjavafx.scene.Scene;importjavafx.scene.effect.ImageInput;importjavafx.scene.image.Image;importjavafx.scene.shape.Rectangle;importjavafx.stage.Stage;publicclassImageInputEffectExampleextendsApplication{@Overridepublicvoidstart(Stage stage){//Creating an image Image image =newImage("http://www.tutorialspoint.com/green/images/logo.png");//Instantiating the Rectangle class Rectangle rectangle =newRectangle();//Instantiating the ImageInput class ImageInput imageInput =newImageInput();//Setting the position of the image
    
      imageInput.setX(150); 
      imageInput.setY(100);//Setting source for image input  
      imageInput.setSource(image);//Applying image input effect to the rectangle node 
      rectangle.setEffect(imageInput);//Creating a Group object  Group root =newGroup(rectangle);//Creating a scene object Scene scene =newScene(root,600,300);//Setting title to the Stage 
      stage.setTitle("Sample Application");//Adding scene to the stage 
      stage.setScene(scene);//Displaying the contents of the stage 
      stage.show();}publicstaticvoidmain(String args&#91;]){launch(args);}}</code></pre>

    Compile and execute the saved java file from the command prompt using the following commands.

    javac --module-path %PATH_TO_FX%--add-modules javafx.controls ImageInputEffectExample.java 
    java --module-path %PATH_TO_FX%--add-modules javafx.controls ImageInputEffectExample

    Output

    On executing, the above program generates a JavaFX window as shown below.

  • Color Input Effect

    Color Input Effect gives the same output as drawing a rectangle and filling it with color. Unlike other effects, if this effect is applied to any node, it displays only a rectangular box (not the node). This effect is mostly used to pass as an input for other effects.

    For example, while applying the blend effect, it requires an object of effect type as input. There we can pass this as an input.

    The class named ColorInput of the package javafx.scene.effect represents the color input effect. This class contains four properties namely −

    • x − This property is of double type; it represents the x coordinate of the position of the color input.
    • y − This property is of double type; it represents the y coordinate of the position of the color input.
    • height − This property is of double type; it represents the height of the region that is to be filled with color.
    • width − This property is of double type; it represents the width of the region that is to be filled with color.
    • paint − This property is of Paint type; it represents the color with which the input region is to be filled.

    Example

    Following is an example demonstrating the color input effect. In here, we are creating a color input of the dimensions 50, 400 (height, width) at the position 50, 140, and filling it with the color CHOCOLATE.

    We are creating rectangle and applying this effect to it. Save this code in a file with the name ColorInputEffectExample.java.

    importjavafx.application.Application;importjavafx.scene.Group;importjavafx.scene.Scene;importjavafx.scene.effect.ColorInput;importjavafx.scene.paint.Color;importjavafx.scene.shape.Rectangle;importjavafx.stage.Stage;publicclassColorInputEffectExampleextendsApplication{@Overridepublicvoidstart(Stage stage){//creating a rectangle Rectangle rectangle =newRectangle();//Instantiating the Colorinput class ColorInput colorInput =newColorInput();//Setting the coordinates of the color input 
    
      colorInput.setX(50); 
      colorInput.setY(140);//Setting the height of the region of the collor input 
      colorInput.setHeight(50);//Setting the width of the region of the color input 
      colorInput.setWidth(400);//Setting the color the color input 
      colorInput.setPaint(Color.CHOCOLATE);//Applying coloradjust effect to the Rectangle 
      rectangle.setEffect(colorInput);//Creating a Group object  Group root =newGroup(rectangle);//Creating a scene object Scene scene =newScene(root,600,300);//Setting title to the Stage 
      stage.setTitle("Sample Application");//Adding scene to the stage 
      stage.setScene(scene);//Displaying the contents of the stage 
      stage.show();}publicstaticvoidmain(String args&#91;]){launch(args);}}</code></pre>

    Compile and execute the saved java file from the command prompt using the following commands.

    javac --module-path %PATH_TO_FX%--add-modules javafx.controls ColorInputEffectExample.java 
    java --module-path %PATH_TO_FX%--add-modules javafx.controls ColorInputEffectExample

    Output

    On executing, the above program generates a JavaFX window as shown below.

    Color Input Effect
  • Color Adjust Effect

    The most basic effect that can be performed on any image is adjusting its color. Various image processing applications allow you to do it. Similarly, JavaFX also allows you to adjust a color of an image in an application.

    You can adjust the color of an image by applying the color adjust effect to it. This includes the adjustment of the Hue, Saturation, Brightness and Contrast on each pixel.

    The class named ColorAdjust of the package javafx.scene.effect represents the color adjust effect, this class contains five properties namely −

    • input − This property is of the Effect type and it represents an input to the color adjust effect.
    • brightness − This property is of Double type and it represents the brightness adjustment value for this effect.
    • contrast − This property is of Double type and it represents the contrast adjustment value for this effect.
    • hue − This property is of Double type and it represents the hue adjustment value for this effect.
    • saturation − This property is of Double type and it represents the saturation adjustment value for this effect.

    Example

    The following program is an example of demonstrating the color adjust effect. In here, we are embedding an image (Tutorialspoint Logo) in JavaFX scene using Image and ImageView classes. This is being done at the position 100, 70 and with a fit height and fit width of 200 and 400 respectively.

    We are adjusting the color of this image using the color adjust effect. With contrast, hue, brightness and saturation values as 0.4. -0.05, 0.9, 0.8.

    Save this code in a file with the name ColorAdjustEffectExample.java.

    importjavafx.application.Application;importjavafx.scene.Group;importjavafx.scene.Scene;importjavafx.scene.effect.ColorAdjust;importjavafx.scene.image.Image;importjavafx.scene.image.ImageView;importjavafx.stage.Stage;publicclassColorAdjustEffectExampleextendsApplication{@Overridepublicvoidstart(Stage stage){//Creating an image Image image =newImage("http://www.tutorialspoint.com/green/images/logo.png");//Setting the image view ImageView imageView =newImageView(image);//Setting the position of the image 
    
      imageView.setX(100);  
      imageView.setY(70);//setting the fit height and width of the image view 
      imageView.setFitHeight(200); 
      imageView.setFitWidth(400);//Setting the preserve ratio of the image view 
      imageView.setPreserveRatio(true);//Instantiating the ColorAdjust class ColorAdjust colorAdjust =newColorAdjust();//Setting the contrast value 
      colorAdjust.setContrast(0.4);//Setting the hue value 
      colorAdjust.setHue(-0.05);//Setting the brightness value 
      colorAdjust.setBrightness(0.9);//Setting the saturation value 
      colorAdjust.setSaturation(0.8);//Applying coloradjust effect to the ImageView node 
      imageView.setEffect(colorAdjust);//Creating a Group object  Group root =newGroup(imageView);//Creating a scene object Scene scene =newScene(root,600,300);//Setting title to the Stage 
      stage.setTitle("Coloradjust effect example");//Adding scene to the stage 
      stage.setScene(scene);//Displaying the contents of the stage 
      stage.show();}publicstaticvoidmain(String args&#91;]){launch(args);}}</code></pre>

    Compile and execute the saved java file from the command prompt using the following commands.

    javac --module-path %PATH_TO_FX%--add-modules javafx.controls ColorAdjustEffectExample.java 
    java --module-path %PATH_TO_FX%--add-modules javafx.controls ColorAdjustEffectExample

    Output

    On executing, the above program generates a JavaFX window as shown below.