A convolutional layer in Keras is a type of layer that applies a convolution operation to the input, which is a mathematical operation that is used to detect patterns in data. This layer is typically used to extract features from images, such as edges, shapes, and textures. The convolutional layer is usually followed by a pooling layer, which is a type of layer that reduces the dimensionality of the data by combining the outputs of the convolutional layer. Pooling layers are used to reduce the computational complexity of the model and to reduce overfitting. The most common type of pooling layer is the max pooling layer, which takes the maximum value from each region of the input. Other types of pooling layers include average pooling and global pooling.
Author: saqibkhan
-
How do you handle overfitting in a Keras model?
Overfitting is a common problem in machine learning, and it can be especially problematic in deep learning models. To handle overfitting in a Keras model, there are several techniques that can be used.
The first technique is to use regularization. Regularization is a technique that adds a penalty to the model for having too many parameters. This penalty helps to reduce the complexity of the model and prevent it from overfitting. Common regularization techniques used in Keras models include L1 and L2 regularization, dropout, and early stopping.
The second technique is to use data augmentation. Data augmentation is a technique that creates new data points from existing data points. This helps to reduce overfitting by providing the model with more data points to learn from. Common data augmentation techniques used in Keras models include image flipping, rotation, and scaling.
The third technique is to use cross-validation. Cross-validation is a technique that splits the data into training and validation sets. The model is then trained on the training set and evaluated on the validation set. This helps to prevent overfitting by providing a more accurate evaluation of the model’s performance.
Finally, the fourth technique is to use hyperparameter tuning. Hyperparameter tuning is a technique that adjusts the model’s hyperparameters to optimize its performance. This helps to reduce overfitting by finding the optimal combination of hyperparameters for the model. Common hyperparameter tuning techniques used in Keras models include grid search and random search. -
What is the difference between a TensorFlow backend and a Theano backend in Keras?
The main difference between a TensorFlow backend and a Theano backend in Keras is the way in which they handle computations. TensorFlow is a symbolic math library that uses data flow graphs to represent computations, while Theano is a numerical computation library that uses multi-dimensional arrays to represent computations.
TensorFlow is optimized for large-scale computations and is well-suited for deep learning applications, while Theano is optimized for smaller-scale computations and is better suited for more traditional machine learning applications.
TensorFlow also has better support for distributed computing, which makes it easier to scale up computations across multiple machines. Theano, on the other hand, is more focused on optimizing the speed of computations on a single machine.
In terms of usability, TensorFlow is generally considered to be easier to use than Theano, as it has a more intuitive API and better documentation. Theano, however, is more flexible and allows for more customization.
Overall, the choice of backend depends on the type of application you are developing and the type of computations you need to perform. If you are developing a deep learning application, then TensorFlow is likely the better choice. If you are developing a more traditional machine learning application, then Theano may be the better choice. -
Node.js TLS/SSL
What is TLS/SSL
TLS stands for Transport Layer Security. It is the successor to Secure Sockets Layer (SSL). TLS along with SSL is used for cryptographic protocols to secure communication over the web.
TLS uses public-key cryptography to encrypt messages. It encrypts communication generally on the TCP layer.
What is public-key cryptography
In public-key cryptography, each client and each server has two keys: public key and private key. Public key is shared with everyone and private key is secured. To encrypt a message, a computer requires its private key and the recipient?s public key. On the other hand, to decrypt the message, the recipient requires its own
You have to use require(‘tls’) to access this module.
Syntax:
var tls = require('tls');The tls module uses OpenSSL to attain Transport Layer Security and Secure Socket Layer. TLS/SSL is a public/private key infrastructure. Each client and each server must have a private key.
A private key can be created like this:
openssl genrsa -out ryans-key.pem 1024All severs and some clients need to have a certificate. Certificates are public keys signed by a Certificate Authority or self-signed. To get certificate, you have to create a “Certificate Signing Request” (CSR) file.
A certificate can be created like this:
openssl req -new -key ryans-key.pem -out ryans-csr.pemTo create a self-signed certificate with the CSR:
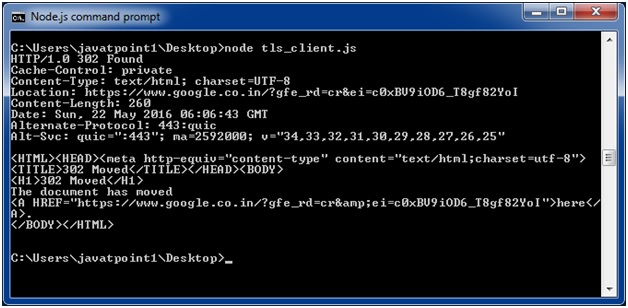
openssl x509 -req -in ryans-csr.pem -signkey ryans-key.pem -out ryans-cert.pemNode.js TLS client example
tls = require('tls');

function connected(stream) {

    if (stream) {

       // socket connected

      stream.write("GET / HTTP/1.0\n\rHost: encrypted.google.com:443\n\r\n\r");

    } else {

      console.log("Connection failed");

    }

}

 // needed to keep socket variable in scope

var dummy = this;

 // try to connect to the server

dummy.socket = tls.connect(443, 'encrypted.google.com', function() {

   // callback called only after successful socket connection

   dummy.connected = true;

   if (dummy.socket.authorized) {

      // authorization successful

      dummy.socket.setEncoding('utf-8');

      connected(dummy.socket);

   } else {

      // authorization failed

     console.log(dummy.socket.authorizationError);

     connected(null);

   }

});

 dummy.socket.addListener('data', function(data) {

   // received data

   console.log(data);

});

 dummy.socket.addListener('error', function(error) {

   if (!dummy.connected) {

     // socket was not connected, notify callback

     connected(null);

   }

   console.log("FAIL");

   console.log(error);

});

 dummy.socket.addListener('close', function() {

 // do something

});
Output:
-
How do you optimize a Keras model for better performance?
Optimizing a Keras model for better performance involves several steps.
1. Data Preprocessing: Before training a model, it is important to preprocess the data to ensure that it is in the correct format and contains no errors. This includes normalizing the data, removing outliers, and filling in missing values.
2. Model Architecture: Choosing the right model architecture is essential for achieving good performance. This includes selecting the right number of layers, the right type of layers, and the right number of neurons in each layer.
3. Hyperparameter Tuning: Hyperparameters are the parameters that control the model’s behavior. Tuning these parameters can help improve the model’s performance. This includes tuning the learning rate, the number of epochs, the batch size, and the optimizer.
4. Regularization: Regularization is a technique used to reduce overfitting. This can be done by adding a penalty to the loss function or by adding dropout layers to the model.
5. Early Stopping: Early stopping is a technique used to prevent overfitting. This involves monitoring the model’s performance on a validation set and stopping the training process when the performance starts to degrade.
6. Data Augmentation: Data augmentation is a technique used to increase the amount of data available for training. This can be done by applying random transformations to the existing data.
7. Model Ensembling: Model ensembling is a technique used to combine multiple models to improve performance. This can be done by averaging the predictions of multiple models or by using a voting system. -
What is the difference between a Sequential model and a Functional API model in Keras?
The main difference between a Sequential model and a Functional API model in Keras is the way in which the models are constructed. A Sequential model is a linear stack of layers, where each layer has exactly one input and one output. This type of model is simple to construct and is suitable for most basic deep learning tasks. On the other hand, a Functional API model is a more flexible and powerful type of model that allows for more complex architectures. It allows for multiple inputs and outputs, as well as the ability to create models with shared layers. This type of model is more suitable for complex tasks such as image classification or natural language processing.
-
Node.js Crypto
The Node.js Crypto module supports cryptography. It provides cryptographic functionality that includes a set of wrappers for open SSL’s hash HMAC, cipher, decipher, sign and verify functions.
What is Hash
A hash is a fixed-length string of bits i.e. procedurally and deterministically generated from some arbitrary block of source data.
What is HMAC
HMAC stands for Hash-based Message Authentication Code. It is a process for applying a hash algorithm to both data and a secret key that results in a single final hash.
Encryption Example using Hash and HMAC
File: crypto_example1.js
const crypto = require('crypto');

const secret = 'abcdefg';

const hash = crypto.createHmac('sha256', secret)

                   .update('Welcome to JavaTpoint')

                   .digest('hex');

console.log(hash);
Open Node.js command prompt and run the following code:
node crypto_example1.js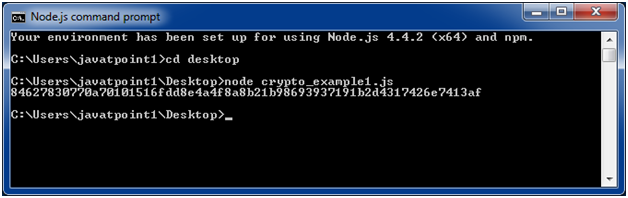
Encryption example using Cipher
File: crypto_example2.js
const crypto = require('crypto');

const cipher = crypto.createCipher('aes192', 'a password');

var encrypted = cipher.update('Hello JavaTpoint', 'utf8', 'hex');

encrypted += cipher.final('hex');

console.log(encrypted);
Open Node.js command prompt and run the following code:
node crypto_example2.js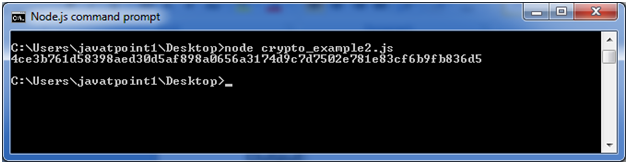
Decryption example using Decipher
File: crypto_example3.js
const crypto = require('crypto');

const decipher = crypto.createDecipher('aes192', 'a password');

var encrypted = '4ce3b761d58398aed30d5af898a0656a3174d9c7d7502e781e83cf6b9fb836d5';

var decrypted = decipher.update(encrypted, 'hex', 'utf8');

decrypted += decipher.final('utf8');

console.log(decrypted);
Open Node.js command prompt and run the following code:
node crypto_example3.js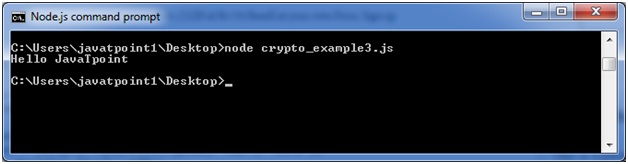
-
Node.js Net
Node.js provides the ability to perform socket programming. We can create chat application or communicate client and server applications using socket programming in Node.js. The Node.js net module contains functions for creating both servers and clients.
Node.js Net Example
In this example, we are using two command prompts:
- Node.js command prompt for server.
- Window’s default command prompt for client.
server:
File: net_server.js
const net = require('net');

var server = net.createServer((socket) => {

  socket.end('goodbye\n');

}).on('error', (err) => {

  // handle errors here

  throw err;

});

// grab a random port.

server.listen(() => {

  address = server.address();

  console.log('opened server on %j', address);

});
Open Node.js command prompt and run the following code:
node net_server.jsclient:
File: net_client.js
const net = require('net');

const client = net.connect({port: 50302}, () => {//use same port of server

  console.log('connected to server!');

  client.write('world!\r\n');

});

client.on('data', (data) => {

  console.log(data.toString());

  client.end();

});

client.on('end', () => {

  console.log('disconnected from server');

});
Open Node.js command prompt and run the following code:
node net_client.js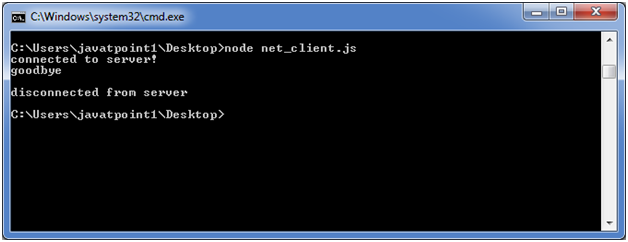
-
How do you debug a Keras model?
Debugging a Keras model can be done in several ways.
First, it is important to understand the model architecture and the data that is being used. This will help to identify any potential issues with the model.
Second, it is important to use the appropriate metrics to evaluate the model. This includes accuracy, precision, recall, and other metrics that are relevant to the task.
Third, it is important to use the appropriate tools to debug the model. This includes using the Keras API to view the model architecture, weights, and layers. It also includes using TensorBoard to visualize the model and its performance.
Fourth, it is important to use the appropriate techniques to debug the model. This includes using techniques such as data augmentation, regularization, and hyperparameter tuning.
Finally, it is important to use the appropriate techniques to debug the model. This includes using techniques such as debugging with a debugger, debugging with a profiler, and debugging with a debugger and profiler.
By following these steps, a Keras developer can effectively debug a Keras model. -
Node.js DNS
The Node.js DNS module contains methods to get information of given hostname. Let’s see the list of commonly used DNS functions:
- dns.getServers()
- dns.setServers(servers)
- dns.lookup(hostname[, options], callback)
- dns.lookupService(address, port, callback)
- dns.resolve(hostname[, rrtype], callback)
- dns.resolve4(hostname, callback)
- dns.resolve6(hostname, callback)
- dns.resolveCname(hostname, callback)
- dns.resolveMx(hostname, callback)
- dns.resolveNs(hostname, callback)
- dns.resolveSoa(hostname, callback)
- dns.resolveSrv(hostname, callback)
- dns.resolvePtr(hostname, callback)
- dns.resolveTxt(hostname, callback)
- dns.reverse(ip, callback)
Node.js DNS Example 1
Let’s see the example of dns.lookup() function.
File: dns_example1.js
const dns = require('dns');

dns.lookup('www.javatpoint.com', (err, addresses, family) => {

  console.log('addresses:', addresses);

  console.log('family:',family);

});
Open Node.js command prompt and run the following code:
node dns_example1.js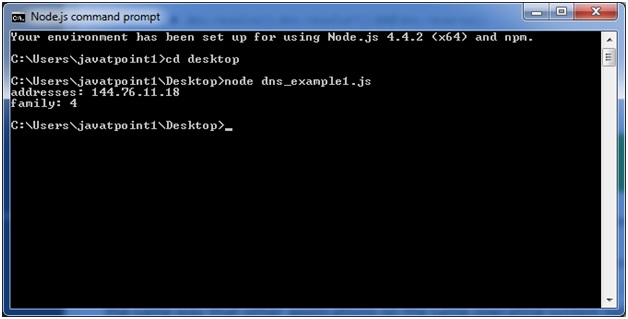
Node.js DNS Example 2
Let’s see the example of resolve4() and reverse() functions.
File: dns_example2.js
const dns = require('dns');

dns.resolve4('www.javatpoint.com', (err, addresses) => {

  if (err) throw err;

  console.log(addresses: ${JSON.stringify(addresses)});

  addresses.forEach((a) => {

    dns.reverse(a, (err, hostnames) => {

      if (err) {

        throw err;

      }

      console.log(reverse for ${a}: ${JSON.stringify(hostnames)});

    });

  });

});
Open Node.js command prompt and run the following code:
node dns_example2.js
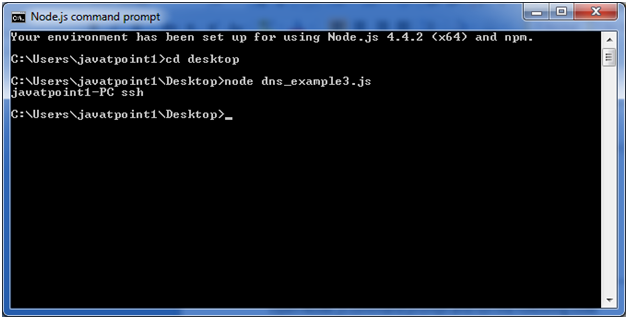
Node.js DNS Example 3
Let’s take an example to print the localhost name using lookupService() function.
const dns = require('dns');

dns.lookupService('127.0.0.1', 22, (err, hostname, service) => {

  console.log(hostname, service);

    // Prints: localhost

});
Open Node.js command prompt and run the following code:
node dns_example3.js