When you create Angular forms, it is important to know how the framework handles the data flow. There are two type of forms in Angular, reactive and template-driven and both follow the different structure to handle user?s input.
Data flow in Reactive forms
In Reactive form, each form element in the view is directly linked to a form model (FormControl instance). Any updation from the view to the model and the model to the view are synchronous and are not dependent on the UI. Let?s understand it using a diagram. It will show how data flows when we change input field’s value from the view and then from the model.
Data flow from View to Model
Steps in data flow from view to model in reactive forms:
- First, the user types a value into the input element. In this example, the input element is Favorite Color and the typed value is Blue.
- Then, the form input element emits an “input” event with the latest typed value.
- Then the control value accessor(who listen for events on the form input element) immediately relays the new value to the FormControl instance.
- After receiving the value theFormControl instance emits the new value through the valueChanges observable.
- Any subscribers to the valueChanges observable receive the new value.
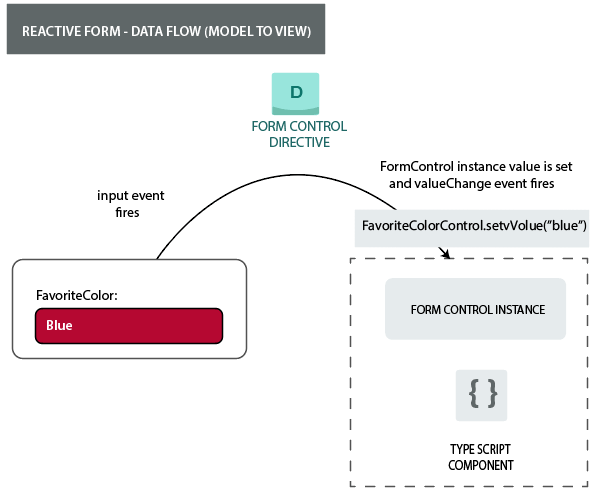
Data flow from Model to View

Steps in data flow from model to viewin reactive forms:
- First, the user calls the favoriteColorControl.setValue() method. This method updates the FormControl value.
- Then, the FormControl instance emits the new value through the valueChanges observable.
- Then, subscribers to the valueChanges observable receive the new value.
- At last, the control value accessor on the form input element updates the element with the new value.
Data flow in Template-driven forms
Every form element of the template-driven forms is linked to a directive to manage the form model internally.Let’s take a graphical example to understand how data flows in template-driven angular forms when an input field’s value is changed from the view and then from the model.
Data flow from View to Model:

Steps in data flow fromview to model in reactive forms:
Here the user has to change the input value from red to blue.
- First, the user types Blue into the input element.
- Then, the input element emits an “input” event having the value Blue.
- Then, the control value accessor attached to the input triggers the setValue() method on the FormControl instance.
- After the setValue() method, the FormControl instance emits the new value through the valueChanges observable.
- Subscribers to the valueChanges observable receive the new value.
- After that, the control value accessor also calls the NgModel.viewToModelUpdate() method which emits an ngModelChange event.
- Here, component template uses two-way data binding for the favoriteColor property, the favoriteColor property in the component is updated to the value emitted by the ngModelChange event (Blue).
Data flow from Model to View:

Steps in data flow from model to viewin reactive forms:
The data flow from model to view consists of following steps when the favoriteColor element changes from red to blue.
- First, the favoriteColor is updated to anew value in the component.
- Change detection starts.
- During change detection, the ngOnChanges lifecycle hook is called on the NgModel directive instance because the value of one of its inputs has changed.
- The ngOnChanges() method queues an async task to set the value for the internal FormControl instance.
- Change detection is complete now.
- Then, the task to set the FormControl instance value is executed.
- The FormControl instance emits the latest value through the valueChanges observable.
- Any subscribers to the valueChanges observable receive the new value.
- The control value accessor updates the form input element in the view with the latest favoriteColor value.