Angular was introduced to create Single Page applications. This framework brings structure and consistency to web applications and provides excellent scalability and maintainability.
Angular is an open-source JavaScript framework entirely written in TypeScript. It uses HTML syntax to express your application’s components clearly.
Angular forms are used to handle user’s input. We can use Angular form in our application to enable users to log in, to update profile, to enter information, and to perform many other data-entry tasks.
In Angular 8, there are 2 approaches to handle user’s input through forms:
Reactive forms
Template-driven forms
Both approaches are used to collect user input events from the view, validate the user input, create a form model and data model to update, and provide a way to track changes.
Reactive Forms vs. Template-driven Forms
Both Reactive forms and Template-driven forms manage and process data differently. Each offers different advantages.
Reactive Forms
Reactive forms are more robust.
Reactive forms are more scalable, reusable, and testable.
They are most preferred to use if forms are a key part of your application, or your application is already built using reactive patterns. In both cases, reactive forms are best to use.
Template-driven Forms
Template-driven forms are best if you want to add a simple form to your application. For example: email list signup form.
Template-driven forms are easy to use in the application but they are not as scalable as Reactive forms.
Template-driven forms are mainly used if your application’s requires a very basic form and logic. It can easily be managed in a template.
Angular 8 Form Example
Let’s understand the Angular 8 form by creating a form example. Here, we use Angular reactive form.
Follow the steps given below:
Create an Angular form app named angular8from and run the server by using the following commands.
ng new angular8form

cd angular8form

ng serve
Install the Bootstrap 4 using the following command.
npm install bootstrap --save
Now, include the bootstrap 4 inside the angular.json file inside styles array.
Use the reactive forms by importing ReactiveFormsModule from the @angular/forms package and add it to your app.module.ts file’s imports array.
So use the following code inside the app.module.ts file.
// app.module.ts

import { BrowserModule } from '@angular/platform-browser';

import { NgModule } from '@angular/core';


import { AppRoutingModule } from './app-routing.module';

import { AppComponent } from './app.component';

import { ReactiveFormsModule } from '@angular/forms';


@NgModule({

  declarations: [

    AppComponent

  ],

  imports: [

    BrowserModule,

    AppRoutingModule,

    ReactiveFormsModule

  ],

  providers: [],

  bootstrap: [AppComponent],

})

export class AppModule { }
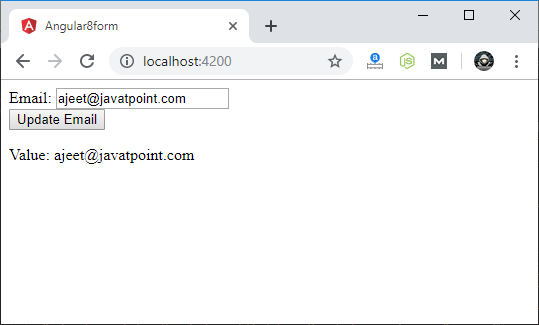
Add FormControl class register the control into the template and update the FormControl value
The FormControl class is the fundamental building block when using the reactive forms. So if you want to register the single form control, you need to import the FormControl class into your component and create the new instance of a form control to save as the class property.
Now, modify the app.component.ts file.
// app.component.ts

import { Component } from '@angular/core';

import { FormControl } from '@angular/forms';

@Component({

  selector: 'app-root',

  templateUrl: './app.component.html',

  styleUrls: ['./app.component.css']

})

export class AppComponent {

  email = new FormControl('');

  updateEmail() {

    this.email.setValue('[email protected]');

  }

}
We have seen that in one-way data binding any change in the template (view) were not be reflected in the component TypeScript code. To resolve this problem, Angular provides two-way data binding. The two-way binding has a feature to update data from component to view and vice-versa.
In two-way databinding, automatic synchronization of data happens between the Model and the View. Here, change is reflected in both components. Whenever you make changes in the Model, it will be reflected in the View and when you make changes in View, it will be reflected in Model.
This happens immediately and automatically, ensures that the HTML template and the TypeScript code are updated at all times.
In two way data binding, property binding and event binding are combined together.
Syntax:
[(ngModel)] = "[property of your component]"
Note: For two way data binding, we have to enable the ngModel directive. It depends upon FormsModule in angular/forms package, so we have to add FormsModule in imports[] array in the AppModule.
Let’s take an example to understand it better.
Open your project’s app.module.ts file and use the following code:
import { BrowserModule } from '@angular/platform-browser';

import { NgModule } from '@angular/core';

import {FormsModule} from '@angular/forms';

import { AppComponent } from './app.component';

@NgModule({

  declarations: [

    AppComponent

  ],

  imports: [

    BrowserModule,

    FormsModule

  ],

  providers: [],

  bootstrap: [AppComponent]

})

export class AppModule { }
In Angular 8, event binding is used to handle the events raised from the DOM like button click, mouse move etc. When the DOM event happens (eg. click, change, keyup), it calls the specified method in the component. In the following example, the cookBacon() method from the component is called when the button is clicked:
For example:
<button (click)="cookBacon()"></button>
Event Binding Example
Let’s take a button in the HTML template and handle the click event of this button. To implement event binding, we will bind click event of a button with a method of the component.
Now, open the app.component.ts file and use the following code:
import { Component } from '@angular/core';

@Component({

  selector: 'app-root',

  templateUrl: './app.component.html',

  styleUrls: ['./app.component.css']

})

export class AppComponent {

  onSave($event){

    console.log("Save button is clicked!", $event);

  }

}
Click on the “Save” button and open console to see result.
Now, you can see that the “Save” button is clicked.
Event Bubbling
Event bubbling is used to specify an order in which event handlers are called when one element is nested inside a second element, and both elements have registered a listener for the same event (i.e. click).
Let’s see the above button example. Here, I have used a div wrapper around the button in component HTML and div has also a click event handler. It is only to show some message if div is clicked.
Use the following code in app.component.ts file:
import { Component } from '@angular/core';

@Component({

  selector: 'app-root',

  templateUrl: './app.component.html',

  styleUrls: ['./app.component.css']

})

export class AppComponent {

  onSave($event){

    console.log("Save button is clicked!", $event);

  }

  onDivClick(){

    console.log("DIV is clicked!");

  }

}
String Interpolation is a one-way databinding technique which is used to output the data from a TypeScript code to HTML template (view). It uses the template expression in double curly braces to display the data from the component to the view. String interpolation adds the value of a property from the component.
For example:
{{ data }}
We have already created an Angular project using Angular CLI.
See: How to create Angular 8 project.
Here, we are using the same project for this example.
Open app.component.ts file and use the following code within the file:
import { Component } from '@angular/core';

@Component({

  selector: 'app-root',

  templateUrl: './app.component.html',

  styleUrls: ['./app.component.css']

})

export class AppComponent {

  title = 'Data binding example using String Interpolation';

}
Now, open app.component.html and use the following code to see string interpolation.
<h2>

  {{ title }}

</h2>
Now, open Node.js command prompt and run the ng serve command to see the result.
Output:
String Interpolation can be used to resolve some other expressions too. Let’s see an example.
Example:
Update the app.component.ts file with the following code:
import { Component } from '@angular/core';

@Component({

  selector: 'app-root',

  templateUrl: './app.component.html',

  styleUrls: ['./app.component.css']

})

export class AppComponent {

  title = 'Data binding example using String Interpolation';

    numberA: number = 10;

    numberB: number = 20;

  }
app.component.html:
<h2>Calculation is : {{ numberA + numberB }}</h2>
Output:
You can use the same application in another way:
App.component.ts:
import { Component } from '@angular/core';

@Component({

  selector: 'app-root',

  templateUrl: './app.component.html',

  styleUrls: ['./app.component.css']

})

export class AppComponent {

  title = 'Data binding example using String Interpolation';

  numberA: number = 10;

  numberB: number = 20;

  addTwoNumbers() {

    return this.numberA + this.numberB;

  }

}
Property Binding is also a one-way data binding technique. In property binding, we bind a property of a DOM element to a field which is a defined property in our component TypeScript code. Actually Angular internally converts string interpolation into property binding.
For example:
<img [src]="imgUrl" />
Property binding is preferred over string interpolation because it has shorter and cleaner code String interpolation should be used when you want to simply display some dynamic data from a component on the view between headings like h1, h2, p etc.
Note: String Interpolation and Property binding both are one-way binding. Means, if field value in the component changes, Angular will automatically update the DOM. But any changes in the DOM will not be reflected back in the component.
Property Binding Example
Open app.componnt.ts file and add the following code:
import { Component } from '@angular/core';

@Component({

  selector: 'app-root',

  templateUrl: './app.component.html',

  styleUrls: ['./app.component.css']

})

export class AppComponent {

  title = "Data binding using Property Binding";

  imgUrl="https://static.javatpoint.com/tutorial/angular7/images/angular-7-logo.png";

}
Now, open app.component.html and use the following code for property binding:
Data binding is the core concept of Angular 8 and used to define the communication between a component and the DOM. It is a technique to link your data to your view layer. In simple words, you can say that data binding is a communication between your typescript code of your component and your template which user sees. It makes easy to define interactive applications without worrying about pushing and pulling data.
Data binding can be either one-way data binding or two-way data binding.
One-way databinding
One way databinding is a simple one way communication where HTML template is changed when we make changes in TypeScript code.
Or
In one-way databinding, the value of the Model is used in the View (HTML page) but you can’t update Model from the View. Angular Interpolation / String Interpolation, Property Binding, and Event Binding are the example of one-way databinding.
Two-way databinding
In two-way databinding, automatic synchronization of data happens between the Model and the View. Here, change is reflected in both components. Whenever you make changes in the Model, it will be reflected in the View and when you make changes in View, it will be reflected in Model.
This happens immediately and automatically, ensures that the HTML template and the TypeScript code are updated at all times.
Angular provides four types of data binding and they are different on the way of data flowing.
String Interpolation
Property Binding
Event Binding
Two-way binding
String interpolation
String Interpolation is a one-way databinding technique which is used to output the data from a TypeScript code to HTML template (view). It uses the template expression in double curly braces to display the data from the component to the view.
For example:
{{ data }}
String interpolation adds the value of a property from the component:
Property Binding is also a one-way data binding technique. In property binding, we bind a property of a DOM element to a field which is a defined property in our component TypeScript code.
For example:
<img [src]="imgUrl"/>
Syntax:
<input type="email" [value]="user.email">
Learn more about Property Binding:
Event Binding
In Angular 8, event binding is used to handle the events raised from the DOM like button click, mouse move etc. When the DOM event happens (eg. click, change, keyup), it calls the specified method in the component. In the following example, the cookBacon() method from the component is called when the button is clicked:
For example:
<button (click)="cookBacon()"></button>
Learn more about Event Binding:
Two-way Data Binding
We have seen that in one-way data binding any change in the template (view) were not be reflected in the component TypeScript code. To resolve this problem, Angular provides two-way data binding. The two-way binding has a feature to update data from component to view and vice-versa.
In two way data binding, property binding and event binding are combined together.
In Angular 8, ngSwitch is a structural directive which is used to Add/Remove DOM Element. It is similar to switch statement of C#. The ngSwitch directive is applied to the container element with a switch expression.
In Angular ngSwitchCase directive, the inner elements are placed inside the container element. The ngSwitchCase directive is applied to the inner elements with a match expression. Whenever the value of the match expression matches the value of the switch expression, the corresponding inner element is added to the DOM. All other inner elements are removed from the DOM
If there is more than one match, then all the matching elements are added to the DOM.
ngSwitchDefault
You can also apply the ngSwitchDefault directive in Angular 8. The element with ngSwitchDefault is displayed only if no match is found. The inner element with ngSwitchDefault can be placed anywhere inside the container element and not necessarily at the bottom. If you add more than one ngSwitchDefault directive, all of them are displayed.
Any elements placed inside the container element, but outside the ngSwitchCase or ngSwitchDefault elements are displayed as it is.
ngSwitch Directive Example
Use the following code in app.component.ts file of your application:
The *ngFor directive is used to repeat a portion of HTML template once per each item from an iterable list (Collection). The ngFor is an Angular structural directive and is similar to ngRepeat in AngularJS. Some local variables like Index, First, Last, odd and even are exported by *ngFor directive.
Syntax of ngFor
See the simplified syntax for the ngFor directive:
<li *ngFor="let item of items;"> .... </li>
How to use ngFor Directive?
To Use ngFor directive, you have to create a block of HTML elements, which can display a single item of the items collection. After that you can use the ngFor directive to tell angular to repeat that block of HTML elements for each item in the list.
Example for *ngFor Directive
First, you have to create an angular Application. After that open the app.component.ts and add the following code.
The following Code contains a list of Top 3 movies in a movies array. Let’s build a template to display these movies in a tabular form.
import { Component } from '@angular/core';

@Component({

    selector: 'movie-app',

    templateUrl:'./app/app.component.html',

    styleUrls:['./app/app.component.css']

})

export class AppComponent

{

    title: string ="Top 10 Movies" ;

    movies: Movie[] =[

        {title:'Zootopia',director:'Byron Howard, Rich Moore',cast:'Idris Elba, Ginnifer Goodwin, Jason Bateman',releaseDate:'March 4, 2016'},

        {title:'Batman v Superman: Dawn of Justice',director:'Zack Snyder',cast:'Ben Affleck, Henry Cavill, Amy Adams',releaseDate:'March 25, 2016'},

        {title:'Captain America: Civil War',director:'Anthony Russo, Joe Russo',cast:'Scarlett Johansson, Elizabeth Olsen, Chris Evans',releaseDate:'May 6, 2016'},

        {title:'X-Men: Apocalypse',director:'Bryan Singer',cast:'Jennifer Lawrence, Olivia Munn, Oscar Isaac',releaseDate:'May 27, 2016'},

    ]

}

class Movie {

    title : string;

    director : string;

    cast : string;

    releaseDate : string;

}
Now, open the app. component.html and add the following code:
The ngIf Directives is used to add or remove HTML Elements according to the expression. The expression must return a Boolean value. If the expression is false then the element is removed, otherwise element is inserted. It is similar to the ng-if directive of AngularJS.
ngIf Syntax
<p *ngIf="condition">

    condition is true and ngIf is true.

</p>

<p *ngIf="!condition">

    condition is false and ngIf is false.

</p>
The *ngIf directive form with an “else” block
<div *ngIf="condition; else elseBlock">

Content to render when condition is true.

</div>

<ng-template #elseBlock>

Content to render when condition is false.

</ng-template>
The ngIf directive does not hide the DOM element. It removes the entire element along with its subtree from the DOM. It also removes the corresponding state freeing up the resources attached to the element.
The *ngIf directive is most commonly used to conditionally show an inline template. See the following example: