Author: saqibkhan

  • Redirections

    Named route is used to give specific name to a route. The name can be assigned using the “as” array key.

    Route::get('user/profile', ['as' => 'profile', function () {
       //
    }]);
    

    Note − Here, we have given the name profile to a route user/profile.

    Redirecting to Named Routes

    Example

    Observe the following example to understand more about Redirecting to named routes −

    Step 1 − Create a view called test.php and save it at

    resources/views/test.php.
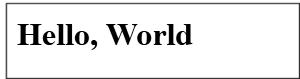
    <html>
       <body>
    
      &lt;h1&gt;Example of Redirecting to Named Routes&lt;/h1&gt;
    </body> </html>

    Step 2 − In routes.php, we have set up the route for test.php file. We have renamed it to testing. We have also set up another route redirect which will redirect the request to the named route testing.

    app/Http/routes.php

    Route::get('/test', ['as'=>'testing',function() {
       return view('test2');
    }]);
    
    Route::get('redirect',function() {
       return redirect()->route('testing');
    });
    

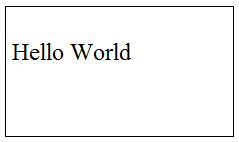
    Step 3 − Visit the following URL to test the named route example.

    http://localhost:8000/redirect
    

    Step 4 − After execution of the above URL, you will be redirected to http://localhost:8000/test as we are redirecting to the named route testing.

    Step 5 − After successful execution of the URL, you will receive the following output −

    Virat Gandhi

    Redirecting to Controller Actions

    Not only named route but we can also redirect to controller actions. We need to simply pass the controller and name of the action to the action method as shown in the following example. If you want to pass a parameter, you can pass it as the second argument of the action method.

    return redirect()->action(‘NameOfController@methodName’,[parameters]);
    

    Example

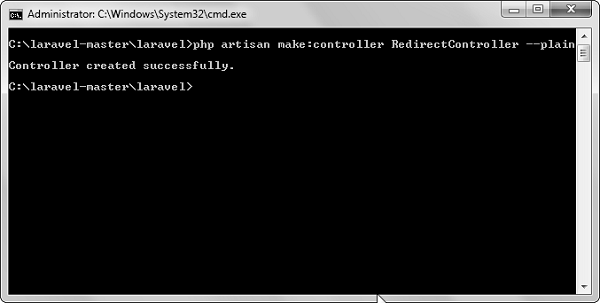
    Step 1 − Execute the following command to create a controller called RedirectController.

    php artisan make:controller RedirectController --plain
    

    Step 2 − After successful execution, you will receive the following output −

    Redirect Controller

    Step 3 − Copy the following code to file

    app/Http/Controllers/RedirectController.php.

    app/Http/Controllers/RedirectController.php

    <?php
    
    namespace App\Http\Controllers;
    
    use Illuminate\Http\Request;
    use App\Http\Requests;
    use App\Http\Controllers\Controller;
    
    class RedirectController extends Controller {
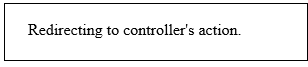
       public function index() {
    
      echo "Redirecting to controller's action.";
    } }

    Step 4 − Add the following lines in app/Http/routes.php.

    app/Http/routes.php

    Route::get('rr','RedirectController@index');
    Route::get('/redirectcontroller',function() {
       return redirect()->action('RedirectController@index');
    });
    

    Step 5 − Visit the following URL to test the example.

    http://localhost:8000/redirectcontroller
    

    Step 6 − The output will appear as shown in the following image.

    RedirectController.jpg
  • Laravel 8.x Features (2020)

    • The introduction of Laravel Jetstream provided a robust application scaffolding solution, integrating authentication and management features. This offered developers a more streamlined starting point for new applications.
  • Laravel Vapor (2019)

    • Launched as a serverless deployment platform for Laravel applications, allowing developers to deploy and scale applications on AWS Lambda without managing servers. This marked a significant shift toward modern cloud-based development practices.
  • Blade Templates

    Laravel 5.1 introduces the concept of using Blade, a templating engine to design a unique layout. The layout thus designed can be used by other views, and includes a consistent design and structure.

    When compared to other templating engines, Blade is unique in the following ways −

    • It does not restrict the developer from using plain PHP code in views.
    • The blade views thus designed, are compiled and cached until they are modified.
    Welcome Blade

    The complete directory structure of Laravel is shown in the screenshot given here.

    You can observe that all views are stored in the resources/views directory and the default view for Laravel framework is welcome.blade.php.

    Please note that other blade templates are also created similarly.

    Steps for Creating a Blade Template Layout

    You will have to use the following steps to create a blade template layout −

    Step 1

    • Create a layout folder inside the resources/views folder. We are going to use this folder to store all layouts together.
    • Create a file name master.blade.php which will have the following code associated with it −
    <html>
       <head>
    
      &lt;title&gt;DemoLaravel - @yield('title')&lt;/title&gt;
    </head> <body>
      @yield('content')
    </body> </html>

    Step 2

    In this step, you should extend the layout. Extending a layout involves defining the child elements. Laravel uses the Blade @extends directive for defining the child elements.

    When you are extending a layout, please note the following points −

    • Views defined in the Blade Layout injects the container in a unique way.
    • Various sections of view are created as child elements.
    • Child elements are stored in layouts folder as child.blade.php

    An example that shows extending the layout created above is shown here −

    @extends('layouts.app')
    @section('title', 'Page Title')
    @section('sidebar')
       @parent
    <p>This refers to the master sidebar.</p>
    @endsection
    @section('content')
    <p>This is my body content.</p>
    @endsection

    Step 3

    To implement the child elements in views, you should define the layout in the way it is needed.

    Landing Page

    Observe the screenshot shown here. You can find that each of links mentioned in the landing page are hyperlinks. Please note that you can also create them as child elements with the help of blade templates by using the procedure given above.

  • Community Contributions and Conferences

    Laravel has fostered a vibrant community, leading to numerous conferences, such as Laracon, which gather developers worldwide to share knowledge and best practices. The community also actively contributes to Laravel’s growth by creating packages, tutorials, and forums.

  • Views

    In MVC framework, the letter “V” stands for Views. It separates the application logic and the presentation logic. Views are stored in resources/views directory. Generally, the view contains the HTML which will be served by the application.

    Example

    Observe the following example to understand more about Views −

    Step 1 − Copy the following code and save it at resources/views/test.php

    <html>
       <body>
    
      &lt;h1&gt;Hello, World&lt;/h1&gt;
    </body> </html>

    Step 2 − Add the following line in app/Http/routes.php file to set the route for the above view.

    app/Http/routes.php

    Route::get('/test', function() {
       return view('test');
    });
    

    Step 3 − Visit the following URL to see the output of the view.

    http://localhost:8000/test
    

    Step 4 − The output will appear as shown in the following image.

    Understanding Views

    Passing Data to Views

    While building application it may be required to pass data to the views. Pass an array to view helper function. After passing an array, we can use the key to get the value of that key in the HTML file.

    Example

    Observe the following example to understand more about passing data to views −

    Step 1 − Copy the following code and save it at resources/views/test.php

    <html>
       <body>
    
      &lt;h1&gt;&lt;?php echo $name; ?&gt;&lt;/h1&gt;
    </body> </html>

    Step 2 − Add the following line in app/Http/routes.php file to set the route for the above view.

    app/Http/routes.php

    Route::get('/test', function() {
       return view('test',[‘name’=>’Virat Gandhi’]);
    });
    

    Step 3 − The value of the key name will be passed to test.php file and $name will be replaced by that value.

    Step 4 − Visit the following URL to see the output of the view.

    http://localhost:8000/test
    

    Step 5 − The output will appear as shown in the following image.

    Virat Gandhi

    Sharing Data with all Views

    We have seen how we can pass data to views but at times, there is a need to pass data to all the views. Laravel makes this simpler. There is a method called share() which can be used for this purpose. The share() method will take two arguments, key and value. Typically share() method can be called from boot method of service provider. We can use any service provider, AppServiceProvider or our own service provider.

    Example

    Observe the following example to understand more about sharing data with all views −

    Step 1 − Add the following line in app/Http/routes.php file.

    app/Http/routes.php

    Route::get('/test', function() {
       return view('test');
    });
    
    Route::get('/test2', function() {
       return view('test2');
    });
    

    Step 2 − Create two view files — test.php and test2.php with the same code. These are the two files which will share data. Copy the following code in both the files. resources/views/test.php & resources/views/test2.php

    <html>
       <body>
    
      &lt;h1&gt;&lt;?php echo $name; ?&gt;&lt;/h1&gt;
    </body> </html>

    Step 3 − Change the code of boot method in the file app/Providers/AppServiceProvider.php as shown below. (Here, we have used share method and the data that we have passed will be shared with all the views.) app/Providers/AppServiceProvider.php

    <?php
    
    namespace App\Providers;
    use Illuminate\Support\ServiceProvider;
    
    class AppServiceProvider extends ServiceProvider {
       
       /**
    
      * Bootstrap any application services.
      *
      * @return void
    */ public function boot() {
      view()-&gt;share('name', 'Virat Gandhi');
    } /**
      * Register any application services.
      *
      * @return void
    */ public function register() {
      //
    } }

    Step 4 − Visit the following URLs.

    http://localhost:8000/test
    http://localhost:8000/test2
    

    Step 5 − The output will appear as shown in the following image.

    Virat Gandhi
  • Laravel 5.8 (2019)

    • Released in February 2019, it focused on making improvements in the authentication system and featured an improved testing suite.
  • Laravel 5.7 (2018)

    • Launched in September 2018, this version included support for the latest PHP features, improved email verification, and the introduction of a new tool for job batching.
  • Laravel 5.6 (2018)

    • Released in February 2018, Laravel 5.6 brought features like dynamic Blade components, new verification features for user registration, and a more refined notification system.
  • Response

    A web application responds to a user’s request in many ways depending on many parameters. This chapter explains you in detail about responses in Laravel web applications.

    Basic Response

    Laravel provides several different ways to return response. Response can be sent either from route or from controller. The basic response that can be sent is simple string as shown in the below sample code. This string will be automatically converted to appropriate HTTP response.

    Example

    Step 1 − Add the following code to app/Http/routes.php file.

    app/Http/routes.php

    Route::get('/basic_response', function () {
       return 'Hello World';
    });
    

    Step 2 − Visit the following URL to test the basic response.

    http://localhost:8000/basic_response
    

    Step 3 − The output will appear as shown in the following image.

    Basic Response

    Attaching Headers

    The response can be attached to headers using the header() method. We can also attach the series of headers as shown in the below sample code.

    return response($content,$status)
       ->header('Content-Type', $type)
       ->header('X-Header-One', 'Header Value')
       ->header('X-Header-Two', 'Header Value');

    Example

    Observe the following example to understand more about Response −

    Step 1 − Add the following code to app/Http/routes.php file.

    app/Http/routes.php

    Route::get('/header',function() {
       return response("Hello", 200)->header('Content-Type', 'text/html');
    });

    Step 2 − Visit the following URL to test the basic response.

    http://localhost:8000/header
    

    Step 3 − The output will appear as shown in the following image.

    Hello

    Explore our latest online courses and learn new skills at your own pace. Enroll and become a certified expert to boost your career.

    Attaching Cookies

    The withcookie() helper method is used to attach cookies. The cookie generated with this method can be attached by calling withcookie() method with response instance. By default, all cookies generated by Laravel are encrypted and signed so that they can’t be modified or read by the client.

    Example

    Observe the following example to understand more about attaching cookies −

    Step 1 − Add the following code to app/Http/routes.php file.

    app/Http/routes.php

    Route::get('/cookie',function() {
       return response("Hello", 200)->header('Content-Type', 'text/html')
    
      -&gt;withcookie('name','Virat Gandhi');
    });

    Step 2 − Visit the following URL to test the basic response.

    http://localhost:8000/cookie
    

    Step 3 − The output will appear as shown in the following image.

    Hello

    JSON Response

    JSON response can be sent using the json method. This method will automatically set the Content-Type header to application/json. The json method will automatically convert the array into appropriate json response.

    Example

    Observe the following example to understand more about JSON Response −

    Step 1 − Add the following line in app/Http/routes.php file.

    app/Http/routes.php

    Route::get('json',function() {
       return response()->json(['name' => 'Virat Gandhi', 'state' => 'Gujarat']);
    });

    Step 2 − Visit the following URL to test the json response.

    http://localhost:8000/json
    

    Step 3 − The output will appear as shown in the following image.

    Json Response