Laravel follows a regular release schedule, with major updates every six months. This ensures the framework stays current with modern development practices and includes new features, security patches, and improvements, helping developers leverage the latest technology.
Author: saqibkhan
-
Forms
Laravel provides various in built tags to handle HTML forms easily and securely. All the major elements of HTML are generated using Laravel. To support this, we need to add HTML package to Laravel using composer.
Example 1
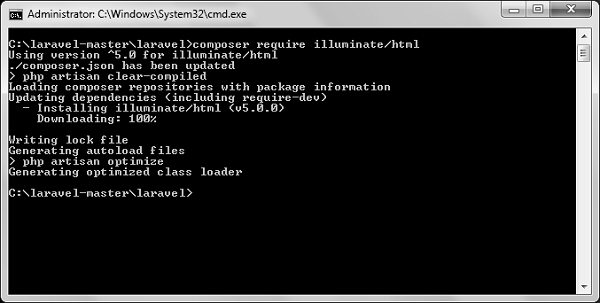
Step 1 − Execute the following command to proceed with the same.
composer require illuminate/htmlStep 2 − This will add HTML package to Laravel as shown in the following image.
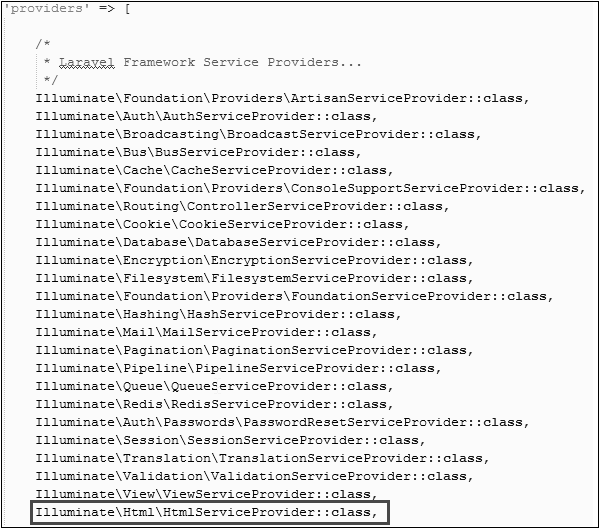
Step 3 − Now, we need to add the package shown above to Laravel configuration file which is stored at config/app.php. Open this file and you will see a list of Laravel service providers as shown in the following image. Add HTML service provider as indicated in the outlined box in the following image.
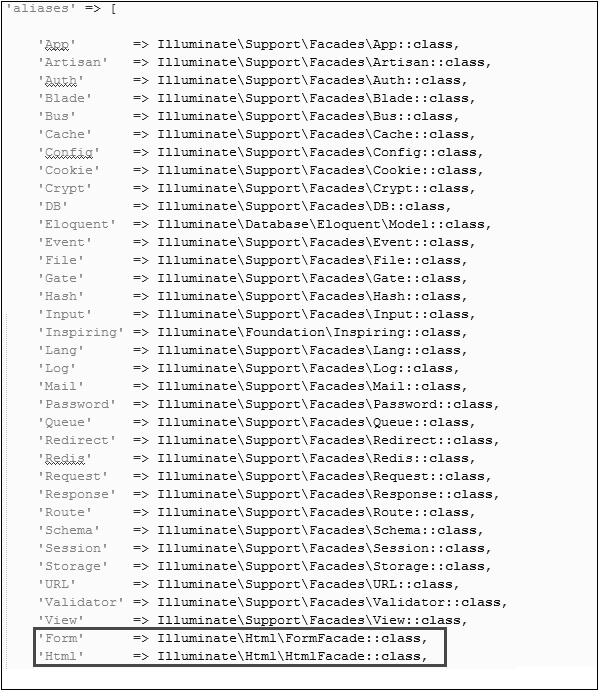
Step 4 − Add aliases in the same file for HTML and Form. Notice the two lines indicated in the outlined box in the following image and add those two lines.
Step 5 − Now everything is setup. Let’s see how we can use various HTML elements using Laravel tags.
Opening a Form
{{ Form::open(array('url' => 'foo/bar')) }}
   //
{{ Form::close() }}
Generating a Label Element
echo Form::label('email', 'E-Mail Address');Generating a Text Input
echo Form::text('username');Specifying a Default Value
echo Form::text('email', '[email protected]');Generating a Password Input
echo Form::password('password');Generating a File Input
echo Form::file('image');Generating a Checkbox Or Radio Input
echo Form::checkbox('name', 'value');
echo Form::radio('name', 'value');
Generating a Checkbox Or Radio Input That Is Checked
echo Form::checkbox('name', 'value', true);
echo Form::radio('name', 'value', true);
Generating a Drop-Down List
echo Form::select('size', array('L' => 'Large', 'S' => 'Small'));Generating A Submit Button
echo Form::submit('Click Me!');Example 2
Step 1 − Copy the following code to create a view called
resources/views/form.php.
resources/views/form.php
<html> <body>
</body> </html><?php echo Form::open(array('url' => 'foo/bar')); echo Form::text('username','Username'); echo '<br/>'; echo Form::text('email', '[email protected]'); echo '<br/>'; echo Form::password('password'); echo '<br/>'; echo Form::checkbox('name', 'value'); echo '<br/>'; echo Form::radio('name', 'value'); echo '<br/>'; echo Form::file('image'); echo '<br/>'; echo Form::select('size', array('L' => 'Large', 'S' => 'Small')); echo '<br/>'; echo Form::submit('Click Me!'); echo Form::close(); ?>Step 2 − Add the following line in app/Http/routes.php to add a route for view form.php
app/Http/routes.php
Route::get('/form',function() {
   return view('form');
});
Step 3 − Visit the following URL to see the form.
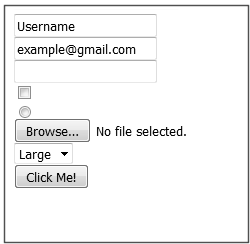
http://localhost:8000/formStep 4 − The output will appear as shown in the following image.
-
Laravel Ecosystem
The Laravel ecosystem comprises several tools and packages that enhance the framework’s functionality. For instance:
- Laravel Forge: Helps manage servers and deploy applications easily.
- Laravel Envoyer: Provides zero-downtime deployment solutions for production applications.
- Laravel Nova: A powerful administration panel for managing application data and users.
-
Artisan Command-Line Interface
Artisan is Laravel’s command-line interface that simplifies common development tasks. It comes with many built-in commands for tasks like creating controllers, running migrations, and seeding databases. Developers can also create custom commands to streamline their workflows.
-
Blade Templating Engine
Blade is Laravel’s powerful templating engine that enables developers to create dynamic web pages efficiently. It provides features like template inheritance, which allows for reusing layouts, and control structures (like loops and conditionals) that integrate seamlessly with HTML.
-
Eloquent ORM
Eloquent is Laravel’s built-in Object-Relational Mapping (ORM) system that allows developers to interact with the database using an intuitive, object-oriented syntax. Instead of writing raw SQL queries, developers can use Eloquent to perform database operations with PHP code, making data manipulation easier and more readable.
-
Open Source
Laravel is open-source software, which means that anyone can view, modify, and distribute its source code. This fosters community contributions and collaboration, resulting in continuous improvement and a wealth of resources for developers.
-
Errors and Logging
This chapter deals with errors and logging in Laravel projects and how to work on them.
Errors
A project while underway, is borne to have a few errors. Errors and exception handling is already configured for you when you start a new Laravel project. Normally, in a local environment we need to see errors for debugging purposes. We need to hide these errors from users in production environment. This can be achieved with the variable APP_DEBUG set in the environment file .env stored at the root of the application.
For local environment the value of APP_DEBUG should be true but for production it needs to be set to false to hide errors.
Note − After changing the APP_DEBUG variable, you should restart the Laravel server.
Logging
Logging is an important mechanism by which system can log errors that are generated. It is useful to improve the reliability of the system. Laravel supports different logging modes like single, daily, syslog, and errorlog modes. You can set these modes in config/app.php file.
'log' => 'daily'You can see the generated log entries in storage/logs/laravel.log file.
-
Created by Taylor Otwell
Taylor Otwell developed Laravel in 2011 to address the shortcomings he observed in other PHP frameworks, such as CodeIgniter. His goal was to create a framework that combined ease of use with powerful features, making it suitable for both beginners and experienced developers.
-
Working With Database
Laravel has made processing with database very easy. Laravel currently supports following 4 databases −
- MySQL
- Postgres
- SQLite
- SQL Server
The query to the database can be fired using raw SQL, the fluent query builder, and the Eloquent ORM. To understand the all CRUD (Create, Read, Update, Delete) operations with Laravel, we will use simple student management system.
Connecting to Database
Configure the database in config/database.php file and create the college database with structure in MySQL as shown in the following table.
Database: College
Table: student
Column Name Column Datatype Extra Id int(11) Primary key | Auto increment Name varchar(25) We will see how to add, delete, update and retrieve records from database using Laravel in student table.
Sr.No. Record & Description 1 Insert RecordsWe can insert the record using the DB facade with insert method. 2 Retrieve RecordsAfter configuring the database, we can retrieve the records using the DB facade with select method. 3 Update RecordsWe can update the records using the DB facade with update method. 4 Delete RecordsWe can delete the record using the DB facade with the delete method.