Laravel has built-in support for testing with PHPUnit, making it easy to write and run tests for your application. The framework provides features for testing routes, database interactions, and more, promoting a test-driven development approach that helps ensure code quality.
Author: saqibkhan
-
Session
Sessions are used to store information about the user across the requests. Laravel provides various drivers like file, cookie, apc, array, Memcached, Redis, and database to handle session data. By default, file driver is used because it is lightweight. Session can be configured in the file stored at config/session.php.
Accessing Session Data
To access the session data, we need an instance of session which can be accessed via HTTP request. After getting the instance, we can use the get() method, which will take one argument, “key”, to get the session data.
$value = $request->session()->get('key');You can use all() method to get all session data instead of get() method.
Storing Session Data
Data can be stored in session using the put() method. The put() method will take two arguments, the “key” and the “value”.
$request->session()->put('key', 'value');Explore our latest online courses and learn new skills at your own pace. Enroll and become a certified expert to boost your career.
Deleting Session Data
The forget() method is used to delete an item from the session. This method will take “key” as the argument.
$request->session()->forget('key');Use flush() method instead of forget() method to delete all session data. Use the pull() method to retrieve data from session and delete it afterwards. The pull() method will also take key as the argument. The difference between the forget() and the pull() method is that forget() method will not return the value of the session and pull() method will return it and delete that value from session.
Example
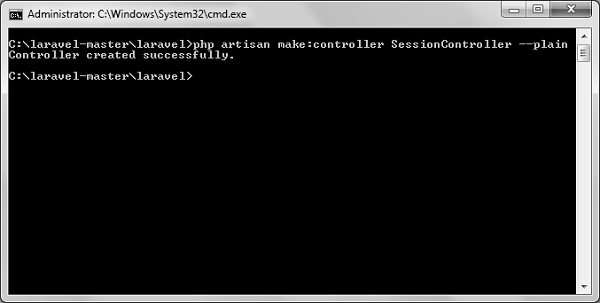
Step 1 − Create a controller called SessionController by executing the following command.
php artisan make:controller SessionController --plainStep 2 − After successful execution, you will receive the following output −
Step 3 − Copy the following code in a file at
app/Http/Controllers/SessionController.php.
app/Http/Controllers/SessionController.php
<?php namespace App\Http\Controllers; use Illuminate\Http\Request; use App\Http\Requests; use App\Http\Controllers\Controller; class SessionController extends Controller { public function accessSessionData(Request $request) {
} public function storeSessionData(Request $request) {if($request->session()->has('my_name')) echo $request->session()->get('my_name'); else echo 'No data in the session';
} public function deleteSessionData(Request $request) {$request->session()->put('my_name','Virat Gandhi'); echo "Data has been added to session";
} }$request->session()->forget('my_name'); echo "Data has been removed from session.";Step 4 − Add the following lines at app/Http/routes.php file.
app/Http/routes.php
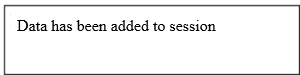
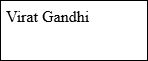
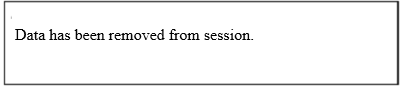
Route::get('session/get','SessionController@accessSessionData');
Route::get('session/set','SessionController@storeSessionData');
Route::get('session/remove','SessionController@deleteSessionData');
Step 5 − Visit the following URL to set data in session.
http://localhost:8000/session/setStep 6 − The output will appear as shown in the following image.
Step 7 − Visit the following URL to get data from session.
http://localhost:8000/session/getStep 8 − The output will appear as shown in the following image.
Step 9 − Visit the following URL to remove session data.
http://localhost:8000/session/removeStep 10 − You will see a message as shown in the following image.
-
Database Migrations
Laravel’s migration system provides a structured way to manage database schema changes. Developers can define their database structure in PHP files, making version control and collaboration easier. Migrations can be rolled back, ensuring that developers can maintain consistency across development environments.
-
Task Scheduling
Laravel includes a task scheduling feature that allows developers to define scheduled tasks within the application. This is done through the
schedulemethod in the console kernel, enabling easy management of cron jobs directly from the application without needing server-level configuration. -
Middleware Support
Laravel supports middleware, which are filters that can be applied to HTTP requests entering your application. Middleware can handle tasks like authentication, logging, and CORS management, allowing developers to apply common functionality across routes easily.
-
RESTful Resource Controllers
Laravel simplifies the creation of RESTful APIs by providing resource controllers. These controllers automatically handle common actions like creating, reading, updating, and deleting resources with minimal setup, making API development more efficient.
-
Localization
Localization feature of Laravel supports different language to be used in application. You need to store all the strings of different language in a file and these files are stored at resources/views directory. You should create a separate directory for each supported language. All the language files should return an array of keyed strings as shown below.
<?php
return [
   'welcome' => 'Welcome to the application'
];
Example
Step 1 − Create 3 files for languages − English, French, and German. Save English file at resources/lang/en/lang.php
<?php return [
]; ?>'msg' => 'Laravel Internationalization example.'Step 2 − Save French file at resources/lang/fr/lang.php.
<?php return [
]; ?>'msg' => 'Exemple Laravel internationalisation.'Step 3 − Save German file at resources/lang/de/lang.php.
<?php return [
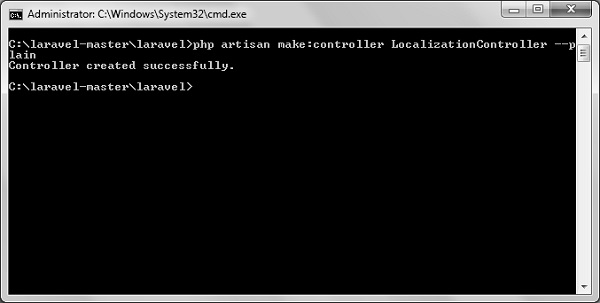
]; ?>'msg' => 'Laravel Internationalisierung Beispiel.'Step 4 − Create a controller called LocalizationController by executing the following command.
php artisan make:controller LocalizationController --plainStep 5 − After successful execution, you will receive the following output −
Step 6 − Copy the following code to file
app/Http/Controllers/LocalizationController.php
app/Http/Controllers/LocalizationController.php
<?php namespace App\Http\Controllers; use Illuminate\Http\Request; use App\Http\Requests; use App\Http\Controllers\Controller; class LocalizationController extends Controller { public function index(Request $request,$locale) {
} }//set’s application’s locale app()->setLocale($locale); //Gets the translated message and displays it echo trans('lang.msg');Step 7 − Add a route for LocalizationController in app/Http/routes.php file. Notice that we are passing {locale} argument after localization/ which we will use to see output in different language.
app/Http/routes.php
Route::get('localization/{locale}','LocalizationController@index');Step 8 − Now, let us visit the different URLs to see all different languages. Execute the below URL to see output in English language.
http://localhost:8000/localization/enStep 9 − The output will appear as shown in the following image.

Step 10 − Execute the below URL to see output in French language.
http://localhost:8000/localization/frStep 11 − The output will appear as shown in the following image.

Step 12 − Execute the below URL to see output in German language
http://localhost:8000/localization/deStep 13 − The output will appear as shown in the following image.

-
Focus on Developer Experience
Laravel emphasizes creating a pleasant developer experience by providing tools and features that streamline common tasks, reduce boilerplate code, and improve code readability. This focus makes it accessible to developers of all skill levels, fostering a supportive environment for learning and growth.
-
Popularity
Laravel is one of the most popular PHP frameworks, frequently cited in surveys and developer rankings. Its combination of robust features, ease of use, and strong community support contributes to its widespread adoption in web development.
-
Strong Community Support
Laravel has a vibrant and active community that contributes to forums, tutorials, and documentation. This community support is invaluable for developers, providing a wealth of knowledge and resources to help them solve problems and learn best practices.