So far, in our examples, we have used the Django dev web server. But this server is just for testing and is not fit for production environment. Once in production, you need a real server like Apache, Nginx, etc. Let’s discuss Apache in this chapter.
Serving Django applications via Apache is done by using mod_wsgi. So the first thing is to make sure you have Apache and mod_wsgi installed. Remember, when we created our project and we looked at the project structure, it looked like −
myproject/
   manage.py
   myproject/
  __init__.py
  settings.py
  urls.py
  wsgi.py
The wsgi.py file is the one taking care of the link between Django and Apache.
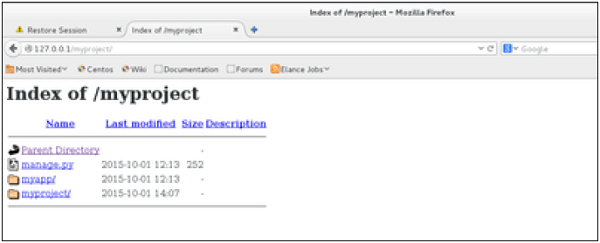
Let’s say we want to share our project (myproject) with Apache. We just need to set Apache to access our folder. Assume we put our myproject folder in the default “/var/www/html”. At this stage, accessing the project will be done via 127.0.0.1/myproject. This will result in Apache just listing the folder as shown in the following snapshot.
As seen, Apache is not handling Django stuff. For this to be taken care of, we need to configure Apache in httpd.conf. So open the httpd.conf and add the following line −
Django is an open-source framework, which means it’s free to use and can be modified by anyone. This encourages a collaborative community that continuously improves the framework.
GraphQL and Other APIs: Django is increasingly being used alongside modern technologies like GraphQL, React, and Vue.js, allowing developers to create dynamic, responsive applications.
Continuous Evolution: Django continues to evolve, with an active development team and community focused on enhancing performance, security, and features, ensuring it remains relevant in a rapidly changing tech landscape.
Comprehensive Guides: Django’s documentation is frequently praised for its thoroughness, making it accessible for both beginners and experienced developers. The community actively contributes to keeping it updated.
It is generally useful for a web app to be able to upload files (profile picture, songs, pdf, words…..). Let’s discuss how to upload files in this chapter.
Uploading an Image
Before starting to play with an image, make sure you have the Python Image Library (PIL) installed. Now to illustrate uploading an image, let’s create a profile form, in our myapp/forms.py −
#-*- coding: utf-8 -*-
from django import forms

class ProfileForm(forms.Form):
   name = forms.CharField(max_length = 100)
   picture = forms.ImageFields()
As you can see, the main difference here is just the forms.ImageField. ImageField will make sure the uploaded file is an image. If not, the form validation will fail.
Now let’s create a “Profile” model to save our uploaded profile. This is done in myapp/models.py −
from django.db import models
class Profile(models.Model):
name = models.CharField(max_length = 50)
picture = models.ImageField(upload_to = 'pictures')
class Meta:
db_table = "profile"</code></pre>
As you can see for the model, the ImageField takes a compulsory argument: upload_to. This represents the place on the hard drive where your images will be saved. Note that the parameter will be added to the MEDIA_ROOT option defined in your settings.py file.
Now that we have the Form and the Model, let's create the view, in myapp/views.py −
#-*- coding: utf-8 -*-
from myapp.forms import ProfileForm
from myapp.models import Profile
def SaveProfile(request):
saved = False
if request.method == "POST":
#Get the posted form
MyProfileForm = ProfileForm(request.POST, request.FILES)
if MyProfileForm.is_valid():
profile = Profile()
profile.name = MyProfileForm.cleaned_data["name"]
profile.picture = MyProfileForm.cleaned_data["picture"]
profile.save()
saved = True
else:
MyProfileForm = Profileform()
return render(request, 'saved.html', locals())
The part not to miss is, there is a change when creating a ProfileForm, we added a second parameters: request.FILES. If not passed the form validation will fail, giving a message that says the picture is empty.
Now, we just need the saved.html template and the profile.html template, for the form and the redirection page −
myapp/templates/saved.html −
<html>
<body>
{% if saved %}
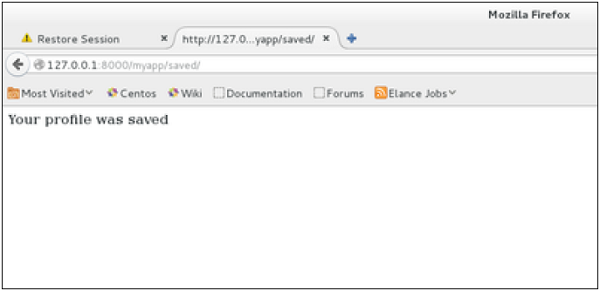
<strong>Your profile was saved.</strong>
{% endif %}
{% if not saved %}
<strong>Your profile was not saved.</strong>
{% endif %}
Next, we need our pair of URLs to get started: myapp/urls.py
from django.conf.urls import patterns, url
from django.views.generic import TemplateView
urlpatterns = patterns(
'myapp.views', url(r'^profile/',TemplateView.as_view(
template_name = 'profile.html')), url(r'^saved/', 'SaveProfile', name = 'saved')
)
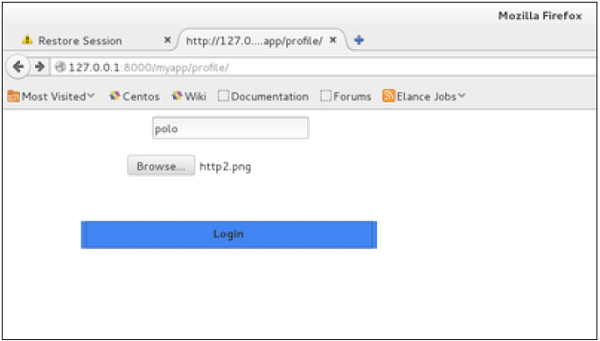
When accessing "/myapp/profile", we will get the following profile.html template rendered −
And on form post, the saved template will be rendered −
We have a sample for image, but if you want to upload another type of file, not just image, just replace the ImageField in both Model and Form with FileField.
Modern Capabilities: The addition of async support in Django 3.1 marked a significant shift, allowing developers to build more performant applications that can handle concurrent requests more effectively.
DjangoCon: Annual conferences, such as DjangoCon, provide a platform for developers to share knowledge, showcase projects, and discuss future directions for the framework.
Django Girls Workshops: These workshops have played a crucial role in introducing many women to programming and web development, fostering diversity in the Django community.
Creating forms in Django, is really similar to creating a model. Here again, we just need to inherit from Django class and the class attributes will be the form fields. Let’s add a forms.py file in myapp folder to contain our app forms. We will create a login form.
myapp/forms.py
#-*- coding: utf-8 -*-
from django import forms

class LoginForm(forms.Form):
   user = forms.CharField(max_length = 100)
   password = forms.CharField(widget = forms.PasswordInput())
As seen above, the field type can take “widget” argument for html rendering; in our case, we want the password to be hidden, not displayed. Many others widget are present in Django: DateInput for dates, CheckboxInput for checkboxes, etc.
Using Form in a View
There are two kinds of HTTP requests, GET and POST. In Django, the request object passed as parameter to your view has an attribute called “method” where the type of the request is set, and all data passed via POST can be accessed via the request.POST dictionary.
Let’s create a login view in our myapp/views.py −
#-*- coding: utf-8 -*-
from myapp.forms import LoginForm
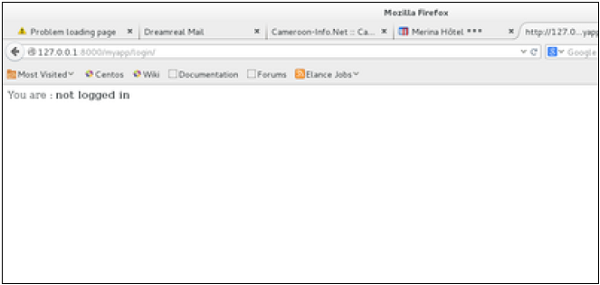
def login(request):
username = "not logged in"
if request.method == "POST":
#Get the posted form
MyLoginForm = LoginForm(request.POST)
if MyLoginForm.is_valid():
username = MyLoginForm.cleaned_data['username']
The view will display the result of the login form posted through the loggedin.html. To test it, we will first need the login form template. Let’s call it login.html.
The template will display a login form and post the result to our login view above. You have probably noticed the tag in the template, which is just to prevent Cross-site Request Forgery (CSRF) attack on your site.
{% csrf_token %}
Once we have the login template, we need the loggedin.html template that will be rendered after form treatment.
<html>
<body>
You are : <strong>{{username}}</strong>
</body>
</html>
Now, we just need our pair of URLs to get started: myapp/urls.py
from django.conf.urls import patterns, url
from django.views.generic import TemplateView

urlpatterns = patterns('myapp.views',
   url(r'^connection/',TemplateView.as_view(template_name = 'login.html')),
   url(r'^login/', 'login', name = 'login'))
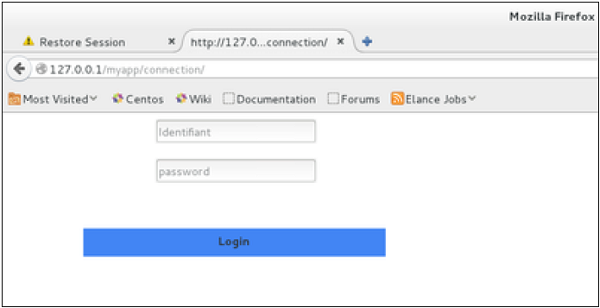
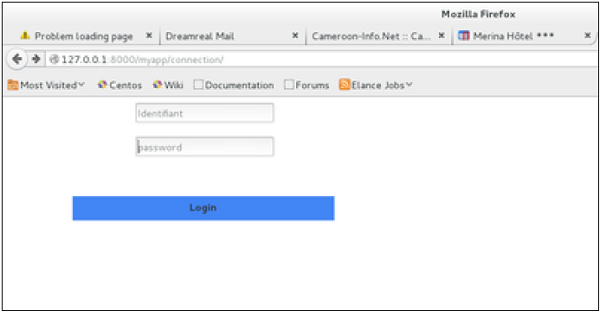
When accessing “/myapp/connection”, we will get the following login.html template rendered −
On the form post, the form is valid. In our case make sure to fill the two fields and you will get −
In case your username is polo, and you forgot the password. You will get the following message −
Using Our Own Form Validation
In the above example, when validating the form −
MyLoginForm.is_valid()
We only used Django self-form validation engine, in our case just making sure the fields are required. Now let’s try to make sure the user trying to login is present in our DB as Dreamreal entry. For this, change the myapp/forms.py to −
#-*- coding: utf-8 -*-
from django import forms
from myapp.models import Dreamreal

class LoginForm(forms.Form):
   user = forms.CharField(max_length = 100)
   password = forms.CharField(widget = forms.PasswordInput())

   def clean_message(self):
  username = self.cleaned_data.get("username")
  dbuser = Dreamreal.objects.filter(name = username)

  if not dbuser:
     raise forms.ValidationError("User does not exist in our db!")
  return username</code></pre>


Now, after calling the "is_valid" method, we will get the correct output, only if the user is in our database. If you want to check a field of your form, just add a method starting by "clean_" then your field name to your form class. Raising a forms.ValidationError is important.
Third-Party Packages: A rich ecosystem of packages and extensions has developed around Django, enhancing its capabilities in areas like CMS, e-commerce, and more.
Django Packages: The Django Packages site is a community-driven resource that lists available packages for various functionalities.