C++ pointers are easy and fun to learn. Some C++ tasks are performed more easily with pointers, and other C++ tasks, such as dynamic memory allocation, cannot be performed without them.
As you know every variable is a memory location and every memory location has its address defined which can be accessed using ampersand (&) operator which denotes an address in memory. Consider the following which will print the address of the variables defined −
#include <iostream>

using namespace std;
int main () {
   int  var1;
   char var2[10];

   cout << "Address of var1 variable: ";
   cout << &var1 << endl;

   cout << "Address of var2 variable: ";
   cout << &var2 << endl;

   return 0;
}
When the above code is compiled and executed, it produces the following result −
Address of var1 variable: 0xbfebd5c0
Address of var2 variable: 0xbfebd5b6
What are Pointers?
A pointer is a variable whose value is the address of another variable. Like any variable or constant, you must declare a pointer before you can work with it. The general form of a pointer variable declaration is −
type *var-name;
Here, type is the pointer’s base type; it must be a valid C++ type and var-name is the name of the pointer variable. The asterisk you used to declare a pointer is the same asterisk that you use for multiplication. However, in this statement the asterisk is being used to designate a variable as a pointer. Following are the valid pointer declaration −
int    *ip;    // pointer to an integer
double *dp;    // pointer to a double
float  *fp;    // pointer to a float
char   *ch     // pointer to character
The actual data type of the value of all pointers, whether integer, float, character, or otherwise, is the same, a long hexadecimal number that represents a memory address. The only difference between pointers of different data types is the data type of the variable or constant that the pointer points to.
Using Pointers in C++
There are few important operations, which we will do with the pointers very frequently. (a) We define a pointer variable. (b) Assign the address of a variable to a pointer. (c) Finally access the value at the address available in the pointer variable. This is done by using unary operator * that returns the value of the variable located at the address specified by its operand. Following example makes use of these operations −
#include <iostream>

using namespace std;

int main () {
   int  var = 20;   // actual variable declaration.
   int  *ip;        // pointer variable

   ip = &var;       // store address of var in pointer variable

   cout << "Value of var variable: ";
   cout << var << endl;

   // print the address stored in ip pointer variable
   cout << "Address stored in ip variable: ";
   cout << ip << endl;

   // access the value at the address available in pointer
   cout << "Value of *ip variable: ";
   cout << *ip << endl;

   return 0;
}
When the above code is compiled and executed, it produces result something as follows −
Value of var variable: 20
Address stored in ip variable: 0xbfc601ac
Value of *ip variable: 20
Pointers in C++
Pointers have many but easy concepts and they are very important to C++ programming. There are following few important pointer concepts which should be clear to a C++ programmer −
Sr.No
Concept & Description
1
Null PointersC++ supports null pointer, which is a constant with a value of zero defined in several standard libraries.
2
Pointer ArithmeticThere are four arithmetic operators that can be used on pointers: ++, –, +, –
3
Pointers vs ArraysThere is a close relationship between pointers and arrays.
4
Array of PointersYou can define arrays to hold a number of pointers.
5
Pointer to PointerC++ allows you to have pointer on a pointer and so on.
6
Passing Pointers to FunctionsPassing an argument by reference or by address both enable the passed argument to be changed in the calling function by the called function.
7
Return Pointer from FunctionsC++ allows a function to return a pointer to local variable, static variable and dynamically allocated memory as well.
C++ array stores a fixed-size sequential collection of elements of the same type. An array is used to store a collection of data, but it is often more useful to think of an array as a collection of variables of the same type.
Instead of declaring individual variables, such as number0, number1, …, and number99, you declare one array variable such as numbers and use numbers[0], numbers[1], and …, numbers[99] to represent individual variables. A specific element in an array is accessed by an index.
All arrays consist of contiguous memory locations. The lowest address corresponds to the first element and the highest address to the last element.
Declaring Arrays
To declare an array in C++, the programmer specifies the type of the elements and the number of elements required by an array as follows −
type arrayName [ arraySize ];
This is called a single-dimension array. The arraySize must be an integer constant greater than zero and type can be any valid C++ data type. For example, to declare a 10-element array called balance of type double, use this statement −
double balance[10];
Initializing Arrays
You can initialize C++ array elements either one by one or using a single statement as follows −
double balance[5]={1000.0,2.0,3.4,17.0,50.0};
The number of values between braces { } can not be larger than the number of elements that we declare for the array between square brackets [ ]. Following is an example to assign a single element of the array −
If you omit the size of the array, an array just big enough to hold the initialization is created. Therefore, if you write −
You will create exactly the same array as you did in the previous example.
balance[4]=50.0;
The above statement assigns element number 5th in the array a value of 50.0. Array with 4th index will be 5th, i.e., last element because all arrays have 0 as the index of their first element which is also called base index. Following is the pictorial representaion of the same array we discussed above −
Accessing Array Elements
An element is accessed by indexing the array name. This is done by placing the index of the element within square brackets after the name of the array. For example −
double salary = balance[9];
The above statement will take 10th element from the array and assign the value to salary variable. Following is an example, which will use all the above-mentioned three concepts viz. declaration, assignment and accessing arrays −
Example
In the following example, we are declaring an array, assigning values to the array, and then accessing array elements −
Open Compiler
#include <iostream>usingnamespace std;#include <iomanip>using std::setw;intmain(){int n[10];// n is an array of 10 integers// initialize elements of array n to 0 for(int i =0; i <10; i++){
n[ i ]= i +100;// set element at location i to i + 100}
cout <<"Element"<<setw(13)<<"Value"<< endl;// output each array element's value for(int j =0; j <10; j++){
You can change the value of an array element by specifying its index and assigning a new value.
Example
In the following example, we are changing the value at index 2 −
Open Compiler
#include <iostream>usingnamespace std;intmain(){int arr[]={10,20,30,40,50};
cout <<"Before changing, element at index 2: "<< arr[2]<< endl;// changing the value
arr[2]=108;
cout <<"After changing, element at index 2: "<< arr[2]<< endl;return0;}
Output
Before changing, element at index 2: 30
After changing, element at index 2: 108
More on C++ Arrays
Arrays are important to C++ and should need lots of more detail. There are following few important concepts, which should be clear to a C++ programmer −
Sr.No
Concept & Description
1
Multi-dimensional arraysC++ supports multidimensional arrays. The simplest form of the multidimensional array is the two-dimensional array.
2
Pointer to an arrayYou can generate a pointer to the first element of an array by simply specifying the array name, without any index.
3
Passing arrays to functionsYou can pass to the function a pointer to an array by specifying the array's name without an index.
4
Return array from functionsC++ allows a function to return an array.
C++ is known for its high performance due to low-level memory manipulation capabilities. This makes it suitable for system programming and applications requiring efficiency, such as game development and real-time simulations.
Normally, when we work with Numbers, we use primitive data types such as int, short, long, float and double, etc. The number data types, their possible values and number ranges have been explained while discussing C++ Data Types.
Defining Numbers in C++
You have already defined numbers in various examples given in previous chapters. Here is another consolidated example to define various types of numbers in C++ −
#include <iostream>
using namespace std;

int main () {
   // number definition:
   short  s;
   int    i;
   long   l;
   float  f;
   double d;

   // number assignments;
   s = 10;
   i = 1000;
   l = 1000000;
   f = 230.47;
   d = 30949.374;

   // number printing;
   cout << "short  s :" << s << endl;
   cout << "int    i :" << i << endl;
   cout << "long   l :" << l << endl;
   cout << "float  f :" << f << endl;
   cout << "double d :" << d << endl;

   return 0;
}
When the above code is compiled and executed, it produces the following result −
short  s :10
int    i :1000
long   l :1000000
float  f :230.47
double d :30949.4
Math Operations in C++
In addition to the various functions you can create, C++ also includes some useful functions you can use. These functions are available in standard C and C++ libraries and called built-in functions. These are functions that can be included in your program and then use.
C++ has a rich set of mathematical operations, which can be performed on various numbers. Following table lists down some useful built-in mathematical functions available in C++.
To utilize these functions you need to include the math header file <cmath>.
Sr.No
Function & Purpose
1
double cos(double);This function takes an angle (as a double) and returns the cosine.
2
double sin(double);This function takes an angle (as a double) and returns the sine.
3
double tan(double);This function takes an angle (as a double) and returns the tangent.
4
double log(double);This function takes a number and returns the natural log of that number.
5
double pow(double, double);The first is a number you wish to raise and the second is the power you wish to raise it t
6
double hypot(double, double);If you pass this function the length of two sides of a right triangle, it will return you the length of the hypotenuse.
7
double sqrt(double);You pass this function a number and it gives you the square root.
8
int abs(int);This function returns the absolute value of an integer that is passed to it.
9
double fabs(double);This function returns the absolute value of any decimal number passed to it.
10
double floor(double);Finds the integer which is less than or equal to the argument passed to it.
Following is a simple example to show few of the mathematical operations −
#include <iostream>
#include <cmath>
using namespace std;

int main () {
   // number definition:
   short  s = 10;
   int    i = -1000;
   long   l = 100000;
   float  f = 230.47;
   double d = 200.374;

   // mathematical operations;
   cout << "sin(d) :" << sin(d) << endl;
   cout << "abs(i)  :" << abs(i) << endl;
   cout << "floor(d) :" << floor(d) << endl;
   cout << "sqrt(f) :" << sqrt(f) << endl;
   cout << "pow( d, 2) :" << pow(d, 2) << endl;

   return 0;
}
When the above code is compiled and executed, it produces the following result −
There are many cases where you will wish to generate a random number. There are actually two functions you will need to know about random number generation. The first is rand(), this function will only return a pseudo random number. The way to fix this is to first call the srand() function.
Following is a simple example to generate few random numbers. This example makes use of time() function to get the number of seconds on your system time, to randomly seed the rand() function −
#include <iostream>
#include <ctime>
#include <cstdlib>
using namespace std;
int main () {
int i,j;
// set the seed
srand( (unsigned)time( NULL ) );
/* generate 10 random numbers. */
for( i = 0; i < 10; i++ ) {
// generate actual random number
j = rand();
cout <<" Random Number : " << j << endl;
}
return 0;
}
When the above code is compiled and executed, it produces the following result −
Random Number : 1748144778
Random Number : 630873888
Random Number : 2134540646
Random Number : 219404170
Random Number : 902129458
Random Number : 920445370
Random Number : 1319072661
Random Number : 257938873
Random Number : 1256201101
Random Number : 580322989
Foreach loop is also known as range-based for loop, it’s a way to iterate over elements through a container (like array, vector, list) in a simple and readable manner without performing any extra performance like initialization, increment/decrement, and loop termination or exit condition.
Syntax
The following is the syntax of for each loop −
for( data_type element_variable__name : container_name ){// code to be executed}
Here,
element_variable_name is the variable name given to the elements stored in a container.
container_name is the variable name of a container of any type such as an array, vector, list. etc.
How Foreach Loop Works?
The foreach loop iterates over all elements of the given container. The process starts with the first element, which is assigned to the variable as element_variable_name as shown in the code.
The loop then executes the body of the for each loop, allowing you to manipulate or use the elements.
After processing the current element, the loop moves to the next element in the container.
This process repeats until it reaches the last element of the container.
Example of Foreach Loop
In this example, the range-based for loop with a reference (int& num) allows you to directly modify each element of the vector.
Open Compiler
#include <iostream>#include <vector>usingnamespace std;intmain(){
vector<int> digits ={10,20,30,40,50};// Range-based for loop to modify each elementfor(int& num : digits){
num *=2;// Double each number}for(int num : digits){
cout << num <<" ";}
cout << endl;return0;}
Output
20 40 60 80 100
Foreach Loop with Vector
The foreach loop can be used to iterate the over the vector elements.
Example
In this example, we are iterating and printing vector’s element by using foreach loop
Open Compiler
#include <iostream>#include <vector>usingnamespace std;intmain(){
vector<int> numbers ={1,2,3,4};for(int num : numbers){
cout << num <<" ";}return0;}</code></pre>
Output
1 2 3 4
Foreach Loop with List
Similarly, the foreach loop can also be used to iterate over the list elements.
Example
Here, in this example we iterating and printing elements of list by using foreach loop
Open Compiler
#include <iostream>#include <list>intmain(){usingnamespace std;
list<int> numbers ={10,20,30,40,50};for(int num : numbers){
cout << num <<" ";}
cout << endl;return0;}
Output
10 20 30 40 50
For Loop Vs. Foreach Loop
The for loop executes the set of statements based on the given condition while the foreach loop (or, range-based for loop) iterates over the collection elements. Consider the following example to understand the difference between for and foreach in C++ −
Standard Method: for loop
The following is an example of for loop, where we are printing the elements of an integer array −
Open Compiler
#include<iostream>usingnamespace std;intmain(){// an Arrayint arr[]={1,2,3,4};// Printing array elements using// for loopfor(int i =0; i <=3; i++){
The following is an example of foreach loop, where we are iterating and printing the elements of an integer array −
Open Compiler
#include<iostream>usingnamespace std;intmain(){int arr[]={1,2,3,4};// Where x is variable name provided to // elements inside containerfor(int x: arr){
cout<< x<<" ";}return0;}</code></pre>
Output
1 2 3 4
Foreach Loop with Non-container Type
Generally, foreach loop is used for iteration for container types like Array, vector, List, Deque, Set and Map etc. but it’s also used for Non-container type, which is iterable, meaning it must have begin() and end() that return iterators.
Traditional containers like vectors and all the rest mentioned above inherently meet these requirements so we don’t need to specifically specify begin() and end() to it.
Example
The following example demonstrates the working of foreach loop with a non-container type element −
Open Compiler
#include <iostream>#include <vector>usingnamespace std;classIterable{public:// Constructor with initialization listIterable(const vector<int>& v):values(v){}// Provide begin() and end() methodsautobegin()const-> vector<int>::const_iterator {return values.begin();}autoend()const-> vector<int>::const_iterator {return values.end();}private:
vector<int> values;};intmain(){
Iterable myIterable({1,2,3,4,5});for(int num : myIterable){
cout << num <<" ";}
cout << endl;return0;}
Output
1 2 3 4 5
Here,
In the above code, the begin() method returns an iterator that points to the first element of the container whereas an end() method returns an iterator that points one position beyond the last element of the container.
Then loop iterate from iterator using for() over each element/value of vector printing each value to console.
Advantages of Foreach Loop
The following are the advantages of using Foreach loop in C++;
Simplicity − It reduces boiler plate code.
Readability − It has a simple way of writing code in an easy and readable manner compared to old standard traditional loop methods like for, while and do-while loop.
Safety − It reduces errors related to index management and edge cases.
Limitation of Foreach Loop
The following are some of the limitations of foreach loop −
Restricted to forward traversal − It does not give access to iterate in reverse order.
Non-interruptible traversal − There is no option to skip any element or break iteration in between before reaching the last index or last element.
No direct access of element while Iteration − There is no direct access to index or position of current element while iterating through foreach loop.
Applications of Foreach Loop
Read-only Iteration − The foreach loop is a good choice for read-only iteration, when the user wants to iterate through elements without any modifications, because the foreach loop provides cleaner and simple code.
Traversing over Container − The foreach loop is useful when we want to traverse over any kind of container like (Array, List, Vector) because this loop simplifies the process of iteration over elements of the container.
Simple Modification − It is useful when we want to perform any simple operation, because it gives simple, easy and readable code compared to the old standard method of writing iteration code.
Working with Non-Container Type − It also works with any type that meets the requirements of an iterable. which consist of begin() and end().
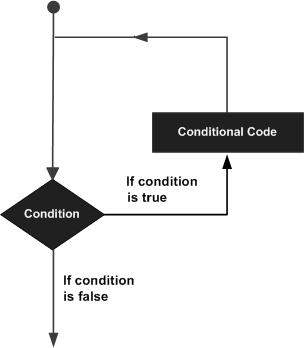
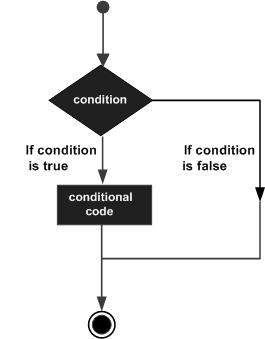
There may be a situation, when you need to execute a block of code several number of times. In general, statements are executed sequentially: The first statement in a function is executed first, followed by the second, and so on.
Programming languages provide various control structures that allow for more complicated execution paths.
A loop statement allows us to execute a statement or group of statements multiple times and following is the general from of a loop statement in most of the programming languages −
C++ programming language provides the following type of loops to handle looping requirements.
Sr.No
Loop Type & Description
1
while loopRepeats a statement or group of statements while a given condition is true. It tests the condition before executing the loop body.
2
for loopExecute a sequence of statements multiple times and abbreviates the code that manages the loop variable.
3
do…while loopLike a ‘while’ statement, except that it tests the condition at the end of the loop body.
4
nested loopsYou can use one or more loop inside any another ‘while’, ‘for’ or ‘do..while’ loop.
Loop Control Statements
Loop control statements change execution from its normal sequence. When execution leaves a scope, all automatic objects that were created in that scope are destroyed.
C++ supports the following control statements.
Sr.No
Control Statement & Description
1
break statementTerminates the loop or switch statement and transfers execution to the statement immediately following the loop or switch.
2
continue statementCauses the loop to skip the remainder of its body and immediately retest its condition prior to reiterating.
3
goto statementTransfers control to the labeled statement. Though it is not advised to use goto statement in your program.
The Infinite Loop
A loop becomes infinite loop if a condition never becomes false. The for loop is traditionally used for this purpose. Since none of the three expressions that form the ‘for’ loop are required, you can make an endless loop by leaving the conditional expression empty.
#include <iostream>
using namespace std;

int main () {
   for( ; ; ) {
  printf("This loop will run forever.\n");   }

   return 0;
}
When the conditional expression is absent, it is assumed to be true. You may have an initialization and increment expression, but C++ programmers more commonly use the ‘for (;;)’ construct to signify an infinite loop.
NOTE − You can terminate an infinite loop by pressing Ctrl + C keys.
Decision making structures require that the programmer specify one or more conditions to be evaluated or tested by the program, along with a statement or statements to be executed if the condition is determined to be true, and optionally, other statements to be executed if the condition is determined to be false.
Following is the general form of a typical decision making structure found in most of the programming languages −
C++ programming language provides following types of decision making statements.
Sr.No
Statement & Description
1
if statementAn ‘if’ statement consists of a boolean expression followed by one or more statements.
2
if…else statementAn ‘if’ statement can be followed by an optional ‘else’ statement, which executes when the boolean expression is false.
3
switch statementA ‘switch’ statement allows a variable to be tested for equality against a list of values.
4
nested if statementsYou can use one ‘if’ or ‘else if’ statement inside another ‘if’ or ‘else if’ statement(s).
5
nested switch statementsYou can use one ‘switch’ statement inside another ‘switch’ statement(s).
The ? : Operator
We have covered conditional operator “? :” in previous chapter which can be used to replace if…else statements. It has the following general form −
Exp1 ? Exp2 : Exp3;
Exp1, Exp2, and Exp3 are expressions. Notice the use and placement of the colon.
The value of a ‘?’ expression is determined like this: Exp1 is evaluated. If it is true, then Exp2 is evaluated and becomes the value of the entire ‘?’ expression. If Exp1 is false, then Exp3 is evaluated and its value becomes the value of the expression.
An operator is a symbol that tells the compiler to perform specific mathematical or logical manipulations. C++ is rich in built-in operators and provide the following types of operators −
Arithmetic Operators
Relational Operators
Logical Operators
Bitwise Operators
Assignment Operators
Misc Operators
This chapter will examine the arithmetic, relational, logical, bitwise, assignment and other operators one by one.
Arithmetic Operators
Arithmetic operators in C++ are the basic operators, which are used for basic mathematical or arithmetical operations on operands. These operators are essential for performing calculations and manipulating data within a program.
There are following arithmetic operators supported by C++ language −
Assume variable A holds 10 and variable B holds 20, then −
Operator
Description
Example
+
Adds two operands
A + B will give 30
–
Subtracts second operand from the first
A – B will give -10
*
Multiplies both operands
A * B will give 200
/
Divides numerator by de-numerator
B / A will give 2
%
Modulus Operator and remainder of after an integer division
The following is an example of arithmetic operators −
Open Compiler
#include <iostream>usingnamespace std;main(){int a =21;int b =10;int c ;

   c = a + b;
   cout <<"Line 1 - Value of c is :"<< c << endl ;

   c = a - b;
   cout <<"Line 2 - Value of c is  :"<< c << endl;

   c = a * b;
   cout <<"Line 3 - Value of c is :"<< c << endl ;

   c = a / b;
   cout <<"Line 4 - Value of c is  :"<< c << endl ;

   c = a % b;
   cout <<"Line 5 - Value of c is  :"<< c << endl ;

   c = a++;
   cout <<"Line 6 - Value of c is :"<< c << endl ;

   c = a--;
   cout <<"Line 7 - Value of c is  :"<< c << endl ;return0;}
Output
Line 1 - Value of c is :31
Line 2 - Value of c is  :11
Line 3 - Value of c is :210
Line 4 - Value of c is  :2
Line 5 - Value of c is  :1
Line 6 - Value of c is :21
Line 7 - Value of c is  :22
Relational Operators
Relational operators are used to compare two values or expressions. These operators return a boolean value − true if the comparison is correct, and else false.
They are essential for making decisions and controlling the flow of a program based on conditions.
There are following relational operators supported by C++ language
Assume variable A holds 10 and variable B holds 20, then −
Operator
Description
Example
==
Checks if the values of two operands are equal or not, if yes then condition becomes true.
(A == B) is not true.
!=
Checks if the values of two operands are equal or not, if values are not equal then condition becomes true.
(A != B) is true.
>
Checks if the value of left operand is greater than the value of right operand, if yes then condition becomes true.
(A > B) is not true.
<
Checks if the value of left operand is less than the value of right operand, if yes then condition becomes true.
(A < B) is true.
>=
Checks if the value of left operand is greater than or equal to the value of right operand, if yes then condition becomes true.
(A >= B) is not true.
<=
Checks if the value of left operand is less than or equal to the value of right operand, if yes then condition becomes true.
(A <= B) is true.
Example
The following is an example of relational operators −
Open Compiler
#include <iostream>usingnamespace std;main(){int a =21;int b =10;int c ;if( a == b ){
cout <<"Line 1 - a is equal to b"<< endl ;}else{
cout <<"Line 1 - a is not equal to b"<< endl ;}if( a < b ){
cout <<"Line 2 - a is less than b"<< endl ;}else{
cout <<"Line 2 - a is not less than b"<< endl ;}if( a > b ){
cout <<"Line 3 - a is greater than b"<< endl ;}else{
cout <<"Line 3 - a is not greater than b"<< endl ;}/* Let's change the values of a and b */
a =5;
b =20;if( a <= b ){
cout <<"Line 4 - a is either less than \ or equal to b"<< endl ;}if( b >= a ){
cout <<"Line 5 - b is either greater than \ or equal to b"<< endl ;}return0;}</code></pre>
Output
Line 1 - a is not equal to b
Line 2 - a is not less than b
Line 3 - a is greater than b
Line 4 - a is either less than or equal to b
Line 5 - b is either greater than or equal to b
Logical Operators
Logical operators are used to perform logical operations on boolean values (true or false). These operators are essential for controlling the flow of a program based on conditions. There are three primary logical operators in C++ as mentioned below −
There are following logical operators supported by C++ language.
Assume variable A holds 1 and variable B holds 0, then −
Operator
Description
Example
&&
Called Logical AND operator. If both the operands are non-zero, then condition becomes true.
(A && B) is false.
||
Called Logical OR Operator. If any of the two operands is non-zero, then condition becomes true.
(A || B) is true.
!
Called Logical NOT Operator. Use to reverses the logical state of its operand. If a condition is true, then Logical NOT operator will make false.
!(A && B) is true.
Example
The following is an example of logical operators −
Open Compiler
#include <iostream>usingnamespace std;main(){int a =5;int b =20;int c ;if(a && b){
cout <<"Line 1 - Condition is true"<< endl ;}if(a || b){
cout <<"Line 2 - Condition is true"<< endl ;}/* Let's change the values of a and b */
a =0;
b =10;if(a && b){
cout <<"Line 3 - Condition is true"<< endl ;}else{
cout <<"Line 4 - Condition is not true"<< endl ;}if(!(a && b)){
cout <<"Line 5 - Condition is true"<< endl ;}return0;}</code></pre>
Output
Line 1 - Condition is true
Line 2 - Condition is true
Line 4 - Condition is not true
Line 5 - Condition is true
Bitwise Operators
Bitwise operators are used to perform operations at the bit level on integer data types. These operations work on direct manipulation of bits, such as low-level programming, graphics, and cryptography.
Bitwise operator works on bits and perform bit-by-bit operation. The truth tables for &, |, and ^ are as follows −
p
q
p & q
p | q
p ^ q
0
0
0
0
0
0
1
0
1
1
1
1
1
1
0
1
0
0
1
1
Assume if A = 60; and B = 13; now in binary format they will be as follows −
A = 0011 1100
B = 0000 1101
-----------------
A&B = 0000 1100
A|B = 0011 1101
A^B = 0011 0001
~A = 1100 0011
The Bitwise operators supported by C++ language are listed in the following table. Assume variable A holds 60 and variable B holds 13, then −
Operator
Description
Example
&
Binary AND Operator copies a bit to the result if it exists in both operands.
(A & B) will give 12 which is 0000 1100
|
Binary OR Operator copies a bit if it exists in either operand.
(A | B) will give 61 which is 0011 1101
^
Binary XOR Operator copies the bit if it is set in one operand but not both.
(A ^ B) will give 49 which is 0011 0001
~
Binary Ones Complement Operator is unary and has the effect of 'flipping' bits.
(~A ) will give -61 which is 1100 0011 in 2's complement form due to a signed binary number.
<<
Binary Left Shift Operator. The left operands value is moved left by the number of bits specified by the right operand.
A << 2 will give 240 which is 1111 0000
>>
Binary Right Shift Operator. The left operands value is moved right by the number of bits specified by the right operand.
A >> 2 will give 15 which is 0000 1111
Example
The following is an example of bitwise operators −
Open Compiler
#include <iostream>usingnamespace std;main(){unsignedint a =60;// 60 = 0011 1100 unsignedint b =13;// 13 = 0000 1101int c =0;
c = a & b;// 12 = 0000 1100
cout <<"Line 1 - Value of c is : "<< c << endl ;
c = a | b;// 61 = 0011 1101
cout <<"Line 2 - Value of c is: "<< c << endl ;
c = a ^ b;// 49 = 0011 0001
cout <<"Line 3 - Value of c is: "<< c << endl ;
c =~a;// -61 = 1100 0011
cout <<"Line 4 - Value of c is: "<< c << endl ;
c = a <<2;// 240 = 1111 0000
cout <<"Line 5 - Value of c is: "<< c << endl ;
c = a >>2;// 15 = 0000 1111
cout <<"Line 6 - Value of c is: "<< c << endl ;return0;}
Output
Line 1 - Value of c is : 12
Line 2 - Value of c is: 61
Line 3 - Value of c is: 49
Line 4 - Value of c is: -61
Line 5 - Value of c is: 240
Line 6 - Value of c is: 15
Assignment Operators
Assignment operators are used to assign values to variables. These operators allow you to set or update the value stored in a variable.
There are following assignment operators supported by C++ language −
Operator
Description
Example
=
Simple assignment operator, Assigns values from right side operands to left side operand.
C = A + B will assign value of A + B into C
+=
Add AND assignment operator, It adds right operand to the left operand and assign the result to left operand.
C += A is equivalent to C = C + A
-=
Subtract AND assignment operator, It subtracts right operand from the left operand and assign the result to left operand.
C -= A is equivalent to C = C - A
*=
Multiply AND assignment operator, It multiplies right operand with the left operand and assign the result to left operand.
C *= A is equivalent to C = C * A
/=
Divide AND assignment operator, It divides left operand with the right operand and assign the result to left operand.
C /= A is equivalent to C = C / A
%=
Modulus AND assignment operator, It takes modulus using two operands and assign the result to left operand.
C %= A is equivalent to C = C % A
<<=
Left shift AND assignment operator.
C <<= 2 is same as C = C << 2
>>=
Right shift AND assignment operator.
C >>= 2 is same as C = C >> 2
&=
Bitwise AND assignment operator.
C &= 2 is same as C = C & 2
^=
Bitwise exclusive OR and assignment operator.
C ^= 2 is same as C = C ^ 2
|=
Bitwise inclusive OR and assignment operator.
C |= 2 is same as C = C | 2
Example
The following is an example of assignment operators −
Open Compiler
#include <iostream>usingnamespace std;main(){int a =21;int c ;
c = a;
cout <<"Line 1 - = Operator, Value of c = : "<<c<< endl ;
c += a;
cout <<"Line 2 - += Operator, Value of c = : "<<c<< endl ;
c -= a;
cout <<"Line 3 - -= Operator, Value of c = : "<<c<< endl ;
c *= a;
cout <<"Line 4 - *= Operator, Value of c = : "<<c<< endl ;
c /= a;
cout <<"Line 5 - /= Operator, Value of c = : "<<c<< endl ;
c =200;
c %= a;
cout <<"Line 6 - %= Operator, Value of c = : "<<c<< endl ;
c <<=2;
cout <<"Line 7 - <<= Operator, Value of c = : "<<c<< endl ;
c >>=2;
cout <<"Line 8 - >>= Operator, Value of c = : "<<c<< endl ;
c &=2;
cout <<"Line 9 - &= Operator, Value of c = : "<<c<< endl ;
c ^=2;
cout <<"Line 10 - ^= Operator, Value of c = : "<<c<< endl ;
c |=2;
cout <<"Line 11 - |= Operator, Value of c = : "<<c<< endl ;return0;}
Output
Line 1 - = Operator, Value of c = : 21
Line 2 - += Operator, Value of c = : 42
Line 3 - -= Operator, Value of c = : 21
Line 4 - *= Operator, Value of c = : 441
Line 5 - /= Operator, Value of c = : 21
Line 6 - %= Operator, Value of c = : 11
Line 7 - <<= Operator, Value of c = : 44
Line 8 - >>= Operator, Value of c = : 11
Line 9 - &= Operator, Value of c = : 2
Line 10 - ^= Operator, Value of c = : 0
Line 11 - |= Operator, Value of c = : 2
Misc Operators
Miscellaneous operators, often abbreviated as "misc operators", include a variety of operators that don’t fit neatly into other categories like arithmetic or logical operators. Here are some common miscellaneous operators and their definitions −
The following table lists some other operators that C++ supports.
Sr.No
Operator & Description
1
sizeofsizeof operator returns the size of a variable. For example, sizeof(a), where ‘a’ is integer, and will return 4.
2
Condition ? X : YConditional operator (?). If Condition is true then it returns value of X otherwise returns value of Y.
3
,Comma operator causes a sequence of operations to be performed. The value of the entire comma expression is the value of the last expression of the comma-separated list.
4
. (dot) and -> (arrow)Member operators are used to reference individual members of classes, structures, and unions.
5
CastCasting operators convert one data type to another. For example, int(2.2000) would return 2.
6
&Pointer operator & returns the address of a variable. For example &a; will give actual address of the variable.
7
*Pointer operator * is pointer to a variable. For example *var; will pointer to a variable var.
Conditional (Ternary) Operator (?:)
It is a shorthand way to perform a conditional evaluation in C++.
int a =10, b =20;int result =(a > b)? a : b;// result will be 20 because a is not greater than b
cout <<"The greater value is: "<< result << endl;
Output
The greater value is: 20
Sizeof Operator
The sizeof operator returns the size, in bytes, of a variable or data type.
int x =5;
cout <<"Size of int: "<<sizeof(x)<<" bytes"<< endl;
cout <<"Size of double: "<<sizeof(double)<<" bytes"<< endl;
Output
4
8
Bitwise Complement Operator (~)
The bitwise complement operator inverts the bits of its operand.
unsignedint num =5;// Binary: 00000000 00000000 00000000 00000101unsignedint result =~num;// Binary: 11111111 11111111 11111111 11111010
cout <<"Bitwise complement of 5: "<< result << endl;// Outputs a large positive number due to unsigned
Scope Resolution Operator (::)
This operator is used to define the scope of a function or variable, particularly in the context of classes and namespaces.
classMyClass{public:staticint value;};int MyClass::value =10;// Define static member outside the class
cout <<"Static value: "<< MyClass::value << endl;
Output
10
Operators Precedence in C++
Operator precedence determines the grouping of terms in an expression. This affects how an expression is evaluated. Certain operators have higher precedence than others; for example, the multiplication operator has higher precedence than the addition operator −
For example x = 7 + 3 * 2; here, x is assigned 13, not 20 because operator * has higher precedence than +, so it first gets multiplied with 3*2 and then adds into 7.
Here, operators with the highest precedence appear at the top of the table, those with the lowest appear at the bottom. Within an expression, higher precedence operators will be evaluated first.
Category
Operator
Associativity
Postfix
() [] -> . ++ - -
Left to right
Unary
+ - ! ~ ++ - - (type)* & sizeof
Right to left
Multiplicative
* / %
Left to right
Additive
+ -
Left to right
Shift
<< >>
Left to right
Relational
< <= > >=
Left to right
Equality
== !=
Left to right
Bitwise AND
&
Left to right
Bitwise XOR
^
Left to right
Bitwise OR
|
Left to right
Logical AND
&&
Left to right
Logical OR
||
Left to right
Conditional
?:
Right to left
Assignment
= += -= *= /= %=>>= <<= &= ^= |=
Right to left
Comma
,
Left to right
Example
The following is an example of demonstrating operators precedence −
Open Compiler
#include <iostream>usingnamespace std;main(){int a =20;int b =10;int c =15;int d =5;int e;
e =(a + b)* c / d;// ( 30 * 15 ) / 5
cout <<"Value of (a + b) * c / d is :"<< e << endl ;
e =((a + b)* c)/ d;// (30 * 15 ) / 5
cout <<"Value of ((a + b) * c) / d is :"<< e << endl ;
e =(a + b)*(c / d);// (30) * (15/5)
cout <<"Value of (a + b) * (c / d) is :"<< e << endl ;
e = a +(b * c)/ d;// 20 + (150/5)
cout <<"Value of a + (b * c) / d is :"<< e << endl ;return0;}
Output
Value of (a + b) * c / d is :90
Value of ((a + b) * c) / d is :90
Value of (a + b) * (c / d) is :90
Value of a + (b * c) / d is :50
A storage class defines the scope (visibility) and life-time of variables and/or functions within a C++ Program. These specifiers precede the type that they modify. There are following storage classes, which can be used in a C++ Program
auto
register
static
extern
mutable
The auto Storage Class
The auto storage class is the default storage class for all local variables.
Example
Below is the example of auto storage class −
{int mount;autoint month;}
The example above defines two variables with the same storage class, auto can only be used within functions, i.e., local variables.
The register Storage Class
The register storage class is used to define local variables that should be stored in a register instead of RAM. This means that the variable has a maximum size equal to the register size (usually one word) and can’t have the unary ‘&’ operator applied to it (as it does not have a memory location).
Example
Below is the example of register storage class −
{registerint miles;}
The register should only be used for variables that require quick access such as counters. It should also be noted that defining ‘register’ does not mean that the variable will be stored in a register. It means that it MIGHT be stored in a register depending on hardware and implementation restrictions.
The static Storage Class
The static storage class instructs the compiler to keep a local variable in existence during the life-time of the program instead of creating and destroying it each time it comes into and goes out of scope. Therefore, making local variables static allows them to maintain their values between function calls.
The static modifier may also be applied to global variables. When this is done, it causes that variable’s scope to be restricted to the file in which it is declared.
In C++, when static is used on a class data member, it causes only one copy of that member to be shared by all objects of its class.
Example
Below is the example of static storage class −
Open Compiler
#include <iostream>// Function declarationvoidfunc(void);staticint count =10;/* Global variable */main(){while(count--){func();}return0;}// Function definitionvoidfunc(void){staticint i =5;// local static variable
   i++;
   std::cout <<"i is "<< i ;
   std::cout <<" and count is "<< count << std::endl;}
When the above code is compiled and executed, it produces the following result −
i is 6 and count is 9
i is 7 and count is 8
i is 8 and count is 7
i is 9 and count is 6
i is 10 and count is 5
i is 11 and count is 4
i is 12 and count is 3
i is 13 and count is 2
i is 14 and count is 1
i is 15 and count is 0
The extern Storage Class
The extern storage class is used to give a reference of a global variable that is visible to ALL the program files. When you use ‘extern’ the variable cannot be initialized as all it does is point the variable name at a storage location that has been previously defined.
When you have multiple files and you define a global variable or function, which will be used in other files also, then extern will be used in another file to give reference of defined variable or function. Just for understanding extern is used to declare a global variable or function in another file.
The extern modifier is most commonly used when there are two or more files sharing the same global variables or functions as explained below.
#include <iostream>externint count;voidwrite_extern(void){
   std::cout <<"Count is "<< count << std::endl;}
Here, extern keyword is being used to declare count in another file. Now compile these two files as follows −
$g++ main.cpp support.cpp -o write
This will produce write executable program, try to execute write and check the result as follows −
$./write
5
The mutable Storage Class
The mutable specifier applies only to class objects, which are discussed later in this tutorial. It allows a member of an object to override const member function. That is, a mutable member can be modified by a const member function.
C++ allows the char, int, and double data types to have modifiers preceding them. A modifier is used to alter the meaning of the base type so that it more precisely fits the needs of various situations.
The data type modifiers are listed here −
signed
unsigned
long
short
The modifiers signed, unsigned, long, and short can be applied to integer base types. In addition, signed and unsigned can be applied to char, and long can be applied to double.
The modifiers signed and unsigned can also be used as prefix to long or short modifiers. For example, unsigned long int.
C++ allows a shorthand notation for declaring unsigned, short, or long integers. You can simply use the word unsigned, short, or long, without int. It automatically implies int. For example, the following two statements both declare unsigned integer variables.
unsigned x;
unsigned int y;
To understand the difference between the way signed and unsigned integer modifiers are interpreted by C++, you should run the following short program −
Open Compiler
#include <iostream>usingnamespace std;/* This program shows the difference between
   * signed and unsigned integers.
*/intmain(){shortint i;// a signed short integershortunsignedint j;// an unsigned short integer

   j =50000;

   i = j;
   cout << i <<" "<< j;return0;}
When this program is run, following is the output −
-15536 50000
The above result is because the bit pattern that represents 50,000 as a short unsigned integer is interpreted as -15,536 by a short.
Type Qualifiers in C++
The type qualifiers provide additional information about the variables they precede.
Sr.No
Qualifier & Meaning
1
constObjects of type const cannot be changed by your program during execution.
2
volatileThe modifier volatile tells the compiler that a variable’s value may be changed in ways not explicitly specified by the program.
3
restrictA pointer qualified by restrict is initially the only means by which the object it points to can be accessed. Only C99 adds a new type qualifier called restrict.