You can include the content of a PHP file into another PHP file before the server executes it. There are two PHP functions which can be used to included one PHP file into another PHP file.
The include() Function
The require() Function
This is a strong point of PHP which helps in creating functions, headers, footers, or elements that can be reused on multiple pages. This will help developers to make it easy to change the layout of complete website with minimal effort. If there is any change required then instead of changing thousand of files just change included file.
The include() Function
The include() function takes all the text in a specified file and copies it into the file that uses the include function. If there is any problem in loading a file then the include() function generates a warning but the script will continue execution.
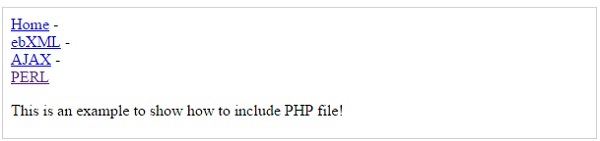
Assume you want to create a common menu for your website. Then create a file menu.php with the following content.
Now create as many pages as you like and include this file to create header. For example now your test.php file can have following content.
<?php <b>include("menu.php");</b> ?><p>This is an example to show how to include PHP file!</p>
It will produce the following result −
The require() Function
The require() function takes all the text in a specified file and copies it into the file that uses the include function. If there is any problem in loading a file then the require() function generates a fatal error and halt the execution of the script.
So there is no difference in require() and include() except they handle error conditions. It is recommended to use the require() function instead of include(), because scripts should not continue executing if files are missing or misnamed.
You can try using above example with require() function and it will generate same result. But if you will try following two examples where file does not exist then you will get different results.
<?php include("xxmenu.php"); ?><p>This is an example to show how to include wrong PHP file!</p>
This will produce the following result −
This is an example to show how to include wrong PHP file!
Now lets try same example with require() function.
<?php <b>require("xxmenu.php");</b> ?><p>This is an example to show how to include wrong PHP file!</p>
This time file execution halts and nothing is displayed.
NOTE − You may get plain warning messages or fatal error messages or nothing at all. This depends on your PHP Server configuration.
This chapter puts all the concepts of form validation and extraction of HTML form data into PHP code. The complete form handling code given below has three sections: A PHP code section in the beginning that looks for any validation errors when the form is submitted, the HTML form with various elements such as text fields, radio buttons, Select control, checkbox, etc. The third part is again a PHP code that renders the data entered by the user.
PHP Error Tracking
The code that traps errors, is in the beginning of the entire script. Obviously, this will be executed every time the page is loaded. If it’s being loaded after the form is submitted, the following segment checks whether each element is empty, the email field is well-formed, and the checkbox is clicked (indicating that the user agrees to the terms).
<?php
// define variables and set to empty values
$nameErr = $emailErr = $genderErr = $websiteErr = "";
$name = $email = $gender = $class = $course = $subject = "";
if ($_SERVER["REQUEST_METHOD"] == "POST") {
if (empty($_POST["name"])) {
$nameErr = "Name is required";
} else {
$name = test_input($_POST["name"]);
}
if (empty($_POST["email"])) {
$emailErr = "Email is required";
} else {
$email = test_input($_POST["email"]);
// check if e-mail address is well-formed
if (!filter_var($email, FILTER_VALIDATE_EMAIL)) {
$emailErr = "Invalid email format";
}
}
The HTML script that renders an entry form, follows the error trapping code. Various for elements have been employed in the form design.
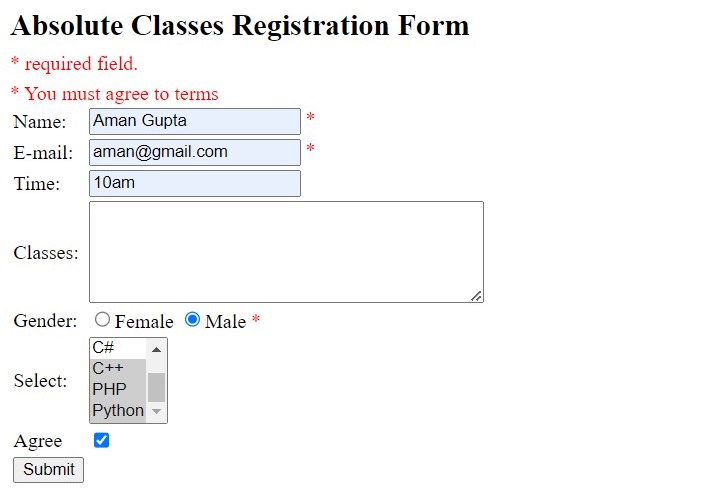
<h2>Absolute Classes Registration Form</h2><p><span class = "error">* required field.</span></p><form method = "POST" action = "<?php echo htmlspecialchars($_SERVER["PHP_SELF"]);?>">
<table><tr><td>Name:</td><td><input type = "text" name = "name"><span class = "error">* <?php echo $nameErr;?></span></td></tr><tr><td>E-mail: </td><td><input type = "text" name = "email"><span class = "error">* <?php echo $emailErr;?></span></td></tr><tr><td>Time:</td><td><input type = "text" name = "course"><span class = "error"><?php echo $websiteErr;?></span></td></tr><tr><td>Classes:</td><td><textarea name = "class" rows = "5" cols = "40"></textarea></td></tr><tr><td>Gender:</td><td><input type = "radio" name = "gender" value = "female">Female
<input type = "radio" name = "gender" value = "male">Male
<span class = "error">* <?php echo $genderErr;?></span></td></tr><tr><td>Select:</td><td><select name = "subject[]" size = "4" multiple><option value = "Android">C</option><option value = "Java">Java</option><option value = "C#">C#</option><option value = "Data Base">C++</option><option value = "Hadoop">PHP</option><option value = "VB script">Python</option></select></td></tr><tr><td>Agree</td><td><input type = "checkbox" name = "checked" value = "1"></td><?php if(!isset($_POST['checked'])){ ?><span class = "error">* <?php echo "You must agree to terms";?></span><?php } ?></tr><tr><td><input type = "submit" name = "submit" value = "Submit"></td></tr></table></form></code></pre>
Note that the form data is submitted back to the same script, hence the form’s action attribute is set to $_SERVER["PHP_SELF"] superglobal. This part also contains certain inline PHP code that flashes the error messages besides the respective form control – such as Name Required message just besides the Name text box, if the name field is empty while submitting the form.
Explore our latest online courses and learn new skills at your own pace. Enroll and become a certified expert to boost your career.
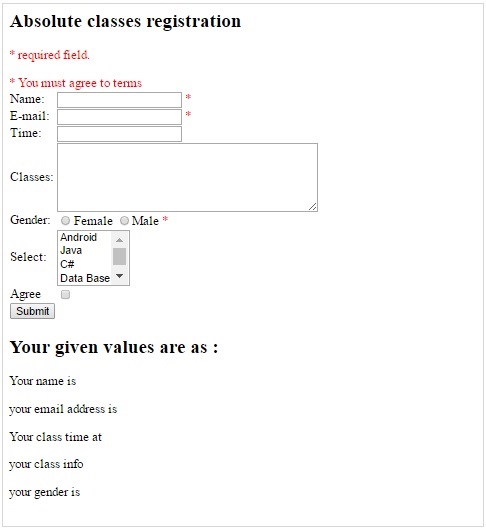
Display Form Data
The third part of the script is again a PHP code that echoes the values of each of the form fields submitted by the user.
PHP provides two alternatives for validating the form data items which are strings but are expected to be a representation of Email ID or a URL. One way to check the form element contains email/URL is with the use of RegEx (regular expressions), and the other, more convenient approach is to use filter_var() function. Let us apply both these methods and validate email and URL submitted by a form to a PHP script.
The HTML Form used for this chapter is as follows −
Open Compiler
<h1>Email and URL Validation</h1><form action="hello.php" method="POST"><p><label for="email">Enter your email:</label><input type="text" id="email" name="email"></p><p><label for="URL">Enter your website<label><input type = "text" id="URL" name="url"></p><input type="submit"></form>
Validation with Regex
PHP’s built-in function library includes the preg_match() function that performs a regular expression match.
This function searches subject for a match to the regular expression given in pattern. preg_match() returns 1 if the pattern matches given subject, 0 if it does not, or false on failure.
A valid email ID should satisfy the following regular expression −
Depending on the enumerated filter ID as the value of $filter parameter, the $value parameter is checked and the function returns the filtered data, or false if the filter fails.
There are various predefined filter ID constants available −
Sr.No
ID & Description
1
FILTER_VALIDATE_BOOLReturns true for "1", "true", "on" and "yes". Returns false otherwise.
2
FILTER_VALIDATE_DOMAINValidates whether the domain name label lengths are valid.
3
FILTER_VALIDATE_EMAILValidates whether the value is a valid e-mail address.
4
FILTER_VALIDATE_IPValidates value as IP address
5
FILTER_VALIDATE_URLValidates value as URL
Example
The following PHP script validates the email and URL data submitted by the HTML for above −
if (!filter_var($email, FILTER_VALIDATE_EMAIL)) {
echo "Invalid email format and please re-enter valid email\n";
}
else
echo "Email entered is in valid format\n";
if (!filter_var($url, FILTER_VALIDATE_URL)) {
echo "Invalid URL format and please re-enter valid URL\n";
}
else
echo "URL entered is in valid format\n";
}
?>
You can test the performance of the above script by entering valid/invalid email/URL.
The term “Form Validation” refers to the process of ascertaining if the data entered by the user in various form elements is acceptable for further processing. Validation of data before its subsequent processing avoids possible exceptions and runtime errors.
Validation can be done both on the client-side and on the server-side. When the client submits the form, the form data is intercepted by the PHP script running on the server. Using various functions available in PHP, the server-side form validation can be done.
Client-side Validation
The new input controls as per the HTML5 specifications have in-built validation. For example an input element of the type ‘email’, even though is a text field, is customized to accept a string that is according to email address protocol.
Validation takes place befor the data is submitted to the server. Same thing is true with other input types such as URL, number, etc.
Example
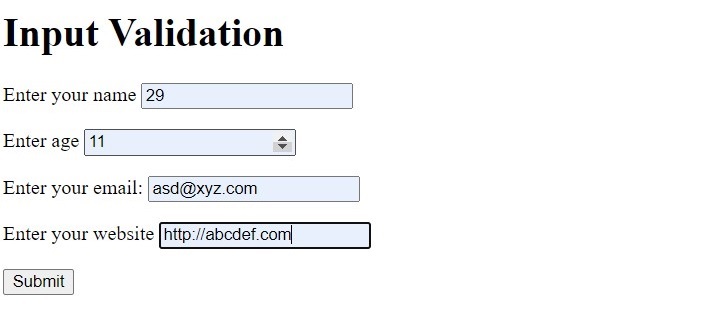
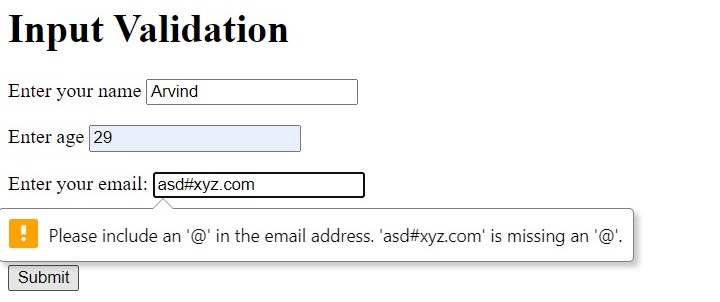
Given below is an HTML form with input elements of number type, email type and URL type. If you enter data that is not as per the required format, a suitable error message is flashed as you try to submit the form.
Open Compiler
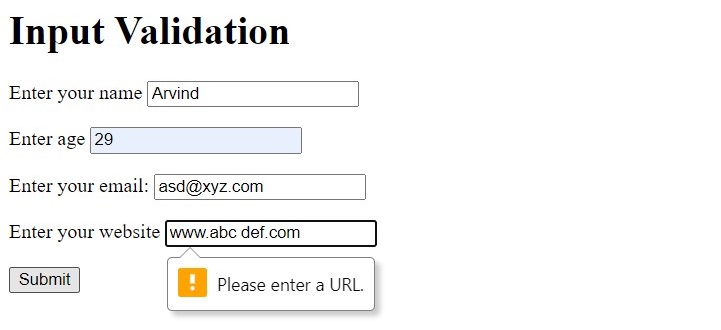
<h1>Input Validation</h1><form><p><Label for "name">Enter your name</label><input type = "text" id="name" name="name"></p><p><label for="age">Enter age</label><input type = "text" id = "age" name="age"></p><p><label for="email">Enter your email:</label><input type="text" id="email" name="email"></p><p><label for="URL">Enter your website<label><input type = "text" id="URL" name="url"></p><input type="submit"></form>
The number type text field shows up/down counter arrows on the right. Only number is accepted, and can be incremented or decremented.
If the data in email field is invalid, you get the error message flashed as below.
Similarly, any incorrect format for the URL also flashes the error as shown −
Validation Functions
The validation on the server-side with PHP comes into picture, either when the form data passes the client-side validation, or there’s no validation on the client side at all.
In the HTML form used in the above example, let us remove all special input types and use all text fields of text type. The form is submitted with POST method to hello.php on the server.
Open Compiler
<form action="hello.php" method="POST"><p><Label for "name">Enter your name</label><input type = "text" id="name" name="name"></p><p><label for="age">Enter age</label><input type = "text" id = "age" name="age"></p><p><label for="email">Enter your email:</label><input type="text" id="email" name="email"></p><p><label for="URL">Enter your website<label><input type = "text" id="URL" name="url"></p><input type="submit"></form>
Explore our latest online courses and learn new skills at your own pace. Enroll and become a certified expert to boost your career.
Form is Empty
If the user (may be inadvertently) clicks the submit button, you can ask PHP to display the form again. You need to check if the $_POST array has been initialized with isset() function. If not, the header() function redirects the control back to the form.
<?php
   if ($_SERVER["REQUEST_METHOD"] == "POST") {
  if (isset($_POST)) {
     header("Location: hello.html", true, 301);
     exit();
  }
  // form processing if the form is not empty   }
?>
Example
You can also check if any of the fields is empty at the time of submitting the form.
<?php
if ($_SERVER["REQUEST_METHOD"] == "POST") {
foreach($_POST as $k=>$v) {
if (empty($v)==true) {
echo "One or more fields are empty \n";
echo "<a href = 'hello.html'>Click here to go back </a>";
exit;
}
else
echo "$k => $v \n";
}
}
?>
Age field is non-numeric
In the HTML form the input field for name is of text type, hence it can accept any characters. However, we want it to be numeric. This can be ensured by is_numeric() function
<?php
if (is_numeric($_POST["age"])==false) {
echo "Age cannot be non-numeric \n";
echo "<a href = 'hello.html'>Click here to go back</a>";
}
?>
PHP also has is_string() function to check if a filed contains a string or not. Two other functions, trim() and htmlspecialchars() are also useful for form validation.
trim() − Removes whitespace from the beginning and end of a string
htmlspecialchars() − Converts special characters to HTML entities to prevent cross-site scripting (XSS) attacks.
HTML Forms play an important role in PHP web applications. Although a webpage composed purely with HTML is a static webpage, the HTML form component is an important feature that helps in bringing interactivity and rendering dynamic content. PHP’s form handling functionality can validate data collected from the user, before processing.
An HTML Form is a collection various form controls such as text fields, checkboxes, radio buttons, etc., with which the user can interact, enter or choose certain data that may be either locally processed by JavaScript (client-side processing), or sent to a remote server for processing with the help of server-side programming scripts such as PHP.
One or more form control elements are put inside <form> and </form> tags. The form element is characterized by different attributes such as name, action, and method.
<form [attributes]>
   Form controls
</form>
Form Attributes
Out of the many attributes of the HTML form element, the following attributes are often required and defined −
Action Attribute
a string representing the URL that processes the form submission. For example, http://example.com/test.php. To submit the for-data to the same PHP script in which the HTML form is defined, use the PHP_SELF server variable −
specifies the method using which the form-data should be encoded before sending it to the server. Possible values are −
application/x-www-form-urlencoded − The default value.
multipart/form-data − Use this if the form contains <input> elements with type=file.
text/plain − Useful for debugging purposes.
Method Attribute
a string representing the HTTP method to submit the form with. The following methods are the possible values of method attribute −
post − The POST method; form data sent as the request body.
get (default) − The GET; form data appended to the action URL with a “?” separator. Use this method when the form has no side effects.
dialog − When the form is inside a <dialog>, closes the dialog and causes a submit event to be fired on submission, without submitting data or clearing the form.
Name Attribute
The name of the form. The value must not be the empty string, and must be unique if there are multiple forms in the same HTML document.
Target Attribute
a string that indicates where to display the response after submitting the form. Should be one of the following −
_self (default) − Load into the same browsing context as the current one.
_blank − Load into a new unnamed browsing context.
_parent − Load into the parent browsing context of the current one.
_top − Load into the top-level browsing context (an ancestor of the current one and has no parent).
Hence, a typical HTML form, used in a PHP web application looks like −
<form name="form1" action="<?php echo $_SERVER['PHP_SELF'];?>" action="POST">
   Form controls
</form>
Form Elements
A HTML form is designed with different types of controls or elements. The user can interact with these controls to enter data or choose from the available options presented. Some of the elements are described below −
Input Element
The input element represents a data field, which enables the user to enter and/or edit the data.
The type attribute of INPUT element controls the data. The INPUT element may be of the following types −
Text
A text field to enter a single line text.
<input type="text" name="employee">
Password
A single line text filed that masks the entered characters.
<input type="password" name="pwd"><br>
Checkbox
A rectangular checkable box which is a set of zero or more values from a predefined list.
<input type="checkbox" id="s1" name="sport1" value="Cricket"><label for="s1">I like Cricket</label><br><input type="checkbox" id="s2" name="sport2" value="Football"><label for="s2">I like Football</label><br><input type="checkbox" id="s3" name="sport3" value="Tennis"><label for="s3">I like Tennis</label><br><br>
Radio
This type renders a round clickable button with two states (ON or OFF), usually a part of multiple buttons in a radio group.
The input type renders a button captioned file and allows the user to select a file from the client filesystem, usually to be uploaded on the server. The form’s enctype attribute must be set to “multipart/form-data”
<input type="file" name="file">
Email
A single line text field, customized to accept a string conforming to valid email ID.
URL
A single line text filed customized to accept a string conforming to valid URL.
Submit
This input element renders a button, which when clicked, initiates the the submission of form data to the URL specified in the action attribute of the current form.
<input type="submit" name="Submit">
Select Element
The select element represents a control for selecting amongst a set of options. Each choice is defined with option attribute of Select Control. For example −
Explore our latest online courses and learn new skills at your own pace. Enroll and become a certified expert to boost your career.
Form Example
Let us use these form elements to design a HTML form and send it to a PHP_SELF script
<html><body><form method = "post" action = "<?php
echo htmlspecialchars($_SERVER["PHP_SELF"]);<strong>?></strong>"><table><tr><td>Name:</td><td><input type = "text" name = "name"></td></tr><tr><td>E-mail: </td><td><input type = "email" name = "email"></td></tr><tr><td>Website:</td><td><input type = "url" name = "website"></td></tr><tr><td>Classes:</td><td><textarea name = "comment" rows = "5" cols = "40"></textarea></td></tr><tr><td>Gender:</td><td><input type = "radio" name = "gender" value = "female">Female
<input type = "radio" name = "gender" value = "male">Male
</td></tr><td><input type = "submit" name = "submit" value = "Submit"></td></table></form><strong><?php</strong>
$name = $email = $gender = $comment = $site = "";
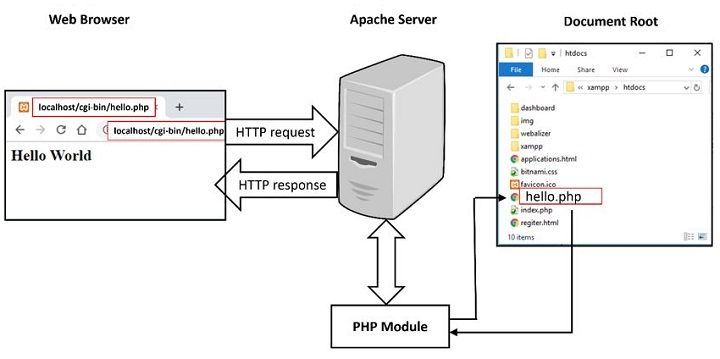
PHP is a server-side scripting language that is used to create dynamic webpages. It is one of the most popular programming languages for web development. This chapter aims to let you get familiarized with certain important concepts of web application development using PHP.
A web-based application is a collection of webpages. A webpage is mainly created with HTML tags. HTML consists of different HTML tags which are required to define the appearance of page elements like text, image, table, etc. Hence, HTML essentially creates a static webpage.
A Web application is hosted on a HTTP server with PHP module installed. The browser acts as a http client, to establish communication with the server, following HTTP protocol.
How to Add Dynamic Content on a Webpage?
To add dynamic content io a webpage, there are two possibilities.
JavaScript is a client-side scripting language, that can access the HTML document object model and render dynamic content on the client browser. JavaScript code can be embedded in HTML page.
The browser may collect data from the user in the form of HTML form elements and send it to a HTTP server for processing. PHP is a widely used Server-side processing language. PHP script can also be embedded inside HTML page.
Example
In the following script, JavaScript code embedded in HTML renders the current date as per the client browser, and the PHP code displays the current date as per the server, where this script is hosted.
date_default_timezone_set("Asia/Calcutta");
echo "server's date is " . date("Y-m-d") . "\n";
echo "The time is " . date("h:i:sa");
?></body></html>
PHP can intercept and process the data from HTML forms. This allows you to collect information from your users. The next chapter discusses PHP’s form handling.
PHP can be used to interact with databases such as MySQL and PostgreSQL. This allows you to store and retrieve data from your database, and dynamically populate the web pages or to power the web applications. PHP includes mysql, mysqli and PDO extensions for database handling.
PHP can handle the data received from the client with HTTP GET as well as POST methods. We shall discuss in detail, how PHP handles GET/POST methods in one of the latter chapters.
HTTP is a stateless protocol. However, it allows Sessions and cookies to be maintained on server and client respectively. PHP can be used to create and manage sessions and cookies. Sessions allow you to track individual users as they navigate your website, while cookies allow you to store information on the user’s computer for later use. In of the subsequent chapters, we shall learn how PHP handles sessions and cookies.
PHP can be used to upload files to your web server. This allows you to create web applications that allow users to upload files, such as images, videos, or documents.
You can use PHP to create a login page for your website. When the user enters their username and password, PHP can check the database to see if the user is valid. If the user is valid, PHP can log the user in and redirect them to the main page of your website.
Identifying Browser & Platform
PHP creates some useful environment variables that can be seen in the phpinfo.php page that was used to setup the PHP environment.
One of the environment variables set by PHP is HTTP_USER_AGENT which identifies the user’s browser and operating system.
PHP provides a function getenv() to access the value of all the environment variables. The information contained in the HTTP_USER_AGENT environment variable can be used to create dynamic content appropriate to the browser.
Example
Following example demonstrates how you can identify a client browser and operating system.
NOTE − The function preg_match()is discussed in PHP Regular expression session.
<?php
function getBrowser() {
$u_agent = $_SERVER['HTTP_USER_AGENT'];
$bname = 'Unknown';
$platform = 'Unknown';
$version = "";
//First get the platform
if (preg_match('/linux/i', $u_agent)) {
$platform = 'linux';
} elseif (preg_match('/macintosh|mac os x/i', $u_agent)) {
$platform = 'mac';
} elseif (preg_match('/windows|win32/i', $u_agent)) {
$platform = 'windows';
}
// Next get the name of the useragent yes seperately and for good reason
if(preg_match('/MSIE/i',$u_agent) && !preg_match('/Opera/i',$u_agent)) {
$bname = 'Internet Explorer';
$ub = "MSIE";
} elseif(preg_match('/Firefox/i',$u_agent)) {
$bname = 'Mozilla Firefox';
$ub = "Firefox";
} elseif(preg_match('/Chrome/i',$u_agent)) {
$bname = 'Google Chrome';
$ub = "Chrome";
} elseif(preg_match('/Safari/i',$u_agent)) {
$bname = 'Apple Safari';
$ub = "Safari";
} elseif(preg_match('/Opera/i',$u_agent)) {
$bname = 'Opera';
$ub = "Opera";
} elseif(preg_match('/Netscape/i',$u_agent)) {
$bname = 'Netscape';
$ub = "Netscape";
}
// finally get the correct version number
$known = array('Version', $ub, 'other');
$pattern = '#(?<browser>' . join('|', $known) . ')
[/ ]+(?<version>[0-9.|a-zA-Z.]*)#';
if (!preg_match_all($pattern, $u_agent, $matches)) {
// we have no matching number just continue
}
// see how many we have
$i = count($matches['browser']);
if ($i != 1) {
//we will have two since we are not using 'other' argument yet
//see if version is before or after the name
if (strripos($u_agent,"Version") < strripos($u_agent,$ub)){
$version= $matches['version'][0];
} else {
$version= $matches['version'][1];
}
} else {
$version= $matches['version'][0];
}
// check if we have a number
if ($version == null || $version == "") {$version = "?";}
return array(
'userAgent' => $u_agent,
'name' => $bname,
'version' => $version,
'platform' => $platform,
'pattern' => $pattern
);
This is producing following result on my machine. This result may be different for your computer depending on what you are using.
It will produce the following result −
Your browser: Google Chrome 54.0.2840.99 on windows reports:
Mozilla/5.0 (Windows NT 6.3; Win64; x64) AppleWebKit/537.36 (KHTML, like Gecko)
   Chrome/54.0.2840.99 Safari/537.36
Explore our latest online courses and learn new skills at your own pace. Enroll and become a certified expert to boost your career.
Display Images Randomly
The PHP rand() function is used to generate a random number.i This function can generate numbers with-in a given range. The random number generator should be seeded to prevent a regular pattern of numbers being generated. This is achieved using the srand() function that specifies the seed number as its argument.
Example
Following example demonstrates how you can display different image each time out of four images −
The most important thing to notice when dealing with HTML forms and PHP is that any form element in an HTML page will automatically be available to your PHP scripts.
Example
Try out following example by putting the source code in test.php script.
<?php
if( $_POST["name"] || $_POST["age"] ) {
if (preg_match("/[^A-Za-z'-]/",$_POST['name'] )) {
die ("invalid name and name should be alpha");
}
echo "Welcome ". $_POST['name']. "<br />";
echo "You are ". $_POST['age']. " years old.";
exit();
}
?><form action = "<?php <b>$_PHP_SELF</b> ?>" method = "POST">
Name: <input type = "text" name = "name" />
Age: <input type = "text" name = "age" /><input type = "submit" /></form>
It will produce the following result −
The PHP default variable $_PHP_SELF is used for the PHP script name and when you click “submit” button then same PHP script will be called and will produce following result −
The method = “POST” is used to post user data to the server script. There are two methods of posting data to the server script which are discussed in PHP GET & POST chapter.
Browser Redirection
The PHP header() function supplies raw HTTP headers to the browser and can be used to redirect it to another location. The redirection script should be at the very top of the page to prevent any other part of the page from loading.
The target is specified by the Location: header as the argument to the header() function. After calling this function the exit() function can be used to halt parsing of rest of the code.
Example
Following example demonstrates how you can redirect a browser request to another web page. Try out this example by putting the source code in test.php script.
}
?><p>Choose a site to visit :</p><form action = "<?php <b>$_SERVER['PHP_SELF']</b> ?>" method ="POST"><select name = "location">.
<option value = "http://www.tutorialspoint.com">
Tutorialspoint.com
</option><option value = "http://www.google.com">
Google Search Page
</option></select><input type = "submit" /></form></code></pre>
The release of version 7.0 is an important milestone in the evolution of PHP language, when a lot of new features were introduced. The feature of Anonymous class was also made available in PHP version 7.0.
As the term “anonymous” suggests, it is a class without a (programmer declared) name. The usual practice is to define a class with a certain identifier, so that it can be used repeatedly. The anonymous class, on the other hand is for one-time use only.
$obj=newclass(){/* class body */};
Apart from this class not having a name, it is similar to a normal named class, in the sense it can contain properties and methods. Its functionality is no different from that of an object of a named class.
An anonymous class might be used over a named class especially when the class does not need to be documented, and when the class is used only once during execution. Anonymous classes are useful when simple, one-off objects need to be created.
Example
In the following code, an anonymous class is instantiated and stored in $obj object. The class includes definitions of addition() and division() methods, which are called with the $obj object.
Open Compiler
<?php
$obj = new class(10) {
private int $x;
function __construct($x) {
$this->x = $x;
}
public function addition($x) {
return $this->x+$x;
}
public function division($x) {
return $this->x/$x;
}
An anonymous class can do everything that a normal class can. It can extends another class, implement an interface or even use a trait.
Example
In the example below, the anonymous class is a child class, extending a parent already available.
Open Compiler
<?php
class myclass {
public function hello() {
echo "Hello World!" . PHP_EOL;
}
}
$obj = new class("Neena") extends myclass {
private string $nm;
function __construct($x) {
$this->nm = $x;
}
public function greeting() {
parent::hello();
echo "Welcome " . $this->nm . PHP_EOL;
}
};
$obj->greeting();
?>
It will produce the following output −
Hello World!
Welcome Neena
Example
Although the anonymous class doesn’t have any user defined name, PHP does assign it an internal name, which can be obtained with the built-in get_class() function as follows −
Open Compiler
<?php
   $obj = new class() {
  function greeting() {
     echo "Hello World" . PHP_EOL;
  }   };
   $obj->greeting();
   echo "Name of class: " . get_class($obj);
?>
It will produce the following output −
Hello World
Name of class: class@anonymousC:\xampp\htdocs\hello.php:2$0
A PHP statement such as “$obj1 = $obj2” merely creates another reference to the same object in memory. Hence, changes in attribute reflect both in original and duplicate object. The clone keyword in PHP creates a shallow copy of an object.
$obj2=$obj1
Changes in the original object do not reflect in the shallow copy.
Explore our latest online courses and learn new skills at your own pace. Enroll and become a certified expert to boost your career.
Example
In the following code, myclass has one of attributes as object of address class. An object of myclass is duplicated by assignment. Any change in the value of its embedded address object is reflected in both the objects, but change in the name property is not effected in the cloned object.
Open Compiler
<?php
class address {
var $city="Nanded";
var $pin="431601";
function setaddr($arg1, $arg2) {
$this->city=$arg1;
$this->pin=$arg2;
}
}
class myclass {
var $name="Raja";
var $obj;
function setname($arg) {
$this->name=$arg;
}
In a shallow copy, any properties of the original object that are references to other variables will remain references. The clone keyword does not copy the contained objects of the copied objects.
We now create a clone of myclass object, so that $obj2 is the clone of $obj1. We change the name property of $obj1 from Raja to Ravi, and also modify the embedded address object. The property change will not reflect in its clone, but the referred address object will be changed.
Example
Take a look at the following example −
Open Compiler
<?php
class address {
var $city="Nanded";
var $pin="431601";
function setaddr($arg1, $arg2) {
$this->city=$arg1;
$this->pin=$arg2;
}
}
class myclass {
var $name="Raja";
var $obj;
function setname($arg) {
$this->name=$arg;
}
The clone keyword creates a shallow copy of the object. When an object is cloned, PHP will perform a shallow copy of all of the object’s properties. Any properties that are references to other variables will remain references. Hence, any changes done to the original object will also appear in the cloned object.
If you wish to prevent the copied object to update automatically, we need to create a deep copy of the object with the __clone() method. It is one of the magic methods in PHP.
Once the cloning is complete, if a __clone() method is defined, then the newly created object’s __clone() method will be called, to allow any necessary properties that need to be changed.
Example
In the above example, we have an object of myclass, one of its attributes $obj holding the reference to an object of address class. To achieve a deep copy, we override the __clone() magic method in myclass.
Open Compiler
<?php
class address {
var $city="Nanded";
var $pin="431601";
function setaddr($arg1, $arg2) {
$this->city=$arg1;
$this->pin=$arg2;
}
}
class myclass {
var $name="Raja";
var $obj;
function setname($arg) {
$this->name=$arg;
}
public function __clone() {
$this->obj = clone $this->obj ;
}
You will now see that the changes in the original object (we change the address attributes) won’t reflect in the cloned object, as the following output shows −
original object
myclass Object
(
[name] => Raja
[obj] => address Object
(
[city] => Nanded
[pin] => 431601
)
)
after change: Original object
myclass Object
(
[name] => Ravi
[obj] => address Object
(
In C++ or Java, the term means a class can a class method of same name more than once but with different arguments and/or return type. In PHP, the term overloading has a different interpretation. It is a feature with which properties and methods can be created dynamically. PHP’s magic methods (method names starting with double underscore) are used to set up dynamic properties and methods.
The magic methods used for the purpose of overloading are invoked when interacting with properties or methods that have not been declared or are not visible in the current scope.
Property Overloading
The examples of PHP’s magic methods are __construct(), __destruct(), __tostring(), etc. PHP uses the following magic methods for overloading properties.
__set() is run for writing data to inaccessible properties that are protected or private or non-existing.
__get() reads data from inaccessible properties.
__isset() calls isset() or empty() on inaccessible properties.
__unset() is invoked when unset() is called on inaccessible properties.
The $name argument used above is the name of the property to be set or retrieved. The $value argument of __set() method specifies the value to be assigned to the property.
The __isset() method checks if a certain property has been set or not. The __unset() method removes the property.
Property overloading works only in object context. In any static context, these magic methods will not be triggered. Hence they should not be declared static.
Example
In the following code, a dynamic property named myprop, which is not declared in the class, is set and retrieved.
Open Compiler
<?php
class myclass {
public function __set($name, $value) {
echo "setting $name property to $value \n";
$this->$name = $value;
}
public function __get($name) {
echo "value of $name property is ";
return $this->$name;
}
}
$obj = new myclass();
# This calls __set() method
$obj->myproperty="Hello World!";
# This call __get() method
echo "Retrieving myproperty: " . $obj->myproperty . PHP_EOL;
?>
It will produce the following output −
setting myproperty property to Hello World!
Retrieving myproperty: Hello World!
The __set() and __get() magical methods also set and retrieve a property which is declared as private. Add the following statement inside myclass (before the function definitions)
private$myproperty;
You can check if the property, define __isset() method in myclass −
The __call() is triggered when invoking inaccessible (not defined or private) methods in an object context. On the other hand, the __callStatic() is triggered when invoking inaccessible methods in a static context.
Example
The following example demonstrates method overloading in PHP
Open Compiler
<?php
   class myclass {
  public function __call($name, $args) {
     // Value of $name is case sensitive.
     echo "Calling object method $name with " . implode(" ", $args). "\n";
  }
  public static function __callStatic($name, $args) {
     echo "Calling static method $name with " . implode(" ", $args). "\n";
  }   }
   $obj = new myclass();

   # This invokes __call() magic method
   $obj->mymethod("Hello World!");

   # This invokes __callStatic() method
   myclass::mymethod("Hello World!");
?>
It will produce the following output −
Calling object method mymethod with Hello World!
Calling static method mymethod with Hello World!
Note that the use of “->” operator implies that the method is an instance method, and “::” operator means that the method is a static method.
The “final” keyword in PHP is used in the definition of a class, a method inside a class, as well as with the definition of a constant property of a class.
A Class with “final” Keyword
Let’s see how to create a class with the “final” keyword −
finalclassmyclass{/*class members*/}
The “final” keyword in class definition prevents such a class from being extended. In other words, you cannot use a final class as a parent. If you try, PHP parser throws an error
Open Compiler
<?php
   final class myclass {

  /* class body */   }
   class newclass extends myclass {

  /* class body */    }
?>
When you run this code, it will show an error −
PHP Fatal error: Class newclass may not inherit from final class (myclass)
Method with “final” Keyword
Here is how you can create a method with the “final” keyword −
classmyclass{finalfunctionmyfunction(){/* function body */}}
Prefixing a method definition with the final keyword prevents it from being overridden in a child class. A class with final method can be extended, but the child class cannot override it.
Example
Take a look at the following example −
Open Compiler
<?php
   class myclass {
  final public function hello() {
     echo "Hello World!";
  }   }
   class newclass extends myclass {
  public function hello() {
     echo "Hello PHP!";
  }   }
?>
When you run this code, it will show an error −
PHP Fatal error: Cannot override final method myclass::hello() in hello.php
Explore our latest online courses and learn new skills at your own pace. Enroll and become a certified expert to boost your career.
Constant with “final” Keyword
You can also declare a constant in a class with the final keyword, starting from PHP 8.1.0 onwards.
finalpublicconstNAME="My Class";
If you try to override a final constant from parent class in a child class, an error is encountered.
Open Compiler
<?php
   class myclass {
  final public const NAME = "My Class";
  final public function hello() {
     echo "Hello World!";
  }   }

   class newclass extends myclass {
  public const NAME = "New Class";   }
?>
When you run this code, it will show an error −
Fatal error: newclass::NAME cannot override final constant myclass::NAME
Example
The following PHP script contains a parent class ellipse with a PI constant and area() method both declared as final. They are inherited by the circle class. The area() function calculates the area of circle.
Open Compiler
<?php
class ellipse {
final public const PI=22/7;
private float $a, $b;
public function __construct($x, $y) {
$this->a = $x;
$this->b = $y;
}
final public function area() : float {
return self::PI*$this->a*$this->b;
}
}
class circle extends ellipse {
public function __construct(float $x) {
parent::__construct($x, $x);
}