One of the most fundamental characteristics of a programming language is the set of data types it supports. These are the type of values that can be represented and manipulated in a programming language.
The Dart language supports the following types−
Numbers
Strings
Booleans
Lists
Maps
Numbers
Numbers in Dart are used to represent numeric literals. The Number Dart come in two flavours −
Integer − Integer values represent non-fractional values, i.e., numeric values without a decimal point. For example, the value “10” is an integer. Integer literals are represented using the int keyword.
Double − Dart also supports fractional numeric values i.e. values with decimal points. The Double data type in Dart represents a 64-bit (double-precision) floating-point number. For example, the value “10.10”. The keyword double is used to represent floating point literals.
Strings
Strings represent a sequence of characters. For instance, if you were to store some data like name, address etc. the string data type should be used. A Dart string is a sequence of UTF-16 code units. Runes are used to represent a sequence of UTF-32 code units.
The keyword String is used to represent string literals. String values are embedded in either single or double quotes.
Explore our latest online courses and learn new skills at your own pace. Enroll and become a certified expert to boost your career.
Boolean
The Boolean data type represents Boolean values true and false. Dart uses the bool keyword to represent a Boolean value.
List and Map
The data types list and map are used to represent a collection of objects. A List is an ordered group of objects. The List data type in Dart is synonymous to the concept of an array in other programming languages. The Map data type represents a set of values as key-value pairs. The dart: core library enables creation and manipulation of these collections through the predefined List and Map classes respectively.
The Dynamic Type
Dart is an optionally typed language. If the type of a variable is not explicitly specified, the variable’s type is dynamic. The dynamic keyword can also be used as a type annotation explicitly.
Syntax defines a set of rules for writing programs. Every language specification defines its own syntax. A Dart program is composed of −
Variables and Operators
Classes
Functions
Expressions and Programming Constructs
Decision Making and Looping Constructs
Comments
Libraries and Packages
Typedefs
Data structures represented as Collections / Generics
Your First Dart Code
Let us start with the traditional “Hello World” example −
main() {
   print("Hello World!");
}
The main() function is a predefined method in Dart. This method acts as the entry point to the application. A Dart script needs the main() method for execution. print() is a predefined function that prints the specified string or value to the standard output i.e. the terminal.
The output of the above code will be −
Hello World!
Execute a Dart Program
You can execute a Dart program in two ways −
Via the terminal
Via the WebStorm IDE
Via the Terminal
To execute a Dart program via the terminal −
Navigate to the path of the current project
Type the following command in the Terminal window
dart file_name.dart
Via the WebStorm IDE
To execute a Dart program via the WebStorm IDE −
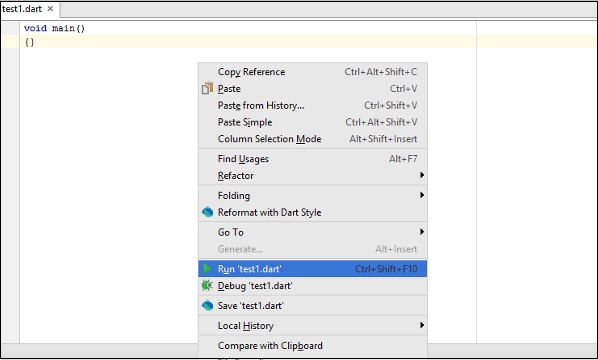
Right-click the Dart script file on the IDE. (The file should contain the main() function to enable execution)
Click on the ‘Run <file_name>’ option. A screenshot of the same is given below −
One can alternatively click thebutton or use the shortcut Ctrl+Shift+F10 to execute the Dart Script.
Explore our latest online courses and learn new skills at your own pace. Enroll and become a certified expert to boost your career.
Dart Command-Line Options
Dart command-line options are used to modify Dart Script execution. Common commandline options for Dart include the following −
Sr.No
Command-Line Option & Description
1
-c or –cEnables both assertions and type checks (checked mode).
2
–versionDisplays VM version information.
3
–packages <path>Specifies the path to the package resolution configuration file.
4
-p <path>Specifies where to find imported libraries. This option cannot be used with –packages.
5
-h or –helpDisplays help.
Enabling Checked Mode
Dart programs run in two modes namely −
Checked Mode
Production Mode (Default)
It is recommended to run the Dart VM in checked mode during development and testing, since it adds warnings and errors to aid development and debugging process. The checked mode enforces various checks like type-checking etc. To turn on the checked mode, add the -c or –-checked option before the script-file name while running the script.
However, to ensure performance benefit while running the script, it is recommended to run the script in the production mode.
Consider the following Test.dart script file −
void main() {
   int n = "hello";
   print(n);
}
Run the script by entering −
dart Test.dart
Though there is a type-mismatch the script executes successfully as the checked mode is turned off. The script will result in the following output −
hello
Now try executing the script with the “- – checked” or the “-c” option −
dart -c Test.dart
Or,
dart - - checked Test.dart
The Dart VM will throw an error stating that there is a type mismatch.
Unhandled exception:
type 'String' is not a subtype of type 'int' of 'n' where
   String is from dart:core
   int is from dart:core
#0  main (file:///C:/Users/Administrator/Desktop/test.dart:3:9)
#1  _startIsolate.<anonymous closure> (dart:isolate-patch/isolate_patch.dart :261)
#2  _RawReceivePortImpl._handleMessage (dart:isolate-patch/isolate_patch.dart:148)
Identifiers in Dart
Identifiers are names given to elements in a program like variables, functions etc. The rules for identifiers are −
Identifiers can include both, characters and digits. However, the identifier cannot begin with a digit.
Identifiers cannot include special symbols except for underscore (_) or a dollar sign ($).
Identifiers cannot be keywords.
They must be unique.
Identifiers are case-sensitive.
Identifiers cannot contain spaces.
The following tables lists a few examples of valid and invalid identifiers −
Valid identifiers
Invalid identifiers
firstName
Var
first_name
first name
num1
first-name
$result
1number
Keywords in Dart
Keywords have a special meaning in the context of a language. The following table lists some keywords in Dart.
abstract 1
continue
false
new
this
as 1
default
final
null
throw
assert
deferred 1
finally
operator 1
true
async 2
do
for
part 1
try
async* 2
dynamic 1
get 1
rethrow
typedef 1
await 2
else
if
return
var
break
enum
implements 1
set 1
void
case
export 1
import 1
static 1
while
catch
external 1
in
super
with
class
extends
is
switch
yield 2
const
factory 1
library 1
sync* 2
yield* 2
Whitespace and Line Breaks
Dart ignores spaces, tabs, and newlines that appear in programs. You can use spaces, tabs, and newlines freely in your program and you are free to format and indent your programs in a neat and consistent way that makes the code easy to read and understand.
Dart is Case-sensitive
Dart is case-sensitive. This means that Dart differentiates between uppercase and lowercase characters.
Statements end with a Semicolon
Each line of instruction is called a statement. Each dart statement must end with a semicolon (;). A single line can contain multiple statements. However, these statements must be separated by a semicolon.
Comments in Dart
Comments are a way to improve the readability of a program. Comments can be used to include additional information about a program like author of the code, hints about a function/ construct etc. Comments are ignored by the compiler.
Dart supports the following types of comments −
Single-line comments ( // ) − Any text between a “//” and the end of a line is treated as a comment
Multi-line comments (/* */) − These comments may span multiple lines.
Example
// this is single line comment

/* This is a
   Multi-line comment
*/
Object-Oriented Programming in Dart
Dart is an Object-Oriented language. Object Orientation is a software development paradigm that follows real-world modelling. Object Orientation considers a program as a collection of objects that communicate with each other via mechanism called methods.
Object − An object is a real-time representation of any entity. As per Grady Brooch, every object must have three features −
State − described by the attributes of an object.
Behavior − describes how the object will act.
Identity − a unique value that distinguishes an object from a set of similar such objects.
Class − A class in terms of OOP is a blueprint for creating objects. A class encapsulates data for the object.
Method − Methods facilitate communication between objects.
Example: Dart and Object Orientation
class TestClass {
   void disp() {
  print("Hello World");    }
}
void main() {
   TestClass c = new TestClass();
   c.disp();
}
The above example defines a class TestClass. The class has a method disp(). The method prints the string “Hello World” on the terminal. The new keyword creates an object of the class. The object invokes the method disp().
This chapter discusses setting up the execution environment for Dart on the Windows platform.
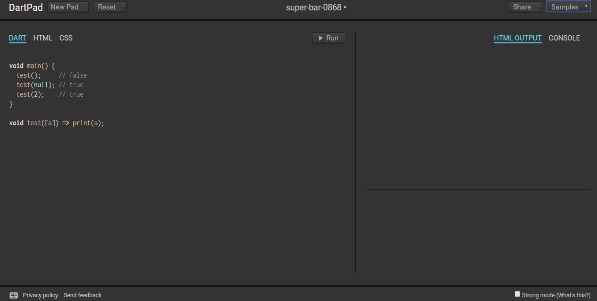
Executing Script Online with DartPad
You may test your scripts online by using the online editor at https://dartpad.dev/. The Dart Editor executes the script and displays both HTML as well as console output. The online editor is shipped with a set of preset code samples.
A screenshot of the Dartpad editor is given below −
Dartpad also enables to code in a more restrictive fashion. This can be achieved by checking the Strong mode option on the bottom right of the editor. Strong mode helps with −
Stronger static and dynamic checking
Idiomatic JavaScript code generation for better interoperability.
You may try the following example using Dartpad
void main() {
   print('hello world');
}
The code will display the following output
hello world
Setting Up the Local Environment
In this section, let us see how to set up the local environment.
Using the Text Editor
Examples of a few editors include Windows Notepad, Notepad++, Emacs, vim or vi, etc. Editors may vary from one Operating System to another. The source files are typically named with the extension “.dart”.
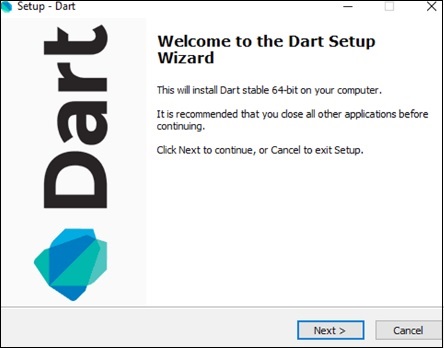
Installing the Dart SDK
The current stable version of Dart is 1.21.0. The dart sdk can be downloaded from −
https://www.dartlang.org/install/archive
http://www.gekorm.com/dart-windows/
A screenshot of the Dart SDK installation is given below −
On completion of the SDK installation, set the PATH environment variable to −
<dart-sdk-path>\bin
Verifying the Installation
To verify if Dart has been successfully installed, open the command prompt and enter the following command −
Dart
If installation is successful, it will show the dart runtime.
Explore our latest online courses and learn new skills at your own pace. Enroll and become a certified expert to boost your career.
IDE Support
A plethora of IDEs support scripting in Dart. Examples include Eclipse, IntelliJ, and WebStorm from Jet brains.
Given below are the steps for configuring the Dart environment using WebStrom IDE.
Installing WebStorm
The installation file for WebStorm can be downloaded from https://www.jetbrains.com/webstorm/download/#section=windows-version.
The WebStorm installation file is available for Mac OS, Windows and Linux.
After downloading the installation files, follow the steps given below −
Install the Dart SDK: Refer to the steps listed above
Create a new Dart project and configure Dart support
To create a new Dart project,
Click Create New Project from the Welcome Screen
In the next dialog box, click Dart
If there is no value specified for the Dart SDK path, then provide the SDK path. For example, the SDK path may be <dart installation directory>/dart/dartsdk.
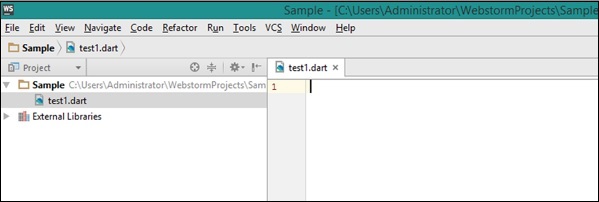
Add a Dart File to the Project
To add a Dart file to the Project −
Right-click on the Project
New → Dart File
Enter the name of the Dart Script
A screenshot of the WebStorm Editor is given below −
The dart2js Tool
The dart2js tool compiles Dart code to JavaScript. Compiling Dart code to JS enables running the Dart script on browsers that do not support the Dart VM.
The dart2js tool is shipped as a part of the Dart SDK and can be found in the /dartsdk/bin folder.
To compile Dart to JavaScript, type the following command in the terminal
dart2js - - out = <output_file>.js <dart_script>.dart
This command produces a file that contains the JavaScript equivalent of your Dart code. A complete tutorial on using this utility can be found on the official Dart website.
Dart is an object-oriented language with C-style syntax which can optionally trans compile into JavaScript. It supports a varied range of programming aids like interfaces, classes, collections, generics, and optional typing.
Dart can be extensively used to create single-page applications. Single-page applications apply only to websites and web applications. Single-page applications enable navigation between different screens of the website without loading a different webpage in the browser. A classic example is GMail ─ when you click on a message in your inbox, browser stays on the same webpage, but JavaScript code hides the inbox and brings the message body on screen.
Google has released a special build of Chromium – the Dart VM. Using Dartium means you don’t have to compile your code to JavaScript until you’re ready to test on other browsers.
The following table compares the features of Dart and JavaScript.
Feature
Dart
JavaScript
Type system
Optional, dynamic
Weak, dynamic
Classes
Yes, single inheritance
Prototypical
Interfaces
Yes, multiple interfaces
No
Concurrency
Yes, with isolates
Yes, with HTML5 web workers
This tutorial provides a basic level understanding of the Dart programming language.
PDO is an acronym for PHP Data Objects. PHP can interact with most of the relational as well as NOSQL databases. The default PHP installation comes with vendor-specific database extensions already installed and enabled. In addition to such database drivers specific to a certain type of database, such as the mysqli extension for MySQL, PHP also supports abstraction layers such as PDO and ODBC.
The PDO extension defines a lightweight, consistent interface for accessing databases in PHP. The functionality of each vendor-specific extension varies from the other. As a result, if you intend to change the backend database of a certain PHP application, say from PostGreSql to MySQL, you need to make a lot of changes to the code. The PDO API on the other hand doesn’t require any changes apart from specifying the URL and the credentials of the new database to be used.
Your current PHP installation must have the corresponding PDO driver available to be able to work with. Currently the following databases are supported with the corresponding PDO interfaces −
Driver Name
Supported Databases
PDO_CUBRID
Cubrid
PDO_DBLIB
FreeTDS / Microsoft SQL Server / Sybase
PDO_FIREBIRD
Firebird
PDO_IBM
IBM DB2
PDO_INFORMIX
IBM Informix Dynamic Server
PDO_MYSQL
MySQL 3.x/4.x/5.x/8.x
PDO_OCI
Oracle Call Interface
PDO_ODBC
ODBC v3 (IBM DB2, unixODBC and win32 ODBC)
PDO_PGSQL
PostgreSQL
PDO_SQLITE
SQLite 3 and SQLite 2
PDO_SQLSRV
Microsoft SQL Server / SQL Azure
By default, the PDO_SQLITE driver is enabled in the settings of php.ini, so if you wish to interact with a MySQL database with PDO, make sure that the following line is uncommented by removing the leading semicolon.
extension=pdo_mysql
You can obtain the list of currently available PDO drivers by calling PDO::getAvailableDrivers() static function in PDO class.
PDO Connection
An instance of PDO base class represents a database connection. The constructor accepts parameters for specifying the database source (known as the DSN) and optionally for the username and password (if any).
The following snippet is a typical way of establishing connection with a MySQL database −
<?php
   $dbh = new PDO('mysql:host=localhost;dbname=test', $user, $pass);
?>
If there is any connection error, a PDOException object will be thrown.
The PDO class defines the following static methods −
PDO::beginTransaction
After obtaining the connection object, you should call this method to that initiates a transaction.
publicPDO::beginTransaction():bool
This method turns off autocommit mode. Hence, you need to call commit() method to make persistent changes to the database Calling rollBack() will roll back all changes to the database and return the connection to autocommit mode.This method returns true on success or false on failure.
PDO::commit
The commit() method commits a transaction.
publicPDO::commit():bool
Since the BeginTransaction disables the autocommit mode, you should call this method after a transaction. It commits a transaction, returning the database connection to autocommit mode until the next call to PDO::beginTransaction() starts a new transaction. This method returns true on success or false on failure.
PDO::exec
The exec() method executes an SQL statement and return the number of affected rows
publicPDO::exec(string$statement):int|false
The exec() method executes an SQL statement in a single function call, returning the number of rows affected by the statement.
Note that it does not return results from a SELECT statement. If you have a SELECT statement that is to be executed only once during your program, consider issuing PDO::query().
On the other hand For a statement that you need to issue multiple times, prepare a PDOStatement object with PDO::prepare() and issue the statement with PDOStatement::execute().
The exec() method need a string parameter that represents a SQL statement to prepare and execute, and returns the number of rows that were modified or deleted by the SQL statement you issued. If no rows were affected, PDO::exec() returns 0.
PDO::query
The query() method prepares and executes an SQL statement without placeholders
This method prepares and executes an SQL statement in a single function call, returning the statement as a PDOStatement object.
PDO::rollBack
The rollback() method rolls back a transaction as initiated by PDO::beginTransaction().
publicPDO::rollBack():bool
If the database was set to autocommit mode, this function will restore autocommit mode after it has rolled back the transaction.
Note that some databases, including MySQL, automatically issue an implicit COMMIT when a DDL statement such as DROP TABLE or CREATE TABLE is issued within a transaction, and hence it will prevent you from rolling back any other changes within the transaction boundary. This method returns true on success or false on failure.
Example
The following code creates a student table in the myDB database on a MySQL server.
PHP FastCGI Process Manager (PHP-FPM) is an efficient alternative to traditional CGI-based methods for handling PHP requests, particularly in high-traffic environments. PHP-FPM has a number of important features. These features are as follows −
Reduced Memory Consumption
With the help of a pool of worker processes to handle requests PHP-FPM significantly reduces memory overhead compared to traditional CGI methods that spawn a new process for each request.
Improved Performance
PHP-FPM’s worker processes are persistent. It allows them to handle multiple requests. It doesn’t need ti repeatedly create and destroy processes. This leads to faster response times and improved handling of high concurrency.
Explore our latest online courses and learn new skills at your own pace. Enroll and become a certified expert to boost your career.
Enhanced Scalability
PHP-FPM’s pool of worker processes can be dynamically adjusted based on traffic demands, allowing it to scale effectively to handle varying workloads.
Advanced Process Management
PHP-FPM offers graceful startup and shutdown. It also has granular control over process management, including, emergency restarts, and monitoring of worker processes.
Environment Isolation
PHP-FPM enables the creation of separate pools for different applications or user groups, so that better isolation and security can be provided for each environment.
Customizable Configuration
PHP-FPM uses php.ini based configuration options. With these extensive options, fine-tuning of its behavior is possible to match specific application requirements.
Supports multiple PHP Versions
PHP-FPM can manage multiple PHP versions simultaneously, enabling the deployment of different PHP applications on a single server.
PHP-FPM is commonly used with web servers like Nginx or Apache. It acts as a backend processor for handling PHP requests. It has become the preferred method for managing PHP applications in production environments due to its performance, scalability, and reliability.
The acronym “CSRF” stands for Cross-Site Request Forgery. CSRF is an Internet exploit that involves a trusted website user issuing unauthorized commands. Providing adequate protection to a PHP web application against this attack can be achieved by taking the measures explained in this chapter.
By default, the browser uses the “GET” request method to send data. This is commonly used as the exploit point in a CSRF. To inject commands into a specific website, the attacker employs HTML tags like “IMG.” For example, the url endpoint of a web application such as “/delete.php?empcode=1234” deletes account as passed from empcode parameter of a GET request. Now, if an authenticated user come across the following script in any other application.
Inadvertently causes the data related to empcode=1234 to be deleted.
A common workaround for this problem is the use of CSRF tokens. A CSRF token is a string of random characters embedded into requests so that a web application can trust that a request has been received from an expected source as per the normal workflow.
Steps to Implement CSRF
The steps to implement CSRF token protection in PHP are as follows −
Begin the script by starting a new session.
Generate a token of random characters. You can use any of the several built-in function that PHP provides for generation of random string. Let use md5() function to obtain the hash value of uniqueid() function that generates a unique randome string.
Inside the HTML form to be provided for the user to submit the data, include a hidden file with its value as the random token generated in the above step.
The token can is then validated by the server against the user session after form submission to eliminate malicious requests.
You can also add another session variable whose value is the current time, and send an expiry time for the validation purpose.
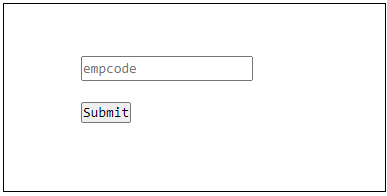
Example
Here is the PHP code that implements CSRF token verification mechanism. The following script generates a token and embeds in a HTML form.
To simulate the failure of CSRF validation, open the inspect tool of the browser, edit the value in the hidden field manually and submit the form to see that the tokens don’t match leading to the validation failure.
PEAR is an acronym for PHP Extension and Application Repository. It is a repository of PHP packages or extensions. You can freely incorporate any of these extensions from PEAR in your code. The PEAR project was established by Stig S. Bakken in 1999.
Most of the precompiled distributions of PHP such as XAMPP already have PEAR bundled with it. If not, you can install PEAR by downloading go-pear.phar file from https://pear.php.net/go-pear.phar and run
php go-pear.phar
In a Windows Command Prompt to start the installation.
Based on your responses to the setup steps, the PEAR Package Manager will be installed in the path, specified during installation.
You can then add that installation path to your PATH environment. Either do this manually (Start > Control Panel > System > Environment) or run (double-click) the newly generated PEAR_ENV.reg that’s now found in the PHP source directory.
You can now access the PEAR Package Manager by running the command −
C:\xampp\php>pear
In a Windows Command Prompt.
You will get the list of PEAR commands as follows −
C:\xampp\php>pear
Commands:
build                  Build an Extension From C Source
bundle                 Unpacks a Pecl Package
channel-add            Add a Channel
channel-alias          Specify an alias to a channel name
channel-delete         Remove a Channel From the List
channel-discover       Initialize a Channel from its server
channel-info           Retrieve Information on a Channel
channel-login          Connects and authenticates to remote channel server
channel-logout         Logs out from the remote channel server
channel-update         Update an Existing Channel
clear-cache            Clear Web Services Cache
config-create          Create a Default configuration file
config-get             Show One Setting
config-help            Show Information About Setting
config-set             Change Setting
config-show            Show All Settings
convert                Convert a package.xml 1.0 to package.xml 2.0 format
cvsdiff                Run a "cvs diff"for all files in a package
cvstag                 Set CVS Release Tag
download               Download Package
download-all           Downloads each available package from the default channel
info                   Display information about a package
install                Install Package
listList Installed Packages In The Default Channel
list-all               List All Packages
list-channels          List Available Channels
list-files             List Files In Installed Package
list-upgrades          List Available Upgrades
login                  Connects and authenticates to remote server [Deprecated in favor of channel-login]
logout                 Logs out from the remote server [Deprecated in favor of channel-logout]
makerpm                Builds an RPM spec file from a PEAR package
package                Build Package
package-dependencies   Show package dependencies
package-validate       Validate Package Consistency
pickle                 Build PECL Package
remote-info            Information About Remote Packages
remote-listList Remote Packages
run-scripts            Run Post-Install Scripts bundled with a package
run-tests              Run Regression Tests
search                 Search remote package database
shell-test             Shell Script Test
sign                   Sign a package distribution file
svntag                 Set SVN Release Tag
uninstall              Un-install Package
update-channels        Update the Channel List
upgrade                Upgrade Package
upgrade-all            Upgrade All Packages [Deprecated in favor of calling upgrade with no parameters]
Installing packages with PEAR is so easy. One way to find packages, is using the official PEAR site https://pear.php.net/packages.php and then run
pear install <package-name>
The next step is to use the PEAR package in your code. To do that, you should include the main PHP script of the package in your program with include, require, include_once or require_once statements.
<?php
   include "PEARPACKAGE.php";
   . . . . .
   // rest of the code
   . . . . .
?>
A newer PHP package manager called Composer is an alternative available for managing packages for a PHP project. Composer also supports the installation of PEAR packages. Composer is preferred by many instead of PEAR for PHP package distribution.
With each new version of PHP, new functionality is added and at the same time certain obsolete functionality is removed. PHP version 7 is a major version when a number of PHP extensions and SAPIs (Server-side Application Programming Interface) were removed. In the subsequent PHP 8 version also, a few more extensions have been removed.
In PHP, an extension is a library or plugin, written in C/C++, and compiled into shared libraries so that can be loaded into the PHP interpreter. Once the PHP interpreter starts, the functions in the extension are available to PHP scripts.
The extensions are periodically removed because they are either no longer maintained or have been replaced with more modern alternatives. Coinciding with PHP 7 for example, the ereg extension was replaced with the preg extension, and the mssql extension was replaced with the PDO_MSSQL extension.
Removed Extensions
The following extensions have been removed with effect from PHP 7 −
ereg extension replaced by preg
mssql extension replaced by pdo_mssql
mysql extension mysqli
sybase_ct replaced by pdo_sybase
The following extensions have been removed from PHP 8 onwards −
Mcrypt − The Mcrypt extension was used for encryption and decryption, but it has been deprecated since PHP 7.1 and removed in PHP 8 due to security vulnerabilities.
MDB2 − The MDB2 extension, earlier used for accessing MDB database files, is removed in PHP 8 due to lack of maintenance.
Ming − As Flash is not popular nowadays, the Ming extension, used for generating flash content, has been deprecated since PHP 5.5 and removed in PHP 8.
Phar Data − The Phar Data extension was used for accessing data within PHAR archives, but it has been removed in PHP 8 as there are other methods for accessing PHAR data.
SNMP − Because it is not being maintained, the SNMP extension has been removed in PHP 8.
Tidy − Since new libraries for HTML validation have been added, the Tidy extension was removed in PHP.
Tokenizer − The Tokenizer extension was also removed in PHP 8 for the same reason.
cURL − The cURL extension was removed in PHP 8.1, as it was no longer maintained.
Removed SAPIs
SAPI stands for Server-side Application Programming Interface in PHP. The SAPI is responsible for translating PHP code into something that the web server can understand. It parses the PHP code and calls the appropriate web server functions. The web server then generates an HTTP response that is sent back to the client.
The following SAPIs (Server-side Application Programming Interfaces) have been removed from PHP 7 onwards −
As some new features are added with each new version, some features are also removed as they are deemed to be obsolete. In this chapter, we have a look at deprecated features after PHP version 5.
Deprecated in PHP Ver 7
PHP 4 Style Constructors
PHP 4 style Constructors are methods having same name as the class they are defined in, are now deprecated, and will be removed in the future. PHP 7 will emit E_DEPRECATED if a PHP 4 constructor is the only constructor defined within a class. Classes implementing a __construct() method are unaffected.
Example
Take a look at the following example −
<?php
   class A {
  function A() {
     print('Style Constructor');
  }   }
?>
It produces the following output on the browser −
Deprecated: Methods with the same name as their class will not be
constructors in a future version of PHP; A has a deprecated constructor in...
Static Calls to Non-static Methods
Static calls to non-static methods are deprecated, and may be removed in the future.
Example
Take a look at the following example −
<?php
   class A {
  function b() {
     print('Non-static call');
  }   }
   A::b();
?>
It produces the following output on the browser −
Deprecated: Non-static method A::b() should not be called statically in...
Non-static call
password_hash() salt option
The salt option for the password_hash() function has been deprecated so that the developers do not generate their own (usually insecure) salts. The function itself generates a cryptographically secure salt, when no salt is provided by the developer – thus custom salt generation is not required any more.
capture_session_meta SSL context option
The capture_session_meta SSL context option has been deprecated. SSL metadata is now used through the stream_get_meta_data() function.
ext/mcrypt
The mcrypt extension has been deprecated in favour of OpenSSL.
Unquoted Strings
Unquoted strings that are non-existent global constants are taken to be strings of themselves. This behaviour used to emit an E_NOTICE, but will now emit an E_WARNING. In the next major version of PHP, an Error exception will be thrown instead.
The __autoload() Method
The __autoload() method has been deprecated because it is inferior to spl_autoload_register() (due to it not being able to chain autoloaders), and there is no interoperability between the two autoloading styles.
The create_function() Function
Given the security issues of this function has now been deprecated. The preferred alternative is to use anonymous functions.
The each() Function
This function causes implementation issues for some language changes. It has therefore been deprecated.
Case-Insensitive Constants
The declaration of case-insensitive constants has been deprecated. Passing true as the third argument to define() will now generate a deprecation warning.
The (real) and is-real() Function
The (real) cast is deprecated, use (float) instead. The is_real() function is also deprecated, use is_float() instead.
The “parent” Leyword
Using parent inside a class without a parent is deprecated, and will throw a compile-time error in the future. Currently an error will only be generated if/when the parent is accessed at run-time.
Deprecated in PHP Ver 8
If a parameter with a default value is followed by a required parameter, the default value has no effect. This is deprecated as of PHP 8.0.0 and can generally be resolved by dropping the default value, without a change in functionality −
<?php
   function test($a = [], $b) {}  // Before
   function test($a, $b) {}      // After
?>
One exception to this rule are parameters of the form Type $param = null, where the null default makes the type implicitly nullable. This usage remains allowed, but it is recommended to use an explicit nullable type instead −
<?php
   function test(A $a = null, $b) {} 	// Still allowed
   function test(?A $a, $b) {}         // Recommended
?>
Calling get_defined_functions() with exclude_disabled explicitly set to false is deprecated and no longer has an effect. get_defined_functions() will never include disabled functions.
Sort comparison functions that return true or false will now throw a deprecation warning, and should be replaced with an implementation that returns an integer less than, equal to, or greater than zero.
The implicit conversion of float to int which leads to a loss in precision is now deprecated. This affects array keys, int type declarations in coercive mode, and operators working on ints.
Calling a Static Element on a Trait
Calling a static method, or accessing a static property directly on a trait is deprecated. Static methods and properties should only be accessed on a class using the trait.
Date Functions
date_sunrise() and date_sunset() have been deprecated. Use date_sun_info() instead.
strptime() has been deprecated. Use date_parse_from_format() instead (for locale-independent parsing), or IntlDateFormatter::parse() (for locale-dependent parsing).
strftime() and gmstrftime() have been deprecated. You can use date() instead (for locale-independent formatting), or IntlDateFormatter::format() (for locale-dependent formatting).
Dynamic Properties
The creation of dynamic properties is deprecated. Instead, use stdClass that allows dynamic properties.
 button or use the shortcut Ctrl+Shift+F10 to execute the Dart Script.