Author: saqibkhan

  • Architecture Application

    In this chapter, let us discuss the architecture of the Flutter framework.

    Widgets

    The core concept of the Flutter framework is In Flutter, Everything is a widget. Widgets are basically user interface components used to create the user interface of the application.

    In Flutter, the application is itself a widget. The application is the top- level widget and its UI is build using one or more children (widgets), which again build using its children widgets. This composability feature helps us to create a user interface of any complexity.

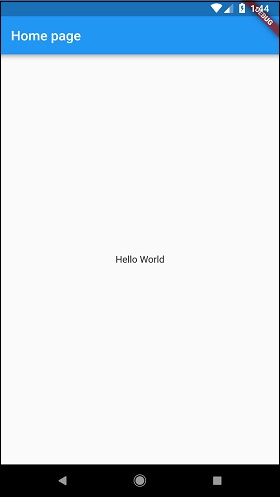
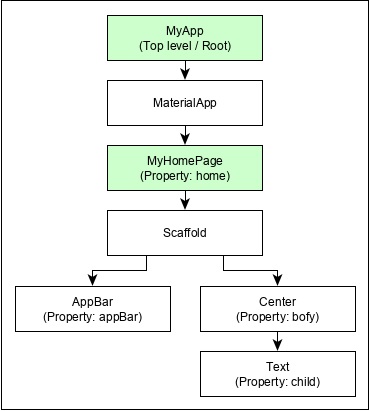
    For example, the widget hierarchy of the hello world application (created in previous chapter) is as specified in the following diagram −

    Hello World Application

    Here the following points are worth notable −

    • MyApp is the user created widget and it is build using the Flutter native widget, MaterialApp.
    • MaterialApp has a home property to specify the user interface of the home page, which is again a user created widget, MyHomePage.
    • MyHomePage is build using another flutter native widget, Scaffold
    • Scaffold has two properties – body and appBar
    • body is used to specify its main user interface and appBar is used to specify its header user interface
    • Header UI is build using flutter native widget, AppBar and Body UI is build using Center widget.
    • The Center widget has a property, Child, which refers the actual content and it is build using Text widget

    Gestures

    Flutter widgets support interaction through a special widget, GestureDetectorGestureDetector is an invisible widget having the ability to capture user interactions such as tapping, dragging, etc., of its child widget. Many native widgets of Flutter support interaction through the use of GestureDetector. We can also incorporate interactive feature into the existing widget by composing it with the GestureDetector widget. We will learn the gestures separately in the upcoming chapters.

    Explore our latest online courses and learn new skills at your own pace. Enroll and become a certified expert to boost your career.

    Concept of State

    Flutter widgets support State maintenance by providing a special widget, StatefulWidget. Widget needs to be derived from StatefulWidget widget to support state maintenance and all other widget should be derived from StatefulWidget. Flutter widgets are reactive in native. This is similar to reactjs and StatefulWidget will be auto re- rendered whenever its internal state is changed. The re-rendering is optimized by finding the difference between old and new widget UI and rendering only the necessary changes

    Layers

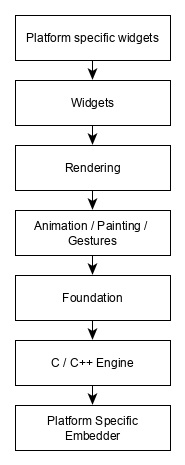
    The most important concept of Flutter framework is that the framework is grouped into multiple category in terms of complexity and clearly arranged in layers of decreasing complexity. A layer is build using its immediate next level layer. The top most layer is widget specific to Android and iOS. The next layer has all flutter native widgets. The next layer is Rendering layer, which is low level renderer component and renders everything in the flutter app. Layers goes down to core platform specific code

    The general overview of a layer in Flutter is specified in the below diagram −

    Overview Of Layer

    The following points summarize the architecture of Flutter −

    • In Flutter, everything is a widget and a complex widget is composed of already existing widgets.
    • Interactive features can be incorporated whenever necessary using GestureDetector widget.
    • The state of a widget can be maintained whenever necessary using StatefulWidget widget.
    • Flutter offers layered design so that any layer can be programmed depending on the complexity of the task.

    We will discuss all these concepts in detail in the upcoming chapters.

  • Creating Simple Application in Android Studio

    In this chapter, let us create a simple Flutter application to understand the basics of creating a flutter application in the Android Studio.

    Step 1 − Open Android Studio

    Step 2 − Create Flutter Project. For this, click File → New → New Flutter Project

    New Flutter Project

    Step 3 − Select Flutter Application. For this, select Flutter Application and click Next.

    Flutter Application Next

    Step 4 − Configure the application as below and click Next.

    • Project name: hello_app
    • Flutter SDK Path: <path_to_flutter_sdk>
    • Project Location: <path_to_project_folder>
    • Description: Flutter based hello world application
    Project Name

    Step 5 − Configure Project.

    Set the company domain as flutterapp.tutorialspoint.com and click Finish.

    Step 6 − Enter Company domain.

    Android Studio creates a fully working flutter application with minimal functionality. Let us check the structure of the application and then, change the code to do our task.

    The structure of the application and its purpose is as follows −

    Structure Application

    Various components of the structure of the application are explained here −

    • android − Auto generated source code to create android application
    • ios − Auto generated source code to create ios application
    • lib − Main folder containing Dart code written using flutter framework
    • ib/main.dart − Entry point of the Flutter application
    • test − Folder containing Dart code to test the flutter application
    • test/widget_test.dart − Sample code
    • .gitignore − Git version control file
    • .metadata − auto generated by the flutter tools
    • .packages − auto generated to track the flutter packages
    • .iml − project file used by Android studio
    • pubspec.yaml − Used by Pub, Flutter package manager
    • pubspec.lock − Auto generated by the Flutter package manager, Pub
    • README.md − Project description file written in Markdown format

    Step 7 − Replace the dart code in the lib/main.dart file with the below code −

    import 'package:flutter/material.dart';
    
    void main() => runApp(MyApp());
    
    class MyApp extends StatelessWidget {
       // This widget is the root of your application.
       @override
       Widget build(BuildContext context) {
    
      return MaterialApp(
         title: 'Hello World Demo Application',
         theme: ThemeData(
            primarySwatch: Colors.blue,
         ),
         home: MyHomePage(title: 'Home page'),
      );
    } } class MyHomePage extends StatelessWidget { MyHomePage({Key key, this.title}) : super(key: key); final String title; @override Widget build(BuildContext context) {
      return Scaffold(
         appBar: AppBar(
            title: Text(this.title),
         ),
         body: Center(
            child:
            Text(
               'Hello World',
            )
         ),
      );
    } }

    Let us understand the dart code line by line.

    • Line 1 − imports the flutter package, material. The material is a flutter package to create user interface according to the Material design guidelines specified by Android.
    • Line 3 − This is the entry point of the Flutter application. Calls runApp function and pass it an object of MyApp class. The purpose of the runApp function is to attach the given widget to the screen.
    • Line 5-17 − Widget is used to create UI in flutter framework. StatelessWidget is a widget, which does not maintain any state of the widget. MyApp extends StatelessWidget and overrides its build method. The purpose of the build method is to create a part of the UI of the application. Here, build method uses MaterialApp, a widget to create the root level UI of the application. It has three properties – title, theme and home.
      • title is the title of the application
      • theme is the theme of the widget. Here, we set blue as the overall color of the application using ThemeData class and its property, primarySwatch.
      • home is the inner UI of the application, which we set another widget, MyHomePage
    • Line 19 – 38 − MyHomePage is same as MyApp except it returns Scaffold Widget. Scaffold is a top level widget next to MaterialApp widget used to create UI conforming material design. It has two important properties, appBar to show the header of the application and body to show the actual content of the application. AppBar is another widget to render the header of the application and we have used it in appBar property. In body property, we have used Center widget, which centers it child widget. Text is the final and inner most widget to show the text and it is displayed in the center of the screen.

    Step 8 − Now, run the application using, Run → Run main.dart

    Main Dart

    Step 9 − Finally, the output of the application is as follows −

    Home Page
  • Installation

    This chapter will guide you through the installation of Flutter on your local computer in detail.

    Installation in Windows

    In this section, let us see how to install Flutter SDK and its requirement in a windows system.

    Step 1 − Go to URL, https://flutter.dev/docs/get-started/install/windows and download the latest Flutter SDK. As of April 2019, the version is 1.2.1 and the file is flutter_windows_v1.2.1-stable.zip.

    Step 2 − Unzip the zip archive in a folder, say C:\flutter\

    Step 3 − Update the system path to include flutter bin directory.

    Step 4 − Flutter provides a tool, flutter doctor to check that all the requirement of flutter development is met.

    flutter doctor
    

    Step 5 − Running the above command will analyze the system and show its report as shown below −

    Doctor summary (to see all details, run flutter doctor -v):
    [√] Flutter (Channel stable, v1.2.1, on Microsoft Windows [Version
    10.0.17134.706], locale en-US)
    [√] Android toolchain - develop for Android devices (Android SDK version
    28.0.3)
    [√] Android Studio (version 3.2)
    [√] VS Code, 64-bit edition (version 1.29.1)
    [!] Connected device
    ! No devices available
    ! Doctor found issues in 1 category.
    

    The report says that all development tools are available but the device is not connected. We can fix this by connecting an android device through USB or starting an android emulator.

    Step 6 − Install the latest Android SDK, if reported by flutter doctor

    Step 7 − Install the latest Android Studio, if reported by flutter doctor

    Step 8 − Start an android emulator or connect a real android device to the system.

    Step 9 − Install Flutter and Dart plugin for Android Studio. It provides startup template to create new Flutter application, an option to run and debug Flutter application in the Android studio itself, etc.,

    • Open Android Studio.
    • Click File → Settings → Plugins.
    • Select the Flutter plugin and click Install.
    • Click Yes when prompted to install the Dart plugin.
    • Restart Android studio.

    Installation in MacOS

    To install Flutter on MacOS, you will have to follow the following steps −

    Step 1 − Go to URL, https://flutter.dev/docs/get-started/install/macos and download latest Flutter SDK. As of April 2019, the version is 1.2.1 and the file is flutter_macos_v1.2.1- stable.zip.

    Step 2 − Unzip the zip archive in a folder, say /path/to/flutter

    Step 3 − Update the system path to include flutter bin directory (in ~/.bashrc file).

    > export PATH = "$PATH:/path/to/flutter/bin"
    

    Step 4 − Enable the updated path in the current session using below command and then verify it as well.

    source ~/.bashrc
    source $HOME/.bash_profile
    echo $PATH
    

    Flutter provides a tool, flutter doctor to check that all the requirement of flutter development is met. It is similar to the Windows counterpart.

    Step 5 − Install latest XCode, if reported by flutter doctor

    Step 6 − Install latest Android SDK, if reported by flutter doctor

    Step 7 − Install latest Android Studio, if reported by flutter doctor

    Step 8 − Start an android emulator or connect a real android device to the system to develop android application.

    Step 9 − Open iOS simulator or connect a real iPhone device to the system to develop iOS application.

    Step 10 − Install Flutter and Dart plugin for Android Studio. It provides the startup template to create a new Flutter application, option to run and debug Flutter application in the Android studio itself, etc.,

    • Open Android Studio
    • Click Preferences → Plugins
    • Select the Flutter plugin and click Install
    • Click Yes when prompted to install the Dart plugin.
    • Restart Android studio.
  • Introduction

    In general, developing a mobile application is a complex and challenging task. There are many frameworks available to develop a mobile application. Android provides a native framework based on Java language and iOS provides a native framework based on Objective-C / Swift language.

    However, to develop an application supporting both the OSs, we need to code in two different languages using two different frameworks. To help overcome this complexity, there exists mobile frameworks supporting both OS. These frameworks range from simple HTML based hybrid mobile application framework (which uses HTML for User Interface and JavaScript for application logic) to complex language specific framework (which do the heavy lifting of converting code to native code). Irrespective of their simplicity or complexity, these frameworks always have many disadvantages, one of the main drawback being their slow performance.

    In this scenario, Flutter – a simple and high performance framework based on Dart language, provides high performance by rendering the UI directly in the operating system’s canvas rather than through native framework.

    Flutter also offers many ready to use widgets (UI) to create a modern application. These widgets are optimized for mobile environment and designing the application using widgets is as simple as designing HTML.

    To be specific, Flutter application is itself a widget. Flutter widgets also supports animations and gestures. The application logic is based on reactive programming. Widget may optionally have a state. By changing the state of the widget, Flutter will automatically (reactive programming) compare the widget’s state (old and new) and render the widget with only the necessary changes instead of re-rendering the whole widget.

    We shall discuss the complete architecture in the coming chapters.

    Features of Flutter

    Flutter framework offers the following features to developers −

    • Modern and reactive framework.
    • Uses Dart programming language and it is very easy to learn.
    • Fast development.
    • Beautiful and fluid user interfaces.
    • Huge widget catalog.
    • Runs same UI for multiple platforms.
    • High performance application.

    Advantages of Flutter

    Flutter comes with beautiful and customizable widgets for high performance and outstanding mobile application. It fulfills all the custom needs and requirements. Besides these, Flutter offers many more advantages as mentioned below −

    • Dart has a large repository of software packages which lets you to extend the capabilities of your application.
    • Developers need to write just a single code base for both applications (both Android and iOS platforms). Flutter may to be extended to other platform as well in the future.
    • Flutter needs lesser testing. Because of its single code base, it is sufficient if we write automated tests once for both the platforms.
    • Flutter’s simplicity makes it a good candidate for fast development. Its customization capability and extendibility makes it even more powerful.
    • With Flutter, developers has full control over the widgets and its layout.
    • Flutter offers great developer tools, with amazing hot reload.

    Explore our latest online courses and learn new skills at your own pace. Enroll and become a certified expert to boost your career.

    Disadvantages of Flutter

    Despite its many advantages, flutter has the following drawbacks in it −

    • Since it is coded in Dart language, a developer needs to learn new language (though it is easy to learn).
    • Modern framework tries to separate logic and UI as much as possible but, in Flutter, user interface and logic is intermixed. We can overcome this using smart coding and using high level module to separate user interface and logic.
    • Flutter is yet another framework to create mobile application. Developers are having a hard time in choosing the right development tools in hugely populated segment.
  • HTML DOM

    Every webpage can be considered as object and it exists inside a browser window. We can access the webpage using the web browser and it needed connected to the internet. The DOM is the acronyms of Document object model. A Document object denotes the HTML document that is displayed in that window. The document object model consists of several properties that refer to the other objects which give the facility to modify the document content.

    The process that a content of document is accessed is called the Document Object Model, or DOM. The Objects are organized in a hierarchy. The hierarchical structure uses to the organization of objects in a web document.

    • Window – It is the first in the hierarchy. It the outmost element of the object hierarchy.
    • Document – When a HTML document loads into a window that it becomes a window object. The document includes the contents of the page.
    • Elements – It denotes the content on the webpage. For example – Title, text box etc.
    • Nodes – These are often elements, but they also be attributes, comments, text and other DOM types.

    Below is the hierarchy of the few important DOM objects.

    Dart HTML DOM

    We can manipulate the objects and element in the DOM by using the dart:html library. Console-based application cannot use the dart:html library. In work with the HTML library in the web application, we need to import the dart:html.

    1. import ‘dart.html’;  

    Let’s understand the DOM operation in the following section.

    Finding DOM Elements

    A document can contain many attributes sometime we need to search particular attribute. The dart:html library provides the querySelector function to search element in the DOM.

    1. Element querySelector(String selector);  

    The querySelector() function returns the first element that matches the specified group of the selector. Let’s understand the.

    following syntax.

    var element1 = document.querySelector('.className');   
    
    var element2 = document.querySelector('#id');  

      Let’s understand the following example.

      Example –

      We create a HTML file name index.html and also create a dart file.

      <!DOCTYPE html>     
      
      <html>   
      
         <head>       
      
            <meta charset = "utf-8">       
      
            <meta http-equiv = "X-UA-Compatible" content = "IE = edge">       
      
            <meta name = "viewport" content = "width = device-width, initial-scale = 1.0">  
      
            <meta name = "scaffolded-by" content = "https://github.com/google/stagehand">  
      
            <title>DemoWebApp</title>       
      
            <link rel = "stylesheet" href = "styles.css">       
      
            <script defer src = "main.dart" type = "application/dart"></script>  
      
            <script defer src = "packages/browser/dart.js"></script>   
      
         </head>  


         <body>     
      
            <h1>  
      
               <div id = "output"></div>   
      
            </h1>    
      
         </body>   
      
      </html> 

        Main.dart

        import 'dart:html';    
        
        void main() {     
        
           querySelector('#output').text = 'Your Dart web dom app is running!!!.';   
        
        }  

          Event Handling

          The dart:html library provides the onClick event for DOM Elements. The syntax shows how an element could handle a stream of click events.

          querySelector('#Id').onClick.listen(eventHanlderFunction);   

          The querySelector() function returns the element from the given DOM and onClick.listen() will take an eventHandler method which will be invoked when a click event is raised. The syntax of eventHandler is given below ?

          void eventHanlderFunction (MouseEvent event){ }   

          Let us now take an example to understand the concept of Event Handling in Dart.

          TestEvent.html

          <!DOCTYPE html>   
          
          <html>   
          
             <head>   
          
                <meta charset = "utf-8">   
          
                <meta http-equiv = "X-UA-Compatible" content = "IE = edge">   
          
                <meta name = "viewport" content = "width = device-width, initial-scale = 1.0">   
          
                <meta name = "scaffolded-by" content ="https://github.com/google/stagehand">   
          
                <title>DemoWebApp</title>   
          
                <link rel = "stylesheet" href = "styles.css">   
          
                <script defer src = "TestEvent.dart" type="application/dart"></script>   
          
                <script defer src = "packages/browser/dart.js"></script>   
          
             </head>  
          
             <body>   
          
                <div id = "output"></div>   
          
                <h1>   
          
                   <div>   
          
                      Enter you name : <input type = "text" id = "txtName">   
          
                      <input type = "button" id = "btnWish" value="Wish">   
          
                   </div>   
          
                </h1>   
          
                <h2 id = "display"></h2>  

            TestEvent.dart

            import 'dart:html';   
            
            void main() {   
            
               querySelector('#btnWish').onClick.listen(wishHandler);   
            
            }    
            
            void wishHandler(MouseEvent event){   
            
               String name = (querySelector('#txtName')  as InputElement).value;   
            
               querySelector('#display').text = 'Hello Mr.'+ name;   
            
            } 
            1. What is Unit Testing?

              Unit testing is a part of the software development process where particular unit/components of an application are tested. Unit testing of each component is necessary to enhance the application performance. We can say that a unit is the smallest testable chunk of a program that can be logically isolated in a system. In various programming languages, the individual program, a subroutine, a function, a method, or a class can be represented as a Unit. There can be many individual units within the module. In object-oriented programming, the method that belongs to base class/superclass, an abstract class can be represented as smaller units. Below image displays the type of testing.

              Dart Unit Testing

              Unit Testing Task

              The unit testing task is given below.

              • Unit Test Plan
                Prepare
                Review
                Rework
                Baseline
              • Unit Test Cases/Scripts
                Prepare
                Review
                Rework
                Baseline
              • Unit Test
                Perform

              Advantage of Unit Testing

              Few advantages of unit testing are given below.

              1. We can maintain code easily
              2. It makes code more reusable.
              3. It makes development faster.
              4. The code can be easily debugged.
              5. It detects the cost of testing and fixing defects, because any error is captured in the early stage.

              Dart Unit Testing

              In Dart, we required to include an external library named “test”, which facilitates a standard way of writing and running individual unit test. Unit testing can be achieved using the following steps.

              Step – 1: Installing “test” package

              To include the unit testing in our project, we must install a third-party packages “test” in our current working project. Let’s open the pubspec.yaml in the our project and type the following statement.

              1. dependencies:  
              2. test:  

              Now, right-click on pubspec.yaml file and click on Pub: get dependencies. This will install the “test” package in our project.

              Dart Unit Testing

              We can also install it by using the following command.

              1. pub get  

              Step – 2: Importing “test” package

              Type the following line to import the “test” package in your project.

              import "package:test/test.dart";  

              Step – 3: Writing Test Cases

              The top-level test() function is added by the Test cases. In the test() function, we make the test assertion using the expect() function. The expert() function takes two arguments actualValue and MatchValue.

              Syntax:

              test("Test Description", () {  
              
                 expert(actualValue, matchingValue)  
              
              }); 

                Group of Test Cases

                We can create a group of multiple test cases using the group() function. It helps grouping of test cases based on some criteria. The description of each group is specified in the beginning of its test’s description.

                Syntax:

                The syntax is given below.

                group("Test_Group_Name", () {   
                
                   test("test_case_name_1", () {   
                
                      expect(actual, equals(exptected));   
                
                   });    
                
                   test("test_case_name_2", () {   
                
                      expect(actual, equals(expected));   
                
                   });   
                
                })  

                  Example – 1(Passing Test)

                  Here is the example where we define an add() method for unit test. It accepts two parameters as an integer values and returns an integer representing the sum. To test the add() method, understand the following example –

                  Step – 1: We import the test package.

                  Step -2: We define the test using the test() function and it uses the expert() function to impose an assertion.

                  import 'package:test/test.dart';        
                  
                  // Importing  the test package   


                  int add(int x,int y)                    
                  
                  // this function to be tested {   
                  
                     return x+y;   
                  
                  }    
                  
                  void main() {   
                  
                     // Defining the test function   
                  
                     test("test to check add method",(){    
                  
                        // Arrange   
                  
                        var expected = 30;   


                        // Act   
                  
                        var actual = add(10,20);   


                        // Asset   
                  
                        expect(actual,expected);   
                  
                     });   
                  
                  }  

                    Output:

                    00:00 +0: test to check add method
                    00:00 +1: All tests passed!
                    

                    Example – 2 A unsuccessful Test

                    We define the sub() method which has a logical mistake. Let’s have a following example.

                    import 'package:test/test.dart';   
                    
                    int add(int x,int y){   
                    
                       return x+y;   
                    
                    }  
                    
                    int sub(int x,int y){   
                    
                       return x-y-1;   
                    
                    }    
                    
                    void main(){   
                    
                       test('test to check sub',(){   
                    
                          var expected = 10;     
                    
                          // Arrange   


                          var actual = sub(30,20);    
                    
                          // Act   


                          expect(actual,expected);    
                    
                          // Assert   
                    
                       });   
                    
                       test("test to check add method",(){   
                    
                          var expected = 30;     
                    
                          // Arrange   


                          var actual = add(10,20);    
                    
                          // Act   


                          expect(actual,expected);    
                    
                          // Asset   
                    
                       });   
                    
                    } 

                      Output:

                      00:00 +0: test to check sub
                      00:00 +0 -1: test to check sub
                      Expected: <10>
                      Actual: <9>
                      package:test expect
                      bin\Test123.dart 18:5 main.<fn>
                      
                      00:00 +0 -1: test to check add method
                      00:00 +1 -1: Some tests failed.
                      Unhandled exception:
                      Dummy exception to set exit code.
                      #0 _rootHandleUncaughtError.<anonymous closure> (dart:async/zone.dart:938)
                      #1 _microtaskLoop (dart:async/schedule_microtask.dart:41)
                      #2 _startMicrotaskLoop (dart:async/schedule_microtask.dart:50)
                      #3 _Timer._runTimers (dart:isolate-patch/timer_impl.dart:394)
                      #4 _Timer._handleMessage (dart:isolate-patch/timer_impl.dart:414)
                      #5 _RawReceivePortImpl._handleMessage (dart:isolate-patch/isolate_patch.dart:148)
                      

                      In the above example, the add() function is tested successfully but the sub() function failed the unit test due to logical error.

                      Grouping Test Cases

                      We can write the multiple test cases in the form of group. The group() is used to grouped together these methods. It helps to write much cleaner code.

                      In the following example, we are writing a test case for the split() function and the trim() function. We grouped together these function and name it String.

                      Let’s understand the following example –

                      Example –

                      import "package:test/test.dart";   
                      
                      void main() {   


                         group("String", () {   
                      
                           // First test case  
                      
                            test("testing on split() method of string class", () {   
                      
                               var string = "Hii,Hello,Hey";   
                      
                               expect(string.split(","), equals(["Hii", "Hello", "Hey"]));   
                      
                            });   
                      
                            // Second test case  
                      
                            test("testing on trim() method of string class", () {   
                      
                               var string = "  Hii ";   
                      
                               expect(string.trim(), equals("Hii"));   
                      
                            });   
                      
                         });   
                      
                      }

                      Output:

                      00:00 +0: String testing on split() method of string class
                      00:00 +1: String testing on trim() method of string class
                      00:00 +2: All tests passed
                      
                    1. What is Concurrency?

                      The Dart concurrency allows us to run multiple programs or multiple parts of a program simultaneously. It executes the several instructions at the same time. Dart provides the Isolates as a tool for doing works for parallel. The concurrency makes the program highly effective and throughput by utilizing the unused capabilities of essential operating system and machine hardware.

                      How to achieve concurrency?

                      In Dart, we can achieve concurrency by using the Isolates. We have discussed Dart isolates in previous tutorial. Here we will understand the brief introduction of it. Dart isolate is a version of the thread. But there is key difference between the common implementation of “Thread” or “Isolates”. The isolate works differently in comparison of Thread. The isolates are independent workers that do not share memory, but instead interconnect by passing message over channels. Since isolates completes its task by passing message thus it need a way to serialize a message.

                      The communication between the isolates is done by the message passing as a client and server. It helps the program to take advantage of multicore microprocessor out of the box.

                      Dart provides the dart:isolate package to apply the isolate in our program. It provides the solution to taking single-threaded Dart code and allowing application to make greater use of the hardware available.

                      Let’s understand the following example –

                      Example –

                      import 'dart:isolate';    
                      
                      void sayhii(var msg){   
                      
                         print('execution from sayhii ... the message is :${msg}');   
                      
                      }    
                      
                      void main(){   
                      
                         Isolate.spawn(sayhii,'Hello!!');   
                      
                         Isolate.spawn(sayhii,'Whats up!!');   
                      
                         Isolate.spawn(sayhii,'Welcome!!');   


                         print('execution from main1');   
                      
                         print('execution from main2');   
                      
                         print('execution from main3');   
                      
                      }  

                        Output:

                        execution from main1
                        execution from main2
                        execution from main3
                        execution from sayhii ... the message is :Whats up!!
                        execution from sayhii ... the message is :Hello!!
                        

                        Output 2:

                        execution from main1
                        execution from main2
                        execution from main3
                        execution from sayhii ... the message is :Hello!!
                        execution from sayhii ... the message is :Welcome!!
                        

                        The concept of the above code is similar to the dart isolates. If we run the above program multiple times, then output will be varied every time.

                      1. Async

                        Dart Async is related to asynchronous programming. It executes the asynchronous operation in a thread. It ensures that the critical functions to be executed until completion. The asynchronous operation is executed, separately the main application thread. In Dart, one operation cannot interrupt the other operation; it means one operation can execute at a time no other part of the program can avert it. Let’s understand the following example –

                        Example –

                        import 'dart:io';   
                        
                        void main() {   
                        
                           print("Enter your favorite car :");              


                           // prompt for user input   
                        
                           String car = stdin.readLineSync();    


                           // this is a synchronous method that reads user input   
                        
                           print("The car is  ${car}");   
                        
                           print("End of main");   
                        
                        }  

                          Output

                          Enter your favorite car :
                          Renault Duster
                          The car is Renault Duster
                          End of main
                          

                          Explanation:

                          In the above code, we used the readLineSync(), which is synchronous method. It means; the execution of all instructions that follow the readLineSync() method call will be blocked until the readLineSync() method doesn’t complete its execution.

                          The stdin.readLineSync () executes nothing until it gets the input from the user. It waits for the user input for further execution.

                          Difference between Asynchronous and Synchronous

                          Let’s understand the difference between synchronous and asynchronous.

                          In computer science, if we say a particular program is synchronous, that means it waits for an event to execute further. This approach is driven with a demerit, if a part of the code takes much time to execute, the succeeding blocks through an unrelated block will be blocked from executing.

                          This is the main problem of the synchronous approach. A part of the program may require executing before the current part, but the synchronous approach doesn’t allow it.

                          This is not suitable for the webservers, where request must be independent of the others. It means, the webserver does not wait to finish the execution of the current request, it responds to the request from the other users.

                          The web server should accept the request from the other user before executing the previous requests.

                          This approach is called asynchronous programming. The asynchronous programming generally focuses on no waiting or non-blocking programming model. The dart: async is facilitated to implement the asynchronous programming block in a Dart script.

                          Example –

                          We create a file with the few names and save this file as names.txt and write a program to read this file without delaying the other part of the code.

                          1, Peter  
                          
                          2, John  
                          
                          3, Tom  
                          
                          4, Johnson  

                            Consider the following code.

                            import "dart:async";   
                            
                            import "dart:io";    


                            void main(){   
                            
                               File file1 = new File("C:\Users\DEVANSH SHARMA\Desktop\contact.txt");   
                            
                               Future<String> fs = file1.readAsString();    


                               // returns a future object, it is an async method   
                            
                               fs.then((data)=>print(data));    


                               // once file is read, call back method is invoked    
                            
                               print("End of main");    


                            }

                            Output

                            End of main
                            1, Peter
                            2, John
                            3, Tom
                            4, Johnson
                            

                            Dart Future

                            The Dart Future is defined as getting a result sometime in the future. The Future object uses to facilitate asynchronous programming. Future objects are a tool to denote values returned by an expression whose execution will complete at a later point in time (In Future). In order to work with the future, we can use either async and await or the Future API.

                            Dart async and await

                            The async and await keywords are allowed to implement asynchronous programming without using the Future API. The async keyword is necessary to run function asynchronously; we need to add async after the function name. The syntax is given below:

                            Syntax:

                            func_name() async {  
                            
                               //function body  
                            
                            } 

                              When an async function is invoked, the Future object instantly returns and that indicates the async function will execute later. Once the body of the async function is executed, the function call returned the Future object. The function call will be completed with its result.

                              Dart await Keyword

                              The await keyword is also used to execute function asynchronously. It suspends the currently running function until the result is ready. When it returns the result, then it continues on to the next line of code. The await keyword can only be used with async functions. The syntax is given below.

                              Syntax:

                              await e;  

                              Here, e is an asynchronous expression, and it is expected to evaluate to a Future. The await expression evaluates e, and then suspends the currently running function until the result is ready.

                              Let’s understand the following example –

                              Example – 1

                              void hii() async {  
                              
                                       print("Hii Javatpoint");  


                              }  


                              void main() async {  
                              
                                       await hii();            // Using await keyword  
                              
                                       print("Task Complete");  


                              }

                              Output

                              Hii JavaTpoint
                              Task Complete
                              

                              Explanation:

                              Here, we have declared the main() function asynchronous using the async keyword because we call the hii() method asynchronously. Then, we used await modifier to call hii() that executed asynchronously.

                            1. Isolates

                              Dart allows us to asynchronous programming which runs our program without getting blocked. The asynchronous programming is used to achieve concurrency. Dart isolate is a version of the thread. But there is key difference between the common implementation of “Thread” or “Isolates”. The isolate works differently in comparison of Thread. The isolates are independent workers that do not share memory, but instead interconnect by passing message over channels. Since isolates completes its task by passing message thus it need a way to serialize a message.

                              The communication between the isolates is done by the message passing as a client and server. It helps the program to take advantage of multicore microprocessor out of the box.

                              Dart provides the dart:isolate package to apply the isolate in our program. It provides the solution to taking single-threaded Dart code and allowing application to make greater use of the hardware available.

                              Create and Start an Isolate

                              Dart provides the spawn() method to create an isolate. It must be declared with an ‘entry point’ with a single parameter. This parameter displays a port which isolate use to refer back notification message.

                              Let’s understand the following example –

                              Example –

                              import 'dart:isolate';    
                              
                              void sayhii(var msg){   
                              
                                 print('execution from sayhii ... the message is :${msg}');   
                              
                              }    
                              
                              void main(){   
                              
                                 Isolate.spawn(sayhii,'Hello!!');   
                              
                                 Isolate.spawn(sayhii,'Whats up!!');   
                              
                                 Isolate.spawn(sayhii,'Welcome!!');   


                                 print('execution from main1');   
                              
                                 print('execution from main2');   
                              
                                 print('execution from main3');   
                              
                              } 

                                Output:

                                execution from main1
                                execution from main2
                                execution from main3
                                execution from sayhii ... the message is :Whats up!!
                                execution from sayhii ... the message is :Hello!!
                                

                                Output 2:

                                execution from main1
                                execution from main2
                                execution from main3
                                execution from sayhii ... the message is :Hello!!
                                execution from sayhii ... the message is :Welcome!!
                                

                                Explanation:

                                In the above program, the spawn method of the isolate class executed a function sayhii in parallel of remaining code. It takes two parameters.

                                • The function that we want to spawned and the string that will be passed to the spawned function.

                                We have two functions sayhii() and main() function might not run in the same order each time. If you run the above program, then the output will be different each time as we can see in second output.

                                Note – We can also pass NULL value if there is no object to pass in spawned function.

                                Let’s understand the another example –

                                Example – 2

                                void start() async {  
                                
                                         ReceivePort  receiverPort = ReceiverPort();   // Port for isolate to receive message.  
                                
                                         isolate = await Isolate.spawn(runTimer, receiverPort.sendPort);  
                                
                                         receivePort.listen((data){  
                                
                                               stdout.write('Receiving: '+ data + ', ');  


                                     });  


                                }  
                                
                                void runTimer(SendPort, sendPort) {  
                                
                                int coun = 0;  
                                
                                Timer.periodic(new Duration(seconds: 1), (Timer t) {  
                                
                                     count++;  
                                
                                     String msg = 'notification ' + count.toString();  
                                
                                     stdout.write('Sending: ' + msg + ' -');  
                                
                                     sendPort.send(msg);  


                                });  
                                
                                }

                                Explanation:

                                In the above code, we created an asynchronous method start() which creates a port and spawn an isolate. We signified the start method as async because of wan can await the response from the spawning of the isolates and to store a reference to the new isolate. It is essential when we want to kill the running isolates. We passed the two parameters in the spawn() method, the first parameter runTimer method, that is a callback function to execute runTimer() and second parameter sendPort which is a callback function and it will used to send message back to the caller. The start() method starts listening the receiverPort for message from isolate. Once it will receive the message then it will print as a console output.

                                The runTimer() method begins a timer that fires every second in order to update a counter. It sends a notification message via the port which it received when the isolate was spawned.

                                Stop an Isolate

                                The dart: isolates package provides the kill() method which is used to stop a running isolate.

                                Let’s understand the following example.

                                Example –

                                void stop() {    
                                
                                        If (isolate != null) {  
                                
                                        stdout.writeln('Stopping Isolate');  
                                
                                        isolate.kill(priority: Isolate.immediate);  
                                
                                        isolate = null;  
                                
                                        }  
                                
                                }  

                                  Explanation:

                                  In the above example, we have declared a stop() method that will destroy the running isolate and sets its reference to null. We defined the priority of isolate: immediate that will terminate the isolate as soon as.

                                  Complete Program

                                  import 'dart:io';  
                                  
                                  import 'dart:async';  
                                  
                                  import 'dart:isolate';  


                                  Isolate isolate;  


                                  // Start the isolate   
                                  
                                  void start() async {  
                                  
                                           ReceivePort  receiverPort = ReceiverPort();   // Port for isolate to receive message.  
                                  
                                           isolate = await Isolate.spawn(runTimer, receiverPort.sendPort);  
                                  
                                           receivePort.listen((data){  
                                  
                                                 stdout.write('Receiving: '+ data + ', ');  


                                       });  


                                  }  
                                  
                                  void runTimer(SendPort, sendPort) {  
                                  
                                  int coun = 0;  
                                  
                                  Timer.periodic(new Duration(seconds: 1), (Timer t) {  
                                  
                                       count++;  
                                  
                                       String msg = 'notification ' + count.toString();  
                                  
                                       stdout.write('Sending: ' + msg + ' -');  
                                  
                                       sendPort.send(msg);  


                                  });  
                                  
                                  }  


                                  // Stopping the isolate using the stop() function.  
                                  
                                  void stop() {  
                                  
                                      if (isolate != null) {  
                                  
                                            stdout.writeln('Stopping Isolate.....');  
                                  
                                            isolate.kill(priority:Isolate.immediate);  
                                  
                                            isolate = null;   
                                  
                                       }  
                                  
                                  }  


                                  void main() async {  
                                  
                                      stdout.writeln('Starting Isolate...');  
                                  
                                      await start();  
                                  
                                      std.writeln('Hit enter key to quit');  
                                  
                                      await stdin.first;  
                                  
                                      stop();  
                                  
                                      stdout.writeln('Bye!');  
                                  
                                      exit(0);  
                                  
                                  }  

                                    Output:

                                    Stating Isolate
                                    Hit enter key to quit
                                    Sending: notification 1 - Receiving: notification 1, Sending: notification 2 - Receiving: notification 2,
                                    Stopping Isolate
                                    
                                  1. Callable Classes

                                    Dart provides the facility to call class instances like a function. To make callable class, we need to implement a call() method in it. Let’s understand the following example –

                                    Example – 1

                                    class Student {  
                                    
                                      String call(String name, int age) {  
                                    
                                                  return('Student name is $name and Age is $age');  


                                               }  
                                    
                                    }  
                                    
                                    void main() {  
                                    
                                       Student stu = new Student();  
                                    
                                       var msg = stu('Sharma',18);     // Class instance called like a function.  
                                    
                                       print('Dart Callable class');  
                                    
                                       print(msg);  
                                    
                                    } 

                                      Output

                                      Dart Callable class
                                      Student name is Sharma and Age is 18
                                      

                                      Explanation:

                                      In the above code, We defined a call() function in the class Student that takes two arguments String name, integer age and return a message with this information. Then, we have created the object of class Student and called it like a function.

                                      var msg = stu('Sharma',18);       

                                      Let’s have a look at another example –

                                      Example – 2 Multiple callable class

                                      class Student {  
                                      
                                        String call(String name, int age) {  
                                      
                                                    return('Student name is $name and Age is $age');  


                                                 }  
                                      
                                      }  


                                      class Employee {  
                                      
                                        int call(int empid, int age) {  
                                      
                                                    return('Employee id is ${empid} and Age is ${age}');  


                                                 }  
                                      
                                      }  


                                      void main() {  
                                      
                                         Student stu = new Student();  


                                         Employee emp = new Employee();  


                                         var msg = stu('peter',18);  // Class instance called like a function.  
                                      
                                         var msg2 = emp(101,32);   // Class instance called like a function.  
                                      
                                         print('Dart Callable class');  
                                      
                                         print(msg);  
                                      
                                         print(msg2);  
                                      
                                      } 

                                        Output

                                        Dart Callable class
                                        Student name is peter and Age is 18
                                        Employee id is 101 and Age is 32
                                        

                                        Explanation:

                                        In the above code, we defined two callable functions in class Student and class Employee. The Employee class call() function accepts two parameters as String empid and int age. We called instances of both classes as callable functions.

                                        var msg = stu('peter',18);    
                                        
                                        var msg2 = emp(101,32);