Flutter provides many advanced packages to work with databases. The most important packages are −
sqflite − Used to access and manipulate SQLite database, and
firebase_database − Used to access and manipulate cloud hosted NoSQL database from Google.
In this chapter, let us discuss each of them in detail.
SQLite
SQLite database is the de-facto and standard SQL based embedded database engine. It is small and time-tested database engine. sqflite package provides a lot of functionality to work efficiently with SQLite database. It provides standard methods to manipulate SQLite database engine. The core functionality provided by sqflite package is as follows −
Create / Open (openDatabase method) a SQLite database.
Execute SQL statement (execute method) against SQLite database.
Advanced query methods (query method) to reduce to code required to query and get information from SQLite database.
Let us create a product application to store and fetch product information from a standard SQLite database engine using sqflite package and understand the concept behind the SQLite database and sqflite package.
Create a new Flutter application in Android studio, product_sqlite_app.
Replace the default startup code (main.dart) with our product_rest_app code.
Copy the assets folder from product_nav_app to product_rest_app and add assets inside the *pubspec.yaml` file.
Configure sqflite package in the pubspec.yaml file as shown below −
dependencies: sqflite: any
Use the latest version number of sqflite in place of any
Configure path_provider package in the pubspec.yaml file as shown below −
dependencies: path_provider: any
Here, path_provider package is used to get temporary folder path of the system and path of the application. Use the latest version number of sqflite in place of any.
Android studio will alert that the pubspec.yaml is updated.
Click Get dependencies option. Android studio will get the package from Internet and properly configure it for the application.
In database, we need primary key, id as additional field along with Product properties like name, price, etc., So, add id property in the Product class. Also, add a new method, toMap to convert product object into Map object. fromMap and toMap are used to serialize and de- serialize the Product object and it is used in database manipulation methods.
class Product {
final int id;
final String name;
final String description;
final int price;
final String image;
static final columns = ["id", "name", "description", "price", "image"];
Product(this.id, this.name, this.description, this.price, this.image);
factory Product.fromMap(Map<String, dynamic> data) {
path is used to access dart core utility function related to file paths.
path_provider is used to get temporary and application path.
sqflite is used to manipulate SQLite database.
Create a new class SQLiteDbProvider
Declare a singleton based, static SQLiteDbProvider object as specified below −
class SQLiteDbProvider {
SQLiteDbProvider._();
static final SQLiteDbProvider db = SQLiteDbProvider._();
static Database _database;
}
SQLiteDBProvoider object and its method can be accessed through the static db variable.
SQLiteDBProvoider.db.<emthod>
Create a method to get database (Future option) of type Future<Database>. Create product table and load initial data during the creation of the database itself.
Used query method to fetch all the product information. query provides shortcut to query a table information without writing the entire query. query method will generate the proper query itself by using our input like columns, orderBy, etc.,
Used Product’s fromMap method to get product details by looping the results object, which holds all the rows in the table.
Write a method to get product specific to id
Future<Product> getProductById(int id) async {
final db = await database;
var result = await db.query("Product", where: "id = ", whereArgs: [id]);
return result.isNotEmpty ? Product.fromMap(result.first) : Null;
}
Here, we have used where and whereArgs to apply filters.
Create three methods - insert, update and delete method to insert, update and delete product from the database.
insert(Product product) async {
final db = await database;
var maxIdResult = await db.rawQuery(
"SELECT MAX(id)+1 as last_inserted_id FROM Product");
var id = maxIdResult.first["last_inserted_id"];
var result = await db.rawInsert(
final db = await database;
var result = await db.query("Product", where: "id = ", whereArgs: [id]);
return result.isNotEmpty ? Product.fromMap(result.first) : Null;
}
insert(Product product) async {
final db = await database;
var maxIdResult = await db.rawQuery("SELECT MAX(id)+1 as last_inserted_id FROM Product");
var id = maxIdResult.first["last_inserted_id"];
var result = await db.rawInsert(
"INSERT Into Product (id, name, description, price, image)"
" VALUES (?, ?, ?, ?, ?)",
[id, product.name, product.description, product.price, product.image]
);
return result;
}
update(Product product) async {
final db = await database;
var result = await db.update(
"Product", product.toMap(), where: "id = ?", whereArgs: [product.id]
);
return result;
}
delete(int id) async {
final db = await database;
db.delete("Product", where: "id = ?", whereArgs: [id]);
}
}
Change the main method to get the product information.
Here, we have used the getAllProducts method to fetch all products from the database.
Run the application and see the results. It will be similar to previous example, Accessing Product service API, except the product information is stored and fetched from the local SQLite database.
Cloud Firestore
Firebase is a BaaS app development platform. It provides many feature to speed up the mobile application development like authentication service, cloud storage, etc., One of the main feature of Firebase is Cloud Firestore, a cloud based real time NoSQL database.
Flutter provides a special package, cloud_firestore to program with Cloud Firestore. Let us create an online product store in the Cloud Firestore and create a application to access the product store.
Create a new Flutter application in Android studio, product_firebase_app.
Replace the default startup code (main.dart) with our product_rest_app code.
Copy Product.dart file from product_rest_app into the lib folder.
class Product {
final String name;
final String description;
final int price;
final String image;
Product(this.name, this.description, this.price, this.image);
factory Product.fromMap(Map<String, dynamic> json) {
Configure cloud_firestore package in the pubspec.yaml file as shown below −
dependencies: cloud_firestore: ^0.9.13+1
Here, use the latest version of the cloud_firestore package.
Android studio will alert that the pubspec.yaml is updated as shown here −
Click Get dependencies option. Android studio will get the package from Internet and properly configure it for the application.
Create a project in the Firebase using the following steps −
Create a Firebase account by selecting Free plan at https://firebase.google.com/pricing/.
Once Firebase account is created, it will redirect to the project overview page. It list all the Firebase based project and provides an option to create a new project.
Click Add project and it will open a project creation page.
Enter products app db as project name and click Create project option.
Go to *Firebase console.
Click Project overview. It opens the project overview page.
Click android icon. It will open project setting specific to Android development.
Enter Android Package name, com.tutorialspoint.flutterapp.product_firebase_app.
Click Register App. It generates a project configuration file, google_service.json.
Download google_service.json and then move it into the project’s android/app directory. This file is the connection between our application and Firebase.
Open android/app/build.gradle and include the following code −
apply plugin: 'com.google.gms.google-services'
Open android/build.gradle and include the following configuration −
buildscript {
repositories {
// ...
}
dependencies {
// ...
classpath 'com.google.gms:google-services:3.2.1' // new
}
}
Open android/app/build.gradle and include the following code as well.
Here, Firestore.instance.collection method is used to access product collection available in the cloud store. Firestore.instance.collection provides many option to filter the collection to get the necessary documents. But, we have not applied any filter to get all product information.
Cloud Firestore provides the collection through Dart Stream concept and so modify the products type in MyApp and MyHomePage widget from Future<list<Product>> to Stream<QuerySnapshot>.
Change the build method of MyHomePage widget to use StreamBuilder instead of FutureBuilder.
Here, we have fetched the product information as List<DocumentSnapshot> type. Since, our widget, ProductBoxList is not compatible with documents, we have converted the documents into List<Product> type and further used it.
Finally, run the application and see the result. Since, we have used the same product information as that of SQLite application and changed the storage medium only, the resulting application looks identical to SQLite application application.
Dart’s way of organizing and sharing a set of functionality is through Package. Dart Package is simply sharable libraries or modules. In general, the Dart Package is same as that of Dart Application except Dart Package does not have application entry point, main.
The general structure of Package (consider a demo package, my_demo_package) is as below −
lib/src/* − Private Dart code files.
lib/my_demo_package.dart − Main Dart code file. It can be imported into an application as −
pubspec.yaml − Project specification, same as that of application,
All Dart code files in the Package are simply Dart classes and it does not have any special requirement for a Dart code to include it in a Package.
Types of Packages
Since Dart Packages are basically a small collection of similar functionality, it can be categorized based on its functionality.
Dart Package
Generic Dart code, which can be used in both web and mobile environment. For example, english_words is one such package which contains around 5000 words and has basic utility functions like nouns (list nouns in the English), syllables (specify number of syllables in a word.
Flutter Package
Generic Dart code, which depends on Flutter framework and can be used only in mobile environment. For example, fluro is a custom router for flutter. It depends on the Flutter framework.
Flutter Plugin
Generic Dart code, which depends on Flutter framework as well as the underlying platform code (Android SDK or iOS SDK). For example, camera is a plugin to interact with device camera. It depends on the Flutter framework as well as the underlying framework to get access to camera.
Using a Dart Package
Dart Packages are hosted and published into the live server, https://pub.dartlang.org. Also, Flutter provides simple tool, pub to manage Dart Packages in the application. The steps needed to use as Package is as follows −
Include the package name and the version needed into the pubspec.yaml as shown below −
dependencies: english_words: ^3.1.5
The latest version number can be found by checking the online server.
Install the package into the application by using the following command −
flutter packages get
While developing in the Android studio, Android Studio detects any change in the pubspec.yaml and displays an Android studio package alert to the developer as shown below −
Dart Packages can be installed or updated in Android Studio using the menu options.
Import the necessary file using the command shown below and start working −
Here, we have used nouns function to get and print the top 50 words.
Explore our latest online courses and learn new skills at your own pace. Enroll and become a certified expert to boost your career.
Develop a Flutter Plugin Package
Developing a Flutter Plugin is similar to developing a Dart application or Dart Package. The only exception is that the plugin is going to use System API (Android or iOS) to get the required platform specific functionality.
As we have already learned how to access platform code in the previous chapters, let us develop a simple plugin, my_browser to understand the plugin development process. The functionality of the my_browser plugin is to allow the application to open the given website in the platform specific browser.
Start Android Studio.
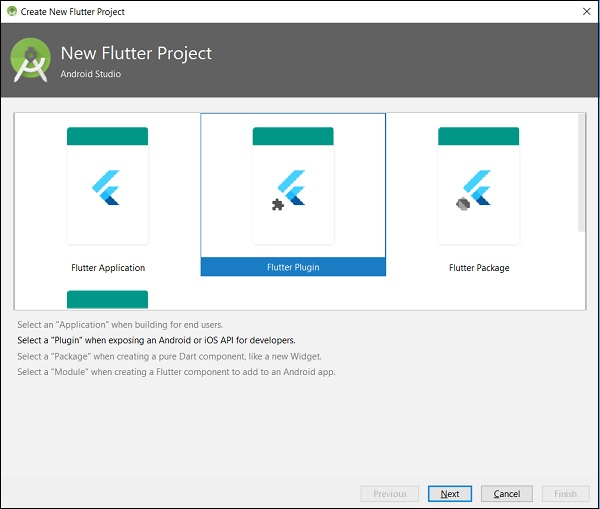
Click File → New Flutter Project and select Flutter Plugin option.
You can see a Flutter plugin selection window as shown here −
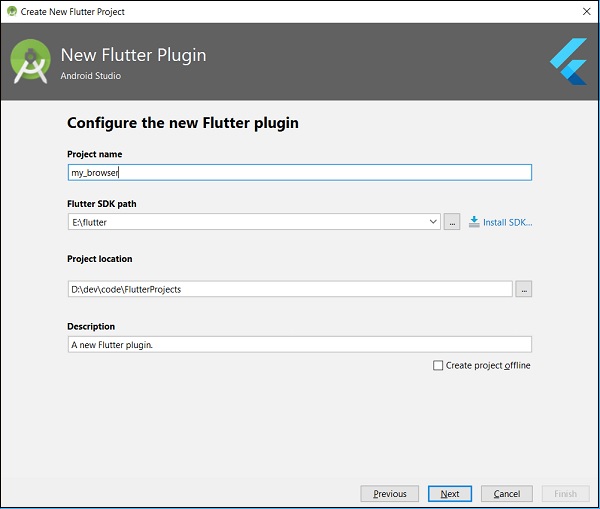
Enter my_browser as project name and click Next.
Enter the plugin name and other details in the window as shown here −
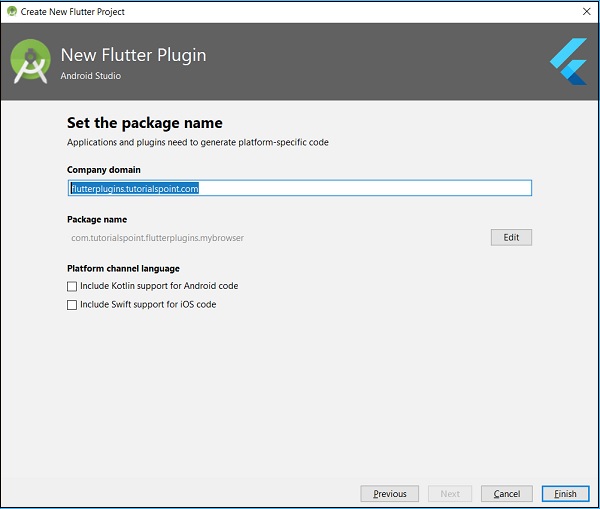
Enter company domain, flutterplugins.tutorialspoint.com in the window shown below and then click on Finish. It will generate a startup code to develop our new plugin.
Open my_browser.dart file and write a method, openBrowser to invoke platform specific openBrowser method.
Change registerWith to include our new constructor in MyBrowserPlugin class.
public static void registerWith(Registrar registrar) {
   final MethodChannel channel = new MethodChannel(registrar.messenger(), "my_browser");
   MyBrowserPlugin instance = new MyBrowserPlugin(registrar);
   channel.setMethodCallHandler(instance);
}
Change the onMethodCall to include openBrowser method in MyBrowserPlugin class.
@Override
public void onMethodCall(MethodCall call, Result result) {
String url = call.argument("url");
if (call.method.equals("getPlatformVersion")) {
try {
final int result = await _channel.invokeMethod(
'openBrowser', <String, String>{'url': urlString});
}
on PlatformException catch (e) {
// Unable to open the browser print(e);
}
final MethodChannel channel = new MethodChannel(
registrar.messenger(), "my_browser");
MyBrowserPlugin instance = new MyBrowserPlugin(registrar);
channel.setMethodCallHandler(instance);
}
@Override
public void onMethodCall(MethodCall call, Result result) {
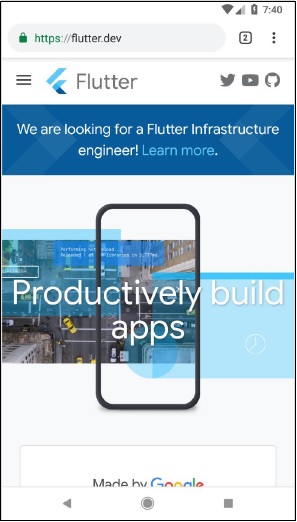
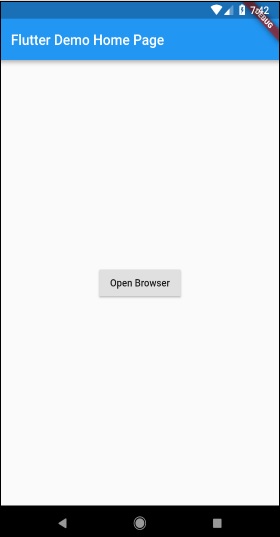
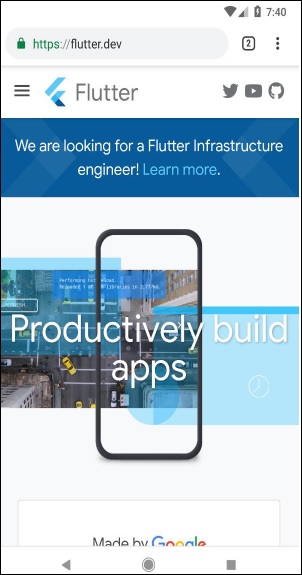
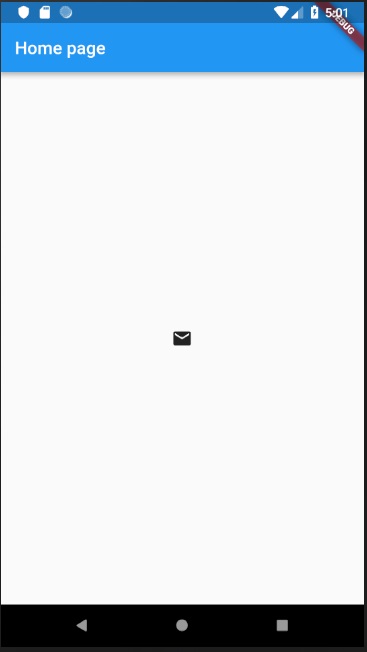
Run the application and click the Open Browser button and see that the browser is launched. You can see a Browser app - Home page as shown in the screenshot shown below −
You can see a Browser app – Browser screen as shown in the screenshot shown below −
Accessing iOS specific code is similar to that on Android platform except that it uses iOS specific languages – Objective-C or Swift and iOS SDK. Otherwise, the concept is same as that of the Android platform.
Let us write the same application as in the previous chapter for iOS platform as well.
Let us create a new application in Android Studio (macOS), flutter_browser_ios_app
Follow steps 2 – 6 as in previous chapter.
Start XCode and click File → Open
Choose the xcode project under ios directory of our flutter project.
Open AppDelegate.m under Runner → Runner path. It contains the following code −
// [GeneratedPluginRegistrant registerWithRegistry:self];
// Override point for customization after application launch.
return [super application:application didFinishLaunchingWithOptions:launchOptions];
}
@end
We have added a method, openBrowser to open browser with specified url. It accepts single argument, url.
Create a variable, weakSelf and set current class −
__weak typeof(self) weakSelf = self;
Now, implement setMethodCallHandler. Call openBrowser by matching call.method. Get url by invoking call.arguments and pass it while calling openBrowser.
[browserChannel setMethodCallHandler:^(FlutterMethodCall* call, FlutterResult result) {
if ([@"openBrowser" isEqualToString:call.method]) {
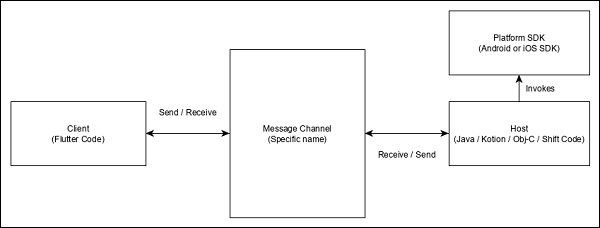
Flutter provides a general framework to access platform specific feature. This enables the developer to extend the functionality of the Flutter framework using platform specific code. Platform specific functionality like camera, battery level, browser, etc., can be accessed easily through the framework.
The general idea of accessing the platform specific code is through simple messaging protocol. Flutter code, Client and the platform code and Host binds to a common Message Channel. Client sends message to the Host through the Message Channel. Host listens on the Message Channel, receives the message and does the necessary functionality and finally, returns the result to the Client through Message Channel.
The platform specific code architecture is shown in the block diagram given below −
The messaging protocol uses a standard message codec (StandardMessageCodec class) that supports binary serialization of JSON-like values such as numbers, strings, boolean, etc., The serialization and de-serialization works transparently between the client and the host.
Let us write a simple application to open a browser using Android SDK and understand how
Create a new Flutter application in Android studio, flutter_browser_app
private static final String CHANNEL = "flutterapp.tutorialspoint.com/browser";
Write android specific code to set message handling in the onCreate method −
new MethodChannel(getFlutterView(), CHANNEL).setMethodCallHandler(
new MethodCallHandler() {
@Override
public void onMethodCall(MethodCall call, Result result) {
Here, we have created a message channel using MethodChannel class and used MethodCallHandler class to handle the message. onMethodCall is the actual method responsible for calling the correct platform specific code by the checking the message. onMethodCall method extracts the url from message and then invokes the openBrowser only when the method call is openBrowser. Otherwise, it returns notImplemented method.
The complete source code of the application is as follows −
try {
final int result = await platform.invokeMethod('openBrowser', <String, String>{
'url': "https://flutter.dev"
});
}
on PlatformException catch (e) {
// Unable to open the browser print(e);
}
Run the application and click the Open Browser button and you can see that the browser is launched. The Browser app – Home page is as shown in the screenshot here −
Animation is a complex procedure in any mobile application. In spite of its complexity, Animation enhances the user experience to a new level and provides a rich user interaction. Due to its richness, animation becomes an integral part of modern mobile application. Flutter framework recognizes the importance of Animation and provides a simple and intuitive framework to develop all types of animations.
Introduction
Animation is a process of showing a series of images / picture in a particular order within a specific duration to give an illusion of movement. The most important aspects of the animation are as follows −
Animation have two distinct values: Start value and End value. The animation starts from Start value and goes through a series of intermediate values and finally ends at End values. For example, to animate a widget to fade away, the initial value will be the full opacity and the final value will be the zero opacity.
The intermediate values may be linear or non-linear (curve) in nature and it can be configured. Understand that the animation works as it is configured. Each configuration provides a different feel to the animation. For example, fading a widget will be linear in nature whereas bouncing of a ball will be non-linear in nature.
The duration of the animation process affects the speed (slowness or fastness) of the animation.
The ability to control the animation process like starting the animation, stopping the animation, repeating the animation to set number of times, reversing the process of animation, etc.,
In Flutter, animation system does not do any real animation. Instead, it provides only the values required at every frame to render the images.
Animation Based Classes
Flutter animation system is based on Animation objects. The core animation classes and its usage are as follows −
Animation
Generates interpolated values between two numbers over a certain duration. The most common Animation classes are −
Animation<double> − interpolate values between two decimal number
Animation<Color> − interpolate colors between two color
Animation<Size> − interpolate sizes between two size
AnimationController − Special Animation object to control the animation itself. It generates new values whenever the application is ready for a new frame. It supports linear based animation and the value starts from 0.0 to 1.0
Here, controller controls the animation and duration option controls the duration of the animation process. vsync is a special option used to optimize the resource used in the animation.
CurvedAnimation
Similar to AnimationController but supports non-linear animation. CurvedAnimation can be used along with Animation object as below −
Derived from Animatable<T> and used to generate numbers between any two numbers other than 0 and 1. It can be used along with Animation object by using animate method and passing actual Animation object.
// The state that has changed here is the animation object’s value.
});
});
Build-in widgets, AnimatedWidget and AnimatedBuilder can be used to skip this process. Both widget accepts Animation object and get current values required for the animation.
Get the animation values during the build process of the widget and then apply it for width, height or any relevant property instead of the original value.
In initState method, we have created an animation controller object (controller), an animation object (animation) and started the animation using controller.forward.
In dispose method, we have disposed the animation controller object (controller).
In build method, send animation to MyHomePage widget through constructor. Now, MyHomePage widget can use the animation object to animate its content.
Here, we have used AniatedBuilder to do our animation. AnimatedBuilder is a widget which build its content while doing the animation at the same time. It accepts a animation object to get current animation value. We have used animation value, animation.value to set the opacity of the child widget. In effect, the widget will animate the child widget using opacity concept.
Finally, create the MyHomePage widget and use the animation object to animate any of its content.
class MyHomePage extends StatelessWidget {
MyHomePage({Key key, this.title, this.animation}) : super(key: key);
final String title;
final Animation<double>
animation;
@override
Widget build(BuildContext context) {
return Scaffold(
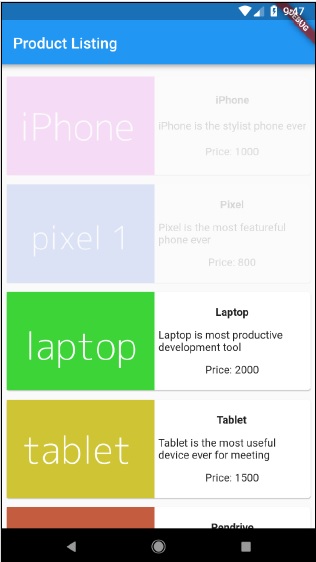
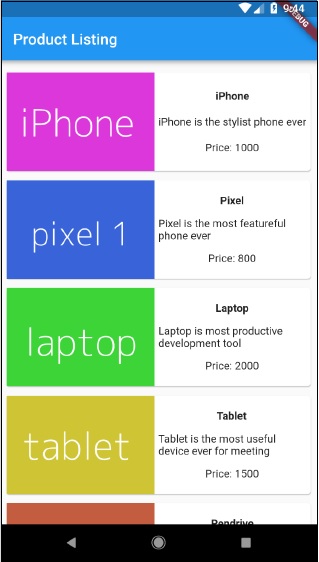
appBar: AppBar(title: Text("Product Listing")),body: ListView(
shrinkWrap: true,
padding: const EdgeInsets.fromLTRB(2.0, 10.0, 2.0, 10.0),
children: <Widget>[
FadeTransition(
child: ProductBox(
name: "iPhone",
description: "iPhone is the stylist phone ever",
price: 1000,
image: "iphone.png"
), opacity: animation
),
MyAnimatedWidget(child: ProductBox(
name: "Pixel",
description: "Pixel is the most featureful phone ever",
price: 800,
image: "pixel.png"
), animation: animation),
ProductBox(
name: "Laptop",
description: "Laptop is most productive development tool",
price: 2000,
image: "laptop.png"
),
ProductBox(
name: "Tablet",
description: "Tablet is the most useful device ever for meeting",
price: 1500,
image: "tablet.png"
),
ProductBox(
name: "Pendrive",
description: "Pendrive is useful storage medium",
price: 100,
image: "pendrive.png"
),
ProductBox(
name: "Floppy Drive",
description: "Floppy drive is useful rescue storage medium",
price: 20,
image: "floppy.png"
),
],
)
);
}
}
Here, we have used FadeAnimation and MyAnimationWidget to animate the first two items in the list. FadeAnimation is a build-in animation class, which we used to animate its child using opacity concept.
Managing state in an application is one of the most important and necessary process in the life cycle of an application.
Let us consider a simple shopping cart application.
User will login using their credentials into the application.
Once user is logged in, the application should persist the logged in user detail in all the screen.
Again, when the user selects a product and saved into a cart, the cart information should persist between the pages until the user checked out the cart.
User and their cart information at any instance is called the state of the application at that instance.
A state management can be divided into two categories based on the duration the particular state lasts in an application.
Ephemeral − Last for a few seconds like the current state of an animation or a single page like current rating of a product. Flutter supports its through StatefulWidget.
app state − Last for entire application like logged in user details, cart information, etc., Flutter supports its through scoped_model.
Navigation and Routing
In any application, navigating from one page / screen to another defines the work flow of the application. The way that the navigation of an application is handled is called Routing. Flutter provides a basic routing class – MaterialPageRoute and two methods – Navigator.push and Navigator.pop, to define the work flow of an application.
MaterialPageRoute
MaterialPageRoute is a widget used to render its UI by replacing the entire screen with a platform specific animation.
MaterialPageRoute(builder: (context) => Widget())
Here, builder will accepts a function to build its content by suppling the current context of the application.
Navigation.push
Navigation.push is used to navigate to new screen using MaterialPageRoute widget.
Replace the default startup code (main.dart) with our startup code.
import 'package:flutter/material.dart';
void main() => runApp(MyApp());
class MyApp extends StatelessWidget {
// This widget is the root of your application.
@override
Widget build(BuildContext context) {
return MaterialApp(
title: 'Flutter Demo',
theme: ThemeData(
primarySwatch: Colors.blue,
),
home: MyHomePage(
title: 'Product state demo home page'
),
);
Let us create a Product class to organize the product information.
class Product {
   final String name;
   final String description;
   final int price;
   final String image;
   Product(this.name, this.description, this.price, this.image);
}
Let us write a method getProducts in the Product class to generate our dummy product records.
The complete code of the application is as follows −
import 'package:flutter/material.dart';
void main() => runApp(MyApp());
class Product {
final String name;
final String description;
final int price;
final String image;
Product(this.name, this.description, this.price, this.image);
static List<Product> getProducts() {
List<Product> items = <Product>[];
items.add(
Product(
"Pixel",
"Pixel is the most featureful phone ever",
800,
"pixel.png"
)
);
items.add(
Product(
"Laptop",
"Laptop is most productive development tool",
2000,
"laptop.png"
)
);
items.add(
Product(
"Tablet",
"Tablet is the most useful device ever for meeting",
1500,
"tablet.png"
)
);
items.add(
Product(
"Pendrive",
"iPhone is the stylist phone ever",
100,
"pendrive.png"
)
);
items.add(
Product(
"Floppy Drive",
"iPhone is the stylist phone ever",
20,
"floppy.png"
)
);
items.add(
Product(
"iPhone",
"iPhone is the stylist phone ever",
1000,
"iphone.png"
)
);
return items;
}
}
class MyApp extends StatelessWidget {
// This widget is the root of your application.
@override
Widget build(BuildContext context) {
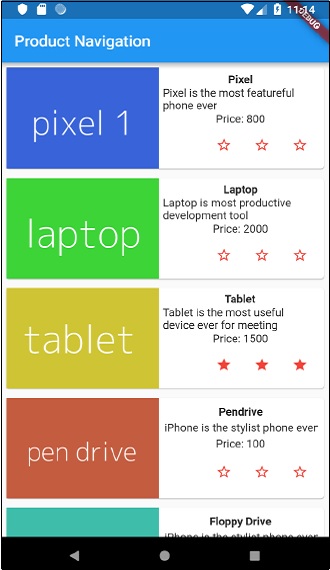
Run the application and click any one of the product item. It will show the relevant details page. We can move to home page by clicking back button. The product list page and product details page of the application are shown as follows −
Gestures are primarily a way for a user to interact with a mobile (or any touch based device) application. Gestures are generally defined as any physical action / movement of a user in the intention of activating a specific control of the mobile device. Gestures are as simple as tapping the screen of the mobile device to more complex actions used in gaming applications.
Some of the widely used gestures are mentioned here −
Tap − Touching the surface of the device with fingertip for a short period and then releasing the fingertip.
Double Tap − Tapping twice in a short time.
Drag − Touching the surface of the device with fingertip and then moving the fingertip in a steady manner and then finally releasing the fingertip.
Flick − Similar to dragging, but doing it in a speeder way.
Pinch − Pinching the surface of the device using two fingers.
Spread/Zoom − Opposite of pinching.
Panning − Touching the surface of the device with fingertip and moving it in any direction without releasing the fingertip.
Flutter provides an excellent support for all type of gestures through its exclusive widget, GestureDetector. GestureDetector is a non-visual widget primarily used for detecting the user’s gesture. To identify a gesture targeted on a widget, the widget can be placed inside GestureDetector widget. GestureDetector will capture the gesture and dispatch multiple events based on the gesture.
Some of the gestures and the corresponding events are given below −
Tap
onTapDown
onTapUp
onTap
onTapCancel
Double tap
onDoubleTap
Long press
onLongPress
Vertical drag
onVerticalDragStart
onVerticalDragUpdate
onVerticalDragEnd
Horizontal drag
onHorizontalDragStart
onHorizontalDragUpdate
onHorizontalDragEnd
Pan
onPanStart
onPanUpdate
onPanEnd
Now, let us modify the hello world application to include gesture detection feature and try to understand the concept.
Change the body content of the MyHomePage widget as shown below −
Observe that here we have placed the GestureDetector widget above the Text widget in the widget hierarchy, captured the onTap event and then finally shown a dialog window.
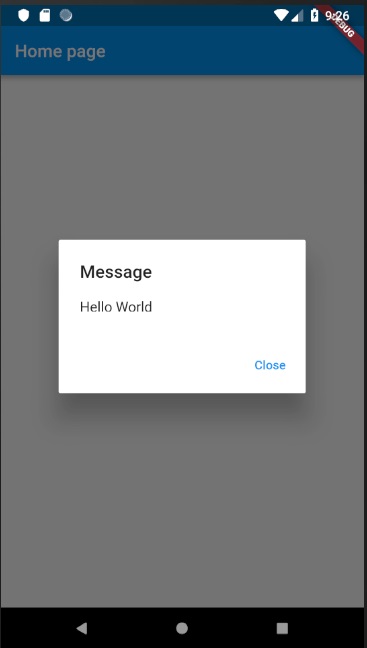
Implement the *_showDialog* function to present a dialog when user tabs the hello world message. It uses the generic showDialog and AlertDialog widget to create a new dialog widget. The code is shown below −
// user defined function void _showDialog(BuildContext context) {
   // flutter defined function
   showDialog(
  context: context, builder: (BuildContext context) {
     // return object of type Dialog
     return AlertDialog(
        title: new Text("Message"),
        content: new Text("Hello World"),
        actions: <Widget>[
           new FlatButton(
              child: new Text("Close"),
              onPressed: () {
                 Navigator.of(context).pop();
              },
           ),
        ],
     );
  },    );
}
The application will reload in the device using Hot Reload feature. Now, simply click the message, Hello World and it will show the dialog as below −
Now, close the dialog by clicking the close option in the dialog.
The complete code (main.dart) is as follows −
import 'package:flutter/material.dart';
void main() => runApp(MyApp());
class MyApp extends StatelessWidget {
// This widget is the root of your application.
@override
Widget build(BuildContext context) {
}
}
class MyHomePage extends StatelessWidget {
MyHomePage({Key key, this.title}) : super(key: key);
final String title;
// user defined function
void _showDialog(BuildContext context) {
// flutter defined function showDialog(
context: context, builder: (BuildContext context) {
// return object of type Dialog return AlertDialog(
title: new Text("Message"),
content: new Text("Hello World"),
actions: <Widget>[
new FlatButton(
child: new Text("Close"),
onPressed: () {
Navigator.of(context).pop();
},
),
],
);
},
);
Finally, Flutter also provides a low-level gesture detection mechanism through Listener widget. It will detect all user interactions and then dispatches the following events −
PointerDownEvent
PointerMoveEvent
PointerUpEvent
PointerCancelEvent
Flutter also provides a small set of widgets to do specific as well as advanced gestures. The widgets are listed below −
Dismissible − Supports flick gesture to dismiss the widget.
Draggable − Supports drag gesture to move the widget.
LongPressDraggable − Supports drag gesture to move a widget, when its parent widget is also draggable.
DragTarget − Accepts any Draggable widget
IgnorePointer − Hides the widget and its children from the gesture detection process.
AbsorbPointer − Stops the gesture detection process itself and so any overlapping widget also can not able to participate in the gesture detection process and hence, no event is raised.
Scrollable − Support scrolling of the content available inside the widget.
Since the core concept of Flutter is Everything is widget, Flutter incorporates a user interface layout functionality into the widgets itself. Flutter provides quite a lot of specially designed widgets like Container, Center, Align, etc., only for the purpose of laying out the user interface. Widgets build by composing other widgets normally use layout widgets. Let use learn the Flutter layout concept in this chapter.
Type of Layout Widgets
Layout widgets can be grouped into two distinct category based on its child −
Widget supporting a single child
Widget supporting multiple child
Let us learn both type of widgets and its functionality in the upcoming sections.
Single Child Widgets
In this category, widgets will have only one widget as its child and every widget will have a special layout functionality.
For example, Center widget just centers it child widget with respect to its parent widget and Container widget provides complete flexibility to place it child at any given place inside it using different option like padding, decoration, etc.,
Single child widgets are great options to create high quality widget having single functionality such as button, label, etc.,
The code to create a simple button using Container widget is as follows −
Here, we have used two widgets – a Container widget and a Text widget. The result of the widget is as a custom button as shown below −
Let us check some of the most important single child layout widgets provided by Flutter −
Padding − Used to arrange its child widget by the given padding. Here, padding can be provided by EdgeInsets class.
Align − Align its child widget within itself using the value of alignment property. The value for alignment property can be provided by FractionalOffset class. The FractionalOffset class specifies the offsets in terms of a distance from the top left.
Some of the possible values of offsets are as follows −
FractionalOffset(1.0, 0.0) represents the top right.
FractionalOffset(0.0, 1.0) represents the bottom left.
FittedBox − It scales the child widget and then positions it according to the specified fit.
AspectRatio − It attempts to size the child widget to the specified aspect ratio
ConstrainedBox
Baseline
FractinallySizedBox
IntrinsicHeight
IntrinsicWidth
LiimitedBox
OffStage
OverflowBox
SizedBox
SizedOverflowBox
Transform
CustomSingleChildLayout
Our hello world application is using material based layout widgets to design the home page. Let us modify our hello world application to build the home page using basic layout widgets as specified below −
Container − Generic, single child, box based container widget with alignment, padding, border and margin along with rich styling features.
Center − Simple, Single child container widget, which centers its child widget.
The modified code of the MyHomePage and MyApp widget is as below −
class MyApp extends StatelessWidget {
@override
Widget build(BuildContext context) {
Container widget is the top level or root widget. Container is configured using decoration and padding property to layout its content.
BoxDecoration has many properties like color, border, etc., to decorate the Container widget and here, color is used to set the color of the container.
padding of the Container widget is set by using dgeInsets class, which provides the option to specify the padding value.
Center is the child widget of the Container widget. Again, Text is the child of the Center widget. Text is used to show message and Center is used to center the text message with respect to the parent widget, Container.
The final result of the code given above is a layout sample as shown below −
Explore our latest online courses and learn new skills at your own pace. Enroll and become a certified expert to boost your career.
Multiple Child Widgets
In this category, a given widget will have more than one child widgets and the layout of each widget is unique.
For example, Row widget allows the laying out of its children in horizontal direction, whereas Column widget allows laying out of its children in vertical direction. By composing Row and Column, widget with any level of complexity can be built.
Let us learn some of the frequently used widgets in this section.
Row − Allows to arrange its children in a horizontal manner.
Column − Allows to arrange its children in a vertical manner.
ListView − Allows to arrange its children as list.
GridView − Allows to arrange its children as gallery.
Expanded − Used to make the children of Row and Column widget to occupy the maximum possible area.
Table − Table based widget.
Flow − Flow based widget.
Stack − Stack based widget.
Advanced Layout Application
In this section, let us learn how to create a complex user interface of product listing with custom design using both single and multiple child layout widgets.
For this purpose, follow the sequence given below −
Create a new Flutter application in Android studio, product_layout_app.
Replace the main.dart code with folowing code −
import 'package:flutter/material.dart';
void main() => runApp(MyApp());
class MyApp extends StatelessWidget {
// This widget is the root of your application.
@override
Widget build(BuildContext context) {
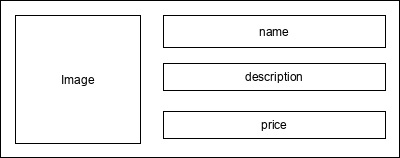
ProductBox has used four arguments as specified below −
name – Product name
description – Product description
price – Price of the product
image – Image of the product
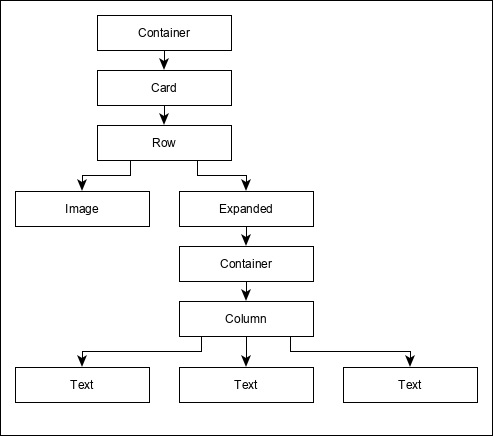
ProductBox uses seven build-in widgets as specified below −
Container
Expanded
Row
Column
Card
Text
Image
ProductBox is designed using the above mentioned widget. The arrangement or hierarchy of the widget is specified in the diagram shown below −
Now, place some dummy image (see below) for product information in the assets folder of the application and configure the assets folder in the pubspec.yaml file as shown below −
Finally, Use the ProductBox widget in the MyHomePage widget as specified below −
class MyHomePage extends StatelessWidget {
   MyHomePage({Key key, this.title}) : super(key: key);
   final String title;

   @override
   Widget build(BuildContext context) {
  return Scaffold(
     appBar: AppBar(title:Text("Product Listing")),
     body: ListView(
        shrinkWrap: true, padding: const EdgeInsets.fromLTRB(2.0, 10.0, 2.0, 10.0),
        children: <Widget> [
           ProductBox(
              name: "iPhone",
              description: "iPhone is the stylist phone ever",
              price: 1000,
              image: "iphone.png"
           ),
           ProductBox(
              name: "Pixel",
              description: "Pixel is the most featureful phone ever",
              price: 800,
              image: "pixel.png"
           ),
           ProductBox(
              name: "Laptop",
              description: "Laptop is most productive development tool",
              price: 2000,
              image: "laptop.png"
           ),
           ProductBox(
              name: "Tablet",
              description: "Tablet is the most useful device ever for meeting",
              price: 1500,
              image: "tablet.png"
           ),
           ProductBox(
              name: "Pendrive",
              description: "Pendrive is useful storage medium",
              price: 100,
              image: "pendrive.png"
           ),
           ProductBox(
              name: "Floppy Drive",
              description: "Floppy drive is useful rescue storage medium",
              price: 20,
              image: "floppy.png"
           ),
        ],
     )
  );   }
}
Here,we have used ProductBox as children of ListView widget.
The complete code (main.dart) of the product layout application (product_layout_app) is as follows −
import 'package:flutter/material.dart';
void main() => runApp(MyApp());
class MyApp extends StatelessWidget {
// This widget is the root of your application.
@override
Widget build(BuildContext context) {
As we learned in the earlier chapter, widgets are everything in Flutter framework. We have already learned how to create new widgets in previous chapters.
In this chapter, let us understand the actual concept behind creating the widgets and the different type of widgets available in Flutter framework.
Let us check the Hello World application’s MyHomePage widget. The code for this purpose is as given below −
class MyHomePage extends StatelessWidget {
MyHomePage({Key key, this.title}) : super(key: key);
final String title;
@override
Widget build(BuildContext context) {
Here, we have created a new widget by extending StatelessWidget.
Note that the StatelessWidget only requires a single method build to be implemented in its derived class. The build method gets the context environment necessary to build the widgets through BuildContext parameter and returns the widget it builds.
In the code, we have used title as one of the constructor argument and also used Key as another argument. The title is used to display the title and Key is used to identify the widget in the build environment.
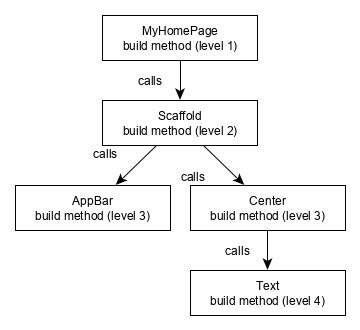
Here, the build method calls the build method of Scaffold, which in turn calls the build method of AppBar and Center to build its user interface.
Finally, Center build method calls Text build method.
For a better understanding, the visual representation of the same is given below −
Widget Build Visualization
In Flutter, widgets can be grouped into multiple categories based on their features, as listed below −
Platform specific widgets
Layout widgets
State maintenance widgets
Platform independent / basic widgets
Let us discuss each of them in detail now.
Platform specific widgets
Flutter has widgets specific to a particular platform – Android or iOS.
Android specific widgets are designed in accordance with Material design guideline by Android OS. Android specific widgets are called as Material widgets.
iOS specific widgets are designed in accordance with Human Interface Guidelines by Apple and they are called as Cupertino widgets.
Some of the most used material widgets are as follows −
Scaffold
AppBar
BottomNavigationBar
TabBar
TabBarView
ListTile
RaisedButton
FloatingActionButton
FlatButton
IconButton
DropdownButton
PopupMenuButton
ButtonBar
TextField
Checkbox
Radio
Switch
Slider
Date & Time Pickers
SimpleDialog
AlertDialog
Some of the most used Cupertino widgets are as follows −
CupertinoButton
CupertinoPicker
CupertinoDatePicker
CupertinoTimerPicker
CupertinoNavigationBar
CupertinoTabBar
CupertinoTabScaffold
CupertinoTabView
CupertinoTextField
CupertinoDialog
CupertinoDialogAction
CupertinoFullscreenDialogTransition
CupertinoPageScaffold
CupertinoPageTransition
CupertinoActionSheet
CupertinoActivityIndicator
CupertinoAlertDialog
CupertinoPopupSurface
CupertinoSlider
Layout widgets
In Flutter, a widget can be created by composing one or more widgets. To compose multiple widgets into a single widget, Flutter provides large number of widgets with layout feature. For example, the child widget can be centered using Center widget.
Some of the popular layout widgets are as follows −
Container − A rectangular box decorated using BoxDecoration widgets with background, border and shadow.
Center − Center its child widget.
Row − Arrange its children in the horizontal direction.
Column − Arrange its children in the vertical direction.
Stack − Arrange one above the another.
We will check the layout widgets in detail in the upcoming Introduction to layout widgets chapter.
State maintenance widgets
In Flutter, all widgets are either derived from StatelessWidget or StatefulWidget.
Widget derived from StatelessWidget does not have any state information but it may contain widget derived from StatefulWidget. The dynamic nature of the application is through interactive behavior of the widgets and the state changes during interaction. For example, tapping a counter button will increase / decrease the internal state of the counter by one and reactive nature of the Flutter widget will auto re-render the widget using new state information.
We will learn the concept of StatefulWidget widgets in detail in the upcoming State management chapter.
Platform independent / basic widgets
Flutter provides large number of basic widgets to create simple as well as complex user interface in a platform independent manner. Let us see some of the basic widgets in this chapter.
Text
Text widget is used to display a piece of string. The style of the string can be set by using style property and TextStyle class. The sample code for this purpose is as follows −
Text widget has a special constructor, Text.rich, which accepts the child of type TextSpan to specify the string with different style. TextSpan widget is recursive in nature and it accepts TextSpan as its children. The sample code for this purpose is as follows −
The most important properties of the Text widget are as follows −
maxLines, int − Maximum number of lines to show
overflow, TextOverFlow − Specify how visual overflow is handled using TextOverFlow class
style, TextStyle − Specify the style of the string using TextStyle class
textAlign, TextAlign − Alignment of the text like right, left, justify, etc., using TextAlign class
textDirection, TextDirection − Direction of text to flow, either left-to-right or right-to-left
Image
Image widget is used to display an image in the application. Image widget provides different constructors to load images from multiple sources and they are as follows −
Image − Generic image loader using ImageProvider
Image.asset − Load image from flutter project’s assets
Image.file − Load image from system folder
Image.memory − Load image from memory
Image.Network − Load image from network
The easiest option to load and display an image in Flutter is by including the image as assets of the application and load it into the widget on demand.
Create a folder, assets in the project folder and place the necessary images.
Specify the assets in the pubspec.yaml as shown below −
flutter:
   assets:
  - assets/smiley.png
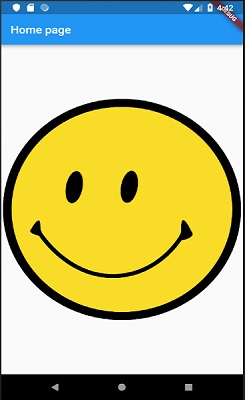
Now, load and display the image in the application.
Image.asset('assets/smiley.png')
The complete source code of MyHomePage widget of the hello world application and the result is as shown below −.
class MyHomePage extends StatelessWidget {
MyHomePage({Key key, this.title}) : super(key: key);
final String title;
@override
Widget build(BuildContext context) {
Dart is an open-source general-purpose programming language. It is originally developed by Google. Dart is an object-oriented language with C-style syntax. It supports programming concepts like interfaces, classes, unlike other programming languages Dart doesn’t support arrays. Dart collections can be used to replicate data structures such as arrays, generics, and optional typing.
The following code shows a simple Dart program −
void main() {
   print("Dart language is easy to learn");
}
Variables and Data types
Variable is named storage location and Data types simply refers to the type and size of data associated with variables and functions.
Dart uses var keyword to declare the variable. The syntax of var is defined below,
var name = 'Dart';
The final and const keyword are used to declare constants. They are defined as below −
void main() {
   final a = 12;
   const pi = 3.14;
   print(a);
   print(pi);
}
Dart language supports the following data types −
Numbers − It is used to represent numeric literals – Integer and Double.
Strings − It represents a sequence of characters. String values are specified in either single or double quotes.
Booleans − Dart uses the bool keyword to represent Boolean values – true and false.
Lists and Maps − It is used to represent a collection of objects. A simple List can be defined as below −.
void main() {
   var list = [1,2,3,4,5];
   print(list);
}
The list shown above produces [1,2,3,4,5] list.
Map can be defined as shown here −
void main() {
   var mapping = {'id': 1,'name':'Dart'};
   print(mapping);
}
Dynamic − If the variable type is not defined, then its default type is dynamic. The following example illustrates the dynamic type variable −
void main() {
   dynamic name = "Dart";
   print(name);
}
Decision Making and Loops
A decision making block evaluates a condition before the instructions are executed. Dart supports If, If..else and switch statements.
Loops are used to repeat a block of code until a specific condition is met. Dart supports for, for..in , while and do..while loops.
Let us understand a simple example about the usage of control statements and loops −
void main() {
   for( var i = 1 ; i <= 10; i++ ) {
  if(i%2==0) {
     print(i);
  }   }
}
The above code prints the even numbers from 1 to 10.
Explore our latest online courses and learn new skills at your own pace. Enroll and become a certified expert to boost your career.
Functions
A function is a group of statements that together performs a specific task. Let us look into a simple function in Dart as shown here −
void main() {
   add(3,4);
}
void add(int a,int b) {
   int c;
   c = a+b;
   print(c);
}
The above function adds two values and produces 7 as the output.
Object Oriented Programming
Dart is an object-oriented language. It supports object-oriented programming features like classes, interfaces, etc.
A class is a blueprint for creating objects. A class definition includes the following −
Fields
Getters and setters
Constructors
Functions
Now, let us create a simple class using the above definitions −
class Employee {
String name;
//getter method
String get emp_name {
return name;
}
//setter method
void set emp_name(String name) {