Author: saqibkhan

  • IDE

    IDE (editors) are software programs that allow the user to create and edit text files. In the development field, editors usually refer to the source code editors that include many special features for writing and editing code.

    We can create Flutter apps using any text editor that can easily combine with our command-line tools. However, it is recommended to use editor plugins (IDE) for a better experience. These plugins come with Syntax highlighting, code completion, widget editing assists, run & debug support, and many other features. Flutter supports several IDE to build the apps. Some of them are discussed below, but you can go ahead if you want to use a different editor.

    The most popular IDEs that give the most effective support for the Flutter application development are:

    • Android Studio
    • IntelliJ Idea
    • Visual Studio
    • Emac
    • Codemagic

    Let us see each IDE one by one.

    Android Studio

    It is free, open-source, and the fastest tool used to build an app on every type of android device. It provides a complete experience for developing Flutter applications such as code completion, navigation, syntax highlighting, refactoring, widget editing assists, and run & debug support, etc. The main purpose of the android studio is to accelerate the development process and build high-quality apps for all android devices. It allows the developer to fix certain code issues automatically.

    Flutter IDE

    To download the android studio,.

    IntelliJ Idea

    IntelliJ IDEA is the most powerful and popular IDE among developers, which is developed and maintained by JetBrains Company. It is licensed by Apache 2.0. It supports many languages to develop applications. It will become a favorite IDE for many developers because it supports excellent plugins and a comprehensive built-in feature set. If you are going to develop an application with Dart language, it acts as a prime leader compared to other IDEs. It offers a complete experience for app development such as smart coding assistance for Dart that includes code completion, formatting, navigation, intentions, refactoring, built-in debugger, integration with pub and the Dart Analysis Server. It allows us to fix certain code issues automatically.

    Flutter IDE

    IntelliJ Idea is mainly available in two editions:

    1. Community Edition (It is free and open-source.)
    2. Ultimate Edition (It is a paid version but free trial for 30 days)

    To download IntelliJ Idea,.

    Visual Studio Code

    Visual Studio Code or VS Code IDE is a famous editor in the market for developing the Flutter application. It is free and easy to use. Most developers use this IDE for Flutter application development because Microsoft’s trusted company backs it. It has relatively high growth and support. It provides a simple Dart plugin that makes the app development faster (within 10 minutes or less). It offers features such as Syntax highlighting, Code Completion, Realtime errors/warnings/TODOs, Pub Get Packages command, Pub Upgrade Packages command, Type Hierarchy, etc. The VS code editor can work on macOS, Windows, and Linux.

    Flutter IDE

    To download the VS Code, .

    Emacs (Dart Mode)

    It is a lightweight IDE that provides support for app development using Flutter and Dart. It is a free and open-source plugin on GitHub. It can be used directly in our Emacs installation for coding in Dart. It is an extensible, customizable, self-documenting, and real-time display editor that supports over 10000 built-in commands. Emacs can work with several operating systems, such as GNU, GNU/Linux, MacOS, Windows, FreeBSD, OpenBSD, and Solaris.

    Flutter IDE

    To download the Emacs, .

    Codemagic

    It is also a useful tool to develop, test, and deliver Flutter application in record time. If we use the Flutter framework to develop an app, it will boost the development process. It provides Cinemagic to test and release the app. It also helps in marketing our app without facing many issues. It is a free and open-source IDE. It also allows us to contribute anything to improve its documentation.

  • State Management

    In this section, we are going to discuss state management and how we can handle it in the Flutter. We know that in Flutter, everything is a widget. The widget can be classified into two categories, one is a Stateless widget, and another is a Stateful widget. The Stateless widget does not have any internal state. It means once it is built, we cannot change or modify it until they are initialized again. On the other hand, a Stateful widget is dynamic and has a state. It means we can modify it easily throughout its lifecycle without reinitialized it again.

    What is State?

    A state is information that can be read when the widget is built and might change or modified over a lifetime of the app. If you want to change your widget, you need to update the state object, which can be done by using the setState() function available for Stateful widgets. The setState() function allows us to set the properties of the state object that triggers a redraw of the UI.

    The state management is one of the most popular and necessary processes in the lifecycle of an application. According to official documentation, Flutter is declarative. It means Flutter builds its UI by reflecting the current state of your app. The following figure explains it more clearly where you can build a UI from the application state.

    Flutter State Management

    Let us take a simple example to understand the concept of state management. Suppose you have created a list of customers or products in your app. Now, assume you have added a new customer or product dynamically in that list. Then, there is a need to refresh the list to view the newly added item into the record. Thus, whenever you add a new item, you need to refresh the list. This type of programming requires state management to handle such a situation to improve performance. It is because every time you make a change or update the same, the state gets refreshed.

    In Flutter, the state management categorizes into two conceptual types, which are given below:

    Ephemeral State
    
    App State

    Ephemeral State

    This state is also known as UI State or local state. It is a type of state which is related to the specific widget, or you can say that it is a state that contains in a single widget. In this kind of state, you do not need to use state management techniques. The common example of this state is Text Field.

    Example

    class MyHomepage extends StatefulWidget {  
    
      @override  
    
      MyHomepageState createState() => MyHomepageState();  
    
    }  


    class MyHomepageState extends State<MyHomepage> {  
    
      String _name = "Peter";  


      @override  
    
      Widget build(BuildContext context) {  
    
        return RaisedButton(  
    
            child: Text(_name),  
    
            onPressed: () {  
    
               setState(() {  
    
                  _name = _name == "Peter" ? "John" : "Peter";  
    
               });  
    
             },  
    
          );  
    
      }  
    
    }  

      In the above example, the _name is an ephemeral state. Here, only the setState() function inside the StatefulWidget’s class can access the _name. The build method calls a setState() function, which does the modification in the state variables. When this method is executed, the widget object is replaced with the new one, which gives the modified variable value.

      App State

      It is different from the ephemeral state. It is a type of state that we want to share across various parts of our app and want to keep between user sessions. Thus, this type of state can be used globally. Sometimes it is also known as application state or shared state. Some of the examples of this state are User preferences, Login info, notifications in a social networking app, the shopping cart in an e-commerce app, read/unread state of articles in a news app, etc.

      The following diagram explains the difference between the ephemeral state and the app state more appropriately.

      Flutter State Management

      The simplest example of app state management can be learned by using the provider package. The state management with the provider is easy to understand and requires less coding. A provider is a third-party library. Here, we need to understand three main concepts to use this library.

      1. ChangeNotifier
      2. ChangeNotifierProvider
      3. Consumer

      ChangeNotifier

      ChangeNotifier is a simple class, which provides change notification to its listeners. It is easy to understand, implement, and optimized for a small number of listeners. It is used for the listener to observe a model for changes. In this, we only use the notifyListener() method to inform the listeners.

      For example, let us define a model based on ChangeNotifier. In this model, the Counter is extended with ChangeNotifier, which is used to notify its listeners when we call notifyListeners(). It is the only method that needs to implement in a ChangeNotifier model. In this example, we declared two functions the increment and decrement, which are used to increase and decrease the value. We can call notifyListeners() method any time the model changes in a way that might change your app’s UI.

      import 'package:flutter/material.dart';  


      class Counter with ChangeNotifier {  
      
        int _counter;  


        Counter(this._counter);  


        getCounter() => _counter;  
      
        setCounter(int counter) => _counter = counter;  


        void increment() {  
      
          _counter++;  
      
          notifyListeners();  
      
        }  


        void decrement() {  
      
          _counter--;  
      
          notifyListeners();  
      
        }  
      
      } 

        ChangeNotifierProvider

        ChangeNotifierProvider is the widget that provides an instance of a ChangeNotifier to its descendants. It comes from the provider package. The following code snippets help to understand the concept of ChangeNotifierProvider.

        Here, we have defined a builder who will create a new instance of the Counter model. ChangeNotifierProvider does not rebuild Counter unless there is a need for this. It will also automatically call the dispose() method on the Counter model when the instance is no longer needed.

        class MyApp extends StatelessWidget {  
        
          @override  
        
          Widget build(BuildContext context) {  
        
            return MaterialApp(  
        
              theme: ThemeData(  
        
                primarySwatch: Colors.indigo,  
        
              ),  
        
              home: ChangeNotifierProvider<CounterModel>(  
        
                builder: (_) => CounterModel(),  
        
                child: CounterView(),  
        
              ),  
        
            );  
        
          }  
        
        }

        If there is a need to provide more than one class, you can use MultiProvider. The MultiProvider is a list of all the different Providers being used within its scope. Without using this, we would have to nest our Providers with one being the child of another and another. We can understand this from the below code.

        void main() {  
        
          runApp(  
        
            MultiProvider(  
        
              providers: [  
        
                ChangeNotifierProvider(builder: (context) => Counter()),  
        
                Provider(builder: (context) => SomeOtherClass()),  
        
              ],  
        
              child: MyApp(),  
        
            ),  
        
          );  
        
        } 

          Consumer

          It is a type of provider that does not do any fancy work. It just calls the provider in a new widget and delegates its build implementation to the builder. The following code explains it more clearly./p>

          return Consumer<Counter>(  
          
            builder: (context, count, child) {  
          
              return Text("Total price: ${count.total}");  
          
            },  
          
          );  

            In the above example, you can see that the consumer widget only requires a builder function, which is called whenever the ChangeNotifier changes. The builder function contains three arguments, which are context, count, and child. The first argument, context, contain in every build() method. The second argument is the instance of the ChangeNotifier, and the third argument is the child that is used for optimization. It is the best idea to put the consumer widget as deep as in the tree as possible.

          1. Gestures

            Gestures are an interesting feature in Flutter that allows us to interact with the mobile app (or any touch-based device). Generally, gestures define any physical action or movement of a user in the intention of specific control of the mobile device. Some of the examples of gestures are:

            • When the mobile screen is locked, you slide your finger across the screen to unlock it.
            • Tapping a button on your mobile screen, and
            • Tapping and holding an app icon on a touch-based device to drag it across screens.

            We use all these gestures in everyday life to interact with your phone or touch-based device.

            Flutter divides the gesture system into two different layers, which are given below:

            1. Pointers
            2. Gestures

            Pointers

            Pointers are the first layer that represents the raw data about user interaction. It has events, which describe the location and movement of pointers such as touches, mice, and style across the screens. Flutter does not provide any mechanism to cancel or stop the pointer-events from being dispatched further. Flutter provides a Listener widget to listen to the pointer-events directly from the widgets layer. The pointer-events are categories into mainly four types:

            • PointerDownEvents
            • PointerMoveEvents
            • PointerUpEvents
            • PointerCancelEvents

            PointerDownEvents: It allows the pointer to contact the screen at a particular location.

            PointerMoveEvents: It allows the pointer to move from one location to another location on the screen.

            PointerUpEvents: It allows the pointer to stop contacting the screen.

            PointerCancelEvents: This event is sent when the pointer interaction is canceled.

            Gestures

            It is the second layer that represents semantic actions such as tap, drag, and scale, which are recognized from multiple individual pointer events. It is also able to dispatch multiple events corresponding to gesture lifecycle like drag start, drag update, and drag end. Some of the popularly used gesture are listed below:

            Tap: It means touching the surface of the screen from the fingertip for a short time and then releasing them. This gesture contains the following events:

            • onTapDown
            • onTapUp
            • onTap
            • onTapCancel

            Double Tap: It is similar to a Tap gesture, but you need to tapping twice in a short time. This gesture contains the following events:

            • onDoubleTap

            Drag: It allows us to touch the surface of the screen with a fingertip and move it from one location to another location and then releasing them. Flutter categories the drag into two types:

            1. Horizontal Drag: This gesture allows the pointer to move in a horizontal direction. It contains the following events:
              • onHorizontalDragStart
              • onHorizontalDragUpdate
              • onHorizontalDragEnd
            2. Vertical Drag: This gesture allows the pointer to move in a vertical direction. It contains the following events:
              • onVerticalDragStart
              • onVerticalDragStart
              • onVerticalDragStart

            Long Press: It means touching the surface of the screen at a particular location for a long time. This gesture contains the following events:

            • onLongPress

            Pan: It means touching the surface of the screen with a fingertip, which can move in any direction without releasing the fingertip. This gesture contains the following events:

            • onPanStart
            • onPanUpdate
            • onPanEnd

            Pinch: It means pinching (move one’s finger and thumb or bring them together on a touchscreen) the surface of the screen using two fingers to zoom into or out of a screen.

            Gesture Detector

            Flutter provides a widget that gives excellent support for all types of gestures by using the GestureDetector widget. The GestureWidget is non-visual widgets, which is primarily used for detecting the user’s gesture. The basic idea of the gesture detector is a stateless widget that contains parameters in its constructor for different touch events.

            In some situations, there might be multiple gesture detectors at a particular location on the screen, and then the framework disambiguates which gesture should be called. The GestureDetector widget decides which gesture is going to recognize based on which of its callbacks are non-null.

            Let us learn how we can use these gestures in our application with a simple onTap() event and determine how the GestureDetector processes this. Here, we are going to create a box widget, design it according to our desired specification, and then add the onTap() function to it.

            Now, create a new Flutter project and replace the following code in main.dart file.

            import 'package:flutter/material.dart';  


            void main() => runApp(MyApp());  


            class MyApp extends StatelessWidget {  
            
              // This widget is the root of your application.  
            
              @override  
            
              Widget build(BuildContext context) {  
            
                return MaterialApp(  
            
                  title: 'Flutter Demo Application', theme: ThemeData(  
            
                  primarySwatch: Colors.green,),  
            
                  home: MyHomePage(),  
            
                );  
            
              }  
            
            }  
            
            class MyHomePage extends StatefulWidget {  
            
              @override  
            
              MyHomePageState createState() => new MyHomePageState();  
            
            }  


            class MyHomePageState extends State<MyHomePage> {  
            
              @override  
            
              Widget build(BuildContext context) {  
            
                return new Scaffold(  
            
                  appBar: new AppBar(  
            
                    title: new Text('Gestures Example'),  
            
                    centerTitle: true,  
            
                  ),  
            
                  body: new Center(child: GestureDetector(  
            
                      onTap: () {  
            
                        print('Box Clicked');  
            
                      },  
            
                      child: Container(  
            
                        height: 60.0,  
            
                        width: 120.0,  
            
                        padding: EdgeInsets.all(10.0),  
            
                        decoration: BoxDecoration(  
            
                          color: Colors.blueGrey,  
            
                          borderRadius: BorderRadius.circular(15.0),  
            
                        ),  
            
                        child: Center(child: Text('Click Me')),  
            
                      )  
            
                  )),  
            
                );  
            
              }  
            
            }  

              Output

              When you run this dart file in Android Studio, it will give the following output in the emulator.

              Flutter Gestures

              In the above image, you can see a button with rounded edges on the center of the screen. When you tap on this, it behaves like a button, and the output can be seen in the console.

              Flutter also provides a set of widgets that can allow you to do a specific as well as advanced gestures. These widgets are given below:

              Dismissible: It is a type of widget that supports the flick gesture to dismiss the widget.

              Draggable: It is a type of widget that supports drag gestures to move the widget.

              LongPressDraggable: It is a type of widget that supports drag gesture to move a widget along with its parent widget.

              DragTarget: It is a type of widget that can accept any Draggable widget

              IgnorePointer: It is a type of widget that hides the widget and its children from the gesture detection process.

              AbsorbPointer: It is a type of widget that stops the gesture detection process itself. Due to this, any overlapping widget cannot able to participate in the gesture detection process, and thus, no event is raised.

              Scrollable: It is a type of widget that supports scrolling of the content which is available inside the widget.

              Multiple Gesture Example

              In this section, we are going to see how multiple gestures work in flutter applications. This demo app consists of two containers parent and child. Here, everything is handled manually by using ‘RawGestureDetector’ and a custom ‘GestureRecognizer’ The custom GestureRecognizer provide ‘AllowMultipleGestureRecognizer’ property to the gesture list and creates a ‘GestureRecognizerFactoryWithHandlers’. Next, when the onTap() event is called, it prints text to the console.

              Open the flutter project and replace the following code in the main.dart file,

              import 'package:flutter/gestures.dart';  
              
              import 'package:flutter/material.dart';  


              //It is the entry point for your Flutter app.  
              
              void main() {  
              
                runApp(  
              
                  MaterialApp(  
              
                    title: 'Multiple Gestures Demo',  
              
                    home: Scaffold(  
              
                      appBar: AppBar(  
              
                        title: Text('Multiple Gestures Demo'),  
              
                      ),  
              
                      body: DemoApp(),  
              
                    ),  
              
                  ),  
              
                );  
              
              }  


              class DemoApp extends StatelessWidget {  
              
                @override  
              
                Widget build(BuildContext context) {  
              
                  return RawGestureDetector(  
              
                    gestures: {  
              
                      AllowMultipleGestureRecognizer: GestureRecognizerFactoryWithHandlers<  
              
                          AllowMultipleGestureRecognizer>(  
              
                            () => AllowMultipleGestureRecognizer(),  
              
                            (AllowMultipleGestureRecognizer instance) {  
              
                          instance.onTap = () => print('It is the parent container gesture');  
              
                        },  
              
                      )  
              
                    },  
              
                    behavior: HitTestBehavior.opaque,  
              
                    //Parent Container  
              
                    child: Container(  
              
                      color: Colors.green,  
              
                      child: Center(  
              
                        //Now, wraps the second container in RawGestureDetector  
              
                        child: RawGestureDetector(  
              
                          gestures: {  
              
                            AllowMultipleGestureRecognizer:  
              
                            GestureRecognizerFactoryWithHandlers<  
              
                                AllowMultipleGestureRecognizer>(  
              
                                  () => AllowMultipleGestureRecognizer(),  //constructor  
              
                                  (AllowMultipleGestureRecognizer instance) {  //initializer  
              
                                instance.onTap = () => print('It is the nested container');  
              
                              },  
              
                            )  
              
                          },  
              
                          //Creates the nested container within the first.  
              
                          child: Container(  
              
                            color: Colors.deepOrange,  
              
                            width: 250.0,  
              
                            height: 350.0,  
              
                          ),  
              
                        ),  
              
                      ),  
              
                    ),  
              
                  );  
              
                }  
              
              }  


              class AllowMultipleGestureRecognizer extends TapGestureRecognizer {  
              
                @override  
              
                void rejectGesture(int pointer) {  
              
                  acceptGesture(pointer);  
              
                }  
              
              }

              Output

              When you run the app, it will give the following output.

              Flutter Gestures

              Next, tap on the orange box, the following output appears on your console.

              It is the nested container.
              It is the parent container gesture.
              
            1. Layouts

              The main concept of the layout mechanism is the widget. We know that flutter assume everything as a widget. So the image, icon, text, and even the layout of your app are all widgets. Here, some of the things you do not see on your app UI, such as rows, columns, and grids that arrange, constrain, and align the visible widgets are also the widgets.

              Flutter allows us to create a layout by composing multiple widgets to build more complex widgets. For example, we can see the below image that shows three icons with a label under each one.

              Flutter Layouts

              In the second image, we can see the visual layout of the above image. This image shows a row of three columns, and these columns contain an icon and label.

              Flutter Layouts

              In the above image, the container is a widget class that allows us to customize the child widget. It is mainly used to add borders, padding, margins, background color, and many more. Here, the text widget comes under the container for adding margins. The entire row is also placed in a container for adding margin and padding around the row. Also, the rest of the UI is controlled by properties such as color, text.style, etc.

              Layout a widget

              Let us learn how we can create and display a simple widget. The following steps show how to layout a widget:

              Step 1: First, you need to select a Layout widget.

              Step 2: Next, create a visible widget.

              Step 3: Then, add the visible widget to the layout widget.

              Step 4: Finally, add the layout widget to the page where you want to display.

              Types of Layout Widgets

              We can categories the layout widget into two types:

              1. Single Child Widget
              2. Multiple Child Widget

              Single Child Widgets

              The single child layout widget is a type of widget, which can have only one child widget inside the parent layout widget. These widgets can also contain special layout functionality. Flutter provides us many single child widgets to make the app UI attractive. If we use these widgets appropriately, it can save our time and makes the app code more readable. The list of different types of single child widgets are:

              Container: It is the most popular layout widget that provides customizable options for painting, positioning, and sizing of widgets.

              Center(  
              
                child: Container(  
              
                  margin: const EdgeInsets.all(15.0),  
              
                  color: Colors.blue,  
              
                  width: 42.0,  
              
                  height: 42.0,  
              
                ),  
              
              )

              Padding: It is a widget that is used to arrange its child widget by the given padding. It contains EdgeInsets and EdgeInsets.fromLTRB for the desired side where you want to provide padding.

              const Greetings(  
              
                child: Padding(  
              
                  padding: EdgeInsets.all(14.0),  
              
                  child: Text('Hello JavaTpoint!'),  
              
                ),  
              
              )  

                Center: This widget allows you to center the child widget within itself.

                Align: It is a widget, which aligns its child widget within itself and sizes it based on the child’s size. It provides more control to place the child widget in the exact position where you need it.

                Center(  
                
                  child: Container(  
                
                    height: 110.0,  
                
                    width: 110.0,  
                
                    color: Colors.blue,  
                
                    child: Align(  
                
                      alignment: Alignment.topLeft,  
                
                      child: FlutterLogo(  
                
                        size: 50,  
                
                      ),  
                
                    ),  
                
                  ),  
                
                )  

                  SizedBox: This widget allows you to give the specified size to the child widget through all screens.

                  SizedBox(  
                  
                    width: 300.0,  
                  
                    height: 450.0,  
                  
                    child: const Card(child: Text('Hello JavaTpoint!')),  
                  
                  )

                  AspectRatio: This widget allows you to keep the size of the child widget to a specified aspect ratio.

                  AspectRatio(  
                  
                    aspectRatio: 5/3,  
                  
                    child: Container(  
                  
                      color: Colors.bluel,  
                  
                    ),  
                  
                  ), 

                    Baseline: This widget shifts the child widget according to the child’s baseline.

                    child: Baseline(  
                    
                             baseline: 30.0,  
                    
                             baselineType: TextBaseline.alphabetic,  
                    
                             child: Container(  
                    
                                  height: 60,  
                    
                                  width: 50,  
                    
                                  color: Colors.blue,  
                    
                             ),  
                    
                    ) 

                      ConstrainedBox: It is a widget that allows you to force the additional constraints on its child widget. It means you can force the child widget to have a specific constraint without changing the properties of the child widget.

                      ConstrainedBox(  
                      
                        constraints: new BoxConstraints(  
                      
                          minHeight: 150.0,  
                      
                          minWidth: 150.0,  
                      
                          maxHeight: 300.0,  
                      
                          maxWidth: 300.0,  
                      
                        ),  
                      
                        child: new DecoratedBox(  
                      
                          decoration: new BoxDecoration(color: Colors.red),  
                      
                        ),  
                      
                      ),

                      CustomSingleChildLayout: It is a widget, which defers from the layout of the single child to a delegate. The delegate decides to position the child widget and also used to determine the size of the parent widget.

                      FittedBox: It scales and positions the child widget according to the specified fit.

                      import 'package:flutter/material.dart';  


                      void main() => runApp(MyApp());  


                      class MyApp extends StatelessWidget {  
                      
                        // It is the root widget of your application.  
                      
                        @override  
                      
                        Widget build(BuildContext context) {  
                      
                          return MaterialApp(  
                      
                            title: 'Multiple Layout Widget',  
                      
                            debugShowCheckedModeBanner: false,  
                      
                            theme: ThemeData(  
                      
                              // This is the theme of your application.  
                      
                              primarySwatch: Colors.green,  
                      
                            ),  
                      
                            home: MyHomePage(),  
                      
                          );  
                      
                        }  
                      
                      }  
                      
                      class MyHomePage extends StatelessWidget {  


                        @override  
                      
                        Widget build(BuildContext context) {  
                      
                          return Scaffold(  
                      
                              appBar: AppBar(title: Text("FittedBox Widget")),  
                      
                              body: Center(  
                      
                              child: FittedBox(child: Row(  
                      
                                children: <Widget>[  
                      
                                  Container(  
                      
                                    child: Image.asset('assets/computer.png'),  
                      
                                    ),  
                      
                                    Container(  
                      
                                      child: Text("This is a widget"),  
                      
                                    )  
                      
                                  ],  
                      
                                ),  
                      
                                fit: BoxFit.contain,  
                      
                              )  
                      
                            ),  
                      
                          );  
                      
                        }  
                      
                      } 

                        Output

                        Flutter Layouts

                        FractionallySizedBox: It is a widget that allows to sizes of its child widget according to the fraction of the available space.

                        IntrinsicHeight and IntrinsicWidth: They are a widget that allows us to sizes its child widget to the child’s intrinsic height and width.

                        LimitedBox: This widget allows us to limits its size only when it is unconstrained.

                        Offstage: It is used to measure the dimensions of a widget without bringing it on to the screen.

                        OverflowBox: It is a widget, which allows for imposing different constraints on its child widget than it gets from a parent. In other words, it allows the child to overflow the parent widget.

                        Example

                        import 'package:flutter/material.dart';  


                        void main() => runApp(MyApp());  


                        class MyApp extends StatelessWidget {  
                        
                          // It is the root widget of your application.  
                        
                          @override  
                        
                          Widget build(BuildContext context) {  
                        
                            return MaterialApp(  
                        
                              title: 'Single Layout Widget',  
                        
                              debugShowCheckedModeBanner: false,  
                        
                              theme: ThemeData(  
                        
                                // This is the theme of your application.  
                        
                                primarySwatch: Colors.blue,  
                        
                              ),  
                        
                              home: MyHomePage(),  
                        
                            );  
                        
                          }  
                        
                        }  
                        
                        class MyHomePage extends StatelessWidget {  


                          @override  
                        
                          Widget build(BuildContext context) {  
                        
                            return Scaffold(  
                        
                              appBar: AppBar(  
                        
                                title: Text("OverflowBox Widget"),  
                        
                              ),  
                        
                              body: Center(  
                        
                              child: Container(  
                        
                                height: 50.0,  
                        
                                width: 50.0,  
                        
                                color: Colors.red,  
                        
                                child: OverflowBox(  
                        
                                  minHeight: 70.0,  
                        
                                  minWidth: 70.0,  
                        
                                  child: Container(  
                        
                                    height: 50.0,  
                        
                                    width: 50.0,  
                        
                                    color: Colors.blue,  
                        
                                    ),  
                        
                                  ),  
                        
                                ),  
                        
                              ),  
                        
                            );  
                        
                          }  
                        
                        }

                        Output

                        Flutter Layouts

                        Multiple Child widgets

                        The multiple child widgets are a type of widget, which contains more than one child widget, and the layout of these widgets are unique. For example, Row widget laying out of its child widget in a horizontal direction, and Column widget laying out of its child widget in a vertical direction. If we combine the Row and Column widget, then it can build any level of the complex widget.

                        Here, we are going to learn different types of multiple child widgets:

                        Row: It allows to arrange its child widgets in a horizontal direction.

                        Example

                        import 'package:flutter/material.dart';  


                        void main() => runApp(MyApp());  


                        class MyApp extends StatelessWidget {  
                        
                          // It is the root widget of your application.  
                        
                          @override  
                        
                          Widget build(BuildContext context) {  
                        
                            return MaterialApp(  
                        
                              title: 'Multiple Layout Widget',  
                        
                              debugShowCheckedModeBanner: false,  
                        
                              theme: ThemeData(  
                        
                                // This is the theme of your application.  
                        
                                primarySwatch: Colors.blue,  
                        
                              ),  
                        
                              home: MyHomePage(),  
                        
                            );  
                        
                          }  
                        
                        }  
                        
                        class MyHomePage extends StatelessWidget {  
                        
                          @override  
                        
                          Widget build(BuildContext context) {  
                        
                            return Center(  
                        
                              child: Container(  
                        
                                alignment: Alignment.center,  
                        
                                color: Colors.white,  
                        
                                child: Row(  
                        
                                  children: <Widget>[  
                        
                                    Expanded(  
                        
                                      child: Text('Peter', textAlign: TextAlign.center),  
                        
                                    ),  
                        
                                    Expanded(  
                        
                                      child: Text('John', textAlign: TextAlign.center ),  


                                    ),  
                        
                                    Expanded(  
                        
                                      child: FittedBox(  
                        
                                        fit: BoxFit.contain, // otherwise the logo will be tiny  
                        
                                        child: const FlutterLogo(),  
                        
                                      ),  
                        
                                    ),  
                        
                                  ],  
                        
                                ),  
                        
                              ),  
                        
                            );  
                        
                          }  
                        
                        }  

                          Output

                          Flutter Layouts

                          Column: It allows to arrange its child widgets in a vertical direction.

                          ListView: It is the most popular scrolling widget that allows us to arrange its child widgets one after another in scroll direction.

                          GridView: It allows us to arrange its child widgets as a scrollable, 2D array of widgets. It consists of a repeated pattern of cells arrayed in a horizontal and vertical layout.

                          Expanded: It allows to make the children of a Row and Column widget to occupy the maximum possible area.

                          Table: It is a widget that allows us to arrange its children in a table based widget.

                          Flow: It allows us to implements the flow-based widget.

                          Stack: It is an essential widget, which is mainly used for overlapping several children widgets. It allows you to put up the multiple layers onto the screen. The following example helps to understand it.

                          import 'package:flutter/material.dart';  


                          void main() => runApp(MyApp());  


                          class MyApp extends StatelessWidget {  
                          
                            // It is the root widget of your application.  
                          
                            @override  
                          
                            Widget build(BuildContext context) {  
                          
                              return MaterialApp(  
                          
                                title: 'Multiple Layout Widget',  
                          
                                debugShowCheckedModeBanner: false,  
                          
                                theme: ThemeData(  
                          
                                  // This is the theme of your application.  
                          
                                  primarySwatch: Colors.blue,  
                          
                                ),  
                          
                                home: MyHomePage(),  
                          
                              );  
                          
                            }  
                          
                          }  
                          
                          class MyHomePage extends StatelessWidget {  
                          
                            @override  
                          
                            Widget build(BuildContext context) {  
                          
                              return Center(  
                          
                                child: Container(  
                          
                                  alignment: Alignment.center,  
                          
                                  color: Colors.white,  
                          
                                  child: Stack(  
                          
                                    children: <Widget>[  
                          
                                      // Max Size  
                          
                                      Container(  
                          
                                        color: Colors.blue,  
                          
                                      ),  
                          
                                      Container(  
                          
                                        color: Colors.pink,  
                          
                                        height: 400.0,  
                          
                                        width: 300.0,  
                          
                                      ),  
                          
                                      Container(  
                          
                                        color: Colors.yellow,  
                          
                                        height: 220.0,  
                          
                                        width: 200.0,  
                          
                                      )  
                          
                                    ],  
                          
                                  ),  
                          
                                ),  
                          
                              );  
                          
                            }  
                          
                          }  

                            Output

                            Flutter Layouts

                            Building Complex Layout

                            In this section, we are going to learn how you can create a complex user interface using both single and multiple child layout widgets. The layout framework allows you to create a complex user interface layout by nesting the rows and columns inside of rows and columns.

                            Let us see an example of a complex user interface by creating the product list. For this purpose, you need first to replace the code of main.dart file with the following code snippet.

                            import 'package:flutter/material.dart';  


                            void main() => runApp(MyApp());  


                            class MyApp extends StatelessWidget {  
                            
                              // It is the root widget of your application.  
                            
                              @override  
                            
                              Widget build(BuildContext context) {  
                            
                                return MaterialApp(  
                            
                                  title: 'Flutter Demo Application', theme: ThemeData(  
                            
                                  primarySwatch: Colors.green,),  
                            
                                  home: MyHomePage(title: 'Complex layout example'),  
                            
                                );  
                            
                              }  
                            
                            }  
                            
                            class MyHomePage extends StatelessWidget {  
                            
                              MyHomePage({Key key, this.title}) : super(key: key);  
                            
                              final String title;  


                              @override  
                            
                              Widget build(BuildContext context) {  
                            
                                return Scaffold(  
                            
                                    appBar: AppBar(title: Text("Product List")),  
                            
                                    body: ListView(  
                            
                                      padding: const EdgeInsets.fromLTRB(3.0, 12.0, 3.0, 12.0),  
                            
                                      children: <Widget>[  
                            
                                        ProductBox(  
                            
                                            name: "iPhone",  
                            
                                            description: "iPhone is the top branded phone ever",  
                            
                                            price: 55000,  
                            
                                            image: "iphone.png"  
                            
                                        ),  
                            
                                        ProductBox(  
                            
                                            name: "Android",  
                            
                                            description: "Android is a very stylish phone",  
                            
                                            price: 10000,  
                            
                                            image: "android.png"  
                            
                                        ),  
                            
                                        ProductBox(  
                            
                                            name: "Tablet",  
                            
                                            description: "Tablet is a popular device for official meetings",  
                            
                                            price: 25000,  
                            
                                            image: "tablet.png"  
                            
                                        ),  
                            
                                        ProductBox(  
                            
                                            name: "Laptop",  
                            
                                            description: "Laptop is most famous electronic device",  
                            
                                            price: 35000,  
                            
                                            image: "laptop.png"  
                            
                                        ),  
                            
                                        ProductBox(  
                            
                                            name: "Desktop",  
                            
                                            description: "Desktop is most popular for regular use",  
                            
                                            price: 10000,  
                            
                                            image: "computer.png"  
                            
                                        ),  
                            
                                      ],  
                            
                                    )  
                            
                                );  
                            
                              }  
                            
                            }  
                            
                            class ProductBox extends StatelessWidget {  
                            
                              ProductBox({Key key, this.name, this.description, this.price, this.image}) :  
                            
                                    super(key: key);  
                            
                              final String name;  
                            
                              final String description;  
                            
                              final int price;  
                            
                              final String image;  


                              Widget build(BuildContext context) {  
                            
                                return Container(  
                            
                                    padding: EdgeInsets.all(2),  
                            
                                    height: 110,  
                            
                                    child: Card(  
                            
                                        child: Row(  
                            
                                            mainAxisAlignment: MainAxisAlignment.spaceEvenly,  
                            
                                            children: <Widget>[  
                            
                                              Image.asset("assets/" + image),  
                            
                                              Expanded(  
                            
                                                  child: Container(  
                            
                                                      padding: EdgeInsets.all(5),  
                            
                                                      child: Column(  
                            
                                                        mainAxisAlignment: MainAxisAlignment.spaceEvenly,  
                            
                                                        children: <Widget>[  
                            
                                                          Text(  
                            
                                                              this.name, style: TextStyle(  
                            
                                                              fontWeight: FontWeight.bold  
                            
                                                          )  
                            
                                                          ),  
                            
                                                          Text(this.description), Text(  
                            
                                                              "Price: " + this.price.toString()  
                            
                                                          ),  
                            
                                                        ],  
                            
                                                      )  
                            
                                                  )  
                            
                                              )  
                            
                                            ]  
                            
                                        )  
                            
                                    )  
                            
                                );  
                            
                              }  
                            
                            } 

                              In the above code, we create widget ProductBox that contains the details of the product, such as image, name, price, and description. In the ProductBox widget, we use the following child widgets: Container, Row, Column, Expanded, Card, Text, Image, etc. This widget contains the following layout:

                              Flutter Layouts

                              Output

                              Now, when we run the dart file in the android emulator, it will give the following output.

                              Flutter Layouts
                            1. Widgets

                              In this section, we are going to learn the concept of a widget, how to create it, and their different types available in the Flutter framework. We have learned earlier that everything in Flutter is a widget.

                              If you are familiar with React or Vue.js, then it is easy to understand the Flutter.

                              Whenever you are going to code for building anything in Flutter, it will be inside a widget. The central purpose is to build the app out of widgets. It describes how your app view should look like with their current configuration and state. When you made any alteration in the code, the widget rebuilds its description by calculating the difference of previous and current widget to determine the minimal changes for rendering in UI of the app.

                              Widgets are nested with each other to build the app. It means the root of your app is itself a widget, and all the way down is a widget also. For example, a widget can display something, can define design, can handle interaction, etc.

                              The below image is a simple visual representation of the widget tree.

                              Flutter Widgets

                              We can create the Flutter widget like this:

                              Class ImageWidget extends StatelessWidget {  
                              
                                       // Class Stuff  
                              
                              } 

                                Hello World Example

                                import 'package:flutter/material.dart';  


                                class MyHomePage extends StatelessWidget {    
                                
                                  MyHomePage({Key key, this.title}) : super(key: key);    
                                
                                  // This widget is the home page of your application.    
                                
                                  final String title;    


                                  @override    
                                
                                  Widget build(BuildContext context) {    
                                
                                    return Scaffold(    
                                
                                      appBar: AppBar(    
                                
                                        title: Text(this.title),    
                                
                                      ),    
                                
                                      body: Center(    
                                
                                        child: Text('Hello World'),    
                                
                                      ),    
                                
                                    );    
                                
                                  }    
                                
                                } 

                                  Types of Widget

                                  We can split the Flutter widget into two categories:

                                  1. Visible (Output and Input)
                                  2. Invisible (Layout and Control)

                                  Visible widget

                                  The visible widgets are related to the user input and output data. Some of the important types of this widget are:

                                  Text

                                  A Text widget holds some text to display on the screen. We can align the text widget by using textAlign property, and style property allow the customization of Text that includes font, font weight, font style, letter spacing, color, and many more. We can use it as like below code snippets.

                                  new Text(     
                                  
                                  'Hello, Javatpoint!',     
                                  
                                  textAlign: TextAlign.center,       
                                  
                                  style: new TextStyle(fontWeight: FontWeight.bold),   
                                  
                                  ) 

                                    Button

                                    This widget allows you to perform some action on click. Flutter does not allow you to use the Button widget directly; instead, it uses a type of buttons like a FlatButton and a RaisedButton. We can use it as like below code snippets.

                                    //FlatButton Example  
                                    
                                    new FlatButton(  
                                    
                                      child: Text("Click here"),  
                                    
                                      onPressed: () {  
                                    
                                        // Do something here  
                                    
                                      },  
                                    
                                    ),  


                                    //RaisedButton Example  
                                    
                                    new RaisedButton(  
                                    
                                      child: Text("Click here"),  
                                    
                                      elevation: 5.0,  
                                    
                                      onPressed: () {  
                                    
                                        // Do something here  
                                    
                                      },  
                                    
                                    ), 

                                      In the above example, the onPressed property allows us to perform an action when you click the button, and elevation property is used to change how much it stands out.

                                      Image

                                      This widget holds the image which can fetch it from multiple sources like from the asset folder or directly from the URL. It provides many constructors for loading image, which are given below:

                                      • Image: It is a generic image loader, which is used by ImageProvider.
                                      • asset: It load image from your project asset folder.
                                      • file: It loads images from the system folder.
                                      • memory: It load image from memory.
                                      • network: It loads images from the network.

                                      To add an image in the project, you need first to create an assets folder where you keep your images and then add the below line in pubspec.yaml file.

                                      assets:  
                                      
                                        - assets/

                                      Now, add the following line in the dart file.

                                      Image.asset('assets/computer.png')  

                                      The complete source code for adding an image is shown below in the hello world example.

                                      class MyHomePage extends StatelessWidget {  
                                      
                                        MyHomePage({Key key, this.title}) : super(key: key);  
                                      
                                        // This widget is the home page of your application.  
                                      
                                        final String title;  


                                        @override  
                                      
                                        Widget build(BuildContext context) {  
                                      
                                          return Scaffold(  
                                      
                                            appBar: AppBar(  
                                      
                                              title: Text(this.title),  
                                      
                                            ),  
                                      
                                            body: Center(  
                                      
                                              child: Image.asset('assets/computer.png'),  
                                      
                                            ),  
                                      
                                          );  
                                      
                                        }  
                                      
                                      }  

                                        When you run the app, it will give the following output.

                                        Flutter Widgets

                                        Icon

                                        This widget acts as a container for storing the Icon in the Flutter. The following code explains it more clearly.

                                        new Icon(  
                                        
                                          Icons.add,  
                                        
                                          size: 34.0,  
                                        
                                        )

                                          Invisible widget

                                          The invisible widgets are related to the layout and control of widgets. It provides controlling how the widgets actually behave and how they will look onto the screen. Some of the important types of these widgets are:

                                          Column

                                          A column widget is a type of widget that arranges all its children’s widgets in a vertical alignment. It provides spacing between the widgets by using the mainAxisAlignment and crossAxisAlignment properties. In these properties, the main axis is the vertical axis, and the cross axis is the horizontal axis.

                                          Example

                                          The below code snippets construct two widget elements vertically.

                                          new Column(  
                                          
                                            mainAxisAlignment: MainAxisAlignment.center,  
                                          
                                            children: <Widget>[  
                                          
                                              new Text(  
                                          
                                                "VegElement",  
                                          
                                              ),  
                                          
                                              new Text(  
                                          
                                                "Non-vegElement"  
                                          
                                              ),  
                                          
                                            ],  
                                          
                                          ), 

                                            Row

                                            The row widget is similar to the column widget, but it constructs a widget horizontally rather than vertically. Here, the main axis is the horizontal axis, and the cross axis is the vertical axis.

                                            Example

                                            The below code snippets construct two widget elements horizontally.

                                            new Row(  
                                            
                                              mainAxisAlignment: MainAxisAlignment.spaceEvenly,  
                                            
                                              children: <Widget>[  
                                            
                                                new Text(  
                                            
                                                  "VegElement",  
                                            
                                                ),  
                                            
                                                new Text(  
                                            
                                                  "Non-vegElement"  
                                            
                                                ),  
                                            
                                              ],  
                                            
                                            ), 

                                              Center

                                              This widget is used to center the child widget, which comes inside it. All the previous examples contain inside the center widget.

                                              Example

                                              Center(  
                                              
                                                child: new clumn(  
                                              
                                                  mainAxisAlignment: MainAxisAlignment.spaceEvenly,  
                                              
                                                  children: <Widget>[  
                                              
                                                    new Text(  
                                              
                                                      "VegElement",  
                                              
                                                    ),  
                                              
                                                    new Text(  
                                              
                                                      "Non-vegElement"  
                                              
                                                    ),  
                                              
                                                  ],  
                                              
                                                ),  
                                              
                                              ),  

                                                Padding

                                                This widget wraps other widgets to give them padding in specified directions. You can also provide padding in all directions. We can understand it from the below example that gives the text widget padding of 6.0 in all directions.

                                                Example

                                                Padding(  
                                                
                                                  padding: const EdgeInsets.all(6.0),  
                                                
                                                  child: new Text(  
                                                
                                                    "Element 1",  
                                                
                                                  ),  
                                                
                                                ),

                                                Scaffold

                                                This widget provides a framework that allows you to add common material design elements like AppBar, Floating Action Buttons, Drawers, etc.

                                                Stack

                                                It is an essential widget, which is mainly used for overlapping a widget, such as a button on a background gradient.

                                                State Management Widget

                                                In Flutter, there are mainly two types of widget:

                                                • StatelessWidget
                                                • StatefulWidget

                                                StatefulWidget

                                                A StatefulWidget has state information. It contains mainly two classes: the state object and the widget. It is dynamic because it can change the inner data during the widget lifetime. This widget does not have a build() method. It has createState() method, which returns a class that extends the Flutters State Class. The examples of the StatefulWidget are Checkbox, Radio, Slider, InkWell, Form, and TextField.

                                                Example

                                                class Car extends StatefulWidget {  
                                                
                                                  const Car({ Key key, this.title }) : super(key: key);   


                                                  @override  
                                                
                                                  _CarState createState() => _CarState();  
                                                
                                                }  


                                                class _CarState extends State<Car> {  
                                                
                                                  @override  
                                                
                                                  Widget build(BuildContext context) {  
                                                
                                                    return Container(  
                                                
                                                      color: const Color(0xFEEFE),  
                                                
                                                           child: Container(  
                                                
                                                            child: Container( //child: Container() )  
                                                
                                                        )  
                                                
                                                    );  
                                                
                                                  }  
                                                
                                                } 

                                                  StatelessWidget

                                                  The StatelessWidget does not have any state information. It remains static throughout its lifecycle. The examples of the StatelessWidget are Text, Row, Column, Container, etc.

                                                  Example

                                                  class MyStatelessCarWidget extends StatelessWidget {  
                                                  
                                                    const MyStatelessCarWidget ({ Key key }) : super(key: key);  


                                                    @override  
                                                  
                                                    Widget build(BuildContext context) {  
                                                  
                                                      return Container(color: const Color(0x0xFEEFE));  
                                                  
                                                    }  
                                                  
                                                  }  
                                                  1. Conclusion

                                                    Flutter framework does a great job by providing an excellent framework to build mobile applications in a truly platform independent way. By providing simplicity in the development process, high performance in the resulting mobile application, rich and relevant user interface for both Android and iOS platform, Flutter framework will surely enable a lot of new developers to develop high performance and feature-full mobile application in the near future.

                                                  2. Writting Advanced Applications

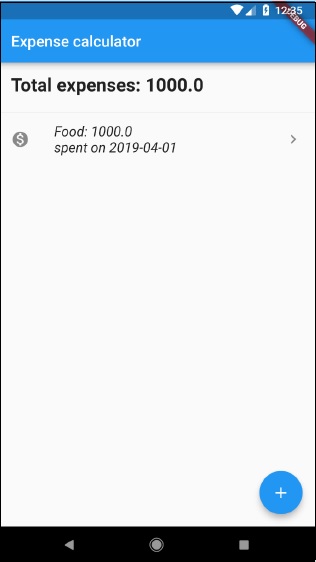
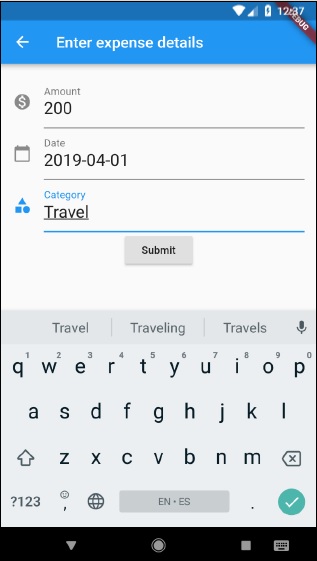
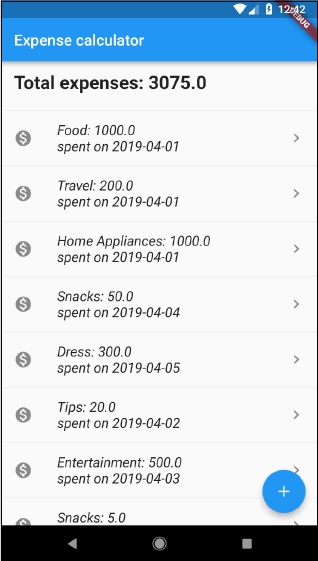
                                                    In this chapter, we are going to learn how to write a full fledged mobile application, expense_calculator. The purpose of the expense_calculator is to store our expense information. The complete feature of the application is as follows −

                                                    • Expense list.
                                                    • Form to enter new expenses.
                                                    • Option to edit / delete the existing expenses.
                                                    • Total expenses at any instance.

                                                    We are going to program the expense_calculator application using below mentioned advanced features of Flutter framework.

                                                    • Advanced use of ListView to show the expense list.
                                                    • Form programming.
                                                    • SQLite database programming to store our expenses.
                                                    • scoped_model state management to simplify our programming.

                                                    Let us start programming the expense_calculator application.

                                                    • Create a new Flutter application, expense_calculator in Android studio.
                                                    • Open pubspec.yaml and add package dependencies.
                                                    dependencies: 
                                                       flutter: 
                                                    
                                                      sdk: flutter 
                                                    sqflite: ^1.1.0 path_provider: ^0.5.0+1 scoped_model: ^1.0.1 intl: any
                                                    • Observe these points here −
                                                      • sqflite is used for SQLite database programming.
                                                      • path_provider is used to get system specific application path.
                                                      • scoped_model is used for state management.
                                                      • intl is used for date formatting.
                                                    • Android studio will display the following alert that the pubspec.yaml is updated.
                                                    Alert Writing Advanced Applications
                                                    • Click Get dependencies option. Android studio will get the package from Internet and properly configure it for the application.
                                                    • Remove the existing code in main.dart.
                                                    • Add new file, Expense.dart to create Expense class. Expense class will have the below properties and methods.
                                                      • property: id − Unique id to represent an expense entry in SQLite database.
                                                      • property: amount − Amount spent.
                                                      • property: date − Date when the amount is spent.
                                                      • property: category − Category represents the area in which the amount is spent. e.g Food, Travel, etc.,
                                                      • formattedDate − Used to format the date property
                                                      • fromMap − Used to map the field from database table to the property in the expense object and to create a new expense object.
                                                    factory Expense.fromMap(Map<String, dynamic> data) { 
                                                       return Expense( 
                                                    
                                                      data&#91;'id'], 
                                                      data&#91;'amount'], 
                                                      DateTime.parse(data&#91;'date']),    
                                                      data&#91;'category'] 
                                                    ); }
                                                    • toMap − Used to convert the expense object to Dart Map, which can be further used in database programming
                                                    Map<String, dynamic> toMap() => { 
                                                       "id" : id, 
                                                       "amount" : amount, 
                                                       "date" : date.toString(), 
                                                       "category" : category, 
                                                    };
                                                    • columns − Static variable used to represent the database field.
                                                    • Enter and save the following code into the Expense.dart file.
                                                    import 'package:intl/intl.dart'; class Expense {
                                                       final int id; 
                                                       final double amount; 
                                                       final DateTime date; 
                                                       final String category; 
                                                       String get formattedDate { 
                                                    
                                                      var formatter = new DateFormat('yyyy-MM-dd'); 
                                                      return formatter.format(this.date); 
                                                    } static final columns = ['id', 'amount', 'date', 'category']; Expense(this.id, this.amount, this.date, this.category); factory Expense.fromMap(Map<String, dynamic> data) {
                                                      return Expense( 
                                                         data&#91;'id'], 
                                                         data&#91;'amount'], 
                                                         DateTime.parse(data&#91;'date']), data&#91;'category'] 
                                                      ); 
                                                    } Map<String, dynamic> toMap() => {
                                                      "id" : id, 
                                                      "amount" : amount, 
                                                      "date" : date.toString(), 
                                                      "category" : category, 
                                                    }; }
                                                    • The above code is simple and self explanatory.
                                                    • Add new file, Database.dart to create SQLiteDbProvider class. The purpose of the SQLiteDbProvider class is as follows −
                                                      • Get all expenses available in the database using getAllExpenses method. It will be used to list all the user’s expense information.
                                                    Future<List<Expense>> getAllExpenses() async { 
                                                       final db = await database; 
                                                       
                                                       List<Map> results = await db.query(
                                                    
                                                      "Expense", columns: Expense.columns, orderBy: "date DESC"
                                                    ); List<Expense> expenses = new List(); results.forEach((result) {
                                                      Expense expense = Expense.fromMap(result); 
                                                      expenses.add(expense); 
                                                    }); return expenses; }
                                                    • Get a specific expense information based on expense identity available in the database using getExpenseById method. It will be used to show the particular expense information to the user.
                                                    Future<Expense> getExpenseById(int id) async {
                                                       final db = await database;
                                                       var result = await db.query("Expense", where: "id = ", whereArgs: [id]);
                                                       
                                                       return result.isNotEmpty ? 
                                                       Expense.fromMap(result.first) : Null; 
                                                    }
                                                    • Get the total expenses of the user using getTotalExpense method. It will be used to show the current total expense to the user.
                                                    Future<double> getTotalExpense() async {
                                                       final db = await database; 
                                                       List<Map> list = await db.rawQuery(
                                                    
                                                      "Select SUM(amount) as amount from expense"
                                                    ); return list.isNotEmpty ? list[0]["amount"] : Null; }
                                                    • Add new expense information into the database using insert method. It will be used to add new expense entry into the application by the user.
                                                    Future<Expense> insert(Expense expense) async { 
                                                       final db = await database; 
                                                       var maxIdResult = await db.rawQuery(
                                                    
                                                      "SELECT MAX(id)+1 as last_inserted_id FROM Expense"
                                                    ); var id = maxIdResult.first["last_inserted_id"]; var result = await db.rawInsert(
                                                      "INSERT Into Expense (id, amount, date, category)" 
                                                      " VALUES (?, ?, ?, ?)", &#91;
                                                         id, expense.amount, expense.date.toString(), expense.category
                                                      ]
                                                    ); return Expense(id, expense.amount, expense.date, expense.category); }
                                                    • Update existing expense information using update method. It will be used to edit and update existing expense entry available in the system by the user.
                                                    update(Expense product) async {
                                                       final db = await database; 
                                                       
                                                       var result = await db.update("Expense", product.toMap(), 
                                                       where: "id = ?", whereArgs: [product.id]); 
                                                       return result; 
                                                    }
                                                    • Delete existing expense information using delete method. It will be used remove the existing expense entry available in the system by the user.
                                                    delete(int id) async {
                                                       final db = await database;
                                                       db.delete("Expense", where: "id = ?", whereArgs: [id]); 
                                                    }
                                                    • The complete code of the SQLiteDbProvider class is as follows −
                                                    import 'dart:async'; 
                                                    import 'dart:io'; 
                                                    import 'package:path/path.dart'; 
                                                    import 'package:path_provider/path_provider.dart'; 
                                                    import 'package:sqflite/sqflite.dart'; 
                                                    import 'Expense.dart'; 
                                                    
                                                    class SQLiteDbProvider {
                                                       SQLiteDbProvider._(); 
                                                       static final SQLiteDbProvider db = SQLiteDbProvider._(); 
                                                       
                                                       static Database _database; Future<Database> get database async { 
                                                    
                                                      if (_database != null) 
                                                         return _database; 
                                                      _database = await initDB(); 
                                                      return _database; 
                                                    } initDB() async {
                                                      Directory documentsDirectory = await getApplicationDocumentsDirectory(); 
                                                      String path = join(documentsDirectory.path, "ExpenseDB2.db"); 
                                                      return await openDatabase(
                                                         path, version: 1, onOpen:(db){}, onCreate: (Database db, int version) async {
                                                            await db.execute(
                                                               "CREATE TABLE Expense (
                                                                  ""id INTEGER PRIMARY KEY," "amount REAL," "date TEXT," "category TEXT""
                                                               )
                                                            "); 
                                                            await db.execute(
                                                               "INSERT INTO Expense ('id', 'amount', 'date', 'category') 
                                                               values (?, ?, ?, ?)",&#91;1, 1000, '2019-04-01 10:00:00', "Food"]
                                                            );
                                                            /*await db.execute(
                                                               "INSERT INTO Product ('id', 'name', 'description', 'price', 'image') 
                                                               values (?, ?, ?, ?, ?)", &#91;
                                                                  2, "Pixel", "Pixel is the most feature phone ever", 800, "pixel.png"
                                                               ]
                                                            ); 
                                                            await db.execute(
                                                               "INSERT INTO Product ('id', 'name', 'description', 'price', 'image') 
                                                               values (?, ?, ?, ?, ?)", &#91;
                                                                  3, "Laptop", "Laptop is most productive development tool", 2000, "laptop.png"
                                                               ]
                                                            );
                                                            await db.execute(
                                                               "INSERT INTO Product ('id', 'name', 'description', 'price', 'image') 
                                                               values (?, ?, ?, ?, ?)", &#91;
                                                                  4, "Tablet", "Laptop is most productive development tool", 1500, "tablet.png"
                                                               ]
                                                            );
                                                            await db.execute(
                                                               "INSERT INTO Product ('id', 'name', 'description', 'price', 'image') 
                                                               values (?, ?, ?, ?, ?)", &#91;
                                                                  5, "Pendrive", "iPhone is the stylist phone ever", 100, "pendrive.png"
                                                               ]
                                                            ); 
                                                            await db.execute(
                                                               "INSERT INTO Product ('id', 'name', 'description', 'price', 'image') 
                                                               values (?, ?, ?, ?, ?)", &#91;
                                                                  6, "Floppy Drive", "iPhone is the stylist phone ever", 20, "floppy.png"
                                                               ]
                                                            ); */ 
                                                         }
                                                      );
                                                    } Future<List<Expense>> getAllExpenses() async {
                                                      final db = await database; 
                                                      List&lt;Map&gt; 
                                                      results = await db.query(
                                                         "Expense", columns: Expense.columns, orderBy: "date DESC"
                                                      );
                                                      List&lt;Expense&gt; expenses = new List(); 
                                                      results.forEach((result) {
                                                         Expense expense = Expense.fromMap(result);
                                                         expenses.add(expense);
                                                      }); 
                                                      return expenses; 
                                                    } Future<Expense> getExpenseById(int id) async {
                                                      final db = await database;
                                                      var result = await db.query("Expense", where: "id = ", whereArgs: &#91;id]); 
                                                      return result.isNotEmpty ? Expense.fromMap(result.first) : Null; 
                                                    } Future<double> getTotalExpense() async {
                                                      final db = await database;
                                                      List&lt;Map&gt; list = await db.rawQuery(
                                                         "Select SUM(amount) as amount from expense"
                                                      );
                                                      return list.isNotEmpty ? list&#91;0]&#91;"amount"] : Null; 
                                                    } Future<Expense> insert(Expense expense) async {
                                                      final db = await database; 
                                                      var maxIdResult = await db.rawQuery(
                                                         "SELECT MAX(id)+1 as last_inserted_id FROM Expense"
                                                      );
                                                      var id = maxIdResult.first&#91;"last_inserted_id"]; 
                                                      var result = await db.rawInsert(
                                                         "INSERT Into Expense (id, amount, date, category)" 
                                                         " VALUES (?, ?, ?, ?)", &#91;
                                                            id, expense.amount, expense.date.toString(), expense.category
                                                         ]
                                                      );
                                                      return Expense(id, expense.amount, expense.date, expense.category); 
                                                    } update(Expense product) async {
                                                      final db = await database; 
                                                      var result = await db.update(
                                                         "Expense", product.toMap(), where: "id = ?", whereArgs: &#91;product.id]
                                                      ); 
                                                      return result; 
                                                    } delete(int id) async {
                                                      final db = await database;
                                                      db.delete("Expense", where: "id = ?", whereArgs: &#91;id]);
                                                    } }
                                                    • Here,
                                                      • database is the property to get the SQLiteDbProvider object.
                                                      • initDB is a method used to select and open the SQLite database.
                                                    • Create a new file, ExpenseListModel.dart to create ExpenseListModel. The purpose of the model is to hold the complete information of the user expenses in the memory and updating the user interface of the application whenever user’s expense changes in the memory. It is based on Model class from scoped_model package. It has the following properties and methods −
                                                      • _items − private list of expenses.
                                                      • items − getter for _items as UnmodifiableListView<Expense> to prevent unexpected or accidental changes to the list.
                                                      • totalExpense − getter for Total expenses based on the items variable.
                                                    double get totalExpense {
                                                       double amount = 0.0; 
                                                       for(var i = 0; i < _items.length; i++) { 
                                                    
                                                      amount = amount + _items&#91;i].amount; 
                                                    } return amount; }
                                                    • load − Used to load the complete expenses from database and into the _items variable. It also calls notifyListeners to update the UI.
                                                    void load() {
                                                       Future<List<Expense>> 
                                                       list = SQLiteDbProvider.db.getAllExpenses(); 
                                                       list.then( (dbItems) {
                                                    
                                                      for(var i = 0; i &lt; dbItems.length; i++) { 
                                                         _items.add(dbItems&#91;i]); 
                                                      } notifyListeners(); 
                                                    }); }
                                                    • byId − Used to get a particular expenses from _items variable.
                                                    Expense byId(int id) { 
                                                       for(var i = 0; i < _items.length; i++) { 
                                                    
                                                      if(_items&#91;i].id == id) { 
                                                         return _items&#91;i]; 
                                                      } 
                                                    } return null; }
                                                    • add − Used to add a new expense item into the _items variable as well as into the database. It also calls notifyListeners to update the UI.
                                                    void add(Expense item) {
                                                       SQLiteDbProvider.db.insert(item).then((val) { 
                                                    
                                                      _items.add(val); notifyListeners(); 
                                                    }); }
                                                    • Update − Used to Update expense item into the _items variable as well as into the database. It also calls notifyListeners to update the UI.
                                                    void update(Expense item) {
                                                       bool found = false;
                                                       for(var i = 0; i < _items.length; i++) {
                                                    
                                                      if(_items&#91;i].id == item.id) {
                                                         _items&#91;i] = item; 
                                                         found = true; 
                                                         SQLiteDbProvider.db.update(item); break; 
                                                      } 
                                                    } if(found) notifyListeners(); }
                                                    • delete − Used to remove an existing expense item in the _items variable as well as from the database. It also calls notifyListeners to update the UI.
                                                    void delete(Expense item) { 
                                                       bool found = false; 
                                                       for(var i = 0; i < _items.length; i++) {
                                                    
                                                      if(_items&#91;i].id == item.id) {
                                                         found = true; 
                                                         SQLiteDbProvider.db.delete(item.id); 
                                                         _items.removeAt(i); break; 
                                                      }
                                                    } if(found) notifyListeners(); }
                                                    • The complete code of the ExpenseListModel class is as follows −
                                                    import 'dart:collection'; 
                                                    import 'package:scoped_model/scoped_model.dart'; 
                                                    import 'Expense.dart'; 
                                                    import 'Database.dart'; 
                                                    
                                                    class ExpenseListModel extends Model { 
                                                       ExpenseListModel() { 
                                                    
                                                      this.load(); 
                                                    } final List<Expense> _items = []; UnmodifiableListView<Expense> get items => UnmodifiableListView(_items); /*Future<double> get totalExpense {
                                                      return SQLiteDbProvider.db.getTotalExpense(); 
                                                    }*/ double get totalExpense {
                                                      double amount = 0.0;
                                                      for(var i = 0; i &lt; _items.length; i++) { 
                                                         amount = amount + _items&#91;i].amount; 
                                                      } 
                                                      return amount; 
                                                    } void load() {
                                                      Future&lt;List&lt;Expense&gt;&gt; list = SQLiteDbProvider.db.getAllExpenses(); 
                                                      list.then( (dbItems) {
                                                         for(var i = 0; i &lt; dbItems.length; i++) {
                                                            _items.add(dbItems&#91;i]); 
                                                         } 
                                                         notifyListeners(); 
                                                      }); 
                                                    } Expense byId(int id) {
                                                      for(var i = 0; i &lt; _items.length; i++) { 
                                                         if(_items&#91;i].id == id) { 
                                                            return _items&#91;i]; 
                                                         } 
                                                      }
                                                      return null; 
                                                    } void add(Expense item) {
                                                      SQLiteDbProvider.db.insert(item).then((val) {
                                                         _items.add(val);
                                                         notifyListeners();
                                                      }); 
                                                    } void update(Expense item) {
                                                      bool found = false; 
                                                      for(var i = 0; i &lt; _items.length; i++) {
                                                         if(_items&#91;i].id == item.id) {
                                                            _items&#91;i] = item; 
                                                            found = true; 
                                                            SQLiteDbProvider.db.update(item); 
                                                            break; 
                                                         }
                                                      }
                                                      if(found) notifyListeners(); 
                                                    } void delete(Expense item) {
                                                      bool found = false; 
                                                      for(var i = 0; i &lt; _items.length; i++) {
                                                         if(_items&#91;i].id == item.id) {
                                                            found = true; 
                                                            SQLiteDbProvider.db.delete(item.id); 
                                                            _items.removeAt(i); break; 
                                                         }
                                                      }
                                                      if(found) notifyListeners(); 
                                                    } }
                                                    • Open main.dart file. Import the classes as specified below −
                                                    import 'package:flutter/material.dart'; 
                                                    import 'package:scoped_model/scoped_model.dart'; 
                                                    import 'ExpenseListModel.dart'; 
                                                    import 'Expense.dart';
                                                    
                                                    • Add main function and call runApp by passing ScopedModel<ExpenseListModel> widget.
                                                    void main() { 
                                                       final expenses = ExpenseListModel(); 
                                                       runApp(
                                                    
                                                      ScopedModel&lt;ExpenseListModel&gt;(model: expenses, child: MyApp(),)
                                                    ); }
                                                    • Here,
                                                      • expenses object loads all the user expenses information from the database. Also, when the application is opened for the first time, it will create the required database with proper tables.
                                                      • ScopedModel provides the expense information during the whole life cycle of the application and ensures the maintenance of state of the application at any instance. It enables us to use StatelessWidget instead of StatefulWidget.
                                                    • Create a simple MyApp using MaterialApp widget.
                                                    class MyApp extends StatelessWidget {
                                                       // This widget is the root of your application. 
                                                       @override 
                                                       Widget build(BuildContext context) {
                                                    
                                                      return MaterialApp(
                                                         title: 'Expense',
                                                         theme: ThemeData(
                                                            primarySwatch: Colors.blue, 
                                                         ), 
                                                         home: MyHomePage(title: 'Expense calculator'), 
                                                      );
                                                    } }
                                                    • Create MyHomePage widget to display all the user’s expense information along with total expenses at the top. Floating button at the bottom right corner will be used to add new expenses.
                                                    class MyHomePage extends StatelessWidget { 
                                                       MyHomePage({Key key, this.title}) : super(key: key); 
                                                       final String title; 
                                                       @override 
                                                       Widget build(BuildContext context) {
                                                    
                                                      return Scaffold(
                                                         appBar: AppBar( 
                                                            title: Text(this.title), 
                                                         ), 
                                                         body: ScopedModelDescendant&lt;ExpenseListModel&gt;(
                                                            builder: (context, child, expenses) {
                                                               return ListView.separated(
                                                                  itemCount: expenses.items == null ? 1 
                                                                  : expenses.items.length + 1, 
                                                                  itemBuilder: (context, index) { 
                                                                     if (index == 0) { 
                                                                        return ListTile(
                                                                           title: Text("Total expenses: " 
                                                                           + expenses.totalExpense.toString(), 
                                                                           style: TextStyle(fontSize: 24,
                                                                           fontWeight: FontWeight.bold),) 
                                                                        );
                                                                     } else {
                                                                        index = index - 1; 
                                                                        return Dismissible( 
                                                                           key: Key(expenses.items&#91;index].id.toString()), 
                                                                              onDismissed: (direction) { 
                                                                              expenses.delete(expenses.items&#91;index]); 
                                                                              Scaffold.of(context).showSnackBar(
                                                                                 SnackBar(
                                                                                    content: Text(
                                                                                       "Item with id, " 
                                                                                       + expenses.items&#91;index].id.toString() + 
                                                                                       " is dismissed"
                                                                                    )
                                                                                 )
                                                                              ); 
                                                                           },
                                                                           child: ListTile( onTap: () { 
                                                                              Navigator.push(
                                                                                 context, MaterialPageRoute(
                                                                                    builder: (context) =&gt; FormPage(
                                                                                       id: expenses.items&#91;index].id,
                                                                                       expenses: expenses, 
                                                                                    )
                                                                                 )
                                                                              );
                                                                           }, 
                                                                           leading: Icon(Icons.monetization_on), 
                                                                           trailing: Icon(Icons.keyboard_arrow_right), 
                                                                           title: Text(expenses.items&#91;index].category + ": " + 
                                                                           expenses.items&#91;index].amount.toString() + 
                                                                           " \nspent on " + expenses.items&#91;index].formattedDate, 
                                                                           style: TextStyle(fontSize: 18, fontStyle: FontStyle.italic),))
                                                                        ); 
                                                                     }
                                                                  },
                                                                  separatorBuilder: (context, index) { 
                                                                     return Divider(); 
                                                                  }, 
                                                               );
                                                            },
                                                         ),
                                                         floatingActionButton: ScopedModelDescendant&lt;ExpenseListModel&gt;(
                                                            builder: (context, child, expenses) {
                                                               return FloatingActionButton( onPressed: () {
                                                                  Navigator.push( 
                                                                     context, MaterialPageRoute(
                                                                        builder: (context) =&gt; ScopedModelDescendant&lt;ExpenseListModel&gt;(
                                                                           builder: (context, child, expenses) { 
                                                                              return FormPage( id: 0, expenses: expenses, ); 
                                                                           }
                                                                        )
                                                                     )
                                                                  ); 
                                                                  // expenses.add(new Expense( 
                                                                     // 2, 1000, DateTime.parse('2019-04-01 11:00:00'), 'Food')
                                                                  ); 
                                                                  // print(expenses.items.length); 
                                                               },
                                                               tooltip: 'Increment', child: Icon(Icons.add), ); 
                                                            }
                                                         )
                                                      );
                                                    } }
                                                    • Here,
                                                      • ScopedModelDescendant is used to pass the expense model into the ListView and FloatingActionButton widget.
                                                      • ListView.separated and ListTile widget is used to list the expense information.
                                                      • Dismissible widget is used to delete the expense entry using swipe gesture.
                                                      • Navigator is used to open edit interface of an expense entry. It can be activated by tapping an expense entry.
                                                    • Create a FormPage widget. The purpose of the FormPage widget is to add or update an expense entry. It handles expense entry validation as well.
                                                    class FormPage extends StatefulWidget { 
                                                       FormPage({Key key, this.id, this.expenses}) : super(key: key); 
                                                       final int id; 
                                                       final ExpenseListModel expenses; 
                                                       
                                                       @override _FormPageState createState() => _FormPageState(id: id, expenses: expenses); 
                                                    }
                                                    class _FormPageState extends State<FormPage> {
                                                       _FormPageState({Key key, this.id, this.expenses}); 
                                                       
                                                       final int id; 
                                                       final ExpenseListModel expenses; 
                                                       final scaffoldKey = GlobalKey<ScaffoldState>(); 
                                                       final formKey = GlobalKey<FormState>(); 
                                                       
                                                       double _amount; 
                                                       DateTime _date; 
                                                       String _category; 
                                                       
                                                       void _submit() {
                                                    
                                                      final form = formKey.currentState; 
                                                      if (form.validate()) {
                                                         form.save(); 
                                                         if (this.id == 0) expenses.add(Expense(0, _amount, _date, _category)); 
                                                            else expenses.update(Expense(this.id, _amount, _date, _category)); 
                                                         Navigator.pop(context); 
                                                      }
                                                    } @override Widget build(BuildContext context) {
                                                      return Scaffold(
                                                         key: scaffoldKey, appBar: AppBar(
                                                            title: Text('Enter expense details'),
                                                         ), 
                                                         body: Padding(
                                                            padding: const EdgeInsets.all(16.0), 
                                                            child: Form(
                                                               key: formKey, child: Column(
                                                                  children: &#91;
                                                                     TextFormField( 
                                                                        style: TextStyle(fontSize: 22), 
                                                                        decoration: const InputDecoration( 
                                                                           icon: const Icon(Icons.monetization_on), 
                                                                           labelText: 'Amount', 
                                                                           labelStyle: TextStyle(fontSize: 18)
                                                                        ), 
                                                                        validator: (val) {
                                                                           Pattern pattern = r'^&#91;1-9]\d*(\.\d+)?$'; 
                                                                           RegExp regex = new RegExp(pattern); 
                                                                           if (!regex.hasMatch(val)) 
                                                                           return 'Enter a valid number'; else return null; 
                                                                        }, 
                                                                        initialValue: id == 0 
                                                                        ? '' : expenses.byId(id).amount.toString(), 
                                                                        onSaved: (val) =&gt; _amount = double.parse(val), 
                                                                     ), 
                                                                     TextFormField( 
                                                                        style: TextStyle(fontSize: 22), 
                                                                        decoration: const InputDecoration( 
                                                                           icon: const Icon(Icons.calendar_today),
                                                                           hintText: 'Enter date', 
                                                                           labelText: 'Date', 
                                                                           labelStyle: TextStyle(fontSize: 18), 
                                                                        ), 
                                                                        validator: (val) {
                                                                           Pattern pattern = r'^((?:19|20)\d\d)&#91;- /.]
                                                                              (0&#91;1-9]|1&#91;012])&#91;- /.](0&#91;1-9]|&#91;12]&#91;0-9]|3&#91;01])$'; 
                                                                           RegExp regex = new RegExp(pattern); 
                                                                           if (!regex.hasMatch(val)) 
                                                                              return 'Enter a valid date'; 
                                                                           else return null; 
                                                                        },
                                                                        onSaved: (val) =&gt; _date = DateTime.parse(val), 
                                                                        initialValue: id == 0 
                                                                        ? '' : expenses.byId(id).formattedDate, 
                                                                        keyboardType: TextInputType.datetime, 
                                                                     ),
                                                                     TextFormField(
                                                                        style: TextStyle(fontSize: 22), 
                                                                        decoration: const InputDecoration(
                                                                           icon: const Icon(Icons.category),
                                                                           labelText: 'Category', 
                                                                           labelStyle: TextStyle(fontSize: 18)
                                                                        ),
                                                                        onSaved: (val) =&gt; _category = val, 
                                                                        initialValue: id == 0 ? '' 
                                                                        : expenses.byId(id).category.toString(),
                                                                     ), 
                                                                     RaisedButton( 
                                                                        onPressed: _submit, 
                                                                        child: new Text('Submit'), 
                                                                     ), 
                                                                  ],
                                                               ),
                                                            ),
                                                         ),
                                                      );
                                                    } }
                                                    • Here,
                                                      • TextFormField is used to create form entry.
                                                      • validator property of TextFormField is used to validate the form element along with RegEx patterns.
                                                      • _submit function is used along with expenses object to add or update the expenses into the database.
                                                    • The complete code of the main.dart file is as follows −
                                                    import 'package:flutter/material.dart'; 
                                                    import 'package:scoped_model/scoped_model.dart'; 
                                                    import 'ExpenseListModel.dart'; 
                                                    import 'Expense.dart'; 
                                                    
                                                    void main() { 
                                                       final expenses = ExpenseListModel(); 
                                                       runApp(
                                                    
                                                      ScopedModel&lt;ExpenseListModel&gt;(
                                                         model: expenses, child: MyApp(), 
                                                      )
                                                    ); } class MyApp extends StatelessWidget { // This widget is the root of your application. @override Widget build(BuildContext context) {
                                                      return MaterialApp(
                                                         title: 'Expense',
                                                         theme: ThemeData(
                                                            primarySwatch: Colors.blue, 
                                                         ), 
                                                         home: MyHomePage(title: 'Expense calculator'), 
                                                      );
                                                    } } class MyHomePage extends StatelessWidget { MyHomePage({Key key, this.title}) : super(key: key); final String title; @override Widget build(BuildContext context) {
                                                      return Scaffold(
                                                         appBar: AppBar(
                                                            title: Text(this.title),
                                                         ),
                                                         body: ScopedModelDescendant&lt;ExpenseListModel&gt;(
                                                            builder: (context, child, expenses) { 
                                                               return ListView.separated(
                                                                  itemCount: expenses.items == null ? 1 
                                                                  : expenses.items.length + 1, itemBuilder: (context, index) { 
                                                                     if (index == 0) { 
                                                                        return ListTile( title: Text("Total expenses: " 
                                                                        + expenses.totalExpense.toString(), 
                                                                        style: TextStyle(fontSize: 24,fontWeight: 
                                                                        FontWeight.bold),) ); 
                                                                     } else {
                                                                        index = index - 1; return Dismissible(
                                                                           key: Key(expenses.items&#91;index].id.toString()), 
                                                                           onDismissed: (direction) {
                                                                              expenses.delete(expenses.items&#91;index]); 
                                                                              Scaffold.of(context).showSnackBar(
                                                                                 SnackBar(
                                                                                    content: Text(
                                                                                       "Item with id, " + 
                                                                                       expenses.items&#91;index].id.toString() 
                                                                                       + " is dismissed"
                                                                                    )
                                                                                 )
                                                                              );
                                                                           }, 
                                                                           child: ListTile( onTap: () {
                                                                              Navigator.push( context, MaterialPageRoute(
                                                                                 builder: (context) =&gt; FormPage(
                                                                                    id: expenses.items&#91;index].id, expenses: expenses, 
                                                                                 )
                                                                              ));
                                                                           }, 
                                                                           leading: Icon(Icons.monetization_on), 
                                                                           trailing: Icon(Icons.keyboard_arrow_right), 
                                                                           title: Text(expenses.items&#91;index].category + ": " + 
                                                                           expenses.items&#91;index].amount.toString() + " \nspent on " + 
                                                                           expenses.items&#91;index].formattedDate, 
                                                                           style: TextStyle(fontSize: 18, fontStyle: FontStyle.italic),))
                                                                        );
                                                                     }
                                                                  }, 
                                                                  separatorBuilder: (context, index) {
                                                                     return Divider(); 
                                                                  },
                                                               ); 
                                                            },
                                                         ),
                                                         floatingActionButton: ScopedModelDescendant&lt;ExpenseListModel&gt;(
                                                            builder: (context, child, expenses) {
                                                               return FloatingActionButton(
                                                                  onPressed: () {
                                                                     Navigator.push(
                                                                        context, MaterialPageRoute(
                                                                           builder: (context)
                                                                           =&gt; ScopedModelDescendant&lt;ExpenseListModel&gt;(
                                                                              builder: (context, child, expenses) { 
                                                                                 return FormPage( id: 0, expenses: expenses, ); 
                                                                              }
                                                                           )
                                                                        )
                                                                     );
                                                                     // expenses.add(
                                                                        new Expense(
                                                                           // 2, 1000, DateTime.parse('2019-04-01 11:00:00'), 'Food'
                                                                        )
                                                                     );
                                                                     // print(expenses.items.length); 
                                                                  },
                                                                  tooltip: 'Increment', child: Icon(Icons.add), 
                                                               );
                                                            }
                                                         )
                                                      );
                                                    } } class FormPage extends StatefulWidget { FormPage({Key key, this.id, this.expenses}) : super(key: key); final int id; final ExpenseListModel expenses; @override _FormPageState createState() => _FormPageState(id: id, expenses: expenses); } class _FormPageState extends State<FormPage> { _FormPageState({Key key, this.id, this.expenses}); final int id; final ExpenseListModel expenses; final scaffoldKey = GlobalKey<ScaffoldState>(); final formKey = GlobalKey<FormState>(); double _amount; DateTime _date; String _category; void _submit() {
                                                      final form = formKey.currentState; 
                                                      if (form.validate()) {
                                                         form.save(); 
                                                         if (this.id == 0) expenses.add(Expense(0, _amount, _date, _category)); 
                                                         else expenses.update(Expense(this.id, _amount, _date, _category)); 
                                                         Navigator.pop(context); 
                                                      } 
                                                    } @override Widget build(BuildContext context) {
                                                      return Scaffold(
                                                         key: scaffoldKey, appBar: AppBar( 
                                                            title: Text('Enter expense details'), 
                                                         ), 
                                                         body: Padding(
                                                            padding: const EdgeInsets.all(16.0),
                                                            child: Form(
                                                               key: formKey, child: Column(
                                                                  children: &#91;
                                                                     TextFormField(
                                                                        style: TextStyle(fontSize: 22), 
                                                                        decoration: const InputDecoration( 
                                                                           icon: const Icon(Icons.monetization_on), 
                                                                           labelText: 'Amount', 
                                                                           labelStyle: TextStyle(fontSize: 18)
                                                                        ), 
                                                                        validator: (val) {
                                                                           Pattern pattern = r'^&#91;1-9]\d*(\.\d+)?$'; 
                                                                           RegExp regex = new RegExp(pattern); 
                                                                           if (!regex.hasMatch(val)) return 'Enter a valid number'; 
                                                                           else return null; 
                                                                        },
                                                                        initialValue: id == 0 ? '' 
                                                                        : expenses.byId(id).amount.toString(), 
                                                                        onSaved: (val) =&gt; _amount = double.parse(val), 
                                                                     ),
                                                                     TextFormField(
                                                                        style: TextStyle(fontSize: 22), 
                                                                        decoration: const InputDecoration(
                                                                           icon: const Icon(Icons.calendar_today), 
                                                                           hintText: 'Enter date', 
                                                                           labelText: 'Date', 
                                                                           labelStyle: TextStyle(fontSize: 18), 
                                                                        ),
                                                                        validator: (val) {
                                                                           Pattern pattern = r'^((?:19|20)\d\d)&#91;- /.]
                                                                           (0&#91;1-9]|1&#91;012])&#91;- /.](0&#91;1-9]|&#91;12]&#91;0-9]|3&#91;01])$'; 
                                                                           RegExp regex = new RegExp(pattern); 
                                                                           if (!regex.hasMatch(val)) return 'Enter a valid date'; 
                                                                           else return null; 
                                                                        },
                                                                        onSaved: (val) =&gt; _date = DateTime.parse(val), 
                                                                        initialValue: id == 0 ? '' : expenses.byId(id).formattedDate, 
                                                                        keyboardType: TextInputType.datetime, 
                                                                     ),
                                                                     TextFormField(
                                                                        style: TextStyle(fontSize: 22), 
                                                                        decoration: const InputDecoration(
                                                                           icon: const Icon(Icons.category), 
                                                                           labelText: 'Category', 
                                                                           labelStyle: TextStyle(fontSize: 18)
                                                                        ), 
                                                                        onSaved: (val) =&gt; _category = val, 
                                                                        initialValue: id == 0 ? '' : expenses.byId(id).category.toString(), 
                                                                     ),
                                                                     RaisedButton(
                                                                        onPressed: _submit, 
                                                                        child: new Text('Submit'), 
                                                                     ),
                                                                  ],
                                                               ),
                                                            ),
                                                         ),
                                                      );
                                                    } }
                                                    • Now, run the application.
                                                    • Add new expenses using floating button.
                                                    • Edit existing expenses by tapping the expense entry.
                                                    • Delete the existing expenses by swiping the expense entry in either direction.

                                                    Some of the screen shots of the application are as follows −

                                                    Expense Calculator
                                                    Enter Expense Details
                                                    Total Expenses
                                                  3. Deployment

                                                    This chapter explains how to deploy Flutter application in both Android and iOS platforms.

                                                    Android Application

                                                    • Change the application name using android:label entry in android manifest file. Android app manifest file, AndroidManifest.xml is located in <app dir>/android/app/src/main. It contains entire details about an android application. We can set the application name using android:label entry.
                                                    • Change launcher icon using android:icon entry in manifest file.
                                                    • Sign the app using standard option as necessary.
                                                    • Enable Proguard and Obfuscation using standard option, if necessary.
                                                    • Create a release APK file by running below command −
                                                    cd /path/to/my/application 
                                                    flutter build apk
                                                    
                                                    • You can see an output as shown below −
                                                    Initializing gradle...                                            8.6s 
                                                    Resolving dependencies...                                        19.9s 
                                                    Calling mockable JAR artifact transform to create file: 
                                                    /Users/.gradle/caches/transforms-1/files-1.1/android.jar/ 
                                                    c30932f130afbf3fd90c131ef9069a0b/android.jar with input 
                                                    /Users/Library/Android/sdk/platforms/android-28/android.jar 
                                                    Running Gradle task 'assembleRelease'... 
                                                    Running Gradle task 'assembleRelease'... 
                                                    Done                                                             85.7s 
                                                    Built build/app/outputs/apk/release/app-release.apk (4.8MB).
                                                    
                                                    • Install the APK on a device using the following command −
                                                    flutter install
                                                    
                                                    • Publish the application into Google Playstore by creating an appbundle and push it into playstore using standard methods.
                                                    flutter build appbundle
                                                    

                                                    iOS Application

                                                    • Register the iOS application in App Store Connect using standard method. Save the =Bundle ID used while registering the application.
                                                    • Update Display name in the XCode project setting to set the application name.
                                                    • Update Bundle Identifier in the XCode project setting to set the bundle id, which we used in step 1.
                                                    • Code sign as necessary using standard method.
                                                    • Add a new app icon as necessary using standard method.
                                                    • Generate IPA file using the following command −
                                                    flutter build ios
                                                    
                                                    • Now, you can see the following output −
                                                    Building com.example.MyApp for device (ios-release)... 
                                                    Automatically signing iOS for device deployment 
                                                    using specified development team in Xcode project: 
                                                    Running Xcode build...                                   23.5s 
                                                    ......................
                                                    
                                                    • Test the application by pushing the application, IPA file into TestFlight using standard method.
                                                    • Finally, push the application into App Store using standard method.
                                                  4. Testing

                                                    Testing is very important phase in the development life cycle of an application. It ensures that the application is of high quality. Testing requires careful planning and execution. It is also the most time consuming phase of the development.

                                                    Dart language and Flutter framework provides extensive support for the automated testing of an application.

                                                    Types of Testing

                                                    Generally, three types of testing processes are available to completely test an application. They are as follows −

                                                    Unit Testing

                                                    Unit testing is the easiest method to test an application. It is based on ensuring the correctness of a piece of code (a function, in general) o a method of a class. But, it does not reflect the real environment and subsequently, is the least option to find the bugs.

                                                    Widget Testing

                                                    Widget testing is based on ensuring the correctness of the widget creation, rendering and interaction with other widgets as expected. It goes one step further and provides near real-time environment to find more bugs.

                                                    Integration Testing

                                                    Integration testing involves both unit testing and widget testing along with external component of the application like database, web service, etc., It simulates or mocks the real environment to find nearly all bugs, but it is the most complicated process.

                                                    Flutter provides support for all types of testing. It provides extensive and exclusive support for Widget testing. In this chapter, we will discuss widget testing in detail.

                                                    Widget Testing

                                                    Flutter testing framework provides testWidgets method to test widgets. It accepts two arguments −

                                                    • Test description
                                                    • Test code
                                                    testWidgets('test description: find a widget', '<test code>');
                                                    

                                                    Explore our latest online courses and learn new skills at your own pace. Enroll and become a certified expert to boost your career.

                                                    Steps Involved

                                                    Widget Testing involves three distinct steps −

                                                    • Render the widget in the testing environment.
                                                    • WidgetTester is the class provided by Flutter testing framework to build and renders the widget. pumpWidget method of the WidgetTester class accepts any widget and renders it in the testing environment.
                                                    testWidgets('finds a specific instance', (WidgetTester tester) async { 
                                                       await tester.pumpWidget(MaterialApp( 
                                                    
                                                      home: Scaffold( 
                                                         body: Text('Hello'), 
                                                      ), 
                                                    )); });
                                                    • Finding the widget, which we need to test.
                                                      • Flutter framework provides many options to find the widgets rendered in the testing environment and they are generally called Finders. The most frequently used finders are find.text, find.byKey and find.byWidget.
                                                        • find.text finds the widget that contains the specified text.
                                                    find.text('Hello')
                                                    
                                                    • find.byKey find the widget by its specific key.
                                                    find.byKey('home')
                                                    
                                                    • find.byWidget find the widget by its instance variable.
                                                    find.byWidget(homeWidget)
                                                    
                                                    • Ensuring the widget works as expected.
                                                    • Flutter framework provides many options to match the widget with the expected widget and they are normally called Matchers. We can use the expect method provided by the testing framework to match the widget, which we found in the second step with our our expected widget by choosing any of the matchers. Some of the important matchers are as follows.
                                                      • findsOneWidget − verifies a single widget is found.
                                                    expect(find.text('Hello'), findsOneWidget);
                                                    
                                                    • findsNothing − verifies no widgets are found
                                                    expect(find.text('Hello World'), findsNothing);
                                                    
                                                    • findsWidgets − verifies more than a single widget is found.
                                                    expect(find.text('Save'), findsWidgets);
                                                    
                                                    • findsNWidgets − verifies N number of widgets are found.
                                                    expect(find.text('Save'), findsNWidgets(2));
                                                    

                                                    The complete test code is as follows −

                                                    testWidgets('finds hello widget', (WidgetTester tester) async { 
                                                       await tester.pumpWidget(MaterialApp( 
                                                    
                                                      home: Scaffold( 
                                                         body: Text('Hello'), 
                                                      ), 
                                                    )); expect(find.text('Hello'), findsOneWidget); });

                                                    Here, we rendered a MaterialApp widget with text Hello using Text widget in its body. Then, we used find.text to find the widget and then matched it using findsOneWidget.

                                                    Working Example

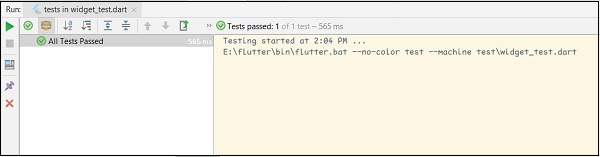
                                                    Let us create a simple flutter application and write a widget test to understand better the steps involved and the concept.

                                                    • Create a new flutter application, flutter_test_app in Android studio.
                                                    • Open widget_test.dart in test folder. It has a sample testing code as given below −
                                                    testWidgets('Counter increments smoke test', (WidgetTester tester) async {
                                                       // Build our app and trigger a frame. 
                                                       await tester.pumpWidget(MyApp()); 
                                                       
                                                       // Verify that our counter starts at 0. 
                                                       expect(find.text('0'), findsOneWidget); 
                                                       expect(find.text('1'), findsNothing); 
                                                       
                                                       // Tap the '+' icon and trigger a frame. 
                                                       await tester.tap(find.byIcon(Icons.add)); 
                                                       await tester.pump(); 
                                                       
                                                       // Verify that our counter has incremented. 
                                                       expect(find.text('0'), findsNothing); 
                                                       expect(find.text('1'), findsOneWidget); 
                                                    });
                                                    • Here, the test code does the following functionalities −
                                                      • Renders MyApp widget using tester.pumpWidget.
                                                      • Ensures that the counter is initially zero using findsOneWidget and findsNothing matchers.
                                                      • Finds the counter increment button using find.byIcon method.
                                                      • Taps the counter increment button using tester.tap method.
                                                      • Ensures that the counter is increased using findsOneWidget and findsNothing matchers.
                                                    • Let us again tap the counter increment button and then check whether the counter is increased to two.
                                                    await tester.tap(find.byIcon(Icons.add)); 
                                                    await tester.pump(); 
                                                    
                                                    expect(find.text('2'), findsOneWidget);
                                                    
                                                    • Click Run menu.
                                                    • Click tests in widget_test.dart option. This will run the test and report the result in the result window.
                                                    Flutter Testing
                                                  5. Internationalization

                                                    Nowadays, mobile applications are used by customers from different countries and as a result, applications are required to display the content in different languages. Enabling an application to work in multiple languages is called Internationalizing the application.

                                                    For an application to work in different languages, it should first find the current locale of the system in which the application is running and then need to show it’s content in that particular locale, and this process is called Localization.

                                                    Flutter framework provides three base classes for localization and extensive utility classes derived from base classes to localize an application.

                                                    The base classes are as follows −

                                                    • Locale − Locale is a class used to identify the user’s language. For example, en-us identifies the American English and it can be created as.
                                                    Locale en_locale = Locale('en', 'US')
                                                    

                                                    Here, the first argument is language code and the second argument is country code. Another example of creating Argentina Spanish (es-ar) locale is as follows −

                                                    Locale es_locale = Locale('es', 'AR')
                                                    
                                                    • Localizations − Localizations is a generic widget used to set the Locale and the localized resources of its child.
                                                    class CustomLocalizations { 
                                                       CustomLocalizations(this.locale); 
                                                       final Locale locale; 
                                                       static CustomLocalizations of(BuildContext context) { 
                                                    
                                                      return Localizations.of&lt;CustomLocalizations&gt;(context, CustomLocalizations); 
                                                    } static Map<String, Map<String, String>> _resources = {
                                                      'en': {
                                                         'title': 'Demo', 
                                                         'message': 'Hello World' 
                                                      }, 
                                                      'es': {
                                                         'title': 'Manifestación', 
                                                         'message': 'Hola Mundo', 
                                                      }, 
                                                    }; String get title {
                                                      return _resources&#91;locale.languageCode]&#91;'title']; 
                                                    } String get message {
                                                      return _resources&#91;locale.languageCode]&#91;'message']; 
                                                    } }
                                                    • Here, CustomLocalizations is a new custom class created specifically to get certain localized content (title and message) for the widget. of method uses the Localizations class to return new CustomLocalizations class.
                                                    • LocalizationsDelegate − LocalizationsDelegate is a factory class through which Localizations widget is loaded. It has three over-ridable methods −
                                                      • isSupported − Accepts a locale and return whether the specified locale is supported or not.
                                                    @override 
                                                    bool isSupported(Locale locale) => ['en', 'es'].contains(locale.languageCode);
                                                    
                                                    • load − Accepts a locale and start loading the resources for the specified locale.
                                                    @override 
                                                    Future<CustomLocalizations> load(Locale locale) { 
                                                       return SynchronousFuture<CustomLocalizations>(CustomLocalizations(locale)); 
                                                    }
                                                    
                                                    • shouldReload − Specifies whether reloading of CustomLocalizations is necessary when its Localizations widget is rebuild.
                                                    @override 
                                                    bool shouldReload(CustomLocalizationsDelegate old) => false;
                                                    
                                                    • The complete code of CustomLocalizationDelegate is as follows −
                                                    class CustomLocalizationsDelegate extends 
                                                    LocalizationsDelegate<CustomLocalizations> { 
                                                       const CustomLocalizationsDelegate(); 
                                                       @override 
                                                       bool isSupported(Locale locale) => ['en', 'es'].contains(locale.languageCode);
                                                       @override 
                                                       Future<CustomLocalizations> load(Locale locale) { 
                                                    
                                                      return SynchronousFuture&lt;CustomLocalizations&gt;(CustomLocalizations(locale));
                                                    } @override bool shouldReload(CustomLocalizationsDelegate old) => false; }

                                                    In general, Flutter applications are based on two root level widgets, MaterialApp or WidgetsApp. Flutter provides ready made localization for both widgets and they are MaterialLocalizations and WidgetsLocaliations. Further, Flutter also provides delegates to load MaterialLocalizations and WidgetsLocaliations and they are GlobalMaterialLocalizations.delegate and GlobalWidgetsLocalizations.delegate respectively.

                                                    Let us create a simple internationalization enabled application to test and understand the concept.

                                                    • Create a new flutter application, flutter_localization_app.
                                                    • Flutter supports the internationalization using exclusive flutter package, flutter_localizations. The idea is to separate the localized content from the main SDK. Open the pubspec.yaml and add below code to enable the internationalization package −
                                                    dependencies: 
                                                       flutter: 
                                                    
                                                      sdk: flutter 
                                                    flutter_localizations:
                                                      sdk: flutter
                                                    • Android studio will display the following alert that the pubspec.yaml is updated.
                                                    Alert
                                                    • Click Get dependencies option. Android studio will get the package from Internet and properly configure it for the application.
                                                    • Import flutter_localizations package in the main.dart as follows −
                                                    import 'package:flutter_localizations/flutter_localizations.dart'; 
                                                    import 'package:flutter/foundation.dart' show SynchronousFuture;
                                                    
                                                    • Here, the purpose of SynchronousFuture is to load the custom localizations synchronously.
                                                    • Create a custom localizations and its corresponding delegate as specified below −
                                                    class CustomLocalizations { 
                                                       CustomLocalizations(this.locale); 
                                                       final Locale locale; 
                                                       static CustomLocalizations of(BuildContext context) {
                                                    
                                                      return Localizations.of&lt;CustomLocalizations&gt;(context, CustomLocalizations); 
                                                    } static Map<String, Map<String, String>> _resources = {
                                                      'en': {
                                                         'title': 'Demo', 
                                                         'message': 'Hello World' 
                                                      }, 
                                                      'es': { 
                                                         'title': 'Manifestación', 
                                                         'message': 'Hola Mundo', 
                                                      }, 
                                                    }; String get title {
                                                      return _resources&#91;locale.languageCode]&#91;'title']; 
                                                    } String get message {
                                                      return _resources&#91;locale.languageCode]&#91;'message']; 
                                                    } } class CustomLocalizationsDelegate extends LocalizationsDelegate<CustomLocalizations> { const CustomLocalizationsDelegate(); @override bool isSupported(Locale locale) => ['en', 'es'].contains(locale.languageCode); @override Future<CustomLocalizations> load(Locale locale) {
                                                      return SynchronousFuture&lt;CustomLocalizations&gt;(CustomLocalizations(locale)); 
                                                    } @override bool shouldReload(CustomLocalizationsDelegate old) => false; }
                                                    • Here, CustomLocalizations is created to support localization for title and message in the application and CustomLocalizationsDelegate is used to load CustomLocalizations.
                                                    • Add delegates for MaterialApp, WidgetsApp and CustomLocalization using MaterialApp properties, localizationsDelegates and supportedLocales as specified below −
                                                    localizationsDelegates: [
                                                       const CustomLocalizationsDelegate(),   
                                                       GlobalMaterialLocalizations.delegate, 
                                                       GlobalWidgetsLocalizations.delegate, 
                                                    ], 
                                                    supportedLocales: [
                                                       const Locale('en', ''),
                                                       const Locale('es', ''), 
                                                    ],
                                                    • Use CustomLocalizations method, of to get the localized value of title and message and use it in appropriate place as specified below −
                                                    class MyHomePage extends StatelessWidget {
                                                       MyHomePage({Key key, this.title}) : super(key: key); 
                                                       final String title; 
                                                       @override 
                                                       Widget build(BuildContext context) {
                                                    
                                                      return Scaffold(
                                                         appBar: AppBar(title: Text(CustomLocalizations .of(context) .title), ), 
                                                         body: Center(
                                                            child: Column(
                                                               mainAxisAlignment: MainAxisAlignment.center, 
                                                               children: &lt;Widget&gt;&#91; 
                                                                  Text( CustomLocalizations .of(context) .message, ), 
                                                               ], 
                                                            ), 
                                                         ),
                                                      );
                                                    } }
                                                    • Here, we have modified the MyHomePage class from StatefulWidget to StatelessWidget for simplicity reason and used the CustomLocalizations to get title and message.
                                                    • Compile and run the application. The application will show its content in English.
                                                    • Close the application. Go to Settings → System → Languages and Input → Languages*.
                                                    • Click Add a language option and select Spanish. This will install Spanish language and then list it as one of the option.
                                                    • Select Spanish and move it above English. This will set as Spanish as first language and everything will be changed to Spanish text.
                                                    • Now relaunch the internationalization application and you will see the title and message in Spanish language.
                                                    • We can revert the language to English by move the English option above Spanish option in the setting.
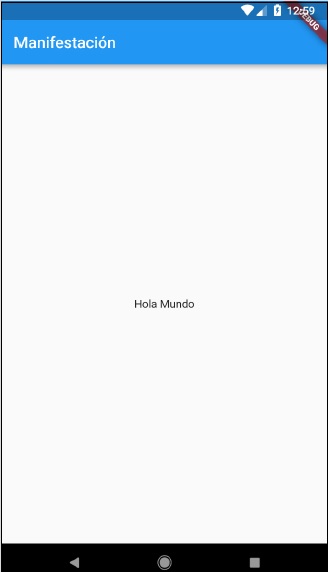
                                                    • The result of the application (in Spanish) is shown in the screenshot given below −
                                                    Manifestacion

                                                    Using intl Package

                                                    Flutter provides intl package to further simplify the development of localized mobile application. intl package provides special methods and tools to semi-auto generate language specific messages.

                                                    Let us create a new localized application by using intl package and understand the concept.

                                                    • Create a new flutter application, flutter_intl_app.
                                                    • Open pubspec.yaml and add the package details.
                                                    dependencies: 
                                                       flutter: 
                                                    
                                                      sdk: flutter 
                                                    flutter_localizations:
                                                      sdk: flutter 
                                                    intl: ^0.15.7 intl_translation: ^0.17.3
                                                    • Android studio will display the alert as shown below informing that the pubspec.yaml is updated.
                                                    Informing Updation
                                                    • Click Get dependencies option. Android studio will get the package from Internet and properly configure it for the application.
                                                    • Copy the main.dart from previous sample, flutter_internationalization_app.
                                                    • Import the intl pacakge as shown below −
                                                    import 'package:intl/intl.dart';
                                                    
                                                    • Update the CustomLocalization class as shown in the code given below −
                                                    class CustomLocalizations { 
                                                       static Future<CustomLocalizations> load(Locale locale) {
                                                    
                                                      final String name = locale.countryCode.isEmpty ? locale.languageCode : locale.toString(); 
                                                      final String localeName = Intl.canonicalizedLocale(name); 
                                                      
                                                      return initializeMessages(localeName).then((_) {
                                                         Intl.defaultLocale = localeName; 
                                                         return CustomLocalizations(); 
                                                      }); 
                                                    } static CustomLocalizations of(BuildContext context) {
                                                      return Localizations.of&lt;CustomLocalizations&gt;(context, CustomLocalizations); 
                                                    } String get title {
                                                      return Intl.message( 
                                                         'Demo', 
                                                         name: 'title', 
                                                         desc: 'Title for the Demo application', 
                                                      ); 
                                                    } String get message{
                                                      return Intl.message(
                                                         'Hello World', 
                                                         name: 'message', 
                                                         desc: 'Message for the Demo application', 
                                                      ); 
                                                    } } class CustomLocalizationsDelegate extends LocalizationsDelegate<CustomLocalizations> { const CustomLocalizationsDelegate(); @override bool isSupported(Locale locale) => ['en', 'es'].contains(locale.languageCode); @override Future<CustomLocalizations> load(Locale locale) {
                                                      return CustomLocalizations.load(locale); 
                                                    } @override bool shouldReload(CustomLocalizationsDelegate old) => false; }
                                                    • Here, we have used three methods from the intl package instead of custom methods. Otherwise, the concepts are same.
                                                      • Intl.canonicalizedLocale − Used to get correct locale name.
                                                      • Intl.defaultLocale − Used to set current locale
                                                      • Intl.message − Used to define new messages.
                                                    • import l10n/messages_all.dart file. We will generate this file shortly
                                                    import 'l10n/messages_all.dart';
                                                    
                                                    • Now, create a folder, lib/l10n
                                                    • Open a command prompt and go to application root directory (where pubspec.yaml is available) and run the following command −
                                                    flutter packages pub run intl_translation:extract_to_arb --output-
                                                       dir=lib/l10n lib/main.dart
                                                    
                                                    • Here, the command will generate, intl_message.arb file, a template to create message in different locale. The content of the file is as follows −
                                                    {
                                                       "@@last_modified": "2019-04-19T02:04:09.627551", 
                                                       "title": "Demo", 
                                                       "@title": {
                                                    
                                                      "description": "Title for the Demo application", 
                                                      "type": "text", 
                                                      "placeholders": {} 
                                                    }, "message": "Hello World", "@message": {
                                                      "description": "Message for the Demo 
                                                      application", 
                                                      "type": "text", 
                                                      "placeholders": {} 
                                                    } }
                                                    • Copy intl_message.arb and create new file, intl_en.arb.
                                                    • Copy intl_message.arb and create new file, intl_es.arb and change the content to Spanish language as shown below −
                                                    {
                                                       "@@last_modified": "2019-04-19T02:04:09.627551",  
                                                       "title": "Manifestación", 
                                                       "@title": {
                                                    
                                                      "description": "Title for the Demo application", 
                                                      "type": "text", 
                                                      "placeholders": {} 
                                                    }, "message": "Hola Mundo", "@message": {
                                                      "description": "Message for the Demo application", 
                                                      "type": "text", 
                                                      "placeholders": {} 
                                                    } }
                                                    • Now, run the following command to create final message file, messages_all.dart.
                                                    flutter packages pub run intl_translation:generate_from_arb 
                                                    --output-dir=lib\l10n --no-use-deferred-loading 
                                                    lib\main.dart lib\l10n\intl_en.arb lib\l10n\intl_es.arb
                                                    
                                                    • Compile and run the application. It will work similar to above application, flutter_localization_app.