Destructuring is a simple term we can use to extract values from array and properties from object. It is a JavaScript expression that help to unpack values from array or similarly properties from object into different variables.
Let’s say you have a box that contain multiple items. Now, imagine someone asks you to take out a particular item from the box, then you will need to check each item one by one and this increases complexity right? Then we just simplify it by using destructuring and get the exact item at once.
When to use Destructuring?
We use destructuring in the following scenarios −
When we need more than one property from object or more than one value from the array, we can use destructuring for that.
Suppose, there is a situation where we need to assign more than one value to variables, we can use destructuring to achieve it.
If we need to pass an object as a function parameter, we can use destructuring to extract the properties of the object.
If there is a need to return multiple values from a function, we can use destructuring to return them as an object.
It is easy to use destructuring when working with arrays and objects.
Types of Destructuring
There are two types of destructuring in JavaScript those are shown below −
Object Destructuring: It is used to extract properties from an object.
Array Destructuring: It is used to extract elements from an array.
Object Destructuring
Object destructuring means when we extract some properties from an object and assign them to variables. It allow us to write short code and also it helps us to improve our code readability.
Array Destructuring
Array destructuring is Same as object destructuring, We can also destructure an array, extract elements from an array and assign them to variables.
The polymorphism in JavaScript allows you to define multiple methods with the same name and different functionalities. Polymorphism is achieved by using method overloading and overriding. JavaScript does not support method overloading natively. Method overriding allows a subclass or child class to redefine a method of superclass or parent class. In this chapter, we will implement the polymorphism using the concept of method overriding.
The polymorphism word is derived from the geek word polymorph. If you break the polymorph, the meaning of the ‘poly’ means many, and ‘morph’ means transforming from one state to another state.
Method Overriding
Before you understand the polymorphism, it is important to understand the method overriding.
If you define a method with the same name in the parent and child class, the child class method overrides the parent class’s method.
For example, you want to calculate the area of the different shapes. You have defined the Shape class containing the area() method. Now, you have a different class for the different shapes, and all extend the Shape class, but you can’t use the area() method of the Shape class to find the area of each shape as each geometry has a different formula to find the area.
So, you need to define the area() method in each child class, override the area() method of the Shape class, and find the area of the particular shape. This way, you can create many forms of the single method.
Examples
Let’s understand the polymorphism and method overriding via the example below.
Example 1: Demonstrating Polymorphism in JavaScript
In the example below, the Shape class contains the area() method. The Circle and Rectangle, both classes, extend the Shape class. Also, the area() method is defined in the Circle and Rectangle class.
There are 3 area() methods defined in the below code, but which method will invoke it depends on which class’s instance you are using to invoke the method.
Open Compiler
<html><body><div id ="output1"></div><div id ="output2"></div><script>classShape{area(a, b){return"The area of each Geometry is different! <br>";}}classCircleextendsShape{area(r){// Overriding the method of the Shape classreturn"The area of Circle is "+(3.14* r * r)+"<br>";}}classRectangleextendsShape{area(l, b){// Overriding the method of the Shape classreturn"The area of Rectangle is "+(l * b)+"<br>";}}const circle =newCircle();// Calling area() method of Circle class
document.getElementById("output1").innerHTML = circle.area(5);const rectangle =newRectangle();// Calling area() method of Rectangle class
document.getElementById("output2").innerHTML = rectangle.area(5,10);</script></body></html></code></pre>
Output
The area of Circle is 78.5
The area of Rectangle is 50
This way, you can define the same method with different functionalities and invoke a particular one according to the required functionalities.
You can also call the parent class method in the child class using the super keyword. Let's understand it via the example below.
Example 2: Parent Class Method's Functionality Extension in Child Class
The Math and AdvanceMath class contains the mathOperations() method in the example below.
In the mathOperations() method of the AdvanceMath class, we used the super keyword to invoke the mathOperations() method of the parent class. We extend the functionality of the math class's mathOperations() method in the AdvanceMath class's mathOperations() method.
Also, when you invoke the mathOperation() method using the object of the Math class, it invokes the method of the Math class only.
Open Compiler
<html><body><p id ="output1"></p><p id ="output2"></p><script>classMath{mathOperations(a, b){
This type of polymorphism is called runtime polymorphism, as the JavaScript engine decides which method it should execute at the run time based on which class's instance is used.
Benefits of using Polymorphism in JavaScript
There are many advantages to using polymorphism in JavaScript; we have explained some of them here.
Code reusability − Polymorphism allows you to reuse the code. In the second example, we have reused the code of the mathOperations() method of the math class.
Extensibility − You can easily extend the current code and define new functionalities.
Dynamic behaviors − You can have multiple classes containing the same method with different functionalities and call the method of the particular class dynamically at the run time.
JavaScript has changed the website, application, and game development world and revolutionized the digital industry. JavaScript is mainly used with HTML and CSS to develop the application interface. However, nowadays, it is also used as a server-side programming language. In the world, according to stackoverflow survey 2023, around 63% of developers are using JavaScript.
History of JavaScript
Let’s discuss a brief history of JavaScript.
First stage development of JavaScript
In 1993, Some developers released the web browser Mosaic, with a graphical interface. In 1994, Netscape was founded by the lead developers of the Mosaic web browser. They have also released the browser named Netscape Navigator.
Till 1996, websites were static, containing only HTML and CSS. So, dynamic behavior needed to be added to the web page to make the website more interactive. The scripting language is required to add the dynamic behavior to the web page.
Netscape’s lead software developer, Brendan Eich, developed the scripting language in September 1995 within 10 days. ‘Mocha’ name was given to the newly developed scripting language and renamed later to ‘LiveScript’ and then ‘JavaScript’.
The name JavaScript is given from the ‘Java’ language. Java was the most popular language in those days, and the script was added due to the scripting language.
Standardization of JavaScript
JavaScript was only supported by the Internet Explorer browser when it was developed. However, the internet explorer browser is deprecated now.
In 1997, to promote JavaScript across all web browsers, Netscape submitted a proposal to the European Computer Manufacturers Association (ECMA) for standardizing JavaScript.
This is how ECMAScript(ES) came into the world of development. After that, the JavaScript developer’s community and Netscape update the JavaScript continuously, adding new features to the JavaScript and releasing the new version, ES1, ES2, , ES13, etc.
The latest version of JavaScript is ES13.
JavaScript Libraries and Frameworks
After 2005, a revolution came into JavaScript development.
In 2006, one of the most popular libraries, JQuery, was developed to make website development more accessible. However, JavaScript supports thousands of libraries nowadays.
In 2010, frameworks like Ember, Backbone, etc., were introduced. The framework provides the structure of the application. In 2013, one of the most popular frameworks named, React, was introduced.
Server-side JavaScript
In 2009, the NodeJS runtime environment was introduced by Ryan Dhal to create server-side applications. Due to NodeJS, developers can use JavaScript for full-stack web development, and JavaScirpt is not limited to front-end development.
Currently, Google is managing NodeJS.
Modern JavaScript and ES6 Release
In 2015, the ES6 version of JavaScript was released. In the Es6 version, JavaScript developers have significantly changed JavaScript and added more advanced features.
The latest version of JavaScript Es13 was released in 2022.
History table of JavaScript
Year
ECMAscript Version
Feature Released
1995
Brendan Eich has developed JavaScript.
1996
JavaScript 1.0 was released.
1997
ES1
Standardization of JavaScript occurred by ECMA, and the ES1 version was released.
1998
ES2
ES2 version of JavaScript released.
1999
ES3
ES3 version of JavaScript released.
2006
The first library, JQuery developed to use JavaScript.
2008
ES4
ES4 version of JavaScript released.
2009
NodeJS was developed for the server-side programming language.
2009
ES5
ES5 version of JavaScript released.
2010
The first framework, Angular JS, was developed.
2013
The most popular JavaScript framework, ReactJS developed.
2015
ES6
ES6 version of JavaScript released.
2016
ES7
ES7 version of JavaScript released.
2017
ES8
ES8 version of JavaScript released.
2018
ES9
ES9 version of JavaScript released.
2019
ES10
ES10 version of JavaScript released.
2020
ES11
ES11 version of JavaScript released.
2021
ES12
ES12 version of JavaScript released.
2022
ES13
ES13 version of JavaScript released.
Future of JavaScript
In the world, 98% of websites use JavaScript as a client-side programming language.
The increasing demand for websites, applications, software, etc., also increases the demand for JavaScript. As time passes, the developer’s community develops more libraries and frameworks supported by JavaScript, making it easier to develop the digital product.
There are 14+ million JavaScript developers in the world, and the number is growing. Overall, the future of JavaScript is bright.
The concept of inheritance in JavaScript allows the child class to inherit the properties and methods of the parent class. Inheritance is also a fundamental concept of object-oriented programming like encapsulation and polymorphism.
Sometimes, you must add the properties and methods of the one class into another. For example, you have created a general class for the bike containing the same properties and methods for each bike. After that, you create a separate class for the bike “Honda”, and you need to add all properties and methods to the “Honda” class. You can achieve it using inheritance.
Before ECMAScript 6 (ES6), the object’s prototype was used for inheritance, but in ES6, the ‘extends’ keyword was introduced to inherit classes.
The following terminologies are used in this chapter.
Parent class − It is a class whose properties are inherited by other classes.
Child class − It is a class that inherits the properties of the other class.
JavaScript Single Class Inheritance
You can use the ‘extends‘ keyword to inherit the parent class properties into the child class. In single class inheritance only a single class inherits the properties of another class.
Syntax
You can follow the syntax below for the single-class inheritance.
classchildClassextendsparentClass{// Child class body}
In the above syntax, you can replace the ‘childClass’ with the name of the child class and ‘parentClass’ with the name of the parent class.
Example: Single Class Inheritance
In the example below, the ‘Bike’ class is a parent class, and the ‘Suzuki’ class is a child class. The suzuki class inherits the properties of the Bike class.
The Bike class contains the constructor() method initializing the gears property and the getGears() method returning the value of the gears property.
The suzuki class contains the constructor() method to initialize the brand property and getBrand() method, returning the value of the brand property.
We have created an object of the ‘suzuki’ class. Using the ‘suzuki’ class instance, we invoke the getBrand() and getGears() methods.
Open Compiler
<html><body><div id ="output1">The brand of the bike is:</div><div id ="output2">Total gears in the bike is:</div><script>// Parent classclassBike{constructor(){this.gear =5;}getGears(){returnthis.gear;}}// Child classclasssuzukiextendsBike{constructor(){super();this.brand ="Yamaha"}getBrand(){returnthis.brand;}}const suzukiBike =newsuzuki();
The brand of the bike is: Yamaha
Total gears in the bike is: 5
In this way, you can use the properties and methods of the parent class through the instance of the child class.
JavaScript super() Keyword
In the above example, we have initialized the 'gear' property of the Bike class with a static value. In real life, you need to initialize it with the dynamic value according to the model of the bike.
Now, the question is how to initialize the properties of the parent class from the child class. The solution is a super() keyword.
The super() keyword is used to invoke the method or access the properties of the parent class in the child class. By default, the super() keyword invokes the constructor function of the parent class. You can also pass the parameters to the super() keyword to pass it to the constructor of the parent class.
Example: Using super() keyword to initialize the parent class properties
In the example below, suzuki class extends the Bike class.
The Bike class contains the constructor, taking gears as parameters and, using it, initializes the gears property.
The 'suzuki' class also contains the constructor, taking a brand and gears as a parameter. Using the brand parameter, it initializes the brand property and passes the gears parameter as an argument of the super() keyword.
After that, we create an object of the 'suzuki' class and pass the brand and gears as an argument of the constructor. You can see the dynamic value of the brand and gear property in the output.
Open Compiler
<html><body><div id ="output1">The brand of the bike is:</div><div id ="output2">Total gears in the bike is:</div><script>// Parent classclassBike{constructor(gears){this.gears = gears;}}// Child classclasssuzukiextendsBike{constructor(brand, gears){super(gears);this.brand = brand;}}const suzukiBike =newsuzuki("Suzuki",4);
The brand of the bike is: Suzuki
Total gears in the bike is: 4
In this way, you can dynamically initialize the properties of the parent class from the child class.
JavaScript Multilevel Inheritance
Multilevel inheritance is a type of inheritance in JavaScript. In multilevel inheritance, one class inherits the properties of another class, and other classes inherit current class properties.
Syntax
Users can follow the syntax below for the multilevel inheritance.
classA{}classBextendsA{}classCextendsB{}
In the above syntax, the C class inherits the B class, and the B class inherits the A class.
Example
In the example below, the Honda class inherits the Bike class. The Shine class inherits the Honda class.
We use the super() keyword in each class to invoke the parent class's constructor () and initialize its properties.
We are accessing the properties of the Bike class using the instance of the Shine class, as it indirectly inherits the properties of the Bike class.
document.getElementById("output").innerHTML =The ${newBike.model} model of the ${newBike.brand} brand has total ${newBike.gears} gears.;</script></body></html></code></pre>
Output
The Shine model of the Honda brand has total 5 gears.
JavaScript Hierarchical Inheritance
In JavaScript hierarchical inheritance, one class is inherited by multiple classes.
Syntax
The syntax of JYou can follow the syntax below for the hierarchical inheritance.
classA{}classBextendsA{}
Class CextendsA{}
In the above syntax, B and C both classes inherit the properties of the A class.
Example
In the example below, the Bike class contains the gears property and is initialized using the constructor() method.
The Honda class extends the Bike class. The constructor() method of the Honda class initializes the properties of the Bike class using the super() keyword and model property of itself.
The Suzuki class inherits the Bike class properties. The constructor() method of the Suzuki class also initializes the Bike class properties and the other two properties of itself.
After that, we create objects of both Honda and Suzuki classes and access their properties.
Open Compiler
<html><body><p id ="output1"> Honda Bike Object:</p><p id ="output2"> Suzuki Bike Object:</p><script>// Parent classclassBike{constructor(gears){this.gears = gears;}}// Child classclassHondaextendsBike{constructor(model, gears){super(gears);this.model = model;}}// Child classclassSuzukiextendsBike{constructor(model, color, gears){super(gears);this.model = model;this.color = color;}}const h_Bike =newHonda("Shine",5);const s_Bike =newSuzuki("Zx6","Blue",6);
Honda Bike Object: {"gears":5,"model":"Shine"}
Suzuki Bike Object: {"gears":6,"model":"Zx6","color":"Blue"}
Inheriting Static Members of the Class
In JavaScript, you can invoke the static methods of the parent class using the super keyword in the child class. Outside the child class, you can use the child class name to invoke the static methods of the parent and child class.
Example
In the example below, the Bike class contains the getDefaultBrand() static method. The Honda class also contains the Bikename() static method.
In the Bikename() method, we invoke the getDefaultBrand() method of the parent class using the 'super' keyword.
Also, we execute the Bikename() method using the 'Honda' class name.
Open Compiler
<html><body><p id ="output">The bike name is:</p><script>// Parent classclassBike{constructor(gears){this.gears = gears;}staticgetDefaultBrand(){return"Yamaha";}}// Child classclassHondaextendsBike{constructor(model, gears){super(gears);this.model = model;}staticBikeName(){returnsuper.getDefaultBrand()+", X6";}}
When you execute any method using the 'super' keyword in the multilevel inheritance, the class finds the methods in the parent class. If the method is not found in the parent class, it finds in the parent's parent class, and so on.
JavaScript Prototype Based Inheritance
You can also update or extend the prototype of the class to inherit the properties of the multiple classes to the single class. So, it is also called multiple inheritance.
Syntax
You can follow the syntax below to use prototype-based inheritance.
Child.prototype = Instance of parent class
In the above syntax, we assign the parent class instance to the child object's prototype.
Example: JavaScript Prototype Based Inheritance
In the example below, Bike() is an object constructor that initializes the brand property.
After that, we add the getBrand() method to the prototype of the Bike() function.
Next, we have created the Vehicle() object constructor and instance of the Bike() constructor.
After that, we update the prototype of the Vehicle class with an instance of the Bike. Here, Vehicle works as a child class and Bike as a parent class.
We access the getBrand() method of the Bike() function's prototype using the instance of the Vehicle () function.
Open Compiler
<html><body><p id ="output1">Bike brand:</p><p id ="output2">Bike Price:</p><script>functionBike(brand){this.brand = brand;}Bike.prototype.getBrand=function(){returnthis.brand;}//Another constructor function functionVehicle(price){this.price = price;}const newBike =newBike("Yamaha");Vehicle.prototype = newBike;//Now Bike treats as a parent of Vehicle. const vehicle =newVehicle(100000);
Encapsulation in JavaScript is a way to keep the related properties and methods under a single namespace by bundling them. It can be a function, a class or an object. In JavaScript, the encapsulation can be implemented using closures, classes and getters and setters.
Encapsulation is a fundamental concept in Object-oriented programming languages, along with inheritance and polymorphism. JavaScript is an object oriented programming language.
It is used to hide the data from the outside world and give access to required data only to improve the integrity and security of the data.
What is the need for encapsulation?
Let’s discuss the need for encapsulation in JavaScript via the following example.
For example, you have defined the below object in your code.
const car ={
   Brand:"Honda city",
   model:"sx",
   year:2016,}
Anyone can access the properties of the car object, as shown below.
car.Brand
Also, anyone can change the value of any property of the car object, as shown below.
car.Brand =true;
Here, the value of the Brand property is changed to the boolean from the string. So, it is required to secure the original data of the object and give limited access to the data to the outside world.
In this situation, the concept of encapsulation comes into the picture.
Different Ways to Achieve Encapsulation in JavaScript
There are three different ways to achieve encapsulation.
Using the function closures
Using the ES6 classes
Using the Getters and Setters
Here, we will learn each approach for achieving encapsulation one by one.
Achieving Encapsulation Using the Function Closures
A JavaScript function closure is a concept allowing the inner function to access the variable defined in the outer function even after the outer function is executed. The variables defined in the outer function can’t be accessed outside its functional scope but can be accessed using the inner scope.
Example
In the below code, shoppingCart() function is an outer function that contains the variables and function. The outer function has its private scope.
The carItems[] array is used to store the shopping cart’s items.
The add() function can access the carItems[] array and add items.
The remove() function checks whether the cartItems[] contains the items you need to remove. If yes, it removes the item. Otherwise, it prints the message that you can’t remove the item.
The shoppingCart() function returns the object containing the add() and remove() functions.
After creating a new instance of the shoppingCart() function, you can use the add() and remove() functions to manipulate the shopping cart data.
Open Compiler
<html><body><p id ="output"></p><script>let output = document.getElementById("output");functionshoppingCart(){const cartItems =[];functionadd(item){
cartItems.push(item);
output.innerHTML +=${item.name} added to the cart. &lt;br&gt;;}functionremove(itemName){const index = cartItems.findIndex(item=> item.name === itemName);if(index !==-1){const removedItem = cartItems.splice(index,1)[0];
output.innerHTML +=${removedItem.name} removed from the cart. &lt;br&gt;;}else{
output.innerHTML +=Item ${itemName} not found in the cart. &lt;br&gt;;}}return{
add,
remove,};}// Defining itemsconst item1 ={ name:'Car', price:1000000};const item2 ={ name:'Bike', price:100000};// Create a new Shopping cartconst cart =shoppingCart();// Adding items to the cart
cart.add(item1);
cart.add(item2);// Remove bike from the cart
cart.remove('Bike');</script></body></html></code></pre>
Output
Car added to the cart.
Bike added to the cart.
Bike removed from the cart.
In this way, no one can directly access and modify the cartItems[] array.
Achieving Encapsulation Using ES6 Classes and Private Variables
In JavaScript, you can use classes and private variables to achieve the encapsulation.
Private Variables (Fields) in JavaScript
To define the private class variables, you can write a variable name followed by the # sign. For example, 'name' is a private variable in the below code.
classcar{
#name="TATA";}</code></pre>
If you try to access the name by the instance of the class, it will give you an error that private fields can't be accessed outside the class.
To achieve encapsulation, you can define the private variables in the class and give them access to the outside world using different methods.
Example
In the example below, we have defined the car class.
The car class contains the 'brand', 'name', and 'milage' private variables.
The getMilage() method is defined to return the milage of the car, and the setMilage() method is used to set the milage of the method.
We created the car class's object and used the method to access and modify the private fields. If you try to access the private field of the class, the code will throw an error.
You can also define more methods in the class to access and modify other private fields.
Open Compiler
<html><body><div id ="output1">The car mileage is:</div><div id ="output2">After updating the car mileage is:</div><script>classCar{
#brand ="TATA";// Private field
#name ="Nexon";// Private field
#milage =16;// Private fieldgetMilage(){returnthis.#milage;// Accessing private field}setMilage(milage){this.#milage = milage;// Modifying private field}}let carobj =newCar();
document.getElementById("output1").innerHTML += carobj.getMilage();
carobj.setMilage(20);
document.getElementById("output2").innerHTML += carobj.getMilage();// carobj.#milage); will throw an error.</script></body></html></code></pre>
Output
The car mileage is: 16
After updating the car mileage is: 20
Achieving Encapsulation Using the Getters and Setters
The JavaScript getters and setters can be defined using the get and set keywords, respectively. The getters are used to get the class properties, and setters are used to update the class properties.
They are very similar to the class methods but defined using the get/set keyword followed by the method name.
Example
In the example below, we have defined the User class containing the three private fields named username, password, and isLoggedIn.
The getters and setters named username are defined to get and set user names. Here, you can observe that name of the getters and setters method is the same.
After that, we create an object of the class and use the getters and setters as the property to access and update the username field of the class.
You may also create getters and setters for the other class fields.
Open Compiler
<html><body><div id ="output1">The initial username is:</div><div id ="output2">The newusername is:</div><script>classUser{
The initial username is: Bob
The new username is: Alice
From the above all, you can understand that encapsulation is making variable privates and restricting its access to the outside world.
Benefits of Encapsulation in JavaScript
Here, we have listed some benefits of encapsulation in JavaScript −
Data protection − The encapsulation allows you to control the access of the class data by making them private. You can expose the required data and methods only. So, no one can modify the data by mistake. Also, you can validate the data while updating them. If new data is not valid, you can throw an error.
Code reusability − The class is a template for the object, and you can reuse it to create objects with different data.
Code Maintenance − The encapsulation makes it easy to maintain the code as each object is independent, and if you make changes to one object, it doesn't affect the other code.
The ES5 Object methods in JavaScript are used to manipulate and protect the obejcts. ECMAScript 5 (ES5) is a significant revision of the language introduced in 2009. It has added many object methods to JavaScript.
These methods provide us with efficient ways to iterate through object properties, manipulate values, and perform various operations on objects. Object manipulation is a fundamental aspect of JavaScript programming.
JavaScript ES5 Object Methods
In ES5, object-related methods are added to manipulate and protect the objects. The following tables highlight the object methods and their descriptions −
Methods to Manipulate the Object
JavaScript contains built-in constructors, which we have listed in the below table.
Sr.No.
Method
Description
1
create()
To create new objects with specified prototype object.
2
defineProperty()
To make a clone of the object and add new properties to its prototype.
3
defineProperties()
To define a property into a particular object and get the updated object.
4
getOwnPropertyDescriptor()
To get the property descriptor for the properties of the object.
5
getOwnPropertyNames()
To get object properties.
6
getPrototypeOf()
To get the prototype of the object.
7
keys()
To get all keys of the object in the array format.
Methods to Protect the Object
Sr.No.
Method
Description
1
freeze()
To prevent adding or updating object properties by freezing the object.
2
seal()
To seal the object.
3
isFrozen()
To check if the object is frozen.
4
isSealed()
To check if the object is sealed.
5
isExtensible()
To check if an object is extensible.
6
keys()
To get all keys of the object in the array format.
7
preventExtensions()
To prevent the prototype updation of the object.
Let’s undertand each of the methods listed above with the help of some examples −
JavaScript Object.create() Method
The JavaScript Object.create() method creates a new object with the specified prototype object and properties. It is a static method in JavaScript.
The syntax of the Object.create() method in JavaScript is as follows
Object.create(proto, propertiesObject)
The paramters in the Object.create() method are as follows −
proto − it is the object that is used as prototype of new object.
propertiesObejct (optaional) − It’s an object that defines the properties of new object.
Example
In the example below, the student object is created using the person object as it’s prototype.
Open Compiler
<html><body><div id ="output"></div><script>const person ={
You can use the Object.definedProperty() method to define a single property of the object or update the property value and metadata. It's a static method in JavaScript.
The syntax of the Object.definedProperty() method in JavaScript is as follows −
Object.defineProperty(obj, prop, descriptor)
The paramters in the Object.definedProperty() method are as follows −
obj − it is the object on which the property is to be defined or modified.
prop (string or symbol) − It's the name of property to be defined or modified.
descriptor − It's an object that defines the property's attributes.
Example
The below example contains the car object's brand, model, and price properties. We used the defineProperty() method to define the 'gears' property in the object.
Open Compiler
<html><body><div id ="output">The obj object is -</div><script>const car ={
The obj object is - {"brand":"Tata","model":"Nexon","price":1000000,"gears":6}
JavaScript Object.defineProperties() Method
The Object.defineProperties() method in JavaScript is a static method that defines new properties of object or modifies the properties.
The syntax of Object.defineProperties() method in JavaScript is as follows
Object.defineProperties(obj, props)
The parameters in the Object.defineProperties() method are as follows −
obj − it is the object on which the properties are to be defined or modified.
prop (string or symbol) − It's the name of property to be defined or modified.
Example
In the following example, we use Object.defineProperties() method to add two mew properties named property1 and property2. The property1 is writable and property2 is non-writable.
Open Compiler
<html><body><div id ="output"></div><script>const object1 ={};
The Object.getOwnPropertyDescriptor() method in JavaScript returns a property descriptor for a specific property of an object. The returned property descriptor is a JavaScript object.
Example
Try the following example −
Open Compiler
<html><body><div id ="output"></div><script>const object1 ={
descriptor configurable? : true
descriptor value : 42
JavaScript Object.getOwnPropertyNames() Method
The Object.getOwnPropertyNames() method in JavaScript returns an array of all the properties found in a given object. This includes both enumerable and non-enumerable properties.
Example
In the example below, we use getOwnPropertyNames() method to get the property names of the created object.
Open Compiler
<html><body><div id ="output"></div><script>const obj ={
The Object.freeze() in JavaScript is static method that freezes an object. A frozen object can not be further changed. No new property can be added or the existing properties can not be removed. The values of the properties can not be modified.
Open Compiler
<html><body><div id ="output"></div><script>const obj ={
prop:23,};
Object.freeze(obj);// obj.prop = 33;// Throws an error in strict mode
document.getElementById("output").innerHTML = obj.prop;</script></body></html></code></pre>
Output
23
JavaScript Object.seal() Method
The Object.seal() static method seals an object. In a sealed object, no new property can be added, no property can be deleted.
Open Compiler
<html><body><div id ="output"></div><script>const obj ={
The Object.isSeal() method in JavaScript is used to check if the given object is sealed or not. It returns true if the object is sealed else it retuens flase.
Open Compiler
<html><body><div id ="output1"></div><div id ="output2"></div><script>const person ={
The ES5 Object.preventExtensions() method is used to prevent the prototype updation of an object. It also prevent the new properties to be added to an object.
Open Compiler
<html><body><div id ="output"></div><script>const person ={};
TypeError: Cannot define property name, object is not extensible
JavaScript Object.isExtensible() Method
The JavaScript Object.isExtensible() method is used to check if an object is extensible or not. It returns true indicating the given object is extensible, else it will return false. An object is extensible if it can have new properties added to it.
Open Compiler
<html><body><div id ="output1"></div><div id ="output2"></div><script>const person ={
The native prototypes in JavaScript are property of Object.prototype object. The prototypes are the mechanism by which the objects inherit features from one another.
In JavaScript, each object contains the prototype property. The prototype of each object contains the methods and properties related to the object. So, it is also called the native prototype.
However, you can update or add new methods and properties to the native prototype object, but you can’t delete any already existing.
The JavaScript object and object constructor are the main prerequisites to understand JavaScript native prototypes.
Syntax
You can follow the syntax below to access the native prototype of the object.
Object.prototype;
In the above syntax, the object can be any JavaScript object.
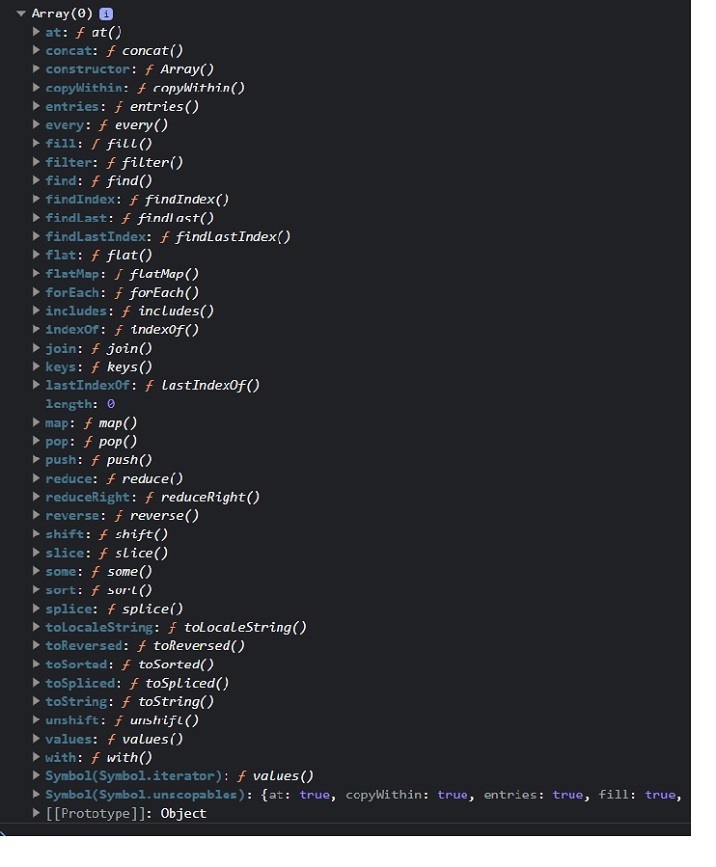
Example: Accessing the array’s prototype
Whenever you execute the below code in the browser, it will print the prototype of the array in the browser console. In the same way, you can check the prototype of the other objects.
In the console, you can see that the prototype object contains the methods which you can use with array methods.
Open Compiler
<html><body><script>
		console.log(Array.prototype);</script><p>Please open the web console before executing the above program.</p></body></html>
Output
On running the above program, you will see the result in web console similar to the following screenshot −
Updating the Native Prototype
You can update the existing method or property of the native prototype object or add a new method or property to the native prototype object.
Syntax
You can follow the syntax below to update or add new properties or methods to the prototype object.
objName.prototype.name = value
In the above syntax, objName is an object whose prototype you need to update.
The ‘name’ is a method or property name. You can assign new values or function expressions to the ‘name.
Example: Updating the toLowerCase() method of the string object’s prototype
The prototype of the String object contains the toLowerCase() method. Here, we update the toLowerCase() method.
The updated toLowerCase() method returns the string in the uppercase. In the output, you can observe the string, which is in uppercase.
In this way, you can update the functionality of the built-in methods of the object.
Open Compiler
<html><body><p id ="output">After updating the string.toLowerCase() method:</p><script>String.prototype.toLowerCase=function(){returnthis.toUpperCase();}let str ="Hello World";
		document.getElementById("output").innerHTML += str.toLowerCase();</script></body></html>
Output
After updating the string.toLowerCase() method: HELLO WORLD
You shouldn’t update the methods and properties of the native prototype object. However, you can add new as shown in the example below.
Example: Adding a new method to the prototype object
You can also add a new method to the Object prototype. Here, we added the firstCase() method in the object prototype.
The firstCase() method returns a string after converting the string’s first character to the uppercase.
Open Compiler
<html><body><p id ="output">After executing the string.firstCase() method:</p><script>String.prototype.firstCase=function(){// First character in uppercase. Other characters in lowercase.returnthis.charAt(0).toUpperCase()+this.slice(1).toLowerCase();}let str ="hello world";
		document.getElementById("output").innerHTML += str.firstCase();</script></body></html>
Output
After executing the string.firstCase() method: Hello world
Adding a method to the constructor function
Whenever you define an object using the constructor function, you can’t add a method or property to the constructor function using its instance. So, you need to add the method to the constructor function prototype. So it can be accessible through all instances of the object.
Example
In the example below, the Person() is a constructor function that initializes object properties.
After that, we added the display() method to the prototype of the person() function.
Next, we created two instances of the Person() function and used the display() method with them. So, methods and properties added in the prototype of the object constructor can be accessed through all instances of the constructor function.
All instances of the object inherit the properties and methods from their parent’s prototype.
JavaScript Prototype Chaining
Simply, you can say that the prototype stores the default values of the properties. The code overrides the prototype property value if the object constructor and its prototype contain the same properties.
Example
In the below code, the Person() function contains the name property. We have added the name and age property in the function’s prototype.
We have created the p1 object using the Person() constructor function. The value of the name property of the p1 object is ‘Nayan’ as the name already exists in the constructor. The value of the age property is 20, which is the same as the age property value in the prototype.
An object constructor in JavaScript is a function that creates an instance of a class, which is typically called an object. A constructor is called when you declare an object using the new keyword. The purpose of a constructor is to create an object and set values if there are any object properties present.
There are two ways to create a template for the object in JavaScript – using a class and using an object constructor.
Whenever you need to create multiple objects with the same syntax, you require a template for the object. For example, you are managing the car inventory. So, it is not a good idea to create a new object every time using the object literal. In such cases, you need to use the object constructors.
The main benefit of the object constructors is that you can reuse the code.
Syntax
You can follow the syntax below to use the object constructor to create an object.
In the above syntax, Funcname() is a constructor function, and you can replace any valid identifier with the Funcname.
A p1, p2, , and pN are parameters you can use inside the function body. You need to pass arguments to the constructor while creating the object.
The ‘this’ keyword represents the function context you are using. Here, the ‘this’ keyword refers to the current instance of the object.
To create an object, you can use the function constructor with a ‘new’ keyword.
Example: Creating an object using a constructor function
In the example below, we have created a Tree() function. In the function body, we initialize the name and age properties.
After that, we use the function name with a ‘new’ keyword to create an object of the Tree() constructor.
Open Compiler
<html><body><p id ="output"></p><script>functionTree(){this.name ="palm";this.age =5;}const tree1 =newTree();
document.getElementById("output").innerHTML ="name = "+ tree1.name +", age = "+ tree1.age;</script></body></html></code></pre>
Output
name = palm, age = 5
Example: Constructor function with parameters
In the example below, the Bike() function takes three parameters. In the function body, we initialize the properties using the parameters.
After that, we created bike1 and bike2 objects with different values using the Bike() constructor. In the output, you can observe the object property values.
Open Compiler
<html><body><p id ="output1">The bike1 object is :</p><p id ="output2">The bike2 object is :</p><script>functionBike(name, speed, gear){this.name = name;this.speed = speed;this.gear = gear;}const bike1 =newBike("Honda",100,4);const bike2 =newBike("Yamaha",200,6);
The bike1 object is : {"name":"Honda","speed":100,"gear":4}
The bike2 object is : {"name":"Yamaha","speed":200,"gear":6}
In this way, you can use the object constructor to reuse the object syntax code and create multiple objects of the same type.
Adding a Property or Method to a Constructor
You learned to add a property of method using the dot or square bracket notation into the object in the Objects chapter. But what if you want to add a property or method to the object constructor?
The object constructor doesn't allow you to add the property or method after defining it. So, you always need to add the required properties and methods while defining it. Let's understand it via the example below.
Example
The below example demonstrates adding methods and properties into the object constructor. We added the three properties and the getFullAddress() method in the houseAddress() constructor function.
Also, we have executed the method by taking the object as a reference.
Open Compiler
<html><body><p id ="output1">The house object is </p><p id ="output2">The full address of the house is </p><script>functionHouseAddress(no, street, city){// Adding propertiesthis.houseNo = no,this.street = street,this.city = city;// Adding a methodthis.getFullAddress=function(){returnthis.houseNo +", "+this.street +", "+this.city;};}const house =newHouseAddress(20,"Cooper Square","New York");
The house object is {"houseNo":20,"street":"Cooper Square","city":"New York"}
The full address of the house is 20, Cooper Square, New York
If you add the method or property as shown below. It will be added to the particular object but not to the constructor function.
Obj.prop =20;
Other objects created using the object constructor don't contain the prop property as it is added to the obj object only.
JavaScript Object Prototype
In JavaScript, each object contains the prototype property by default, and the object constructor is also one kind of object. So, you can add properties or methods to the object prototype.
Syntax
You can follow the syntax below to add properties or methods to the object constructor prototype.
obj.prototype.name = value;
In the above syntax, 'obj' is an object constructor in which you need to add a property or method.
The 'name' is a property or method name.
For the property, you can replace a 'value' with an actual value; for the method, you can replace a 'value' with a function expression.
Example
In the example below, we have added the BikeDetails() method to the prototype of the Bike() constructor.
The BikDetails() method can be executed using any object of the Bike() constructor. However, when you print the bike1 and bike2 objects, it won't show you BikeDetails() method as it is added in the prototype.
The object accessor properties in JavaScript are methods that get or set the value of an object. They are defined using the get and set keywords. Accessor properties are a powerful way to control how your objects are accessed and modified.
The JavaScript object can have two kinds of properties.
Data properties
Accessor properties
The below property is called the data properties.
const obj ={
key:"value",// Data property}</code></pre>
Object Accessor Properties
In JavaScript, you can use the getters to get the object properties and setters to set the object properties.
There are two keywords to define accessor properties.
get − The get keyword is used to define a method to get the object property value.
set − The set keyword is used to define a method to update the object property value.
JavaScript Getters
The getters are used to access the object properties. To define a method as getter, we use get keyword followed by method name. Follow the syntax below to define the getter.
getmethodName(){// Method body}
obj.methodName;
In the above syntax, we have defined the getters using the 'get' keyword followed by the method name.
You can use the method name as an object property to get its returned value.
You don't need to write the pair of parenthesis followed by the method name to execute the getters. You can access it like the object property.
Example
In the example below, in the wall object, we have defined the getColor() getters. The getColor() returns the value of the color property.
After that, we use the getColor() method to access the color property value of the object.
Open Compiler
<html><body><p id ="output">The color of the wall is :</p><script>const wall ={
The setters are used to update the JavaScript object properties. To define a method as setter, we use set keyword followed by method name You can follow the syntax below to define setters in the JavaScript object.
In the above syntax, the 'set' keyword is used to define the setter method.
The method_name can be any valid identifier.
The setter method always takes a single parameter. If you don't pass a parameter or multiple parameters, it will give you an error.
You can assign value to the setter method as you assign value to the property.
Example
In the example below, we have defined the setter method to set the value of the color property of the wall object. We set the 'red' value to the color property of the object using the 'setColor' setter method.
Open Compiler
<html><body><p id ="output"></p><script>const wall ={
color:"brown",setsetColor(color){returnthis.color = color;}}
document.getElementById("output").innerHTML +="The color of the wall before update is : "+ wall.color +"<br>";//updating the color of wall
wall.setColor ="Red";
document.getElementById("output").innerHTML +="The color of the wall after update is : "+ wall.color;</script></body></html></code></pre>
Output
The color of the wall before update is : brown
The color of the wall after update is : Red
JavaScript Object Methods vs. Getters/Setters
In JavaScript, whatever you can do using the getters and setters, you can also do by defining the specific object method. The difference is that getters and setters provide simpler syntax.
Let's understand it with the help of some examples.
Example
In the example below, we have defined the getColor() getters method and colorMethod() object method in the wall object. Both method returns the color value.
You can observe that defining and accessing getters is more straightforward than defining and accessing the object method.
Open Compiler
<html><body><p id ="output"></p><script>const wall ={
color:"brown",getgetColor(){returnthis.color;},colorMethod:function(){returnthis.color;}}
document.getElementById("output").innerHTML +="Getting the color using the getters : "+ wall.getColor +"<br>";
document.getElementById("output").innerHTML +="Getting the color using the object method : "+ wall.colorMethod();</script></body></html></code></pre>
Output
Getting the color using the getters : brown
Getting the color using the object method : brown
Data Quality and Security
The getter and setter methods can provide better data quality. Also, they are used for encapsulation to secure the object data.
Let's understand how getter and setter improve data quality and provide security via the example below.
Example
In the example below, the getColor() is a getter method, returning the value of the color property after converting it to the uppercase. Also, it hides the color property from users, as you can access its value using the getColor() method.
Open Compiler
<html><body><p id ="output"></p><script>const wall ={
color:"Brown",getgetColor(){returnthis.color.toUpperCase();}}
document.getElementById("output").innerHTML +="Getting the color using the getters : "+ wall.getColor;</script></body></html></code></pre>
Output
Getting the color using the getters : BROWN
Defining getters/setters using the Object.defineProperty()
You can also use the Object.defineProperty() method to add getters or setters into the object.
There are different ways to display objects in JavaScript. Using the console.log() method, we can display the object in the web console. Sometimes developers require to display the object properties and their value in the HTML or for debugging the code.
For displaying an object, we can access the different properties and display them. We can also convert the object to a JSON string and display it as a string.
When you print the object like other variables in the output, it prints the ‘[object Object]’ as shown in the example below.
In the example below, we have created a fruit object and printed it in the output. You can observe that it prints the [object Object].
Open Compiler
<html><body><p id ="output">The object is:</p><script>const fruit ={
To overcome the above problem, you need to use specific approaches to display the object.
Some approaches to display the JavaScript objects are as follows −
Accessing the object properties
Using the JSON.stringify() method
Using the Object.entries() method
Using the for...in loop
Accessing the Object Properties
In the object properties chapter, you learned different ways to access the values of the object properties. You can use the dot notation or square bracket notation to display the property values.
This way, you may get all property values and display them in the output.
Syntax
Users can follow the syntax below to display the object by accessing properties.
obj.property;OR
obj["property"];
In the above syntax, we access the property using the obj object's dot and square bracket notation.
Example
In the example below, we have accessed the 'name' property of the object using the dot notation and the 'price' property using the square bracket notation.
Open Compiler
<html><body><p id="output"></p><script>const fruit ={
document.getElementById("output").innerHTML ="The price of the "+ fruitName +" is: "+ fruitPrice;</script></body></html></code></pre>
Output
The price of the Banana is: 100
Using the JSON.stringify() Method
When object contains the dynamic properties or you don't know object properties, you can't print properties and values using the first approach. So, you need to use the JSON.stringify() method. It converts the object into a string.
Syntax
Follow the syntax below to use the JSON.stringify() method to display the object.
JSON.stringify(obj);
You need to pass the object as a parameter of the JSON.stringify() method.
Example
In the example below, we have converted the fruit string into the JSON string and displayed in the output.
Open Compiler
<html><body><p id ="output">The fruit object is </p><script>const fruit ={
The Object.entries() is a static method of the Object class, allowing you to extract the properties and values in the 2D array. After that, you can use the loop to traverse the array and display each property and value pair individually.
Syntax
Follow the syntax below to use the Object.entries() method.
Object.entries(obj);
The Object.entries() method takes the object as a parameter and returns the 2D array, where each 1D array contains the key-value pair.
Example
In the example below, the numbers object contains the 4 properties. We used the Object.entries() method to get all entries of the object.
After that, we used the for loop to traverse the object entries and display them.
Open Compiler
<html><body><p> Displaying the object entries</p><p id ="output"></p><script>const numbers ={
The for...in loop is used to traverse the iterable, and the object is one of them.
Syntax
Users can follow the syntax below to use the for...in loop to traverse the object and display it in the output.
for(key in obj){// Use the key to access the value}
In the above syntax, obj is an object to display. In the loop body, you can access the value related to the key and print the key-value pair.
Example
In the example below, we used the for...in loop to traverse each key of the object and print them in the output.
Open Compiler
<html><body><p> Displaying Object Entries using for...in loop:</p><p id ="output"></p><script>const languages ={
language1:"JavaScript",
language2:"Python",
language3:"Java",
language4:"HTML",}for(const key in languages){
document.getElementById("output").innerHTML +=
key +": "+ languages [key]+" <br>";}</script></body></html></code></pre>
Output
Displaying Object Entries using for...in loop:
language1: JavaScript
language2: Python
language3: Java
language4: HTML
The best way to display the object is using the JSON.stringify() method. It converts the object into a flat string. Other approaches can't be used to display the nested objects, but JSON.stringify() method can be used.