Content projection is a technique available in the Angular component to include external content (from consumer of the component) along with layout and styles in the specific area of the component template.
Different Implementation of Content Projection
The different ways in which we can implement content projection are:
Single-slot content projection
Multi-slot content projection
Conditional content projection
Single-Slot Content Projection
A component involving only one content projection is called single-slot content projection.
Example
Let us understand the content projection by creating the above explained component.
Step 1: Create a projectionSample application using the below command −
ng newprojectionSample
Step 2: Navigate to project folder and create a new component with the name content-projection-sample:
cd projectSample

ng generate component content-projection-sample
CREATE src/app/content-projection-sample/content-projection-sample.component.html(41 bytes)CREATE src/app/content-projection-sample/content-projection-sample.component.spec.ts(736 bytes)CREATE src/app/content-projection-sample/content-projection-sample.component.ts(320 bytes)CREATE src/app/content-projection-sample/content-projection-sample.component.css(0 bytes)
Step 3: Add <ng-content> tag in the template, i.e. content-projection-sample.component.html file as shown below −
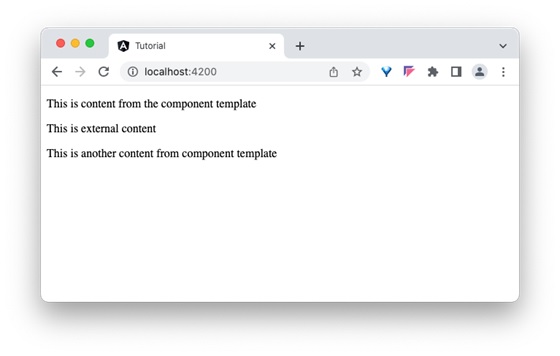
<p>This is content from the component template</p><ng-content></ng-content><p>This is another content from component template</p>
Step 4: Use the content-projection-sample component in the app.component.html file as shown below −
<app-content-projection-sample><p>This is external content</p></app-content-projection-sample><router-outlet></router-outlet>
Step 5: Now import the ContentProjectionSampleComponent inside the AppComponent.
Angular allows multiple content to be projected in the component as well and it is called multi-slot content projection.
Example
Let us see how to use multiple content projections by modifying the above example.
Step 1: Add another <ng-content> along with selector attribute in the component template, content-projection-sample.component.html as shown below −
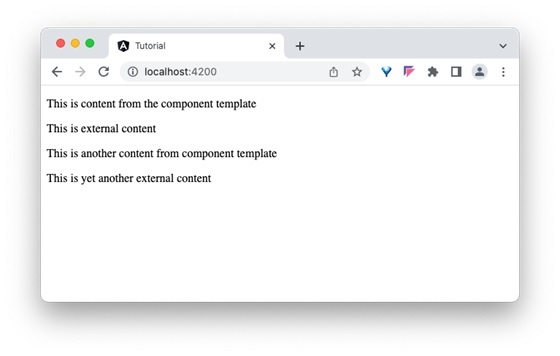
<p>This is content from the component template</p><ng-content></ng-content><p>This is another content from component template</p><ng-content select="[second]"></ng-content>
Step 2: Update the app component template, app.component.html as shown below −
<app-content-projection-sample><p>This is external content</p><p second>This is yet another external content</p></app-content-projection-sample><router-outlet></router-outlet>
Here, the value of selector attribute (second) set in the component template is used in the content to be projected.
Step 3: Now, run the application and check the output.
Conditional content projection
Conditional content projection is projecting a content when certain condition is met. We can use ng-content to conditionally project the content. But it is not recommended since <ng-content> will be initialized even if the content is not going to be rendered. Instead, we can use <ng-template> to project the content safely since it will initialize the content only when it is going to be rendered.
Example
Let us create a working demo by updating our projectionSample application and learning the conditional projection in more detail.
Step 1: Create a directive, greet-content using angular CLI as shown below −
ng g directive directives/greet-content
CREATE src/app/directives/greet-content.directive.spec.ts(257 bytes)CREATE src/app/directives/greet-content.directive.ts(184 bytes)
Step 2: Update the directive and get the template reference as shown below −
show is the variable, which holds the deciding condition
@ContentChild is the decorator, which will be used to get the directive instance
Step 4: In the component’s template, use ngIf for checking the condition, ng-container and ngTemplateOutlet to display the template (greet.template) in the components template as shown below −
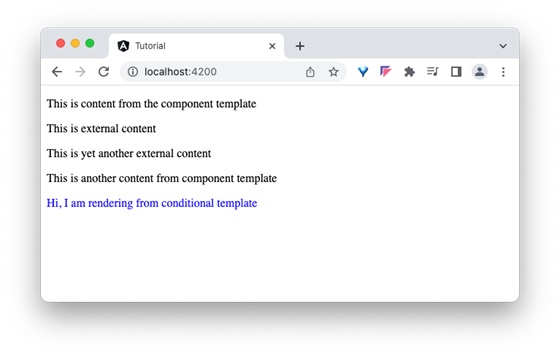
<p>This is content from the component template</p><ng-content></ng-content><p>This is another content from component template</p><ng-content select="[second]"></ng-content><div *ngIf="show"><ng-container [ngTemplateOutlet]="greet.template"></ng-container></div>
Step 5: Finally, use the component and its conditional projection in the app component as shown below −
<app-content-projection-sample><p>This is external content</p><ng-container ngProjectAs="second"><p>This is yet another external content</p></ng-container><ng-template appGreetContent>
Step 7: Run the application and check the output to find whether content is rendered through conditional projection concept or not:
Step 8: Update the condition, show in the component to false and check the output to find that the ng-template content is not rendered.
exportclassContentProjectionSampleComponent{
   show =false;
   @ContentChild(GreetContentDirective) greet!: GreetContentDirective;}
Special Case: ngProjectAs Attribute
ngProjectAs is a special attribute used to project content in complex scenarios. One example is using ng-container to layout the template. As we know, ng-container does not render itself and out-render its child content, we need to use ngProjectAs attribute to project its content.
Let us change the above example to use ng-container and ngProjectAs attribute. Update the app component template, app.component.html as shown below −
<app-content-projection-sample><p>This is external content</p><ng-container ngProjectAs="second"><p>This is yet another external content</p></ng-container></app-content-projection-sample><router-outlet></router-outlet>
Here, the value of selector attribute (second) set in the component template is used in the ng-container.
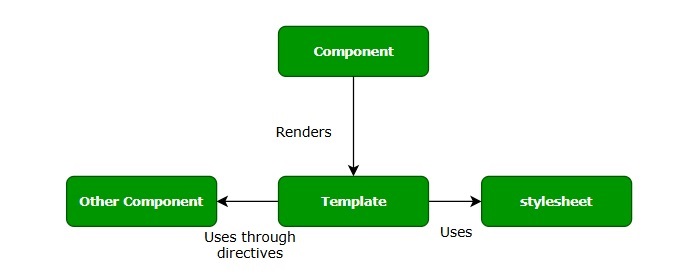
When you work with a large Angular application, placing all features in a single Component is not a good idea. As the application grows, maintaining it can become quite challenging. Therefore, we need to split it into multiple components. It may require creating components inside others to form a hierarchical structure.
In Angular, it is possible to nest components inside each other. The outside container is known as the parent container, and the inner one is known as the child container.
How to Create Nested Components in Angular?
Nested components are normal Angular Components with parent-child relations. The parent can access and share data with the child, either partially or fully. Creating nested components follows the same process as creating regular components.
Example
Let’s look at an example of how to create nested components in an Angular application. Following are the steps −
Step 1: Create an application named nestedApplication.
ng newnestedApplication
Step 2: Use the cd command to navigate inside the project folder. Then, create a component called parent using the following command −
ng g c parent
Step 3: To create child component, use the command given below −
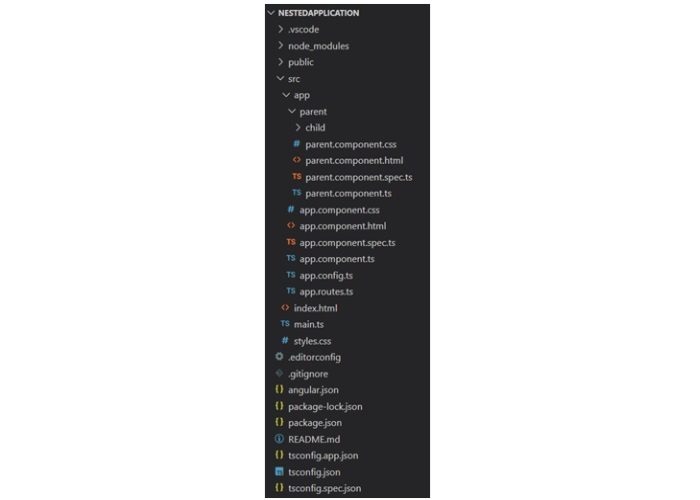
ng g c parent/child
Here, child will be created inside the parent component. And, your project structure will look like this −
Step 4: Next, make changes in the child.component.html file:
<p>This is child component. It is inside parent component.</p>
Step 5: Add the below code snippet to the parent.component.html file:
<p>This is child component. It is inside parent component.</p>
Step 6: Now, call the ParentComponent inside the app.component.html file:
Styling is the process of designing and formatting the visual presentation of web pages. Since Angular applications are composed of multiple components, styles are applied to them individually. Angular components can be styled using CSS as well as popular pre-processors such as Sass and Less.
Let’s see different techniques of applying styles to the Angular components and different ways to allow safe and efficient customization of styles by the component users in this chapter.
How to Add Styles to Angular Components?
You can use the following ways for styling Angular components −
Using “styles”
Using “styleUrls”
Styling through template
Using global styles
Using CSS preprocessor
Customized styles
Using custom selectors
Using “styles”
The simplest and fastest way to style a component is by usingstyles. It is a property of the@Componentdecorator. It accepts an array of CSS styles and applies it to the component view. The pseudo-code of using styles in a component is as follows:
@Component({// selector and template code

   styles:['p { font-style: italic; }', 'em { font-style: italic;
   font-weight: bold }']// other properties / meta data})exportclassMyComponent{// ...}
The style applied using styles will affect the component view generated through component template only and is not inherited by the view of the nested components in the component template as well as any content projected in the component view.
Using “styleUrls”
The styleUrls is also a property of the @Component decorator and is similar to styles property. It accepts an array of CSS style file paths instead of the style itself and applies it to the component view. The pseudo-code of using styleUrls in a component is as follows:
@Component({// selector and template code

   styleUrls:['my-component.component.css','my-component-another.component.css']// other properties / meta data})exportclassMyComponent{// ...}
The style applied using styleUrls will affect the component view generated through the component template only and is not inherited by the view of the nested components in the component template as well as any content projected in the component view.
Styling Through Template
Styling through template is old school method of using CSS styles in the HTML itself through template property of @Component decorator. We can style a component using template in two ways, which are:
Applying styles using HTML style tag
Linking CSS files through link tag
Styling through template does not restrict the styles to the component view only and applies to the entire HTML generated from the component including nested components and projections.
Applying Style Using “style” Tag
In HTML, style tag is used to define internal CSS styles for a web page. This tag allows you to embed CSS rules directly within the HTML document. The use of this tag in the Angular template is similar to how we use it in HTML. The pseudo-code to apply styles using style tag is as follows:
`,// other properties / meta data})exportclassMyComponent{// ...}
Applying Style Using “link” Tag
The most common use of link tags in HTML documents is to attach external stylesheets. The pseudo code to apply styles to an Angular component using link tag is as follows:
`,// other properties / meta data})exportclassMyComponent{// ...}
The CSS file path should be relative to the component file. Otherwise, the CSS path in the generated HTML may be pointing to an incorrect or non-existing file.
@import can be used in CSS files to load more CSS files and the import file should be relative to the host CSS file.
@import'./another-css.css'
Using Global Styles
Global styles will be configured during the application creation itself. Angular CLI will set src/styles.css file as a global stylesheet. We can use it to set styles targeting anything in the application. We can use the global setting to set one or more style sheets as required. The below snippet shows the initial angular configuration created during application creation through angular CLI.
Angular allow not only the plain CSS to style the component. It allows the popular CSS preprocessors such as Sass and Less. Using Sass and Less is as simple as including the Sass and Less files instead of CSS files.
Component styleUrls can be used to include Sass and Less as specified below.
@Component({// selector and template code

   styleUrls:['my-component.component.scss']// other properties / meta data})exportclassMyComponent{// ...}
CSS preprocessor can be configured at project level or component level through angular settings. Angular CLI command “ng new” will ask the preprocessor to set during initial project creation.
$ ng newmyapp? Would you like to add Angular routing? No
? Which stylesheet format would you like to use?(Use arrow keys)CSSSCSS[ https://sass-lang.com/documentation/syntax#scss                ]
  Sass   [ https://sass-lang.com/documentation/syntax#the-indented-syntax ]
  Less   [ http://lesscss.org
Angular CLI will configure the project with proper CSS preprocessor.
Customize Styles of Angular Component
Generally, every angular component will have a default style associated with it. As components can be used in various scenarios, there is a necessity to customize the style of the component to match a given scenario. A good component should have a clear approach to changing the style to suit the environment where the component is used. Angular provides four ways to customize the style of a component.
CSS custom properties
Global CSS along with @mixins
Using pseudo selectors of shadow DOM
Using component properties / API
CSS Custom Properties
CSS provides CSS variables to hold styles. Once the CSS variables are defined, they can be used in any CSS properties and allow certain styles to be changed across the application by changing the value of the CSS variable.
Let us see how to define and use CSS variables. CSS variables can be created using :root pseudo selector as shown below −
:root{--myColor: red;}
Here, myColor variable is defined and its initial value is red. myColor variable can be used in other CSS properties as shown below −
p{color:var(--myColor, grey);}
Here, color will be set with the value of myColor (red in this case). If myColor does not have any value or undefined, then grey will be set as color.
The same concept can be applied in a component by using component property and CSS Variable as shown below.
Declare a property for the CSS variable, myColorVar in the component as shown below −
Use CSS variable, myColor and Component property, myColorVar in the style (template) as shown below −
<p [style.--myColor]="myColorVar">Hello</p>
Now, the component can be customized by changing the CSS variable in the :root pseudo selector as shown below −
:root{--myColor: green;}
Global CSS with @mixins
CSS preprocessor provides a great option to mix different style as and when needed in the CSS using mixin concept. Mixin is simply grouping of one or more CSS styles with a name and using it afterwards wherever necessary using the defined name. Let us define two mixin, one for color and another for font style:
Finally, the user can customize the color and font style in the global style without interfering with the component.
Pseudo Selector of Shadow DOM
Components using shadow DOM can be set with part attributes to allow the users to customize the style using ::part pseudo selector in the CSS styles as shown below −
Here, component will use the properties to get the color information from the user and set it in the template.
Using Custom Selectors
Angular provides two custom selectors similar to the shadow DOM concept.
:host
:host-context
:host selector is used to style the host element of the component. It comes in two forms. First one is a simple form as shown below −
Here, :host selector applies to the host element and all its descendant elements.
The second one is the function form, which will target the host element only if the host element has the included selector (as arguments) as shown below −
:host(.active){font-weight: bold;}
Here, :host(.active) targets the host element only if it has an active class.
Finally, :host-context selector is similar to host function form :host() except it checks whether any of the ancestor of the host element has the specified selector (in the argument).
:host(.active){font-weight: bold;}
Here, the style applies to the host only when any of the ancestors of the host element has .active class assigned to it.
Angular provides options to share data from parent component to child component as well as, child to parent component. Also, it is possible to share data between any other component within the Angular application. Component is a TypeScript class decorated with the @Component decorator. It is used to create the user interface.
Data sharing is the practice of making important information accessible to different parts of an application. It is done by transferring data from one component to another, allowing access to data during operations, or synchronizing data between different parts of an application.
Interaction between components is one of the important and necessary features in the context of component based architecture. Angular provides multiple options to pass and receive data between components. Let us see how to share data between components in this tutorial.
How Components Interact in Angular?
In Angular, parent and child components shares data or interacts to each other through the following ways −
The parent component can pass the data to the child component through the @Input()decorator. The child component receives data during its entire life cycle from initialization to destruction. Angular is designed in such a way that the child component automatically intercepts the data changes from the parent component and does the necessary update. Angular also provides hooks to intercept the data changes and write custom processing.
Overall, we have three ways for the child component to intercept data from parent component −
Auto interception
Setter interception
ngOnChanges hook
Auto Interception
Auto interception simplifies receiving the data from parent component. Angular provides a decorator @Input to receive data from parent component. It receives the data whenever the parent component updates the data Configuring Input decorator is very simple. Just append the input decorator to a property in the child component and then pass the data from parent component through child component attributes in the template.
Example
Let us create a child component and then try to pass the data from parent to child and render it in the child component.
Step 1: Create a new child component, InOutChildSample using angular CLI as shown below −
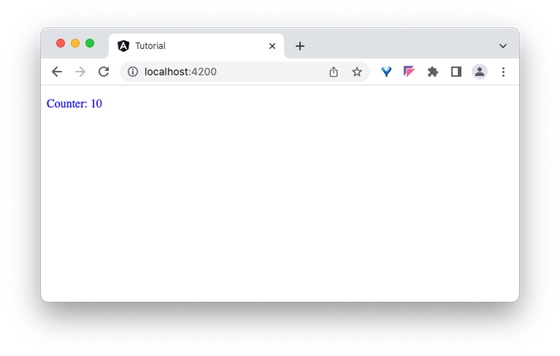
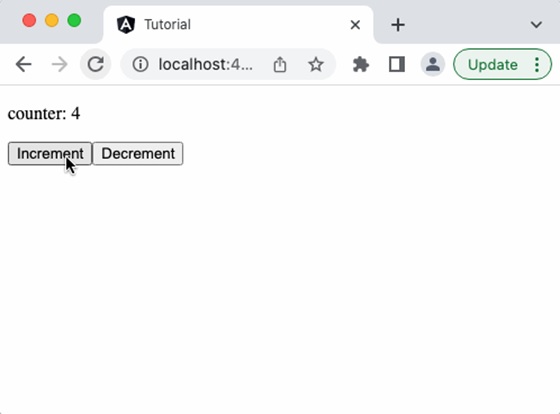
Step 6: Finally, run the application and check that the counter shows whether the value passed from the parent component or not −
Setter Interception
The setter based interception is just an extension of the previous technique. It basically uses a getter and setter for the property used in @Input decorator.
Example
Let us change our counter example, in-out-child-sample.component.ts to intercept the counter using setter and reset the counter to 1, if the counter value exceeds 25.
import{ Component, Input }from'@angular/core';

@Component({
  selector:'app-in-out-child-sample',
  standalone:true,
  imports:[InOutChildSampleComponent],
  templateUrl:'./in-out-child-sample.component.html',
  styleUrl:'./in-out-child-sample.component.css'})exportclassInOutChildSampleComponent{
  @Input()getcounter(): number {returnthis._counter;}setcounter(val: number){this._counter = val ||0;if(val >25)this._counter = val %25;}private _counter: number =1;}
Add a function to increment the counter value in the parent component as shown below −
inc(){this.counter++}
Add a button in the parent components template and bind the function as shown below −
Run the application, and you can see that the counter will reset to 1 once it reaches 25.
The ngOnChanges Hook Interception
As we learned in the life cycle of a component and its hook methods, ngOnChanges is a hook method, which will run whenever angular detects changes in its input.
ngOnChanges hook accepts an object of type SimpleChanges. SimpleChanges is a dictionary having all properties with changes. We can go through all the properties and find the latest value of the property. The pseudo-code to go through all changed properties is as follows −
const currentVal = prop.currentValue
cont isFirstChange = pop.isFirstChange()if(prop.isFirstChange()){
console.log("The current value is ${prop.currentValue}")}else{
console.log(`${key} changed from ${prop.previousValue} to
${prop.currentValue}`);}}}</pre>
Using @Output Decorator
Child component can send the data to parent component through the @Output decorator. Use of this decorator is quite simple and similar to @Input decorator except that the output is actually an event emitter passing the data (output) along with event. The parent component can be subscribed for the event in the child component and get the emitted value from the child component whenever the data is changed in the child component.
Example
Let us write an @output decorator in our child component, InOutChildSample component and try to get the output from the parent component.
Step 1: Create an output event emitter in the child component, in-out-child-sample.component.ts along with a method to pass the value of the counter by emitting the event along with counter data in the child component, in-out-child-sample.component.ts.
Step 2: Open the child component template, in-out-child-sample.component.html and add a button to invoke the counter event when the user clicks the button.
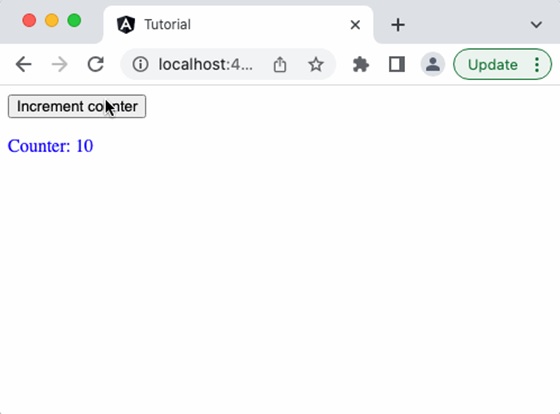
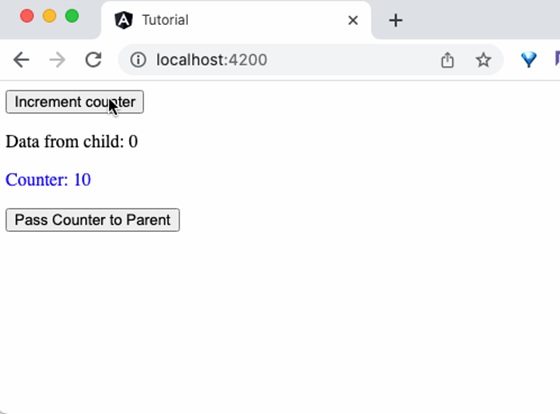
<div><p>Counter:{{counter}}</p><button(click)="passCounterToParent()">Pass Counter to Parent</button></div>
Here,
click is the button click event and it is configured to run passCounterToParent() function when it is clicked.
Step 3: Add a variable in the parent component to hold the output data passed through event from child component. Also, add a function in the parent component to get the output data passed through event from child component.
Step 4: Open the parent component template, app.component.html and add the code as shown below −
<button(click)="inc()">Increment counter</button><p>Data from child:{{childCounter}}</p><app-in-out-child-sample [counter]="counter"(counterEvent)="get($event)"/>
Here,
counterEvent is the event from the child component
get($event) is the callback function. $event will hold the current counter value.
childContent is the data from the child component.
Step 5: Finally, run the application and you can see that the child component will send the updated counter value to the parent component when the button in the child component is clicked.
Using Local Variable
Parent components can get complete access to the child component throughlocal variable. However, parent component gets access to the child component in its template only.
Example
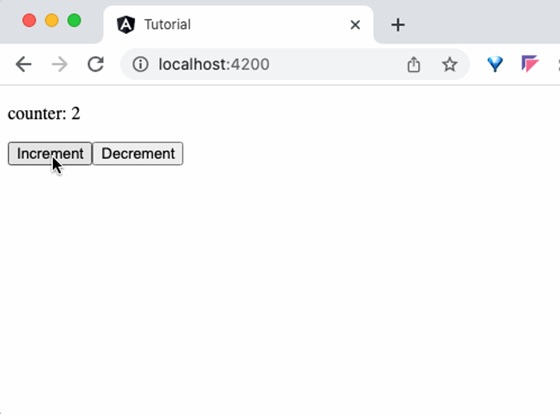
Let us create two component, ParentCounterComponent and ChildCounterComponent to understand the concept. The purpose of the ParentCounterComponent is to provide counter functionality through two button, increment and decrement button. The increment button will increment the counter and the decrement button will decrement the counter. Parent component will get the increment and decrement functionality from child component instead of implementing itself.
Step 1: Create child component, ChildCounterComponent using angular CLI as shown below −
Step 2: Declare a variable counter and two methods inc() and dec() to increment and decrement the counter respectively inside the child component −
import{ Component }from'@angular/core';

@Component({
  selector:'app-child-counter',
  standalone:true,
  imports:[],
  templateUrl:'./child-counter.component.html',
  styleUrl:'./child-counter.component.css'})exportclassChildCounterComponent{
  counter: number =0// increment and decrement counter  inc(){this.counter++}dec(){this.counter--}}
Step 3: Next, open parent component's template file, app.component.html and add child component along with an id, #child to access the child component.
<app-child-counter #child></app-child-counter>
Step 4: Next, add two buttons and bind click events with child component's inc() and dec() methods accessed through child identifier. Also, show the current value of counter using child identifier.
Step 6: Finally, run the application and check whether the counter is working fine.
Using @Viewchild Decorator
Like the local variable, the @ViewChild decorator is also used to get complete access to the child component. However, along with template, the parent component will get access to the child component in its class environment as well. This makes a huge difference as the parent component can use the child component functionality in its methods as well.
Example
To understand the @Viewchild decorator, let's change the parent component, i.e. AppComponent. Now, we will use @ViewChild concept instead of local variable. We don't need to make any changes in the child component.
Step 1: Import necessary classes from @angular/core module:
Here, we have created a counter method in ngAterViewInit life cycle hook. The child component will be available only after this life cycle. So, we have created a dummy counter method (which needs to access child component's counter value ) during component initialization and the update the counter method in the hook method.
Step 6: The complete code of the AppComponent is as follows −
Here, we have not included the identifier and used only the parent components functionality instead of child component (which we have done in previous example, local variable concept). The parent component will get the required functionality from child variable, which it got through @ViewChild decorator.
Step 8: Finally, run the application and check that the counter shows that the value passed from parent component as shown below −
Using a Common Service
Service is an integral part of the angular framework. We can create a service to implement specific functionality and then use it in any component. The best use cases of services are as follows:
API calls
Utility functions
Sharing data between components
Example
Let us learn how to use services to share data between components in this section. We will learn the step by step process to share data through a service in this example.
Step 1: Create a service, MyCounterService using angular CLI as shown below −
ng g service services/MyCounter
CREATE src/app/services/my-counter.service.spec.ts(389 bytes)CREATE src/app/services/my-counter.service.ts(147 bytes)
It is better to put all the services inside a single folder. Therefore, we are creating MyCounter inside service folder using the above command.
Step 2: Create a component, MyCounterServiceComponent using angular CLI as shown below −
Step 10: Next, open the component's template, my-counter-service.component.html and write template markup to show the current counter value and then add two more buttons to increment and decrement the counter value. Bind inc() and dec() methods to increment and decrement button's click event respectively.
Step14: Run the application and see that incrementing one component will reflect in the other component as well. It happens as it is based on the same service.
View encapsulation is a technique to encapsulate the style of the given view from other sections of the application. By default, the CSS style applied in an HTML document will affect the entire document. The same applies to the Angular framework as well. This default behaviour is going to be an advantage in some scenarios like global styles but at the same time, it may affect specific parts of the application unintentionally (like a special button/link with specific styles).
To make sure that the style of the specific part of the application does not get affected, the view encapsulation concept provided by Angular can be used.
View Encapsulation Modes in Angular
Angular provides a property named view encapsulation in the Component decoration to direct the scope of component style. There are three modes of encapsulation, which are as follows −
None (ViewEncapsulation.None)
Emulated (ViewEncapsulation.Emulated)
ShadowDom (ViewEncapsulation.ShadowDom)
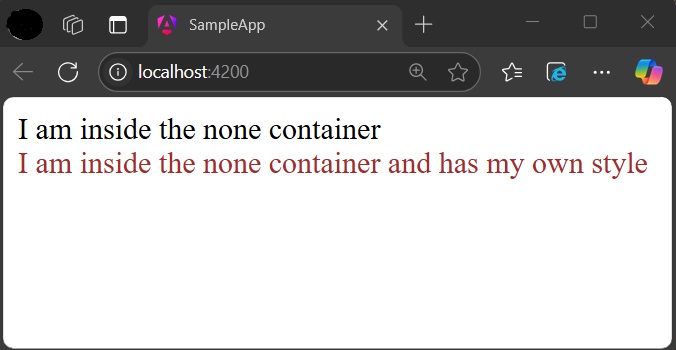
ViewEncapsulation.None
The mode None will not do anything to safeguard the style of an element inside the component. Component view will be exposed to all the global styles and get affected by it.
Example
Let us create a simple component to check how ViewEncapsulation.None mode works.
Step 1: Create a new Angular application with the name sample-app using the below command −
ng newsample-app
Step 2: Navigate to the project folder using cd command. Create a new component and name it view-encapsulation-sample.
Step 4: Change the template, view-encapsulation-sample.component.html and add two containers as shown below −
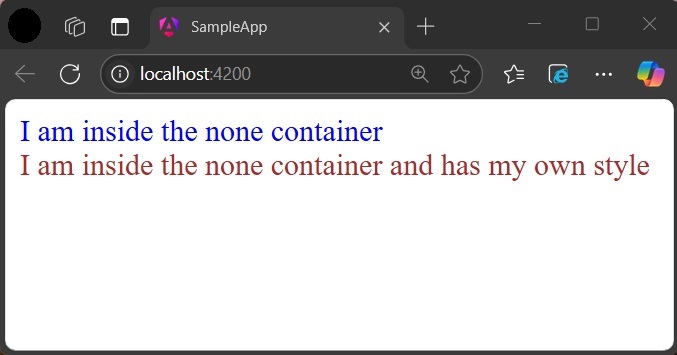
<div>I am inside the none container</div><div class="mystyle">I am inside the none container and has my own style</div>
Here, the first container does not have any styles or class and it is more prone to get affected by the global styles. The second container has class attributes and yet has a chance to get affected by global styles.
Step 5: Apply the style in the component css file, view-encapsulation-sample.component.css as shown below −
div.mystyle { color: brown }
Step 6: Add the component in the app component, app.component.html as shown below −
Step 7: On running the application, you can clearly see that the generated style and element are plain and no safeguard is applied and the application will look as shown below −
Step 8: Add a style in the global css assets, styles.css targeting div tag and re-run the application.
div { color: blue }
Now, the color of the first container changed to blue as shown below −
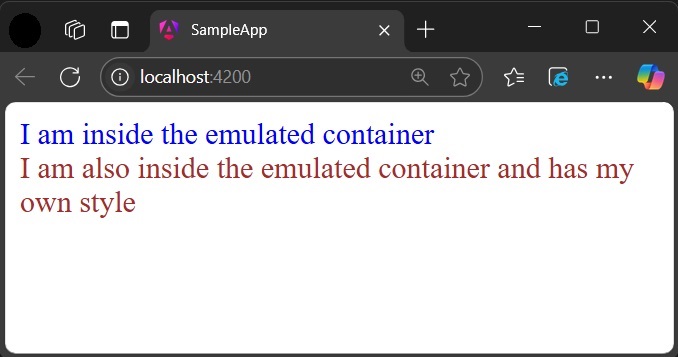
ViewEncapsulation.Emulated
Emulated mode will change the styles in such a way that it only applies to the element inside the component only. However, global styles may still affect elements inside a component.
Example
Let us change our application and apply the Emulated option as shown below −
Now, re-run the application and check the result −
ViewEncapsulation.ShadowDom
ShadowDom mode will apply the HTML native shadow dom concept to scope the style of the component. The element of the component will not be affected by the global styles in any situation as it completely hide using shadowDOM concept.
Example
Change our application and apply the ShadowDOM mode as shown below −
Now, both containers are safeguarded by native shadowDOM concept and are not affected by the global styles.
Applying different encapsulation in an application
View encapsulation of a component can be different from other components used in the application as view encapsulation is applied per component basis. Even the nested component can have different view encapsulation options as per component requirements. Angular will apply the encapsulation as directed even in very complex nested component trees as well.
Angular component goes through a series of stages/events during its existence. Before moving further in the journey of learning Angular, it is necessary to understand how a component interacts with the framework and the DOM throughout its existence.
When an angular component is constructed, it first goes through the change detection phase, where it checks whether there are any changes in the input and then acts accordingly. Then, the initialization phase kicks on and continues to other phases and finally gets destroyed in the destruction phase.
Component Lifecycle Phases in Angular
The different stages of the Angular Components Lifecycle are as follows −
Creation: It is the first phase where a component is instantiated.
Change Detection: Then, Angular try to detect changes in the View and Content of the application.
Rendering: After change detection, the new template is updated.
Destruction: The Component is destroyed at the end.
Component Lifecycle Hook in Angular
Each phase of the angular component is associated with a lifecycle hook interface which can be implemented to perform arbitrary action in that particular phase. Generally, the lifecycle hooks refer to the methods of lifecycle hook interfaces. Let’s see the phases, their sequence and the corresponding hooks.
Phases
Lifecycle Hooks
Description
Creation
Constructor
Constructor runs when Angular instantiates the component for the first time.
Change Detection
ngOnChanges()
Change detection is the first phase, where the angular component will check the inputs for changes and act accordingly. It has a corresponding lifecycle hook, ngOnChanges(). This hook runs before the ngOnInit() during the first initialization process.
ngOnInit()
The ngOnInit() lifecycle hook runs exactly once after ngOnChanges(). It is raised to do the necessary initialization process based on the initial input.
ngDoCheck()
Next, Angular tries to detect the changes in the component and act accordingly. The lifecycle hook used for checking is ngDoCheck(). This hook is invoked even if there is not change in the input bound properties. Avoid defining this hook as it might affect the page’s performance.
ngAfterContentInit()
This lifecycle hook is called only once after the initialization of all children nested inside the content of component.
ngAfterContentchecked()
It is invoked during every change detection phase after the children nested inside the component’s content have been checked for changes.
ngAfterViewInit()
Next is the view initialization phase, where angular sets the various child views of the component template. The lifecycle hook used for view initialization phase is ngAfterViewInit().
ngAfterViewchecked()
Now, Angular tries to detect the changes in the view of the component/directive. The lifecycle hook for view checking phase is ngAfterViewchecked().
Rendering
afterNextRender()
It runs only once when all components have been rendered to the DOM.
afterRender()
Runs every time after all components have been rendered to the DOM.
Destruction
ngOnDestroy()
In the final phase, ngOnDestroy() hook is called to destroy the component/directive.
Execution Order of Component Lifecyle Hooks
Let us see the lifecycle sequence of an arbitrary component/directive through its hooks.
ngOnChanges
ngOnInit
ngDoCheck
ngAfterContentInit
ngAfterContentChecked
ngAfterViewInit
ngAfterViewChecked
ngOnChanges
ngDocheck
ngAfterContentChecked
ngAfterViewchecked
Repeation of Step 8 – 11 until destruction
ngOnDestroy
Example
Let us create a new component, MyLifecycleComponent, wire up all hooks and check the sequence of the lifecylce using console output.
Step 1: Create a new component using angular CLI as shown below −
ng generate component my-lifecycle-sample
This will create a new component and its related template and styles as shown below.
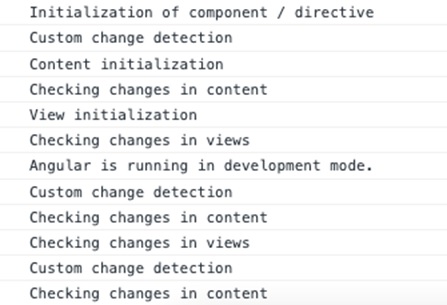
Run the application using ng serve and test the console through developer tool in the browser. It will show all the lifecycle events executing in the above discussed order.
Components are the building blocks of an Angular application. The primary use of Angular Component is to generate a section of web page called View. By combining different views, a single application is created. Every component will have an associated template and it will be called in order to generate views.
Let us learn the basic concept of components in this tutorial.
Structure of Angular Component
Each component of an Angular application has a few important parts which are as follows −
@component Decorator: All the application related configurations are written inside this decorator.
HTML Template: View of the Angular application.
Styles: It controls the styles of a view.
TypeScript Class: Code related to behavior of the Angular application goes into this class.
By default, all these parts are created by Angular CLI, you can update, add or even delete them if any of them is not required.
How to Create Components in Angular?
In Angular, a new Component is created using the ng generate component command as specified below −
ng generate component name-of-component
Example
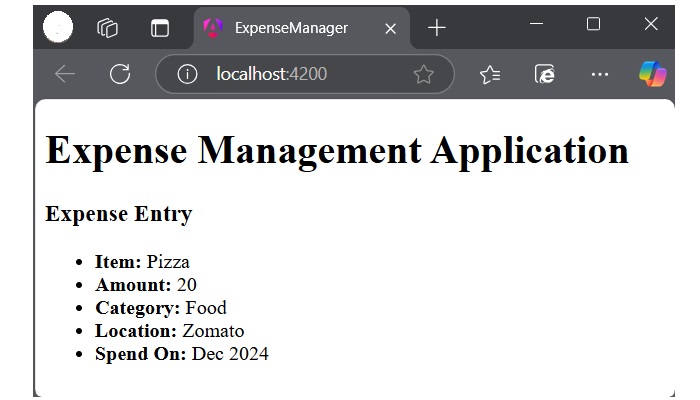
Let’s see an example where we create a new component in our ExpenseManager application. This component will contain our first expense entry. First, open the command prompt and navigate to ExpenseManager application.
cd expense-manager
Now, use the command given below to create a expense-entry component −
ng generate component expense-manager
Following files and folders will be created by Angular CLI on the above command −
Angular component goes through a series of stages/events during its existence. The different stages of the Angular Components Lifecycle are creation, change detection, rendering and destruction.
Each phase of the angular component is associated with a lifecycle hook interface which can be implemented to perform arbitrary action in that particular phase. The lifecycle hooks refer to the methods of lifecycle hook interfaces.
Component Interaction
Component interaction is one of the important and necessary features in the context of component based architecture. Angular provides multiple options to pass and receive data between components.
You can share data from parent component to child component as well as, child to parent component. Also, it is possible to share data between any other component within the Angular application.
In Angular, parent and child components interacts through the following ways −
@Input decorator
@Output decorator
local variable
@Viewchild decorator
Services
Component Styling
Component styling is the process of designing and formatting the visual presentation of views or components. You can use the following ways for styling:
Using “styles”
Using “styleUrls”
Styling through template
Using global styles
Using CSS preprocessor
Customized styles
Using custom selectors
Nested Components
Nested components are normal Angular Components with parent-child relations. The parent can access and share data with the child, either partially or fully. The component nested inside another component is called child component. The component containing the child component is called the parent component.
Dynamic Components
Angular allows the component to be dynamically created and loaded at run time at a specific location in the host (another) component.
Interrupting a thread in Python is a common requirement in multi-threaded programming, where a thread’s execution needs to be terminated under certain conditions. In a multi-threaded program, a task in a new thread, may be required to be stopped. This may be for many reasons, such as − task completion, application shutdown, or other external conditions.
In Python, interrupting threads can be achieved using threading.Event or by setting a termination flag within the thread itself. These methods allow you to interrupt the threads effectively, ensuring that resources are properly released and threads exit cleanly.
Thread Interruption using Event Object
One of the straightforward ways to interrupt a thread is by using the threading.Event class. This class allows one thread to signal to another that a particular event has occurred. Here’s how you can implement thread interruption using threading.Event
Example
In this example, we have a MyThread class. Its object starts executing the run() method. The main thread sleeps for a certain period and then sets an event. Till the event is detected, loop in the run() method continues. As soon as the event is detected, the loop terminates.
from time import sleep
from threading import Thread
from threading import Event
classMyThread(Thread):def__init__(self, event):super(MyThread, self).__init__()
Another approach to interrupting threads is by using a flag that the thread checks at regular intervals. This method involves setting a flag attribute in the thread object and regularly checking its value in the thread's execution loop.
Example
This example demonstrates how to use a flag to control and stop a running thread in Python multithreaded program.
import threading import time
def foo(): t = threading.current_thread() while getattr(t, "do_run", True): print("working on a task") time.sleep(1) print("Stopping the Thread after some time.")
# Create a thread t = threading.Thread(target=foo) t.start()
# Allow the thread to run for 5 seconds time.sleep(5)
# Set the termination flag to stop the thread t.do_run = False When you execute this code, it will produce the following output −
working on a task working on a task working on a task working on a task working on a task Stopping the Thread after some time.
A deadlock may be described as a concurrency failure mode. It is a situation in a program where one or more threads wait for a condition that never occurs. As a result, the threads are unable to progress and the program is stuck or frozen and must be terminated manually.
Deadlock situation may arise in many ways in your concurrent program. Deadlocks are never not developed intentionally, instead, they are in fact a side effect or bug in the code.
Common causes of thread deadlocks are listed below −
A thread that attempts to acquire the same mutex lock twice.
Threads that wait on each other (e.g. A waits on B, B waits on A).
When a thread that fails to release a resource such as lock, semaphore, condition, event, etc.
Threads that acquire mutex locks in different orders (e.g. fail to perform lock ordering).
How to Avoid Deadlocks in Python Threads
When multiple threads in a multi-threaded application attempt to access the same resource, such as performing read/write operations on the same file, it can lead to data inconsistency. Therefore, it is important to synchronize concurrent access to resources by using locking mechanisms.
The Python threading module provides a simple-to-implement locking mechanism to synchronize threads. You can create a new lock object by calling the Lock() class, which initializes the lock in an unlocked state.
Locking Mechanism with the Lock Object
An object of the Lock class has two possible states − locked or unlocked, initially in unlocked state when first created. A lock doesn’t belong to any particular thread.
The Lock class defines acquire() and release() methods.
The acquire() Method
The acquire() method of the Lock class changes the lock’s state from unlocked to locked. It returns immediately unless the optional blocking argument is set to True, in which case it waits until the lock is acquired.
Here is the Syntax of this method −
Lock.acquire(blocking, timeout)
Where,
blocking − If set to False, it means do not block. If a call with blocking set to True would block, return False immediately; otherwise, set the lock to locked and return True.
timeout − Specifies a timeout period for acquiring the lock.
The return value of this method is True if the lock is acquired successfully; False if not.
The release() Method
When the state is locked, this method in another thread changes it to unlocked. This can be called from any thread, not only the thread which has acquired the lock
Following is the Syntax of the release() method −
Lock.release()
The release() method should only be called in the locked state. If an attempt is made to release an unlocked lock, a RuntimeError will be raised.
When the lock is locked, reset it to unlocked, and return. If any other threads are blocked waiting for the lock to become unlocked, allow exactly one of them to proceed. There is no return value of this method.
Example
In the following program, two threads try to call the synchronized() method. One of them acquires the lock and gains the access while the other waits. When the run() method is completed for the first thread, the lock is released and the synchronized method is available for second thread.
When both the threads join, the program comes to an end.
from threading import Thread, Lock
import time

lock=Lock()
threads=[]classmyThread(Thread):def__init__(self,name):
  Thread.__init__(self)
  self.name=name   defrun(self):
  lock.acquire()
  synchronized(self.name)
  lock.release()defsynchronized(threadName):print("{} has acquired lock and is running synchronized method".format(threadName))   counter=5while counter:print('**', end='')
  time.sleep(2)
  counter=counter-1print('\nlock released for', threadName)
t1=myThread('Thread1')
t2=myThread('Thread2')

t1.start()
threads.append(t1)

t2.start()
threads.append(t2)for t in threads:
   t.join()print("end of main thread")
It will produce the following output −
Thread1 has acquired lock and is running synchronized method
**********
lock released for Thread1
Thread2 has acquired lock and is running synchronized method
**********
lock released for Thread2
end of main thread
Semaphore Object for Synchronization
In addition to locks, Python threading module supports semaphores, which offering another synchronization technique. It is one of the oldest synchronization techniques invented by a well-known computer scientist, Edsger W. Dijkstra.
The basic concept of semaphore is to use an internal counter which is decremented by each acquire() call and incremented by each release() call. The counter can never go below zero; when acquire() finds that it is zero, it blocks, waiting until some other thread calls release().
The Semaphore class in threading module defines acquire() and release() methods.
The acquire() Method
If the internal counter is larger than zero on entry, decrement it by one and return True immediately.
If the internal counter is zero on entry, block until awoken by a call to release(). Once awoken (and the counter is greater than 0), decrement the counter by 1 and return True. Exactly one thread will be awoken by each call to release(). The order in which threads awake is arbitrary.
If blocking parameter is set to False, do not block. If a call without an argument would block, return False immediately; otherwise, do the same thing as when called without arguments, and return True.
The release() Method
Release a semaphore, incrementing the internal counter by 1. When it was zero on entry and other threads are waiting for it to become larger than zero again, wake up n of those threads.
Example
This example demonstrates how to use a Semaphore object in Python to control access to a shared resource among multiple threads, for avoiding deadlock in Python’s multi-threaded program.
from threading import*import time
# creating thread instance where count = 3
lock = Semaphore(4)# creating instancedefsynchronized(name):# calling acquire method
lock.acquire()for n inrange(3):print('Hello! ', end ='')
Inter-Thread Communication refers to the process of enabling communication and synchronization between threads within a Python multi-threaded program.
Generally, threads in Python share the same memory space within a process, which allows them to exchange data and coordinate their activities through shared variables, objects, and specialized synchronization mechanisms provided by the threading module.
To facilitate inter-thread communication, the threading module provides various synchronization primitives like, Locks, Events, Conditions, and Semaphores objects. In this tutorial you will learn how to use the Event and Condition object for providing the communication between threads in a multi-threaded program.
The Event Object
An Event object manages the state of an internal flag so that threads can wait or set. Event object provides methods to control the state of this flag, allowing threads to synchronize their activities based on shared conditions.
The flag is initially false and becomes true with the set() method and reset to false with the clear() method. The wait() method blocks until the flag is true.
Following are the key methods of the Event object −
is_set(): Return True if and only if the internal flag is true.
set(): Set the internal flag to true. All threads waiting for it to become true are awakened. Threads that call wait() once the flag is true will not block at all.
clear(): Reset the internal flag to false. Subsequently, threads calling wait() will block until set() is called to set the internal flag to true again.
wait(timeout=None): Block until the internal flag is true. If the internal flag is true on entry, return immediately. Otherwise, block until another thread calls set() to set the flag to true, or until the optional timeout occurs. When the timeout argument is present and not None, it should be a floating point number specifying a timeout for the operation in seconds.
Example
The following code attempts to simulate the traffic flow being controlled by the state of traffic signal either GREEN or RED.
There are two threads in the program, targeting two different functions. The signal_state() function periodically sets and resets the event indicating change of signal from GREEN to RED.
The traffic_flow() function waits for the event to be set, and runs a loop till it remains set.
from threading import Event, Thread
import time

terminate =Falsedefsignal_state():global terminate
whilenot terminate:
    time.sleep(0.5)print("Traffic Police Giving GREEN Signal")
    event.set()
    time.sleep(1)print("Traffic Police Giving RED Signal")
    event.clear()deftraffic_flow():global terminate
num =0while num <10andnot terminate:print("Waiting for GREEN Signal")
    event.wait()print("GREEN Signal ... Traffic can move")while event.is_set()andnot terminate:
        num +=1print("Vehicle No:", num," Crossing the Signal")
        time.sleep(1)print("RED Signal ... Traffic has to wait")
event = Event()
t1 = Thread(target=signal_state)
t2 = Thread(target=traffic_flow)
t1.start()
t2.start()# Terminate the threads after some time
time.sleep(5)
terminate =True# join all threads to complete
t1.join()
t2.join()print("Exiting Main Thread")
Output
On executing the above code you will get the following output −
Waiting for GREEN Signal Traffic Police Giving GREEN Signal GREEN Signal ... Traffic can move Vehicle No: 1 Crossing the Signal Traffic Police Giving RED Signal RED Signal ... Traffic has to wait Waiting for GREEN Signal Traffic Police Giving GREEN Signal GREEN Signal ... Traffic can move Vehicle No: 2 Crossing the Signal Vehicle No: 3 Crossing the Signal Traffic Police Giving RED Signal Traffic Police Giving GREEN Signal Vehicle No: 4 Crossing the Signal Traffic Police Giving RED Signal RED Signal ... Traffic has to wait Traffic Police Giving GREEN Signal Traffic Police Giving RED Signal Exiting Main Thread The Condition Object
The Condition object in Python's threading module provides a more advanced synchronization mechanism. It allows threads to wait for a notification from another thread before proceeding. The Condition object are always associated with a lock and provide mechanisms for signaling between threads.
Following is the syntax of the threading.Condition() class −
threading.Condition(lock=None) Below are the key methods of the Condition object −
acquire(*args): Acquire the underlying lock. This method calls the corresponding method on the underlying lock; the return value is whatever that method returns. release(): Release the underlying lock. This method calls the corresponding method on the underlying lock; there is no return value. wait(timeout=None): This method releases the underlying lock, and then blocks until it is awakened by a notify() or notify_all() call for the same condition variable in another thread, or until the optional timeout occurs. Once awakened or timed out, it re-acquires the lock and returns. wait_for(predicate, timeout=None): This utility method may call wait() repeatedly until the predicate is satisfied, or until a timeout occurs. The return value is the last return value of the predicate and will evaluate to False if the method timed out. notify(n=1): This method wakes up at most n of the threads waiting for the condition variable; it is a no-op if no threads are waiting. notify_all(): Wake up all threads waiting on this condition. This method acts like notify(), but wakes up all waiting threads instead of one. If the calling thread has not acquired the lock when this method is called, a RuntimeError is raised. Example
This example demonstrates a simple form of inter-thread communication using the Condition object of the Python's threading module. Here thread_a and thread_b are communicated using a Condition object, the thread_a waits until it receives a notification from thread_b. the thread_b sleeps for 2 seconds before notifying thread_a and then finishes.
from threading import Condition, Thread import time
c = Condition()
def thread_a(): print("Thread A started") with c: print("Thread A waiting for permission...") c.wait() print("Thread A got permission!") print("Thread A finished")
def thread_b(): print("Thread B started") with c: time.sleep(2) print("Notifying Thread A...") c.notify() print("Thread B finished")
On executing the above code you will get the following output −
Thread A started Thread A waiting for permission... Thread B started Notifying Thread A... Thread B finished Thread A got permission! Thread A finished Example
Here is another code demonstrating how the Condition object is used for providing the communication between threads. In this, the thread t2 runs the taskB() function, and the thread t1 runs the taskA() function. The t1 thread acquires the condition and notifies it.
By that time, the t2 thread is in a waiting state. After the condition is released, the waiting thread proceeds to consume the random number generated by the notifying function.
from threading import Condition, Thread import time import random
numbers = []
def taskA(c): for _ in range(5): with c: num = random.randint(1, 10) print("Generated random number:", num) numbers.append(num) print("Notification issued") c.notify() time.sleep(0.3)
def taskB(c): for i in range(5): with c: print("waiting for update") while not numbers: c.wait() print("Obtained random number", numbers.pop()) time.sleep(0.3)
c = Condition() t1 = Thread(target=taskB, args=(c,)) t2 = Thread(target=taskA, args=(c,)) t1.start() t2.start() t1.join() t2.join() print("Done") When you execute this code, it will produce the following output −
waiting for update Generated random number: 2 Notification issued Obtained random number 2 Generated random number: 5 Notification issued waiting for update Obtained random number 5 Generated random number: 1 Notification issued waiting for update Obtained random number 1 Generated random number: 9 Notification issued waiting for update Obtained random number 9 Generated random number: 2 Notification issued waiting for update Obtained random number 2 Done