RDBMS stands for Relational Database Management System. RDBMS is the basis for SQL, and for all modern database systems like MS SQL Server, IBM DB2, Oracle, MySQL, and Microsoft Access.
A Relational database management system (RDBMS) is a database management system (DBMS) that is based on the relational model as introduced by E. F. Codd in 1970.
What is a Table?
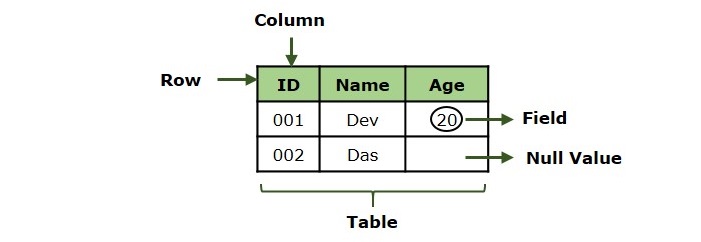
The data in an RDBMS is stored in database objects known as tables. This table is basically a collection of related data entries and it consists of numerous columns and rows.
Remember, a table is the most common and simplest form of data storage in a relational database. Following is an example of a CUSTOMERS table which stores customer’s ID, Name, Age, Salary, City and Country −
ID
Name
Age
Salary
City
Country
1
Ramesh
32
2000.00
Hyderabad
India
2
Mukesh
40
5000.00
New York
USA
3
Sumit
45
4500.00
Muscat
Oman
4
Kaushik
25
2500.00
Kolkata
India
5
Hardik
29
3500.00
Bhopal
India
6
Komal
38
3500.00
Saharanpur
India
7
Ayush
25
3500.00
Delhi
India
8
Javed
29
3700.00
Delhi
India
What is a Field?
Every table is broken up into smaller entities called fields. A field is a column in a table that is designed to maintain specific information about every record in the table.
For example, our CUSTOMERS table consists of different fields like ID, Name, Age, Salary, City and Country.
What is a Record or a Row?
A record is also called as a row of data is each individual entry that exists in a table. For example, there are 7 records in the above CUSTOMERS table. Following is a single row of data or record in the CUSTOMERS table −
ID
Name
Age
Salary
City
Country
1
Ramesh
32
2000.00
Hyderabad
India
A record is a horizontal entity in a table.
What is a Column?
A column is a vertical entity in a table that contains all information associated with a specific field in a table.
For example, our CUSTOMERS table have different columns to represent ID, Name, Age, Salary, City and Country.
What is a NULL Value?
A NULL value in a table is a value in a field that appears to be blank, which means a field with a NULL value is a field with no value.
It is very important to understand that a NULL value is different than a zero value or a field that contains spaces. A field with a NULL value is the one that has been left blank during a record creation. Following table has three records where first record has NULL value for the salary and second record has a zero value for the salary.
ID
Name
Age
Salary
City
Country
1
Ramesh
32
Hyderabad
India
2
Mukesh
40
00.00
New York
USA
3
Sumit
45
4500.00
Muscat
Oman
SQL Constraints
Constraints are the rules enforced on data columns on a table. These are used to limit the type of data that can go into a table. This ensures the accuracy and reliability of the data in the database.
Constraints can either be column level or table level. Column level constraints are applied only to one column whereas, table level constraints are applied to the entire table.
Following are some of the most commonly used constraints available in SQL −
S.No.
Constraints
1
NOT NULL ConstraintEnsures that a column cannot have a NULL value.
2
DEFAULT ConstraintProvides a default value for a column when none is specified.
3
UNIQUE KeyEnsures that all the values in a column are different.
4
PRIMARY KeyUniquely identifies each row/record in a database table.
5
FOREIGN KeyUniquely identifies a row/record in any another database table.
6
CHECK ConstraintEnsures that all values in a column satisfy certain conditions.
7
INDEX ConstraintUsed to create and retrieve data from the database very quickly.
Data Integrity
The following categories of data integrity exist with each RDBMS −
Entity Integrity − This ensures that there are no duplicate rows in a table.
Domain Integrity − Enforces valid entries for a given column by restricting the type, the format, or the range of values.
Referential integrity − Rows cannot be deleted, which are used by other records.
User-Defined Integrity − Enforces some specific business rules that do not fall into entity, domain or referential integrity.
Database Normalization
Database normalization is the process of efficiently organizing data in a database. There are two reasons of this normalization process −
Eliminating redundant data, for example, storing the same data in more than one table.
Ensuring data dependencies make sense.
Both these reasons are worthy goals as they reduce the amount of space a database consumes and ensures that data is logically stored. Normalization consists of a series of guidelines that help guide you in creating a good database structure.
Normalization guidelines are divided into normal forms; think of a form as the format or the way a database structure is laid out. The aim of normal forms is to organize the database structure, so that it complies with the rules of first normal form, then second normal form and finally the third normal form.
It is your choice to take it further and go to the Fourth Normal Form, Fifth Normal Form and so on, but in general, the Third Normal Form is more than enough for a normal Database Application.
SQL (Structured Query Language) is a language to operate databases; it includes Database Creation, Database Deletion, Fetching Data Rows, Modifying & Deleting Data rows, etc.
SQL stands for Structured Query Language which is a computer language for storing, manipulating and retrieving data stored in a relational database. SQL was developed in the 1970s by IBM Computer Scientists and became a standard of the American National Standards Institute (ANSI) in 1986, and the International Organization for Standardization (ISO) in 1987.
Though SQL is an ANSI (American National Standards Institute) standard language, but there are many different dialects of the SQL language like MS SQL Server is using T-SQL and Oracle is using PL/SQL.
SQL is the standard language to communicate with Relational Database Systems. All the Relational Database Management Systems (RDMS) like MySQL, MS Access, Oracle, Sybase, Informix, Postgres and SQL Server use SQL as their Standard Database Language.
Why SQL?
SQL is widely popular because it offers the following advantages −
Allows users to access data in the relational database management systems.
Allows users to describe the data.
Allows users to define the data in a database and manipulate that data.
Allows to embed within other languages using SQL modules, libraries & pre-compilers.
Allows users to create and drop databases and tables.
Allows users to create view, stored procedure, functions in a database.
Allows users to set permissions on tables, procedures and views.
A Brief History of SQL
1970 − Dr. Edgar F. “Ted” Codd of IBM is known as the father of relational databases. He described a relational model for databases.
1974 − Structured Query Language (SQL) appeared.
1978 − IBM worked to develop Codd’s ideas and released a product named System/R.
1986 − IBM developed the first prototype of relational database and standardized by ANSI. The first relational database was released by Relational Software which later came to be known as Oracle.
1987 − SQL became the part of the International Organization for Standardization (ISO).
How SQL Works?
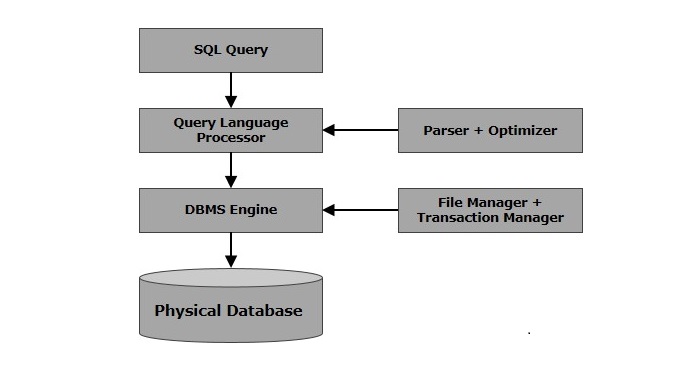
When you are executing an SQL command for any RDBMS, the system determines the best way to carry out your request and SQL engine figures out how to interpret the task.
There are various components included in this process. These components are −
Query Dispatcher
Optimization Engines
Classic Query Engine
SQL Query Engine, etc.
A classic query engine handles all the non-SQL queries, but a SQL query engine won’t handle logical files. Following is a simple diagram showing the SQL Architecture −
This Roadmap will guide you to master SQL. You will learn core concepts, techniques, and best practices by following mentioned topics. This step-by-step path will help you as a beginner.
What is a Tutorial Roadmap?
Tutorial Roadmap typically covers the journey from beginner to advanced user, including key concepts, practical applications, and best practices.
SQL Roadmap
This SQL roadmap is created to upgrade you from a SQL novice to a SQL expert. Whether you’re aspiring to become a data analyst, database administrator, or software developer, this comprehensive guide will provide a structured path to master SQL.
SQL Roadmap
SQL Basics
RDBMS Concepts
CREATE
RDBMS Benefits
SQL Database
DROP
SELECT
RENAME
SHOW
BACKUP
SQL Basic Syntax
SQL Comment
SQL Data Types
SQL Operators
SQL Expressions
SQL Statements
SELECT
INSERT
DELETE
UPDATE
DATA Definition Language
SQL Table
CREATE
RENAME
SHOW
TRUNCATE
CLONE
ALTER
TEMPORARY
DROP
DELETE
CONTRAINTS
DATA Manipulation Language
Aggregate Functions
List of Aggregate Functions
SUM
COUNT
AVG
MIN
MAX
Indexes
Advanced SQL
JOIN Queries
Create Index
Drop Index
Show Index
Unique Index
Clustered Index
Non-Clustered Index
Inner
Left
Full
Right
Cross
Delete
SQL Introduction
SELECT
FROM
WHERE
JOINS
Wildcards
Injection
Hoisting
Sub Queries
Stored Procedures
Transactions
Auto Increment
Handling Duplicates
Data Constraints
Primary
Unique
Check
Foreign
Not Null
How SQL Roadmap Can help you?
This roadmap provides a structured approach to mastering SQL. Remember, expertise comes from consistent practice, curiosity, and real-world problem-solving. Your journey from a beginner to an SQL expert is a marathon, not a sprint. So keep practicing and improve yourself.
Our SQL tutorial helps you learn SQL (Structured Query Language) in simple and easy steps so that you can start your database programming quickly. It covers most of the important concepts related to SQL for a basic to advanced understanding of SQL and to get a feel of how SQL works.
SQL (Structured Query Language) is a programming language which is used to manage data stored in relational databases like MySQL, MS Access, SQL Server, Oracle, Sybase, Informix, Postgres etc.
SQL is a database computer language designed for the retrieval and management of data in a relational databases like MySQL, MS Access, SQL Server, Oracle, Sybase, Informix, Postgres etc. SQL stands for Structured Query Language. SQL was developed in the 1970s by IBM Computer Scientists.
SQL is not a database management system, but it is a query language which is used to store and retrieve the data from a database or in simple words SQL is a language that communicates with databases.
SQL Examples
Consider we have following CUSTOMERS table which stores customer’s ID, Name, Age, Salary, City and Country −
ID
Name
Age
Salary
City
Country
1
Ramesh
32
2000.00
Maryland
USA
2
Mukesh
40
5000.00
New York
USA
3
Sumit
45
4500.00
Muscat
Oman
4
Kaushik
25
2500.00
Kolkata
India
5
Hardik
29
3500.00
Bhopal
India
6
Komal
38
3500.00
Saharanpur
India
7
Ayush
25
3500.00
Delhi
India
SQL makes it easy to manipulate this data using simple DML (Data Manipulation Language) Statements. For example, if we want to list down all the customers from USA then following will be the SQL query.
SELECT*FROM CUSTOMERS WHERE country ='USA';
This will produce the following result:
ID
Name
Age
Salary
City
Country
1
Ramesh
32
2000.00
Maryland
USA
2
Mukesh
40
5000.00
New York
USA
SQL Online Editor
We have provided SQL Online Editor which helps you to Edit and Execute the SQL code directly from your browser. Try to click the icon to run the following SQL code to be executed on CUSTOMERS table and print the records matching with the given condition.
SELECT*FROM CUSTOMERS WHERE country ='USA';
So now, you do not need to do a sophisticated setup to execute all the examples given in this tutorial because we are providing you Online SQL Editor, which allows you to edit your code and compile it online. You can try our Online SQL Editor.
SQL Basic Commands
We have a list of standard SQL commands to interact with relational databases, These commands are CREATE, SELECT, INSERT, UPDATE, DELETE, DROP and TRUNCATE and can be classified into the following groups based on their nature −
Data Definition Language (DDL)
A Data Definition Language (DDL) is a computer language which is used to create and modify the structure of database objects which include tables, views, schemas, and indexes etc.
Command
Description
Demo
CREATE
Creates a new table, a view of a table, or other object in the database.
Demo
ALTER
Modifies an existing database object, such as a table.
Demo
DROP
Deletes an entire table, a view of a table or other objects in the database.
Demo
TRUNCATE
Truncates the entire table in a go.
Demo
Data Manipulation Language (DML)
A Data Manipulation Language (DML) is a computer programming language which is used for adding, deleting, and modifying data in a database.
Command
Description
Demo
SELECT
Retrieves certain records from one or more tables.
Demo
INSERT
Creates a record.
Demo
UPDATE
Modifies records.
Demo
DELETE
Deletes records.
Demo
Data Control Language (DCL)
Data Control Language (DCL) is a computer programming language which is used to control access to data stored in a database.
Command
Description
Demo
GRANT
Gives a privilege to user
Demo
REVOKE
Takes back privileges granted from user.
Demo
Why to Learn SQL?
SQL (Structured Query Language) is a MUST for the students and working professionals to become a great Software Engineer specially when they are working in Software Development Domain. SQL is the most common language used almost in every application software including banking, finance, education, security etc. to store and manipulate data.
SQL is fairly easy to learn, so if you are starting to learn any programming language then it is very much advised that you should also learn SQL and other Database related concepts to become a complete Software Programmer. There are many good reasons which makes SQL as the first choice of any programmer −
SQL is the standard language for any Relational Database System. All the Relational Data Base Management Systems (RDBMS) like MySQL, MS Access, Oracle, Sybase, Informix, Postgres and SQL Server use SQL as their standard database language.
Also, software industry is using different dialects of SQL, such as −
MS SQL Server using T-SQL,
Oracle using PL/SQL,
MS Access version of SQL is called JET SQL (native format) etc.
SQL Applications
SQL is one of the most widely used Query Language over the databases. SQL provides following functionality to the database programmers −
Execute different database queries against a database.
Define the data in a database and manipulate that data.
Create data in a relational database management system.
Access data from the relational database management system.
Create and drop databases and tables.
Create and maintain database users.
Create view, stored procedure, functions in a database.
Set permissions on tables, procedures and views.
Who Should Learn SQL
This SQL tutorial will help both students as well as working professionals who want to develop applications based on some databases like banking systems, support systems, information systems, web websites, mobile apps or personal blogs etc. We recommend reading this tutorial, in the sequence listed in the left side menu.
Today, SQL is an essential language to learn for anyone involved in the software applicatipon development process including Software Developers, Software Designers, and Project Managers etc.
Prerequisites to Learn SQL
Though we have tried our best to present the SQL concepts in a simple and easy way, still before you start learning SQL concepts given in this tutorial, it is assumed that you are already aware about some basic concepts of computer science, what is a database, especially the basics of RDBMS and associated concepts.
This tutorial will give you enough understanding on the various concepts of SQL along with suitable examples so that you can start your Software Development journey immediately after finishing this tutorial.
SQL Online Quizzes
This SQL tutorial helps you prepare for technical interviews and certification exams. We have provided various quizzes and assignments to check your learning level. Given quizzes have multiple choice type of questions and their answers with short explanation.
Following is a sample quiz, try to attempt any of the given answers:Show Answer
Q 1 – The SQL programming language was developed by which of the following:
A – Google in 1990s
B – Microsoft in 1980s
C – IBM in 1970s
D – None of the Above
Start your online quiz Start SQL Quiz.
SQL Jobs and Opportunities
SQL professionals are very much in high demand as the data turn out is increasing exponentially. Almost every major company is recruiting IT professionals having good experience with SQL.
Average annual salary for a SQL professional is around $150,000. Though it can vary depending on the location. Following are the great companies who keep recruiting SQL professionals like Database Administrator (DBA), Database Developer, Database Testers, Data Scientist, ETL Developer, Database Migration Expert, Cloud Database Expert etc:
Google
Amazon
Netflix
Infosys
TCS
Tech Mahindra
Wipro
Pinterest
Uber
Trello
Many more…
So, you could be the next potential employee for any of these major companies. We have developed a great learning material for SQL which will help you prepare for the technical interviews and certification exams based on SQL. So, start learning SQL using our simple and effective tutorial anywhere and anytime absolutely at your pace.
Frequently Asked Questions about SQL
There are some very Frequently Asked Questions(FAQ) about SQL, this section tries to answer them briefly.What are SQL skills?
Scalable Vector Graphics, in short SVG, is used to create vector-based graphics in XML format. XML is a markup language like HTML that stores and transfers data on the web.
SVG provides a framework for creating rich graphics with declarative programming. Angular template can be applied to the SVG to create dynamic graphics with minimal effort.
In this chapter, we will understand how to create SVG as an Angular Template.
Creating SVG as a Template
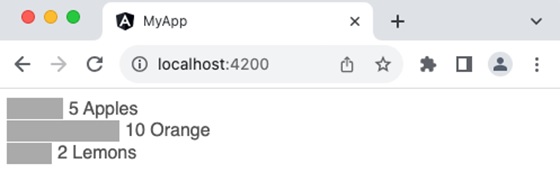
Let us create a simple bar chart in SVG format and use it in our template and then update the bar chart dynamically through template input variables.
Step 1: Create a new application using angular CLI as shown below −
$ ng newmy-app
Step 2: Create a component, chart using angular CLI as shown below −
ngFor (structural directive) is used to loop over the fruits.
Attribute binding ([attr.width], [attr.x] & [attr-y]) is used along with template statement to dynamically add each bar in the chart based on the fruits template variable
fruit.count * 10 is a template statement, which sets the width of the bar based on the fruit count
0 + (i * 20) is another template statement, which sets the y position of the bar in the chart.
fruit.count * 10 + 5 is another template statement, which sets x position of the text at the end of the bar in the chart.
10 + (i * 20) is another template statement, which sets the y position of the text at the end of the bar in the chart.
Step 13: Run the application and check whether the chart is rendered properly.
Template variables are variables available in the context of template. Angular does not allow the developer to create a new variable in the template. Instead, it allows new variables to be passed into the template through a component or directive instance. Also, it allows to declare a variable in the template and refers to any of the existing elements available in the template.
Let us learn more about template variables in this chapter.
Types of Template Variables
There are two types of template variables −
Template input variable: Template input variables are passed into the template either through component or directive instance.
Template reference variable: Template reference variables are declared in the template itself and refer to the existing element in the template.
Template Input Variable
Template input variables are variables passed into the template and available in the context of template. They are passed into the template through multiple channels. They are as follows:
Component: Component exposes all its public variables/properties to it’s template
Directive: Directive exposes selective variables into the template during its execution. For example, ngFor exposes index and current looping variable to the template as shown below,
users is template input variable exposed by component.
user and i are template input variables exposed by ngFor directive.
Template Reference Variable
The syntax to declare a template reference variables is #var (# along with variable name). Angular allows the variable to be declared as attributes of an element available in the template. The type and value of the template reference variable depend on where it is declared.
1. If a variable is declared inside an element, then it refers to the HTML element.
<button #btn>Click Here</button>
Here, btn refers to the button object of type HtmlButtonElement
2. If a variable is declared inside a component, then it refers to the component instance.
<app-comp #mycomp></app-comp>
Here, mycomp refers to the component instance and can access the internal of the referenced component.
3. If a variable is declared inside a template (ng-template, a tag used to create template within a template), then it refers to the instance of the template.
<ng-template #mytemplate><div>Hi, I am template within the template</div></ng-template>
Here, mytemplate refers to the instance of the template.
4. If a variable is declared inside a custom web component, then it refers to the custom HTML element.
<my-card #mycard>Click Here</my-card>
Here, mycard refers to the custom web component, my-card
Let us see how to create a template reference variable, firstname to refer to an input element as shown below −
firstname represents the instance of HtmlInputElement element. HtmlInputElement is a type in DOM to represent the input element.
firstname can access all properties and methods of HtmlInputElement element
The template reference variable can be used in template statement and text interpolation.
Example
Let us create an application to show the value entered by user in an input box to a span element using pure template reference variable concept. The application will provide a button for the user to fire the process of accessing the input box value and show it in the span element.
Step 1: Create a new application using angular CLI as shown below −
$ ng newmy-app
Step 2: Create a component, MyTemplateRefVarSample using angular CLI as shown below −
Here, the click event has a single template statement, which will access the value entered by user in input element through value property of source object and set it into the target element, span using innerText property of target object.
Step 7: Next, open the app components template file, src/app/app.component.html and add our component as shown below −
<app-my-template-ref-var-sample />
Step 8: Finally, run the application and check whether the button is working fine.
Template reference variable with a value
In general, a template reference variable will only declare a variable inside the element to be referred.
<form #formVar><!-- form information --></form>
Here, the formVar represents the object of type HtmlFormElement. But, in some cases, it can include value as well. If it includes value, then the value is interrupted as directive or component with exportAs property matching the set value.
To better understand the concept, let us change the above form to include ngForm as value.
<form #formVar="ngForm"><!-- form information --></form>
ngForm is a directive provided by angular team to support form programming. Here, the formVar refers to an instance of ngForm directive instead of HtmlFormElement. formVar can access properties and methods (like formVar.form.valid) of ngForm and do better form programming.
Template statements are used to interact with users through events in the HTML document. They allow the developer to call the components method in response to the users action. Also, it allows the developer to write simple logic in the template itself with multiple statements separated by colon (;). Let’s learn more about the template statement in this chapter.
Syntax
Template statement is similar to JavaScript expression with the below exceptions.
Compound assignment operators: The template statement does not support compound assignment operators (+= and -=). Compared to the template expression, the statement supports the normal assignment operator (=).
The new keyword: Template does not allow the creation of new objects. All objects should be created in the component class. An object created in the component will be available in the template.
Increment and decrement operators: Template does not allow side effects. Since the increment and decrement operators do the side effects, they are excluded.
Bitwise operator: Bitwise operators (| and &) are not supported.
Pipe operator: Template statement does not support pipe (|) operator.
How to use Template Statements in the Template
Template statements can be written inside the double quotes and set as the value of components or elements event property as shown below −
<button(click)="<statements>">Click here</button>
Here,
(click) represent the click event of the button. It uses event binding concept, which is explained in the Event binding chapter.
<statement> can be any template statement as specified in the previous section.
Template Statement Context
Similar to template expression, template statement has three contexts, which are:
1. Components property/method: Component’s property/method is the property/method set in the components instance. For example, a user object (user) in the component can be used in the template as follows,
Here, the context of user property and showUser() method is components instance.
2. Template input variable: Template input variables are input to the template assigned through directives. For example, ngFor directive sends the index and current item of the loop to the template as shown below −
<ul><li *ngFor="let user of users"(click)="showUser(user)">{{user.name}}</li></ul>
Here, the context of user property is template input variable.
3. Template reference variable: Template reference variable is basically a representation of HTML elements, components and directives in the given template as shown below −
Here, the context of user & user.value is template reference variable.
The precedence of context in case of name collision is as follow,
Template variable
Variable in the directives context
Components member variable and method
The angular team recommends using complex logic in the components method and calling it through a template statement instead of trying to write the logic in the template itself using a template statement.
Example
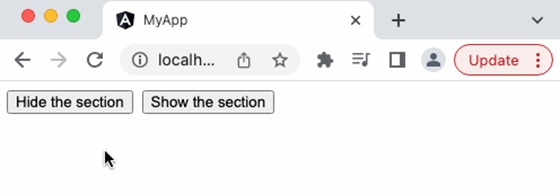
Let us consider a simple scenario of show/hide a section through user’s action.
Step 1: Create a new application using angular CLI as shown below −
$ ng newmy-app
Step 2: Create a component, BlockWithShowHide using angular CLI as shown below −
Step 3: Next, open the component file, src/app/block-with-show-hide/block-with-show-hide.component.ts and add a variable, hideStatus to represent the show / hide status
hideStatus: boolean =false;
Step 4: Next, add two method, show() and hide() to change the value of hideStatus variable with respect to the users action.
Step 5: Next, open the components template file, src/app/block-with-show-hide/block-with-show-hide.component.html and a block with two buttons,
<div><div><p>Hi, I am simple section created for the testing purpose<p></div><button>Hide the section</button><button>Show the section</button></div>
Step 6: Next, add click event to the button and the corresponding method as shown below −
<div><div [class.hide]="hideStatus"><p>Hi, I am simple section created for the testing purpose<p></div><button (click)="hide()">Hide the section</button><button (click)="show()">Show the section</button></div>
Step 7: Next, add a class property binding, class.hide with value hideStatus in the block to be shown / hidden.
<div><div [class.hide]="hideStatus"><p>Hi, I am simple section created for the testing purpose<p></div><button (click)="hide()">Hide the section</button><button (click)="show()">Show the section</button></div>
Here,
class.hide represents the hide CSS class and it will be set if its value hideStatus is true.
Step 8: The complete listing of the component is as follows,
Template is a small part of an Angular application’s user interface(UI). It is written in HTML and its use is to generate the view of a component to be rendered in the browser. Since the purpose of an angular template is to produce only a chunk of HTML and not a complete HTML document, it does not support a few HTML elements, which are <html>, <body> and <base>. The <script> tag is not supported intentionally to prevent script injection in the final angular application.
Relation between Template and Component
Angular Component controls how a view should be displayed on the browser screen. It consists of a TypeScript class and CSS style along with an HTML template. Templates can be found inside the metadata of a Component defined using the template property or linked using the templateURL property. We can conclude that the Component generates the view with the help of Template.
Ways to Define Templates in Angular
There are two ways in which we can define Angular Templates −
Inline: We can create a template using the template property of the @Component decorator directly in the component class file.
External: It is the default way of creating a template. It uses the templateUrl property to link a template to a Component.
The Angular Views
Angular provides a rich set of features to create a user interface of the application. A portion of the user interface in an angular application is called View. Angular Views are basically a chunk of HTML/DOM structure represented immediately in the memory during the execution of an angular application and are rendered into the final HTML markup.
Each component in an Angular application has an associated view, known as a component view, which is created from the template associate with the component. This template and component instance have dynamic interaction between them. The template receives data from the component and sends data back to the component as well.
Features of Angular Template
In addition to HTML, The Angular template supports additional features to create dynamic content and to provide rich interaction with components. These additional features are −
Text interpolation
Text transformation through angular pipes
Template Statements
Data Binding
Directives
Template Variables
Text Interpolation
Text interpolation is the usage of a component’s data in its template using the template expression. Let us consider that a component has a name as one of its properties.
exportclassHomeComponent{
   name: string ='John'}
Then, name can be used in its template as shown below −
Hello {{ name }}
Please note that the double curly brace is used to specify the template expression.
Text Transformation through Pipes
Text transformation can be done in the template using pipe symbol (|). Angular template provides a unique feature called Angular pipes, basically a javascript function, which accepts input along with modifiers through arguments and transforms the input data from one format to another and renders it. Angular has many built-in pipes for date, currency, etc., and also provides an option to create new, customized pipes.
Let us consider a simple component, CurrentTimeComponent to show the current time along with the date.
exportclassCurrentTimeComponent{
   currentDate : date =newDate()}<div>
   The current date and time is {{ currentDate | date:'short'}}</div>
Here, the date is the pipe function (datePipe) and short is its argument. This will show the current date with time in a simple format as shown below
<div _ngcontent-ng-c323970836="">
   The current date and time is 7/29/23,3:35PM</div>
Template Statement
Template statements are used to interact with users through events in the HTML document. They are similar to JavaScript expressions with few exceptions and few additions.
Let us consider a simple scenario of show/hide a section through user’s action. The component will have a hide() method to hide and another method show() to show the section. The component’s template will have two buttons to fire the show and hide action. The click event of the buttons will be set with show/hide method through template statement.
Here, hideStatus is a boolean property of the component used to set/remove the CSS class, hide in the section element. show() and hide() are two method to execute the action of setting / remove the css class from the section element.
.hide {
   display: none;}<div [class.hide]="hideStatus"><p>Hi,I am simple section created for the testing purpose<p></div><button(click)="hide()">Hide the section</button><button(click)="show()">Show the section</button>
Here, hide() and show() are template statements used to set the action for click event of the buttons. [class.hide]=”hideStatus” is class binding concept available in angular template, which we will learn in upcoming chapters.
Data Binding
Binding is the process of connecting a target in the template and an expression or statement based on model of the component to which the template belongs. Text interpolation is the simplest form for binding and angular provides many types of binding. They are as follows,
Text interpolation: Text interpolation is the process of connecting model of a components instance to the text portion of components template
Attribute binding: Attribute binding is the process of connecting model of a components instance to the attribute of a (target) HTML element in the components template
Class and style binding: Class and style binding is the process of connecting model of a components instance to the class and style attributes of a (target) HTML element in the components template
Property binding: Property binding is the process of connecting model of a components instance to the property of a (target) HTML element / other component in the components template. Angular exposes the attributes of HTML element as properties with attribute names converted to CamelCase. This will help to connect all attributes of the HTML element through property binding.
Event binding: Event binding is the process of connecting the model of a components instance method to the event of a (target) HTML element / (another) component.
Two way data binding: Two way data binding is a combination of property and event binding to sync data between parent and child component.
Directives
Angular provides an excellent feature, Directive to add additional behavior to any existing HTML elements or components in a generic way. In addition to creating new directives, angular provides a default set of directives to provide additional functionality like condition (ngIf) and loops (ngFor) (which are not available in the angular tempaltes) to the HTML elements and component. We will learn the complete set of built-in directive in the later chapter.
A simple example of using ngIf directive to show or hide a target element is as follows,
Here, showSection is a variable in the component having truthy value.
<div *ngIf="showSection">
   I will be shown based on the showSection property in the component's
   instance.
</div>
Here, showSection is the condition (template expression) used by ngIf to decide whether to render the div element. If the condition succeeds, it will render the div element; otherwise, it will skip the rendering of the element.
If the showSection value is changed to false, then the section will not be shown.
Template Variables
The Template Variable is basically used to reference any one of the below items in the template.
HTML element
Directive
Component
Template inside template (ng-template)
Web component
Let us create a reference to a input element and span element and show the value entered in the input element to the span element.
source is the template variable referring to the input element.
target is the template variable referring to the target span element.
When the user clicks the button, the click event will fire and run the statement specified inside the event and set the data entered by user into the span element.
Angular elements are reusable components that have been transformed into custom elements (also called Web Components). Angular provides a simple and effective method to create Web components.
Web components are custom HTML elements available in native HTML specifications to extend the features/tags of the HTML document. It can be created through JavaScript and can be made available in the HTML document. JavaScript has special methods to create custom HTML elements.
Creating custom HTML elements using JavaScript is a lengthy process and developers need to understand the internal workings of custom HTML elements and the Shadow DOM concept. Angular simplifies the process by enabling the conversion of Angular components to web components with minimal change in the component class.
Creating Angular Elements
Creating Angular elements means transforming a component into a custom element. For this purpose, the @angular/elements package is used. This package exports a createCustomElement() function that converts a component into a class that can be registered with the browser as a custom element.
Example
Let us learn how to create a custom HTML element in Angular.
In this example, we will create a component to display employee information (say EmpCard) and convert it into custom HTML element.
Step 1: Create an angular application, emp-card-web-component using Angular CLI.
ng newemp-card-web-component
Step 2: Create the emp-card component using Angular CLI.
Step 3: Add encapsulation option in the @Component decorator with ViewEncapsulation.ShadowDom option. ShadowDom option enables the HTML native ShadowDom concept to preserve the styles of the component without leaking into the other part of the HTML document.
Step 8: Next, install @angular/elements module provided by angular team. @angular/elements module has options to create custom HTML element from angular component.
ng add @angular/elements
✔ Determining Package Manager
   Using package manager: npm
✔ Searching for compatible package version
   Found compatible package version: @angular/[email protected].
✔ Loading package information from registry
✔ Confirming installation
✔ Installing package
Package "@angular/elements" was found but does not support schematics.
Step 9: Next, open the main.ts file and remove all boilerplate code.
Step 10: Next, import createApplication from @angular/platform-browser. createApplication will bootstrap the angular application.
Step 11: Next, import createCustomElement from @angular/element module. createCustomElement will be used to create custom HTML element from the angular component.
Step 13: Next, create application using createAppliation() method by inputting providers and a callback method. The callback method will be used to create the custom HTML element from angular component.
Step 14: Implement the callback method and create custom element using createCustomElement() method. createCustomElement accepts the component to be converted and the apps injector.
We can get injector from application reference returned from createApplication() method.
Step 18: Once, the build is done, the output files are available in dist/emp-card-web-component folder. It has below files (similar files) along with a index.html file.
main-5LWF45YA.js
polyfills-FFHMD2TL.js
styles-5INURTSO.css
Step 19: Update the index.html file of the src folder with the newly created component and check the output for correctness.
Angular allows the component to be dynamically created and loaded at run time at a specific location in the host (another) component. Loading a component at run time opens a lot of opportunities to do advanced functionality. For example, a banner rotation component can accept heavily customized banner item instead of accepting banners confirming to a specific template, which is always pre-defined and static in nature.
Let us learn how to create an Angular component at run time and attach it to the host component in this chapter.
How to Render Angular Components Dynamically?
There are two ways to create dynamic components in Angular:
Using NgComponentOutlet
Using ViewContainerRef
Using NgComponentOutlet
The NgComponentOutlet is a directive that helps in dynamic component creation. It instantiates a Component and embeds its view (host view) inside the current view. Please note it only accepts Components and to use it, you need to import CommonModule.
Example
In this example, we see the practical implementation of NgComponentOutlet directive. Here, we create an Angular application that will have two main child components and they will be associated with buttons named Admin and User. On clicking the Admin button, AdminBioComponent will be displayed and when you click the User button, StandardBioComponent will be displayed.
Step 1: Create AdminBioComponent using the given command −
ng g c admin-bio
Step 2: Create a second component, StandardBioComponent using the command given below −
ng g c standard-bio
Step 3: We need another component that will contain the logic of dynamic component creation.
ng g c check-bio
Step 4: Now, open admin-bio.component.html file and copy the below code −
<h3>Admin Bio</h3><p>Content of the Admin Bio Component.</p>
Step 5: Then, open standard-bio.component.html file and copy the below code −
<h3>Standard Bio</h3><p>Content of the Standard Bio Component.</p>
Step 6: Next, open check-bio.component.html file and copy the below code −
Step 7: In the check-bio.component.ts file, create a method named getBioComponent(). This method will check which button is clicked among the two and display the view accordingly. The complete code is given below −
Step 8: Next, open app.component.html file and copy the below code −
<!-- buttons to trigger admin() and userLog() methods --><button(click)="admin()">Admin</button><button(click)="userLog()">User</button><!-- conditional rendering --><div *ngIf="isValid"><!--input binding --><app-check-bio [user]="user"></app-check-bio><router-outlet /></div>
Here, the given buttons will trigger the admin() and userLog() methods. The *ngIf directive conditionally includes the <div> element in the DOM if the isValid property is true. If it is false, the <div> and its contents are not rendered.
Step 10: Finally, inside the app.component.ts file, copy the below code −
The second way of creating and rendering components dynamically is by using ViewContainerRef. Other components or directives use it to get a reference to a view container corresponding to their location in the DOM. In this way, ViewContainerRef helps to dynamically create and insert components at that specific location.
Example
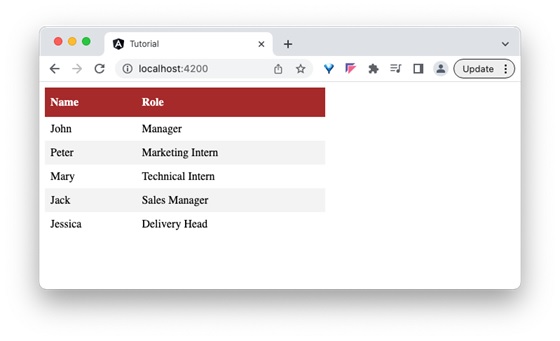
Let us create a real time application to display a collection of employees in two different formats, table and gallery. We will create two components, one to show employees in the table and another in gallery format. Then we will create a host component, which will dynamically load either table based component or gallery based component.
Step 1: Create an interface to hold common data across multiple dynamic component
$ ng generate interfaceDynDataCREATE src/app/dyn-data.ts(29 bytes)
Step 2: Create a directive, DynSample. The purpose of the directive is to target and select the view container (where dynamic component will be placed) in the host component template.
$ ng generate directive DynSample
CREATE src/app/dyn-sample.directive.spec.ts(237 bytes)CREATE src/app/dyn-sample.directive.ts(147 bytes)
Step 3: Create a dynamic component, DynList. The purpose of the component is to list the employee as gallery.
Step 5: Create a host component, DynHost. The purpose of the component is to host any one of the component, DynList and DynTable based on configuration.
Attribute directive purpose is to target the element (ng-template) in the host components template where the dynamic component will be injected.
appDynSample is the selector to target and select the element (ng-template). The dynamic component will be created, initialized and injected into the appHello element (ng-template) later.
Step 7: Next, initialize the view component reference object (ViewComponentRef) in the directive as shown below −
Imported the ViewContainerRef from @angular/core module
Initialized the viewContainerRef object through contructor dependency injection. viewContainerRef is the view container of the targeted element (ng-template) in the host components template. ViewContainerRef has method to dynamically create a component and append that component to it. We will use it later in the host component to dynamically create the DynListComponent and DynTableComponent.
Step 8: Next, open the interface, DynData and add an array property, data
exportinterfaceDynData{
data : any[]}
Step 9: Next, open the DynListComponent component and implement DynData interface.
Step 24: Next, open the app components template and include the host component.
<app-dyn-host format="table"/>
Here, we have directed the host component to render the employees data in the tabular format. The host component will dynamically create the DynTableComponent and inject into the host component template.
Step 25: Next, run the application and you can see that the employee data is shown in a tabular format as shown below −
Step 26: Next, open the app components template and change the format to gallery.
<app-dyn-host format="gallery"/>
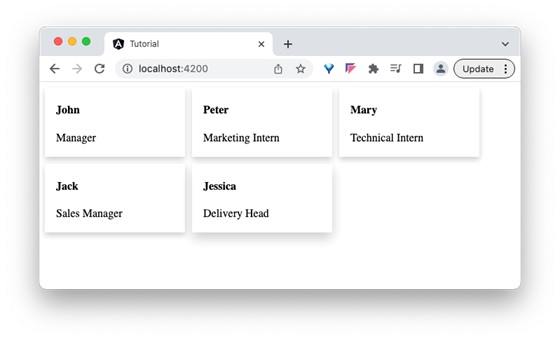
Here, we have directed the host component to render the employees data in gallery format. The host component will dynamically create the DynListComponent and inject into the host component template.
Step 27: Next, run the application and you can see that the employee data is shown in gallery format as shown below −
 to run the following SQL code to be executed on CUSTOMERS table and print the records matching with the given condition.