Angular provides option to listen and fire action for each user initiated event in a typical web application. Event binding is the process of targeting an event in a HTML element/component and set a responder for the target event. The responder will execute once the event is fired.
In this tutorial, we will understand Event Binding.
How to use Event Binding?
An event can be set for an HTML element/component by including the event name inside the bracket (( )) and assigning a template statement. The template statement will execute once the event is fired by the user. The generic syntax to set an action for an event is as follows:
(<event_name>)="template statement"
The syntax to listen a click event of a button is as follows:
Now, myAction() will execute whenever the submit button is clicked by the user.
Event Object ($event)
Event object has the data about target and the event send by the firing event to the responding action. Angular expose the event object of any event in the an object represented by $event in the context of template.
To get the event object of the button click event, use $event object available in the template as shown below −
Now, modify the action, myAction() in the component to use the $event object as shown below −
myAction(e){
   e.preventDefault()}
Here, preventDefault() is the method available in the HtmlButtonElement’s event object to suppress the button events built-in action like submitting the form.
Types of Events
Angular supports all events in a web application and the events are categorized by its source and usage. The type of events are as follows:
Mouse events
Keyboard based events
Touch based events
Document based events
Let’s learn them one by one in brief.
Mouse Based Events
Mouse based events are events fired by mouse actions like click, scroll, movement, drag, etc.,. Some of the most important events in this category and its angular event binding target name are given below −
Single click – (click)
Double click – (dblclick)
Mouse down – (mousedown)
Mouse up – (mouseup)
Mouse entering an element – (mouseenter)
Mouse leaving an element – (mouseleave)
Scrolling a block – (scroll)
Holding and dragging an element – (drag)
Holding and dropping an element – (drop)
Dragging an event over the target drop event – (dragover)
Keyboard Based Events
Keyboard based events are events fired when the user works on the keyboard. Some of the most important events in this category are mentioned below −
Pressing a key – (keydown)
Releasing a key – (keyup)
Pressing a character key – (keypress)
Focusing an element – (focus)
Opposite of focusing an element – (blur)
Pressing a specific key or key combination like Shift + T (keydown.shift.t)
Events targeting a specific key press can be done using below format:
keydown.<modifier_key>.<key_code>
keydown.<key_code>
keydown.code.<event code separated by dot(.)>
Here,
Modifier_key represents shift, alt and control
Key_code represent the target keyboard code like alphabets, digit, etc., as specified in HTML spec. Example, keydown.shift.t
Event code represent the event code as specified in HTML spec like keyT, Tab, etc.,
For example, pressing shift key and t at the same time can be targeted as shown below −
Touch based events are events fired when the user interacts through a touch device. Some of the most important events in this category are as follows −
Pointing an element and start moving in a touch device – (touchstart)
Pointing an element and Moving in a touch device – (touchmove)
Pointing an element and stop moving in a touch device – (touchend)
Web Document Based Events
Web document based events are specific events fired in the web document to perform actions like cut, copy and paste a text, submitting a form, etc., Some of the most important events in this category are mentioned below −
Submitting a form by clicking the submit button – (submit)
Copying a text to clipboard – (copy)
Pasting a text from clipboard – (paste)
Deleting and copying a piece of text to clipboard – (cut)
Implementing Event Binding
Let us create a simple registration form to understand attribute binding. Our registration form will have three input field as shown below and a button to submit the registration form.
Username
Password
Confirm password
Step 1: Create a new application, my-app using angular CLI as shown below −
ng newmy-app
Step 2: Create a new registration form component, RegisterForm using angular CLI as shown below −
ng generate component RegisterForm
Step 3: Next, open the registration form component’s template and add a form with username, password and confirm password.
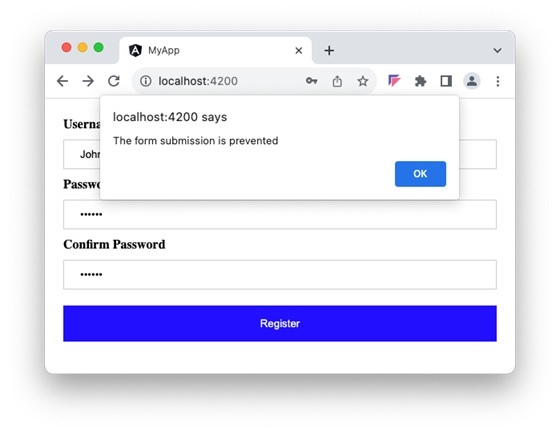
Step 11: Run the application and check the output. Clicking the button does not submit the form as it is intercepted and prevented using event binding.
There may be a situation when you need an exact copy of a table with the same columns, attributes, indexes, default values and so forth. Instead of spending time on creating the exact same version of an existing table, you can create a clone of the existing table.
SQL Cloning Operation allows to create the exact copy of an existing table along with its definition. There are three types of cloning possible using SQL in various RDBMS; they are listed below −
Simple Cloning
Shallow Cloning
Deep Cloning
Simple Cloning in MySQL
Simple cloning operation creates a new replica table from the existing table and copies all the records in newly created table. To break this process down, a new table is created using the CREATE TABLE statement; and the data from the existing table, as a result of SELECT statement, is copied into the new table.
Here, clone table inherits only the basic column definitions like the NULL settings and default values from the original table. It does not inherit the indices and AUTO_INCREMENT definitions.
Syntax
Following is the basic syntax to perform simple cloning in MySQL−
CREATETABLE new_table SELECT*FROM original_table;
Example
Consider the following existing CUSTOMERS table which will be cloned in next new few steps.
ID
NAME
AGE
ADDRESS
SALARY
1
Ramesh
32
Ahmedabad
2000.00
2
Khilan
25
Delhi
1500.00
3
Kaushik
23
Kota
2000.00
4
Chaitali
25
Mumbai
6500.00
5
Hardik
27
Bhopal
8500.00
6
Komal
22
Hyderabad
4500.00
7
Muffy
24
Indore
10000.00
Now let’s use the following SQL statement to create NEW_CUSTOMERS table using the existing table CUSTOMERS.
To verify whether the table has been cloned successfully, we can use the following SELECT query −
SELECT*FROM NEW_CUSTOMERS;
If NEW_CUSTOMERS table is created successfully, then it should get all the records which are available in CUSTOMERS table.
Shallow Cloning in MySQL
Shallow cloning operation creates a new replica table from the existing table but does not copy any data records into newly created table, so only new but empty table is created.
Here, the clone table contains only the structure of the original table along with the column attributes including indices and AUTO_INCREMENT definition..
Syntax
Following is the basic syntax to perform shallow cloning in MySQL RDBMS −
CREATETABLE new_table LIKE original_table;
Example
Following is an example to create a shallow clone copy of the existing table CUSTOMERS.
CREATETABLE SHALL_CUSTOMERS LIKE CUSTOMERS;
Output
The output is displayed as −
Query OK, 0 rows affected (0.06 sec)
Verification
To verify whether the table has been cloned successfully, we can use the following DESC table_name query −
DESC SHALL_CUSTOMERS;
This will display the following information about the SHALL_CUSTOMERS table which is just a replica of CUSTOMERS table −
Field
Type
Null
Key
Default
Extra
ID
int(11)
NO
PRI
NULL
NAME
varchar(20)
NO
NULL
AGE
int(11)
NO
NULL
ADDRESS
char(25)
YES
NULL
SALARY
decimal(18,2)
YES
NULL
Deep Cloning in MySQL
Deep cloning operation is a combination of simple cloning and shallow cloning. It not only copies the structure of the existing table but also its data into the newly created table. Hence, the new table will have all the contents from existing table and all the attributes including indices and the AUTO_INCREMENT definitions.
Since it is a combination of shallow and simple cloning, this type of cloning will have two different queries to be executed: one with CREATE TABLE statement and one with INSERT INTO statement. The CREATE TABLE statement will create the new table by including all the attributes of existing table; and INSERT INTO statement will insert the data from existing table into new table.
Syntax
Following is the basic syntax to perform deep cloning in MySQL RDBMS −
CREATETABLE new_table LIKE original_table;INSERTINTO new_table SELECT*FROM original_table;
Example
Following is an example to create a deep clone copy of the existing table CUSTOMERS. First step is to create a shallow clone of the existing table.
CREATETABLE DEEP_CUSTOMERS LIKE CUSTOMERS;
The output is displayed as −
Query OK, 0 rows affected (0.06 sec)
Now second step is to copy all the records from the CUSTOMERS table to DEEP_CUSTOMERS.
To verify whether the table has been cloned successfully, we can use the following SELECT query −
SELECT*FROM DEEP_CUSTOMERS;
If DEEP_CUSTOMERS table is cloned successfully, then it should get all the records which are available in CUSTOMERS.
Table Cloning in SQL Server
However, there is no direct way to fully clone a table in an SQL server. However, we have some work around to handle the situation.
SELECT…INTO STATEMENT
MS SQL Server can make use of the SELECT…INTO statement to create a new table and copies the data from an existing table into it. However, this command only copies the data and not the definition of it, thus, omitting constraints, indexes etc., if any. They need to be added separately if one wishes to have the exact same structure of the original table in their new table.
You can use the SELECT…INTO command to copy a table within the same database as well as across different databases.
Syntax
Following is the basic syntax of the SELECT…INTO statement −
SELECT*INTO new_table FROM original_table;
The above SQL command will create a table new_table using the structure of original_table and then it will copy all the data from original_table to new_table.
Example
Consider the following existing CUSTOMERS table which will be cloned in this section.
ID
NAME
AGE
ADDRESS
SALARY
1
Ramesh
32
Ahmedabad
2000.00
2
Khilan
25
Delhi
1500.00
3
Kaushik
23
Kota
2000.00
4
Chaitali
25
Mumbai
6500.00
5
Hardik
27
Bhopal
8500.00
6
Komal
22
Hyderabad
4500.00
7
Muffy
24
Indore
10000.00
Now, if you want to clone the data of this table into a new table NEW_CUSTOMERS, let’s use the following SQL query as shown below −
SELECT*INTO NEW_CUSTOMERS FROM CUSTOMERS;
Output
The output will be displayed as −
(7 rows affected)
Verification
To verify whether all the data has been copied into the new table NEW_CUSTOMERS, we shall use the SQL SELECT statement as follows −
SELECT*FROM NEW_CUSTOMERS;
If NEW_CUSTOMERS table is created successfully, then it should get all the records which are available in CUSTOMERS table.
Text interpolation is the process of using data of Angular component in its corresponding template using the template expression. It is used just to display a piece of information in HTML, such as displaying a title or name.
The component is a building block of an Angular application. It consists of a TypeScript class, an HTML template, and CSS styles. The template expression is a piece of code written within double curly braces {{ }} in the Template.
How to use Text Interpolation?
As discussed earlier, we write the template expression inside double curly braces to use Text Interpolation. It is shown below for the reference −
{{<template expression>}}
Let us consider that a component has name as one of its property.
exportclassHomeComponent{
   name: string ='John'}
Now, name can be used in it’s template as shown below −
Hello {{ name }}
Understanding Template Expression
Template expressions are same as that of JavaScript expression excluding two set of expression:
Expression with no usage in the template (assignement, object creation, etc.,)
Expressions with side effects
For example, the increment operator (++) basically increment the given variable and then returns the incremented value. This is called side effect. Since the increment operator produces the side effect, it is not allowed in the template expression.
Some of the JavaScript expressions not allowed in the template expression. They are given below:
Assignment operators: Template does not have the concept of creating a new variable and setting value for it in the context of template.
new keyword: Template does not allow the creation of new object. Any object should be created in the component class. Object created in the component will be available in the template.
typeof and instanceOf keyword: Template does not allow interpretation of the object in the template. Logic should be done in the component through public method and should exposed to the template.
Chaining expressions: Template expression allows only a single expression and so, all chaining operators are excluded.
increment and decrement operators: Template does not allow side effects. Since the increment and decrement operator does side effects, they are excluded.
Bitwise operator: Pipe symbol (|) is used to represent the angular pipe concept. Angular pipes are used for text transformation.
As template will render many times during the lifetime of the application, angular team recommends the expression to be short, quick and have no side effects.
Template Expression Context
Template expression has three context −
1. Component’s property: Components property are the property set in the components instance. For example, a user object (user) in the component can be used in the template as follows,
{{ user.name }}
Here, user context is component’s instance.
2. Template input variable: Template input variable are input to the template assigned through directives. For example, ngFor directive send the index and current item of the loop to the template as shown below,
<ul><li *ngFor="let user of users">{{user.name}}</li></ul>
Here, user context is template input variable.
3. Template reference variable: Template reference variable is basically representation of HTML elements, components and directive in the give template as shown below −
<input #user /><span>{{ user.value }}</span>
Here, user context is template reference variable.
The precedence of context in case of name collision is as follow,
Template variable
Variable in the directive’s context
Component’s member variable
Working Example
Now, let’s see a practical example of Text Interpolation in Angular.
Step 1: Create a new application using angular CLI as shown below −
$ ng newmy-app
Step 2: Create a component, Hello using angular CLI as shown below −
SQL provides command to TRUNCATE a table completely in one go instead of deleting table records one by one which will be very time consuming and cumbersome process.
The SQL TRUNCATE TABLE Statement
The SQL TRUNCATE TABLE command is used to empty a table. This command is a sequence of DROP TABLE and CREATE TABLE statements and requires the DROP privilege.
You can also use DROP TABLE command to delete a table but it will remove the complete table structure from the database and you would need to re-create this table once again if you wish you store some data again.
Syntax
The basic syntax of a TRUNCATE TABLE command is as follows.
TRUNCATETABLE table_name;
Example
First let’s create a table CUSTOMERS which can store the personal details of customers including their name, age, address and salary etc. as shown below −
CREATETABLE CUSTOMERS (
   ID INTNOTNULL,
   NAME VARCHAR(20)NOTNULL,
   AGE INTNOTNULL,
   ADDRESS CHAR(25),
   SALARY DECIMAL(18,2),PRIMARYKEY(ID));
Now insert values into this table using the INSERT statement as follows −
Following SQL TRUNCATE TABLE CUSTOMER statement will remove all the records of the CUSTOMERS table −
TRUNCATETABLE CUSTOMERS;
Verification
Now, the CUSTOMERS table is truncated and the output from SELECT statement will be as shown in the code block below −
SELECT*FROM CUSTOMERS;
Following will be the output −
Empty set (0.00 sec)
TRUNCATE vs DELETE
Even though the TRUNCATE and DELETE commands work similar logically, there are some major differences that exist between them. They are detailed in the table below.
DELETE
TRUNCATE
The DELETE command in SQL removes one or more rows from a table based on the conditions specified in a WHERE Clause.
SQL’s TRUNCATE command is used to remove all of the rows from a table, regardless of whether or not any conditions are met.
It is a DML(Data Manipulation Language) command.
It is a DDL(Data Definition Language) command.
There is a need to make a manual COMMIT after making changes to the DELETE command, for the modifications to be committed.
When you use the TRUNCATE command, the modifications made to the table are committed automatically.
It deletes rows one at a time and applies same criteria to each deletion.
It removes all of the information in one go.
The WHERE clause serves as the condition in this case.
The WHERE Clause is not available.
All rows are locked after deletion.
TRUNCATE utilizes a table lock, which locks the pages so they cannot be deleted.
It makes a record of each and every transaction in the log file.
The only activity recorded is the deallocation of the pages on which the data is stored.
It consumes a greater amount of transaction space compared to TRUNCATE command.
It takes comparatively less amount of transaction space.
If there is an identity column, the table identity is not reset to the value it had when the table was created.
It returns the table identity to a value it was given as a seed.
It requires authorization to delete.
It requires table alter permission.
When it comes to large databases, it is much slower.
It is much faster.
TRUNCATE vs DROP
Unlike TRUNCATE that resets the table structure, DROP command completely frees the table space from the memory. They are both Data Definition Language (DDL) operations as they interact with the definitions of database objects; which allows the database to automatically commit once these commands are executed with no chance to roll back.
However, there are still some differences exist between these two commands, which have been summarized in the following table −
DROP
TRUNCATE
The DROP command in SQL removes an entire table from a database including its definition, indexes, constraints, data etc.
The TRUNCATE command is used to remove all of the rows from a table, regardless of whether or not any conditions are met and resets the table definition.
It is a DDL(Data Definition Language) command.
It is also a DDL(Data Definition Language) command.
The table space is completely freed from the memory.
The table still exists in the memory.
All the integrity constraints are removed.
The integrity constraints still exist in the table.
Requires ALTER and CONTROL permissions on the table schema and table respectively, to be able to perform this command.
Only requires the ALTER permissions to truncate the table.
DROP command is much slower than TRUNCATE but faster than DELETE.
TRUNCATE command is faster than both DROP and DELETE commands.
Data Binding is the process of connecting a target (such as a DOM element, property, or event) in a template to a model (data or behavior) in the component. This process lets the template to dynamically reflect changes in the component’s state or execute actions based on user interactions, using template expressions or template statements.
In Angular, data binding is used to establish communication between component class to view template and view template to the component class.
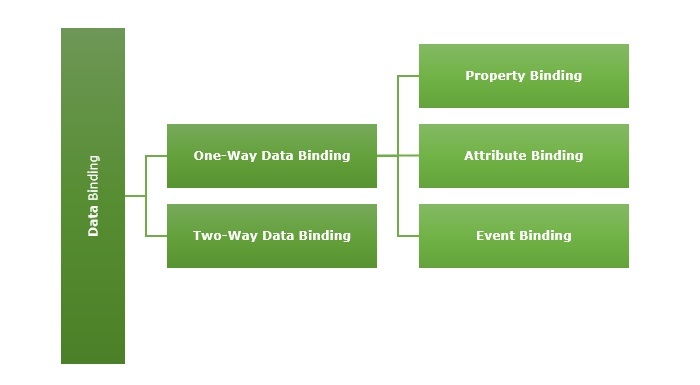
Types of Data Binding
There are two types of Data Binding in Angular −
One-Way Data Binding
Two-Way Data Binding
The diagram below shows the categorization of data binding −
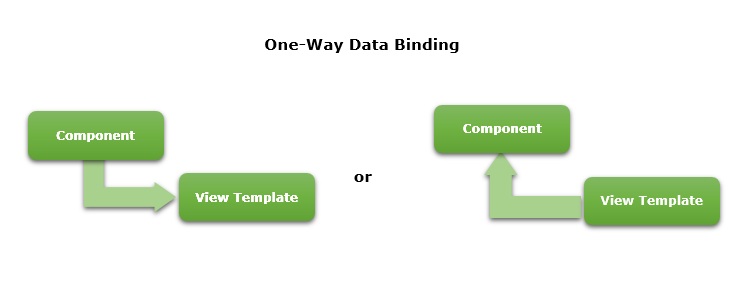
One-Way Data Binding
One-way data binding is a one-directional interaction between a component and its template. The data flows either from component to its corresponding template or template to the component. If you perform any changes in your component, then it will reflect in the HTML elements.
One-way data binding can be achieved through the following ways −
Text Interpolation
Event Binding
Property Binding
Attribute Binding
Text Interpolation
In general,Text Interpolationis the process of formatting or manipulating strings. In Angular,itis used to display data from a component to a view. In this way of data binding, we use the curly braces {{ }}.
Let us consider a variable, name available in the component.
name: string ="John"
Then, the name can be used in the template using interpolation as shown below −
Name:{{ name }}
The final output of the template is shown below −
Name: John
Event Binding
Event binding is the process of setting an action to the event of an HTML element or another component. It is used to achieve one-way data binding where data flows from the view template to the component class. Here, we use the parentheses ( ).
Events are actions like a mouse click, double click, hover or any other keyboard and mouse actions. If a user interacts with an application and performs some actions, then an event will be raised.
Suppose there is a method called myAction() inside the component.
myAction(){// do some process}
For this, event binding can be written as shown below −
Once the submit event is fired, myAction() method will be called and executed.
Property Binding
Property binding lets us bind a property of a DOM. It is used to show or hide a DOM element, or simply manipulate the DOM. Here, we use square brackets [ ]
Let us consider a property, name available in the component.
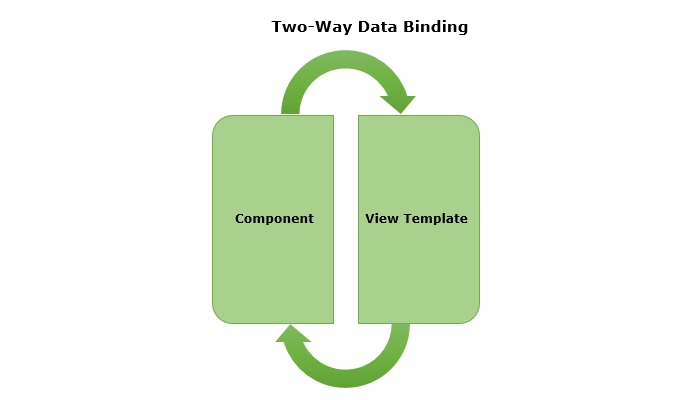
Two-way data binding is a two-way interaction where data flows in both ways, from component to views and views to component at the same time. If you do any changes in your property (or model) then, it reflects in your view and vice-versa. It is the combination of property and event binding.
The NgModel, a standalone Angular directive, is used for two-way data binding. This directive binds the form control to property and the property to form control.
The syntax of ngModel is as follows −
<HTML [(ngModel)]="model.name" />
A sample two-way data binding format is as follows,
Here, data will be passed initially from parent to child component and then, whenever the data gets updated in the child component, the child component will fire an event with updated data and the parent will capture the data through event callback method, dataChange().
We will learn two-way data binding concept in more detail in the upcoming chapter.
SQL provides two ways to rename an MySQL table. You can use either SQL RENAME TABLE or ALTER TABLE statement to change a table name in MySQL RDBMS.
The SQL RENAME TABLE Statement
You can change a MySQL table name using SQL RENAME TABLE statement.
Syntax
Following is the syntax of the SQL RENAME TABLE Statement −
RENAMETABLE table_name TO new_table_name;
Where, table_name is the current name of an existing table and new_table_name is the new name of the table.
Example: SQL RENAME TABLE Statement
Let us create a table with the name CUSTOMERS which contains the personal details of customers including their name, age, address and salary etc. as shown below −
CREATETABLE CUSTOMERS (
   ID INTNOTNULL,
   NAME VARCHAR(20)NOTNULL,
   AGE INTNOTNULL,
   ADDRESS CHAR(25),
   SALARY DECIMAL(18,2),PRIMARYKEY(ID));
Now, let us insert few records into this table using the INSERT statement as follows −
Following SQL Query changes the name of the CUSTOMERS table to BUYERS −
RENAMETABLE CUSTOMERS to BUYERS;
Verification
Once you change the name of a table, you can start using the new table name in your SQL queries.
SELECT*FROM BUYERS;
If table name got changed successfully, then it should list down all the records which were available in CUSTOMERS table.
The SQL ALTER TABLE Statement
The ALTER TABLE statement can be used to change or modify the structure of an existing table i.e. using this statement you can add/delete columns, create/destroy indexes, change the datatypes of the existing columns, rename the columns and, we can even rename the table.
Syntax
Following is the syntax of the SQL ALTER TABLE statement to rename an existing table −
Following SQL ALTER TABLE statement will change the table name from BUYERS to CUSTOMERS.
ALTERTABLE BUYERS RENAMETO CUSTOMERS;
Verification
Once you change the name of the table to CUSTOMERS, you can start using this name in your SQL queries.
SELECT*FROM CUSTOMERS;
This will produce the following result:
ID
NAME
AGE
ADDRESS
SALARY
1
Ramesh
32
Ahmedabad
2000.00
2
Khilan
25
Delhi
1500.00
3
Kaushik
23
Kota
2000.00
4
Chaitali
25
Mumbai
6500.00
5
Hardik
27
Bhopal
8500.00
6
Komal
22
Hyderabad
4500.00
7
Muffy
24
Indore
10000.00
Renaming a Table in SQL Server
There isn’t a query in SQL Server that can rename a table directly. However, it does give you access to a stored procedure called sp_rename that enables you to rename a table.
The sp_rename is a system stored procedure (set of pre-built subroutines that perform tasks within the database) in SQL that can be used to rename various database objects including tables, columns, indexes, and constraints.
Syntax
Following is the basic syntax to rename a table in SQL Server −
EXEC sp_rename 'old_table_name','new_table_name'
Here, you must ensure that old table name is present in the database and that new table name does not already exist. Otherwise, it will issue a warning. Second important point is to make sure that the table is not locked and there is no active transaction involving this table.
Example: Renaming a Table in SQL Server
Assume we already have the CUSTOMERS table in our database. Now, we are going to rename this table from CUSTOMERS to WORKERS, using the following query −
We can verify whether the changes are reflected by retrieving its contents using the SELECT statement as follows −
SELECT*FROM WORKERS;
This will list down all the records available in WORKERS table as follows −
ID
NAME
AGE
ADDRESS
SALARY
1
Ramesh
32
Ahmedabad
2000.00
2
Khilan
25
Delhi
1500.00
3
Kaushik
23
Kota
2000.00
4
Chaitali
25
Mumbai
6500.00
5
Hardik
27
Bhopal
8500.00
6
Komal
22
Hyderabad
4500.00
7
Muffy
24
Indore
10000.00
Because you have renamed the table to WORKERS so if you try to get the details by using the old table name, it will throw an error showing that the table does not exist.
Rules to be followed while renaming tables
When renaming tables in SQL, there are some rules and best practices that should be followed to ensure that the renaming process goes smoothly and does not cause any unintended consequences or issues.
Avoid renaming system tables − System tables are tables that are created and used by the database management system itself. Renaming these tables can cause issues with the functioning of the database system, so it is generally not recommended to rename system tables.
Update all references to the table − After renaming a table, any stored procedures, views, triggers, or other database objects that reference the table will need to be updated to use the new name of the table. Failure to update these references can result in errors or issues with the functioning of the database system.
Test thoroughly − Before renaming a table in a production environment, it is important to test the renaming process thoroughly in a development or testing environment to ensure that all references to the table have been updated correctly and that the database system continues to function as expected.
Use a consistent naming convention − It is a good practice to use a consistent naming convention for tables and other database objects to make it easier to understand and maintain the database system. If you need to rename a table, consider following the same naming convention that you have used for other tables in the database.
Backup the database − Before renaming a table, it is recommended to create a backup of the database to ensure that you have a restore point; in case anything goes wrong during the renaming process.
There are several instances when you need to retrieve a list of tables from your database. This could be done for testing purposes, to identify any existing tables before adding or removing any, or for any other reason. This tutorial will discuss how we can list down all the table in MySQL, SQL Server and Oracle using simple SQL commands.
MySQL – Listing Tables
You can use SQL SHOW TABLES statements in MySQL to list down all the tables available in a selected database.
Syntax
Following is the syntax to list all the tables in SQL in MySQL −
SHOWTABLES;
Example
Following is an example which will list down all the tables from a testDB database.
USE testDB;SHOWTABLES;
This will display the following output depending on the number of tables available in your database.
Tables_in_testDB
CALENDAR
CUSTOMERS
COMPANIES
SALARY
SQL Server – Listing Tables
SQL Server does not provide SHOW TABLE command in an SQL Server. Instead, we can use the “SELECT” statement to retrieve information about tables in a database. We have three different commands to use with the SELECT statement to list all the tables in a database −
sys.tables
information_schema.tables
sysobjects
The SYS.TABLES View
Following is the syntax to list down all the tables in SQL using the SYS.TABLES view −
SELECT*FROM SYS.TABLES;
Following is the output of the above query −
name
object_id
principal_id
schema_id
CUSTOMER
4195065
NULL
1
ORDERS
68195293
NULL
1
COMPANIES
100195407
NULL
1
SALARY
2107154552
NULL
1
The INFORMATION_SCHEMA.TABLES View
Following is the syntax to list down all the tables in SQL using the INFORMATION_SCHEMA.TABLES view −
SELECT table_name, table_type FROM INFORMATION_SCHEMA.TABLES;
Following is the output of the above query −
table_name
table_type
CUSTOMER
BASE TABLE
ORDERS
BASE TABLE
COMPANIES
BASE TABLE
SALARY
BASE TABLE
The SYSOBJECTS View
You can use SYSOBJECTS view to retrieve the information of all the objects created in SQL Server database, including stored procedures, views, system tables and user-defined tables. Following is the basic syntax of using sysobjects view −
SELECT name, id, xtype FROM sysobjects WHERE xtype ='U';
Click here to see the different value of xtype
This will produce following result −
name
id
xtype
CUSTOMER
4195065
U
ORDERS
68195293
U
COMPANIES
100195407
U
SALARY
2107154552
U
Oracle – Listing Tables
There are following three SQL SELECT statements which you can use to list down the tables available in Oracle.
Listing ALL Tables
Following is the SQL SELECT statement which will list down all the available tables in an Oracle Database.
SELECT owner, table_name FROM ALL_TABLES
Listing DBA Tables
Following is the SQL SELECT statement which will list down all the DBA related tables in an Oracle Database.
SELECT owner, table_name FROM DBA_TABLES
Listing USER Tables
Following is the SQL SELECT statement which will list down all the USER created tables in an Oracle Database.
SELECT owner, table_name FROM USER_TABLES
Listing ALL Views
Following is the SQL SELECT statement which will list down all the views available in an Oracle Database.
This tutorial will teach you how to use SQL to create tables in RDBMS. We use CREATE TABLE command to create a Table in a Database.
In RDBMS, Database tables are used to store the data in the form of some structures (fields and records). Here, a field is a column defining the type of data to be stored in a table and record is a row containing actual data. In simple words, we can say a Table is a combination of rows and columns.
SQL provides various queries to interact with the data in a convenient way. We can use SQL statements to create and delete tables, inserting, updating and deleting data in these tables.
For a more detail on different concepts related to RDBMS please check RDBMS Concepts tutorial.
The SQL CREATE TABLE Statement
SQL provides the CREATE TABLE statement to create a new table in a given database. An SQL query to create a table must define the structure of a table. The structure consists of the name of a table and names of columns in the table with each column’s data type. Note that each table must be uniquely named in a database.
Syntax
CREATE TABLE statement is used to create a new table in a database. −
CREATETABLE table_name(
   column1 datatype,
   column2 datatype,
   column3 datatype,.....
   columnN datatype,PRIMARYKEY( one or more columns));
Here are the key points-
CREATE TABLE is the keyword telling the database system what you want to do. In this case, you want to create a new table. The unique name or identifier for the table follows the CREATE TABLE statement.
The column parameters (e.g. column1, column2, column3, etc.) specify the names of the columns of the table.
The datatype parameter specifies the type of data the column can hold (e.g. integer, varchar, string, etc.).
PRIMARY KEY constraint uniquely identifies each record in a table. Primary keys must contain UNIQUE values, and cannot contain NULL values.
Example: Creating Table in SQL
CREATETABLE CUSTOMERS(
   ID          INTNOTNULL,
   NAME        VARCHAR(20)NOTNULL,
   AGE         INTNOTNULL,
   ADDRESS     CHAR(25),
   SALARY      DECIMAL(18,2),PRIMARYKEY(ID));
Here are the key points-
The following code block is an example, which creates a CUSTOMERS table with column name ID, NAME, AGE, ADDRESS and, SALARY and ID as a primary key.
NOT NULL are the constraints showing that these fields cannot be NULL while creating records in this table.
Verification
Once your table is created, you can check if it has been created successfully or not. You can use SQL DESC table_name command to list down the description of the table as follows:
DESC CUSTOMERS;
This will display the structure of the table created: column names, their respective data types, constraints (if any) etc.
Field
Type
Null
Key
Default
Extra
ID
int(11)
NO
PRI
NULL
NAME
varchar(20)
NO
NULL
AGE
int(11)
NO
NULL
ADDRESS
char(25)
YES
NULL
SALARY
decimal(18,2)
YES
NULL
Now, you have CUSTOMERS table available in your database which you can use to store the required information related to customers.
SQL CREATE TABLE IF NOT EXISTS
Consider a situation where you will try to create a table which already exists, in such situation MySQL will throw the following error.
So to avoid such error we can use SQL command CREATE TABLE IF NOT EXISTS to create a table.
Syntax
Following is the basic syntax of a CREATE TABLE IF NOT EXISTS statement −
CREATETABLEIFNOTEXISTS table_name(
   column1 datatype,
   column2 datatype,
   column3 datatype,.....
   columnN datatype,PRIMARYKEY( one or more columns));
Example: Creating Table if Not Exists
The following SQL command will create the CUSTOMERS table only when there is no table exists with the same name otherwise it will exit without any error.
CREATETABLEIFNOTEXISTS CUSTOMERS(
   ID          INTNOTNULL,
   NAME        VARCHAR(20)NOTNULL,
   AGE         INTNOTNULL,
   ADDRESS     CHAR(25),
   SALARY      DECIMAL(18,2),PRIMARYKEY(ID));
Creating a Table from an Existing Table
Instead of creating a new table every time, one can also copy an existing table and its contents including its structure, into a new table. This can be done using a combination of the CREATE TABLE statement and the SELECT statement. Since its structure is copied, the new table will have the same column definitions as the original table. Furthermore, the new table would be populated using the existing values from the old table.
Syntax
The basic syntax for creating a table from another table is as follows −
CREATETABLE NEW_TABLE_NAME ASSELECT[column1, column2...columnN]FROM EXISTING_TABLE_NAME
WHERE Condition;
Here, column1, column2… are the fields of the existing table and the same would be used to create fields of the new table.
Example: Creating Table from an Existing Table
Following is an example, which would create a table SALARY using the CUSTOMERS table and having the fields customer ID and customer SALARY −
CREATETABLE SALARY ASSELECT ID, SALARY
FROM CUSTOMERS;
This will create a new table SALARY which will have the following structure −
In this SQL Backup Database tutorial, we will explain how we can take a backup of a database in MySQL and MS SQL Server. It is very important and basic development practice to have a backup of the database in case the original is corrupted or lost due to power surges or disk crashes etc. By practicing this, the database can be recovered as it was before the failure.
SQL Backup Database Statement
In SQL, the BACKUP DATABASE statement is used to create database backups.
Syntax
Following is the syntax of SQL Backup Database Statement −
BACKUPDATABASE database_name
TODISK='filepath'
GO
Here, the SQL command creates a backup file of the database_name database.
Types of Backups in SQL
In SQL, there are three types of database backups available. These are:
Full Backup
Differential Backup
Transaction Log (T-log) backup
SQL Full Backup
A full backup is a complete backup of an SQL server database.
Syntax
Following is the syntax of SQL Full Backup −
BACKUPDATABASE database_name
TO medium ='filepath'
GO
Here, database_name is the name of the database, medium refers to the storage medium such as disk, tape or url.
SQL Differential Backup
In Sql, you can also backup only the new changes by using the WITH DIFFERENTIAL command.
Syntax
Following is the syntax of Sql Differential Backup −
BACKUPDATABASE my_db
TO medium ='filepath'WITH DIFFERENTIAL;
GO
Here, database_name is the name of the database, medium refers to storage device such as disk, tape or url.
Transaction Log (T-log) backup
A transaction log backup includes all the transactions since the last transaction log backup. BACKUP LOG comnmand is used to perfom the Transaction Log backup.
Syntax
Following is the syntax of Sql transaction log backup −
BACKUP LOG database_name
TO medium ='filepath';
GO
Here, database_name is the name of the database, medium refers to storage device such as disk
Restore Database From Backup
To restore a backup file in Database, we can use the RESTORE DATABASE command.
Syntax
Following is the syntax of Restore Database From Backup −
RESTOREDATABASE database_name
FROMDISK='filepath';
GO
Here, database_name is the name of the database, medium refers to disk, tape or url.
MySQL and MS SQL Database Backup and Restore
Here is the process to create backup in MySQL and MS Sql databases.
Backup MySQL Database
MySQL mysqldump command can be used to take complete backup of a given database. This operation will be performed from command line and will require database user name and password, preferably admin privilege.
We are using the -p flag immediately followed by our password to connect to the database with no space between. The -R is required to tell mysqldump to copy stored procedures and functions along with the normal data from the database.
Depending on the database size, above command may take sometime to create a final output file testDB.sql. Once command is completed, you will have a complete database dump in testDB.sql file which you can keep safe anywhere you like. Later this file can be used to restore the database.
Restore MySQL Database
If we have a database dump then we can use the following two step process to restore our database. First step is to create our new database using mysqladmin prompt command as follows:
The next step is to import old database into new database shown below :
$ mysql -u username -p"password" tutorialsDB < testDB.sql;
If you want to keep your database name same as the old one then you will have to drop old database and then re-create it before importing old data into this database, but make sure you don’t have any data in this database which you do not want to loose.
Backup MS SQL Database
If you are working with MS SQL Server then to create a backup for an existing database, SQL provides us with a simple SQL BACKUP DATABASE command.
Syntax
Following is the syntax of the BACKUP DATABASE command in SQL −
BACKUPDATABASE database_name
TODISK='filepath'
GO
Example
Following is an example to create a backup file for the database testDB on D drive.
SQL>BACKUPDATABASE testDB
TODISK='D:\testDB.bak'
GO
To perform a backup or restore you should have admin sysadmin privileges. You should also back up the database onto a different disk other than the actual database. Even if the disk crashes, we will not lose our backup file along with the database.
Output
When we execute the above query, the output is obtained as follows −
Processed 344 pages for database 'testDB', file 'testDB' on file 1.
Processed 2 pages for database 'testDB', file 'testDB_log' on file 1.
BACKUP DATABASE successfully processed 346 pages in 0.011 seconds (245.383 MB/sec).
Restore MS SQL Database
If you have a proper backup of an MS SQL database then youc an easily restore it when needed.
Syntax
Following is the syntax of the RESTORE DATABASE command in SQL −
RESTOREDATABASE database_name
FROMDISK='filepath'[WITHREPLACE]
GO
Here WITH REPLACE option can be given if you want to overwrite the existing database.
Example
Following is an example to restore a database from a backup file testDB.bak available on D drive.
SQL>RESTOREDATABASE testDB
FROMDISK='D:\testDB.bak'WITHREPLACE
GO
Many a times you face a situation where you need to list down all the available databases. MySQL provides a convenient way to list down all the databases using SHOW DATABASES command where as there is no particular command in MS SQL Server to show or list the databases but, you can use the SELECT…FROM command as a work around list down available databases.
List Databases using SQL
The SQL SHOW DATABASES statement is used to list down all the available databases in MySQL database. You can use SHOW SCHEMAS as an alternate command for SHOW DATABASES.
Syntax
Following is the syntax of SQL SHOW DATABASES to list down all the available databases in MySQL −
SHOWDATABASES[LIKE'pattern'|WHERE expr];
We can use LIKE or WHERE clause along with SHOW DATABASES to filter out a list of databases.
Example
Following is an example to list down all the available databases.
SHOWDATABASES;
The output will be displayed as follows. This output depends on the number of databases available in the system −
Database
performance_schema
information_schema
mysql
testDB
Following is an example to list down all the databases whose name starts with test.
SHOWDATABASESLIKE'test%';
The output will be displayed as follows −
Database (test%)
testDB
The SHOW SCHEMAS Statement
You can use the SHOW SCHEMAS statement as an alternate for the SHOW DATABASES statement.
Syntax
Following is the syntax of the SQL SHOW SCHEMAS statement to list down all the available databases in MySQL −
SHOW SCHEMAS [LIKE'pattern'|WHERE expr];
We can use LIKE or WHERE clause along with SHOW SCHEMAS to filter out a list of databases.
Example
Following is an example to list down all the available databases.
SHOW SCHEMAS;
The output will be displayed as follows. This output depends on the number of databases available in the system −
Database
performance_schema
information_schema
mysql
testDB
Following is an example to list down all the databases whose name starts with test.
SHOW SCHEMAS LIKE'test%';
The output will be displayed as follows −
Database (test%)
testDB
The SELECT…FROM Statement
If you are working with MS SQL Server then you can use the SELECT…FROM statement to list down all the available databases as shown below.
SQL>SELECT*FROM sys.databases;
Output
If we execute the above query, it returns a table that lists down all the databases and associated information about the databases.
name
database_id
source_database_id
owner_sid
master
1
NULL
001
tempdb
2
NULL
001
model
3
NULL
001
msdb
4
NULL
001
testDB
5
NULL
001000
The EXEC sp_databases Statement
If you are using MS SQL Server then you can use the following EXEC sp_databases statement to list down all the databases −
SQL>EXEC sp_databases;
Output
This will display the same result as we got from SELECT…FROM statement.