Author: saqibkhan

  • Class and Style Binding

    What is Class Binding?

    A dynamic web application usually have dynamic styles and are set during the runtime of the application. Class binding is a special binding to bind a dynamic value to the class attribute of a HTML element.

    Let us see more details about class binding in this chapter.

    Ways to use Class Binding

    Angular provides four different ways to implement class binding. Each of them supports a special feature. The four ways are as follows:

    Let us learn one by one in the upcoming sections.

    Single Class Binding

    In single class binding, class string should be surrounded by square bracket and a template variable should be set as it’s value.

    <div [class]="<template variable>"><!-- content --></div>

    Here, the template variable holds the class name for the specific HTML element.

    Single Class Binding with on/off Feature

    In single class binding with on/off feature, class style should be appended by the actual class name of the given HTML element and a template variable with boolean value should be set as it’s value. The boolean value determines the availability of the specific class to the HTML element.

    <div [class.<class name>]="template variable">
       <!-- content --></div>

    Here, the template variable outputs either true or false.

    Let us consider a class with name red, used to set the text of the HTML element to red color.

    .red{color: red;}

    Consider a member variable, isRedEnabled available in the component.

    isRedEnabled: boolean =true

    Then, the class binding can be set in a HTML element as shown below −

    <div [class.red]="isRedEnabled"><!-- content --></div>

    Multiple Class Binding

    In multiple class binding, class string should be surrounded by square bracket and the value should be set with one of more existing class name separated by space. For example, two class (myClass and myAnotherClass) for a HTML element can be set using [class] as shown below −

    <div [class]="<template variable>"><!-- content --></div>

    Here, the template variable will emit myClass myAnotherClass string.

    Multiple Class Binding through an Object with on/off Feature

    In multiple class binding through an object with on/off feature, class string should be surrounded by square bracket and the value should be set with an object of type Record<string, boolean> having keys and values with class name and boolean value respectively. The boolean value of a key determine whether the corresponding key will be set a class of the given HTML element.

    <div [class]="<objects as template variable>"><!-- content --></div>

    Let as consider an object with multiple keys representing class name and have boolean values as shown below −

    // in component
    myClass: Record<string, boolean>={ 
       c1:true,
       c2:false
       c3:true}

    Apply the class binding in the template as shown below −

    // in template
    <div [class]="myClass"><!-- content --></div>

    Then the output will have c1 and c3 class because both of these classes have true value in the object.

    // output
    <div class="c1 c3"><!-- content --></div>

    Implementing Class Binding

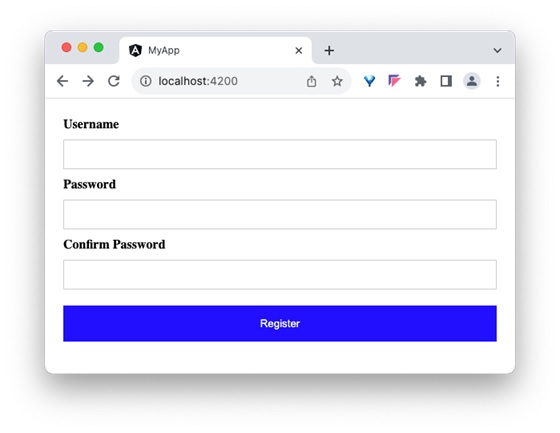
    Let us create a simple registration form to understand class binding. Our registration form will have three input field as shown below and a button to submit the registration form.

    1. Username
    2. Password
    3. Confirm password
    

    Step 1: Create a new application, my-app using angular CLI as shown below −

    ng newmy-app
    

    Step 2: Create a new registration form component, RegisterForm using angular CLI as shown below −

    ng generate component RegisterForm
    

    Step 3: Next, open the registration form component’s template and add a form with username, password and confirm password.

    <div><form method="post"><div class="container"><label for="username"><b>Username</b></label><input type="text" name="username" required><label for="password"><b>Password</b></label><input type="password" name="password" required><label for="confirm_password"><b>Confirm Password</b></label><input type="password" name="confirm_password" required><button type="submit">Register</button></div></form></div>

    Step 4: Open the registration form component’s CSS style and style the form using CSS as shown below −

    .container{padding: 15px;}input[type=text], input[type=password]{width: 100%;padding: 10px 20px;margin: 10px 0;display: inline-block;border: 1px solid #ccc;box-sizing: border-box;}button{background-color: blue;color: white;padding: 15px 20px;margin: 10px 0;border: none;cursor: pointer;width: 100%;}

    Step 5: Include our registration form component in the app template file, app.component.html

    <app-register-form />

    Step 6: Run the application and test the registration form.

    blue_button

    Step 7: Next, let us create few classes in the style file and apply our new class for the button using class binding.

    Step 8: Next, add two class, purple and smallcaps in the component’s style file.

    .purple{background-color: purple;}.smallcaps{font-variant: small-caps;}

    Step 9: Add a member variable, isPurple in the component as shown below −

    isPurple: boolean =true

    Step 10: Next, add an object in the component with purple and smallcaps class as keys as shown below −

    btnClass: Record<string, boolean>={'purple':true,'smallcaps':true}

    Step11: Next, assign the variable, isPurple to the button through class binding.

    <button type="submit"[class.purple]="isPurple">Register</button>

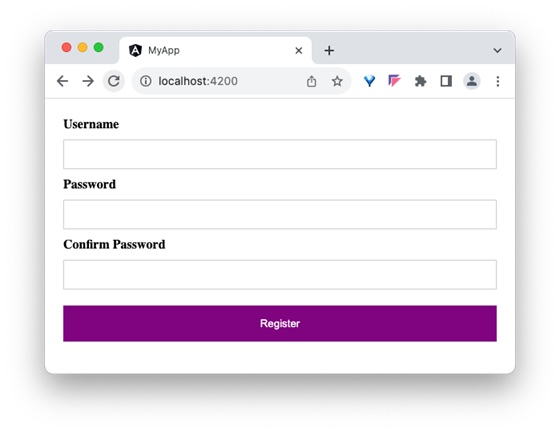
    Step12: Run the application and check the output. Output will show the button with purple color.

    purple button

    Step13: Next, reassign the object, btnClass to the buttons class through class binding.

    <button type="submit"[class]="btnClass">Register</button>

    Here, both purple and small caps will be applied.

    Step14: Run the application and check the output. Output will show the button with purple color and Register text is small caps format.

    button small caps

    Step15: The complete listing of the component is as follows,

    import{ Component }from'@angular/core';
    
    @Component({
       selector:'app-login-form',
       templateUrl:'./register-form.component.html',
       styleUrls:['./register-form.component.css']})exportclassRegisterFormComponent{
       isPurple: boolean =true
       
       btnClass: Record<string, boolean>={'purple':true,'smallcaps':true}}

    Step16: The complete listing of the component’s template is as follows,

    <div><form method="post"><div class="container"><label for="username"><b>Username</b></label><input type="text" name="username" required><label for="password"><b>Password</b></label><input type="password" name="password" required><label for="confirm_password"><b>Confirm Password</b></label><input type="password" name="confirm_password" required><!-- <button type="submit" [class.purple]="isPurple">Register</button> --><button type="submit" [class]="btnClass">Register</button></div></form></div>

    Style binding

    Style binding in Angular allows you to dynamically set inline CSS styles on an HTML element based on the component’s properties or template variables.

    Syntax of Style Binding

    Angular provides four different syntax in style binding. Each type of style binding supports a special feature. The four syntax as are follows:

    • Single style binding
    • Single style binding with unit
    • Multiple style binding
    • Multiple style binding through a custom style object
  • Indexes

    The SQL Indexes

    SQL Indexes are special lookup tables that are used to speed up the process of data retrieval. They hold pointers that refer to the data stored in a database, which makes it easier to locate the required data records in a database table.

    SQL Indexes work similar to the index of a book or a journal.

    While an index speeds up the performance of data retrieval queries (SELECT statement), it slows down the performance of data input queries (UPDATE and INSERT statements). However, these indexes do not have any effect on the data.

    SQL Indexes need their own storage space within the database. Despite that, the users cannot view them physically as they are just performance tools.

    The CREATE INDEX Statement

    An index in SQL can be created using the CREATE INDEX statement. This statement allows you to name the index, to specify the table and which column or columns to index, and to indicate whether the index is in an ascending or descending order.

    Preferably, an index must be created on column(s) of a large table that are frequently queried for data retrieval.

    Syntax

    The basic syntax of a CREATE INDEX is as follows −

    CREATEINDEX index_name ON table_name;

    Types of Indexes

    There are various types of indexes that can be created using the CREATE INDEX statement. They are:

    • Unique Index
    • Single-Column Index
    • Composite Index
    • Implicit Index

    Unique Indexes

    Unique indexes are used not only for performance, but also for data integrity. A unique index does not allow any duplicate values to be inserted into the table. It is automatically created by PRIMARY and UNIQUE constraints when they are applied on a database table, in order to prevent the user from inserting duplicate values into the indexed table column(s). The basic syntax is as follows.

    CREATEUNIQUEINDEX index_name
    on table_name (column_name);

    Single-Column Indexes

    A single-column index is created only on one table column. The syntax is as follows.

    CREATEINDEX index_name
    ON table_name (column_name);

    Composite Indexes

    A composite index is an index that can be created on two or more columns of a table. Its basic syntax is as follows.

    CREATEINDEX index_name
    on table_name (column1, column2);

    Implicit Indexes

    Implicit indexes are indexes that are automatically created by the database server when an object is created. For example, indexes are automatically created when primary key and unique constraints are created on a table in MySQL database.

    The DROP INDEX Statement

    An index can be dropped using SQL DROP command. Dropping an index can effect the query performance in a database. Thus, an index needs to be dropped only when it is absolutely necessary.

    The basic syntax is as follows −

    DROPINDEX index_name;

    When should indexes be avoided?

    Although indexes are intended to enhance a database’s performance, there are times when they should be avoided.

    The following guidelines indicate when the use of an index should be reconsidered.

    • Indexes should not be used on small tables.
    • They should not be used on tables that have frequent, large batch updates or insert operations.
    • Indexes should not be used on columns that contain a high number of NULL values.
    • Columns that are frequently manipulated should not be indexed.
  • Alternate Key

    The SQL Alternate Key

    SQL Alternate Keys in a database table are candidate keys that are not currently selected as a primary key. They can be used to uniquely identify a tuple(or a record) in a table.

    There is no specific query or syntax to set the alternate key in a table. It is just a column that is a close second candidate which could be selected as a primary key. Hence, they are also called secondary candidate keys.

    If a database table consists of only one candidate key, that is treated as the primary key of the table, then there is no alternate key in that table.

    Let us understand the concept of alternate key with an example. Suppose we have a table named CUSTOMERS with various fields like ID, NAME, AGE, AADHAAR_ID, MOBILE_NO and SALARY as shown below.

    Alternate

    The details like id, mobile number and aadhaar number of a customer are unique, and we can identify the records from the CUSTOMERS table uniquely using their respective fields; ID, AADHAAR_ID and MOBILE_NO. Therefore, these three fields can be treated as candidate keys.

    And among them, if one is declared as the primary key of the CUSTOMERS table then the remaining two would be alternate keys.

    Features of Alternate Keys

    Following are some important properties/features of alternate keys −

    • The alternate key does not allow duplicate values.
    • A table can have more than one alternate keys.
    • The alternate key can contain NULL values unless the NOT NULL constraint is set explicitly.
    • All alternate keys can be candidate keys, but all candidate keys can not be alternate keys.
    • The primary key, which is also a candidate key, can not be considered as an alternate key.

    Example

    For a better understanding, let us create the above discussed table demonstrating the usage of the various keys and illustrating the fields that can be considered as alternate keys.

    CREATETABLE CUSTOMERS(
       ID INT,
       NAME VARCHAR(20),
       AGE INT,
       AADHAAR_ID BIGINT,
       MOBILE_NO BIGINT,
       SALARY DECIMAL(18,2),PRIMARYKEY(ID));

    Now, insert some records into the CUSTOMERS table using the INSERT statement as shown below −

    INSERTINTO CUSTOMERS VALUES(1,'Ramesh',32,90123498456,9023456789,22000.00),(2,'Khilan',25,91123249545,9032456578,24500.34),(3,'Kaushik',23,91223242546,9012436789,20000.12);

    The table will be created as −

    IDNAMEAGEAADHAAR_IDMOBILE_NOSALARY
    1Ramesh3290123498456902345678922000.00
    2Khilan2591123249545903245657824500.34
    3Kaushik2391223242546901243678920000.12

    Keys in a table

    As a summary lets revisit all the keys in a database table −

    Candidate Key

    Candidate key is a subset of super keys that is used to uniquely identify records of a table. It can be a single field or multiple fields. The primary keys, alternate keys, foreign keys in a table are all types of candidate key.

    Primary Key

    Primary Key is a main key that is used to retrieve records from a table. It is a single column or field in a table that uniquely identifies each record in a database table.

    It can be set using the PRIMARY KEY keyword while creating a table using the CREATE TABLE statement. Following is the basic syntax to create primary key constraint on a column in a table −

    CREATETABLE table_name(
       column1 datatype,
       column2 datatype,
       column3 datatype,.....
       columnN datatype,PRIMARYKEY(column_name));

    Foreign Key

    The Primary key of one table will be the Foreign key in another table. While inserting values into these tables, values in the primary key field must match the values in the foreign key field; otherwise, the foreign key column will not accept the INSERT query and throws an error.

    In SQL server, the syntax to set a foreign key field in a table is −

    CREATETABLE table_name (
    
    column1 datatype,
    column2 datatype,...CONSTRAINT fk_name 
    FOREIGNKEY(column_name)REFERENCES referenced_table(referenced_column));

    Alternate Key

    An Alternate key is a candidate key that could be a primary key but is not. Like primary key, it also uniquely identifies the records in a field of a table to retrieve row tuples from the said table. There can be a single or multiple fields identifying as alternate keys in a table.

  • Composite Key

    The SQL Composite Key

    An SQL Composite Key is a key that can be defined on two or more columns in a table to uniquely identify any record. It can also be described as a Primary Key created on multiple columns.

    Composite Keys are necessary in scenarios where a database table does not have a single column that can uniquely identify each row from the table. In such cases, we might need to use the combination of columns to ensure that each record in the table is distinct and identifiable.

    Let us understand the composite keys with an example. Suppose if we have a table named CUSTOMERS with various fields like ID, NAME, AGE, AADHAAR_ID, MOBILE_NO and SALARY as shown below −

    Alternate

    We can select the two columns AADHAAR_ID and MOBILE_NO and define a Composite key on them, and it can be used to fetch the records of the CUSTOMERS table uniquely.

    Features of Composite Keys

    Following are some important features of the SQL Composite Key −

    • A Composite Key can be created by combining more than one Candidate Key.
    • Each Candidate Key (or column) that makes up a Composite Key may or may not be a Foreign Key. However, if all the columns of the Composite Key are Foreign Keys in their own right, then the Composite Key is known as a Compound Key.
    • A Composite Key cannot be NULL; i.e. any column of the Composite Key must not contain NULL values.
    • The individual columns making up the Composite Key can contain duplicate values, but, the combination of these columns must be unique across the database table.

    Syntax

    Following is the syntax to create an SQL Composite Key while creating a table −

    CREATETABLE table_name(
       column1 datatype,
       column2 datatype,
       column3 datatype,.....
       columnN datatype,CONSTRAINT composite_key_name,PRIMARYKEY(column_name));

    Here, the composite_key_name is the optional placeholder which holds the name of a Composite Key in a table. It is used while dropping the constraint from a table in some databases.

    Example

    In the following example, we are creating a table named CUSTOMERS with multiple columns. The Composite Key is created when a PRIMARY KEY is defined on ID and NAME columns together. Look at the query below −

    CREATETABLE CUSTOMERS(
       ID INTNOTNULL,
       NAME VARCHAR(20)NOTNULL,
       AGE INTNOTNULL,
       ADDRESS CHAR(25),
       SALARY DECIMAL(18,2),CONSTRAINT ck_customers 
       PRIMARYKEY(ID, NAME));

    Where, ck_customers is the name of a composite key of this table.

    Output

    Following is the output of the above statement −

    Query OK, 0 rows affected (0.02 sec)
    

    Verification

    As we have created a Composite Key on the columns ID and NAME of the CUSTOMERS table, the combination of values in these columns can not be duplicated. To verify it, let us insert two records with same values in these columns into the CUSTOMERS table −

    INSERTINTO CUSTOMERS VALUES(1,'Ramesh',32,'Ahmedabad',2000.00),(1,'Ramesh',25,'Delhi',1500.00);

    You can observe that the second INSERT statement generates an error message saying “Duplicate entry” as shown below −

    ERROR 1062 (23000): Duplicate entry '1-Ramesh' for key 'customers.PRIMARY'
    

    Dropping a Composite Key in MySQL

    You can drop the composite key from a table in MySQL database using the ALTER TABLE… DROP statement.

    Syntax

    Following is the syntax to drop the Composite Key in MySQL −

    ALTERTABLE table_name DROPPRIMARYKEY;

    Example

    Using the following SQL statement, we can drop the Composite Key constraint from the CUSTOMERS table −

    ALTERTABLE CUSTOMERS DROPPRIMARYKEY;

    Output

    The above SQL statement produces the following output −

    Query OK, 1 row affected (0.02 sec)
    Records: 1  Duplicates: 0  Warnings: 0
    

    Verification

    Since, we have dropped the composite from the CUSTOMERS table, so now you can insert the duplicate values in the columns ID and NAME.

    Let us insert two records with the same ID and NAME into the CUSTOMERS table −

    INSERTINTO CUSTOMERS VALUES(1,'Ramesh',25,'Delhi',1500.00),(1,'Ramesh',23,'Kota',2000.00);

    If you retrieve the contents the CUSTOMERS table you can find the records with same ID and NAME as −

    IDNAMEAGEADDRESSSALARY
    1Ramesh32Ahmedabad2000.00
    1Ramesh25Delhi1500.00
    1Ramesh23Kota2000.00

    Dropping a Composite Key in SQL Server

    In SQL Server, we have a different syntax to drop a composite key of a table. The syntax is almost similar, but we just need to specify the composite key name in order to drop it, rather than the keyword PRIMARY KEY.

    Syntax

    Following is the syntax to drop a composite key in SQL Server −

    ALTERTABLE table_name DROP composite_key_name;

    Example

    Assuming that a composite key “ck_customers” is created on ID and NAME columns of the CUSTOMERS table, we will use the following query to drop it −

    ALTERTABLE CUSTOMERS DROP ck_customers;

    Output

    When we execute the above query, the composite key will be dropped.

    Commands completed successfully.
    

    Verification

    To verify whether we have removed the composite key from the CUSTOMERS table or not, insert duplicate values into the ID and NAME columns using the following query −

    INSERTINTO CUSTOMERS VALUES(1,'Ramesh',25,'Delhi',1500.00),(1,'Ramesh',23,'Kota',2000.00);

    As we can see in the table below, both the customers have the same ID and NAME −

    IDNAMEAGEADDRESSSALARY
    1Ramesh32Ahmedabad2000.00
    1Ramesh25Delhi1500.00
    1Ramesh23Kota2000.00

  • Foreign Key

    The SQL Foreign Key

    In SQL, a Foreign Key is a column in one table that matches a Primary Key in another table, allowing the two tables to be connected together.

    A foreign key also maintains referential integrity between two tables, making it impossible to drop the table containing the primary key (preserving the connection between the tables).

    The foreign key can reference the unique fields of any table in the database. The table that has the primary key is known as the parent table and the key with the foreign key is known as the child table.

    Let’s consider an example scenario, assume we have two tables namely CUSTOMERS (ID, NAME, AGE, ADDRES, SALARY) and ORDERS (ID, DATE, CUSTOMER_ID, AMOUNT). Here the id of the customer is primary key (ID) in the CUSTOMERS table and foreign key in the ORDERS (CUSTOMER_ID) table observe the following diagram −

    foreign key

    Features of Foreign Key

    Following is the of features of Foreign Key −

    • A Foreign Key is used to reduce the redundancy (or duplicates) in the table.
    • It helps to normalize (or organize the data in a database) the data in multiple tables.

    Syntax

    Following is the basic syntax to add Foreign Key constraints on a column of a table in MySQL database −

    CREATETABLE table_name (
    
    column1 datatype,
    column2 datatype,...CONSTRAINT fk_name 
    FOREIGNKEY(column_name)REFERENCES referenced_table(referenced_column));

    Example

    Let us create two tables with the names CUSTOMERS and ORDERS. The following query creates a table with the name CUSTOMERS −

    CREATETABLE CUSTOMERS(
       ID INTNOTNULL,
       NAME VARCHAR(20)NOTNULL,
       AGE INTNOTNULL,
       ADDRESS CHAR(25),
       SALARY DECIMAL(18,2),PRIMARYKEY(ID));

    Output

    Following is the output of the above SQL statement −

    Query OK, 0 rows affected (0.02 sec)
    

    Now, let us create the ORDERS table. While doing so, we add the foreign key constraint on column CUSTOMER_ID reference on column ID of the CUSTOMERS table as shown in the statement below −

    CREATETABLE ORDERS (
       ID INTNOTNULL,DATEDATETIME, 
       CUSTOMER_ID INT,CONSTRAINT FK_CUSTOMER 
       FOREIGNKEY(CUSTOMER_ID)REFERENCES CUSTOMERS(ID),
       AMOUNT DECIMAL,PRIMARYKEY(ID));

    Output

    The above statement produces the following output −

    Query OK, 0 rows affected (0.04 sec)
    

    Verification

    We have created a Foreign Key Constraint on a column named CUSTOMER_ID in the ORDERS table that references the column named ID of the CUSTOMERS table; so you can’t drop table1 (CUSTOMERS) before dropping the table2 (ORDERS).

    First of all, let’s drop the CUSTOMERS table without dropping the ORDERS table using the DROP TABLE statement −

    DROPTABLE CUSTOMERS;

    If you verify the error message below, you will observe that it says that the table can not be dropped because it is referenced by a FOREIGN KEY constraint −

    ERROR 3730 (HY000): Cannot drop table 'customers' referenced by a foreign key constraint 'FK_CUSTOMER' on table 'orders'.
    

    Foreign Key Constraint on an Existing Column

    We can also create a Foreign key constraint on a column of an existing table. This is useful when you forget to add a Foreign Key constraint on a column while creating a table, or when you want to add this constraint on another column even if one Foreign Key column exists in a table.

    Syntax

    Using the ALTER TABLE statement we can add a Foreign Key constraint on an existing column in a table in MySQL database as shown below −

    ALTERTABLE TABLE2 
    ADDCONSTRAINT[symbol]FOREIGNKEY(column_name)REFERENCES TABLE1(column_name);

    Here, FK_ORDERS is the name of the foreign key constraint. It is optional to specify the name of a constraint but it comes in handy while dropping the constraint.

    Example

    Assume the CUSTOMERS and ORDERS tables have already been created in the SQL database. Now, we will add a Foreign Key Constraint on the ID column of the ORDERS table.

    Following is the SQL query to add the foreign key constraint on an the column of an existing table −

    ALTERTABLE ORDERS 
    ADDCONSTRAINT FK_ORDERS 
    FOREIGNKEY(ID)REFERENCES CUSTOMERS(ID);

    Output

    Following is the output of the above program −

    Query OK, 0 rows affected (0.04 sec)
    Records: 0  Duplicates: 0  Warnings: 0
    

    Verification

    We have created a Foreign Key Constraint on a column named CUSTOMER_ID in the ORDERS table that references the column name ID of the CUSTOMERS table. So, you can’t drop table1 (CUSTOMERS) before dropping the table2 (ORDERS).

    First of all, let us drop the CUSTOMERS table without dropping the ORDERS table by executing the following statement −

    DROPTABLE CUSTOMERS;

    This generates an error message saying that the table can not be dropped because it is referenced by a FOREIGN KEY constraint −

    ERROR 3730 (HY000): Cannot drop table 'customers' referenced by a foreign key constraint 'FK_CUSTOMER' on table 'orders'.
    

    Dropping a FOREIGN KEY

    You can drop the foreign key from a table, without dropping that entire table, using the ALTER TABLE statement.

    Syntax

    Following is the syntax to drop the FOREIGN key constraint from the column of the table using the ALTER TABLE statement−

    ALTERTABLE table_name DROPFOREIGNKEY(constraint symbol);

    Where, FK_NAME is the name of the foreign key constraint you need to drop.

    Example

    The SQL query to drop the foreign key constraint from the column of a table is as follows −

    ALTERTABLE ORDERS DROPFOREIGNKEY FK_ORDERS;

    Output

    Following is the output of the above SQL query −

    Query OK, 0 rows affected (0.01 sec)
    Records: 0  Duplicates: 0  Warnings: 0
    

    Verification

    Since we have dropped the Foreign key constraint from the ORDERS table, you can now directly drop the CUSTOMERS table without dropping the ORDERS table, as shown below −

    DROPTABLE CUSTOMERS;

    If you verify the below status code thrown by the above SQL command, you observe that the CUSTOMERS table has dropped.

    Query OK, 0 rows affected (0.02 sec)
    

    Primary Key vs Foreign Key

    Even though both the primary key and foreign key refer to the same column, there are many differences to be observed in the way they work. They are listed below −

    Primary KeyForeign Key
    The primary key is always unique.The foreign key can be duplicated.
    The primary key can not be NULL.The Foreign can be NULL.
    A table can contain only one Primary Key.We can have more than one Foreign Key per table.
  • Primary Key

    The SQL Primary Key

    The SQL Primary Key is a column (or combination of columns) that uniquely identifies each record in a database table. The Primary Key also speeds up data access and is used to establish a relationship between tables.

    Even though a table can only have one Primary Key, it can be defined on one or more fields. When a primary key is created on multiple fields of a table, it is called a Composite Key.

    Let us say, you are developing an application called “Customer Management System” to handle all the customer data of a member-only resort. This data can include their personal details, assigned member IDs, other details of the membership they opted, etc. And in all the tables created within this database, the member ID is used to distinguish the customers from each other. So, this field will be the Primary Key.

    Following is the diagram of a CUSTOMERS table that holds the personal details of the customers. And as we can observe, the primary key is defined on the CUST_ID column. Using this primary key, we can retrieve a unique record of any customer.

    Primary Key

    Points to Remember

    Here are some key points of the PRIMARY KEY −

    • It contains only a unique value.
    • It can not be null.
    • One table can have only one Primary Key.
    • A primary key length cannot be more than 900 bytes.

    Creating an SQL Primary Key

    While creating a table using the CREATE TABLE statement, you can add the primary key constraint on a particular column of the table just by to specifying the name of the column along with the keyword “PRIMARY KEY”.

    Syntax

    Following is the syntax to define a column of a table as a primary key −

    CREATETABLE table_name(
       column1 datatype,
       column2 datatype,
       column3 datatype,.....
       columnN datatype,PRIMARYKEY(column_name));

    Example

    In the following example, we are trying to create a table with the name CUSTOMERS with various fields in an SQL database. While creating the table, we will add the constraint “PRIMARY KEY” on the column named ID.

    CREATETABLE CUSTOMERS (
       ID INTNOTNULL,
       NAME VARCHAR(20)NOTNULL,
       AGE INTNOTNULL,
       ADDRESS CHAR(25),
       SALARY DECIMAL(18,2),PRIMARYKEY(ID));

    Output

    Following is the output of the above SQL statement −

    Query OK, 0 rows affected (0.03 sec)
    

    Verification

    As we know primary key value must be unique, so you can not insert the record with the same ID. Here, we will verify the constraint created on the ID column, by inserting records with duplicate ID values.

    First of all, let’s insert a record into the CUSTOMERS table −

    INSERTINTO CUSTOMERS VALUES(3,'Kaushik',23,'Kota',2000.00);

    Now, let’s insert one more record with same ID −

    INSERTINTO CUSTOMERS VALUES(3,'Chaitali',25,'Mumbai',6500.00);

    As we have mentioned above, if any field/column is defined as Primary Key in a database table, two records can not have the same value in that column/field. Therefore, the second insert statement generates the following error −

    ERROR 1062 (23000): Duplicate entry '3' for key 'customers.PRIMARY'
    

    Similarly, a primary key column cannot contain null values. Here, using the INSERT statement we are passing a NULL value to the primary key column (ID).

    INSERTINTO CUSTOMERS VALUES(NULL,'Komal',22,'Hyderabad',4500.00);

    This statement generates the following error −

    ERROR 1048 (23000): Column 'ID' cannot be null
    

    Creating Primary Key on an Existing Column

    We can also add the PRIMARY KEY constraint on an existing column of a table using the ALTER TABLE statement.

    Syntax

    Following is the syntax to create a primary constraint on existing columns of a table −

    ALTERTABLE table_name ADDCONSTRAINTPRIMARYKEY(column_name);

    Example

    In this example, we are adding the PRIMARY KEY constraint on the NAME column of the existing CUSTOMERS table −

    ALTERTABLE CUSTOMERS ADDCONSTRAINTPRIMARYKEY(NAME);

    Output

    Following is the output of the above statement −

    Query OK, 0 rows affected (0.05 sec)
    Records: 0  Duplicates: 0  Warnings: 0
    

    Dropping an SQL Primary Key

    If you can add a Primary Key Constraint to a column in the table, you can drop it as well. This is done by using the ALTER TABLE… DROP statement.

    Syntax

    Following is the syntax of the ALTER TABLE statement to can drop the Primary key constraints from the column of a table −

    ALTERTABLE table_name DROPPRIMARYKEY;

    Example

    Let us consider the CUSTOMERS table where we have created a primary key constraint on a column named ID. You can drop this constraint from the column ID by executing the following statement −

    ALTERTABLE CUSTOMERS DROPPRIMARYKEY;

    Output

    The above SQL query produces the following output −

    Query OK, 1 row affected (0.03 sec)
    Records: 1  Duplicates: 0  Warnings: 0
    

    Verification

    As we have dropped the Primary key from the column named ID, we can insert multiple records with the same ID. Following statement inserts four records with the same ID −

    INSERTINTO CUSTOMERS VALUES(3,'Chaitali',25,'Mumbai',6500.00),(3,'Hardik',27,'Bhopal',8500.00),(3,'Komal',22,'Hyderabad',4500.00),(3,'Muffy',24,'Indore',10000.00);

    If you verify the content of this table, you can find multiple records with same ID −

    SELECT*FROM CUSTOMERS;

    The table will be displayed as −

    IDNAMEAGEADDRESSSALARY
    3Kaushik23Kota2000.00
    3Chaitali25Mumbai6500.00
    3Hardik27Bhopal8500.00
    3Komal22Hyderabad4500.00
    3Muffy24Indore10000.00

  • Unique Key

    The SQL Unique Key

    The SQL Unique Key (or, Unique constraint) does not allow duplicate values in a column of a table. It prevents two records from having same values in a column.

    Unique Key is just an alternative to the Primary Key; as both Unique and Primary Key constraints ensure uniqueness in a column of the table.

    Suppose we have a table named CUSTOMERS to store the customer records in a Bank and if one of the column names is MOBILE_NO then, we can create a UNIQUE constraint on this column to prevent the entry of multiple records with the same mobile number.

    Features of Unique Keys

    Following is the list of some key features of the Unique Key in an SQL database −

    • The unique key is similar to the primary key in a table, but it can accept NULL values, whereas the primary key does not.
    • It accepts only one NULL value.
    • It cannot have duplicate values.
    • It can also be used as a foreign key in another table.
    • A table can have more than one Unique column.

    Creating SQL Unique Key

    You can create a Unique Key on a database table using the UNIQUE keyword in SQL. While creating a database table, specify this SQL keyword along with the column (where this key needs to be defined on).

    Syntax

    Following is the syntax to create a UNIQUE key constraint on a column in a table −

    CREATETABLE table_name(
       column1 datatype UNIQUEKEY,
       column2 datatype,..........
       columnN datatype
    );

    Example

    Using the following SQL query, we are creating a table named CUSTOMERS with five fields ID, NAME, AGE, ADDRESS, and SALARY in it. Here, we are creating a Unique Key on the ID column.

    CREATETABLE CUSTOMERS (
       ID INTNOTNULLUNIQUEKEY,
       NAME VARCHAR(20)NOTNULL,
       AGE INTNOTNULL,
       ADDRESS CHAR(25),
       SALARY DECIMAL(18,2));

    Output

    Following is the output of the above SQL statement −

    Query OK, 0 rows affected (0.03 sec)
    

    Verification

    Since we have created a UNIQUE constraint on the column named ID, we cannot insert duplicate values in it. Let us verify by inserting the following records with duplicate ID values into the CUSTOMERS table −

    INSERTINTO CUSTOMERS VALUES(1,'Ramesh',32,'Ahmedabad',2000.00),(1,'Khilan',25,'Delhi',1500.00);

    On execution, following error is displayed proving that the UNIQUE constraint is indeed defined on the ID column −

    ERROR 1062 (23000): Duplicate entry '1' for key 'customers.ID'
    

    Multiple Unique Keys

    We can create one or more Unique Keys on one or more columns in an SQL table.

    Syntax

    Following is the syntax to create unique key constraints on multiple columns in a table −

    CREATETABLE table_name(
       column1 datatype UNIQUEKEY,
       column2 datatype UNIQUEKEY,..........
       columnN datatype
    );

    Example

    Assume we have created a table with the name CUSTOMERS in the SQL database using CREATE TABLE statement. A Unique key is defined on columns ID and NAME using the UNIQUE keyword as shown below −

    CREATETABLE BUYERS (
       ID INTNOTNULLUNIQUEKEY,
       NAME VARCHAR(20)NOTNULLUNIQUEKEY,
       AGE INTNOTNULL,
       ADDRESS CHAR(25),
       SALARY DECIMAL(18,2));

    Output

    Following is the output of the above SQL statement −

    Query OK, 0 rows affected (0.03 sec)
    

    Verification

    Since we have created a UNIQUE constraint on the column named ID and NAME, we cannot insert duplicate values in it. Let us verify by inserting duplicate records into the BUYERS table using the following INSERT statement −

    INSERTINTO BUYERS VALUES(1,'Ramesh',32,'Ahmedabad',2000.00),(1,'Rajesh',25,'Delhi',1500.00);

    Following error is displayed −

    ERROR 1062 (23000): Duplicate entry '1' for key 'customers.ID'
    

    In the same way if you try to insert the another record with duplicate value for the column NAME as −

    INSERTINTO BUYERS VALUES(2,'Ramesh',36,'Chennai',1700.00);

    Following error is generated −

    ERROR 1062 (23000): Duplicate entry 'Ramesh' for key 'buyers.NAME'
    

    Unique Key on an Existing Column

    Until now, we have only seen how to define a Unique Key on a column while creating a new table. But, we can also add a unique key on an existing column of a table. This is done using the ALTER TABLE… ADD CONSTRAINT statement.

    Syntax

    Following is the syntax to create a unique constraint on existing columns of a table −

    ALTERTABLE table_name ADDCONSTRAINT 
    UNIQUE_KEY_NAME UNIQUE(column_name);

    Note − Here the UNIQUE_KEY_NAME is just the name of the UNIQUE KEY. It is optional to specify and is used to drop the constraint from the column in a table.

    Example

    In this example, we add a Unique Key on the ADDRESS column of the existing CUSTOMERS table −

    ALTERTABLE CUSTOMERS ADDCONSTRAINT 
    UNIQUE_ADDRESS UNIQUE(ADDRESS);

    Output

    Following is the output of the above statement −

    Query OK, 0 rows affected (0.05 sec)
    Records: 0  Duplicates: 0  Warnings: 0
    

    Dropping an SQL Unique Key

    If you have already created a unique key on a column, you can drop it whenever it is not needed. To drop the Unique Key from the column of a table, you need to use the ALTER TABLE statement.

    Syntax

    Following is the SQL query to drop the UNIQUE constraint from the column of a table −

    ALTERTABLE table_name DROPCONSTRAINT UNIQUE_KEY_NAME;

    Example

    Consider the CUSTOMERS table created above, we have created the UNIQUE constraints on three columns named ID, NAME and ADDRESS; drop the UNIQUE constraints from the column ADDRESS by executing the following SQL query −

    ALTERTABLE CUSTOMERS DROPCONSTRAINT UNIQUE_ADDRESS;

    Output

    Following is the output of the above statement −

    Query OK, 0 rows affected (0.01 sec)
    Records: 0  Duplicates: 0  Warnings: 0
    

    Verification

    Now, let us insert two duplicate records of column ADDRESS −

    INSERTINTO CUSTOMERS VALUES(1,'Ramesh',32,'Ahmedabad',2000.00),(2,'Khilan',25,'Ahmedabad',1500.00);

    If you verify the contents of the table, you can observe that both the records have the same ADDRESS as shown below −

    IDNAMEAGEADDRESSSALARY
    1Ramesh32Ahmedabad2000.00
    2Khilan25Ahmedabad1500.00
  • UNION vs JOIN

    SQL provides various relational operators to handle data that is spread across multiple tables in a relational database. Out of them, UNION and JOIN queries are fundamentally used to combine data from multiple tables.

    Even though they are both used for the same purpose, i.e. to combine tables, there are many differences between the working of these operators. The major difference is that the UNION operator combines data from multiple similar tables irrespective of the data relativity, whereas, the JOIN operator is only used to combine relative data from multiple tables.

    Working of UNION

    UNION is a type of operator/clause in SQL, that works similar to the union operator in relational algebra. It does nothing more than just combining information from multiple tables that are union compatible.

    The tables are said to be union compatible if they follow the conditions given below −

    • The tables to be combined must have same number of columns with the same datatype.
    • The number of rows need not be same.

    Once these criteria are met, UNION operator returns all the rows from multiple tables, after eliminating duplicate rows, as a resultant table.

    Note − Column names of first table will become column names of resultant table, and contents of second table will be merged into resultant columns of same data type.

    Syntax

    Following is the syntax of the SQL UNION operator −

    SELECT*FROM table1
    UNIONSELECT*FROM table2;

    Example

    Let us first create two table “COURSES_PICKED” and “EXTRA_COURSES_PICKED” with the same number of columns having same data types.

    Create table COURSES_PICKED using the following query −

    CREATETABLE COURSES_PICKED(
       STUDENT_ID INTNOTNULL, 
       STUDENT_NAME VARCHAR(30)NOTNULL, 
       COURSE_NAME VARCHAR(30)NOTNULL);

    Insert values into the COURSES_PICKED table with the help of the query given below −

    INSERTINTO COURSES_PICKED VALUES(1,'JOHN','ENGLISH'),(2,'ROBERT','COMPUTER SCIENCE'),(3,'SASHA','COMMUNICATIONS'),(4,'JULIAN','MATHEMATICS');

    Create table EXTRA_COURSES_PICKED using the following query −

    CREATETABLE EXTRA_COURSES_PICKED(
       STUDENT_ID INTNOTNULL, 
       STUDENT_NAME VARCHAR(30)NOTNULL, 
       EXTRA_COURSE_NAME VARCHAR(30)NOTNULL);

    Following is the query to insert values into the EXTRA_COURSES_PICKED table −

    INSERTINTO EXTRA_COURSES_PICKED VALUES(1,'JOHN','PHYSICAL EDUCATION'),(2,'ROBERT','GYM'),(3,'SASHA','FILM'),(4,'JULIAN','PHOTOGRAPHY');

    Now, let us combine the tables COURSES_PICKED and EXTRA_COURSES_PICKED, using the UNION query as follows −

    SELECT*FROM COURSES_PICKED 
    UNIONSELECT*FROM EXTRA_COURSES_PICKED;

    Output

    The resultant table obtained after performing the UNION operation is −

    STUDENT_IDSTUDENT_NAMECOURSE_NAME
    1JhonEnglish
    1JhonPhysical Education
    2RobertComputer Science
    2RobertGym
    3ShashaCommunications
    3ShashaFilm
    4JulianMathematics
    4JulianPhotography

    Working of JOIN

    The Join operation is used to combine information from multiple related tables into one, based on their common fields. This operation can be used with various clauses like ON, WHERE, ORDER BY, GROUP BY etc.

    There are two types of Joins −

    • Inner Join
    • Outer Join

    The basic type of join is an Inner Join, which only retrieves the matching values of common columns. It is a default join.

    The result table of the Outer join includes both matched and unmatched rows from the first table. It is divided into subtypes like Left Join, Right Join, and Full Join.

    Syntax

    Following is the basic syntax of a Join operation in SQL −

    SELECT column_name(s)FROM table1
    JOIN table2
    ON table1.column_name = table2.column_name;

    Example

    In the following example, we will join the same tables we created above, i.e., COURSES_PICKED and EXTRA_COURSES_PICKED, using the query below –

    SELECT c.STUDENT_ID, c.STUDENT_NAME, COURSE_NAME, COURSES_PICKED 
    FROM COURSES_PICKED c
    JOIN EXTRA_COURSES_PICKED e
    ON c.STUDENT_ID = e.STUDENT_ID;

    Output

    The resultant table will be displayed as follows −

    STUDENT_IDSTUDENT_NAMECOURSE_NAMECOURSE_PICKED
    1JhonENGLISHPhysical Education
    2RobertCOMPUTER SCIENCEGym
    3ShashaCOMMUNICATIONSFilm
    4JulianMATHEMATICSPhotography

    UNION Vs JOIN

    As we saw in the examples given above, the UNION operator is only executable on tables that are union compatible, whereas, the JOIN operator joins two tables that need not be compatible but should be related.

    Let us summarize all the difference between these queries below −

    UNIONJOIN
    UNION operation is only performed on tables that are union compatible, i.e., the tables must contain same number of columns with same data type.JOIN operation can be performed on tables that has at least one common field between them. The tables need not be union compatible.
    The data combined will be added as new rows of the resultant table.The data combined will be adjoined into the resultant table as new columns.
    This works as the conjunction operation.This works as an intersection operation.
    UNION removes all the duplicate values from the resultant tables.JOIN retains all the values from both tables even if they’re redundant.
    UNION does not need any additional clause to combine two tables.JOIN needs an additional clause ON to combine two tables based on a common field.
    It is mostly used in scenarios like, merging the old employees list in an organization with the new employees list.This is used in scenarios where merging related tables is necessary. For example, combining tables containing customers list and the orders they made.

  • Left Join vs Right Join

    The main difference between the Left Join and Right Join can be observed in the way tables are joined.

    They are both types of Outer Joins; that is, they retain unmatched rows in one table and discard the unmatched rows of another. Left Join preserves the unmatched rows of left table while Right join preserves the unmatched rows of right table.

    Working of Left Join

    Left Join or Left Outer Join in SQL combines two or more tables, where the first table is returned as it is; but, only the record(s) that have counterparts in first table are returned from consequent tables.

    If the ON clause matches zero records in consequent tables with the rows in first table, left join will still return these rows of first table in the result, but with NULL in each column from the right table.

    Syntax

    Following is the basic syntax of Left Join in SQL −

    SELECT table1.column1, table2.column2...FROM table1
    LEFTJOIN table2
    ON table1.column_name = table2.column_name;

    Example

    The example below demonstrates the Left Join operation on two relative tables. Here, the first table contains the salary information while the second table contains marital status information. Since Alex’s status is unknown, it is not recorded in the table.

    Left Join Vs Right Join

    When both tables are joined using the Left Join query, since there is no record matching Alex’s Status, the value is recorded as NULL in the final table.

    Working of Right Join

    Right Join or Right Outer Join query in SQL returns all rows from the right table, even if there are no matches in the left table. This means that if the ON clause matches 0 (zero) records in left table with the records in right table; right join will still return the rows of right table in the result, but with a NULL value in each column of the left table.

    Syntax

    Following is the basic syntax of a Right Join in SQL −

    SELECT table1.column1, table2.column2...FROM table1
    RIGHTJOIN table2
    ON table1.column_name = table2.column_name;

    Example

    Now in this example, the Right Join operation is performed on the same tables. Here, we are starting the join from the right table; since, the right table does not contain the record value matching Alex’s row, the row is discarded from the final table.

    Left Join Vs Right Join

    The final table only consists of two rows as the right table consists of two rows only.

    Left Join Vs Right Join

    Let us summarize all the differences between the Left Join and Right Join in the table below −

    Left JoinRight Join
    Left Join matches the data of the first table or the left table with the data in second table. If the data is matched, the records are combined; otherwise, NULL is recorded.Right Join matches the data of the second table or right table with the data in first table. If the data is matched, the records are combined; otherwise, NULL is recorded.
    If the first table has less rows than the second table, extra unmatched rows from the second table are discarded.If the second table has less rows than the first table, extra unmatched rows from the first table are discarded.
    This Join is also known as Left Outer JoinThis Join is also known as Right Outer Join
    *= is used in Transact SQL, instead of using the LEFT JOIN or LEFT OUTER JOIN query.=* is used in Transact SQL, instead of using the RIGHT JOIN or RIGHT OUTER JOIN query.

    As we can observe from the summary, there aren’t wide range of differences between the Left and Right joins. Every difference between them zeroes down to the way the tables are joined and the join point of view.

  • UPDATE JOIN

    To update the data entered in a single database table using SQL, you can use the UPDATE statement. However, to update the data in multiple database tables, we need to use the UPDATE… JOIN clause.

    For instance, if a student changes their primary phone number and wishes to update it in their organizational database, the information needs to be modified in multiple tables like student records, laboratory records, canteen passes etc. Using the JOIN clause, you can combine all these tables into one, and then using UPDATE statement, you can update the student data in them simultaneously.

    The SQL UPDATE… JOIN Clause

    The UPDATE statement only modifies the data in a single table and JOINS in SQL are used to fetch the combination of rows from multiple tables, with respect to a matching field.

    If we want to update data in multiple tables, we can combine multiple tables into one using JOINS and then update them using UPDATE statement. This is also known as cross-table modification.

    Syntax

    Following is the basic syntax of the SQL UPDATE… JOIN statement −

    UPDATEtable(s)JOIN table2 ON table1.join_column = table2.join_column
    SET table1.column1 = table2.new_value1, 
    
    table1.column2 = table2.new_value2;</pre>

    Where, JOIN can be: Regular Join, Natural Join, Inner Join, Outer Join, Left Join, Right Join, Full Join etc.

    Example

    Assume we have created a table named CUSTOMERS, which contains the personal details of customers including their name, age, address and salary etc., using the following query −

    CREATETABLE CUSTOMERS (
       ID INTNOTNULL,
       NAME VARCHAR(20)NOTNULL,
       AGE INTNOTNULL,
       ADDRESS CHAR(25),
       SALARY DECIMAL(18,2),PRIMARYKEY(ID));

    Now, insert values into this table using the INSERT statement as follows −

    INSERTINTO CUSTOMERS VALUES(1,'Ramesh',32,'Ahmedabad',2000.00),(2,'Khilan',25,'Delhi',1500.00),(3,'Kaushik',23,'Kota',2000.00),(4,'Chaitali',25,'Mumbai',6500.00),(5,'Hardik',27,'Bhopal',8500.00),(6,'Komal',22,'Hyderabad',4500.00),(7,'Muffy',24,'Indore',10000.00);

    The table will be created as −

    IDNAMEAGEADDRESSSALARY
    1Ramesh32Ahmedabad2000.00
    2Khilan25Delhi1500.00
    3Kaushik23Kota2000.00
    4Chaitali25Mumbai6500.00
    5Hardik27Bhopal8500.00
    6Komal22Hyderabad4500.00
    7Muffy24Indore10000.00

    Let us create another table ORDERS, containing the details of orders made and the date they are made on.

    CREATETABLE ORDERS (
       OID INTNOTNULL,DATEVARCHAR(20)NOTNULL,
       CUSTOMER_ID INTNOTNULL,
       AMOUNT DECIMAL(18,2));

    Using the INSERT statement, insert values into this table as follows −

    INSERTINTO ORDERS VALUES(102,'2009-10-08 00:00:00',3,3000.00),(100,'2009-10-08 00:00:00',3,1500.00),(101,'2009-11-20 00:00:00',2,1560.00),(103,'2008-05-20 00:00:00',4,2060.00);

    The table is displayed as follows −

    OIDDATECUSTOMER_IDAMOUNT
    1022009-10-08 00:00:0033000.00
    1002009-10-08 00:00:0031500.00
    1012009-11-20 00:00:0021560.00
    1032008-05-20 00:00:0042060.00

    Following UPDATE... JOIN query increments the salary of customers by 1000 with respect to the inflation of their order amount by 500 −

    UPDATE CUSTOMERS 
    JOIN ORDERS 
    ON CUSTOMERS.ID = ORDERS.CUSTOMER_ID 
    SET CUSTOMERS.SALARY = CUSTOMERS.SALARY +1000, 
    ORDERS.AMOUNT = ORDERS.AMOUNT +500;

    Verification

    We can verify whether the changes are reflected in a table by retrieving its contents using the SELECT statement as follows −

    SELECT*FROM CUSTOMERS;

    The updated CUSTOMERS table is displayed as follows −

    IDNAMEAGEADDRESSSALARY
    1Ramesh32Ahmedabad2000.00
    2Khilan25Delhi2500.00
    3Kaushik23Kota3000.00
    4Chaitali25Mumbai7500.00
    5Hardik27Bhopal8500.00
    6Komal22Hyderabad4500.00
    7Muffy24Indore10000.00

    Now, check whether the ORDERS table is updated using the following SELECT statement −

    SELECT*FROM ORDERS;

    The updated ORDERS table is displayed as follows −

    OIDDATECUSTOMER_IDAMOUNT
    1022009-10-08 00:00:0033500.00
    1002009-10-08 00:00:0032000.00
    1012009-11-20 00:00:0022060.00
    1032008-05-20 00:00:0042560.00

    UPDATE... JOIN with WHERE Clause

    While updating records from multiple tables, if we use the WHERE clause along with the UPDATE... JOIN statement we can filter the records to be updated (from the combined result set).

    Syntax

    The syntax of SQL UPDATE... JOIN with WHERE clause in MySQL database is as follows −

    UPDATEtable(s)JOIN table2 ON column3 = column4
    SET table1.column1 = value1, table1.column2 = value2,...WHERE condition;

    Example

    Now, let us execute the following query to increase the salary of customer whose id is 3 −

    UPDATE CUSTOMERS 
    LEFTJOIN ORDERS 
    ON CUSTOMERS.ID = ORDERS.CUSTOMER_ID 
    SET CUSTOMERS.SALARY = CUSTOMERS.SALARY +1000WHERE ORDERS.CUSTOMER_ID =3;

    Verification

    We can verify whether the changes are reflected in a table by retrieving its contents using the SELECT statement as follows.

    SELECT*FROM CUSTOMERS;

    As we can see in the table below, SALARY value of "Kaushik" is increased by 1000 −

    IDNAMEAGEADDRESSSALARY
    1Ramesh32Ahmedabad2000.00
    2Khilan25Delhi1500.00
    3Kaushik23Kota3000.00
    4Chaitali25Mumbai6500.00
    5Hardik27Bhopal8500.00
    6Komal22Hyderabad4500.00
    7Muffy24Indore10000.00

    The UPDATE... JOIN Clause in SQL Server

    The SQL UPDATE... JOIN Clause also works in SQL Server database. But, the syntax of the query is slightly different from that of MySQL. However, the working of it is exactly the same as MySQL query.

    In MySQL, the UPDATE statement is followed by the JOIN clause and SET statements respectively. Whereas, in MS SQL Server the SET statement is followed by the JOIN clause.

    Syntax

    Following is the syntax of the UPDATE... JOIN in SQL Server −

    UPDATEtables(s)SET column1 = value1, column2 = value2,...FROM table1
    JOIN table2 ON table1.join_column = table2.join_column;

    Example

    In this example, we will update values of the CUSTOMERS and ORDERS table that we created above; using the following UPDATE... JOIN query −

    UPDATE CUSTOMERS
    SET SALARY = SALARY +1000FROM CUSTOMERS 
    JOIN ORDERS ON CUSTOMERS.ID = ORDERS.CUSTOMER_ID;

    Verification

    We can verify whether the changes are reflected in a table by retrieving its contents using the SELECT statement as follows.

    SELECT*FROM CUSTOMERS;

    The updated CUSTOMERS table is displayed as follows −

    IDNAMEAGEADDRESSSALARY
    1Ramesh32Ahmedabad2000.00
    2Khilan25Delhi2500.00
    3Kaushik23Kota3000.00
    4Chaitali25Mumbai7500.00
    5Hardik27Bhopal8500.00
    6Komal22Hyderabad4500.00
    7Muffy24Indore10000.00