In Angular, dynamic routes are used to load a specific data or entity within a component based on the route parameters.
For example, in a streaming platform having multiple videos, the application could use dynamic routes to load each video within the VideosComponent by passing the video ID as a route parameter.
This way, each time a user navigates to a new video (e.g., /videos/:id), the corresponding video data is fetched and displayed dynamically.
Note: Dynamic routing refers to the overall technique or approach of implementing dynamic routes.
Syntax of Angular Dynamic Routes
Below is the syntax to create Dynamic Routes in Angular −
route-path: This represents the name of the route path that will be used to access the current component.
parameterName: The name of the parameter that you want to access, such as id.
SomeComponent: The name of the component that should be loaded based on the current path and parameter.
The ‘parameterName’ can be accessed in the component using two techniques, which are:
Using Observable.
Using snapshot (non-observable option).
Using Observable
Angular provides a special interface named paramMap to access the parameters of the path (URL). parmaMap has the following methods −
has(name): Returns true if the specified name is available in the path (parameter list).
get(name): Returns the value of the specified name in the path (parameter list).
getAll(name): Returns the multiple value of the specified name in the path. The get() method returns only the first value when multiple values are available.
keys: Returns all parameters available in the path.
The Steps to access the parameter using paramMap are as follows −
Import paramMap available in @angular/router package.
Use paramMap in the ngOnInit() to access the parameter and set it to a local variable.
In web development, routing is a technique for navigating between different views or pages in a an application. It allows the application to determine which page to display based on the URL requested by the user.
Routing in Angular
In Angular, routing is used to develop a single-page applications (SPAs). Although, an SPA does not support multipage navigation, it allows navigation from one view (component) to another without reloading the entire page. You can define the routes for different components to navigate when the URL changes.
Below is the snippet of code of how routes are defined for different components:
routes: An array contains all the routes for different components.
path: A path, which you can access on the URL to load the target component.
component: A target component will be loaded when the path is active on the URL.
When you create a new application, an app.routes.ts file will automatically generated, where you can define these routes for navigation.
The diagram below will give you a clear understanding of how routing works in Angular when the user clicks on a link to navigate to a different component:
Types of routes in Angular
Static routes: These are the simple routes that map a specific URL path to a component.
{path: 'path-name', component: component-name}
Dynamic routes: A routes allow you to load different data or entities (such as products in an e-commerce application or videos in a streaming platform) based on the values in the URL.
These routes are use parameters in the URL to dynamically load different entities of a components based on current paramter pased in URL:
Wildcard routes: These routes matches any URL path, which does not matched by other routes.
{path: '**', component: component-name}
Nested routes: A routes defined within other routes allow for hierarchical navigation structures. Sometimes, we want a page (child route) to load only when its parent route is loaded first. For example, in the route /settings/profile, the “settings” are the “parent route”, and the “profile” is the “child route”. The profile page will only be accessible and displayed after the settings page has been loaded:
To configure a static (basic) routing in our Angular application, the Angular CLI (command line interface) provides comprehensive support for setting up routing both during the application creation process and while working on an existing application.
Let’s create a new application with routing enabled using the command below:
ng new routing-app --routing
Even if you do not provide the –routing flag, the above command will generate a new file named app.routes.ts by default:
To work with routing, you need to include the <router-outlet>directive in your root component (recommended to add in app.component.html.), where you want to display the loaded components.
Including the “router-outlet” directive in app.component.html:
To test the routing, run the application and try to navigate to “/home” and “/about” by changing the URL:
Using RouterLink for Navigation
Rather than changing the URL manually, you can use the RouterLink directive. The RouterLink directive is used to set a path for navigating between views or components in an Angular application.
Binding a specified path in app.routes.ts with an anchor element (<a>) to handle navigation when links are clicked:
An SQL stored procedure is a group of pre-compiled SQL statements (prepared SQL code) that can be reused by simply calling it whenever needed.
It can be used to perform a wide range of database operations such as inserting, updating, or deleting data, generating reports, and performing complex calculations. Stored procedures are very useful because they allow you to encapsulate (bundle) a set of SQL statements as a single unit and execute them repeatedly with different parameters, making it easy to manage and reuse the code.
Procedures have similar structure as functions: they accept parameters and perform operations when we call them. But, the difference between them is that SQL stored procedures are simpler to write or create, whereas functions have a more rigid structure and support fewer clauses.
Syntax
The basic syntax to create an SQL stored procedure is as follows −
DELIMITER//CREATEPROCEDURE procedure_name(parameter1 datatype, parameter2 datatype,...)BEGIN-- SQL statements to be executedENDDELIMITER;
The CREATE PROCEDURE statement is used to create the procedure. We can define any number of input parameters as per the requirement.
The SQL statements that make up the procedure are placed between the BEGIN and END keywords.
Creating a Procedure
We can create a stored procedure using the CREATE PROCEDURE statement in SQL. Following are the simple steps for creating a stored procedure −
Choose a name for the procedure.
Write the SQL code for the procedure.
We can then test the stored procedure by executing it with different input parameters.
Example
To understand it better let us consider the CUSTOMERS table which contains the personal details of customers including their name, age, address and salary etc. as shown below −
CREATETABLE CUSTOMERS (
   ID INTNOTNULL,
   NAME VARCHAR(20)NOTNULL,
   AGE INTNOTNULL,
   ADDRESS CHAR(25),
   SALARY DECIMAL(18,2),PRIMARYKEY(ID));
Now, insert values into this table using the INSERT statement as follows −
Now, let us look at a simple example of creating a stored procedure that takes an input parameter and returns a result set.
In the following query, we are creating the stored procedure with the name GetCustomerInfo. then we provide it with a single input parameter called @CutomerAge. The stored procedure then selects all records from the CUSTOMERS table where the value of the CutomerAge matches the input parameter.
DELIMITER//CREATEPROCEDURE GetCustomerInfo(IN CustomerAge INT)BEGINSELECT*FROM CUSTOMERS WHERE AGE = CustomerAge;END//DELIMITER;
Output
This would produce the following result −
Query OK, 0 rows affected (0.01 sec)
Verification
We can test the stored procedure by executing it using the CALL statement as shown below −
CALL GetCustomerInfo(25);
This will return all columns from the CUSTOMERS table where the customers age is 25.
ID
NAME
AGE
ADDRESS
SALARY
2
Khilan
25
Delhi
1500.00
4
Chaitali
25
Mumbai
6500.00
Stored Procedure Parameter Types
Stored procedures in a database system can have different types of parameters, which are placeholders for values that will be passed to the stored procedure when it is executed. Following are the different types of stored procedure parameters in SQL −
S.No.
Parameter & Description
1
Input parametersThese parameters are used to pass values from the calling statement to the stored procedure.
2
Output parametersThese parameters are used to return values from the stored procedure.
3
Input/Output parametersThese parameters allow a stored procedure to accept input values and return output values.
Procedure with IN parameter
IN is the default parameter of the procedure that will receive input values. We can pass the values as arguments when the stored procedure is being called.
These values are read-only, so they cannot be modified by the stored procedure.
Example
In the following query, we are creating a stored procedure that takes a customer ID as an input parameter and returns the corresponding customer salary.
The procedure body simply performs a SELECT statement to retrieve the “Salary” column from the “CUSTOMERS” table, where the “CustomerID” matches the input parameter.
DELIMITER//CREATEPROCEDURE GetCustomerSalary(IN CustomerID Int)BEGINSELECT SALARY FROM CUSTOMERS WHERE ID = CustomerID;END//DELIMITER;
Output
This would produce the following result −
Query OK, 0 rows affected (0.01 sec)
Verification
We can test it by executing it with different ID as an input parameter as shown in the query below −
CALL GetCustomerSalary(6);
This will return the salary for the customer with an ID of 6, assuming there is a corresponding row in the CUSTOMERS table −
SALARY
4500.00
Procedure with OUT parameter
The OUT parameter is used to return the output value from the procedure.
Note that when using an OUT parameter, we must specify the keyword OUT before the parameter name when passing it to the stored procedure. This tells the SQL database that the parameter is an output parameter and should be assigned with a value in the stored procedure.
Example
In the following query we are creating a stored procedure that used to count the number of records of customer having same age and assign this count to the ‘total’ variable which holds the number of records.
The procedure body performs a SELECT statement to get the count of records having same age from the “CUSTOMERS” table
DELIMITER//CREATEPROCEDURE GetDetail(OUT total INT)BEGINSELECTCOUNT(AGE)INTO total FROM CUSTOMERS
WHERE AGE =25;END//DELIMITER;</pre>
Calling the created procedure and passing the 'total' parameter
CALL GetDetail(@total);
Here, we are using the SELECT statement and getting the count −
SELECT@total;
Output
This would produce the following result −
@total
2
Verification
To verify weather the procedure is created, we can use the following query −
SHOWCREATEPROCEDURE GetDetails;
Procedure with INOUT parameter
The INOUT parameter is a combination of an IN parameter and an OUT parameter. You can pass data into the stored procedure and receive data from the stored procedure using the same parameter.
To declare an INOUT parameter in a stored procedure, we need to specify the INOUT keyword before the parameter name.
Example
In the following query, we provide two INOUT parameters to the stored procedure: cust_id and curr_Salary. These two are used as both an input and output parameters.
The stored procedure first retrieves the current salary of the customer from the database using the cust_id parameter. It then increases the salary by 10% and updates the customers salary in the database using the same parameter.
DELIMITER//CREATEPROCEDURE increaseSalary(INOUT Cust_Id Int,INOUT curr_Salary Int)BEGINSELECT SALARY INTO curr_Salary From CUSTOMERS Where ID = Cust_Id;SET curr_Salary = curr_Salary *1.1;Update CUSTOMERS SET SALARY = curr_Salary Where ID = Cust_Id;END//DELIMITER;
Output
This would produce the following result −
Query OK, 0 rows affected (0.01 sec)
Verification
We can test it by executing it with different ID or input parameters as shown in the query below −
Following is Query to select the updated salary from the stored procedure
SELECT@salaryAS updated_salary;
The result-set is obtained as −
updated_salary
2200
Advantages of Stored Procedures
Following are the advantages of stored procedures −
Improved Performance: Stored procedures are pre-compiled and stored on the server, so they can be executed more quickly than SQL statements that are sent from client applications.
Code Reuse: Stored procedures can be called from different client applications, which means that the same code can be reused across different applications. This reduces development time and maintenance costs.
Reduced Network Traffic: Because stored procedures are executed on the server, only the results are returned to the client, which reduces network traffic and improves application performance.
Better Security: Stored procedures can be used to enforce security rules and prevent unauthorized access to sensitive data. They can also limit the actions that can be performed by users, making it easier to maintain data integrity and consistency.
Simplified Maintenance: By storing SQL code in a single location, it becomes easier to maintain and update the code. This makes it easier to fix bugs, add new functionality, and optimize performance.
Drawbacks of Stored Procedures
Following are the disadvantages of stored procedures −
Increased Overhead: Stored procedures can consume more server resources than simple SQL statements, particularly when they are used frequently or for complex operations.
Limited Portability: Stored procedures are often specific to a particular database management system (DBMS), which means they may not be easily portable to other DBMSs.
Debugging Challenges: Debugging stored procedures can be more challenging than debugging simple SQL statements, particularly when there are multiple layers of code involved.
Security Risks: If stored procedures are not written correctly, they can pose a security risk, particularly if they are used to access sensitive data or to perform actions that could compromise the integrity of the database.
A form generated or modified at the run time based on the application state or user interaction is called a dynamic form. It makes the forms adaptable to changes in data model. For example, if a user selects a country, the form could dynamically adjust to show additional fields like postal code, state, or country code.
In Angular, Forms are a way of collecting input data from users and it helps them to interact with the application. In this tutorial, we will learn how to create a dynamic forms in Angular.
Need for Dynamic Forms
In Angular, dynamic forms are needed for several reasons which are as follows −
They allow developers to tailor the form fields to the needs of individual users.
Dynamic forms are also needed when input fields are required for data input without prior knowledge. Scenarios like questionnaires where the questions vary based on previous answers.
You can hide, show, or validate certain form controls depending on previous answers or user input.
Last but not least, the use case of dynamic form is that instead of having multiple forms for different cases, we can create a dynamic form to handle various scenarios by adjusting its layout and fields according to the changes in the data model.
Creating Dynamic Form in Angular
The dynamic form in Angular is based on Reactive Forms. To create a dynamic form in Angular, follow the steps given below −
Step 1: Install Angular CLI and create a new Angular project.
Step 2: Import the ReactiveFormsModule and define a data model for form controls inside the Component.
Step 3: Now, write logic for creating dynamic form controls within the same Component.
Step 4: In the end, render the dynamic form in the Template.
Working Example
In this example, we are going to create a Reactive Form. The form will generate a country code field dynamically when user select the country.
Step 1: Create a new Angular project. We have named it dynamic-form.
ng newdynamic-form
Step 2: Open the app.component.ts file. Import the necessary package, define a data model and code to generate form controls.
The SQL DEFAULT Constraint is used to specify the default value for a column of a table. We usually set default value while creating the table.
The default values are treated as the column values if no values are provided while inserting the data, ensuring that the column will always have a value. We can specify default values for multiple columns in an SQL table.
Syntax
Following is the syntax of the SQL DEFAULT Constraint −
In the following query we are creating the CUSTOMERS table using the CREATE TABLE statement. Here, we are adding a default constraint to the columns NAME, AGE, ADDRESS, and SALARY −
CREATETABLE CUSTOMERS (
   ID INTNOTNULL,
   NAME VARCHAR(20)NOTNULLDEFAULT'Ramesh',
   AGE INTNOTNULLDEFAULT'32',
   ADDRESS CHAR(25)DEFAULT'Ahmedabad',
   SALARY DECIMAL(18,2)DEFAULT'2000',PRIMARYKEY(ID));
Following query inserts values into this table using the INSERT statement −
The table is created with default values in the NAME, AGE, ADDRESS, and SALARY columns for the first row as shown below −
ID
NAME
AGE
ADDRESS
SALARY
1
Ramesh
32
Ahmedabad
2000.00
2
Khilan
25
Delhi
1500.00
Passing “DEFAULT” as Value
While inserting data into a table, if the column names are not included in the INSERT query, to insert the default value into the record we need to pass “DEFAULT” as a value, as shown below −
We can also add default constraints to an existing column of a table using the ALTER TABLE statement. This allows us to modify the structure of existing table by specifying default values, ensuring data consistency in the database.
Syntax
Following is the syntax for adding a default constraint to a column in an existing table −
Form validation is a process used to check whether the user input is in the correct format or not before submission. The validation process can be used to verify the format of email addresses and phone numbers as they have specific formats. Also, you can verify if the given input meets specific constraints like a minimum or maximum length. The form validation can prevent errors by catching invalid input before it is processed or sent to the server.
As we know, Angular has two kinds of forms. The first one is template-driven forms, and the other is reactive forms. The validation is implemented in two different ways. In template-driven forms, directives are used within the template to validate the form. In reactive forms, a model-driven approach is used where validation logic is defined in the component class.
Built-in Angular Validators
The Validator class in Angular provides a set of built-in validator functions that validate the form controls. A list of validator functions is −
SNo.
Validators & Descriptions
1.
minThis validator is used to check whether the control’s value is greater than or equal to the specified number.
2.
maxUnlike min, the max validator checks if the control’s value is less than or equal to a specified number.
3.
requiredWhen required validator is applied, it checks if the input field has a value and marks the form control as invalid if it is empty. This validator is used in mandatory fields of a form to ensure that users provide the necessary information before submitting the form.
4.
requiredTrueIf applied, it checks whether the value is true. Commonly used for checkbox validation.
5.
emailTo make sure the control’s value is a valid email address format, the email validator is used.
6.
minLengthIt validates that the control’s value is at least a specified length.
7.
maxLengthThis validators ensures that the control’s value does not exceed a specified length.
8.
patternIt validates that the control’s value matches a specified regular expression.
9.
nullValidatorIt is a no operation validator that always returns null. Commonly used for validation control.
10.
composeCombines multiple synchronous validators into one validator function. It returns an error map if any of the individual validators fail.
11.
composeAsyncSimilar to compose, but it combines asynchronous validators and returns an observable that emits either null for valid or an error object for invalid.
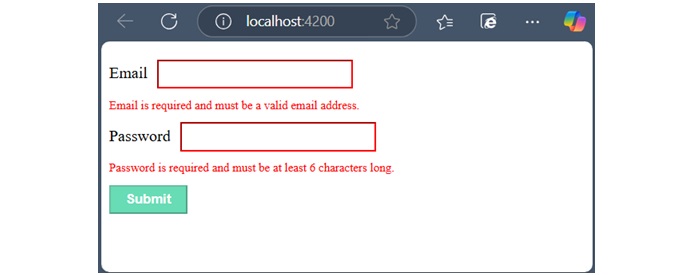
Validation in Angular Template-Driven Forms
In Angular, Template-Driven Forms are forms where the validation is applied directly in the HTML template using Angular’s built-in directives, like required, minlength, maxlength, and more. This type of form uses ngModel directive for two-way data binding and needs less code than Reactive Forms.
Example
In the below example, we will see how to use the validation in Template-Driven Form.
Email is required and must be a valid email address.</div></div><div><label for="password">Password</label><input class="input-box" type="password" id="password" name="password"[(ngModel)]="user.password" required minlength="6" #password="ngModel"><div *ngIf="password.invalid && password.touched"class="error">
Password is required and must be at least 6 characters long.</div></div><button class="btn" type="submit"[disabled]="userForm.invalid">Submit</button></form><router-outlet /></pre>
Step 2: Add the below code inside component class −
Reactive Form is a type of Angular form that manages the form state using an immutable approach. Here, immutable means each change to the form state returns a new version of the state.
Reactive forms are created inside the component class and are also referred to as model-driven forms. Every form control used within these forms has a separate object in the component class, which helps developers access and manage the data received from user input.
Let’s understand how to use Reactive Forms in angular.
Classes of Angular Reactive Forms
Before moving to create Reactive forms, we need to understand the use of following classes −
FormControl: Define the basic functionality of individual form control.
FormGroup: Used to aggregate the values of form control collection.
FormArray: Used to aggregate the values of form control into an array.
ControlValueAccessor: Acts as an interface between Forms API and HTML DOM elements.
Creating Angular Reactive Forms
You can create an Angular reactive form in the four simple steps given below −
Step 1: First, import ReactiveFormsModule, FormGroup, FormControl from the @angular/forms package.
Step 2: Instantiate FormGroup and FormControl inside your component’s TypeScript file (e.g., app.component.ts).
Step 3: Now, open component’s HTML template (e.g., app.component.html) and bind the form using formGroup.
Step 4: At the end, use formControlName to bind each individual input field to the corresponding form control.
Example
Let us create a sample application (reactive-form-app) in Angular to learn the reactive form. Here, we create a simple reactive form to display user-entered text.
Step 1: Open the command prompt and create a new Angular application using the below command −
ng newreactive-form-app
Step 2: As mentioned earlier, import FormGroup, FormControl and ReactiveFormsModule in app.component.ts file.
Step 5: Finally, start your application using the below command −
ng serve
On running the application, the following output will be displayed −
Enter any text in the input field and press submit button. The onClickSubmit() function will be called and user-entered text will be sent as an argument and displayed on the screen.
Flow of Data in Reactive Forms
In the case of reactive forms, the form elements defined within the view are directly associated with the FormControl instance. However, any update from the view to the form model and from the model to the view does not depend on the user interface.
In reactive forms, the data flows in two ways as shown below −
View to Model
Model to View
View-to-Model Flow Diagram
The diagram given below shows the view-to-model data flow. This means how data flows when value of an input field is changed from the view.
Suppose a user types a value or makes a selection through the input element. This input element emits an input event with the latest value. Then, the ControlValueAccessor, which listens for events, immediately relays the new value to the FormControl instance. Next, the FormControl instance generates the new value through the valueChanges observable. In the end, the new value will be received by all subscribers of the valueChanges observable.
Model-to-View flow diagram
The diagram given below shows the model-to-view data flow. This means how data flows from model to view when logic is changed.
First, the user calls the setValue() method, which updates the FormControl value. Then, the instance of FormControl generates the new value through the valueChanges observable. Now, the new value is received by the subscribers of the valueChanges observable. Lastly, the ControlValueAccessor will update the element with the new value.
The SQL CHECK constraint is used to add conditions on a column of a table.
Once you add the check constraint on a column, it ensures that the data entered into the column meets the specified conditions. If a particular record does not meet the conditions, the database will prevent you from inserting or updating that record.
Suppose we have a table CUSTOMERS having a column AGE. We can add a CHECK constraint on this column to ensure that the age entered is always a positive number and not greater than 50 years. If someone tries to input a negative age or an age over 50, the database will reject it, ensuring that your data remains accurate and valid.
Check Constraint on Single Column
To add a check constraint on a column level, we have to specify the check constraint just after the column name during table creation.
Syntax
Following is the syntax to specify the check constraint on a single column −
In the following query, we are creating a table named CUSTOMERS. Here, we are specifying a column-level check constraint on the AGE column, that allows only those records to be inserted where the age value of the customer is greater than “20” −
Open Compiler
CREATETABLE CUSTOMERS (
   ID INTNOTNULL,
   NAME VARCHAR(20)NOTNULL,
   AGE INTNOTNULLCHECK(AGE>=20),
   ADDRESS CHAR(25),
   SALARY DECIMAL(18,2),PRIMARYKEY(ID));
Verification
To verify whether the check constraint is added to the AGE column, we can use the following query in the MySQL database −
SELECT table_name, constraint_type, constraint_name
FROM information_schema.table_constraints
WHERE table_name='CUSTOMERS';
Output
The above query will show all the details of the CUSTOMERS table, including how many columns have check constraints and what constraints we have specified in the table as shown below −
TABLE_NAME
CONSTRAINT_TYPE
CONSTRAINT_NAME
customers
PRIMARY KEY
PRIMARY
customers
PRIMARY KEY
PRIMARY
customers
PRIMARY KEY
PRIMARY
customers
PRIMARY KEY
PRIMARY
customers
CHECK
employees_chk_1
Now, to verify if the CHECK constraint is working properly, let us insert a record into CUSTOMERS where AGE contains a value less than 20 (does not satisfy the given condition) −
ERROR 3819 (HY000): Check constraint 'customers_chk_1' is violated.
Check Constraint on Multiple Columns
We can also add check constraint on multiple columns of a table by specifying the conditions that must be met for the combination of values in those columns.
Suppose we have a table containing the details of products, including their start and end dates. We can add a CHECK constraint that ensures the end date is always greater than or equal to the start date. In this case, the constraint is checking the values in two columns (start date and end date) within the same row to make sure they follow a specific relationship.
Example
In the following example, we are specifying a column-level check constraint on multiple columns (AGE and SALARY) of the CUSTOMERS table. Here, the AGE column will allow only those records where the AGE is greater than or equal to 20, and the SALARY column will allow only those records where the SALARY is greater than 20000 −
CREATETABLE CUSTOMERS (
   ID INTNOTNULL,
   NAME VARCHAR(20)NOTNULL,
   AGE INTNOTNULLCHECK(AGE >=20),
   ADDRESS CHAR(25),
   SALARY DECIMAL(18,2)CHECK(SALARY >=20000),PRIMARYKEY(ID));
Verification
To verify whether the check constraint is applied on both the columns, we can use the following query in the MySQL database −
SELECT table_name, constraint_type, constraint_name
FROM information_schema.table_constraints
WHERE table_name='CUSTOMERS';
Output
It will show all the details of the created table, including how many columns have check constraints and what constraints we have specified in the table −
TABLE_NAME
CONSTRAINT_TYPE
CONSTRAINT_NAME
customers
PRIMARY KEY
PRIMARY
customers
PRIMARY KEY
PRIMARY
customers
PRIMARY KEY
PRIMARY
customers
PRIMARY KEY
PRIMARY
customers
CHECK
customers_chk_1
customers
CHECK
customers_chk_2
Now, we are inserting values into the CUSTOMERS table where the age is less than 20 and the salary is less than 20000.
In the following SQL query, we are creating a table PRODUCTS. In here, we are specifying a table level check constraint on the DATE_OF_ORDER column, that allows only those records to be inserted where the DATE_OF_ORDER is less than (before) “2023-02-09” −
To verify whether the check constraint is applied after the table creation, use the following SQL query −
SELECT table_name, constraint_type, constraint_name
FROM information_schema.table_constraints
WHERE table_name='CUSTOMERS';
Output
It will display all of the table’s information, including the constraint we added to the age column −
TABLE_NAME
CONSTRAINT_TYPE
CONSTRAINT_NAME
customers
PRIMARY KEY
PRIMARY
customers
PRIMARY KEY
PRIMARY
customers
PRIMARY KEY
PRIMARY
customers
PRIMARY KEY
PRIMARY
customers
CHECK
Constraint_Age
Removing a Check Constraint
If there is a way to add a constraint on a column, then you must also be able to remove the constraint from that column. To do that, you can use the ALTER DROP statement.
Syntax
Following is the syntax to remove a check constraint from the table −
The template-driven form is a type of Angular form that relies on the template for managing form state and validation. It is created directly in the HTML template using Angular directives.
These forms are simpler to set up and hence, mainly used for creating a simple and less complex form application. Let’s understand how to create and use template driven forms in an Angular application.
Directives used in Template-Driven Form
The following directives of the FormsModule class are used in Template-Driven Form −
NgModel: This directive is used to create two-way data binding between the form control in the template and the corresponding property in the component class. It binds the input field to a model in the component, and the model is updated whenever the input field value changes.
NgForm: It is used to track the form state. It automatically creates a FormGroup for the entire form when applied to the form tag.
NgModelGroup: The ngModelGroup directive is used to group related form controls into a nested form group.
Creating Angular Template-Driven Form
To create an Angular template-driven form, follow the steps given below −
Step 1: First, import FormsModule class of the @angular/forms package.
Step 2: Next, define the properties that will be bound to form controls in the template. These properties will hold the data entered by the user.
Step 3: Now, open the component’s HTML template (e.g., app.component.html) and create the form. Inside the newly created form, use the ngForm directive to bind the entire form and track its state.
Step 4: Finally, use the ngModel directive on each form control to bind it to the corresponding property in the component class. The name attribute is used to identify the control within the form, and the ngModel for two-way data binding.
Example
Let us create a sample application (template-form-app) in Angular to learn the template-driven form. Here, we create a simple template-driven form to display user-entered text.
Step 1: Open the Angular CLI and create a new Angular application using the below command −
ng newtemplate-form-app
Step 2: Add the below code in app.component.html file −
Step 5: Now, start your application using the below command −
ng serve
When the application will start, you will see the below response −
Flow of Data in Template-Driven Forms
In template-driven forms, the data flows in two ways as shown below −
View to Model
Model to View
View-to-Model Flow Diagram
The diagram given below illustrates how data flows when an input field's value is changed from the view in template-driven forms −
Model-to-View Flow Diagram
The diagram given below shows the model-to-view data flow in template-driven forms. This means how data flows from model to view when logic is changed.
Forms are used to collect input data from users and enable users to interact with the application. A general form consists of various input fields such as text boxes, radio buttons, checkboxes, and dropdowns, along with a submit button that triggers the action of sending data to a server or performing some other operation within the application.
In this tutorial, we will learn what are Angular forms, how they work and their use cases.
Forms in Angular
Angular forms are a way to accept user input in an Angular application. They receive input events from users through the template view, validate the input given by the user, create a form model and data model to update, and also, provide a way to track changes. It is important to note that the Angular forms are structured using the HTML form tag.
An Angular application that contains a form, keeps the view in sync with the component model and the component model in sync with the view. When users type or update values through the view, the new values are reflected in the data model. Similarly, if the program logic updates values in the data model, those values are also reflected in the view.
Features and Uses of Angular Forms
Following are the features and uses of Angular Forms −
Angular forms support two-way data binding. It is a type of data binding that allows two-way interaction between component and view.
You can find various built-in validators in Angular forms that help to check whether the user has entered valid data or not before submitting the form.
Angular forms also allow developers to add, remove, and modify form controls dynamically as per the needs of the user interface.
Developers can organize form controls into logical groups using FormGroup. It helps to manage and track the state of different sections of the form.
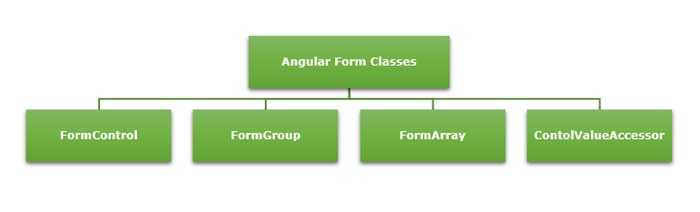
Angular Form Classes
The Angular forms are built on the following four foundation classes −
FormControl: Represents a single form input field. It tracks the value, validation status, and user interactions for the individual input control.
FormGroup: This foundation class represents a collection of FormControl instances or nested FormGroup instances. You can group related form controls together using this class. It’s used to manage the state of a form section (e.g., user details, address information).
FormArray: It is used to handle an array of form controls, such as a list of checkboxes or input fields.
ControlValueAccessor: It connects Angular FormControl instances to built-in DOM elements.
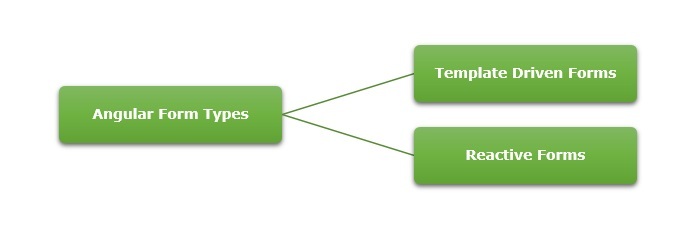
Types of Form in Angular
Angular supports two types of forms. They are as follows −
Template-Driven Forms: As the name suggests, the template-driven forms are closely associated with Angular Templates. User input validation and behaviors are defined using directives within the template. For data flow, these forms use two-way data binding. You can build any kind of simple form within your Angular application, such as login forms and contact forms. Remember, if you have very basic form requirements and prefer to manage it solely using the template, then template-driven forms may be a suitable choice.
Reactive Forms: The reactive forms follow a model-driven approach. Compared to template-driven forms, they are more robust, scalable and suitable for complex forms. Instead of a template, these forms are controlled from the Angular Component class. Use this type of form, if forms are a key part of your Angular application.
Difference between Reactive Forms and Template-Driven Forms
The table below shows how Reactive Forms are different from Template-Driven Forms −
Reactive Forms
Template-Driven Forms
They follow a model-driven approach.
They follow a view-driven approach
Forms are created and controlled from the component class.
Forms are created and validations are handled directly in the template.
The flow of data is Synchronous.
Asynchronous data flow.
It is flexible and scalable for complex forms with dynamic behavior.
More suitable for simple and static forms.
In reactive forms, the form control instances are accessed using FormControl and FormGroup.
Form controls are accessed using template reference variables.
Form validations are applied using the built-in validator functions.
Form validations are applied using the built-in directives.
Form Validation
Form validation is a process used to check whether the user input is in the correct format or not before submission. The validation process can be used to verify the format of email addresses and phone numbers as they have specific formats. Also, you can verify if the given input meets specific constraints like a minimum or maximum length. The form validation can prevent errors by catching invalid input before it is processed or sent to the server.
The Validator class in Angular provides a set of built-in validator functions that validate the form controls. A few example of validators are min, max, required, email, pattern and so on.
Dynamic Form?
A form generated or modified at the run time based on the application state or user interaction is called a dynamic form. It makes the forms adaptable to changes in data model. For example, if a user selects a country, the form could dynamically adjust to show additional fields like postal code, state, or country code.
You can learn how to create and use dynamic forms in angular by visiting this link: dynamic form.