Errors are the unexpected issue or problem that occurs during the execution of a program. Incorrect syntax, invalid input, system failures or bug in API logic could be the possible reasons for these errors. These errors may affect the user experience in negative way, hence, it is necessary to handle them at compile time.
Error handling is the process of detecting and resolving these errors or exceptions before execution. Angular provides a number of ways to handle the errors that we are going to learn in this tutorial.
Handling Errors in Angular
There are multiple ways to handle errors in Angular, which are given below −
The ErrorHandler is a built-in class of the Angular @angular/core package. It provides a hook to catch errors globally. When something goes wrong, like any unhandled exception occurs anywhere in the application, this class catches that exception and prints the error messages on console.
Remember! the ErrorHandler class simply prints the error message so that developers can see what went wrong and fix it. However, you can replace this default behavior by creating a custom ErrorHandler.
Extend the ErrorHandler class and override its handleError() method as shown below to create a custom behavior of this class −
import{ Injectable, ErrorHandler }from'@angular/core';
@Injectable({
providedIn:'root'})exportclassGlobalErrorHandlerimplementsErrorHandler{handleError(error: any):void{// Log the error to an external service or display a message
console.error("An error occurred:", error);// Create any custom behavior}}</pre>
Using HttpInterceptor Interface
The HttpInterceptor is an interface that is used for handling HTTP-specific errors, such as network issues, server errors, etc. It can intercept and modify HTTP requests or responses. Think of it as a service that can check and change the data going to and coming from a server.
To use an HttpInterceptor, create a class that implements the HttpInterceptor interface and define the intercept() method. This method takes an HTTP request and a handler, and it returns an observable of the HTTP event. Inside this method, you can modify the request or response as needed.
In Angular, errors can occur during component lifecycle. To handle these errors, you can use the a try-catch block within the ngOnInit(), which is a component lifecycle hook defined by OnInit interface. It is important to implement this interface as it helps to check if component is properly initialized.
The try block is used to wrap the code that might throw an error during its execution. And, the catch block is used to handle any errors or exceptions that occur within the try block.
Here, you can see a component with try-catch block:
import{ Component, OnInit }from'@angular/core';import{ CommonModule }from'@angular/common';
@Component({
selector:'app-example',
standalone:true,
imports:[CommonModule],
templateUrl:'./example.component.html',
styleUrls:['./example.component.css']})exportclassExampleComponentimplementsOnInit{ngOnInit(){try{// code that might throw an errorthrownewError("Error message");}catch(error){
console.error("error caught", error);}}}</pre>
Using Validation
Validation is used in Angular Forms to validate whether the user input is in the correct format or not before submission. The reactive forms and template-driven forms has built-in validators to handle validation errors.
With reactive forms, you can easily validate user input and display custom error messages as shown in the following code block −
In this tutorial, we will learn complete step-by-step working of an angular application. This chapter is part of the Angular Tutorial. We recommend you go through all the previous chapters before moving ahead in this chapter. We have covered all angular concepts from beginner to advanced.
Let us create an Angular application to check our day-to-day expenses. Let us give ExpenseManager as our choice for our new application.
We are going to implement the following concepts of Angular in our application −
Use the below command to create the new application −
cd /path/to/workspace
ng newexpense-manager
Here,
new is one of the commands of the ng CLI. It is used to create new applications. It will ask some basic questions in order to create a new application. It is enough to let the application choose the default choices.
Once the basic questions are answered, a new Angular application will be created with the name expense-manager.
Let us move into the our newly created application folder using the following command −
cd expense-manager
Let us start the application using the below command −
ng serve
The application will start on the http://localhost:4200 port. Change the title of the application to better reflect our application. Open src/app/app.component.ts and rename the title as specified below −
exportclassAppComponent{
   title ='Expense Manager';}
Our final application will be rendered in the browser as shown below −
Add a Component
To create a new component, we use ng generate component command. Write this command in Angular CLI as shown below −
ng generate component expense-entry
On running the above command, following output will be displayed in CLI −
Let’s include Bootstrap into our ExpenseManager application using styles option and change the default template to use bootstrap components. Open CLI and go to ExpenseManager application using the below command −
cd expense-manager
Install bootstrap and JQuery library using below commands −
npm install --save bootstrap jquery
To read more about using bootstrap in angular application, we recommend checking this chapter: Adding Bootstrap in Angular.
Now, open angular.json file and set bootstrap and jquery library path −
scripts option is used to include JavaScript library. JavaScript registered through scripts will be available to all Angular components in the application.
Open app.component.html and change the content as specified below −
Now, you can see the updated output which is as follows −
Add an Interface
Create ExpenseEntry interface within src/app/expense-entry.component.ts file and add id, amount, category, Location, spendOn and createdOn. Also, create an object of ExpenseEntry object. The updated code will look like −
Here, the command creates the ExpenseEntryList Component and add the necessary code by default.
Create the same ExpenseEntry interface within src/app/expense-entry-list.component.ts file. Then, add a method named getExpenseEntries() to return list of expense entry (mock items) in ExpenseEntryListComponent. Also, declare a local variable, expenseEntries and load the mock list of expense entries.
Finally, run the application. The output of the application is as shown below −
Use of Pipes
Let us use the pipe in the our ExpenseManager application
Open ExpenseEntryListComponent's template, i.e., src/app/expense-entry-list/expense-entry-list.component.html and include pipe in entry.spendOn as mentioned below −
<td>{{ entry.spendOn | date: 'short' }}</td>
Here, we have used the date pipe to show the spend on date in the short format.
Finally, the output of the application is as shown below −
Decorators are special functions used to add metadata, modify behavior, or add some additional functionalities to classes, methods, properties, or parameters in programming languages like TypeScript or JavaScript.
In Angular, each decorator has a base configuration with some default values and you can change or update it according to the project’s need. It is defined using the @ symbol followed by a function name. This symbol helps Angular to recognize decorators.
The @Component decorator is used to define a component in Angular. A component generates a section of web page called View and this decorator helps Angular understand the metadata related to the component.
Example
The following example shows @component decorator in an angular component.
The metadata included in the above example is selector, imports, templateUrl, and styleUrl. They define how the component should be displayed in the DOM.
The @Injectable Decorator
If a TypeScript class in Angular is decorated by @Injectable decorator, Angular will consider it as a service that can be injected into other classes.
Example
Let’s see an example of @Injectable decorator.
import{ Injectable }from'@angular/core';

@Injectable({
  providedIn:'root'})exportclassMyService{// your service code}
By marking a service with @Injectable, Angular knows to create and inject the service wherever it’s needed in the application.
The @NgModule Decorator
The @NgModule decorator is used to define an Angular module. A module is a collection of related components, services, pipes, and directives that are bundled together.
Child component can send the data to parent component through the @Output decorator. This decorator is actually an event emitter that passes the data (output) along with event.
Example
The following example shows the use of @Output decorator.
This CapitalizePipe transforms the first letter of a string to uppercase and the rest to lowercase.
What Is Metadata in Angular?
In Angular, Metadata is the information that is attached to classes and other elements to define their behavior. It is defined via decorators, as we saw earlier. When Angular processes a component or service, it reads the metadata to configure the element’s behavior.
Example
Let’s see the metadata mentioned inside an Angular @Component decorator −
Displaying data in Angular involves accessing the properties of a component class and rendering their values in the template. Angular provides various ways to display these data values (including variables, objects, arrays, etc.) in the template (HTML) using features such as interpolation, property binding, and structural directives.
Let’s discuss a few different ways to display data in Angular, with appropriate examples to help you understand each of them clearly.
In Angular, interpolation is one of the most common or basic ways to bind (display) data from your component to the HTML template. It allows you to embed expressions into marked-up text and uses the double curly {{}} as a delimiter.
Syntax
Following is the syntax of interpolation in Angular −
{{<template expression>}}
Here, the template_expression can be any property (variable) of your component.
Example
In this example, we will create properties (variables) named title (string type), num (number type), and isTrue (boolean type). We will bind (display) them in the template using interpolation −
In the app.component.ts, declare the properties with some initial values:
In the app.component.html, bind the declared properties using interpolation {{}} −
<h3>Displaying Angular Data with Interpolation</h3><p>{{title}}</p><p>Number value: {{num}}</p><p>Boolean value: {{isTrue}}</p>
Output
The displayed data will look like this −
Using Property Binding
This is another way to display data using Angular property bindings. In Angular, binding is a “technique” to “bind data between the component and the view”.
Example
We create an input field and bind the [value] property to display the component data (i.e., variable “username”) within the input field default when the page is loaded −
In the app.component.ts, create a variable named username with the value “[email protected]” −
In the app.component.html, update the existing code with the code given below −
<h3>Displaying Angular Data with Property Binding</h3><input type="text" [value]="username"><p>Welcome, {{username}}!!</p>
Output
The output of the above code will look like:
Using Structural Directives
In Angular, structural directives are built-in directives used to control the appearance and behavior of elements in the DOM. They can dynamically add, remove, or manipulate elements based on certain conditions. Common structural directives are:
*ngIf
*ngFor
*ngSwitch
Example
In the example below, we will use the structural *ngFor directive to iterate through the object defined in the component and display all data in the template −
In the app.component.ts, create an array of objects with the keys id, name, and age as follows:
In the app.component.html, use the *ngFor directive to iterate through the object data and display them in the template:
<h3>Displaying Angular Data with Stuctural Directive</h3><ul *ngFor="let data of myData;"><li>Id: {{data.id}}</li&t;
   <li>Name: {{data.name}}</li><li>Age: {{data.age}}</li></ul>
Output
Following is the output of the above code −
Note! In this tutorial, we have learned the various ways to display data in Angular. There are still more methods that you can explore in individual chapters. This tutorial provided a brief introduction to the concept of displaying data in Angular.
The Angular configuration is a set of instructions that defines how the Angular application is built and developed. It includes various information about the Angular application such as project files, tools, environments, and some other dependencies.
Important Configuration files in Angular
Here is a list of important configuration files that are automatically created when an Angular application is built using the Angular CLI. These files are important for running, deploying, and testing the application.
In an Angular application, the angular.json file is a key configuration file that defines and manages all the settings for the Angular CLI (Command Line Interface). This file is necessary for customizing various aspects of your Angular project.
This file contains key aspects of your Angular project, such as the “application name”, “index.html”, “main.ts”, “assets”, “styles”, “scripts”, “environment configurations”, “build” and “test” options, and other settings important for your Angular applicationâs build and deployment process.
Important Points of the angular.json File
Here are a few important aspects of the angular.json file that you should know:
my-app: This is the name of your Angular project or application.
index.html: The main HTML file that serves as the entry point for your application. It usually contains the “root” HTML element where the Angular app will be bootstrapped.
main.ts: The main TypeScript file that acts as the entry point for the Angular application. It is responsible for bootstrapping the root module or component of the application.
assets: A directory that contains static assets such as images, fonts, and other files that are needed by the application.
styles: An array of global stylesheets that are included in the application. These stylesheets can be CSS or SCSS files and are applied to the entire application.
scripts: An array of global scripts that are included in the application. These can be JavaScript files that need to be loaded before the Angular app starts.
The package.json Configuration File
In an Angular application, the package.json file serves as a fundamental part of managing the project’s dependencies and scripts. It contains “metadata” about the project, including the project “name”, “version”, “scripts for starting’, “building”, “serving”, and “watching the application”, as well as the “dependencies” and “devDependencies”.
Here are a few important aspects of the package.json file that you should know:
name & version: The name and the version of your application, which is useful for identifying, and tracking updates and dependencies.
scripts: It contains commands for common tasks such as “building”, “serving”, and “testing” the Angular project. These commands are executed using npm run <command>
dependencies: It is a list of Angular packages and other libraries your project depends on. These are important for the application to run and are installed when you run the npm install command.
devDependencies: Â It is a list of packages that are needed only for “development purposes”, such as “testing tools” and “build tools”.
The main.ts Configuration File
In an Angular application, the main.ts file serves as the entry point. It is responsible for “bootstrapping” the root module or component. When you run the ng serve command, it compiles the application and looks for the “main.ts” file first to initiate the “bootstrapping process”.
If the main.ts file is missing or has issues, your application will fail to start, and you will face errors.
AppComponent: It is the main component that acts as the root component of your application.
The tsconfig.json Configuration File
A given Angular workspace contains several TypeScript configuration files. At the root tsconfig.json file specifies the base TypeScript and Angular compiler options that all projects in the workspace inherit.
Initially, the tsconfig.json file data will look like this:
In conclusion, Angular configuration plays an important role in ensuring that your Angular application runs smoothly without any lag or errors. It involves setting up various aspects of the application, such as “environment settings”, “build configurations”, “module imports”, etc.
Following points need to be noted about the above code.
We are defining an array called appList which is of the type any. This is so that it can store any type of element.
We are defining 2 elements. Each element has 3 properties, ID, Name and url.
The URL for each element is the relative path to the 2 images.
Step 6 − Make the following changes to the app/app.component.html file which is your template file.
<div *ngFor ='let lst of appList'><ul><li>{{lst.ID}}</li><li>{{lst.Name}}</li><img [src]='lst.url'></ul></div>
Following points need to be noted about the above program −
The ngFor directive is used to iterate through all the elements of the appList property.
For each property, it is using the list element to display an image.
The src property of the img tag is then bounded to the url property of appList in our class.
Step 7 − Save all the code changes and refresh the browser, you will get the following output. From the output, you can clearly see that the images have been picked up and shown in the output.
Reactive programming is a programming paradigm dealing with data streams and the propagation of changes. Data streams may be static or dynamic. An example of static data stream is an array or collection of data. It will have an initial quantity and it will not change.
An example for dynamic data stream is event emitters. Event emitters emit the data whenever the event happens. Initially, there may be no events but as the time moves on, events happens and it will gets emitted.
Reactive programming enables the data stream to be emitted from one source called Observable and the emitted data stream to be caught by other sources called Observer through a process called subscription.
This Observable/Observer pattern or simple Observer pattern greatly simplifies complex change detection and necessary updating in the context of the programming.
Reactive Programming in Angular
JavaScript does not have the built-in support for Reactive Programming. RxJs is a JavaScript Library which enables reactive programming in JavaScript. Angular uses RxJs library extensively to do below mentioned advanced concepts −
Data transfer between components.
HTTP client.
Router.
Reactive forms.
Let us learn reactive programming using RxJs library in this chapter.
Observable
As learn earlier, Observable are data sources and they may be static or dynamic. Rxjs provides lot of method to create Observable from common JavaScript Objects. Let us see some of the common methods.
of(): Emit any number of values in a sequence and finally emit a complete notification.
const numbers$ =of(1,2,3,4,5,6,7,8,9,10);
Here,
numbers$ is an Observable object, which when subscribed will emit 1 to 10 in a sequence.
Dollar sign ($) at the end of the variable is to identify that the variable is Observable.
range(): Emit a range of number in sequence.
const numbers$ =range(1,10)
from(): Emit array, promise or iterable.
const numbers$ =from([1,2,3,4,5,6,7,8,9,10]);
ajax(): Fetch a url through AJAX and then emit the response.
Angular internally uses the concept extensively to provide data transfer between components and for reactive forms.
Subscribing process
Subscribing to an Observable is quite easy. Every Observable object will have a method, subscribe for the subscription process. Observer need to implement three callback function to subscribe to the Observable object. They are as follows −
next: Receive and process the value emitted from the Observable
error: Error handling callback
complete: Callback function called when all data from Observable are emitted.
Once the three callback functions are defined, Observable’s subscribe method has to be called as specified below −
numbers$.subscribe(observer);const filterFn =filter((num : number)=> num >5);const filteredNumbers =filterFn(numbers$);
filteredNumbers.subscribe((num : number)=>{this.filteredNumbers.push(num);this.val2 += num });const mapFn =map((num : number)=> num + num );const processedNumbers$ = numbers$.pipe(filterFn, mapFn);
processedNumbers$.subscribe((num : number)=>{this.processedNumbers.push(num);this.val3 += num });const api$ =ajax({
url:'https://httpbin.org/delay/1',
method:'POST',
headers:{'Content-Type':'application/text'},
body:"Hello"});
api$.subscribe(res=>this.apiMessage = res.response.data );const clickEvent$ =fromEvent(document.getElementById('counter'),'click');
clickEvent$.subscribe(()=>this.counter++);}}</pre>
Here,
Used of, range, from, ajax and fromEvent methods to created Observable.
Used filter, map and pipe operator methods to process the data stream.
Callback functions catch the emitted data, process it and then store it in components local variables.
Change the AppComponent template, src/app/app.component.html as specified below −
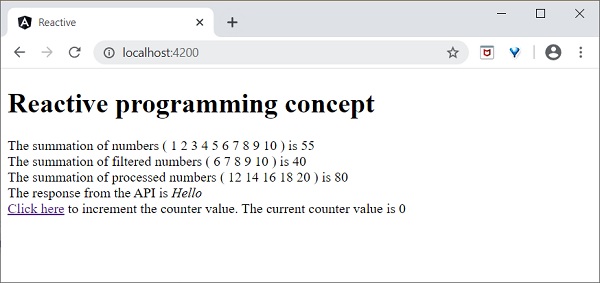
<h1>{{ title }}</h1><div>
   The summation ofnumbers(<span *ngFor="let num of numbers">{{ num }}</span>) is {{ val1 }}</div><div>
   The summation of filtered numbers(<span *ngFor="let num of filteredNumbers">{{ num }}</span>) is {{ val2 }}</div><div>
   The summation of processed numbers(<span *ngFor="let num of processedNumbers">{{ num }}</span>) is {{ val3 }}</div><div>
   The response from the API is <em>{{ apiMessage }}</em></div><div><a id="counter" href="#">Click here</a> to increment the counter value. The current counter value is {{ counter }}<div>
Here,
Shown all the local variable processed by Observer callback functions.
Open the browser, http://localhost:4200.
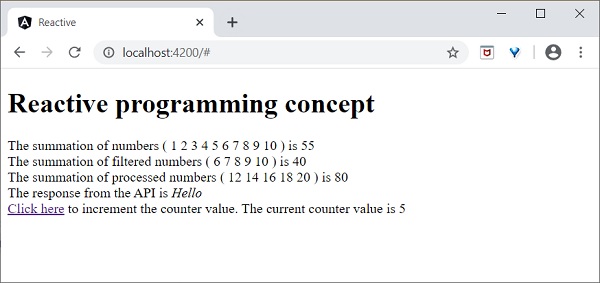
Click the Click here link for five times. For each event, the event will be emitted and forward to the Observer. Observer callback function will be called. The callback function increment the counter for every click and the final result will be as shown below −
Angular framework provides maximum compatibility with previous versions. If Angular Team deprecate a feature in a release, it will wait for 3 more release to completely remove the feature. Angular Team release a major version for every six months. Every version will have active maintenance period of six months and then Long Term Support (LTS) period for another one year. Angular does not introduce breaking changes during these 18 months. If Angular version deprecate a feature in version 5, then it will probably remove it in version 8 or in next releases.
Angular maintains documentation and guides of all version. For example, Angular documentation for version 7 can be checked @ https://v7.angular.io. Angular also provides a detailed upgrade path through https://update.angular.io/ site.
To update Angular application written from previous version, use below command inside the project directory:
ng update @angular/cli@8 @angular/core@8
Let us see some of the important changes introduced in Angular.
HttpModule module and its associated Http service is removed. Use HttpClient service from HttpClientModule module.
/deep/, >>> and :ng-deep component selectors are removed.
Angular default version of TypeScript is 3.4.
Node version supported by Angular is v10 and later.
@ViewChild() and ContentChild() decorator behaviour is changed from dynamic to static.
Lazy loading string syntax in router module is removed and only function based is supported.
Bazel is an open-source build and test tool developed by Google. You can use it to automate the building and testing of software. The reason to develop Bazel was to create a free and open-source build system that provides both speed and correctness. It uses a human-readable, high-level build language.
Angular is a front-end framework that can handle a large scale application, but as the size of your application grows, the build process can slow down significantly. To tackle this, Bazel can be used. Integrating it with Angular can provide several benefits that we are going to explore in this tutorial.
Build Process of Bazel
When Bazel is used, it works in the following steps −
First, the BUILD files relevant to the target are loaded.
In the second step, it creates an action graph after analyzing the inputs and their dependencies. It uses specified build rules during the process.
Executes the build actions on the given inputs to produce the final build outputs.
Features of Bazel
Some of the features of Bazel are as follows:
To describe build properties, Bazel uses abstract and human-readable language.
To speed up the build process, it caches all previously done work and tracks changes to both file content and build commands.
It supports multiple languages and platforms.
Also, it supports multiple repositories.
It is a high-level build language.
Bazel is fast and reliable.
Using Bazel in Angular
Angular supports building the application using bazel. Let us see how to use it to compile and build Angular applications.
First, install @angular/bazel package.
npm install -g @angular/bazel
The above command will install the @angular/bazel package globally. However, note that the Angular team has shifted some of its focus to support Bazel as part of the official Angular CLI tooling. You may also install this package locally in your project if preferred, but the command above should work fine for most setups.
For existing applications, add @angular/bazel as mentioned below:
ng add @angular/bazel
This command adds the necessary Bazel configuration to your existing Angular application. It sets up the BUILD.bazel files and modifies the angular.json file accordingly.
For new application, use below mentioned command:
ng new--collection=@angular/bazel
To build an application using bazel, use below command:
ng newapp-name --collection=@angular/bazel
Here,
leaveBazelFilesOnDisk option will leave the bazel files created during build process, which we can use to build the application directly using bazel.
To build an application using bazel directly, install @bazel/bazelisk and then, use bazelisk build command.
Ivy Compiler is the latest compiler for Angular application released by Angular Team. Currently, Angular is using View Engine compiler to compile Angular application.
In general, Angular compiler has two options to compile an application.
Just In Time (JIT) Compiler
In Just In Time (JIT) compilation, the compiler will be bundled along with the application and send to the browser. Angular application will be compiled in the browser and run just before the execution of application.
Even though JIT provides certain advanced feature, JIT slows down the compilation and also the app bundle will be double the size produced by AOT compiler as it includes compiler as well.
Ahead Of Time (AOT) Compiler
In AOT compilation, the compiler will emit optimised code ready to run inside the browser without any addition step. It will reduce the size of the bundle as well as reduce the compilation time and startup time of the application.
Advantages of Ivy Compiler
Ivy Compiler is the optimised and advanced compiler for Angular. As of Angular, it is not yet complete even though it is useable at this stage. Angular Team is recommending the developer to use it in Angular.
The main advantages of Ivy Compiler are as follows −
Optimized code.
Faster build time.
Reduced bundle size.
Better performance.
How to use Ivy?
Ivy Compiler can be used in Angular application by changing the project setting as specified below −
Open angular.json and set the aot option (projects -> -> architect -> build -> configurations -> production) of the project to true.