Author: saqibkhan

  •  z index Property

    The z-index Property

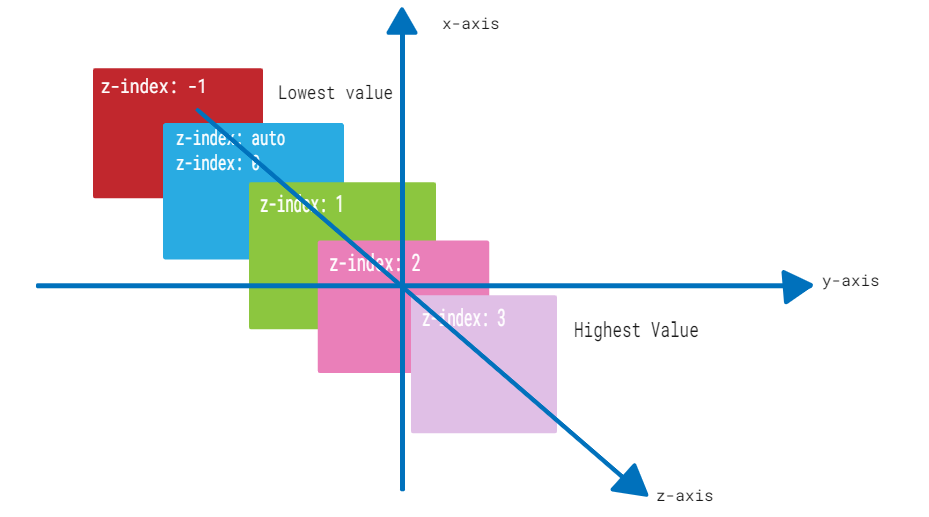
    CSS z-index property controls the stacking order of elements in a web page when they overlap in the same stacking context. Elements with a higher z-index value appear in front of elements with lower values.

    The following diagram demonstrates the z-index layout for reference:

    z-index

    CSS z-index property can be used with positioned elements that are nested inside of other positioned elements.

    Syntax

    The syntax for z-index property is as follows:

    z-index: auto | number | initial | inherit;

    Property Values

    ValueDescription
    autoIt is the default value. The stack order is equal to that of the parent element.
    <Integer>It represents a positive or negative integer. It sets the element’s stack level to the given value.
    initialIt is used to set this property to it’s default value.
    inheritIt is used to inherit the property of it’s parent element.

    Applies to

    All positioned elements.

    CSS z-index With auto Value

    CSS z-index: auto sets the z-index of an element to its parent element’s stack order. It is the default value for the z-index property.

    Example

    The following example demonstrates the z-index property with auto value.

    <html><head><style>
       .box1 {
    
      position: absolute;
      height: 200px;
      width: 280px;
      background-color: #f0baba;
      z-index: auto;
      text-align: center;
      padding: 3px;
      left: 10px;
      top: 10px;
    } .box2 {
      position: absolute;
      height: 120px;
      width: 200px;
      background-color: #eae98f;
      z-index: 1;
      text-align: center;
      padding: 5px;
      margin: 20px;
      left: 30px;
      top: 30px;
    } p {
      margin-top: 250px;
    } </style></head><body><p>The element with z-index value of auto appears behind the element with the z-index value of 1.</p><div class="box1"><span>CSS z-index: auto</span><div class="box2"><span>CSS z-index: 1</span></div></div></body></html>

    CSS z-index With Positive Integer

    CSS z-index property can have a positive integer value. The element with a higher integer value will appear above elements with lower values in the stacking order.

    Example

    The following example demonstrates the z-index property with a positive integer value.

    <html><head><style>
       .box1 {
    
      position: absolute;
      height: 200px;
      width: 280px;
      background-color: #f0baba;
      z-index: 1;
      text-align: center;
      padding: 3px;
      left: 10px;
      top: 10px;
    } .box2 {
      position: absolute;
      height: 140px;
      width: 220px;
      background-color: #eae98f;
      z-index: 2;
      text-align: center;
      padding: 5px;
      margin: 10px;
      left: 30px; 
      top: 30px;
    } .box3 {
      position: absolute;
      height: 90px;
      width: 160px;
      background-color: #b7c8ae;
      z-index: 3;
      text-align: center;
      padding: 5px;
      margin: 20px;
      left: 50px; 
      top: 50px;
    } p {
      margin-top: 250px;
    } </style></head><body><p>The element with z-index value of 1 appears behind the element with the z-index value of 2 and 3.</p><div class="box1">
      CSS z-index: 1
    </div><div class="box2">
      CSS z-index: 2
    </div><div class="box3">
      CSS z-index: 3
    </div></body></html>

    CSS z-index With Negative Integer

    You can also use negative integer values for the z-index property. An element with a negative z-index value will be stacked below elements with a higher z-index value.

    Example

    The following example demonstrates the z-index property with a negative integer value.

    <html><head><style>
       .box1 {
    
      position: absolute;
      height: 200px;
      width: 280px;
      background-color: #f0baba;
      z-index: -3;
      text-align: center;
      padding: 3px;
      left: 10px; 
      top: 10px;
    } .box2 {
      position: absolute;
      height: 140px;
      width: 220px;
      background-color: #eae98f;
      z-index: -2;
      text-align: center;
      padding: 5px;
      margin: 10px;
      left: 30px; 
      top: 30px;
    } .box3 {
      position: absolute;
      height: 90px;
      width: 160px;
      background-color: #b7c8ae;
      z-index: -1;
      text-align: center;
      padding: 5px;
      margin: 20px;
      left: 50px; 
      top: 50px;
    } p {
      margin-top: 250px;
    } </style></head><body><p>The element with z-index value of -3 appears behind the element with the z-index value of -2 and -1.</p><div class="box1">
      CSS z-index: -3
    </div><div class="box2">
      CSS z-index: -2
    </div><div class="box3">
      CSS z-index: -1
    </div></body></html>

    Placing Text Over Image

    The z-index property can be used for placing a text over an image and vice-versa.

    Example

    In this example, we are placing a text over an image using CSS z-index property and position property.

    <!DOCTYPE html><html lang="en"><head><title>Displaying Text Over Image</title><style>
    
        .container {
            position: relative;
            width: 500px;
        }
        img {
            display: block;
        }
        .txt {
            position: absolute;
            top: 20%;
            left: 35%;
            transform: translate(-50%, -50%);
            color: white;
            font-family: Verdana, sans-serif;
            font-size: 16px;
            background: rgba(0, 0, 0, 0.5);
        }
    &lt;/style&gt;&lt;/head&gt;&lt;body&gt;&lt;h2&gt;CSS z-index Property&lt;/h2&gt;&lt;div class="container"&gt;&lt;img src="/html/images/test.png" alt="Logo"&gt;&lt;p class="txt"&gt;This text displays over the photo.&lt;/p&gt;&lt;/div&gt;&lt;/body&gt;&lt;/html&gt;</pre>

    CSS z-index With Sticky Position

    The z-index can be used with position:sticky to fix the element's position on scroll.

    Example

    In this example, we have used the sticky value with z-index property to fix the position of div boxes on scroll.

    <html><head><style>
       .box1 {
    
      position: sticky;
      height: 200px;
      width: 280px;
      background-color: #f0baba;
      z-index: 1;
      text-align: center;
      padding: 3px;
      margin: 10px;
      left: 10px; 
      top: 80px;
    } .box2 {
      position: sticky;
      height: 140px;
      width: 220px;
      background-color: #eae98f;
      z-index: 2;
      text-align: center;
      padding: 5px;
      margin: 10px;
      left: 40px; 
      top: 200px;
    } .box3 {
      position: sticky;
      height: 90px;
      width: 160px;
      background-color: #b7c8ae;
      z-index: 3;
      text-align: center;
      padding: 5px;
      margin: 10px;
      left: 70px; 
    } </style></head><body><p>Move cursor upward to see the effect.</p><div class="box1">
      CSS z-index: 1
    </div><div class="box2">
      CSS z-index: 2
    </div><div class="box3">
      CSS z-index: 3
    </div></body></html>

    CSS z-index With Fixed Position

    The z-index property is used with the position:fixed value to fix an element at the top of the content when the user scrolls down.

    Example

    In the example, we have used position:fixed value to fix the text content on top while scrolling.

    <html><head><style>
       .container {
    
      position: relative;
      height: 350px;
    } .box1 {
      position: fixed;
      height: 200px;
      width: 280px;
      background-color: #f0baba;
      z-index: -3;
      text-align: center;
      padding: 3px;
      left: 10px; 
      top: 10px;
    } .box2 {
      position: fixed;
      height: 140px;
      width: 220px;
      background-color: #eae98f;
      z-index: -2;
      text-align: center;
      padding: 5px;
      margin: 10px;
      left: 30px; 
      top: 30px;
    } .box3 {
      position: fixed;
      height: 90px;
      width: 160px;
      background-color: #b7c8ae;
      z-index: -1;
      text-align: center;
      padding: 5px;
      margin: 20px;
      left: 50px; 
      top: 50px;
    } h3 {
         margin-top: 320px;
    } </style></head><body><h3>Scroll down the content to see the effect.</h3><div class="container"><div class="box1">
         CSS z-index: -3
      &lt;/div&gt;&lt;div class="box2"&gt;
         CSS z-index: -2
      &lt;/div&gt;&lt;div class="box3"&gt;
         CSS z-index: -1
      &lt;/div&gt;&lt;/div&gt;&lt;/body&gt;&lt;/html&gt;</pre>

    CSS z-index With Static Position

    The position:static property value makes the use of z-index property ineffective. The z-index property does not affect the stacking order of elements that have the static value of position property.

    Example

    The following example shows that the z-index property is ineffective when position:static property is used:

    <html><head><style>
       .box1 {
    
      position: static;
      height: 200px;
      width: 280px;
      background-color: #f0baba;
      z-index: 1;
      text-align: center;
      padding: 3px;
      margin: 10px;
      left: 10px;
      top: 10px;
    } .box2 {
      position: static;
      height: 140px;
      width: 220px;
      background-color: #eae98f;
      z-index: 2;
      text-align: center;
      padding: 5px;
      margin: 10px;
      left: 30px; 
      top: 30px;
    } .box3 {
      position: static;
      height: 90px;
      width: 160px;
      background-color: #b7c8ae;
      z-index: 3;
      text-align: center;
      padding: 5px;
      margin: 10px;
      left: 50px; 
      top: 50px;
    } </style></head><body><p>The z-index property has no effect on the stacking order of elements if the position property is set to static.</p><div class="box1">
      CSS z-index: 1
    </div><div class="box2">
      CSS z-index: 2
    </div><div class="box3">
      CSS z-index: 3
    </div></body></html>

    CSS z-index With Relative Position

    The position:relative property can be used with z-index property to position the element relative to its original position in the document flow.

    Example

    The following example demonstrates use of position:relative property value with z-index property.

    The example shows that when elements have the position: relative property, the z-index property positions the element relative to its original position in the document flow.

    <html><head><style>
       .box1 {
    
      position: relative;
      height: 200px;
      width: 280px;
      background-color: #f0baba;
      z-index: 1;
      text-align: center;
      padding: 3px;
      margin: 10px;
      left: 10px;
      top: 10px;
    } .box2 {
      position: relative;
      height: 140px;
      width: 220px;
      background-color: #eae98f;
      z-index: 2;
      text-align: center;
      padding: 5px;
      margin: 10px;
      left: 30px; 
      top: 30px;
    } .box3 {
      position: relative;
      height: 90px;
      width: 160px;
      background-color: #b7c8ae;
      z-index: 3;
      text-align: center;
      padding: 5px;
      margin: 10px;
      left: 50px; 
      top: 50px;
    } </style></head><body><p>The z-index property positions the element relative to its original position if position is relative.</p><div class="box1">
      CSS z-index: 1
    </div><div class="box2">
      CSS z-index: 2
    </div><div class="box3">
      CSS z-index: 3
    </div></body></html>
  • opacity Property

    The opacity Property

    CSS opacity property controls the transparency of an element. It determines how much of a hidden element’s content is visible. The property can be used on various elements, whether they contain text, images, or serve as backgrounds.

    CSS opacity Example

    Here is an example of the opacity property. You can change the slider and see the change in opacity and the value of opacity.

    Slide this slider to see the change in opacity.

    Adjust Opacity:

    0.5

    Syntax

    The syntax for the CSS opacity property is as follows:

    opacity: number | percentage | initial | inherit;

    Property Values

    ValueDescription
    numberIt specifies the opacity level of elements using numeric values between 0 (fully transparent) and 1 (Visible).
    percentageIt specifies the opacity level of elements using percent values between 0% (fully transparent) and 100% (Visible).
    initialIt sets the property to its default value.
    inheritIt inherits the property from the parent element.

    CSS opacity Property with Numeric Values

    To set the transparency level of an element, we can specify numeric values between 0 and 1 including them with the opacity property.

    Example

    In this example, we have used numeric values to specify the opacity level of div elements.

    <!DOCTYPE html><html><head><style>
    
      .props {
         height: 50px;
         padding: 20px;
         text-align: center;
         font-weight: bold;
         font-size: 20px;
         background-color: lightgreen;
      }
      .first {
         opacity: 0.3;
      }
      .second {
         opacity: 0.6;
      }
      .third {
         opacity: 1;
      }
    </style></head><body><h2>
      CSS opacity property
    </h2><h4>
      opacity: 0.3
    </h4><div class="props first">
      This div has opacity: 0.3
    </div><h4>
      opacity: 0.6
    </h4><div class="props second">
      This div has opacity: 0.6
    </div><h4>
      opacity: 1
    </h4><div class="props third">
      This div has opacity: 1
    </div></body></html>

    CSS opacity Property with Percentage Values

    To set the transparency level of an element, we can specify percentage values between 0% and 100% including them with the opacity property.

    Example

    In this example, we have used the percent value to specify the opacity level of div elements.

    <!DOCTYPE html><html><head><style>
    
      .props {
         height: 50px;
         padding: 20px;
         text-align: center;
         font-weight: bold;
         font-size: 20px;
         background-color: lightgreen;
      }
      .first {
         opacity: 30%;
      }
      .second {
         opacity: 60%;
      }
      .third {
         opacity: 100%;
      }
    </style></head><body><h2>
      CSS opacity property
    </h2><h4>
      opacity: 30%
    </h4><div class="props first">
      This div has opacity: 30%
    </div><h4>
      opacity: 60%
    </h4><div class="props second">
      This div has opacity: 60%
    </div><h4>
      opacity: 100%
    </h4><div class="props third">
      This div has opacity: 100%
    </div></body></html>

    CSS opacity for Images

    You can use the opacity property to set the transparency level of images. Setting the transparency level of an image can help in creating an overlay.

    Example

    In this example, we have used the opacity property to set the transparency level of the logo at different levels.

    <!DOCTYPE html><html><head><style>
    
      .props {
         width: 300px;
         height: 150px;
      }
      .first-img {
         opacity: 0.1;
      }
      .second-img {
         opacity: 50%;
      }
      .third-img {
         opacity: 1;
      }
    </style></head><body><h2>
      CSS opacity property
    </h2><h4>
      opacity: 0.1
    </h4><img class="first-img props" src="/css/images/logo.png" alt="Tutorials point"><h4>
      opacity: 50%
    </h4><img class="second-img props" src="/css/images/logo.png" alt="Tutorials point"><h4>
      opacity: 1
    </h4><img class="third-img props" src="/css/images/logo.png" alt="Tutorials point"></body></html>

    CSS opacity Property with RGBA Color Values

    The opacity property applies transparency to an element and its child elements. To avoid this and still achieve transparency, we can use the rgba() values. These values specify colors along with opacity only to the desired element.

    Example

    In this example, we have used the opacity and rgba() functions to highlight the difference between these two.

    <!DOCTYPE html><html><head><style>
    
      div {
         width: 200px;
         padding: 10px;
         text-align: center;
      }
      .first-color {
         background-color: rgba(77, 77, 255);
      }
      .decimal-opacity1 {
         opacity: 0.1;
      }
      .decimal-opacity2 {
         opacity: 0.3;
      }
      .decimal-opacity3 {
         opacity: 0.6;
      }
      .decimal-opacity4 {
         opacity: 0.9;
      }
      .rgba-opacity1 {
         background-color: rgba(77, 77, 255, 0.1);
      }
      .rgba-opacity2 {
         background-color: rgba(77, 77, 255, 0.3);
      }
      .rgba-opacity3 {
         background-color: rgba(77, 77, 255, 0.6);
      }
      .rgba-opacity4 {
         background-color: rgba(77, 77, 255, 0.9);
      }
      .container {
         font-weight: bolder;
         margin-left: 50px;
         float: left;
      }
    </style></head><body><h2>
      CSS opacity property
    </h2><p>
      It is clear from the 
    <strong>
      transparent element
    </strong>
      portion below, that the opacity property is 
      applied to all other elements present within 
      the element that uses opacity property. 
    </p><p>
      To prevent this, we can make use of the 
    <strong>
      rgba values
    </strong>
      which define the color along with opacity. The 
      opacity is applied only to the particular element 
      and not to the elements present within it.
    </p><div class="container"><h4>
         Transparent element
      &lt;/h4&gt;&lt;div class=" first-color decimal-opacity1"&gt;
         CSS Opacity 0.1
      &lt;/div&gt;&lt;div class="first-color decimal-opacity2"&gt;
         CSS Opacity 0.3
      &lt;/div&gt;&lt;div class="first-color decimal-opacity3"&gt;
         CSS Opacity 0.6
      &lt;/div&gt;&lt;div class="first-color decimal-opacity4"&gt;
         CSS Opacity 0.9
      &lt;/div&gt;&lt;/div&gt;&lt;div class="container"&gt;&lt;h4&gt;
         With RGBA color values
      &lt;/h4&gt;&lt;div class="rgba-opacity1"&gt;
         CSS Opacity 10%
      &lt;/div&gt;&lt;div class="rgba-opacity2"&gt;
         CSS Opacity 30%
      &lt;/div&gt;&lt;div class="rgba-opacity3"&gt;
         CSS Opacity 60%
      &lt;/div&gt;&lt;div class="rgba-opacity4"&gt;
         CSS Opacity 90%
      &lt;/div&gt;&lt;/div&gt;&lt;/body&gt;&lt;/html&gt;</pre>
  • Width Property

    The width property sets the width of an element’s content area. In case, the box-sizing is set to border-box, the property width sets the width of the border area.

    The value specified by the width property remains within the values defined by min-width and max-width properties.

    Refer the image for the understanding of width of an element.

    width

    Possible Values

    • <length>: A specific length value such as pixels (px), centimeters (cm), inches (in), etc.
    • <percentage>: A percentage of the width of the containing element.
    • auto: The browser will calculate the width automatically based on the content. It is the default value.
    • max-content: Defines the intrinsic preferred width.
    • min-content: Defines the intrinsic minimum width.
    • fit-content: Fits the content in the available space, but never more than max-content.
    • fit-content: fit-content formula is used, i.e, min(max-content, max(min-content, <length-percentage>)).

    Applies to

    All the HTML elements except non-replaced inline elements, table rows, and row groups.

    DOM Syntax

    object.style.width = "100px";
    

    CSS Width – Length Unit

    Here is an example of adding a width to a div element in length units:

    <html><head><style>
       div {
    
      border: 1px solid black;
      margin-bottom: 5px;
    } div.a {
      width: 100px;
      background-color: rgb(230, 230, 203);
    } div.b {
      width: 5em;
      background-color: rgb(230, 230, 203);
    } </style></head><body><div class="a">This div element has a width of 100px.</div><div class="b">This div element has a width of 5em.</div></body></html>

    CSS Width – Percentage Value

    Here is an example of adding a width to a div element in percentage values:

    <html><head><style>
       div {
    
      border: 1px solid black;
      margin-bottom: 5px;
    } div.a {
      width: 120%;
      background-color: yellow;
    } div.b {
      width: 20%;
      background-color: rgb(236, 190, 190);
    } </style></head><body><div class="a">This div element has a width of 120%.</div><div class="b">This div element has a width of 20%.</div></body></html>

    CSS Width – Auto

    Here is an example of adding a width to a div element as auto:

    <html><head><style>
       div {
    
      border: 1px solid black;
      margin-bottom: 5px;
    } div.auto {
      width: auto;
      background-color: yellow;
    } </style></head><body><div class="auto">This div element has a width set as auto.</div></body></html>

    CSS Width – Using max-content and min-content

    Here is an example of width equal to max-content and min-content:

    <html><head><style>
       div {
    
      border: 1px solid black;
      margin-bottom: 5px;
    } div.c {
      width: max-content;
      background-color: bisque;
    } div.d {
      width: min-content;
      background-color: darkseagreen;
    } </style></head><body><div class="c">This div element has a width as max-content.</div><div class="d">This div element has a width of min-content.</div></body></html>

    CSS width – Image

    Here is an example of adding width to an image:

    <html><head><style>
       div {
    
      border: 1px solid black;
      margin-bottom: 5px;
    } .demoImg {
      margin-top: 15px;
      width: 300px;
      margin-right: 0.5in;
    } </style></head><body><img class="demoImg" src="images/scancode.png" alt="image-width"></body></html>

    CSS width – Using fit-content

    Here is an example of fit-content value set for width of a list:

    <html><head><style>
       ul {
    
      background-color: beige;
      width: fit-content;
      padding: 1.5em;
      border: 2px solid black;
    } li {
      display: inline-flex;
      background-color: orange;
      border: 2px solid black;
      padding: 0.5em;
    } </style><body><ul><li>Item1</li><li>Item2</li><li>Item3</li><li>Item4</li></ul></body></html>

    CSS Width – Related Properties

    Following is the list of related CSS properties of width:

    propertyvalue
    max-widthSets an upper bound on the width of an element.
    min-widthSets a lower bound on the width of an element.
    min-contentSets intrinsic minimum width of the content.
    max-contentSets intrinsic maximum width of the content.
    fit-contentFits the content depending on the available size.
    fit-content()Clamps a given size based on the formula min(maximum size, max(minimum size, argument)).

  • character Property

    CSS hyphenate-character property allows you to specify the character that should be used as the hyphenation point when text is hyphenated using the hyphens property. When text is hyphenated, the browser will insert a hyphen character at appropriate points within words.

    Syntax

    hyphenate-character: auto | string | initial | inherit;

    Property Values

    ValueDescription
    autoSuitable character is selected by the browser based on the current typography conventions. Default.
    stringIt specifies the character to be used at the end of line before a hyphenation break.
    initialThis sets the property to its default value.
    inheritThis inherits the property from the parent element.

    Examples of CSS Hyphenate Character Property

    The following examples explain the hyphenate-character property with different values.

    Hyphenate Character Property with Auto Value

    To allow the browser to use its default hyphenation character for breaking words which typically is a standard hyphen (-) or another character defined by the browsers settings for hyphenation, we use the auto value. This is shown in the following example.

    Example

    <!DOCTYPE html><html><head><style>
    
      div {
         width: 80px;
         border: 2px solid blue;
         hyphens: auto;
         hyphenate-character: auto;
      }
    </style></head><body><h2>
      CSS hyphenate-character property
    </h2><h4>
      hyphenate-character: auto
    </h4><div>
      CSS hyphenatecharacter auto
    </div></body></html>

    Hyphenate Character Property with String Value

    To use different characters for hyphenation, we specify the character in string to the hyphenate-character property. The specified character(s) will be used as the hyphenation character when breaking words. This is shown in the following example.

    Example

    <!DOCTYPE html><html><head><style>
    
      div {
         width: 80px;
         border: 2px solid blue;
         hyphens: auto;
      }
      .box1 {
         hyphenate-character: "=";
      }
      .box2 {
         hyphenate-character: "*";
      }
      .box3 {
         hyphenate-character: "%";
      }
    </style></head><body><h2>
      CSS hyphenate-character property
    </h2><h4>hyphenate-character: "="</h4><div class="box1">
      CSS hyphenatecharacter "="
    </div><h4>hyphenate-character: "*"</h4><div class="box2">
      CSS hyphenatecharacter "*"
    </div><h4>hyphenate-character: "%"</h4><div class="box3">
      CSS hyphenatecharacter "%"
    </div></body></html>
  • Deployment

    So far, we have learned about various features of the Rails framework by building the applications on the locally running Puma server. In this chapter, we will learn how to deploy a Rails application on a publicly accessible server.

    Deploy with Rails Kamal

    Rails comes with a deployment tool called Kamal that we can use to deploy our application directly to a server. Kamal uses Docker containers to run your application and deploy with zero downtime. It is a simple, SSH-based deployment tool for Dockerized applications across any host or cloud provider. It is a lightweight, straightforward alternative to heavier tools like Kubernetes, or cloud-specific services like Heroku or AWS ECS.

    To deploy with Kamal, we need −

    • A server running Ubuntu LTS with 1GB RAM or more.
    • A Docker Hub account and access token. Docker Hub stores the image of the application so it can be downloaded and run on the server.

    On Docker Hub, create a Repository for your application image. Use “library” as the name for the repository.

    When you create a new Rails application with Rails new command, the dockerfile gem is automatically added.

    # Deploy this application anywhere as a Docker container [https://kamal-deploy.org]
    gem "kamal",require:false

    Note that Docker must be installed on your local machine and target servers, and have SSH access to your remote VPS.

    Kamal Configuration File

    Rails creates the config/deploy.yml file. This is the Kamal configuration file.

    It defines the following −

    • Service name
    • Docker image name
    • List of remote servers
    • Registry and environment settings

    For example, your deploy.yml might look like −

    # Name of your application. Used to uniquely configure containers.
    service: library
    
    # Name of the container image.
    image: your-user/library
    
    # Deploy to these servers.
    	servers:
    		web:-192.168.0.1
    
    	proxy:
    		ssl:true
    		host: app.example.com
    
    	# Credentials for your image host.
    	registry:
    		username: your-user
    		password:-KAMAL_REGISTRY_PASSWORD
    
    	env:
    		secret:-RAILS_MASTER_KEY
    		clear:# Run the Solid Queue Supervisor inside the web server's Puma process to do jobs.# When you start using multiple servers, you should split out job processing to a dedicated machine.SOLID_QUEUE_IN_PUMA:true
    
    	aliases:
    		console: app exec --interactive --reuse "bin/rails console"
    		shell: app exec --interactive --reuse "bash"
    		logs: app logs -f
    		dbc: app exec --interactive --reuse "bin/rails dbconsole"
    
    	volumes:-"library_storage:/rails/storage"
    
    
    	asset_path:/rails/public/assets
    
    	# Configure the image builder.
    	builder:
    		arch: amd64
    

    Note that you should replace 192.168.0.1 with your server’s IP address and your-user with your Docker Hub username.

    DockerFile

    You will also find DockerFile in the project structure, ready to containerize your Rails app. It includes steps to install system dependencies, bundle gems, precompile assets, and launch the app. You can customize it to add JS tools (e.g., Node, esbuild, Tailwind).

    The DockerFile includes −

    • Ruby image base (e.g., ruby:3.2)
    • System package installs (nodejs, postgresql-client, etc.)
    • bundle install
    • Asset precompilation
    • Puma server boot command

    Here’s a sample Dockerfile −

    FROM ruby:3.2# Install dependenciesRUN apt-get update -qq && apt-get install -y nodejs postgresql-client
    
    # Set working directoryWORKDIR/app
    
    # Install gemsCOPYGemfile*./RUN bundle install
    
    # Copy the rest of the appCOPY..# Precompile assets and prepare productionRUN bundle exec rake assets:precompile# Start serverCMD["bash","-c","bundle exec rails db:migrate && bundle exec puma -C config/puma.rb"]

    A file named as .dockerignore is also created. It works like .gitignore, but for Docker builds. Its purpose is to prevent unnecessary files (like log/, tmp/, node_modules/, .git/) from being added to the Docker image.

    Kamal Commands

    Listed below are the important commands in Kamal −

    • kamal build − Builds the Docker image
    • kamal push − Pushes the image to the container registry
    • kamal deploy − Deploys the image on the server
    • kamal env push − Syncs secret environment variables
    • kamal rollback − Rolls back to the previous deployment
    • kamal ssh app − SSH into the running container

    To set up your server and deploy your application for the first time, run the following command −

    bin/kamal deploy
    

  • Error Handling

    In Rails, error handling mainly works through a combination of Ruby exception handling (begin-rescue-end blocks) and Rails’ built-in mechanisms for managing errors in web requests, models, and controllers.

    Difference between Error and Exception

    In programming, you come across the terms exception and error, which have different meanings.

    An exception represents an error condition in a program. Exceptions provide a mechanism for stopping the execution of a program. They work somewhat like break statements in that they cause the program flow to jump to another location. However, unlike break, the location may be another layer of the program stack. Unhandled exception causes the program to stop.

    An error, on the other hand, is an unwanted or unexpected event, which occurs during the execution of a program, i.e., at runtime, that disrupts the normal flow of the program’s instructions.

    Ruby has a hierarchy of exception classes, highest level of exception handling StandardError class.

    Exception Handling Keywords

    The following keywords are important for exception handling −

    • begin – end − A set of instructions where probable exception appears is put inside the begin – end block.
    • raise − The raise statement allows the program to explicitly raise an exception.
    • ensure − The ensure statement allows the program to ensure that a block of code is executed, whether an exception is raised or not
    • rescue − A block where an exception is captured.

    The standard Ruby exception handling syntax is represented as −

    begin# risky operationrescueSomeError=> e
    	# handle errorend

    The rescue_from Method

    In a Rails application, you usually don’t write explicit begin-rescue blocks for each action of a controller. Instead, Rails provides structured ways to catch errors.

    Starting from the release 2.0, Rails provides a clean way to rescue exceptions in a controller, mapping specific error classes to corresponding handlers. Instead of rescue, Rails has the rescue_from method.

    rescue_from is a class-level method specific to Ruby on Rails, typically used in controllers or ActiveSupport-based classes. This enables you to handle exceptions for the entire class, without repeating the same error handling code in every action or method.

    You can also specify the type of exception you want to handle and provides a block or method reference that will be called when that exception is raised.

    rescue_from is useful for handling application-level exceptions and keeping your code DRY (Don’t Repeat Yourself).

    classBooksController<ApplicationController
       rescue_from ActiveRecord::RecordNotFound, with::record_not_founddefshow@book=Book.find(params[:id])endprivatedefrecord_not_found
    
      render plain:"Book not found", status::not_foundendend</pre>

    In this code snippet, if Book.find(params[:id]) raises ActiveRecord::RecordNotFound, the record_not_found method is called.

    rescue_from can be used at the controller level or in ApplicationController to handle errors app-wide.

    Model-Level Error Handling

    When saving models (save, update, etc.), Rails provides a validation errors system.

    @user=User.new(email:"")[email protected]
    	# successelse# @user.error full_messages will have validation error messagesend

    Since failed saves don't raise exceptions by default, you inspect @model.errors to know what went wrong. If you want to force exceptions on validation failures, use save! or update! −

    [email protected]!rescueActiveRecord::RecordInvalid=> e
    	puts e.message
    end

    Rails Error Reporter

    The Rails framework also has the Active Support Error Reporter feature that is a common interface for error reporting services. It provides a standard way to collect errors in your application and report them to your preferred service (monitoring service such as Sentry).

    • Error Handling refers to how your code reacts to exceptions (rescue, fallback actions, custom error pages, etc.).
    • Error Reporting, on the other hand, is how your application logs, notifies, or tracks errors (e.g., showing logs, sending error notifications, etc.).

    To rescue and report any unhandled error, you can use the handle method −

    Rails.error.handle do
    	do_something!end

    If an error is raised, it will be reported and swallowed.

    Alternatively, if you want to report the error but not swallow it, you can use record −

    Rails.error.record do
    	do_something!end

    Ways to Report Methods

    Rails error reporter has four methods that allow you to report methods in different ways −

    Rails.error.handle

    This method will report any error raised within the block. It will then swallow the error, and the rest of your code outside the block will continue as normal.

    Rails.error.record

    This method will report errors to all registered subscribers and then reraise the error, meaning that the rest of your code won't execute.

    Rails.error.report

    You can also manually report errors by calling this method −

    begin# coderescueStandardError=> e
    	Rails.error.report(e)end

    Rails.error.unexpected

    You can report any unexpected error by calling this method.

  •  Rack

    Rack provides a minimal, modular, and adaptable interface for building web applications. It wraps HTTP requests and responses in the simplest way possible, and unifies and distills the API for web servers, web frameworks, and middleware into a single method call.

    The standardized Interface of Rack is common for all web applications and web servers. This interface expects a Ruby object (usually a class or proc) that responds to a single method call −

    call(env)

    where env is a hash containing the HTTP request data. The call() method must return an array with three elements −

    [status_code, headers_hash, body_array]

    Pure Rack Application

    To begin with, let us build a pure Rack Application without Rails.

    mkdir rackapp
    cd rackapp
    

    Save the following code in the config.ru file.

    # config.ruclassAppdefcall(env)
    
      headers ={'Content-Type'=&gt;'text/html'}
      response =['&lt;h1&gt;Greetings from Rack!!&lt;/h1&gt;'][200, headers, response]endend
    run App.new

    This is a basic web application that returns a simple response. We shall use Puma the web server that Ruby on Rails ships with. Rack also works with servers such as Thin and Unicorn.

    To run the application with Puma, use the following command −

    puma config.ru
    

    The server starts at port 9292.

    ***SIGUSR2not implemented, signal based restart unavailable!***SIGUSR1not implemented, signal based restart unavailable!***SIGHUPnot implemented, signal based logs reopening unavailable!Puma starting in single mode...*Puma version:6.6.0("Return to Forever")*Ruby version: ruby 3.3.7(2025-01-15 revision be31f993d7)[x64-mingw-ucrt]*Min threads:0*Max threads:5*Environment: development
    *PID:12756*Listening on http://0.0.0.0:9292

    Use Ctrl-C to stop

    Open a browser and visit http://localhost:9292 to get the following output −

    Rails on Rack1

    Any Rack-compliant web server works well here, as it will always invoke a call method on an object (the Rack application) and serve the result of that method.

    Rack allows application frameworks and web servers to communicate with each other, and replace each without changing the other. The advantage of Rack is that it provides a common protocol (or interface, or specification) that different web servers can use to talk to different web applications, without worrying about the internals of each.

    Rails is built on top of Rack, so that every Rails application is also a Rack application. Rails uses a Rack-compatible interface to handle HTTP requests and responses.

    You can add or customize Rack middleware in a Rails app through the config/application.rb or environment-specific config files.

    Rack App in Rails

    Let us now create a standalone Rack app and mount it inside Rails routes.

    Assume that you have already created a Rails app.

    rails new myapp
    

    Enter the lib folder of the project file structure and open the following code as lib/hello_rack_app.rb –

    classHelloRackAppdefcall(env)[200,{"Content-Type"=>"text/html"},["<h1>Greetings from Rack!!</h1>"]]endend

    This is a simple Rack app as before. To mount it along with other Rails routes, join its path with other routes. Edit the config/routes.rb file of the project with the following code −

    requireRails.root.join("lib/hello_rack_app")Rails.application.routes.draw do# Other Rails routes...
       root "index#index"
       mount HelloRackApp.new=>"/hello_rack"end

    That’s it. Save the changes and run the Rails server. You now have mounted the Rack app on a Rails application. Visit http://localhost:3000/hello_rack to get the following output −

    Rails on Rack2

    Rack Middleware

    Rack allows middleware components (e.g., logging, session handling, CORS handling, etc.) to be inserted into the request/response cycle. Middleware sits between the server and the application and can modify the request or response.

    To define your Rack middleware, create a new class in lib/middleware folder that implements the call(env) method −

    # lib/middleware/logger_middleware.rbclassLoggerMiddlewaredefinitialize(app)@app= app
       enddefcall(env)Rails.logger.info ">> Request received at: #{Time.now}"
    	  status, headers, response [email protected](env)Rails.logger.info "<< Response status: #{status}"[status, headers, response]endend

    Next, add it to the middleware stack −

    # config/application.rb
    config.autoload_paths <<Rails.root.join('lib/middleware')
    config.middleware.use LoggerMiddleware

    You can also use insert_before or insert_after to control its position relative to other middleware.

  • Send Emails

    Action Mailer is the Rails component that enables applications to send and receive emails. The other email related component in the Rails framework is Action Mailbox, which deals with receiving emails.

    Action Mailer

    Action Mailer uses mailers classes and views to create and configure the email to be sent. Mailer class inherits from ActionMailer::Base. It is similar to controller classes, as it also has:

    • Instance variables
    • It can use layouts and partials
    • It has access to a params hash
    • It also defines actions and associated views in app/views

    Let’s start creating a new project using the following command –

    rails new mailtest
    

    This will create the required framework to proceed. Now, we will start with configuring the ActionMailer.

    Action Mailer – Configuration

    Follow the steps given below to complete your configuration before proceeding with the actual work –

    Go to the config\environments folder of your project and open development.rb file and add the following line inside the Rails.application.configure do block.

    config.action_mailer.delivery_method =:smtp

    It tells ActionMailer that you want to use the SMTP server. You can also set it to be :sendmail if you are using a Unix-based operating system such as Mac OS X or Linux.

    This configuration file has many configuration settings. Keep them unchanged, configure smtp setting as follows to use Gmail for sending email:

    Rails.application.configure do# Other existing settings...# Configure mailer settings for Gmail SMTP
      config.action_mailer.delivery_method =:smtp
      config.action_mailer.smtp_settings ={
    
    address:"smtp.gmail.com",
    port:587,
    domain:"gmail.com",
    authentication:"plain",
    enable_starttls_auto:true,
    user_name:"GMAIL_USERNAME",
    password:"GMAIL_PASSWORD"}
    config.action_mailer.perform_deliveries =true# Ensure emails are actually sent config.action_mailer.raise_delivery_errors =true# Show errors for debuggingend

    Replace each hash value with proper settings for your Simple Mail Transfer Protocol (SMTP) server. You can take this information from your Internet Service Provider if you already don’t know. You don’t need to change port number 25 and authentication type if you are using a standard SMTP server.

    Note that Gmail has strict security policies. To send emails from your app, you can enable Less Secure Apps access in your Google account. However this feature not available for accounts with 2 Factor Authentication. In such case, the preferred option is to use an App Password instead of your real password. You can generate it in your Google Account Security settings.

    You may also change the default email message format. If you prefer to send email in HTML instead of plain text format, add the following line to the development.rb as well −

    ActionMailer::Base.default_content_type ="text/html"

    ActionMailer::Base.default_content_type could be set to “text/plain”, “text/html”, and “text/enriched”. The default value is “text/plain”.

    The next step will be to generate a mailer.

    Generate a Mailer

    Use the following command to generate a mailer as follows –

    rails generate mailer UserMailer

    This will create a file user_mailer.rb in the app\mailer directory. Check the content of this file as follows −

    classEmailer<ActionMailer::Baseend

    Let’s add the welcome_email method as follows −

    classUserMailer<ApplicationMailer
      default from:" GMAIL_USERNAME"defwelcome_email(user)@user= user
    
    mail(to:@user.email, subject:"Welcome to My Awesome Site!")endend</pre>
    • default Hash − This is a hash of default values for any email you send from this mailer. In this case we are setting the :from header to a value for all messages in this class. This can be overridden on a per-email basis
    • mail − The actual email message, we are passing the :to and :subject headers in.

    Create a file called welcome_email.html.erb in app/views/user_mailer/. This will be the template used for the email, formatted in HTML –

    <h1>Welcome to example.com, <%= @user.name %></h1><p>
    	You have successfully signed up to example.com,your username is: 
    	<%= @user.email %>.<br></p><p>
    	To login to the site, just follow this link: 
    	<%= @url %>.
    </p><p>Thanks for joining and have a great day!</p>

    You can also create Plain text email view in app/views/user_mailer/welcome_email.text.erb:

    Welcome to example.com,<%= @user.name %>
    ===============================================You have successfully signed up to example.com,Your username is:<%= @user.email %>.
    
    To login to the site, just follow this link: <%=@url%>.Thanksfor joining and have a great day!

    Calling the Mailer

    First, let's create a simple User scaffold.

    rails generate scaffold User name:string email:string

    Then, run migrations:

    rails db:migrate

    This will create User model, UsersController class with new, create, edit, update, destroy, index, show actions and the corresponding views such as new.html.erb, edit.html.erb, etc.

    Modify UsersController to Send Email on User Creation

    Edit the Create action in app/controllers/users_controller.rb to send a welcome email after a user is created:

    defcreate@user=User.new(user_params)[email protected]
    
      UserMailer.welcome_email(@user).deliver_now  # Send email after user creation
      redirect_to @user, notice:"User was successfully created. A welcome email has been sent."else
      render :new, status::unprocessable_entityendendprivatedefuser_params
    params.require(:user).permit(:name,:email)end</pre>

    Ensure that the UsersController also has the show action as follows:

    defshow@user=User.find(params[:id])end

    The set_user method stores the current user in the @user instance variable.

    That’s it. Now, to test your application start the server and visit  http://127.0.0.1:3000/users/new. It displays the following screen to add a new user

    Modify UsersController

    This adds a new User object and calls the welcome_email method to generate the welcome email, using the Gmail address set in the configuration.

    While the user can verify that he has received the email, the app redirects the browser to show the confirmation.

    welcome email

    On the console, you get the following log:

    UserMailer#welcome_email: processed outbound mail in 148.6msDelivered mail [email protected] (22000.3ms)Date:Thu,03Apr202512:22:33+0530From:*****@gmail.com
    To:*****@gmail.com
    Message-ID:<[email protected]>Subject:Welcome to MyAwesomeSite!Mime-Version:1.0Content-Type: multipart/alternative;
      boundary="--==_mimepart_67ee3030ed242_73d4638841e";
      charset=UTF-8Content-Transfer-Encoding:7bit
    
    ----==_mimepart_67ee3030ed242_73d4638841e
    Content-Type: text/plain;
      charset=UTF-8Content-Transfer-Encoding:7bit
    

    For more information on how to send emails using Rails, please go through the official documentation on ActionMailer (https://guides.rubyonrails.org/action_mailer_basics.html)

  • File Uploading

    You may have a requirement in which you want your site visitors to upload a file on your server. Rails makes it very easy to handle this requirement. Now we will proceed with a simple and small Rails project.

    As usual, let’s start off with a new Rails application called FileUploadapp. Let’s create the basic structure of the application by using simple rails command.

    rails newFileUploadapp
    cd FileUploadapp

    Before starting application development, we should install gem files. Open up your Gemfile and add the following two gems at the bottom.

    gem 'carrierwave','~> 3.0'
    gem install bootstrap-sass
    

    After adding gems in, we need to run the following command −

    bundle install
    

    The command terminal shows the following log −

    Resolving dependencies...Fetching mini_magick 5.2.0Fetching ssrf_filter 1.2.0Fetching ffi 1.17.1(x64-mingw-ucrt)Installing ssrf_filter 1.2.0Installing mini_magick 5.2.0Installing ffi 1.17.1(x64-mingw-ucrt)Fetching ruby-vips 2.2.3Installing ruby-vips 2.2.3Fetching image_processing 1.14.0Installing image_processing 1.14.0Fetching carrierwave 3.1.1Installing carrierwave 3.1.1Bundle complete!22Gemfile dependencies,125 gems now installed.

    What is CarrierWave?

    CarrierWave is a file uploader library for Rails. It handles file uploads through forms, and stores files locally or in the cloud (e.g., Amazon S3). With the help of libraries like MiniMagick, it allows you to process and resize images, and gives you more control over file paths, naming, and structure.

    You need to configure CarrierWave by adding the following settings in config\initializers\carrierwave.rb

    require"carrierwave"require"carrierwave/orm/activerecord"CarrierWave.configure do|config|
      config.root =Rails.root.join("public")# Ensures uploads go to /public/uploads
      config.cache_dir ="tmp/uploads"end

    Note that by default, CarrierWave stores uploaded files in −

    public/uploads/

    Generate Uploader

    Now we need to create an uploader. An Uploader came from carrierWave gem and it tells to carrierwave how to handle the files. In short, it contained all file processing functionalities. Run the command to create an uploader as shown below.

    rails generate uploader ProfilePicture

    This creates app/uploaders/profile_picture_uploader.rb.

    classProfilePictureUploader<CarrierWave::Uploader::Base# Choose what kind of storage to use for this uploader:
      storage :filedefstore_dir"uploads/#{model.class.to_s.underscore}/#{mounted_as}/#{model.id}"endend

    Generate User Scaffold

    Let us create the User model, the controller and the required views with the scaffold command −

    rails generate scaffold User username:string email:string profile_picture:string
    rails db:migrate

    Mount the Uploader

    Open the User model (app/models/user.rb) and call the uploader as shown below −

    classUser<ApplicationRecord
      mount_uploader :profile_picture,ProfilePictureUploaderend

    Also, make sure that the user input Only allows a list of trusted parameters through.

    defuser_params
      params.require(:user).permit(:username,:email,:profile_picture)end

    Update the Views

    Edit the _form.html.erb file to add the File field to let the user choose profile picture −

    <%= form_with(model: user) do |form| %>
      <% if user.errors.any? %>
    
    &lt;div style="color: red"&gt;&lt;h2&gt;&lt;%= pluralize(user.errors.count, "error") %&gt; prohibited this user from being saved:&lt;/h2&gt;
      &lt;ul&gt;
        &lt;% user.errors.each do |error| %&gt;
          &lt;li&gt;&lt;%= error.full_message %&gt;&lt;/li&gt;&lt;%end%&gt;
      &lt;/ul&gt;&lt;/div&gt;&lt;%end%&gt;
    <div><%= form.label :username, style: "display: block" %>
    &lt;%= form.text_field :username%&gt;
    </div><div><%= form.label :email, style: "display: block" %>
    &lt;%= form.text_field :email%&gt;
    </div><div><%= form.label :profile_picture, style: "display: block" %>
    &lt;%= form.text_field :profile_picture%&gt;
    </div><div class="field"><%= form.label :profile_picture %>
    &lt;%= form.file_field :profile_picture%&gt;
    </div><div><%= form.submit %> </div><%end%>

    Similarly, modify the show.html.erb file.

    <p style="color: green"><%= notice %></p><p><strong>Username:</strong>
      <%= @user.username %>
    </p><p><strong>Email:</strong>
      <%= @user.email %>
    </p>
    
    <% if @user.profile_picture? %>
      <p><strong>Profile Picture:</strong><br>
    
    &lt;%= image_tag @user.profile_picture.url, width: 150, height: 150 %&gt;
    </p> <% else %> <p>No profile picture uploaded.</p> <% end %> <div> <%= link_to "Edit this user", edit_user_path(@user) %> | <%= link_to "Back to users", users_path %> <%= button_to "Destroy this user", @user, method: :delete %> </div>

    That’s it. Now start the server and visit http://localhost:3000/users/new to open up the user registration form.

    Update the Views

    Click on the choose File button, navigate to the desired file and then click Create User button. Rails responds with a confirmation page, displaying the profile picture you uploaded.

    Update the View

    CarrieerWave vs Active Storage

    In Rails 6 and onwards, the Active Storage framework was added which can natively handle file uploads. Here is a comparison of handling uploads with CarrierWave and Active Storage:

    FeatureActive StorageCarrierWave
    Built into RailsYes (since Rails 6)No (requires separate gem)
    Setup complexitySimple, plug-and-playMore configurable, but requires boilerplate
    File storage structureManaged internally (in storage/)You control the structure (e.g., /uploads/users/)
    Image processingOn-demand variants (using MiniMagick/Vips)Immediate, during upload (using MiniMagick)
    Metadata storageIn database (active_storage_blobs)Typically stored in model columns or filenames
    Cloud storage supportYesYes
    Attachment declarationhas_one_attached, has_many_attachedYou mount uploaders in models
    Preview/caching supportBuilt-in previewsNeeds custom logic or plugins

  • Action Cable

    Rails follows the MVC architecture and by default uses the HTTP protocol to handle the request-response cycle in a web application. However, since Rails version 5, the Action Cable feature was included to lend support for the new WebSocket protocol.

    Unlike the HTTP protocol, WebSocket is an asynchronous protocol, thus enabling real-time communication between the client and the server.

    In Rails 8, Action Cable is enabled by default. In earlier versions, it must be included as a gem to be able to use.

    Add this to the Gemfile −

    gem "action_cable"

    and then,

    bundle install
    

    What is Action Cable?

    Action Cable lets you seamlessly integrate the WebSockets in your Rails application. You can write performant and scalable real-time features in Ruby that has the access to the Active Record or your ORM of choice.

    While a regular Rails server accepts only HTTP requests, an ActionCable server accepts WebSocket requests. The ActionCable server subscribes to channels and broadcasts from channels using Redis.

    What is Action Cable?

    Action Cable seamlessly integrates WebSockets with the rest of your Rails application. It allows for real-time features to be written in Ruby in the same style and form as the rest of your Rails application, while still being performant and scalable. It’s a full-stack offering that provides both a client-side JavaScript framework and a server-side Ruby framework. You have access to your entire domain model written with Active Record or your ORM of choice.

    To mount Action Cable, you need to edit the routes.rb file of your application −

    mount ActionCable.server =>'/cable'

    Action Cable Terminology

    Action Cable uses WebSockets instead of the HTTP request-response protocol. One needs to get familiar with the following terms:

    Connections

    Connections are fundamental to the client-server relationship. A single Action Cable server can handle multiple connection instances. It has one connection instance per WebSocket connection.

    A new connection object is instantiated for every WebSocket accepted by the server. The connection object is a parent of all subsequent channel subscriptions, although it deals only with authentication and authorization and not any specific application logic.

    Consumers

    The client of a WebSocket connection is called the connection consumer. An individual user will create one consumer-connection pair per browser tab, window, or device they have open.

    Consumers

    Every client of a WebSocket connection is called the consumer. In Action Cable, the consumer is created by the client-side JavaScript framework.

    Channels

    A channel is similar to what a consumer is in a MVC framework. Each channel encapsulates a logical unit of work. A consumer can subscribe to multiple channels.

    For example, you could have a ChatChannel and an AppearancesChannel, and a consumer could be subscribed to either or both of these channels. A consumer should be subscribed to one channel.

    You can generate new channels where WebSocket features live using the generate channel command.

    rails generate channel Chatroom

    It creates the ChatroomChannel class which inherits class. You can override the following methods from the parent −

    • subscribed − Called when a client successfully subscribes to the channel.
    • unsubscribed − Called when the client disconnects or unsubscribes.
    • receive(data) − Called when the client sends a message via the WebSocket.
    • stream_from(stream_name) − Starts streaming messages from a named broadcasting channel to the client.
    • transmit(data) − Sends data directly to the client without a broadcast.

    Subscribers

    When the consumer is subscribed to a channel, he becomes a subscriber. The connection between the subscriber and the channel is called a subscription.

    A consumer can subscribe to a given channel any number of times. For example, a consumer could subscribe to multiple chat rooms at the same time.

    Publishers

    In Action Cable, your application code (controllers, models, jobs, etc.) acts as the publisher, sending data or events to a specific channel.

    Pub/Sub Pattern

    As publishers send messages to a channel, subscribers (clients) listen for messages on that channel. This is called the publish/subscribe pattern.

    Action Cable uses the (Pub/Sub) pattern which refers to a message queue paradigm in which the senders (publishers) send data to an abstract class of recipients (subscribers), without specifying individual recipients. Action Cable uses this approach to communicate between the server and many clients.

    Broadcastings

    broadcasting is a pub/sub link where anything transmitted by the broadcaster is sent directly to the channel subscribers who are streaming that named broadcasting. Each channel can be streaming zero or more broadcastings.

    With these basics of Action Cable features understood, let us build a simple real-time chat application using Action Cable and WebSocket.