Microdata is a standardized way to provide additional semantics in the web pages. It lets us define our own customized elements and start embedding custom properties in the web pages. The microdata consists of a group of name-value pairs.
The groups are called items, and each name-value pair is a property. Items and properties are represented by regular elements.
Using Microdata in HTML document
Earlier, we mentioned that the microdata has group of name-value pairs (property) and this group is known as items.
To create an item, the itemscope attribute is used.
To add a property to an item, the itemprop attribute is used on one of the item’s descendants.
Example
In this example, there are two items, each of which has the property “name” −
Open Compiler
<html><body><div itemscope><p>My name is <span itemprop="name">Zara</span>.</p></div><div itemscope><p>My name is <span itemprop="name">Nuha</span>.</p></div></body></html>
Properties generally have values that are strings but it can have following data types −
Global Attributes
Microdata introduces five global attributes which would be available for any element to use and give context for machines about your data.
S.No.
Attribute & Description
1
itemscopeThis is used to create an item. The itemscope attribute is a Boolean attribute that tells that there is Microdata on this page, and this is where it starts.
2
itemtypeThis attribute is a valid URL which defines the item and provides the context for the properties.
3
itemidThis attribute is global identifier for the item.
4
itempropThis attribute defines a property of the item.
5
itemrefThis attribute gives a list of additional elements to crawl to find the name-value pairs of the item.
Properties Datatypes
Properties generally have values that are strings as mentioned in above example but they can also have values that are URLs. Following example has one property, “image”, whose value is a URL −
Properties can also have values that are dates, times, or dates and times. This is achieved using the time element and its datetime attribute.
Open Compiler
<html><body><div itemscope>
My birthday is −
<time itemprop="birthday" datetime="1971-05-08">
Aug 5th 1971
</time></div></body></html></pre>
Properties can also themselves be groups of name-value pairs, by putting the itemscope attribute on the element that declares the property.
Microdata API support
If a browser supports the HTML5 microdata API, there will be a getItems() function on the global document object. If browser doesn't support microdata, the getItems() function will be undefined.
function supports_microdata_api() {
return !!document.getItems;
}
Modernizr does not yet support checking for the microdata API, so we will need to use the function like the one listed above.
The HTML5 microdata standard includes both HTML markup (primarily for search engines) and a set of DOM functions (primarily for browsers).
We can include microdata markup in our web pages and the search engines that are not capable to understand the microdata attributes will just ignore them. But if we need to access or manipulate microdata through the DOM, we need to check whether the browser supports the microdata DOM API.
Defining Microdata Vocabulary
To define microdata vocabulary, you need a namespace URL which points to a working web page. For example, http://data-vocabulary.org/Person can be used as the namespace for a personal microdata vocabulary with the following named properties −
name − Person name as a simple string
Photo − A URL to a picture of the person.
URL − A website belonging to the person.
Using about properties a person microdata could be as follows −
Google supports microdata as part of their Rich Snippets program. When Google's web crawler parses your page and finds microdata properties that conform to the vocabulary, it parses out those properties and stores them alongside the rest of the page data.
For further development on Microdata you can always refer to HTML5 Microdata.
HTML MathML (Mathematical Markup Language) is used to embed mathematical equations and chemical reaction equations into HTML document.
Mathematical Markup Language (MathML)
Mathematical Markup Language is a XML based markup language introduced in 2015.
It helps to represent complex mathematical formula in human readable format.
This representation also helps software to understand context of the equation.
To embed MathML elements inside a web page, we can use the HTML <math> tag.
HTML MathML Elements
The following table contains a list of MathML elements used in HTML:
Element
Description
<math>
It is the top level tag (root) of all MathML elements.
<mrow>
It indicates row of a given table or matrix.
<msqrt>
It displays square roots symbol in an expression.
<msub>
It is used for adding subscript in a given expression.
<msup>
It is used for adding superscript in a given expression.
<mo>
It represents operators such as equal to, comma and so on.
<mi>
It represents identifiers such as variable or constant.
<mtable>
It is used for creating table or matrix.
<mtr>
It is used for table row or matrix row.
<mtd>
It is used to enter data in a cell of a table or a matrix.
Purpose of HTML MathML
MathML is helpful to display formula in technical and mathematical webpages. This ensures clear math content in e-learning materials, scientific papers and complex algorithms.
MathML is only supported in Google Chrome and Mozilla Firefox browsers. Please make sure that your browser supports MathML before testing it.
Examples MathML in HTML
Following are some examples that illustrates how to use MathML elements in HTML.
Pythagorean theorem Using MathML
In this example, we will make Pythagorean Equation using HTML code.
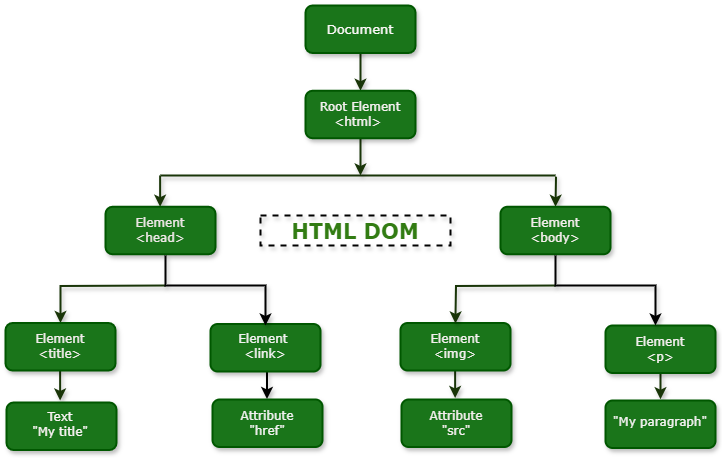
The HTML Document Object Model (in short, HTML DOM) represents all the elements of an HTML document in a hierarchical order (or tree structure). Where each node of this tree represents an element in the HTML document.
Accessing and Modifying HTML DOM
Using the HTML DOM methods we can access the tree and modify the structure or, contents of the respective HTML document. We can also have events attached to the nodes.
HTML DOM Tree Structure
For instance, if your HTML document contains elements like <html>, <head>, <body>, <title>, <link>, <img> and <p>, the browser will create a DOM Tree of the HTML document that can be represented as shown in the diagram given below −
Please note that each HTML document contain <html>, <head> and <body> tags. The root element is <html>, and <head> and <body> tags are its child element.
What is Document Object Model?
The Document Object Model (DOM) is a programming interface that works as a bridge between web pages and scripts or programming languages. It represents a web document (like an HTML or XML) as a tree of objects where each branch of the tree ends with a node, and each node contains objects.
Click on the button given below to understand it properly. It will generate a DOM Tree.Create DOM Tree
The DOM provides a set of methods that allow programming languages, such as JavaScript, to access the DOM tree. Using these methods, you can change the document’s structure, style, or content. It makes a web page interactive and dynamic.
The DOM is not a programming language, it is designed to be language independent. Most web developers use the DOM through JavaScript, however, implementations of the DOM can be built for any language.
HTML DOM vs JavaScript DOM
We use HTML to structure a web page and JavaScript to make it interactive. However, JavaScript can not understand the a web page directly. It takes help of the HTML DOM. When an HTML page is loaded, the browser creates an Object Model of the page, which JavaScript can then interact with to manipulate the content, structure, and styles of the page.
JavaScript can perform the below operations with the help of object model −
Access and replace HTML elements.
Access and replace HTML attributes.
Change all the CSS styles in the page.
Respond to user events.
Add animation to the web page.
The below table explains the difference between HTML DOM and JavaScript DOM −
HTML DOM
JavaScript DOM
The HTML DOM is an Object Model for HTML that represents all elements of an HTML document in a tree like structure.
The HTML DOM is an API for JavaScript that helps add, change, and replace elements, attributes and events of an HTML document.
DOM Methods Reference
Below is a list of important DOM methods −
Sr.No
Method & Description
1.
toString()It is used to convert an HTML element into a string format.
2.
setAttribute()This method allows you to define attributes for a particular element.
3.
setAttributeNode()This method allows you to define a particular attribute node on a particular element.
4.
scrollIntoView()It ensures that a particular element on a web page of scrollable container becomes visible by adjusting the scroll position.
5.
querySelector()It is used to select and access the first HTML element that matches a given CSS selector(s) within the document.
6.
querySelectorAll()This method allows you to select and access all HTML element that matches a given CSS selector(s) within the document.
7.
remove()This method can delete an element completely from the web page.
8.
removeAttribute()This method is used to delete any attribute that has been set on an HTML element within the DOM structure.
9.
removeAttributeNode()It allows you to delete a specific attribute node from an element.
10.
removeChild()It is used to delete the selected child element from its parent element.
11.
removeEventListener()This method allows you to delete an event listener that was previously assigned to an element.
12.
replaceChild()This method enable us to replace one child element with another in a parent element.
13.
hasAttribute()It is used to check whether an attribute exists within an HTML element.
14.
hasAttributes()This method checks whether an element in HTML DOM has attributes.
15.
hasChildNodes()It is used to check if an HTML element has any child element inside it.
Click here to view list of all methods….
DOM Properties Reference
Below is a list of important DOM properties −
Sr.No
Method & Description
1.
titleIt helps us to access and update the value stored in an element’s title attribute.
2.
textContentThis property is used to access and update the text content of an HTML element and all its child elements as a single string.
3.
tagNameIt gives you the name of the HTML tag in uppercase that defines an element on a webpage.
4.
styleUsing this property, you can get the CSS styles that are directly set for a particular element.
5.
tabIndexIt is used to access and update the value of the tabIndex attribute for an element.
6.
scrollLeftThis property is used to access and update how far an element’s content is scrolled horizontally.
7.
scrollTopIt is used to access and update how far an element’s content is scrolled vertically.
8.
scrollWidthThis property gives you the total horizontal width of an element’s content in pixels.
9.
scrollHeightYou can get the total vertical height of an element’s content in pixels using this property.
10.
idThe id property is used for setting and retrieving the value of the element’s id attribute.
11.
innerTextIt allows us to retrieve or change the visible text content directly within an HTML element on a web page.
12.
isContentEditableIt is used to check if a webpage element can be edited by users directly.
13.
langThe lang property is an attribute of an HTML element that specifies the language code.
14.
lastChildThe lastChild property returns a node that points to the last child node of a specific parent element.
15.
lastElementChildIt returns a node that holds the last child element of a parent element.
Server-sent events are a way of sending data from a server to a web page without requiring the page to refresh or make requests. These events are useful for creating real-time applications, such as chat, news feeds, or notifications. Using SSE, we can push DOM events continuously from our web server to the visitor’s browser.
The event streaming approach opens a persistent connection to the server, sending data to the client when new information is available, eliminating the need for continuous polling. Server-sent events standardize how we stream data from the server to the client.
How to Use SSE in Web Application?
To use Server-sent events in a web application, we need to add an <eventsource> element to the document. The src attribute of the <eventsource> element should point to an URL that provides a persistent HTTP connection that sends a data stream containing the events. Furthermore, the URL points to a PHP, PERL, or any Python script that would take care of sending event data consistently.
Instance
Following is a sample HTML code of a web application that would expect server time:
The following are the steps for sending server-sent events (SSE) from a server-side script:
1. Set the Content-Type Header
A server-side script should send Content-Type header specifying the type text/event-stream as follows.
print "Content-Type: text/event-stream\n\n";
2. Send an Event Name
After setting Content-Type, the server-side script would send an Event: tag followed by the event name. Following code snippet would send Server-Time as an event name terminated by a new line character.
print "Event: server-time\n";
3. Send Event Data
The final step is to send event data using Data: tag which would be followed by an integer of a string value terminated by a new line character as follows −
$time = localtime();
print "Data: $time\n";
4. Combine Steps into a Complete Script
Finally, following is a complete “ticker.cgi” written in Perl −
You can also modify the web application to listen for and process server-sent events using an eventsource object. Let us modify our web application to handle server-sent events.
Example
The following example demonstrates handling server-sent events:
document.getElementsByTagName("eventsource")[0].addEventListener("server-time", eventHandler, false);
function eventHandler(event) {
// Alert time sent by the server
document.querySelector('#ticker').innerHTML = event.data;
}
</script></head><body><div id="sse"><eventsource src="/cgi-bin/ticker.cgi" /></div><div id="ticker" name="ticker"> [TIME] </div></body></html></pre>
Note: Before testing Server-Sent events, I would suggest that you make sure your web browser supports this concept.
HTML Web storage is a mechanism used for storing structured data on the client side without sending it to the server. These two storage mechanisms are session storage and local storage. Both are collectively part of the HTML5 Web Storage API.
Need of Web Storage
HTML Web storage was introduced to overcome the following drawbacks of cookies:
Cookies are included with every HTTP request, thereby slowing down your web application by transmitting the same data.
Cookies are included with every HTTP request, thereby sending data unencrypted over the internet.
Cookies are limited to about 4 KB of data. Not enough to store required data.
Types of Web Storage
HTML provides two types of web storage:
Session storage
Local storage
To use these two web storages (session storage or local storage) in your web application, you can access them through the window.sessionStorage and window.localStorage properties, respectively.
The Session Storage
The session storage is temporary, and it gets cleared when the page session ends, which happens when the browser tab or window is closed. The data stored in session storage is specific to each tab or window.
HTML5 introduces the sessionStorage attribute, which would be used by the sites to add data to the session storage, and it will be accessible to any page from the same site opened in that window, i.e., session, and as soon as you close the window, the session would be lost.
Example
Following is the code that would set a session variable and access that variable −
</script><p>Refresh the page to increase number of hits.</p><p>Close the window and open it again and check the result.</p></body></html>
Local Storage
The local storage is designed for storage that spans multiple windows and lasts beyond the current session. It does not expire and remains in the browser until it is manually deleted by the user or by the web application. In particular, web applications may wish to store megabytes of user data, such as entire user-authored documents or a user’s mailbox, on the client side for performance reasons.
Again, cookies do not handle this case well because they are transmitted with every request.
HTML5 introduces the localStorage attribute, which would be used to access a page’s local storage area without a time limit, and this local storage will be available whenever you use that page.
Example
Following is the code that would set a local storage variable and access that variable every time this page is accessed, even next time, when you open the window −
</script><p>Refresh the page to increase number of hits.</p><p>Close the window and open it again and check the result.</p></body></html>
Delete Web Storage
Storing sensitive data on a local machine could be dangerous and could leave a security hole. The session storage data would be deleted by the browsers immediately after the session gets terminated.
However, to clear a local storage setting, we need to call localStorage.remove(‘key’), where ‘key’ is the key of the value we want to remove. If we want to clear all settings, the localStorage.clear() method can be called.
Example
Following is the code that would clear complete local storage −
WebSockets is a next-generation bidirectional communication technology for web applications that operates over a single socket.
WebSockets allow bidirectional communication, which means both client and server can send data to each other independently and simultaneously.
After establishing a Web Socket connection with the web server, we can send data from browser to server by calling the send() method and receive data from server to browser by an onmessage event handler.
Syntax
Following is the API, which creates a new WebSocket object:
var Socket = new WebSocket(url, [protocol] );
Here the first argument, url, specifies the URL to which to connect. The second attribute, protocol, is optional and, if present, specifies a sub-protocol that the server must support for the connection to be successful.
Attributes of WebSocket
Following are the attributes of the WebSocket object. Assuming we created a socket object as mentioned above:
Attribute
Description
Socket.readyState
The readonly attribute readyState represents the state of the connection. It can have the following values:A value of 0 indicates that the connection has not yet been established.A value of 1 indicates that the connection is established and communication is possible.A value of 2 indicates that the connection is going through the closing handshake.A value of 3 indicates that the connection has been closed or could not be opened.
Socket.bufferedAmount
The readonly attribute bufferedAmount represents the number of bytes of UTF-8 text that have been queued using the send() method.
WebSocket Events
Following are the events associated with the WebSocket object. Assuming we created a socket object as mentioned above:
Event
Values & Event Handler
Values & Description
open
Socket.onopen
This event occurs when socket connection is established.
message
Socket.onmessage
This event occurs when client receives data from server.
error
Socket.onerror
This event occurs when there is any error in communication.
close
Socket.onclose
This event occurs when connection is closed.
WebSocket Methods
Following are the methods associated with the WebSocket object. Assuming we created a socket object as mentioned above:
Method
Description
Socket.send()
The send(data) method transmits data using the connection.
Socket.close()
The close() method would be used to terminate any existing connection.
Setting Up the WebSocket Server with Python
Step 1. Install PythonIf you don’t have Python installed on your device, download and install it from Python.orgStep 2. Install WebSocket libraryAfter installing python create a folder for your project, and open that folder in the command prompt or terminal. Then run this prompt.
pip install websockets
Step 3. Create the websocket serverOpen any text editor and write the below Python code. Then save that as a file in the folder with the name ‘server.py’
import asyncio
import websockets

asyncdefecho(websocket, path):asyncfor message in websocket:print(f"Received message: {message}")await websocket.send(f"Server: You said \"{message}\"")

start_server = websockets.serve(echo,"localhost",8080)

asyncio.get_event_loop().run_until_complete(start_server)
asyncio.get_event_loop().run_forever()
Step 4. Run the serverIn the terminal navigate to your project folder, and run this command to start server.
python server.py
Setting up HTML Client for the Server
So far we setup a Python server for websocket. The server will be running on your terminal, so any messages sent to the server will be visible at the terminal. Here we will see how to setup a client that can receive messages from the server and also send messages to the server using HTML and JavaScript.
The HTML Web Workers API is a JavaScript feature that is used to run computationally intensive tasks in background in a separate thread without interrupting the user interface.
In this Web Workers API chapter, you will learn the following topics:
What Are Web Workers?
Need of Web Workers
How Web Workers Work?
Stopping Web Workers
Handling Web Workers Errors
Browser Support of Web Workers
What Are Web Workers?
Web workers allows long tasks to be executed without yielding to keep the page unresponsive.
Web workers are background scripts, and they are relatively heavy-weight and are not intended to be used in large numbers. For example, it would be inappropriate to launch one worker for each pixel of a four-megapixel image.
When a script is executing inside a Web worker, it cannot access the web page’s window object (window.document).
Web workers don’t have direct access to the web page and the DOM API. Although Web workers cannot block the browser UI, they can still consume CPU cycles and make the system less responsive.
Need of Web Workers
JavaScript was designed to run in a single-threaded environment, meaning multiple scripts cannot run at the same time. Consider a situation where you need to handle UI events, query and process large amounts of API data, and manipulate the DOM. JavaScript will hang your browser in situations where CPU utilization is high.
Example
Let us take a simple example where JavaScript goes through a big loop. Your browser will become unresponsive when you run this code:
Open Compiler
<!DOCTYPE html><html><head><title>Big for loop</title><script>
function bigLoop() {
for (var i = 0; i <= 10000000000; i += 1) {
var j = i;
}
alert("Completed " + j + "iterations");
}
function sayHello() {
alert("Hello sir....");
}
The situation explained above can be handled using Web Workers, which will do all the computationally expensive tasks without interrupting the user interface and typically run on separate threads.
How Web Workers Work?
Web Workers are initialized with the URL of a JavaScript file, which contains the code the worker will execute. This code sets event listeners and communicates with the script that spawned it from the main page. Following is the simple syntax:
var worker = new Worker('bigLoop.js');
If the specified JavaScript file exists, the browser will spawn a new worker thread, which is downloaded asynchronously. If the path to our worker returns a 404 error, the worker will fail silently.
If our application has multiple supporting JavaScript files, we can import them using the importScripts() method, which takes file name(s) as argument separated by comma as follows:
importScripts("helper.js", "anotherHelper.js");
Once the Web Worker is spawned, communication between the web worker and its parent page is done using the postMessage() method. Depending on the browser/version, the postMessage() method can accept either a string or JSON object as its single argument.
The message passed by Web Worker is accessed using onmessage event in the main page. Below is the main page (hello.htm) which will spawn a web worker to execute the loop and to return the final value of variable j:
Example
<!DOCTYPE html><html><head><title>Big for loop</title><script>
var worker = new Worker('bigLoop.js');
worker.onmessage = function(event) {
alert("Completed " + event.data + "iterations");
};
function sayHello() {
alert("Hello sir....");
}
Following is the content of bigLoop.js file. This makes use of postMessage() API to pass the communication back to main page:
for (var i = 0; i <= 1000000000; i += 1){
var j = i;
}
postMessage(j);
The j variable from bigLoop.js is published using function postMessage(), Which then received at hello.htm using event attribute of worker.onmessage = function(event) {}
Stopping Web Workers
Web Workers don't stop by themselves, but the page that started them can stop them by calling the terminate() method.
worker.terminate();
A terminated Web Worker will no longer respond to messages or perform any additional computations. We cannot restart a worker; instead, we need to create a new worker using the same URL.
Handling Web Workers Errors
You can handle errors that occur in the Web Worker from the main thread by using the worker.onerror() method.
Example
The following shows an example of an error handling function in a Web Worker JavaScript file that logs errors to the console. With error handling code, the above example would become as follows:
<!DOCTYPE html><html><head><title>Big for loop</title><script>
var worker = new Worker('bigLoop.js');
worker.onmessage = function(event) {
alert("Completed " + event.data + "iterations");
};
worker.onerror = function(event) {
console.log(event.message, event);
};
function sayHello() {
alert("Hello sir....");
}
You can use the following code snippets as an error handler for the worker on the main page:
worker.onerror = function(event) {
console.error("Error in web worker: " + event.message, event);
alert("Error occurred in the web worker.");
// Prevents the default handling of the error
event.preventDefault();
};
Checking for Browser Support
To check the browser support for Web Workers, you can use Modernizr's webworkers feature test.
Example
Following is the syntax to detect a Web Worker feature support available in a browser:
<!DOCTYPE html><html><head><title>Big for loop</title><script src="/js/modernizr-1.5.min.js"></script><script>
if (Modernizr.webworkers) {
alert("You have web workers support.");
} else {
alert("You do not have web workers support.");
}
Drag and Drop (DnD) is a powerful user interface concept that makes it easy to copy, reorder, and delete items with the help of mouse clicks and movements. This allows the user to click and hold the mouse button down over an element, drag it to another location, and release the mouse button to drop the element there.
To achieve drag-and-drop functionality with traditional HTML4, developers either have to use complex JavaScript programming or other JavaScript frameworks like jQuery, etc.
Now, HTML5 came up with a Drag and Drop (DnD) API that brings native DnD support to the browser, making it much easier to code up. It is supported by all the major browsers, like Chrome, Firefox 3.5, Safari 4, etc.
Creating an HTML Element Draggable
You can create an HTML element draggable by using the draggable attribute with that specific element. Set the “true” value to the draggable attribute to make any HTML element, such as images, divs, files, or links, drag-enabled.
Syntax
The following syntax demonstrates making a div element draggable:
<div draggable="true">
Drag and Drop Events
There are a number of events that are fired during various stages of the drag-and-drop operation. These events are listed below −
Sr.No.
Events & Description
1
dragstartFires when the user starts dragging of the object.
2
dragenterFired when the mouse is first moved over the target element while a drag is occurring. A listener for this event should indicate whether a drop is allowed over this location. If there are no listeners, or the listeners perform no operations, then a drop is not allowed by default.
3
dragoverThis event is fired as the mouse is moved over an element when a drag is occurring. Much of the time, the operation that occurs during a listener will be the same as the dragenter event.
4
dragleaveThis event is fired when the mouse leaves an element while a drag is occurring. Listeners should remove any highlighting or insertion markers used for drop feedback.
5
dragFires every time the mouse is moved while the object is being dragged.
6
dropThe drop event is fired on the element where the drop was occurred at the end of the drag operation. A listener would be responsible for retrieving the data being dragged and inserting it at the drop location.
7
dragendFires when the user releases the mouse button while dragging an object.
Note − Note that only drag events are fired; mouse events such as mousemove are not fired during a drag operation.
The DataTransfer Object
The event listener methods for all the drag-and-drop events accept the Event object, which has a readonly attribute called dataTransfer.
The event.dataTransfer returns the DataTransfer object associated with the event as follows:
function EnterHandler(event) {
   DataTransfer dt = event.dataTransfer;
   .............
}
The DataTransfer object holds data about the drag and drop operation. This data can be retrieved and set in terms of various attributes associated with the DataTransfer object, as explained below −
S.No.
Attribute & Description
1
dataTransfer.dropEffect [ = value ]Returns the kind of operation that is currently selected.This attribute can be set, to change the selected operation.The possible values are none, copy, link, and move.
2
dataTransfer.effectAllowed [ = value ]Returns the kinds of operations that are to be allowed.This attribute can be set, to change the allowed operations.The possible values are none, copy, copyLink, copyMove, link, linkMove, move, all and uninitialized.
3
dataTransfer.typesReturns a DOMStringList listing the formats that were set in the dragstart event. In addition, if any files are being dragged, then one of the types will be the string “Files”.
4
dataTransfer.clearData ( [ format ] )Removes the data of the specified formats. Removes all data if the argument is omitted.
5
dataTransfer.setData(format, data)Adds the specified data.
6
data = dataTransfer.getData(format)Returns the specified data. If there is no such data, returns the empty string.
7
dataTransfer.filesReturns a FileList of the files being dragged, if any.
8
dataTransfer.setDragImage(element, x, y)Uses the given element to update the drag feedback, replacing any previously specified feedback.
9
dataTransfer.addElement(element)Adds the given element to the list of elements used to render the drag feedback.
Drag and Drop Process
Following are the steps to be carried out to implement Drag and Drop operation −
Step 1 − Making an Object Draggable
Here are steps to be taken −
If you want to drag an element, you need to set the draggable attribute to true for that element.
Set an event listener for dragstart that stores the data being dragged.
The event listener dragstart will set the allowed effects (copy, move, link, or some combination).
Example
Following is an example of making an object draggable −
</script></head><body><center><h2>Drag and drop HTML5 demo</h2><div>Try to drag the purple box around.</div><div id="boxA" draggable="true" ondragstart="return dragStart(event)"><p>Drag Me</p></div><div id="boxB">Dustbin</div></center></body></html>
Step 2 − Dropping the Object
To accept a drop, the drop target has to listen to at least three events.
The dragenter event, which is used to determine whether or not the drop target is to accept the drop. If the drop is to be accepted, then this event has to be canceled.
The dragover event, which is used to determine what feedback is to be shown to the user. If the event is canceled, then the feedback (typically the cursor) is updated based on the dropEffect attribute’s value.
Finally, the drop event, which allows the actual drop to be performed.
Example
Following is an example of dropping an object into another object −
function dragEnter(ev) {
event.preventDefault();
return true;
}
function dragOver(ev) {
return false;
}
function dragDrop(ev) {
var src = ev.dataTransfer.getData("Text");
ev.target.appendChild(document.getElementById(src));
ev.stopPropagation();
return false;
}
</script></head><body><center><h2>Drag and drop HTML5 demo</h2><div>Try to move the purple box into the pink box.</div><div id="boxA" draggable="true" ondragstart="return dragStart(event)"><p>Drag Me</p></div><div id="boxB" ondragenter="return dragEnter(event)" ondrop="return dragDrop(event)" ondragover="return dragOver(event)">Dustbin</div></center></body></html>
HTML Geolocation API is used by web applications to access the geographical location of the user. Most modern browsers and mobile devices support the Geolocation API.
JavaScript can capture your latitude and longitude and can be sent to a backend web server and do fancy location-aware things like finding local businesses or showing your location on a map.
Syntax
var geolocation = navigator.geolocation;
The geolocation object is a service object that allows widgets to retrieve information about the geographic location of the device.
Geolocation API Methods
The Geolocation API provides the following methods:
Method
Description
getCurrentPosition()
This method retrieves the current geographic location of the user.
watchPosition()
This method retrieves periodic updates about the current geographic location of the device.
clearWatch()
This method cancels an ongoing watchPosition call.
Example
Following is a sample code to use any of the above methods:
Here, showLocation and errorHandler are callback methods that would be used to get the actual position as explained in the next section and to handle errors if there are any.
Location Properties
Geolocation methods getCurrentPosition() and getPositionUsingMethodName() specify the callback method that retrieves the location information. These methods are called asynchronously with an object Position which stores the complete location information.
The Position object specifies the current geographic location of the device. The location is expressed as a set of geographic coordinates together with information about heading and speed.
The following table describes the properties of the Position object. For the optional properties, if the system cannot provide a value, the value of the property is set to null.
Property
Type
Description
coords
objects
Specifies the geographic location of the device. The location is expressed as a set of geographic coordinates together with information about heading and speed.
coords.latitude
Number
Specifies the latitude estimate in decimal degrees. The value range is [-90.00, +90.00].
coords.longitude
Number
Specifies the longitude estimate in decimal degrees. The value range is [-180.00, +180.00].
coords.altitude
Number
[Optional] Specifies the altitude estimate in meters above the WGS 84 ellipsoid.
coords.accuracy
Number
[Optional] Specifies the accuracy of the latitude and longitude estimates in meters.
coords.altitudeAccuracy
Number
[Optional] Specifies the accuracy of the altitude estimate in meters.
coords.heading
Number
[Optional] Specifies the device’s current direction of movement in degrees counting clockwise relative to true north.
coords.speed
Number
[Optional] Specifies the device’s current ground speed in meters per second.
timestamp
date
Specifies the time when the location information was retrieved and the Position object was created.
Example
Following is a sample code that makes use of the “position” object. Here, the showLocation() method is a callback method:
functionshowLocation(position){var latitude = position.coords.latitude;var longitude = position.coords.longitude;...}
Handling Errors
Geolocation is complicated, and it is very much required to catch any error and handle it gracefully.
The geolocation methods getCurrentPosition() and watchPosition() make use of an error handler callback method that gives a PositionError object. This object has the following two properties:
Property
Type
Description
code
Number
Contains a numeric code for the error.
message
String
Contains a human-readable description of the error.
The following table describes the possible error codes returned in the PositionError object.
Code
Constant
Description
0
UNKNOWN_ERROR
The method failed to retrieve the location of the device due to an unknown error.
1
PERMISSION_DENIED
The method failed to retrieve the location of the device because the application does not have permission to use the Location Service.
2
POSITION_UNAVAILABLE
The location of the device could not be determined.
3
TIMEOUT
The method was unable to retrieve the location information within the specified maximum timeout interval.
Example
Following is a sample code that makes use of the PositionError object. Here errorHandler method is a callback method:
functionerrorHandler(err){if(err.code ==1){// access is denied}...}
Position Options
Following is the actual syntax of the getCurrentPosition() method:
Here are some examples that show how to access geolocation in HTML:
Get Current Location
The following code shows how to access the current location of your device using JavaScript and HTML.
Open Compiler
<!DOCTYPE html><html><head><title>
Geolocation API Example
</title></head><body><h2>Geolocation API Example</h2><p id="demo">
Click the button to get your coordinates:
</p><button onclick="getLocation()">
Show Location
</button><script>
var x = document.getElementById("demo");
function getLocation() {
if (navigator.geolocation) {
navigator.geolocation.getCurrentPosition(showPosition);
} else {
x.innerHTML =
"Geolocation is not supported by this browser.";
}
}
Following is a sample code that shows how to use the above-mentioned methods:
Open Compiler
<!DOCTYPE html><html><head><title>Geolocation API Example</title></head><body><h2>Geolocation API Example</h2><p id="demo">
Turn off location service of your device,
See how the error is handled.
</p><button onclick="getLocation()">
Show Location
</button><script>
var x = document.getElementById("demo");
function getLocation() {
if (navigator.geolocation) {
navigator.geolocation.getCurrentPosition(showPosition, showError);
} else {
x.innerHTML = "Geolocation is not supported by this browser.";
}
}
function showError(error) {
switch(error.code) {
case error.PERMISSION_DENIED:
x.innerHTML =
"User denied the request for Geolocation.";
break;
case error.POSITION_UNAVAILABLE:
x.innerHTML =
"Location information is unavailable.";
break;
case error.TIMEOUT:
x.innerHTML =
"The request to get user location timed out.";
break;
case error.UNKNOWN_ERROR:
x.innerHTML =
"An unknown error occurred.";
break;
}
}
HTML element <canvas> gives you an easy and powerful way to draw graphics using JavaScript. It can be used to draw graphs, make photo compositions or do simple (and not so simple) animations.
Here is a simple <canvas> element which has only two specific attributes width and height plus all the core HTML attributes like id, name and class, etc.
The <canvas> is initially blank, and to display something, a script first needs to access the rendering context. The canvas element has a DOM method called getContext, which is used to obtain the rendering context and its drawing functions. This function takes one parameter, the type of context 2d.
Instance
Following is the code to get required context along with a check if the browser supports <canvas> element −
var canvas  = document.getElementById("mycanvas");
if (canvas.getContext){
   var ctx = canvas.getContext('2d');
   // drawing code here
} else {
   // canvas-unsupported code here
}
Browser Support
The latest versions of Firefox, Safari, Chrome and Opera all support for HTML Canvas but IE8 does not support canvas natively.
You can use ExplorerCanvas to have canvas support through Internet Explorer. You just need to include this JavaScript as follows −
There are three methods that draw rectangles on the canvas −
S.No.
Method & Description
1
fillRect(x,y,width,height)This method draws a filled rectangle.
2
strokeRect(x,y,width,height)This method draws a rectangular outline.
3
clearRect(x,y,width,height)This method clears the specified area and makes it fully transparent
Here x and y specify the position on the canvas (relative to the origin) of the top-left corner of the rectangle and width and height are width and height of the rectangle.
Example
Following is a simple example which makes use of above mentioned methods to draw a nice rectangle.
function drawShape(){
// Get the canvas element using the DOM
var canvas = document.getElementById('mycanvas');
// Make sure we don't execute when canvas isn't supported
if (canvas.getContext){
// use getContext to use the canvas for drawing
var ctx = canvas.getContext('2d');
// Draw shapes
ctx.fillRect(25,25,100,100);
ctx.clearRect(45,45,60,60);
ctx.strokeRect(50,50,50,50);
} else {
alert('You need Safari or Firefox 1.5+ to see this demo.');
}
}
We require the following methods to draw paths on the canvas −
S.No.
Method & Description
1
beginPath()This method resets the current path.
2
moveTo(x, y)This method creates a new subpath with the given point.
3
closePath()This method marks the current subpath as closed, and starts a new subpath with a point the same as the start and end of the newly closed subpath.
4
fill()This method fills the subpaths with the current fill style.
5
stroke()This method strokes the subpaths with the current stroke style.
6
arc(x, y, radius, startAngle, endAngle, anticlockwise)Adds points to the subpath such that the arc described by the circumference of the circle described by the arguments, starting at the given start angle and ending at the given end angle, going in the given direction, is added to the path, connected to the previous point by a straight line.
Example
Following is a simple example which makes use of above mentioned methods to draw a shape.
function drawShape(){
// get the canvas element using the DOM
var canvas = document.getElementById('mycanvas');
// Make sure we don't execute when canvas isn't supported
if (canvas.getContext){
// use getContext to use the canvas for drawing
var ctx = canvas.getContext('2d');
// Draw shapes
ctx.beginPath();
ctx.arc(75,75,50,0,Math.PI*2,true); // Outer circle
ctx.moveTo(110,75);
ctx.arc(75,75,35,0,Math.PI,false); // Mouth
ctx.moveTo(65,65);
ctx.arc(60,65,5,0,Math.PI*2,true); // Left eye
ctx.moveTo(95,65);
ctx.arc(90,65,5,0,Math.PI*2,true); // Right eye
ctx.stroke();
} else {
alert('You need Safari or Firefox 1.5+ to see this demo.');
}
}
We require the following methods to draw lines on the canvas −
S.No.
Method & Description
1
beginPath()This method resets the current path.
2
moveTo(x, y)This method creates a new subpath with the given point.
3
closePath()This method marks the current subpath as closed, and starts a new subpath with a point the same as the start and end of the newly closed subpath.
4
fill()This method fills the subpaths with the current fill style.
5
stroke()This method strokes the subpaths with the current stroke style.
6
lineTo(x, y)This method adds the given point to the current subpath, connected to the previous one by a straight line.
Example
Following is a simple example which makes use of the above-mentioned methods to draw a triangle.
function drawShape(){
// get the canvas element using the DOM
var canvas = document.getElementById('mycanvas');
// Make sure we don't execute when canvas isn't supported
if (canvas.getContext){
// use getContext to use the canvas for drawing
var ctx = canvas.getContext('2d');
// Filled triangle
ctx.beginPath();
ctx.moveTo(25,25);
ctx.lineTo(105,25);
ctx.lineTo(25,105);
ctx.fill();
// Stroked triangle
ctx.beginPath();
ctx.moveTo(125,125);
ctx.lineTo(125,45);
ctx.lineTo(45,125);
ctx.closePath();
ctx.stroke();
} else {
alert('You need Safari or Firefox 1.5+ to see this demo.');
}
}
We need the following methods to draw Bezier curves on the canvas −
S.No.
Method & Description
1
beginPath()This method resets the current path.
2
moveTo(x, y)This method creates a new subpath with the given point.
3
closePath()This method marks the current subpath as closed, and starts a new subpath with a point the same as the start and end of the newly closed subpath.
4
fill()This method fills the subpaths with the current fill style.
5
stroke()This method strokes the subpaths with the current stroke style.
6
bezierCurveTo(cp1x, cp1y, cp2x, cp2y, x, y)This method adds the given point to the current path, connected to the previous one by a cubic Bezier curve with the given control points.
The x and y parameters in bezierCurveTo() method are the coordinates of the end point. cp1x and cp1y are the coordinates of the first control point, and cp2x and cp2y are the coordinates of the second control point.
Example
Following is a simple example which makes use of above mentioned methods to draw a Bezier curves.
function drawShape(){
// get the canvas element using the DOM
var canvas = document.getElementById('mycanvas');
// Make sure we don't execute when canvas isn't supported
if (canvas.getContext){
// use getContext to use the canvas for drawing
var ctx = canvas.getContext('2d');
ctx.beginPath();
ctx.moveTo(75,40);
ctx.bezierCurveTo(75,37,70,25,50,25);
ctx.bezierCurveTo(20,25,20,62.5,20,62.5);
ctx.bezierCurveTo(20,80,40,102,75,120);
ctx.bezierCurveTo(110,102,130,80,130,62.5);
ctx.bezierCurveTo(130,62.5,130,25,100,25);
ctx.bezierCurveTo(85,25,75,37,75,40);
ctx.fill();
} else {
alert('You need Safari or Firefox 1.5+ to see this demo.');
}
}
We require the following methods to draw quadratic curves on the canvas −
S.No.
Method & Description
1
beginPath()This method resets the current path.
2
moveTo(x, y)This method creates a new subpath with the given point.
3
closePath()This method marks the current subpath as closed, and starts a new subpath with a point the same as the start and end of the newly closed subpath.
4
fill()This method fills the subpaths with the current fill style.
5
stroke()This method strokes the subpaths with the current stroke style.
6
quadraticCurveTo(cpx, cpy, x, y)This method adds the given point to the current path, connected to the previous one by a quadratic Bezier curve with the given control point.
The x and y parameters in quadraticCurveTo() method are the coordinates of the end point. The cpx and cpy are the coordinates of the control point.
Example
Following is a simple example which makes use of above mentioned methods to draw a Quadratic curve.
function drawShape(){
// get the canvas element using the DOM
var canvas = document.getElementById('mycanvas');
// Make sure we don't execute when canvas isn't supported
if (canvas.getContext){
// use getContext to use the canvas for drawing
var ctx = canvas.getContext('2d');
// Draw shapes
ctx.beginPath();
ctx.moveTo(75,25);
ctx.quadraticCurveTo(25,25,25,62.5);
ctx.quadraticCurveTo(25,100,50,100);
ctx.quadraticCurveTo(50,120,30,125);
ctx.quadraticCurveTo(60,120,65,100);
ctx.quadraticCurveTo(125,100,125,62.5);
ctx.quadraticCurveTo(125,25,75,25);
ctx.stroke();
} else {
alert('You need Safari or Firefox 1.5+ to see this demo.');
}
}
This tutorial would show how to import an external image into a canvas and then how to draw on that image by using following methods −
S.No.
Method & Description
1
beginPath()This method resets the current path.
2
moveTo(x, y)This method creates a new subpath with the given point.
3
closePath()This method marks the current subpath as closed, and starts a new subpath with a point the same as the start and end of the newly closed subpath.
4
fill()This method fills the subpaths with the current fill style.
5
stroke()This method strokes the subpaths with the current stroke style.
6
drawImage(image, dx, dy)This method draws the given image onto the canvas. Here image is a reference to an image or canvas object. x and y form the coordinate on the target canvas where our image should be placed.
Example
Following is a simple example which makes use of above mentioned methods to import an image.
Open Compiler
<!DOCTYPE HTML><html><head><script type = "text/javascript">
  function drawShape() {

     // get the canvas element using the DOM
     var canvas = document.getElementById('mycanvas');

     // Make sure we don't execute when canvas isn't supported
     if (canvas.getContext) {

        // use getContext to use the canvas for drawing
        var ctx = canvas.getContext('2d');

        // Draw shapes
        var img = new Image();
        img.src = '/html/images/backdrop.jpg';
        img.onload = function() {
           ctx.drawImage(img,0,0);
           ctx.beginPath();

           ctx.moveTo(30,96);
           ctx.lineTo(70,66);

           ctx.lineTo(103,76);
           ctx.lineTo(170,15);

           ctx.stroke();
        }
     } else {
        alert('You need Safari or Firefox 1.5+ to see this demo.');
     }
  }   </script></head><body onload = "drawShape();"><canvas id = "mycanvas"></canvas></body></html>
HTML Canvas – Create Gradients
HTML canvas allows us to fill and stroke shapes using linear and radial gradients using the following methods −
S.No.
Method & Description
1
addColorStop(offset, color)This method adds a color stop with the given color to the gradient at the given offset. Here 0.0 is the offset at one end of the gradient, 1.0 is the offset at the other end.
2
createLinearGradient(x0, y0, x1, y1)This method returns a CanvasGradient object that represents a linear gradient that paints along the line given by the coordinates represented by the arguments. The four arguments represent the starting point (x1,y1) and end point (x2,y2) of the gradient.
3
createRadialGradient(x0, y0, r0, x1, y1, r1)This method returns a CanvasGradient object that represents a radial gradient that paints along the cone given by the circles represented by the arguments. The first three arguments define a circle with coordinates (x1,y1) and radius r1 and the second a circle with coordinates (x2,y2) and radius r2.
Example – Linear Gradient
Following is a simple example which makes use of above mentioned methods to create Linear gradient.
function drawShape(){
// get the canvas element using the DOM
var canvas = document.getElementById('mycanvas');
// Make sure we don't execute when canvas isn't supported
if (canvas.getContext){
// use getContext to use the canvas for drawing
var ctx = canvas.getContext('2d');
// Create Linear Gradients
var lingrad = ctx.createLinearGradient(0,0,0,150);
lingrad.addColorStop(0, '#00ABEB');
lingrad.addColorStop(0.5, '#fff');
lingrad.addColorStop(0.5, '#66CC00');
lingrad.addColorStop(1, '#fff');
var lingrad2 = ctx.createLinearGradient(0,50,0,95);
lingrad2.addColorStop(0.5, '#000');
lingrad2.addColorStop(1, 'rgba(0,0,0,0)');
// assign gradients to fill and stroke styles
ctx.fillStyle = lingrad;
ctx.strokeStyle = lingrad2;
// draw shapes
ctx.fillRect(10,10,130,130);
ctx.strokeRect(50,50,50,50);
} else {
alert('You need Safari or Firefox 1.5+ to see this demo.');
}
}
function drawShape(){
// get the canvas element using the DOM
var canvas = document.getElementById('mycanvas');
// Make sure we don't execute when canvas isn't supported
if (canvas.getContext){
// use getContext to use the canvas for drawing
var ctx = canvas.getContext('2d');
// Create a pattern
for (var i=0;i<7;i++){
for (var j=0;j<7;j++){
ctx.fillStyle='rgb(' + Math.floor(255-20.5*i)+ ','+ Math.floor(255 - 42.5*j) + ',255)';
ctx.fillRect( j*25, i* 25, 55, 55 );
}
}
}
else {
alert('You need Safari or Firefox 1.5+ to see this demo.');
}
}
function drawShape(){
// get the canvas element using the DOM
var canvas = document.getElementById('mycanvas');
// Make sure we don't execute when canvas isn't supported
if (canvas.getContext){
// use getContext to use the canvas for drawing
var ctx = canvas.getContext('2d');
// Create a pattern
for (var i=0;i<10;i++){
for (var j=0;j<10;j++){
ctx.strokeStyle='rgb(255,'+ Math.floor(50-2.5*i)+','+ Math.floor(155 - 22.5 * j ) + ')';
ctx.beginPath();
ctx.arc(1.5+j*25, 1.5 + i*25,10,10,Math.PI*5.5, true);
ctx.stroke();
}
}
}
else {
alert('You need Safari or Firefox 1.5+ to see this demo.');
}
}
HTML canvas provides capabilities to create text using different font and text properties listed below −
S.No.
Property & Description
1
font [ = value ]This property returns the current font settings and can be set, to change the font.
2
textAlign [ = value ]This property returns the current text alignment settings and can be set, to change the alignment. The possible values are start, end, left, right, andcenter.
3
textBaseline [ = value ]This property returns the current baseline alignment settings and can be set, to change the baseline alignment. The possible values are top, hanging, middle , alphabetic, ideographic and bottom
4
fillText(text, x, y [, maxWidth ] )This property fills the given text at the given position indicated by the given coordinates x and y.
5
strokeText(text, x, y [, maxWidth ] )This property strokes the given text at the given position indicated by the given coordinates x and y.
Example
Following is a simple example which makes use of above mentioned attributes to draw a text −
function drawShape(){
// get the canvas element using the DOM
var canvas = document.getElementById('mycanvas');
// Make sure we don't execute when canvas isn't supported
if (canvas.getContext){
// use getContext to use the canvas for drawing
var ctx = canvas.getContext('2d');
ctx.fillStyle = '#00F';
ctx.font = 'Italic 30px Sans-Serif';
ctx.textBaseline = 'Top';
ctx.fillText ('Hello world!', 40, 100);
ctx.font = 'Bold 30px Sans-Serif';
ctx.strokeText('Hello world!', 40, 50);
} else {
alert('You need Safari or Firefox 1.5+ to see this demo.');
}
}
There is following method required to create a pattern on the canvas −
S.No.
Method & Description
1
createPattern(image, repetition)This method will use image to create the pattern. The second argument could be a string with one of the following values: repeat, repeat-x, repeat-y, and no-repeat. If the empty string or null is specified, repeat will. be assumed
Example
Following is a simple example which makes use of above mentioned method to create a nice pattern.
function drawShape(){
// get the canvas element using the DOM
var canvas = document.getElementById('mycanvas');
// Make sure we don't execute when canvas isn't supported
if (canvas.getContext){
// use getContext to use the canvas for drawing
var ctx = canvas.getContext('2d');
// create new image object to use as pattern
var img = new Image();
img.src = '/html/images/pattern.jpg';
img.onload = function(){
// create pattern
var ptrn = ctx.createPattern(img,'repeat');
ctx.fillStyle = ptrn;
ctx.fillRect(0,0,150,150);
}
}
else {
alert('You need Safari or Firefox 1.5+ to see this demo.');
}
}
HTML canvas provides capabilities to create nice shadows around the drawings. All drawing operations are affected by the four global shadow attributes.
S.No.
Property & Description
1
shadowColor [ = value ]This property returns the current shadow color and can be set, to change the shadow color.
2
shadowOffsetX [ = value ]This property returns the current shadow offset X and can be set, to change the shadow offset X.
3
shadowOffsetY [ = value ]This property returns the current shadow offset Y and can be set, change the shadow offset Y.
4
shadowBlur [ = value ]This property returns the current level of blur applied to shadows and can be set, to change the blur level.
Example
Following is a simple example which makes use of above mentioned attributes to draw a shadow.
function drawShape(){
// get the canvas element using the DOM
var canvas = document.getElementById('mycanvas');
// Make sure we don't execute when canvas isn't supported
if (canvas.getContext){
// use getContext to use the canvas for drawing
var ctx = canvas.getContext('2d');
ctx.shadowOffsetX = 2;
ctx.shadowOffsetY = 2;
ctx.shadowBlur = 2;
ctx.shadowColor = "rgba(0, 0, 0, 0.5)";
ctx.font = "20px Times New Roman";
ctx.fillStyle = "Black";
ctx.fillText("This is shadow test", 5, 30);
} else {
alert('You need Safari or Firefox 1.5+ to see this demo.');
}
}
HTML canvas provides two important methods to save and restore the canvas states. The canvas drawing state is basically a snapshot of all the styles and transformations that have been applied and consists of the followings −
The transformations such as translate, rotate and scale etc.
The current clipping region.
The current values of the following attributes − strokeStyle, fillStyle, globalAlpha, lineWidth, lineCap, lineJoin, miterLimit, shadowOffsetX, shadowOffsetY, shadowBlur, shadowColor, globalCompositeOperation, font, textAlign, textBaseline.
Canvas states are stored on a stack every time the save method is called, and the last saved state is returned from the stack every time the restore method is called.
S.No.
Method & Description
1
save()This method pushes the current state onto the stack..
2
restore()This method pops the top state on the stack, restoring the context to that state.
Example
Following is a simple example which makes use of above mentioned methods to show how the restore is called, to restore the original state and the last rectangle is once again drawn in black.
function drawShape(){
// get the canvas element using the DOM
var canvas = document.getElementById('mycanvas');
// Make sure we don't execute when canvas isn't supported
if (canvas.getContext){
// use getContext to use the canvas for drawing
var ctx = canvas.getContext('2d');
// draw a rectangle with default settings
ctx.fillRect(0,0,150,150);
// Save the default state
ctx.save();
// Make changes to the settings
ctx.fillStyle = '#66FFFF'
ctx.fillRect( 15,15,120,120);
// Save the current state
ctx.save();
// Make the new changes to the settings
ctx.fillStyle = '#993333'
ctx.globalAlpha = 0.5;
ctx.fillRect(30,30,90,90);
// Restore previous state
ctx.restore();
// Draw a rectangle with restored settings
ctx.fillRect(45,45,60,60);
// Restore original state
ctx.restore();
// Draw a rectangle with restored settings
ctx.fillRect(40,40,90,90);
} else {
alert('You need Safari or Firefox 1.5+ to see this demo.');
}
}
function drawShape(){
// get the canvas element using the DOM
var canvas = document.getElementById('mycanvas');
// Make sure we don't execute when canvas isn't supported
if (canvas.getContext){
// use getContext to use the canvas for drawing
var ctx = canvas.getContext('2d');
ctx.fillRect(0,0,300,300);
for (i=0;i<3;i++) {
for (j=0;j<3;j++) {
ctx.save();
ctx.strokeStyle = "#FF0066";
ctx.translate(50+j*100,50+i*100);
drawSpirograph(ctx,10*(j+3)/(j+2),-2*(i+3)/(i+1),10);
ctx.restore();
}
}
}
else {
alert('You need Safari or Firefox 1.5+ to see this demo.');
}
}
function drawSpirograph(ctx,R,r,O){
var x1 = R-O;
var y1 = 0;
var i = 1;
ctx.beginPath();
ctx.moveTo(x1,y1);
do {
if (i>20000) break;
var x2 = (R+r)*Math.cos(i*Math.PI/72) - (r+O)*Math.cos(((R+r)/r)*(i*Math.PI/72))
var y2 = (R+r)*Math.sin(i*Math.PI/72) - (r+O)*Math.sin(((R+r)/r)*(i*Math.PI/72))
ctx.lineTo(x2,y2);
x1 = x2;
y1 = y2;
i++;
} while (x2 != R-O && y2 != 0 );
ctx.stroke();
}
HTML canvas provides rotate(angle) method which is used to rotate the canvas around the current origin.
This method only takes one parameter and that’s the angle the canvas is rotated by. This is a clockwise rotation measured in radians.
Example
Following is a simple example which we are running two loops where first loop determines the number of rings, and the second determines the number of dots drawn in each ring.
function drawShape(){
// get the canvas element using the DOM
var canvas = document.getElementById('mycanvas');
// Make sure we don't execute when canvas isn't supported
if (canvas.getContext){
// use getContext to use the canvas for drawing
var ctx = canvas.getContext('2d');
ctx.translate(100,100);
for (i=1; i<7; i++){
ctx.save();
ctx.fillStyle = 'rgb('+(51*i)+','+(200-51*i)+',0)';
for (j=0; j < i*6; j++){
ctx.rotate(Math.PI*2/(i*6));
ctx.beginPath();
ctx.arc(0,i*12.5,5,0,Math.PI*2,true);
ctx.fill();
}
ctx.restore();
}
} else {
alert('You need Safari or Firefox 1.5+ to see this demo.');
}
}
HTML canvas provides scale(x, y) method which is used to increase or decrease the units in our canvas grid. This can be used to draw scaled down or enlarged shapes and bitmaps.
This method takes two parameters where x is the scale factor in the horizontal direction and y is the scale factor in the vertical direction. Both parameters must be positive numbers.
Values smaller than 1.0 reduce the unit size and values larger than 1.0 increase the unit size. Setting the scaling factor to precisely 1.0 doesn’t affect the unit size.
Example
Following is a simple example which uses spirograph function to draw nine shapes with different scaling factors.
function drawShape(){
// Get the canvas element using the DOM
var canvas = document.getElementById('mycanvas');
// Make sure we don't execute when canvas isn't supported
if (canvas.getContext){
// Use getContext to use the canvas for drawing
var ctx = canvas.getContext('2d');
ctx.strokeStyle = "#fc0";
ctx.lineWidth = 1.5;
ctx.fillRect(0,0,300,300);
// Uniform scaling
ctx.save()
ctx.translate(50,50);
drawSpirograph(ctx,22,6,5);
ctx.translate(100,0);
ctx.scale(0.75,0.75);
drawSpirograph(ctx,22,6,5);
ctx.translate(133.333,0);
ctx.scale(0.75,0.75);
drawSpirograph(ctx,22,6,5);
ctx.restore();
// Non uniform scaling (y direction)
ctx.strokeStyle = "#0cf";
ctx.save()
ctx.translate(50,150);
ctx.scale(1,0.75);
drawSpirograph(ctx,22,6,5);
ctx.translate(100,0);
ctx.scale(1,0.75);
drawSpirograph(ctx,22,6,5);
ctx.translate(100,0);
ctx.scale(1,0.75);
drawSpirograph(ctx,22,6,5);
ctx.restore();
// Non uniform scaling (x direction)
ctx.strokeStyle = "#cf0";
ctx.save()
ctx.translate(50,250);
ctx.scale(0.75,1);
drawSpirograph(ctx,22,6,5);
ctx.translate(133.333,0);
ctx.scale(0.75,1);
drawSpirograph(ctx,22,6,5);
ctx.translate(177.777,0);
ctx.scale(0.75,1);
drawSpirograph(ctx,22,6,5);
ctx.restore();
} else {
alert('You need Safari or Firefox 1.5+ to see this demo.');
}
}
function drawSpirograph(ctx,R,r,O){
var x1 = R-O;
var y1 = 0;
var i = 1;
ctx.beginPath();
ctx.moveTo(x1,y1);
do {
if (i>20000) break;
var x2 = (R+r)*Math.cos(i*Math.PI/72) - (r+O)*Math.cos(((R+r)/r)*(i*Math.PI/72))
var y2 = (R+r)*Math.sin(i*Math.PI/72) - (r+O)*Math.sin(((R+r)/r)*(i*Math.PI/72))
ctx.lineTo(x2,y2);
x1 = x2;
y1 = y2;
i++;
}
while (x2 != R-O && y2 != 0 );
ctx.stroke();
}
HTML canvas provides methods which allow modifications directly to the transformation matrix. The transformation matrix must initially be the identity transform. It may then be adjusted using the transformation methods.
S.No.
Method & Description
1
transform(m11, m12, m21, m22, dx, dy)This method changes the transformation matrix to apply the matrix given by the arguments.
2
setTransform(m11, m12, m21, m22, dx, dy)This method changes the transformation matrix to the matrix given by the arguments .
The transform (m11, m12, m21, m22, dx, dy) method must multiply the current transformation matrix with the matrix described by −
m11     m21     dx
m12     m22     dy
0       0       1
The setTransform(m11, m12, m21, m22, dx, dy) method must reset the current transform to the identity matrix, and then invoke the transform(m11, m12, m21, m22, dx, dy) method with the same arguments.
Example
Following is a simple example which makes use of transform() and setTransform() methods −
function drawShape(){
// get the canvas element using the DOM
var canvas = document.getElementById('mycanvas');
// Make sure we don't execute when canvas isn't supported
if (canvas.getContext){
// use getContext to use the canvas for drawing
var ctx = canvas.getContext('2d');
var sin = Math.sin(Math.PI/6);
var cos = Math.cos(Math.PI/6);
ctx.translate(200, 200);
var c = 0;
for (var i=0; i <= 12; i++) {
c = Math.floor(255 / 12 * i);
ctx.fillStyle = "rgb(" + c + "," + c + "," + c + ")";
ctx.fillRect(0, 0, 100, 100);
ctx.transform(cos, sin, -sin, cos, 0, 0);
}
ctx.setTransform(-1, 0, 0, 1, 200, 200);
ctx.fillStyle = "rgba(100, 100, 255, 0.5)";
ctx.fillRect(50, 50, 100, 100);
}
else {
alert('You need Safari or Firefox 1.5+ to see this demo.');
}
}
HTML canvas provides compositing attribute globalCompositeOperation which affect all the drawing operations.
We can draw new shapes behind existing shapes and mask off certain areas, clear sections from the canvas using globalCompositeOperation attribute as shown below in the example.
There are following values which can be set for globalCompositeOperation −
S.No.
Attribute & Description
1
source-overThis is the default setting and draws new shapes on top of the existing canvas content.
2
source-inThe new shape is drawn only where both the new shape and the destination canvas overlap. Everything else is made transparent.
3
source-outThe new shape is drawn where it doesn’t overlap the existing canvas content.
4
source-atopThe new shape is only drawn where it overlaps the existing canvas content.
5
lighterWhere both shapes overlap the color is determined by adding color values.
6
xorShapes are made transparent where both overlap and drawn normal everywhere else.
7
destination-overNew shapes are drawn behind the existing canvas content.
8
destination-inThe existing canvas content is kept where both the new shape and existing canvas content overlap. Everything else is made transparent.
9
destination-outThe existing content is kept where it doesn’t overlap the new shape.
10
destination-atopThe existing canvas is only kept where it overlaps the new shape. The new shape is drawn behind the canvas content.
11
darkerWhere both shapes overlap the color is determined by subtracting color values.
Example
Following is a simple example which makes use of globalCompositeOperation attribute to create all possible compositions −
HTML canvas provides necessary methods to draw an image and erase it completely. We can take Javascript help to simulate good animation over a HTML canvas.
Following are the two important Javascript methods which would be used to animate an image on a canvas −
S.No.
Method & Description
1
setInterval(callback, time);This method repeatedly executes the supplied code after a given timemilliseconds.
2
setTimeout(callback, time);This method executes the supplied code only once after a given time milliseconds.
Example
Following is a simple example which would rotate a small image repeatedly −
var pattern= new Image();
function animate(){
pattern.src = '/html/images/pattern.jpg';
setInterval(drawShape, 100);
}
function drawShape(){
// get the canvas element using the DOM
var canvas = document.getElementById('mycanvas');
// Make sure we don't execute when canvas isn't supported
if (canvas.getContext){
// use getContext to use the canvas for drawing
var ctx = canvas.getContext('2d');
ctx.fillStyle = 'rgba(0,0,0,0.4)';
ctx.strokeStyle = 'rgba(0,153,255,0.4)';
ctx.save();
ctx.translate(150,150);
var time = new Date();
ctx.rotate( ((2*Math.PI)/6)*time.getSeconds() + ( (2*Math.PI)/6000)*time.getMilliseconds() );
ctx.translate(0,28.5);
ctx.drawImage(pattern,-3.5,-3.5);
ctx.restore();
}
else {
alert('You need Safari or Firefox 1.5+ to see this demo.');
}
}